Hotpoint AQ104D 49 EU/B Kullanici rehberi
- Kategori
- Çamaşır makineleri
- Tip
- Kullanici rehberi

GB
1
Contents
Installation, 2-3
Unpacking and levelling
Connecting the electricity and water supplies
Technical data
Description of the machine, 4-5
Touch control panel
Running a wash cycle, 6
Wash cycles and options, 7
Table of wash cycles
Wash options
Detergents and laundry, 8
Detergent
Preparing the laundry
Washing recommendations
Precautions and advice, 9
General safety
Load balancing system
Disposal
Opening the porthole door manually
Care and maintenance, 10
Cutting off the water and electricity supplies
Cleaning the machine
Cleaning the detergent dispenser drawer
Caring for your appliance drum
Cleaning the pump
Checking the water inlet hose
Trouble shooting, 11
Assistance, 12
WASHING MACHINE
AQUALTIS
AQ104D 49
Instructions for
installation and use
English,1
GB
GR
ΕΛΛΗΝΙΚΑ, 13
Türkçe,25
TR

GB
2
Installation
! This instruction manual should be kept in a safe place
for future reference. If the washing machine is sold, given
away or moved, please ensure the manual is kept with
the machine, so that the new owner may benefit from the
advice contained within it.
! Read these instructions carefully: they contain vital
information relating to the safe installation and operation of
the appliance.
! Inside the pack containing this manual, you will also find
the guarantee and all the details necessary for installation.
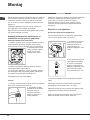
Unpacking and levelling
Unpacking
1. Once you have removed all the packaging from the
washing machine, make sure it has not been damaged
during transportation.
If it has been damaged, contact the retailer and do not
proceed any further with the installation process.
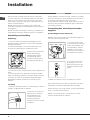
2. Remove the 4 protective
screws (used during
transportation) and the
corresponding spacer,
located on the rear part of
the appliance (see figure).
3. Close off the holes using the plastic plugs supplied in the
pack.
4. Keep all the parts in a safe place; they will be needed
again if the washing machine is moved to another location,
to prevent the inside of the appliance being damaged.
! Packaging materials should not be used as toys for
children.
Levelling
1. Place the washing machine on a flat sturdy floor, without
resting it up against walls or cabinets.
2. If the floor is uneven, the
front feet of the machine
may be adjusted until
it reaches a horizontal
position (the angle of
inclination must not exceed
2 degrees).
! If the appliance is levelled correctly, it will be more stable
and much less likely to cause vibrations and noise while it
is operating, particularly during the spin cycle.
! If it is placed on carpet or a rug, adjust the feet in such a
way as to allow a sufficient ventilation space underneath
the washing machine.
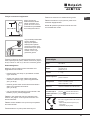
Connecting the electricity and water
supplies
Connecting the water inlet hose
! Before connecting the inlet hose to the water supply, run
the water until it is perfectly clear.
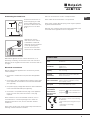
1. Connect the inlet hose
to the machine by screwing
it onto the cold water inlet
of the appliance, which is
situated on the top right-
hand side of the rear part of
the appliance (see figure).
2. Connect the inlet hose
by screwing it to a cold
water tap using a 3/4 gas
threaded connection (see
figure).
3. Make sure that the hose is not folded over or bent.
! The water pressure at the tap must fall within the values
indicated in the Technical data table (see next page).
! If the inlet hose is not long enough, contact a specialised
shop or an authorised technician.
! Never use second-hand or old inlet hoses; use the
products supplied with the machine.

GB
3
Technical data
Model
AQ104D 49
Dimensions
width 59.5 cm
height 85 cm
depth 64,5 cm
Capacity
from 1 to 10 kg
Electrical
connections
please refer to the technical data plate
fixed to the machine
Water connections
maximum pressure 1 MPa (10 bar)
minimum pressure 0.05 MPa (0.5 bar)
drum capacity 71 litres
Spin speed
up to 1400 rotations per minute
Test wash cycles
in accordance
with directives
1061/2010 and
1015/2010
programme
; Cotton standard 60 °C;
programme
; Cotton standard 40 °C.
This appliance conforms to the following
EC Directives:
- 2004/108/EC (Electromagnetic Compa-
tibility)
- 2006/95/EC (Low Voltage)
- 2012/19/EU
Connecting the drain hose
Connect the drain hose to
drain duct piping or a wall
drain located between 65
and 100 cm above the floor,
making sure it is not bent
at all.
Alternatively, rest the
drain hose on the side of
a washbasin or bathtub,
fastening the duct supplied
to the tap (see figure).
The free end of the hose
should not be underwater.
! We advise against the use of hose extensions; if it is
absolutely necessary, the extension must have the same
diameter as the original hose and must not exceed 150 cm
in length.
Electrical connections
Before plugging the appliance into the electricity socket,
make sure that:
• the socket is earthed and complies with all applicable
laws;
• the socket is able to withstand the maximum power load
of the appliance as indicated in the Technical data table
(see opposite);
• the power supply voltage falls within the values indicated
in the Technical data table (see opposite);
• the socket is compatible with the plug of the appliance.
If this is not the case, have the socket or the plug
replaced.
! The machine must not be installed outdoors, even in
covered areas. It is extremely dangerous to leave the
appliance exposed to rain, storms and other weather
conditions.
! The mains socket must remain within easy reach after the
washing machine has been installed.
! Do not use extension cords or multiple sockets.
! The cable should not be bent or compressed.
! The power supply cable and plug must only be replaced
by authorised technicians.
Warning! The company shall not be held responsible in the
event that these regulations are not respected.
65 - 100 cm

GB
4
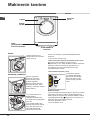
3. extra compartment: Bleach
! The use of extra compartment 3 excludes the pre-
wash function.
washing additives compartment: for fabric softener
or liquid additives. We recommend that the maximum
level indicated by the grille is not exceeded, and that
concentrated fabric softeners are diluted.
TOUCH CONTROL PANEL
To adjust the settings, gently
press the icon inside the
sensitive (touch control) area
as illustrated in the figure.
Standby mode
This washing machine, in compliance with new energy
saving regulations, is fitted with an automatic standby
system which is enabled after about 30 minutes if no
activity is detected. Press the ON-OFF
button briefly and
wait for the machine to start up again.
Consumption in off-mode: 0,5 W
Consumption in Left-on: 8 W
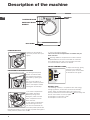
PORTHOLE DOOR
Always use the handle to
open the porthole door (see
figure).
DETERGENT DISPENSER DRAWER
The detergent dispenser
drawer is located inside
the machine and can be
accessed by opening the
door.
For more information on
detergent measures, please
refer to the chapter entitled
“Detergents and laundry”.
1. pre-wash compartment:
use powder detergent.
! Before pouring in the
detergent, make sure that
extra compartment 3 has
been removed.
2. main wash compartment:
If liquid detergent is used,
it is recommended that the
removable plastic partition A
(supplied) be used for proper dosage.If powder detergent is
used, place the partition into slot B.
3
1
2
1
8
0
2
1
0
1
5
0
1
2
0
9
0
6
0
B
A
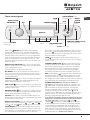
Description of the machine
CONTROL
PANEL
PORTHOLE DOOR
PORTHOLE DOOR
HANDLE
KICK STRIP

GB
55
WASH CYCLE
SELECTOR knob
Button with
ON/OFF
indicator light
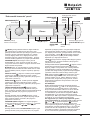
Touch control panel
Button with ON/OFF indicator light: press this briefly
to switch the machine on or off. The green indicator light
indicates that the machine is switched on. To switch off the
washing machine during the wash cycle, press and hold the
button for approximately 3 seconds; if the button is pressed
briefly or accidentally the machine will not switch off. If the
machine is switched off during a wash cycle, this wash cycle
will be cancelled.
WASH CYCLE SELECTOR knob: may be turned in either
direction. To select the most suitable wash cycle, please refer
to the “Table of wash cycles”.
The knob will not move during the wash cycle.
M1-M2-M3 buttons: press and hold one of the buttons to
store a cycle with your own set preferences in the memory
of the machine. To recall a previously-stored cycle, press the
corresponding button.
TEMPERATURE
button: press to modify or exclude the
temperature setting; the value selected will appear on the
display above (see “Running a wash cycle”).
SPIN CYCLE
button: press to modify or exclude the spin
cycle; the value selected will appear on the display above (see
“Running a wash cycle”).
DELAYED START
button: press to set a delayed start for
the selected wash cycle; the set delay time will appear on the
display above (see “Running a wash cycle”).
OPTION buttons: press to select the available options. The
indicator light corresponding to the selected option will remain
lit (see “Running a wash cycle”).
WASH CYCLE PHASE icons: these illuminate to indicate the
progress of the wash cycle (Wash
– Rinse – Spin –
Drain
). The text lights up when the cycle is complete.
START/PAUSE button with indicator light: when the green
indicator light flashes slowly, press the button to start a wash
cycle. Once the cycle has begun the indicator light will remain
lit in a fixed manner. To pause the wash cycle, press the
button again; the indicator light will flash in an orange colour. If
the “LOCK”
indicator light is switched off, the door may be
opened. To start the wash cycle from the point at which it was
interrupted, press the button again.
LOCK
indicator light: indicates that the porthole door is
locked. To open the door, pause the wash cycle (see “Running
a wash cycle”).
CONTROL PANEL LOCK
button with indicator light: to
activate or deactivate the control panel lock, press and hold
the button for approximately 2 seconds. when the indicator
light is illuminated, the control panel is locked. This means
it is possible to prevent wash cycles from being modified
accidentally, especially where there are children in the home.
ECO indicator light: the
icon lights up when, after altering the
washing parameters, an energy saving of at least 10% is made.
Furthermore, before the machine enters “Standby” mode, the
icon will light up for a few seconds; when the machine is switched
off the estimated energy saving will be around the 80% mark.
CHANGE LANGUAGEsThe first time the machine is
switched on, the first language will flash on the display. The
“
“, “OK” and “V” symbols will appear on the display, in line
with the 3 buttons on the right-hand side. The languages
change automatically every 3”; alternatively, they can be
changed by pressing the buttons next to the “
“ and “V”
symbols. Use the “OK” button to confirm the language, which
will be set after 2”. If no buttons are pressed, the automatic
language change will begin again after 30”.
To change the language, switch the machine on and off
again; in the 30” time period after it has been switched
off, press and hold the temperature
+spin
+delayed
start buttons simultaneously for 5’’. A short
sound alert will be emitted and the set language will flash
on the display.
Press the buttons next to the “ “ and “V”
symbols to change the language. Use the button next to the
“OK” symbol to confirm the language, which will be set after
2”. If no buttons are pressed, the language set previously will
be displayed after 30”. Switch on the machine.
TEMPERATURE
button
OPTION
buttons
SPIN
button
DISPLAY
M1
M3
ECO
indicator light
DELAYED START
button
START/PAUSE button
with indicator light
LOCK indicator light
WASH
CYCLE
PHASE
icons
CONTROL PANEL LOCK
button with indicator light
M2

GB
6
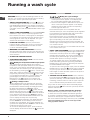
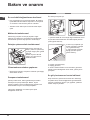
WARNING: before you use the washing machine for the
first time, run a wash cycle with detergent and no laundry,
using the 90° cottons cycle without pre-wash.
1. SWITCH THE MACHINE ON. Press the
button. All
the indicator lights will illuminate for 1 second and the
text AQUALTIS will appear on the display; the indicator
light corresponding to the
button will then remain lit in
a constant manner and the START/PAUSE indicator light
will flash.
2. SELECT THE PROGRAMME. Turn the PROGRAMME
KNOB left or right, until the required programme has
been selected; the name of the programme will appear
on the display. A temperature and spin speed is set for
each programme; these may be adjusted. The cycle
duration will also appear on the display.
3. LOAD THE LAUNDRY. Open the porthole door.
Load the laundry, making sure you do not exceed the
maximum load value indicated in the table of wash
cycles on the following page.
4. MEASURE OUT THE DETERGENT. Pull out the
detergent dispenser drawer and pour the detergent into
the relevant compartments as described in “Description
of the machine”.
5. CLOSE THE PORTHOLE DOOR.
6. CUSTOMISE THE WASH CYCLE. Use the relevant
buttons on the control panel:
Modify the temperature and/or spin speed.
The machine automatically displays the maximum
temperature and spin speed values set for the selected
cycle, or the most recently-used settings if they are
compatible with the selected cycle. The temperature can
be decreased by pressing the
button, until the cold
wash “OFF” setting is reached. The spin speed may be
progressively reduced by pressing the
button, until
it is completely excluded “OFF”. If these buttons are
pressed again, the maximum values are restored.
! Exception: if the
programme is selected, the
temperature can be increased up to a value of 90°C.
Setting a delayed start.
To set a delayed start for the selected cycle, press the
corresponding button repeatedly until the required delay
period has been reached. During the setting procedure,
the delay period and the text “Starts in:” will be
displayed, along with the flashing
symbol. After the
delayed start has been set, the
symbol will remain
fixed on the display, which will also indicate the duration
of the selected cycle with the text “Ends in:” and the
cycle duration. Press the DELAYED START button just
once to display the delay time set previously.
After the countdown has begun, the display will show
the text “Starts in:” and the delay period. Once the
set delay time has elapsed, the machine will begin its
cycle and the display will show “Ends in:” and the time
remaining until the end of the cycle.
To remove the delayed start option, press the button
until the display shows the text OFF; the
symbol will
disappear.
Modify the cycle settings.
• Press the button to activate the option; the name
of the option will then appear on the display and
the corresponding indicator light will illuminate.
• Press the button again to deactivate the option; the
name of the option will then appear on the display
followed by the text OFF, and the corresponding
indicator light will switch off.
! If the selected option is not compatible with the
selected wash cycle, this incompatibility will be signalled
by the flashing of the indicator light and a sound alert
(3 beeps); the option will not be activated.
! If the selected option is not compatible with another
option that has been selected previously, the indicator
light corresponding to the first option selected will
flash and only the second option will be activated; the
indicator light corresponding to the button will remain lit
in a constant manner.
! The options may affect the recommended load value and/
or the duration of the cycle.
7. START THE PROGRAMME. Press the START/PAUSE
button. The corresponding indicator light remains lit in a
fixed manner and the porthole door locks (the
LOCK
indicator light illuminates). The icons corresponding to
the wash cycle phases will light up during the cycle to
indicate which phase is currently in progress.
To change a wash cycle once it has already started,
pause the washing machine by pressing the START/
PAUSE button; then select the desired cycle and press
the START/PAUSE button again.
To open the door during a wash cycle, press the START/
PAUSE button; if the LOCK
indicator light is switched
off you may open the door. Press the START/PAUSE
button again to restart the wash cycle from the point at
which it was interrupted.
8. THE END OF THE WASH CYCLE. This is indicated
by the illuminated text END. The porthole door may be
opened immediately. If the START/PAUSE indicator light
is flashing, press the button to end the cycle. Open the
door, unload the laundry and switch off the machine.
! If you wish to cancel a cycle which has already begun,
press and hold the
button until the cycle stops and the
machine switches off.
Bag for quilts, curtains and delicate garments
The Aqualtis washing machine makes it easier for you
to wash even the most valuable and delicate garments
in complete confidence thanks to the special bag which
protects the laundry (this is supplied with the machine).
We recommend that the bag is used every time you wash
quilts and padded items with an outer layer made
using synthetic material.
Running a wash cycle

GB
7
Wash cycles and options
Wash options
Super Wash
This option offers a high-
performance wash due to the
greater quantity of water used in
the initial phase of the cycle, and
due to the increased wash cycle
duration, is particularly useful for
the removal of stubborn stains.
It can be used with or without
bleach. If you desire bleaching,
insert the extra tray compartment
(3) into compartment 1. When
pouring in the bleach, be careful
not to exceed the “max” level
marked on the central pivot (see
figure). To bleach laundry without carrying out a full wash
cycle, pour the bleach into the extra compartment 3, select the
“Rinse” cycle and activate the “Super Wash” option .
! It cannot be used in conjunction with
, , , , ,
, , .
Extra rinse
By selecting this option, the efficiency of the rinse is increased
and optimal residual detergent removal is guaranteed. It is
particularly useful for skin which is sensitive to detergents. We
recommend this option is used with a full load of washing, or
when a large amount of detergent is required.
! It cannot be used in conjunction with
, , , , .
Easy Iron
By selecting this option, the wash and spin cycles will be
modified in order to reduce the formation of creases.
At the end of the cycle the washing machine drum will
rotate slowly; the “Easy Iron” and START/PAUSE indicator
lights will flash. To end the cycle press the START/PAUSE
button or the “Easy Iron” button.
! It cannot be used in conjunction with
, , , , , .
Prewash
If this function is selected, the pre-wash cycle will run; this is
useful for removing stubborn stains.
N.B.: put the detergent in the relevant compartment.
! It cannot be used in conjunction with
, , , , ,
, , , , (60°), , .
3
1
2
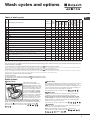
Table of wash cycles
Icon
Description of the wash cycle
Max.
temp. (°C)
Max.
speed
(rpm)
Detergent and additives
Max. load (kg)
Residual
dampness %
Energy con-
sumption kWh
Total water lt
Cycle dura-
tion
Prewash
Wash
Bleach
Fabric
softener
Synthetics Resistant 60° 800
5 48 0,99 57 115’
Synthetics Resistant (4) 40° 800
5 48 0,63 55 95’
Whites
60° 1400
-
6 - - - 190’
Coloureds
40° 1400
6 53 0,98 90 120’
Darks
30° 800 -
-
6 - - - 75’
Shirts
40° 600 -
2,5 - - - 75’
Duvets: for down-stuffed garments. 30° 1200 -
-
3,5 - - - 145’
Bed&Bath for bedlinen and towels. 60° 1400
10 - - - 155’
Rinse
- 1400 - -
10 - - - 49’
Spin and Pump out - 1400 - - - - 10 - - - 16’
Anti Allergy
60° 1400 -
-
6 - - - 205’
Ultradelicates
30° 0 -
-
1 - - - 80’
Wool: for wool, cashmere, etc. 40° 800 -
-
2,5 - - - 100’
Mix 30': to refresh lightly soiled garments quickly (not suitable for
wool, silk and clothes which require washing by hand).
30° 800 -
-
4 71 0,21 41 30’
Cotton Standard 60°C (1): heavily soiled whites and resistant colours.
60°
(Max. 90°)
1400
(3)
10 53 1,07 60 220’
Cotton Standard 40°C (2): lightly soiled whites and delicate colours. 40° 1400 -
10 53 0,97 87 190’
Cotton Standard 20°C: lightly soiled whites and delicate colours. 20° 1400 -
10 - - - 175’
Note: 10 minutes after the START, the machine will recalculate the time remaining until the end of the wash cycle on the basis of the load inside it; this value
will then be shown on the display.
The length of cycle shown on the display or in this booklet is an estimation only and is calculated assuming standard working conditions. The actual duration can vary accor-
ding to factors such as water temperature and pressure, the amount of detergent used, the amount and type of load inserted, load balancing and any wash options selected.
1) Test wash cycle in compliance with directive 1061/2010: set wash cycle with a temperature of 60°C.
This cycle is designed for cotton loads with a normal soil level and is the most efficient in terms of both electricity and water consumption; it should be used for
garments which can be washed at 60°C. The actual washing temperature may differ from the indicated value.
2) Test wash cycle in compliance with directive 1061/2010: set wash cycle
with a temperature of 40°C.
This cycle is designed for cotton loads with a normal soil level and is the most efficient in terms of both electricity and water consumption; it should be used for
garments which can be washed at 40°C. The actual washing temperature may differ from the indicated value.
3) At 60 °C the “Prewash” function cannot be selected.
For all Test Institutes:
2) Long wash cycle for cottons: set wash cycle
with a temperature of 40°C.
4) Long wash cycle for synthetics: set wash cycle
with a temperature of 40°C.

GB
8
Detergents and laundry
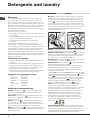
Duvets: to wash double or single duvets (the weight of
which should not exceed 3,5 kg), cushions or clothes
padded with goose down such as puffa jackets, use the
special
wash cycle. We recommend that duvets are
placed in the drum with their edges folded inwards (see
figure) and that no more than ¾ of the total volume of the
drum is used. To achieve the best results, we recommend
that a liquid detergent is used and placed inside the
detergent dispenser drawer.
Quilts: to wash quilts with a synthetic outer layer, use the
bag provided and set the wash cycle to
.
Bedlinen and towels: Use programme
to wash bed
linen and towels in one single cycle: it optimises softener
performance and helps you save time and energy. We
recommend the use of powder detergent
Anti Allergy: use programme
to remove major allergens
such as pollen, mites, cat’s and dog’s hair.
Ultradelicates: use programme
to wash very delicate
garments having strasses or sequins.
We recommend turning the garments inside out before
washing and placing small items into the special bag
for washing delicates. Use liquid detergent on delicate
garments for best results.
To wash Silk garments and Curtains (these should be folded
and placed inside the bag provided), select cycle
and then
option
(in this case it will also be possible to enable the
“Extra Rinse” option); the machine will end the cycle while
the laundry is soaking and the
indicator light will flash.
To drain the water so that the laundry may be removed,
press the START/PAUSE button or the
button.
Wool: the wool wash cycle on this Hotpoint-Ariston
machine has been tested and approved by The
Woolmark Company for washing wool garments labelled
as hand washable provided that the garments are
washed according to the instructions on the garment
label and those issued by the manufacturer of this
washing machine. Hotpoint-Ariston is the first washing
machine brand to be approved by The Woolmark
Company for Apparel Care- Platinum for its washing
performance and consumption of energy and water.
(M1135)
Cotton Standard 20°C: ideal for lightly soiled cotton
loads. The effective performance levels achieved at cold
temperatures, which are comparable to washing at 40°,
are guaranteed by a mechanical action which operates at
varying speed, with repeated and frequent peaks.
Detergent
The type and quantity of detergent required depend on
the type of fabric you are washing (cotton, wool, silk,
etc.), as well as its colour, the washing temperature, the
level of soiling and the hardness of the water in the area.
Measuring out the detergent carefully will avoid wastage
and help to protect the environment: although they are
biodegradable, detergents still contain ingredients which
alter the balance of nature.
We recommend the following:
• use powder detergents for white cotton garments and
pre-washing.
• use liquid detergents for delicate cotton garments and
for all low-temperature wash cycles.
• use gentle liquid detergents for wool and silk
garments.
The detergent should be poured into the relevant
compartment - or the dispenser placed directly inside the
drum - before the wash cycle begins. In the latter case, it will
not be possible to select the Cottons with pre-wash cycle.
! Use powder detergent for white cotton garments, for
pre-washing, and for washing at temperatures over 60°C
! Follow the instructions given on the detergent packaging.
! Do not use hand washing detergents because these
create too much foam.
Preparing the laundry
• Shake out the garments before loading them into the
machine.
• Divide the laundry according fabric type (symbol on the
washing instruction label) and colour, making sure you
separate the coloured garments from the white ones;
• Empty all pockets and check the buttons;
• Do not exceed the values listed in the “Table of wash cycles”,
which refer to the weight of the laundry when dry.
How much does your laundry weigh?
1 sheet 400-500 g
1 pillowcase 150-200 g
1 tablecloth 400-500 g
1 bathrobe 900-1200 g
1 towel 150-250 g
1 pair of jeans 400-500 g
1 shirt 150-200 g
Washing recommendations
Whites: use this cycle to wash white clothes. The
programme is designed to maintain the brightness of
white clothes over time.
Coloureds: use this cycle
to wash bright coloured
clothes. The programme is designed to maintain bright
colours over time.
Darks: Use cycle
to wash dark-coloured garments.
This programme is designed to maintain dark colours
over time. We recommend using a liquid detergent for the
best results when washing dark-coloured garments.
Shirts: use the special
wash cycle to wash shirts in
different fabrics and colours to guarantee they receive the
best possible care.

GB
9
Precautions and tips
! The machine was designed and constructed in
accordance with international safety regulations. The
following information is provided for safety reasons and
must therefore be read carefully.
General safety
• This appliance was designed for domestic use only.
• This appliance is not intended for use by persons
(including children) with reduced physical, sensory
or mental capabilities, or lack of experience and
knowledge, unless they have been given supervision
or instruction concerning use of the appliance by a
person responsible for their safety. Children should be
supervised to ensure that they do not play with the
appliance.
• Do not touch the machine when barefoot or with wet or
damp hands or feet.
• Do not pull on the power supply cable when unplugging
the appliance from the electricity socket. Hold the plug
and pull.
• Do not touch the drained water as it may reach
extremely high temperatures.
• Never force the porthole door. This could damage the
safety lock mechanism designed to prevent accidental
opening.
• If the appliance breaks down, do not under any
circumstances access the internal mechanisms in an
attempt to repair it yourself.
• Always keep children well away from the appliance while
it is operating.
• If it must be moved, proceed with the help of two or
three people and handle it with the utmost care. Never
try to do this alone, because the appliance is very heavy.
• Before loading laundry into the washing machine, make
sure the drum is empty.
Load balancing system
Before every spin cycle, to avoid excessive vibrations
before every spin and to distribute the load in a uniform
manner, the drum rotates continuously at a speed which
is slightly greater than the washing rotation speed. If,
after several attempts, the load is not balanced correctly,
the machine spins at a reduced spin speed. If the load is
excessively unbalanced, the washing machine performs
the distribution process instead of spinning. To encourage
improved load distribution and balance, we recommend
small and large garments are mixed in the load.
Disposal
• Disposing of the packaging materials: observe local
regulations so that the packaging may be re-used.
• The European Directive 2012/19/EU relating to Waste
Electrical and Electronic Equipment (WEEE) states
that household appliances should not be disposed of
using the normal solid urban waste cycle. Exhausted
appliances should be collected separately in order to
optimise the cost of re-using and recycling the materials
inside the machine, while preventing potential damage
to the atmosphere and to public health.
The crossed-out dustbin is marked on all products
to remind the owner of their obligations regarding
separated waste collection.
For more information relating to the correct disposal of
household appliances, owners should contact their local
authorities or appliance dealer.
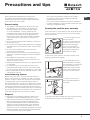
Opening the porthole door manually
In the event that it is not possible to open the porthole door
due to a powercut, and if you wish to remove the laundry,
proceed as follows:
1. remove the plug from the
electrical socket.
2. make sure the water level
inside the machine is lower
than the door opening; if
it is not, remove excess
water using the drain hose,
collecting it in a bucket as
indicated in the figure.
3. remove the cover panel on the lower front part of the
washing machine (see overleaf).
4. pull outwards using the
tab as indicated in the figure,
until the plastic tie-rod is freed
from its stop position; pull
downwards until you hear a
“click”, which indicates that
the door is now unlocked.
5. open the door; if this is
still not possible repeat the
procedure.
6. reposition the panel, making sure the hooks are securely
in place before you push it onto the appliance.

GB
10
Care and maintenance
Cutting off the water and electricity
supplies
• Turn off the water tap after every wash cycle. This will
limit wear on the hydraulic system in the machine and
help to prevent leaks.
• Unplug the appliance when cleaning it and during all
maintenance work.
Cleaning the machine
The outer parts and rubber components of the appliance
can be cleaned using a soft cloth soaked in lukewarm
soapy water. Do not use solvents or abrasives.
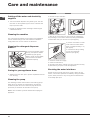
Cleaning the detergent dispenser
drawer
To remove the drawer, press
lever (1) and pull the drawer
outwards (2) (see figure).
Wash it under running water;
this procedure should be
repeated frequently.
Caring for your appliance drum
• Always leave the door ajar to prevent unpleasant odours
from forming.
Cleaning the pump
The washing machine is fitted with a self-cleaning pump
which does not require any maintenance. Sometimes,
small items (such as coins or buttons) may fall into the
protective pre-chamber at the base of the pump.
! Make sure the wash cycle has finished and unplug the
appliance.
To access the pre-chamber:
1. take off the cover panel on the front of the machine by
first pressing it in the centre and then pushing downwards
on both sides until you can remove it (see figures);
2. position a container so that
it will collect the water which
flows out (approximately 1.5 l)
(see figure);
3. unscrew the lid by rotating
it in an anti-clockwise
direction (see figure);
4. clean the inside thoroughly;
5. screw the lid back on;
6. reposition the panel, making sure the hooks are securely
in place before you push it onto the appliance.
Checking the water inlet hose
Check the inlet hose at least once a year. If there are any
cracks, it should be replaced immediately: during the wash
cycles, water pressure is very strong and a cracked hose
could easily split open.
1
2
1
2
1
2

GB
11
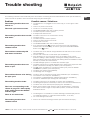
Trouble shooting
Your washing machine could occasionally fail to work. Before contacting the Technical Assistance Centre (see “Assistance”),
make sure that the problem cannot be solved easily using the following list.
Problem:
The washing machine does not
switch on.
The wash cycle does not start.
The washing machine does not fill
with water.
The washing machine door
remains locked.
The machine continuously fills
with water and drains.
The washing machine does not
drain or spin.
The machine vibrates a lot during
the spin cycle.
The washing machine leaks.
The icons corresponding to the
“Phase in progress” flash rapidly
at the same time as the ON/OFF
indicator light.
There is too much foam.
The washing machine door
remains locked.
Possible causes / Solutions:
• The appliance is not plugged into the socket fully, or not enough to make
contact.
• There is no power in the house.
• The door is not closed properly.
• The START/PAUSE button has not been pressed.
• The water tap has not been opened.
• A delayed start has been set.
• The water inlet hose is not connected to the tap.
• The hose is bent.
• The water tap has not been opened.
• There is no water supply in the house.
• The pressure is too low.
• The START/PAUSE button has not been pressed.
• If you have selected the
function, at the end of the cycle the washing
machine drum will rotate slowly; to end the cycle press the START/PAUSE
button or the
button.
• The drain hose is not fitted at a height between 65 and 100 cm from the floor
(see “Installation”).
• The free end of the hose is under water (see “Installation”).
• If the dwelling is on one of the upper floors of a building, there may be
problems relating to water drainage, causing the washing machine to fill with
water and drain continuously. Special anti-draining valves are available in shops
and help to prevent this inconvenience.
• The wall drainage system is not fitted with a breather pipe.
• The wash cycle does not include draining: Some wash cycles require the drain
phase to be started manually (see “Wash cycles and options”).
• The
option is enabled: to complete the wash cycle, press the START/
PAUSE button (“Wash cycles and options”).
• The drain hose is bent (see Installation).
• The drainage duct is clogged.
• The drum was not unlocked correctly during installation (see “Installation”).
• The machine is not level (see “Installation” ).
• The machine is trapped between cabinets and walls (see “Installation”).
• The load is unbalanced (see “Detergents and laundry”).
• The water inlet hose is not screwed on properly (see “Installation”).
• The detergent dispenser is blocked (to clean it, see “Care and maintenance”).
• The drain hose is not fixed in place properly (see “Installation”).
• Switch off the machine and unplug it, wait for approximately 1 minute and
then switch it back on again. If the problem persists, contact the Technical
Assistance Service.
• The detergent is not suitable for machine washing (it should display the text
“for washing machines” or “hand and machine wash”, or the like).
• Too much detergent was used.
• Perform the manual unlocking procedure (see “Precautions and tips”).
!
Note: to exit “Demo mode”, switch machine off, press and hold the two and buttons simultaneously for 3 seconds.

GB
12
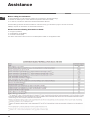
Before calling for Assistance:
• Check whether you can solve the problem by yourself (see “Trouble shooting”);
• Restart the wash cycle to check whether the problem has been solved;
• If it has not, contact the Authorised Technical Assistance Service.
! If the washing machine has been installed or used incorrectly, you will have to pay for the call-out service.
! Always request the assistance of authorised technicians.
Please have the following information to hand:
• the type of problem;
• the appliance model (Mod.);
• the serial number (S/N).
The above information can be found on the data plate located on the appliance itself.
Assistance

13
GR
Ελληνικά
Περιεχόμενα
Εγκατάσταση, 14-15
Αποσυσκευασία και οριζοντίωση
Υδραυλικές και ηλεκτρικές συνδέσεις
Τεχνικά στοιχεία
Περιγραφή της μηχανής, 16-17
Πίνακας χειριστηρίων “touch control”
Πως διενεργείται ένας κύκλος πλυσίματος, 18
Προγράμματα και δυνατότητες, 19
Πίνακας Προγραμμάτων
Δυνατότητες πλυσίματος
Απορρυπαντικά και μπουγάδα, 20
Απορρυπαντικό
Προετοιμασία της μπουγάδας
Συμβουλές πλυσίματος
Προφυλάξεις και συμβουλές, 21
Γενική ασφάλεια
Σύστημα ισοστάθμισης του φορτίου
Διάθεση
Χειρονακτικό άνοιγμα της πόρτας
Συντήρηση και φροντίδα, 22
Αποκλεισμός νερού και ηλεκτρικού ρεύματος
Καθαρισμός της μηχανής
Καθαρισμός του συρταριού απορρυπαντικών
Φροντίδα του κάδου
Καθαρισμός της αντλίας
Έλεγχος του σωλήνα τροφοδοσίας του νερού
Ανωμαλίες και λύσεις, 23
Υποστήριξη, 24
GR
ΠΛΥΝΤΗΡΙΟ ΡΟΥΧΩΝ
AQUALTIS
AQ104D 49
Οδηγίες για την εγκατάσταση και τη
χρήση

GR
14
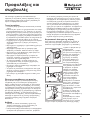
! Είναι σημαντικό να διατηρήσετε το εγχειρίδιο αυτό για
να μπορείτε να το συμβουλεύεστε οποιαδήποτε στιγμή.
Σε περίπτωση πώλησης, παραχώρησης ή μετακόμισης,
βεβαιωθείτε ότι παραμένει μαζί με το πλυντήριο.
! Διαβάστε προσεκτικά τις οδηγίες: υπάρχουν σημαντικές
πληροφορίες για την εγκατάσταση, τη χρήση και την
ασφάλεια.
! Στη σακουλίτσα που περιέχει το εγχειρίδιο αυτό θα
βρείτε, εκτός της εγγύησης, υλικά που χρησιμεύουν για
την εγκατάσταση.
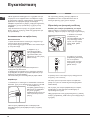
Αποσυσκευασία και οριζοντίωση
Αποσυσκευασία
1. Αφού αποσυσκευαστεί το πλυντήριο, ελέγξτε αν έχει
υποστεί ζημιές κατά τη μεταφορά.
Αν έχει υποστεί ζημιές μην το συνδέετε και επικοινωνήστε
με τον μεταπωλητή.
2. Αφαιρέστε τις 4
προστατευτικές βίδες
για τη μεταφορά και τον
σχετικό αποστάτη που
βρίσκονται στο πίσω μέρος
(βλέπε εικόνα).
3. Κλείστε τις οπές με τα πλαστικά πώματα που
περιέχονται στη σακουλίτσα.
4. Φυλάξτε όλα τα κομμάτια. Αν το πλυντήριο χρειαστεί
να μεταφερθεί, θα πρέπει να ξαναμονταριστούν για την
αποφυγή εσωτερικών βλαβών.
! Οι συσκευασίες δεν είναι παιχνίδια για μικρά παιδιά!
Αλφάδιασμα
1. Τοποθετήστε το πλυντήριο σε ένα δάπεδο επίπεδο και
ανθεκτικό, χωρίς να το ακουμπήσετε σε τοίχους ή έπιπλα.
2. Αντισταθμίστε τις
ανωμαλίες ξεβιδώνοντας ή
βιδώνοντας τα ποδαράκια
έως ότου η μηχανή
αλφαδιαστεί (δεν πρέπει να
κλίνει περισσότερο από 2
μοίρες).
! Ένα επιμελές αλφάδιασμα δίνει σταθερότητα και
αποσοβεί δονήσεις και θορυβότητα κυρίως στη φάση
στυψίματος.
! Σε περίπτωση μοκέτας ή τάπητα, ρυθμίστε τα
ποδαράκια έτσι ώστε να υφίσταται κάτω από το
πλυντήριο αρκετός χώρος για τον αερισμό.
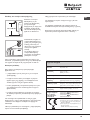
Υδραυλικές και ηλεκτρικές συνδέσεις
Σύνδεση του σωλήνα τροφοδοσίας του νερού
! Πριν συνδέσετε το σωλήνα τροφοδοσίας στο δίκτυο
ύδρευσης, αφήστε να τρέξει το νερό μέχρι να βγει διαυγές.
1. Συνδέστε το σωλήνα
τροφοδοσίας στο
πλυντήριο βιδώνοντάς τον
στην αντίστοιχη είσοδο
νερού, στο πίσω μέρος
επάνω δεξιά (βλέπε
εικόνα).
2. Συνδέστε το σωλήνα
τροφοδοσίας βιδώνοντάς
τον σε ένα κρουνό
κρύου νερού με στόμιο
σπειρώματος 3/4 gas
(βλέπε εικόνα).
3. Προσέξτε ώστε στο σωλήνα να μην υπάρχουν ούτε
πτυχώσεις, ούτε στενώσεις.
! Η πίεση νερού του κρουνού πρέπει να κυμαίνεται
μεταξύ των τιμών του πίνακα Τεχνικά στοιχεία (βλέπε
σελίδα δίπλα).
! Αν το μήκος του σωλήνα τροφοδοσίας δεν επαρκεί,
απευθυνθείτε σε ένα ειδικευμένο κατάστημα ή σε
εξουσιοδοτημένο τεχνικό.
! Μη χρησιμοποιείτε ποτέ χρησιμοποιημένους ή παλιούς
σωλήνες τροφοδοσίας, αλλά εκείνους που παρέχονται με
τη μηχανή.
Εγκατάσταση

15
GR
Σύνδεση του σωλήνα αποστράγγισης
Συνδέστε το σωλήνα
αδειάσματος σε μια
σωλήνωση αδειάσματος
ή σε μια επιτοίχια
παροχέτευση σε ύψος από
το έδαφος μεταξύ 65 και
100 cm και αποφεύγοντας
ρητά να τον διπλώσετε.
Εναλλακτικά, στηρίξτε το
σωλήνα αδειάσματος στο
χείλος ενός νιπτήρα ή μιας
λεκάνης, δένοντας τον
οδηγό που σας παρέχεται
στον κρουνό (βλέπε
εικόνα).
Το ελεύθερο άκρο του
σωλήνα αδειάσματος
δεν πρέπει να παραμένει
βυθισμένο στο νερό.
! Δεν συνιστάται η χρήση προεκτάσεων σωλήνων. Αν
απαιτείται, η προέκταση πρέπει να έχει την ίδια διάμετρο
του αρχικού σωλήνα και να μην ξεπερνάει τα 150 cm.
Ηλεκτρική σύνδεση
Πριν εισάγετε το βύσμα στην ηλεκτρική πρίζα,
βεβαιωθείτε ότι:
• η πρίζα διαθέτει γείωση και τηρεί τις εκ του νόμου
προδιαγραφές.
• Η πρίζα να είναι σε θέση να υποφέρει το μέγιστο
φορτίο ισχύος της μηχανής, που αναφέρεται στον
πίνακα Τεχνικών στοιχείων (βλέπε δίπλα).
• Η τάση τροφοδοσίας να κυμαίνεται μεταξύ των τιμών
που αναφέρονται στον πίνακα Τεχνικών στοιχείων
(βλέπε δίπλα).
• Η πρίζα να είναι συμβατή με το βύσμα της μηχανής.
Σε αντίθετη περίπτωση, αντικαταστήστε την πρίζα ή το
βύσμα.
! Το πλυντήριο δεν εγκαθίσταται σε ανοιχτό χώρο,
ακόμη και αν ο χώρος είναι καλυμμένος, διότι είναι πολύ
επικίνδυνο να το αφήνετε εκτεθειμένο σε βροχή και
κακοκαιρία.
! Με την εγκατάσταση του πλυντηρίου, η πρίζα ρεύματος
πρέπει να είναι εύκολα προσβάσιμη.
! Μη χρησιμοποιείτε προεκτάσεις και πολύπριζα.
! Το καλώδιο δεν πρέπει να φέρει πτυχές ή να είναι
συμπιεσμένο.
! Το καλώδιο τροφοδοσίας και το βύσμα πρέπει να
αντικαθίστανται μόνο από εξουσιοδοτημένους τεχνικούς.
Προσοχή! Η επιχείρηση αποποιείται κάθε ευθύνης σε
περίπτωση που δεν τηρούνται αυτοί οι κανόνες.
65 - 100 cm
Ôå÷íéêÜ óôïé÷åßá
ÌïíôÝëï AQ104D 49
ÄéáóôÜóåéò
ðëÜôïò cm 59,5
ýøïò cm 85
âÜèïò cm 64,5
×ùñçôéêüôçôá áðü 1 Ýùò 10 kg
ÇëåêôñéêÝò
óõíäÝóåéò
ÂëÝðå ôçí ðéíáêßäá
÷áñáêôçñéóôéêþí åðß ôçò ìç÷áíÞò
ÓõíäÝóåéò íåñïý
ìÝãéóôç ðßåóç 1 MPa (10 bar)
ÅëÜ÷éóôç ðßåóç 0,05 MPa (0,5 bar)
÷ùñçôéêüôçôá ôïõ êÜäïõ 71 ëßôñá
Ôá÷ýôçôá
óôõøßìáôïò
ìÝ÷ñé 1400 óôñïöÝò ôï ëåðôü
Προγράμματα
ελέγχου σύμφωνα
με τις οδηγίες
1061/2010 και
1015/2010
ðñüãñáììá
; ΒΑΜΒΑΚΕΡΑ
ΚΑΝΟΝΙΚΌ 60 °C.
ðñüãñáììá
; ΒΑΜΒΑΚΕΡΑ
ΚΑΝΟΝΙΚΌ 40 °C.
Ç óõóêåõÞ áõôÞ åßíáé óýìöùíç ìå
ôéò áêüëïõèåò ÊïéíïôéêÝò Ïäçãßåò:
- 2004/108/CE
(ÇëåêôñïìáãíçôéêÞ Óõìâáôüôçôá)
- 2012/19/EU
- 2006/95/CE (×áìçëÞ ÔÜóç)

GR
16
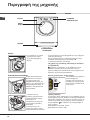
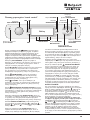
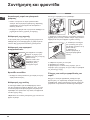
ΠΌΡΤΑ
Για να ανοίξετε την πόρτα
χρησιμοποιείτε πάντα
τη σχετική λαβή (βλέπε
εικόνα).
ΘΉΚΗ ΑΠΟΡΡΥΠΑΝΤΙΚΏΝ
Η θήκη απορρυπαντικών
βρίσκεται στο εσωτερικό
της μηχανής και έχετε
πρόσβαση ανοίγοντας την
πόρτα. Για τη δοσολογία των
απορρυπαντικών βλέπε το
κεφάλαιο “Απορρυπαντικά
και μπουγάδα”.
1. λεκανίτσα για την
πρόπλυση: χρησιμοποιείτε
απορρυπαντικό σε σκόνη.
! Πριν χύσετε το
απορρυπαντικό ελέγξτε αν
έχει εισαχθεί η πρόσθετη
λεκανίτσα 3.
2. λεκανίτσα για το Σε
περίπτωση χρήσης υγρού
απορρυπαντικού, συστήνεται
να χρησιμοποιείτε το δοσομετρητή Α που σας παρέχεται
για σωστή δοσολογία.
Για τη χρησιμοποίηση του απορρυπαντικού σε σκόνη
αποθέστε το δοσομετρητή στην κοιλότητα B.
3. λεκανίτσα πρόσθετη: Λευκαντικό
! Η χρήση της πρόσθετης λεκανίτσας 3 αποκλείει
την πρόπλυση.
λεκανίτσα για πρόσθετα: για το μαλακτικό ή υγρά
πρόσθετα. Συστήνεται να μην ξεπερνάτε ποτέ τη
μέγιστη στάθμη που υποδεικνύεται από τη σχάρα και να
αραιώνετε συμπυκνωμένα μαλακτικά.
Πίνακας χειριστηρίων “touch control”
Για να αλλάξετε τις ρυθμίσεις
πιέστε ελαφρά στο
εικονίδιο στο εσωτερικό της
ευαίσθητης περιοχής (touch
control) όπως υποδεικνύεται
στην εικόνα.
Τρόπος stand by
Το πλυντήριο αυτό, σύμφωνα με τις νέες διατάξεις για την
εξοικονόμηση ενέργειας, διαθέτει ένα σύστημα αυτόματου
σβησίματος (stand by) που τίθεται σε λειτουργία εντός 30
λεπτών στην περίπτωση μη χρήσης. Πιέστε στιγμιαία το
κουμπί ON-OFF
και περιμένετε να ενεργοποιηθεί εκ
νέου η μηχανή.
Κατανάλωση σε off-mode: 0,5 W
Κατανάλωση σε Left-on: 8 W
ΠΊΝΑΚΑΣ
ΧΕΙΡΙΣΤΗΡΊΩΝ
ΠΌΡΤΑ
ΛΑΒΗ
ΠΟΡΤΑΣ
ΠΕΛΜΑ
ΡΥΘΜΙΖΟΜΕΝΑ
ΠΟΔΑΡΑΚΙΑ
Περιγραφή της μηχανής
3
1
2
1
8
0
2
1
0
1
5
0
1
2
0
9
0
6
0
B
A

17
GR
17
Πίνακας χειριστηρίων “touch control”
Κουμπί με ενδεικτικό φωτάκι ON/OFF: πιέστε σύντομα το
κουμπί για να ανάψετε ή να σβήσετε τη μηχανή. Το πράσινο
ενδεικτικό φωτάκι δείχνει ότι η μηχανή είναι αναμμένη. Για να
σβήσετε το πλυντήριο κατά το πλύσιμο πρέπει να κρατάτε
πατημένο το κουμπί πιο πολύ, περίπου 3 sec. Στιγμιαίο ή τυχαίο
πάτημα δεν επιτρέπει το σβήσιμο της μηχανής. Το σβήσιμο της
μηχανής κατά το πλύσιμο σε εξέλιξη ακυρώνει το ίδιο το πλύσιμο.
Επιλογέας ΠΡΟΓΡΑΜΜΑΤΑ: μπορεί να στραφεί σε
αμφότερες τις κατευθύνσεις. Για να θέσετε το πλέον σωστό
πρόγραμμα δείτε τον “Πίνακας Προγραμμάτων”. Κατά το
πλύσιμο ο επιλογέας παραμένει ακίνητος.
Κουμπιά M1-M2-M3: κρατήστε πατημένο ένα από τα κουμπιά
για την αποθήκευση ενός κύκλου και των προσωπικών
σας προτιμήσεων. Για την ανάκληση ενός κύκλου που
αποθηκεύτηκε προηγουμένως πατήστε το σχετικό κουμπί.
Κουμπί
ΘΕΡΜΟΚΡΑΣΙΑ: πιέστε για να αλλάξετε
ή να αποκλείσετε τη θερμοκρασία. Η επιλεγείσα τιμή
υποδεικνύεται από την από πάνω οθόνη (βλέπε “Πως
διενεργείται ένας κύκλος πλυσίματος”).
Κουμπί
ΣΤΥΨΙΜΟ: πιέστε για να αλλάξετε ή να
αποκλείσετε το στύψιμο. Η επιλεγείσα τιμή υποδεικνύεται
από την από πάνω οθόνη (βλέπε “Πως διενεργείται ένας
κύκλος πλυσίματος”).
Κουμπί
ΕΚΚΙΝΗΣΗ ΜΕ ΧΡΟΝΙΚΗ ΥΣΤΕΡΗΣΗ: πατήστε
για να θέσετε μια εκκίνηση με υστέρηση του προεπιλεγμένου
προγράμματος. Η τεθείσα τιμή της υστέρησης υποδεικνύεται
από την επικείμενη οθόνη (βλέπε “Πως διενεργείται ένας
κύκλος πλυσίματος”).
Κουμπιά με ενδεικτικά φωτάκια ΔΥΝΑΤΟΤΗΤΕΣ: πιέστε για
να επιλέξετε τις διαθέσιμες δυνατότητες. Το ενδεικτικό φωτάκι
το σχετικό με την επιλεγμένη δυνατότητα θα παραμείνει
αναμμένο (βλέπε “Πως διενεργείται ένας κύκλος πλυσίματος”).
Εικονίδια ΦΑΣΕΙΣ ΠΛΥΣΙΜΑΤΟΣ: φωτίζονται δείχνοντας
την προώθηση του κύκλου (
Πλύσιμο - Ξέβγαλμα -
Στύψιμο
- Άντληση ). Η ένδειξη φωτίζεται όταν ο
κύκλος τελειώσει.
Κουμπί με ενδεικτικό φωτάκι START/PAUSE: όταν το
πράσινο ενδεικτικό φωτάκι αναβοσβήνει αργά, πιέστε το
κουμπί για την εκκίνηση ενός πλυσίματος. Με την εκκίνηση
του κύκλου το ενδεικτικό φωτάκι σταθεροποιείται. Για να
θέσετε μια παύση στο πλύσιμο, πατήστε εκ νέου το κουμπί.
Το ενδεικτικό φωτάκι θα αναβοσβήνει με πορτοκαλί χρώμα.
Αν το ενδεικτικό φωτάκι “LOCK”
είναι σβηστό, μπορείτε να
ανοίξετε την πόρτα. Για να ξεκινήσει πάλι το πλύσιμο από το
σημείο διακοπής, πατήστε εκ νέου το κουμπί.
Ενδεικτικό φωτάκι
LOCK: δείχνει ότι η πόρτα είναι
ασφαλισμένη. Για να ανοίξετε την πόρτα θέστε τον κύκλο σε
παύση (βλέπε “Πως διενεργείται ένα κύκλος πλυσίματος”).
Κουμπί με ενδεικτικό φωτάκι
ΑΣΦΑΛΙΣΗ ΚΟΥΜΠΙΩΝ:
για την ενεργοποίηση ή απενεργοποίηση του μπλοκ του
πίνακα χειριστηρίων, κρατήστε πατημένο το κουμπί για
περίπου 2 δευτερόλεπτα. Το αναμμένο φωτάκι δείχνει
ότι ο πίνακας χειριστηρίων είναι ασφαλισμένος. Με τον
τρόπο αυτόν παρεμποδίζονται τυχαίες τροποποιήσεις των
προγραμμάτων, κυρίως αν στο σπίτι υπάρχουν παιδιά.
Ενδεικτικό φωτάκι ECO: το εικονίδιο
θα ανάψει όταν,
τροποποιώντας τις παραμέτρους πλυσίματος, επιτευχθεί
μια εξοικονόμηση ενέργειας τουλάχιστον 10%. Ακόμη, πριν
η μηχανή εισέλθει σε κατάσταση “Stand by” το εικονίδιο
θα ανάψει για λίγα δευτερόλεπτα. Με τη μηχανή σβηστή η
ενεργειακή ανάκτηση εκτιμάται ότι θα είναι περίπου 80%.
ΑΛΛΑΓΗ ΓΛΩΣΣΑΣ
Στο πρώτο άναμμα της μηχανής εμφανίζεται στην οθόνη η
πρώτη γλώσσα να αναβοσβήνει. Απέναντι από τα 3 κουμπιά
δεξιά της οθόνης εμφανίζονται τα σύμβολα “
”, “OK” και “V”.
Οι γλώσσες αλλάζουν αυτόματα κάθε 3’’ ή πιέζοντας τα
κουμπιά δίπλα από τα σύμβολα “
“ και “V”. Με το κουμπί
“OK” επιβεβαιώνεται η γλώσσα που σταθεροποιείται μετά
από 2’’. Αν δεν πατηθεί κανένα κουμπί, με το πέρας των 30’’ η
αυτόματη αλλαγή των γλωσσών ξαναρχίζει.
Για την αλλαγή της γλώσσας χρειάζεται να ανάψετε και
να σβήσετε τη μηχανή, στα 30” μετά το σβήσιμο πατήστε
ταυτόχρονα τα κουμπιά θερμοκρασίας
+στυψίματος
+εκκίνηση με καθυστέρηση για 5’’ και εκτός από ένα
σύντομο ακουστικό σήμα εμφανίζεται στην οθόνη η τεθείσα
γλώσσα να αναβοσβήνει. Πιέζοντας τα κουμπιά δίπλα στα
σύμβολα “
“ και “V” αλλάζει η γλώσσα. Με το κουμπί
δίπλα στο σύμβολο «OK» επιβεβαιώνεται η γλώσσα που
σταθεροποιείται μετά από 2’’. Αν δεν πατηθεί κανένα κουμπί,
με το πέρας των 30’’ θα απεικονιστεί η προηγουμένως τεθείσα
γλώσσα.
Οθόνη
M1
Επιλογέας
ΠΡΟΓΡΑΜΜΑΤΩΝ
Κουμπί με ενδεικτικό
φωτάκι ΟΝ/OFF
M2
M3
Κουμπιά
ΥΝΑΤΟΤΗΤΕΣ
Πλήκτρο
ΘΕΡΜΟΚΡΑΣΙΑ
Κουμπί ΣΤΥΨΙΜΟ
Κουμπί ΕΚΚΙΝΗΣΗ
ΜΕ ΥΣΤΕΡΗΣΗ
Ενδεικτικό φωτάκι
ΑΣΦΑΛΙΣΗΣ ΠΟΡΤΑΣ
Κουμπί με ενδεικτικό
φωτάκι ΑΣΦΑΛΙΣΗΣ
ΚΟΥΜΠΙΩΝ
Κουμπί με
ενδεικτικό
φωτάκι START/PAUSE
Εικονίδια
ΦΑΣΕΙΣ
ΠΛΥΣΙΜΑΤΟΣ
Ενδεικτικό
φωτάκι ECO

GR
18
ΣΗΜΕΙΩΣΗ: την πρώτη φορά που χρησιμοποιείτε το
πλυντήριο, διενεργήστε ένα κύκλο πλυσίματος χωρίς
ρούχα αλλά με απορρυπαντικό, θέτοντας το πρόγραμμα
βαμβακερών 90° χωρίς πρόπλυση.
1. ΑΝΑΨΤΕ ΤΗ ΠΛΥΝΤΗΡΙΟ. Πατήστε το κουμπί
. Όλα
τα ενδεικτικά φωτάκια θα ανάψουν για 1 δευτερόλεπτο και
στην οθόνη θα εμφανιστεί η ένδειξη AQUALTIS. Μετά θα
παραμείνει αναμμένο συνεχώς το ενδεικτικό φωτάκι του
κουμπιού
και το ενδεικτικό φωτάκι START/PAUSE θα
αναβοσβήνει.
2. ΕΠΙΛΕΞΤΕ ΤΟ ΠΡΟΓΡΑΜΜΑ. Στρέψτε τον επιλογέας
ΠΡΟΓΡΑΜΜΑΤΩΝ προς τα δεξιά ή προς τα αριστερά
μέχρι να επιλέξετε το επιθυμητό πρόγραμμα. Το όνομα
του προγράμματος θα εμφανιστεί στην οθόνη και σε
αυτό αντιστοιχίζεται μια θερμοκρασία και μια ταχύτητα
στυψίματος που μπορούν να τροποποιηθούν. Στην οθόνη
θα εμφανιστεί η διάρκεια του κύκλου.
3. ΦΟΡΤΩΣΗ ΤΗΣ ΜΠΟΥΓΑΔΑΣ. Ανοίξτε την πόρτα.
Φορτώστε την μπουγάδα προσέχοντας να μην ξεπεράσει
την ποσότητα φορτίου που αναφέρεται στον πίνακα
προγραμμάτων της επόμενης σελίδας.
4. ΔΟΣΟΛΟΓΙΑ ΤΟΥ ΑΠΟΡΡΥΠΑΝΤΙΚΟΥ. Βγάλτε το
συρτάρι και χύστε το απορρυπαντικό στις αντίστοιχες
λεκανίτσες όπως εξηγείται στην “Περιγραφή της μηχανής”.
5. ΚΛΕΙΣΤΕ ΤΗΝ ΠΟΡΤΑ.
6. ΕΞΑΤΟΜΙΚΕΥΣΗ ΤΟΥ ΚΥΚΛΟΥ ΠΛΥΣΙΜΑΤΟΣ.
Ενεργήστε στα αντίστοιχα κουμπιά του πίνακα
χειριστηρίων:
Τροποποιήστε τη θερμοκρασία ή/και το
στύψιμο.
Η μηχανή απεικονίζει αυτόματα τις τιμές μέγιστης
θερμοκρασίας και στυψίματος που προβλέπονται για το
τεθέν πρόγραμμα ή τις τελευταίες επιλεγείσες αν είναι
συμβατές με το επιλεγμένο πρόγραμμα. Πατώντας το
κουμπί
μειώνεται προοδευτικά η θερμοκρασία μέχρι
το πλύσιμο σε κρύο νερό (OFF). Πατώντας το κουμπί
μειώνεται προοδευτικά το στύψιμο μέχρι τον αποκλεισμό
του (OFF). Περαιτέρω πάτημα των κουμπιών επαναφέρει
τις τιμές στις μέγιστες προβλεπόμενες.
! Εξαίρεση: επιλέγοντας το πρόγραμμα
η
θερμοκρασία μπορεί να αυξηθεί μέχρι 90°.
Θέστε μια εκκίνηση με υστέρηση.
Για να θέσετε την εκκίνηση με υστέρηση του
προεπιλεγμένου προγράμματος, πατήστε το σχετικό
κουμπί μέχρι να επιτευχθεί ο χρόνος της επιθυμητής
υστέρησης. Κατά τη ρύθμιση απεικονίζεται ο χρόνος
υστέρησης μαζί με την ένδειξη “Εναρζη σε:” και το
σύμβολο
αναβοσβήνει. Αφού θέσετε την εκκίνηση
με υστέρηση η Οθόνη θα απεικονίσει το σύμβολο
σταθερό και η οθόνη θα επιστρέψει στην απεικόνιση
της διάρκειας του τεθέντος κύκλου με τις ενδείξεις “Λήζη
σε:” και τη διάρκεια του κύκλου. Πιέζοντας το κουμπί
ΕΚΚΙΝΗΣΗ ΜΕ ΥΣΤΕΡΗΣΗ μια μόνο φορά απεικονίζεται
ο προηγουμένως τεθείς χρόνος υστέρησης.
Μετά την εκκίνηση η οθόνη θα απεικονίσει την ένδειξη
“Εναρζη σε:” και το χρόνο καθυστέρησης. Αφού
διανυθεί ο τεθείς χρόνος καθυστέρησης, η μηχανή θα
ξεκινήσεις και η οθόνη θα απεικονίσει “Λήζη σε:” και τον
υπολειπόμενο χρόνο για το τέλος του κύκλου.
Για να απαλείψετε την εκκίνηση με υστέρηση πατήστε το
κουμπί μέχρις ότου εμφανιστεί στην οθόνη η ένδειξη OFF.
Το σύμβολο
θα σβήσει.
Τροποποιήστε τα χαρακτηριστικά του
κύκλου.
• Πατήστε το κουμπί για να ενεργοποιήσετε μια
δυνατότητα. Στην οθόνη θα εμφανιστεί το όνομα της
δυνατότητας και το φωτάκι του αντίστοιχου κουμπιού
θα ανάψει.
• Πατήστε εκ νέου το κουμπί για να απενεργοποιήσετε
μια δυνατότητα. Στην οθόνη θα εμφανιστεί το όνομα
της δυνατότητας και το OFF και το φωτάκι θα σβήσει.
! Αν η επιλεγμένη δυνατότητα δεν είναι συμβατή με το
τεθέν πρόγραμμα, η ασυμβατότητα θα επισημανθεί με την
αναλαμπή της ενδεικτικής λυχνίας και ένα ηχητικό σήμα
(3 μπιπ) και η δυνατότητα δεν θα ενεργοποιηθεί.
! Αν η επιλεγμένη δυνατότητα δεν είναι συμβατή με μια
άλλη που επελέγη προηγουμένως, το σχετικό φωτάκι της
πρώτης επιλεγμένης δυνατότητας θα αναβοσβήνει και θα
ενεργοποιηθεί μόνο η δεύτερη, το ενδεικτικό φωτάκι του
κουμπιού θα σταθεροποιηθεί.
! Οι δυνατότητες μπορεί να τροποποιούν το προτεινόμενο
φορτίο ή/και τη διάρκεια του κύκλου.
7. ΕΚΚΙΝΗΣΗ ΤΟΥ ΠΡΟΓΡΑΜΜΑΤΟΣ. Πιέστε το κουμπί
v. Το σχετικό ενδεικτικό φωτάκι θα σταθεροποιηθεί
και η πόρτα θα ασφαλιστεί (ενδεικτικό φωτάκι LOCK
αναμμένο). Τα εικονίδια τα σχετικά με τις φάσεις
πλυσίματος θα φωτιστούν κατά τον κύκλο δείχνοντας
την σε εξέλιξη φάση. Για να αλλάξετε ένα πρόγραμμα
ενώ είναι σε εξέλιξη ένας κύκλος, θέστε το πλυντήριο
σε παύση πιέζοντας το κουμπί START/PAUSE. Κατόπιν
επιλέξτε τον επιθυμητό κύκλο και πατήστε εκ νέου το
κουμπί START/PAUSE. Για να ανοίξετε την πόρτα ενώ
είναι σε εξέλιξη ένας κύκλος πατήστε το κουμπί START/
PAUSE. Αν το ενδεικτικό φωτάκι; LOCK
είναι σβηστό
θα μπορείτε να ανοίξετε την πόρτα. Πατήστε εκ νέου
το κουμπί START/PAUSE για να ξεκινήσει πάλι το
πρόγραμμα από το σημείο διακοπής.
8. ΤΕΛΟΣ ΤΟΥ ΠΡΟΓΡΑΜΜΑΤΟΣ. Υποδεικνύεται από
την ένδειξη END αναμμένη. Η πόρτα θα μπορεί να
ανοίξει αμέσως. Αν το ενδεικτικό φωτάκι START/PAUSE
αναβοσβήνει, πατήστε το κουμπί για να τελειώσει ο
κύκλος. Ανοίξτε την πόρτα, αδειάστε τα ρούχα και σβήστε
τη μηχανή.
! Αν επιθυμείτε να ακυρώσετε έναν κύκλο που ήδη ξεκίνησε,
κρατήστε πατημένο το κουμπί
μέχρι να διακοπεί ο κύκλος
και να σβήσει η μηχανή.
Σακίδιο για παπλώματα, κουρτίνες και ευαίσθητα ρούχα
Χάρη στο ειδικό σακίδιο που παρέχεται, το πλυντήριο
Aqualtis σου δίνει τη δυνατότητα να πλένεις ακόμη και τα
ευαίσθητα και ακριβά ρούχα διασφαλίζοντάς τους τη μέγιστη
προστασία. Συστήνεται να χρησιμοποιείτε σε κάθε
περίπτωση το σακίδιο για το πλύσιμο παπλωμάτων
με ή χωρίς πούπουλα με εξωτερική επένδυση από
συνθετικό υλικό.
Πως διενεργείται ένας κύκλος
πλυσίματος

19
GR
19
Προγράμματα και
δυνατότητες
Δυνατότητες πλυσίματος
Σούπερ Γουός
Η δυνατότητα αυτή εξασφαλίζει
ένα πλύσιμο υψηλών
επιδόσεων χάρη στη χρήση
μεγαλύτερης ποσότητας νερού
στην αρχική φάση του κύκλου
και στη μεγαλύτερη διάρκεια
του προγράμματος. Μπορεί
να χρησιμοποιείται με ή χωρίς
λευκαντικό. Αν επιθυμείτε να
διενεργήσετε και τη λεύκανση
εισάγετε την πρόσθετη
λεκανίτσα 3, που παρέχεται,
στη λεκανίτσα 1. Αν επιθυμείτε μόνο λεύκανση χωρίς πλήρες
πλύσιμο, χύστε το λευκαντικό στην πρόσθετη λεκανίτσα 3,
θέστε το πρόγραμμα “Ξέβγαλμα”
και ενεργοποιήστε τη
δυνατότητα “Σούπερ Γουός”
.
! Δεν ενεργοποιείται στα προγράμματα
, , , , ,
, , .
Εξτρα ξέβγαλμα
Επιλέγοντας τη δυνατότητα αυτή αυξάνεται η
αποτελεσματικότητα του ξεβγάλματος και εξασφαλίζεται η
μέγιστη απομάκρυνση του απορρυπαντικού. Είναι χρήσιμο
για επιδερμίδες ιδιαίτερα ευαίσθητες στα απορρυπαντικά.
Συνιστάται η χρήση της δυνατότητας αυτής με το πλυντήριο
σε πλήρες φορτίο ή με τη χρήση υψηλών δόσεων
απορρυπαντικού.
! Δεν είναι διαθέσιμο στα προγράμματα
, , , , .
Εύκολο Σιδέρωμα
Επιλέγοντας τη δυνατότητα αυτή, το πλύσιμο και το στύψιμο
θα τροποποιηθούν κατάλληλα για τη μείωση σχηματισμού
τσαλακωμάτων. Στο τέλος του κύκλου το πλυντήριο θα
διενεργεί αργές περιστροφές του κάδου. Τα ενδεικτικά φωτάκια
“Εύκολο Σιδέρωμα” και START/PAUSE θα αναβοσβήνουν.
Για το πέρας του κύκλου πατήστε το κουμπί START/PAUSE
ή το κουμπί “Εύκολο Σιδέρωμα”.
! Δεν είναι διαθέσιμο στα προγράμματα
, , , , , .
Πρόπλυση
Επιλέγοντας τη λειτουργία αυτή διενεργείται η πρόπλυση,
χρήσιμη για την απομάκρυνση δύσκολων λεκέδων.
ΠΑΡΑΤΗΡΗΣΗ: Προσθέστε το απορρυπαντικό στο
αντίστοιχο διαμέρισμα.
! Δεν είναι διαθέσιμη στα προγράμματα
, , , ,
, , , , , (60°), , .
3
1
2
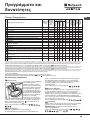
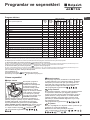
Πίνακας Προγραμμάτων
Προγράμματα
Περιγραφή του προγράμματος
Μέγιστη
θερμοκρ.
(°C)
Μέγιστη
ταχύτητα
(στροφές
ανά
λεπτό)
Απορρυπαντικά
και πρόσθετα
Μέγιστο Φορτίο.
(Kg)
Υπολειπόμενη
υγρασία %
Κατανάλωση
ενέργειας kWh
Συνολικό
νερό lt
Διάρκεια
κύκλου
Πρόπλυση
Πλύσιμο
Ëåõêáíôéêü
Μαλακτικό
Συνθετικά
60° 800
5 48 0,99 57 115’
Συνθετικά (4)
40° 800
5 48 0,63 55 95’
Λευκά Λευκά
60° 1400
-
6 - - - 190’
Χρωματιστά
40° 1400
6 53 0,98 90 120’
Σκουρόχρωμα
30° 800 -
-
6 - - - 75’
ΠΟΥΚΑΜΙΣΑ
40° 600 -
2,5 - - - 75’
Παπλώματα: Για ρούχα με εσωτερική επένδυση πούπουλων χήνας.
30° 1200 -
-
3,5 - - - 145’
Ασπρόρουχα: Για ασπρόρουχα κρεβατιού και μπάνιου.
60° 1400
10 - - - 155’
Ξέβγαλμα
- 1400 - -
10 - - - 49’
Στύψιμο + Άντληση
- 1400 - - - - 10 - - - 16’
Αντι-αλλεργικό
60° 1400 -
-
6 - - - 205’
Ευαίσθητα
30° 0 -
-
1 - - - 80’
Μάλλινα: Για μάλλινα, cachemire, κλπ.
40° 800 -
-
2,5 - - - 100’
Mix 30’: Για το γρήγορο φρεσκάρισμα ρούχων ελαφρά λερωμένων
(δεν ενδείκνυται για μάλλινα, μεταξωτά και ρούχα που πλένονται στο
χέρι).
30° 800 -
-
4 71 0,21 41 30’
βαμβακερά Kανονικό 60°C (1): Λευκά και χρωματιστά ανθεκτικά,
πολύ λερωμένα.
60°
(Max. 90°)
1400
(3)
10 53 1,07 60 220’
βαμβακερά Kανονικό 40°C (2): Λευκά λίγο λερωμένα και ευαίσθητα
χρώματα.
40° 1400 -
10 53 0,97 87 190’
βαμβακερά Kανονικό 20°C: Λευκά λίγο λερωμένα και ευαίσθητα
χρώματα.
20° 1400 -
10 - - - 175’
(*) Σημείωση: μετά από περίπου 10 λεπτά από το START, η μηχανή με βάση το πραγματοποιηθέν φορτίο, θα επανυπολογίσει και θα απεικονίσει τον υπολειπόμενο χρόνο για το τέλος του προγράμματος.
Για όλα τα Test Institutes:
2) Πρόγραμμα βαμβακερών μακρύ: θέστε το πρόγραμμα σε μια θερμοκρασία 40°C.
4) Πρόγραμμα συνθετικών μεγάλης διάρκειας: θέστε το πρόγραμμα σε μια θερμοκρασία 40°C.
Η διάρκεια του κύκλου που φαίνεται στην οθόνη ή στο εγχειρίδιο αποτελεί μια εκτίμηση υπολογισμένη με βάση τις στάνταρ συνθήκες. Ο πραγματικός χρόνος μπορεί να ποικίλει με βάση πολυάριθμους παράγοντες
όπως θερμοκρασία και πίεση του εισερχόμενου νερού, θερμοκρασία περιβάλλοντος, ποσότητα απορρυπαντικού, ποσότητα και τύπος φορτίου, ισοστάθμιση του φορτίου, πρόσθετες επιλεγμένες δυνατότητες.
1) Πρόγραμμα ελέγχου σύμφωνα με την προδιαγραφή 1061/2010: θέστε το πρόγραμμα σε μια θερμοκρασία 60°C.
Ο κύκλος αυτός είναι κατάλληλος για τον καθαρισμό φορτίου βαμβακερών με συνηθισμένη βρωμιά και είναι ο πλέον αποτελεσματικός σε όρους κατανάλωσης
ενέργειας και νερού, προς χρήση σε ρούχα πλενόμενα στους 60 °C. Η πραγματική θερμοκρασία πλυσίματος μπορεί να διαφέρει από την υποδεικνυόμενη.
2) Πρόγραμμα ελέγχου σύμφωνα με την προδιαγραφή 1061/2010: θέστε το πρόγραμμα σε μια θερμοκρασία 40°C.
Ο κύκλος αυτός είναι κατάλληλος για τον καθαρισμό φορτίου βαμβακερών με συνηθισμένη βρωμιά και είναι ο πλέον αποτελεσματικός σε όρους κατανάλωσης
ενέργειας και νερού, προς χρήση σε ρούχα πλενόμενα στους 40 °C. Η πραγματική θερμοκρασία πλυσίματος μπορεί να διαφέρει από την υποδεικνυόμενη.
3) Στη θερμοκρασία των 60 °C η λειτουργία “Πρόπλυση” δεν μπορεί να είναι ενεργή.

GR
20
Απορρυπαντικά και μπουγάδα
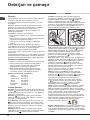
ΠΑΠΛΩΜΑΤΑ: για να πλύνετε ρούχα με γέμιση από
πούπουλα χήνας όπως παπλώματα «διπλά» ή μονά (που
δεν υπερβαίνουν τα 3,5 kg βάρους), μαξιλάρια, μπουφάν,
χρησιμοποιήστε το συγκεκριμένο πρόγραμμα
. Συστήνεται
να βάζετε τα πουπουλένια στον κάδο διπλώνοντάς τις άκρες
προς τα μέσα (βλέπε εικόνες) και να μην ξεπερνάτε τα 3/4
του όγκου του ίδιου του κάδου. Για ένα βέλτιστο πλύσιμο
συστήνεται να χρησιμοποιείτε υγρό απορρυπαντικό που θα
το δοσολογείτε στη θήκη απορρυπαντικού.
Παπλώματα: για να πλύνετε παπλώματα με συνθετική
επένδυση, χρησιμοποιήστε το παρεχόμενο σακίδιο και
θέστε το πρόγραμμα
.
ΑΣΠΡΟΡΟΥΧΑ: για να πλύνετε τα ασπρόρουχα μπάνιου
και ύπνου σε ένα μοναδικό κύκλο, χρησιμοποιήστε το
πρόγραμμα
που βελτιστοποιεί τη χρήση του μαλακτικού
και επιτρέπει εξοικονόμηση χρόνου και ενέργειας. Συνιστάται
η χρήση απορρυπαντικού σε σκόνη.
ΥΠΟ-ΑΛΛΕΡΓΙΚΑ: χρησιμοποιήστε το πρόγραμμα
για την
απομάκρυνση των κυριότερων αλλεργιογόνων όπως γύρη,
άκαρι, τρίχες γάτας και σκύλου.
ΥΠΕΡ ΕΥΑΙΣΘΗΤΑ: χρησιμοποιήστε το πρόγραμμα για
το πλύσιμο ρούχων πολύ ευαίσθητων που φέρουν πρόσθετα
όπως στρας ή παγέτες. Συνιστάται να γυρίζετε από την ανάποδη
τα ρούχα πριν το πλύσιμο και να βάζετε τα μικρά ρούχα στο
ειδικό σακίδιο για το πλύσιμο των ευαίσθητων ρούχων.
Για καλύτερα αποτελέσματα συνιστάται η χρήση υγρού
απορρυπαντικού για ευαίσθητα ρούχα.
Για το πλύσιμο μεταξωτών ρούχων και κουρτινών (Προτείνεται
να τις διπλώνετε και να τις βάζετε στο παρεχόμενο σακίδιο),
επιλέξτε τον κύκλο
και ενεργοποιήστε τη δυνατότητα
(Στην περίπτωση αυτή μπορείτε να ενεργοποιήσετε και τη
δυνατότητα “Επιπλέον Ξέβγαλμα”); η μηχανή θα τελειώσει
τον κύκλο με την μπουγάδα σε μούλιασμα και το ενδεικτικό
φωτάκι
θα αναβοσβήνει. Για να αδειάσετε το νερό και να
μπορείτε να βγάλετε την μπουγάδα πρέπει να πατήσετε το
κουμπί START/PAUSE ή το κουμπί
.
Μάλλινα: ο κύκλος πλυσίματος “Μάλλινα” αυτού του
πλυντηρίου Hotpoint-Ariston δοκιμάστηκε και εγκρίθηκε από
την Woolmark Company για το πλύσιμο ρούχων μάλλινων που
ταξινομούνται ως “πλενόμενα στο χέρι”, αρκεί το πλύσιμο να
εκτελείται σύμφωνα με τις οδηγίες της ετικέτας του ενδύματος
και τις υποδείξεις του κατασκευαστή της οικιακής ηλεκτρικής
συσκευής. Η Hotpoint-Ariston είναι η πρώτη μάρκα που
απέκτησε από την Woolmark Company την πιστοποίηση
Woolmark Apparel Care - Platinum για τις επιδόσεις της στο
πλύσιμο και τη χαμηλή κατανάλωση νερού και ενέργειας.
(M1135)
βαμβακερά kανονικό 20°C: ιδανικό για φορτία λερωμένων
βαμβακερών. Οι καλές επιδόσεις και σε χαμηλή θερμοκρασία,
συγκρίσιμες με ένα πλύσιμο στους 40°, εξασφαλίζονται από
μια μηχανική δράση που λειτουργεί με μεταβολή ταχύτητας σε
επαναλαμβανόμενες και κοντινές αυξομειώσεις.
Απορρυπαντικό
Η επιλογή και η ποσότητα του απορρυπαντικού εξαρτώνται
από τον τύπο υφάσματος (βαμβακερά, μάλλινα, μεταξωτά...),
από το χρώμα, από τη θερμοκρασία πλυσίματος, από το βαθμό
βρωμιάς και από την σκληρότητα του νερού.
Η καλή δοσολογία του απορρυπαντικού αποσοβεί σπατάλες και
προστατεύει το περιβάλλον: αν και βιοδιασπώμενα, τα απορρυπαντικά
περιέχουν στοιχεία που αλλοιώνουν την ισορροπία στη φύση.
Συνιστάται:
• η χρήση απορρυπαντικών σε σκόνη για ρούχα λευκά
βαμβακερά και για την πρόπλυση.
• να χρησιμοποιείτε υγρά απορρυπαντικά για ευαίσθητα
ρούχα βαμβακερά και για όλα τα προγράμματα σε χαμηλή
θερμοκρασία.
• να χρησιμοποιείτε υγρά απορρυπαντικά απαλά για
μάλλινα και μεταξωτά.
Το απορρυπαντικό πρέπει να χύνεται πριν την έναρξη
του πλυσίματος στην αντίστοιχη λεκανίτσα ή να το βάζετε
απ’ευθείας στον κάδο. Στην περίπτωση αυτή δεν μπορείτε να
επιλέξετε τον κύκλο Βαμβακερά με πρόπλυση.
! Μη χρησιμοποιείτε απορρυπαντικά για το πλύσιμο στο χέρι,
διότι παράγουν πολύ αφρό.
! Να χρησιμοποιείτε απορρυπαντικά σε σκόνη για ρούχα
λευκά βαμβακερά και για την πρόπλυση και για πλυσίματα σε
θερμοκρασία μεγαλύτερη των 60°C.
! Ακολουθήστε τις υποδείξεις που αναγράφονται στη
συσκευασία του απορρυπαντικού.
Προετοιμασία της μπουγάδας
• Ανοίξτε καλά τα ρούχα πριν τα τοποθετήσετε.
• Χωρίστε την μπουγάδα ανάλοογα με τον τύπο του
υφάσματος (σύμβολο στην ετικέτα του ρούχου) και το
χρώμα προσέχοντας να χωρίσετε τα χρωματιστά ρούχα
από τα λευκά.
• Εκκενώστε τις τσέπες και ελέγξτε τα κουμπιά.
• Μην ξεπερνάτε τις υποδεικνυόμενες τιμές στον “Πίνακας
Προγραμμάτων” σε σχέση με το βάρος της στεγνής
μπουγάδας.
Πόσο ζυγίζει η μπουγάδα;
1 σεντόνι 400-500 gr.
1 μαξιλαροθήκη 150-200 gr.
1 τραπεζομάντιλο 400-500 gr.
1 μπουρνούζι 900-1200 gr.
1 πετσέτα 150-250 gr.
1 jean 400-500 gr.
1 πουκάμισο 150-200 gr.
Συμβουλές πλυσίματος
ΛΕΥΚΆ: χρησιμοποιήστε τον κύκλο για το πλύσιμο των
λευκών ρούχων. Το πρόγραμμα μελετήθηκε για τη διατήρηση
της λαμπρότητας του λευκού στο χρόνο. Για καλύτερα
αποτελέσματα συστήνεται η χρήση απορρυπαντικού σε
σκόνη.
ΧΡΩΜΑΤΙΣΤΆ: χρησιμοποιήστε τον κύκλο
για το πλύσιμο
ανοιχτόχρωμων ρούχων. Το πρόγραμμα μελετήθηκε για τη
διατήρηση της ζωντάνιας των χρωμάτων στο χρόνο.
ΣΚΟΥΡΑ: χρησιμοποιήστε το πρόγραμμα
για το πλύσιμο
σκουρόχρωμων ρούχων. Το πρόγραμμα μελετήθηκε για τη
διατήρηση των σκούρων χρωμάτων στο χρόνο. Για καλύτερα
αποτελέσματα συνιστάται η χρήση υγρού απορρυπαντικού,
κατά προτίμηση για το πλύσιμο σκουρόχρωμων ρούχων.
ΠΟΥΚΑΜΙΣΑ: χρησιμοποιήστε το αντίστοιχο πρόγραμμα
για να πλύνετε πουκάμισα διαφόρων ειδών υφάσματος
και χρώματος για τη μέγιστη φροντίδα.
Sayfa yükleniyor...
Sayfa yükleniyor...
Sayfa yükleniyor...
Sayfa yükleniyor...
Sayfa yükleniyor...
Sayfa yükleniyor...
Sayfa yükleniyor...
Sayfa yükleniyor...
Sayfa yükleniyor...
Sayfa yükleniyor...
Sayfa yükleniyor...
Sayfa yükleniyor...
Sayfa yükleniyor...
Sayfa yükleniyor...
Sayfa yükleniyor...
Sayfa yükleniyor...
-
 1
1
-
 2
2
-
 3
3
-
 4
4
-
 5
5
-
 6
6
-
 7
7
-
 8
8
-
 9
9
-
 10
10
-
 11
11
-
 12
12
-
 13
13
-
 14
14
-
 15
15
-
 16
16
-
 17
17
-
 18
18
-
 19
19
-
 20
20
-
 21
21
-
 22
22
-
 23
23
-
 24
24
-
 25
25
-
 26
26
-
 27
27
-
 28
28
-
 29
29
-
 30
30
-
 31
31
-
 32
32
-
 33
33
-
 34
34
-
 35
35
-
 36
36


Hotpoint AQ104D 49 EU/B Kullanici rehberi
- Kategori
- Çamaşır makineleri
- Tip
- Kullanici rehberi
diğer dillerde
- English: Hotpoint AQ104D 49 EU/B User guide