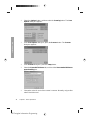
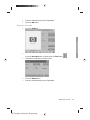
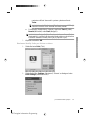
HP DesignJet 4500 Printer series Başvuru Kılavuzu
- Kategori
- Yazdır
- Tip
- Başvuru Kılavuzu
Bu kılavuz aynı zamanda aşağıdakiler için de uygundur:

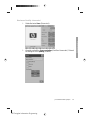
HP DesignJet Information Engineering
Quick reference guide
HP Designjet T11 MFP /
45
mfp / 45 Tarayıcı
Hızlı başvuru kılavuzu
Skenery
HP Designjet T11
MFP /
45
mfp / 45
Stručná referenční příručka
HP Designjet T11
45 mfp többfunkciós készülék/
45
lapolvasó
Felhasználói gyorskalauz
MFP /
EN
TR
HU
CS

HP DesignJet Information Engineering
You can nd legal and warranty information on the CD. Further information is available at HP’s support Web
site (http://www.hp.com/go/knowledge_center/).
Legal notices
The information contained herein is subject to change without notice. The only warranties for HP Products and
services are set forth in the express warranty statement accompanying such products and services. Nothing herein
should be construed as constituting an additional warranty. HP shall not be liable for technical or editorial errors or
omissions contained herein.
CD'de yasal ve garanti ile ilgili bilgiler mevcuttur. Diğer bilgiler HP’nin destek web sitesinde
(http://www.hp.com/go/knowledge_center/) bulunmaktadır.
Yasal bildirimler
Burada yer alan bilgiler önceden bildirilmeden değiştirilebilir. HP ürün ve hizmetleri için yalnızca söz konusu ürün
ve hizmetlere eşlik eden açık garanti belgelerinde belirtilen garantiler geçerlidir. Burada kullanılan hiçbir ifade ek
garanti olarak yorumlanamaz. HP, bu belgedeki teknik hatalardan veya yazım hatalarından ya da eksikliklerden
sorumlu tutulamaz.
Na disku CD naleznete právní ujednání a informace o záruce. Další informace jsou k dispozici
na webu podpory společnosti HP (http://www.hp.com/go/knowledge_center/).
Právní informace
Informace v tomto dokumentu mohou být změněny bez předchozího upozornění. Jediné záruky poskytované
k produktům a službám HP jsou výslovně uvedeny v prohlášení o záruce, které se dodává společně s těmito
produkty a službami. Žádné z informací uvedených v tomto dokumentu nemohou sloužit jako podklad pro
vyvození dalších záruk. Společnost HP nenese odpovědnost za případné technické či redakční chyby ani
opomenutí v tomto dokumentu.
A CD-lemezen jogi tudnivalókat és a jótállással kapcsolatos információkat találhat. További információ
a HP terméktámogatási webhelyén található (http://www.hp.com/go/knowledge_center/).
Jogi kitételek
Az itt található információk előzetes értesítés nélkül megváltozhatnak. A HP termékekre és szolgáltatásokra
vonatkozó garanciákat kizárólag az ilyen termékek és szolgáltatások kifejezett garancianyilatkozatában rögzítettek
szerint vállaljuk. Az itt talált információk semmilyen módon nem tekinthetők további garanciának. A HP nem felelős
az itt található semmilyen technikai vagy szerkesztési hibáért vagy kihagyásért.
EN
TR
HU
CS

Table of contents
1 Introduction
Using this guide .............................................................................................. 1
Introduction ................................................................................... 1
Basic operations ........................................................................... 1
Maintenance ................................................................................. 1
Troubleshooting ............................................................................ 1
Index ............................................................................................. 1
Warnings and Cautions ................................................................ 1
Scanner software ............................................................................................ 1
2 Basic Operations
Add a new printer ............................................................................................ 5
Delete a printer ............................................................................................... 6
Create a new media profile ............................................................................. 6
Set the output quality .................................................................................... 10
Copy-quality settings for scanning and printing .......................... 10
Print-quality settings for printing from a file ................................ 12
Scan-quality settings .................................................................. 13
Copy a document .......................................................................................... 15
Collate copies ............................................................................................... 19
Perform a batch copy .................................................................................... 19
Scan a document to a file ............................................................................. 21
Scan a document to the network .................................................................. 23
Add a network connection .......................................................... 23
Scan to the network .................................................................... 24
Access files in the network folder ............................................... 24
Perform a batch scan .................................................................................... 25
Use the auto-naming feature ...................................................... 25
Scan the documents ................................................................... 25
Print a file ...................................................................................................... 26
Adjust color ................................................................................................... 27
View, move, rename, or delete a file ............................................................ 28
Scan heavyweight paper or cardboard ......................................................... 28
Preview copies .............................................................................................. 31
Zoom all ...................................................................................... 31
Zoom in ...................................................................................... 31
Zoom out .................................................................................... 31
One-to-one pixel viewing ............................................................ 32
Resize paper frame .................................................................... 32
Move tool .................................................................................... 32
Position the paper frame ............................................................ 32
Align left and align right .............................................................. 33
Save files on a CD or DVD ........................................................................... 34
Access the shared folder from my computer ................................................ 34
Accessing the shared folder from Windows XP ......................... 35
Accessing the shared folder from Windows 2000 ...................... 35
HP DesignJet Information Engineering
EN

Accessing the shared folder from Windows 98 .......................... 36
Accessing the shared folder from Mac OS X ............................. 36
Set up a password ........................................................................................ 36
Enable password access to a shared directory ............................................ 38
Connect the scanner to a network ................................................................ 39
Manage an account ...................................................................................... 40
Create an account ...................................................................... 41
Delete an account ...................................................................... 42
Reset an account ....................................................................... 43
Rename an account ................................................................... 44
Set the time, date, and timezone .................................................................. 45
Set sleep and wake-up timers ...................................................................... 46
3 Maintenance
Clean the glass plate and the scanning area ................................................ 47
Calibrate the scanner .................................................................................... 47
Calibrate the touch screen pointer ................................................................ 49
Replace worn parts ....................................................................................... 49
Lamp unit .................................................................................... 50
Air filters ..................................................................................... 50
White-background platen ........................................................... 50
Glass plate ................................................................................. 50
4 Troubleshooting
The Diagnostics light is flashing ................................................................... 52
The Wait light is flashing ............................................................................... 53
The Wait and Diagnostics lights are both flashing ........................................ 53
The Power, Wait, Diagnostics, and Paper-Ready lights are flashing ........... 53
Lines in the scanned image appear too thin or discontinuous ...................... 54
A warning message appears on the panel PC touch screen ........................ 55
The scanner software is in the wrong language ........................................... 55
The scanner software does not start ............................................................ 55
The CD or DVD cannot be read by my computer ......................................... 56
A media profile cannot be generated ............................................................ 56
Streaks in the scanned image ...................................................................... 56
The scanner is not detected after it is power-cycled ..................................... 57
Index ............................................................................................................................... 58
HP DesignJet Information Engineering

1 Introduction
●
Using this guide
●
Scanner software
Using this guide
This guide is organized into the following chapters.
Introduction
This chapter provides a brief introduction to the scanner and its documentation for
new users.
Basic operations
This chapter helps you to carry out various common procedures.
Maintenance
This chapter helps you to carry out various calibration and maintenance
procedures.
Troubleshooting
This chapter helps you to solve problems that may occur while scanning.
Index
In addition to the table of contents, there is an alphabetical index to help you to find
topics quickly.
Warnings and Cautions
Symbols are used in this manual to ensure the proper use of the printer and to
prevent printer damage. Follow the instructions that are marked with these symbols.
WARNING! Failure to follow the guidelines that are marked with this symbol could
result in serious personal injury or death.
CAUTION: Failure to follow the guidelines that are marked with this symbol could
result in minor personal injury or damage to the product.
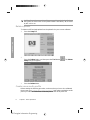
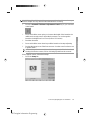
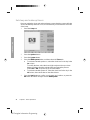
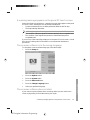
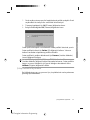
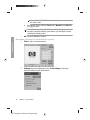
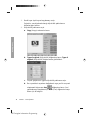
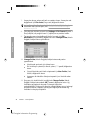
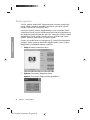
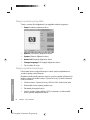
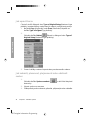
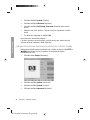
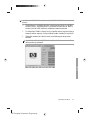
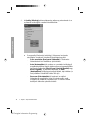
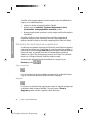
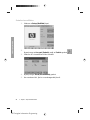
Scanner software
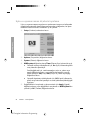
The scanner software is installed in the scanner's touch screen, and runs
automatically when you switch on the touch screen. The first screen that you see
is divided into three main sections:
●
The viewing section on the left, for viewing scanned images
●
The control section on the right
●
The toolbar on the bottom
Using this guide
1
Introduction
HP DesignJet Information Engineering

NOTE: Some details of this screen may vary depending on which printer is
connected to the scanner.
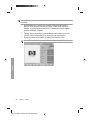
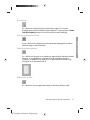
The screen includes:
●
The preview window. Fills most of the viewing section. Above it is the image
toolbar, with nine buttons that can be used to change the preview (see
Preview
copies on page 31).
●
The control section. Contains four tabs: Copy, Scan, Print, and Setup. Each
tab provides options that you can select when performing copy, scan, print, or
setup tasks.
●
Nine larger function buttons at the bottom of the screen:
◦
Quit: shuts down the touch screen
◦
Online help: provides additional information on many topics
not included in this document
◦
File Manager: opens the File Management dialogue box
◦
Print queue: accesses the print queue
◦
Collate: groups copies into sets
◦
Preview: scans the document to preview the image and
select an area of interest
2 Chapter 1 Introduction
Introduction
HP DesignJet Information Engineering

◦
Reset: resets settings to default values
◦
Stop: cancels the current activity
◦
Copy, Scan, or Print: each icon
appears in its respective tab, and initiates the copy, scan, or print function
depending on the tab within which you are working.
Scanner software
3
Introduction
HP DesignJet Information Engineering

2 Basic Operations
●
Add a new printer
●
Delete a printer
●
Create a new media profile
●
Set the output quality
●
Copy a document
●
Collate copies
●
Perform a batch copy
●
Scan a document to a file
●
Scan a document to the network
●
Perform a batch scan
●
Print a file
●
Adjust color
●
View, move, rename, or delete a file
●
Scan heavyweight paper or cardboard
●
Preview copies
●
Save files on a CD or DVD
●
Access the shared folder from my computer
●
Set up a password
●
Enable password access to a shared directory
●
Connect the scanner to a network
●
Manage an account
●
Set the time, date, and timezone
●
Set sleep and wake-up timers
4 Chapter 2 Basic Operations
Basic Operations
HP DesignJet Information Engineering

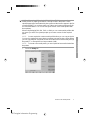
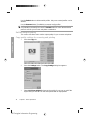
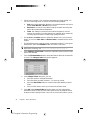
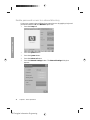
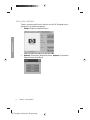
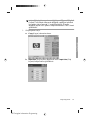
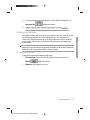
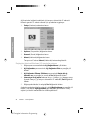
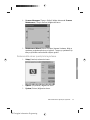
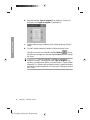
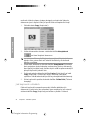
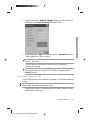
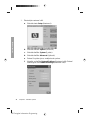
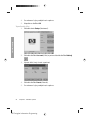
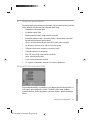
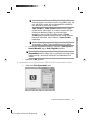
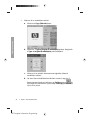
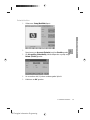
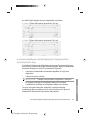
Add a new printer
To add a new HP Designjet printer to the printer list in your scanner software, follow
these steps:
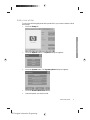
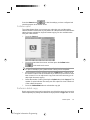
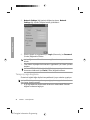
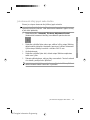
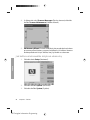
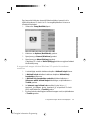
1. Press the Setup tab.
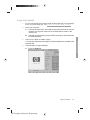
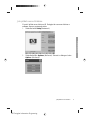
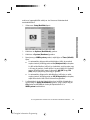
2. Press the Options button. The Options dialog box appears:
3. Press the System button. The System options dialog box appears:
4. Press the Install Printer Driver button.
5. Select the printer you want to install.
Add a new printer
5
Basic Operations
HP DesignJet Information Engineering

NOTE: If more than one printer of the same model number is installed on
the system, the name of the second printer added is denoted by “#2”, the third
by “#3”, and so on.
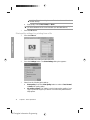
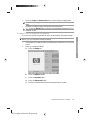
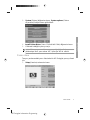
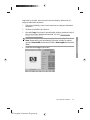
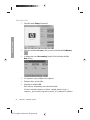
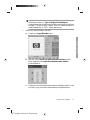
Delete a printer
To delete an HP Designjet printer from the printer list in your scanner software:
1. Press the Setup tab.
2.
Press the Printer button, and then press the Tool button
. The Printer
Setup dialog box appears.
3. Press the Delete button.
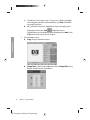
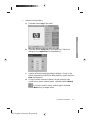
Create a new media profile
Before starting the following procedure, make sure that you have color-calibrated
the scanner (see
Calibrate the scanner on page 47) and make sure that the media
profile you intend to create does not already exist in the media profile list.
6 Chapter 2 Basic Operations
Basic Operations
HP DesignJet Information Engineering

NOTE: When using HP Designjet 45XX, 40XX, or T11XX, you can only create
media profiles for paper types that are currently loaded in the printer. These
standard paper types are detected by the system and their names appear in the list
of media profiles. You can then select one of these and create a media profile for
it as described below. You can not change the names of the media profiles with
these printers.
When using Designjet 500, 800, 5X00, or 1000 you can create media profiles with
any name you want. The system prompts you to enter a name for the required
paper.
NOTE: You are required to create a media profile before you can copy and print.
You are also required to have at least one printer connected to the scanner before
you can copy and print. The printer can be connected to the scanner directly through
the panel PC, or through the local area network (LAN).
NOTE: To create a new media profile, you are required to have media loaded into
the printer.
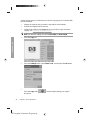
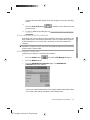
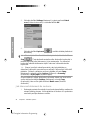
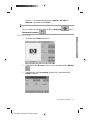
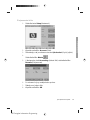
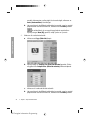
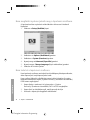
1. Press the Setup tab.
Create a new media profile
7
Basic Operations
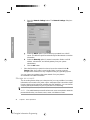
HP DesignJet Information Engineering

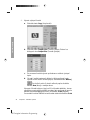
2.
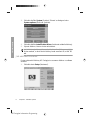
Press the Media Profile button, and then press the Tool button
.
(Alternative path: Printer > Tool > Media Profile).
NOTE: With some printers, a Calibrate RIP feature is available in the dialog
box as the first step. Calibrating the RIP involves configuring the gamma
values of red, green, and blue to ensure a neutral appearance of printed gray
(also referred to as gray balance). Press the Calibrate RIP button and follow
the on-screen instructions to use this feature.
3. Press the button that corresponds to the media that you have loaded in the
printer.
4. Press the OK button when this message appears.
8 Chapter 2 Basic Operations
Basic Operations
HP DesignJet Information Engineering

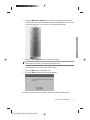
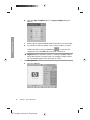
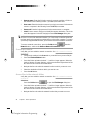
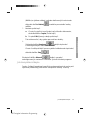
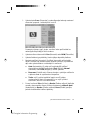
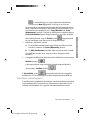
5. Press the Print Color Sheet button to print a color patch reference sheet.
Some printers print a special test sheet just before printing the color sheet. Do
not use the test sheet—only use the color sheet (shown below).
6. Press the Scan Sheet button to scan the color sheet.
NOTE: Some HP Designjet models require that you enter the media profile
name when the system is connected through the LAN.
7. Load the color sheet into the scanner face down. Align the arrow on the color
sheet with the arrow on the center of the scanner.
8. Press the OK button to initiate the scan.
9. Press the OK button when this message appears.
The media profile is active and visible in the list of available media profiles.
Create a new media profile
9
Basic Operations
HP DesignJet Information Engineering

Use the Delete button to delete media profiles. Only user-created profiles can be
deleted.
Use the Rename button (if available) to rename media profiles.
NOTE: When using HP Designjet 45XX, 40XX, or T11XX, the Rename button is
not available in the dialog box. Use the Validate button to check that the media
profile is valid for your scanner and printer combination.
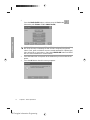
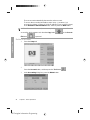
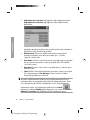
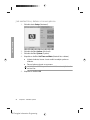
Set the output quality
This section describes how to set the output quality for your scanner and printer.
Copy-quality settings for scanning and printing
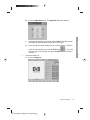
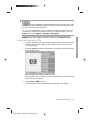
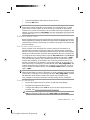
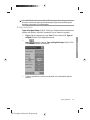
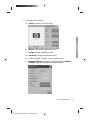
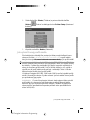
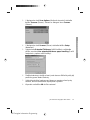
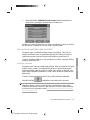
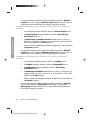
1. Press the Copy tab.
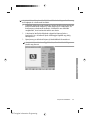
2. Press the Settings button. The Copy Settings dialog box appears:
3. Select Ink Printer Original to improve the quality of your copy or print if the
original that you want to scan has been printed with an inkjet printer.
10 Chapter 2 Basic Operations
Basic Operations
HP DesignJet Information Engineering

4. Press the OK button.
5. Press the Quality button.
6. Define the scan quality and print-quality settings using the Quality dialog box.
●
Scan quality: Select one of the following scan quality settings:
◦
Scan resolution: Manually set the scan resolution in dots per inch
(dpi).
◦
Auto: The system determines the best scan resolution based on the
print quality (Fast, Normal, or Best) that you select. The resolution
setting (in dpi) is displayed next to the Auto checkbox (200 dpi in
the example above).
◦
Descreen: The scanner scans with the optical resolution and relays
the data to the system. The software then sets the optimal resolution
value.
NOTE: The Descreen setting gives the best results when
scanning raster images (non-vector images, such as .jpeg, .tiff,
and .pdf files), however the scanning speed is reduced.
◦
Turbo: The Turbo setting increases the rate at which the paper is
fed and reduces the amount of scanning data that is captured, which
means the scanning speed increases, but the image quality
decreases. To use the Turbo setting, first manually set the scan
resolution, and then select Turbo.
Set the output quality
11
Basic Operations
HP DesignJet Information Engineering

NOTE: The turbo setting has no effect when the resolution is set
below 300 dpi.
●
Print quality: Select Fast, Normal, or Best.
NOTE: If you set the scan quality to Auto, the print-quality setting that
you select determines the scan resolution (as described above).
7. Press the OK button.
Print-quality settings for printing from a file
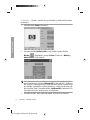
1. Press the Print tab.
2. Press the Settings button. The Print Settings dialog box appears:
3. Select from the following print settings:
●
Print quality: Press the Print quality button to select a Fast, Normal,
or Best print-quality setting.
●
Ink printer original: This setting is used to improve the quality of your
copy or print if the original you want to scan has been printed with an
inkjet printer.
12 Chapter 2 Basic Operations
Basic Operations
HP DesignJet Information Engineering

●
Black ink only: This setting is used to create true- and neutral-graytone
output from graytone image files.
NOTE: The use of this setting can result in output that is more grainy
than graytone output which was created with colored inks.
●
Optimize for drawing: This setting is recommended for text and
drawings.
NOTE: The use of this setting for documents which contain pictures can
result in reduced image quality.
●
Max detail: This setting is used for enhancing detailed graphics, such as
maps and certain CAD drawings.
NOTE: The use of this setting for documents which contain pictures can
result in reduced image quality.
4. Press the OK button.
NOTE: The availability of these options depends on the printer model.
Scan-quality settings
1. Press the Scan tab.
Set the output quality
13
Basic Operations
HP DesignJet Information Engineering

2. Press the Scan resolution button. The Quality dialog box appears:
3. Select from the following quality settings:
●
Scan resolution: Manually set the scan resolution in dots per inch (dpi).
●
Auto: The system determines the best scan resolution based on the print
quality (Fast, Normal, or Best) that you select. The resolution setting (in
dpi) is displayed next to the Auto checkbox (200 dpi in the example
above).
NOTE: The system determines the scan resolution based on the print-
quality that you select, however the print-quality setting is not actually
used in the scan-to-network process.
●
Descreen: The scanner scans with the optical resolution and relays the
data to the system. The software then sets the optimal resolution value.
NOTE: The Descreen setting gives the best results when scanning
raster images (non-vector images, such as .jpeg, .tiff, and .pdf files),
however the scanning speed is reduced.
●
Turbo: The Turbo setting increases the rate at which the paper is fed
and reduces the amount of scanning data that is captured, which means
the scanning speed increases, but the image quality decreases. To use
the Turbo setting, first manually set the scan resolution, and then
select Turbo.
NOTE: The turbo setting has no effect when the resolution is set below
300 dpi.
4. Press the OK button.
14 Chapter 2 Basic Operations
Basic Operations
HP DesignJet Information Engineering

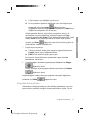
Copy a document
1. If you do not already have a media profile for the paper type you are planning
to use, you must create one. See
Create a new media profile on page 6.
2. Insert your document.
a. Place the document face down with the top edge forward in the scanner
insertion slot. Align the center of the document with the center of the
insertion slot.
b. Slide the document gently into the insertion slot until you feel it pulled into
the starting position.
3. Select color or black-and-white copying.
Your selection determines which type-of-original templates are available in the
following step.
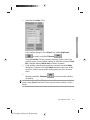
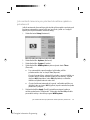
4. Select the type-of-original template.
a. Press the Copy tab.
Copy a document
15
Basic Operations
HP DesignJet Information Engineering

b. Press the Type of original button. The Type of original dialog box
appears:
c. Select a type-of-original template that best describes your current input.
d. If you want to change the settings for any of these options, or want to
create a new option, press the Tool button
. To save the new
configuration, press the New button and enter a name for it.
NOTE: If you change any of the original template settings, the Type of
Original dialog box shows the symbol “*” next to the template name to
denote that changes have been made. For example, changes made to
the CAD template appear in the dialog box as “CAD*”.
5. Select the input size.
a. Press the Copy tab.
16 Chapter 2 Basic Operations
Basic Operations
HP DesignJet Information Engineering
Sayfa yükleniyor...
Sayfa yükleniyor...
Sayfa yükleniyor...
Sayfa yükleniyor...
Sayfa yükleniyor...
Sayfa yükleniyor...
Sayfa yükleniyor...
Sayfa yükleniyor...
Sayfa yükleniyor...
Sayfa yükleniyor...
Sayfa yükleniyor...
Sayfa yükleniyor...
Sayfa yükleniyor...
Sayfa yükleniyor...
Sayfa yükleniyor...
Sayfa yükleniyor...
Sayfa yükleniyor...
Sayfa yükleniyor...
Sayfa yükleniyor...
Sayfa yükleniyor...
Sayfa yükleniyor...
Sayfa yükleniyor...
Sayfa yükleniyor...
Sayfa yükleniyor...
Sayfa yükleniyor...
Sayfa yükleniyor...
Sayfa yükleniyor...
Sayfa yükleniyor...
Sayfa yükleniyor...
Sayfa yükleniyor...
Sayfa yükleniyor...
Sayfa yükleniyor...
Sayfa yükleniyor...
Sayfa yükleniyor...
Sayfa yükleniyor...
Sayfa yükleniyor...
Sayfa yükleniyor...
Sayfa yükleniyor...
Sayfa yükleniyor...
Sayfa yükleniyor...
Sayfa yükleniyor...
Sayfa yükleniyor...
Sayfa yükleniyor...
Sayfa yükleniyor...
Sayfa yükleniyor...
Sayfa yükleniyor...
Sayfa yükleniyor...
Sayfa yükleniyor...
Sayfa yükleniyor...
Sayfa yükleniyor...
Sayfa yükleniyor...
Sayfa yükleniyor...
Sayfa yükleniyor...
Sayfa yükleniyor...
Sayfa yükleniyor...
Sayfa yükleniyor...
Sayfa yükleniyor...
Sayfa yükleniyor...
Sayfa yükleniyor...
Sayfa yükleniyor...
Sayfa yükleniyor...
Sayfa yükleniyor...
Sayfa yükleniyor...
Sayfa yükleniyor...
Sayfa yükleniyor...
Sayfa yükleniyor...
Sayfa yükleniyor...
Sayfa yükleniyor...
Sayfa yükleniyor...
Sayfa yükleniyor...
Sayfa yükleniyor...
Sayfa yükleniyor...
Sayfa yükleniyor...
Sayfa yükleniyor...
Sayfa yükleniyor...
Sayfa yükleniyor...
Sayfa yükleniyor...
Sayfa yükleniyor...
Sayfa yükleniyor...
Sayfa yükleniyor...
Sayfa yükleniyor...
Sayfa yükleniyor...
Sayfa yükleniyor...
Sayfa yükleniyor...
Sayfa yükleniyor...
Sayfa yükleniyor...
Sayfa yükleniyor...
Sayfa yükleniyor...
Sayfa yükleniyor...
Sayfa yükleniyor...
Sayfa yükleniyor...
Sayfa yükleniyor...
Sayfa yükleniyor...
Sayfa yükleniyor...
Sayfa yükleniyor...
Sayfa yükleniyor...
Sayfa yükleniyor...
Sayfa yükleniyor...
Sayfa yükleniyor...
Sayfa yükleniyor...
Sayfa yükleniyor...
Sayfa yükleniyor...
Sayfa yükleniyor...
Sayfa yükleniyor...
Sayfa yükleniyor...
Sayfa yükleniyor...
Sayfa yükleniyor...
Sayfa yükleniyor...
Sayfa yükleniyor...
Sayfa yükleniyor...
Sayfa yükleniyor...
Sayfa yükleniyor...
Sayfa yükleniyor...
Sayfa yükleniyor...
Sayfa yükleniyor...
Sayfa yükleniyor...
Sayfa yükleniyor...
Sayfa yükleniyor...
Sayfa yükleniyor...
Sayfa yükleniyor...
Sayfa yükleniyor...
Sayfa yükleniyor...
Sayfa yükleniyor...
Sayfa yükleniyor...
Sayfa yükleniyor...
Sayfa yükleniyor...
Sayfa yükleniyor...
Sayfa yükleniyor...
Sayfa yükleniyor...
Sayfa yükleniyor...
Sayfa yükleniyor...
Sayfa yükleniyor...
Sayfa yükleniyor...
Sayfa yükleniyor...
Sayfa yükleniyor...
Sayfa yükleniyor...
Sayfa yükleniyor...
Sayfa yükleniyor...
Sayfa yükleniyor...
Sayfa yükleniyor...
Sayfa yükleniyor...
Sayfa yükleniyor...
Sayfa yükleniyor...
Sayfa yükleniyor...
Sayfa yükleniyor...
Sayfa yükleniyor...
Sayfa yükleniyor...
Sayfa yükleniyor...
Sayfa yükleniyor...
Sayfa yükleniyor...
Sayfa yükleniyor...
Sayfa yükleniyor...
Sayfa yükleniyor...
Sayfa yükleniyor...
Sayfa yükleniyor...
Sayfa yükleniyor...
Sayfa yükleniyor...
Sayfa yükleniyor...
Sayfa yükleniyor...
Sayfa yükleniyor...
Sayfa yükleniyor...
Sayfa yükleniyor...
Sayfa yükleniyor...
Sayfa yükleniyor...
Sayfa yükleniyor...
Sayfa yükleniyor...
Sayfa yükleniyor...
Sayfa yükleniyor...
Sayfa yükleniyor...
Sayfa yükleniyor...
Sayfa yükleniyor...
Sayfa yükleniyor...
Sayfa yükleniyor...
Sayfa yükleniyor...
Sayfa yükleniyor...
Sayfa yükleniyor...
Sayfa yükleniyor...
Sayfa yükleniyor...
Sayfa yükleniyor...
Sayfa yükleniyor...
Sayfa yükleniyor...
Sayfa yükleniyor...
Sayfa yükleniyor...
Sayfa yükleniyor...
Sayfa yükleniyor...
Sayfa yükleniyor...
Sayfa yükleniyor...
Sayfa yükleniyor...
Sayfa yükleniyor...
Sayfa yükleniyor...
Sayfa yükleniyor...
Sayfa yükleniyor...
Sayfa yükleniyor...
Sayfa yükleniyor...
Sayfa yükleniyor...
Sayfa yükleniyor...
Sayfa yükleniyor...
Sayfa yükleniyor...
Sayfa yükleniyor...
Sayfa yükleniyor...
Sayfa yükleniyor...
Sayfa yükleniyor...
Sayfa yükleniyor...
Sayfa yükleniyor...
Sayfa yükleniyor...
Sayfa yükleniyor...
Sayfa yükleniyor...
Sayfa yükleniyor...
Sayfa yükleniyor...
Sayfa yükleniyor...
Sayfa yükleniyor...
Sayfa yükleniyor...
Sayfa yükleniyor...
Sayfa yükleniyor...
Sayfa yükleniyor...
Sayfa yükleniyor...
Sayfa yükleniyor...
Sayfa yükleniyor...
Sayfa yükleniyor...
Sayfa yükleniyor...
Sayfa yükleniyor...
Sayfa yükleniyor...
Sayfa yükleniyor...
Sayfa yükleniyor...
Sayfa yükleniyor...
Sayfa yükleniyor...
Sayfa yükleniyor...
Sayfa yükleniyor...
Sayfa yükleniyor...
Sayfa yükleniyor...
Sayfa yükleniyor...
Sayfa yükleniyor...
Sayfa yükleniyor...
Sayfa yükleniyor...
Sayfa yükleniyor...
Sayfa yükleniyor...
Sayfa yükleniyor...
Sayfa yükleniyor...
Sayfa yükleniyor...
Sayfa yükleniyor...
Sayfa yükleniyor...
Sayfa yükleniyor...
Sayfa yükleniyor...
Sayfa yükleniyor...
Sayfa yükleniyor...
Sayfa yükleniyor...
Sayfa yükleniyor...
Sayfa yükleniyor...
Sayfa yükleniyor...
Sayfa yükleniyor...
Sayfa yükleniyor...
Sayfa yükleniyor...
Sayfa yükleniyor...
Sayfa yükleniyor...
Sayfa yükleniyor...
Sayfa yükleniyor...
Sayfa yükleniyor...
Sayfa yükleniyor...
Sayfa yükleniyor...
Sayfa yükleniyor...
-
 1
1
-
 2
2
-
 3
3
-
 4
4
-
 5
5
-
 6
6
-
 7
7
-
 8
8
-
 9
9
-
 10
10
-
 11
11
-
 12
12
-
 13
13
-
 14
14
-
 15
15
-
 16
16
-
 17
17
-
 18
18
-
 19
19
-
 20
20
-
 21
21
-
 22
22
-
 23
23
-
 24
24
-
 25
25
-
 26
26
-
 27
27
-
 28
28
-
 29
29
-
 30
30
-
 31
31
-
 32
32
-
 33
33
-
 34
34
-
 35
35
-
 36
36
-
 37
37
-
 38
38
-
 39
39
-
 40
40
-
 41
41
-
 42
42
-
 43
43
-
 44
44
-
 45
45
-
 46
46
-
 47
47
-
 48
48
-
 49
49
-
 50
50
-
 51
51
-
 52
52
-
 53
53
-
 54
54
-
 55
55
-
 56
56
-
 57
57
-
 58
58
-
 59
59
-
 60
60
-
 61
61
-
 62
62
-
 63
63
-
 64
64
-
 65
65
-
 66
66
-
 67
67
-
 68
68
-
 69
69
-
 70
70
-
 71
71
-
 72
72
-
 73
73
-
 74
74
-
 75
75
-
 76
76
-
 77
77
-
 78
78
-
 79
79
-
 80
80
-
 81
81
-
 82
82
-
 83
83
-
 84
84
-
 85
85
-
 86
86
-
 87
87
-
 88
88
-
 89
89
-
 90
90
-
 91
91
-
 92
92
-
 93
93
-
 94
94
-
 95
95
-
 96
96
-
 97
97
-
 98
98
-
 99
99
-
 100
100
-
 101
101
-
 102
102
-
 103
103
-
 104
104
-
 105
105
-
 106
106
-
 107
107
-
 108
108
-
 109
109
-
 110
110
-
 111
111
-
 112
112
-
 113
113
-
 114
114
-
 115
115
-
 116
116
-
 117
117
-
 118
118
-
 119
119
-
 120
120
-
 121
121
-
 122
122
-
 123
123
-
 124
124
-
 125
125
-
 126
126
-
 127
127
-
 128
128
-
 129
129
-
 130
130
-
 131
131
-
 132
132
-
 133
133
-
 134
134
-
 135
135
-
 136
136
-
 137
137
-
 138
138
-
 139
139
-
 140
140
-
 141
141
-
 142
142
-
 143
143
-
 144
144
-
 145
145
-
 146
146
-
 147
147
-
 148
148
-
 149
149
-
 150
150
-
 151
151
-
 152
152
-
 153
153
-
 154
154
-
 155
155
-
 156
156
-
 157
157
-
 158
158
-
 159
159
-
 160
160
-
 161
161
-
 162
162
-
 163
163
-
 164
164
-
 165
165
-
 166
166
-
 167
167
-
 168
168
-
 169
169
-
 170
170
-
 171
171
-
 172
172
-
 173
173
-
 174
174
-
 175
175
-
 176
176
-
 177
177
-
 178
178
-
 179
179
-
 180
180
-
 181
181
-
 182
182
-
 183
183
-
 184
184
-
 185
185
-
 186
186
-
 187
187
-
 188
188
-
 189
189
-
 190
190
-
 191
191
-
 192
192
-
 193
193
-
 194
194
-
 195
195
-
 196
196
-
 197
197
-
 198
198
-
 199
199
-
 200
200
-
 201
201
-
 202
202
-
 203
203
-
 204
204
-
 205
205
-
 206
206
-
 207
207
-
 208
208
-
 209
209
-
 210
210
-
 211
211
-
 212
212
-
 213
213
-
 214
214
-
 215
215
-
 216
216
-
 217
217
-
 218
218
-
 219
219
-
 220
220
-
 221
221
-
 222
222
-
 223
223
-
 224
224
-
 225
225
-
 226
226
-
 227
227
-
 228
228
-
 229
229
-
 230
230
-
 231
231
-
 232
232
-
 233
233
-
 234
234
-
 235
235
-
 236
236
-
 237
237
-
 238
238
-
 239
239
-
 240
240
-
 241
241
-
 242
242
-
 243
243
-
 244
244
-
 245
245
-
 246
246
-
 247
247
-
 248
248
-
 249
249
-
 250
250
-
 251
251
-
 252
252
-
 253
253
-
 254
254
-
 255
255
-
 256
256
-
 257
257
-
 258
258
-
 259
259
-
 260
260
-
 261
261
-
 262
262
-
 263
263
-
 264
264
-
 265
265
-
 266
266
-
 267
267
-
 268
268
-
 269
269
-
 270
270
-
 271
271
-
 272
272
-
 273
273
-
 274
274
-
 275
275
-
 276
276
-
 277
277
-
 278
278
-
 279
279
-
 280
280


HP DesignJet 4500 Printer series Başvuru Kılavuzu
- Kategori
- Yazdır
- Tip
- Başvuru Kılavuzu
- Bu kılavuz aynı zamanda aşağıdakiler için de uygundur:
diğer dillerde
İlgili makaleler
-
HP DesignJet 820 MFP series Başvuru Kılavuzu
-
HP DesignJet T1120 SD Multifunction Printer series Başvuru Kılavuzu
-
HP DesignJet T2600 Multifunction Printer series Kullanici rehberi
-
-
HP PageWide XL 4700 Printer series Kullanici rehberi
-
-
-
-
-