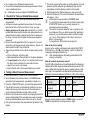
Microlife Bluetooth® blood pressure monitor Kullanım kılavuzu
- Kategori
- Kan basıncı birimleri
- Tip
- Kullanım kılavuzu

IB BP A7 Touch BT S-V11 2021
Revision Date: 2021-05-10
BP
A7 Touch BT
Bluetooth
®
Blood Pressure Monitor
EN
ES
1
9
FR
IT
19
29
DE
TR
39
49
PT
NL
57
67
GR
AR
75
84
FA
92
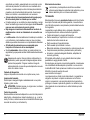
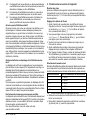
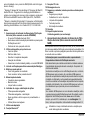
Preparation
Sit on a back-supported chair and keep your legs uncrossed. / Siéntese en una silla con
respaldo y mantenga las piernas descritas. / Asseyez-vous sur une chaise (avec dossier)
et ne croisez pas les jambes. / Sedere su una sedia con schienale e non accavallare le
gambe. / Setzen Sie sich auf einen Stuhl mit Rückenlehnen und kreuzen Sie die Beine
nicht. / Arkası destekli bir sandalyeye oturunuz ve bacak bacak üzerine atmayınız. /
Sente-se numa cadeira com encosto e não cruze as pernas. /
Ga op een stoel zitten
met rugleuning en kruis uw benen niet. / Καθίστε σε καρέκλα με πλάτη και
μην σταυρώνετε τα πόδια σας. /
1.
3.
5.
2.
4.
6.
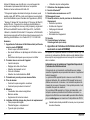
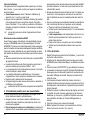
Fit the cuff closely, but not too tight. / Ajuste el brazalete de cerca, pero no demasiado
apretado. / Ajustez le brassard mais ne pas trop serrer. / Indossare il bracciale e
stringerlo, ma non troppo. / Legen Sie die Manschette eng aber nicht zu stramm an.
/ Manşonu yakın bir şekilde kapatınız ancak çok sıkmayınız. / Aperte corretamente
a braçadeira, mas não demasiado.
/ Breng de manchet aan rondom uw arm,
maar niet te strak. / Τοποθετήστε την περιχειρίδα εφαρμοστά αλλά όχι πολύ
σφιχτά. /
Avoid thick or close-fitting garments on the upper arm. / Evite prendas gruesas o
ajustadas en la parte superior del brazo. / Évitez les vêtements épais ou ajustés sur
le haut du bras. / Evitare di indossare abiti pesanti o aderenti intorno al braccio. /
Vermeiden Sie dicke oder eng anliegende Kleidungsstücke am Oberarm. / Kolun üst
kısmında sıkan ve dar giysilerden uzak durunuz. / Evite usar roupa grossa ou justa no
braço. /
Vermijd dikke of strak zittende kleding aan uw bovenarm.
/ Αποφύγετε να
φοράτε χοντρά ή στενά ενδύματα στο μπράτσο σας. /
Place the artery-mark on the cuff over your artery. / Coloque la marca de la arteria en
el brazalete sobre su arteria. / Placez le repère d'artère du brassard au niveau de votre
artère. / Posizionare l’indicatore giallo dell’arteria posto sul bracciale in corrispondenza
dell’arteria del braccio./ Platzieren Sie die Arterienmarkierung auf der Manschette über
Ihrer Arterie. / Manşonun üzerindeki arter işaretinini, kolunuzun üzerindeki artere denk
getiriniz. / Coloque a marca existente na braçadeira sobre a artéria do braço
. / Plaats
de manchet met arteriemarkering op uw arterie. /
Τοποθετήστε την ένδειξη
αρτηρίας που βρίσκεται στην περιχειρίδα πάνω από την αρτηρία σας. /
Position the cuff 1-2 cm above your elbow. / Coloque el brazalete 1-2 cm por
encima del codo. / Installez le brassard 1 à 2 cm au dessus de la pliure du coude.
/ Posizionare il bracciale 1-2 cm sopra il gomito. / Positionieren Sie die Manschette
1-2 cm über Ihrem Ellbogen. / Manşonu dirseğinizden 1-2 cm yukarıya yerleştirin. /
Coloque a braçadeira 1-2 cm acima do cotovelo
. / Positioneer de manchet
1-2
cm boven uw elleboog. /
Τοποθετήστε την περιχειρίδα
1-2
εκατοστά πάνω
από τον αγκώνα σας. /
Keep your arm still and do not speak during the measurement. / Mantenga su brazo quieto
y no hable durante la medición. / Ne pas parler et ne pas bouger votre bras pendant la
prise de mesure. / Tenere il braccio fermo e non parlare durante la misurazione. / Halten Sie
Ihren Arm ruhig und sprechen Sie während der Messung nicht. / Kolunuzu sabit tutunuz ve
ölçüm sırasında konuşmayınız.
/ Mantenha o braço imóvel e não fale durante a medição.
/ Houd uw arm stil en spreek niet tijdens de meting. /
Κρατήστε το χέρι σας
ακίνητο και μην μιλάτε κατά τη διάρκεια της μέτρησης. /
/
1-2
-
Microlife AG
Espenstrasse 139
9443 Widnau / Switzerland
www.microlife.com
Microlife UAB
P. Lukšio g. 32,
08222 Vilnius / Lithuania

Start
Stop
+
_
AM
AL
AK
AT
3
8
9
5
4
1
2
6
7
ANAO
AP
AQ
AR
AS
BT
BK
BL
BM
BN
BO
BP
BQ
BR
BS
Microlife BP A7 Touch BT Microlife BP A7 Touch BTMicrolife BP A7 Touch BT Guarantee CardBefore each measurement
Name of Purchaser / Nombre del comprador/
Nom de l'acheteur / Nome del rivenditore / Name
des Käufers / Alıcının adı / Nome do comprador /
Naam koper / Ονοματεπώνυμο αγοραστή /
/
Serial Number / Número de serie/ Numéro
de série / Numero di serie / Serien-Nr. / Seri
numarası / Número de série / Serienummer /
Αριθμός σειράς / /
Date of Purchase / Fecha de compra/ Date
d'achat / Data d’acquisto / Kaufdatum / Satın
alma tarihi / Data da compra / Datum van
aankoop / Ημερομηνία αγοράς / /
Specialist Dealer / Distribuidor especializado/
Revendeur / Categoria rivenditore / Fachhändler /
Uzman satıcı / Revendedor autorizado / Specialist
Dealer / Εξειδικευμένος αντιπρόσωποςa /
/
١٢
AR
ﺔﻟﺎﻔﻜﻟا ﺔﻗﺎﻄﺑ
(ﻲﻔﻠﺨﻟا ءﺎﻄﻐﻟا ﺮﻈﻧا) ﺔﻟﺎﻔﻜﻟا ﺔﻗﺎﻄﺑ
:يﺮﺘﺸﻤﻟا ﻢﺳا
:ﻞﻳدﻮﻤﻟا
:ﻞﺴﻠﺴﺘﻟا ﻢﻗر
:ءاﺮﺸﻟا ﺦﻳرﺎﺗ
:ﺺﺘﺨﻤﻟا ﺮﺟﺎﺘﻟا
١٢
AR
ﺔﻟﺎﻔﻜﻟا ﺔﻗﺎﻄﺑ
(ﻲﻔﻠﺨﻟا ءﺎﻄﻐﻟا ﺮﻈﻧا) ﺔﻟﺎﻔﻜﻟا ﺔﻗﺎﻄﺑ
:يﺮﺘﺸﻤﻟا ﻢﺳا
:ﻞﻳدﻮﻤﻟا
:ﻞﺴﻠﺴﺘﻟا ﻢﻗر
:ءاﺮﺸﻟا ﺦﻳرﺎﺗ
:ﺺﺘﺨﻤﻟا ﺮﺟﺎﺘﻟا
١٢
AR
ﺔﻟﺎﻔﻜﻟا ﺔﻗﺎﻄﺑ
(ﻲﻔﻠﺨﻟا ءﺎﻄﻐﻟا ﺮﻈﻧا) ﺔﻟﺎﻔﻜﻟا ﺔﻗﺎﻄﺑ
:يﺮﺘﺸﻤﻟا ﻢﺳا
:ﻞﻳدﻮﻤﻟا
:ﻞﺴﻠﺴﺘﻟا ﻢﻗر
:ءاﺮﺸﻟا ﺦﻳرﺎﺗ
:ﺺﺘﺨﻤﻟا ﺮﺟﺎﺘﻟا
١٢
AR
ﺔﻟﺎﻔﻜﻟا ﺔﻗﺎﻄﺑ
(ﻲﻔﻠﺨﻟا ءﺎﻄﻐﻟا ﺮﻈﻧا) ﺔﻟﺎﻔﻜﻟا ﺔﻗﺎﻄﺑ
:يﺮﺘﺸﻤﻟا ﻢﺳا
:ﻞﻳدﻮﻤﻟا
:ﻞﺴﻠﺴﺘﻟا ﻢﻗر
:ءاﺮﺸﻟا ﺦﻳرﺎﺗ
:ﺺﺘﺨﻤﻟا ﺮﺟﺎﺘﻟا
1.
2.
3.
Avoid eating, bathing, smoking or caffeine (approx. 30 min).
Evite comer, bañarse, fumar o cafeína (aproximadamente 30 minutos).
Évitez de manger, de vous baigner, de fumer ou do consommer des produits contenant de
la caféine pendant environ 30 minutes.
Evitare di mangiare, fare il bagno, fumare o bere caffè (almeno 30 min.)
Vermeiden Sie essen, baden, rauchen oder Koffein (ca. 30 min).
Yeme, içme, duş alma, sigarak içme ve kefeinden uzak durunuz (yaklaşık 30 dak.)
Evite comer, tomar banho, fumar ou ingerir cafeína (cerca de 30 min).
Vermijd eten, baden, roken of het nuttigen van caffeine (ca. 30 minuten).
Αποφύγετε τη κατανάλωση φαγητού, το μπάνιο, το κάπνισμα ή την καφεΐνη (περίπου 30
λεπτά)
30
Avoid activity and relax for 5-10 min.
Evite la actividad y relájese durante 5-10 min.
Évitez toute activité et détendez-vous pendant 5 à 10 min
Evitare di fare attività fisica e rilassarsi per 5-10 minuti.
Vermeiden Sie Bewegung und entspannen Sie sich für 5-10 Min.
Spordan kaçınınız ve 5-10 dakika dinlenmiş olunuz.
Evite a atividade física e relaxe 5-10 min.
Vermijd beweging en ontspan voor 5-10 minuten.
Αποφύγετε τη σωματική δραστηριότητα και χαλαρώστε για 5-10 λεπτά
5-10
Measure before medication intake.
Mida antes de tomar medicamentos.
Ne pas prendre de médicament avant de mesurer votre tension.
Effettuare la misurazione prima di assumere farmaci.
Messen Sie bevor Sie Medikamente einnehmen.
İlaç alımından önce ölçüm yapınız.
Proceda à medição antes de tomar medicação.
Meet alvorens u medicatie inneemt.
Πραγματοποιήστε τη μέτρηση πριν από τη λήψη φαρμάκων

1BP A7 Touch BT
EN
Display
Read the instructions carefully before using this device.
Type BF applied part
Intended use:
This oscillometric blood pressure monitor is intended for measuring
non-invasive blood pressure in people aged 12 years or older.
It is clinically validated in patients with hypertension, hypotension,
diabetes, pregnancy, pre-eclampsia, atherosclerosis, end-stage
renal disease, obesity and the elderly.
The device can detect an irregular pulse suggestive of Atrial Fibril-
lation (AF). Please note that the device is not intended to diagnose
AF. A diagnosis of AF can only be confirmed by ECG. The patient
is advised to see a physician.
Dear Customer,
This device was developed in collaboration with physicians and
clinical tests carried out prove its measurement accuracy to be of
a very high standard.*
Microlife AFIBsens is the world’s leading digital blood pressure
measurement technology for the detection of atrial fibrillation (AF)
and arterial hypertension. These are the two top risk factors of
getting a stroke or heart disease. It is important to detect AF and
hypertension at an early stage, even though you may not experi-
ence any symptoms. AF screening in general and thus also with
the Microlife AFIB algorithm, is recommended for people of 65
years and older. The AFIB algorithm indicates that atrial fibrillation
may be present. For this reason, it is recommended that you visit
your doctor when the device gives an AFIB signal during your
blood pressure measurement. The AFIB algorithm of Microlife has
been clinically investigated by several prominent clinical investiga-
tors and showed that the device detects patients with AFIB at a
certainty of 97-100%.
1,2
If you have any questions, problems or want to order spare parts
please contact your local Microlife-Customer Service. Your dealer
or pharmacy will be able to give you the address of the Microlife
dealer in your country. Alternatively, visit the internet at
www.microlife.com where you will find a wealth of invaluable infor-
mation on our products.
Stay healthy – Microlife AG!
* This device uses the same measuring technology as the award
winning «BP 3BTO-A» model tested according to the British and
Irish Hypertension Society (BIHS) protocol.
1
Kearley K, Selwood M, Van den Bruel A, Thompson M, Mant D,
Hobbs FR et al.: Triage tests for identifying atrial fibrillation in
primary care: a diagnostic accuracy study comparing single-lead
ECG and modified BP monitors. BMJ Open 2014; 4:e004565.
Microlife BP A7 Touch BT
EN
1
Enter
2
Display
3
Lock Switch
4
Cuff Socket
5
AFIB/MAM Switch
6
+ «Forward» Button
7
- «Backward» Button
8
USB Port
9
Mains Adapter Socket
AT
Battery Compartment
AK
Cuff
AL
Cuff Connector
AM
Cuff Tube
AN
START/STOP Button
AO
M-button (memory)
AP
Systolic Value
AQ
Diastolic Value
AR
Pulse Rate
AS
Battery Display
BT
Cuff Check Indicator
BK
Arm Movement Indicator
BL
Atrial Fibrillation Indicator (AFIB)
BM
User Indicator
BN
AFIB/MAM Mode
BO
AFIB/MAM Interval Time
BP
Traffic Light Indicator
BQ
Date/Time
BR
Pulse Indicator
BS
Active Bluetooth
®
Keep dry

2
2
Wiesel J, Arbesfeld B, Schechter D: Comparison of the Microlife
blood pressure monitor with the Omron blood pressure monitor for
detecting atrial fibrillation. Am J Cardiol 2014; 114:1046-1048.
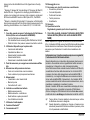
Table of Contents
1. Appearance of the Atrial Fibrillation Indicator for early
Detection (Active only in AFIB/MAM mode)
• What is Atrial Fibrillation (AF)?
• Who should be screened for Atrial Fibrillation?
• Risk factors you can control
2. Using the Device for the First Time
• Inserting the batteries
• Setting the date and time
• Selecting the correct cuff
• Selecting the user
• Selecting standard or AFIB/MAM mode
3. Checklist for Taking a Reliable Measurement
4. Taking a Blood Pressure Measurement
• How not to store a reading
• How do I evaluate my blood pressure?
5. Data Memory
• Viewing the stored values
• Memory full
• Clearing all values
6. Battery Indicator and Battery change
• Low battery
• Flat battery – replacement
• Which batteries and which procedure?
• Using rechargeable batteries
7. Using a Mains Adapter
8. Bluetooth
®
Function
9. PC-Link Functions
10. Error Messages
11. Safety, Care, Accuracy Test and Disposal
• Safety and protection
• Device care
• Cleaning the cuff
• Accuracy test
• Disposal
12. Guarantee
13. Technical Specifications
Guarantee Card (see Back Cover)
1. Appearance of the Atrial Fibrillation Indicator for
early Detection (Active only in AFIB/MAM mode)
This device is able to detect atrial fibrillation (AF). This symbol BL
indicates that atrial fibrillation was detected during the measure-
ment. Please refer to the next paragraph for information regarding
the consultation with your doctor.
Keep the arm still during measuring to avoid false readings.
This device may not or wrongly detect atrial fibrillation in
people with pacemakers or defibrillators.
In the presence of atrial fibrillation the diastolic blood pressure
value may not be accurate.
In the presence of atrial fibrillation using
AFIB/MAM
-mode is
recommended for more reliable blood pressure measure-
ment.
What is Atrial Fibrillation (AF)?
Normally, your heart contracts and relaxes to a regular beat. Certain
cells in your heart produce electrical signals that cause the heart to
contract and pump blood. Atrial fibrillation occurs when rapid, disorga-
nized electrical signals are present in the heart’s two upper chambers,
called the atria; causing them to contract irregularly (this is called fibril-
lation). Atrial fibrillation is the most common form of heart arrhythmia.
Information for the doctor on frequent appearance of the
atrial fibrillation indicator
This device is an oscillometric blood pressure monitor that also
analyses pulse irregularity during measurement. The device is
clinically tested.
The AFIB symbol is displayed after the measurement, if atrial
fibrillation occurred during measuring. If the AFIB symbol
appears after having performed a full blood pressure measure-
ment episode (triplicate measurements), the patient is advised to
perform another measurement episode (triplicate measure-
ments). If the AFIB symbol appears again, we recommend the
patient to seek medical advice.
If the AFIB-symbol appears on the screen of the blood pressure
monitor, it indicates the possible presence of atrial fibrillation.
The atrial fibrillation diagnosis however, must be made by a
cardiologist based on ECG interpretation.

3BP A7 Touch BT
EN
It often causes no symptoms, yet it significantly increases your risk of
stroke. You’ll need a doctor to help you control the problem.
Who should be screened for Atrial Fibrillation?
AF screening is recommended for people over 65 years of age, since
the chance of having a stroke increases with age. AF screening is
also recommended for people from the age of 50 years who have
high blood pressure (e.g. SYS higher than 159 or DIA higher than 99)
as well as those with diabetes, coronary heart failure or for those who
have previously had a stroke.
In young people or in pregnancy AF screening is not recommended
as it could generate false results and unnecessary anxiety. In addi-
tion, young individuals with AF have a low risk of getting stroke as
compared to elder people.
Risk factors you can control
Early diagnosis of AF followed by adequate treatment can signifi-
cantly reduce the risk of getting stroke. Knowing your blood pressure
and knowing whether you have AF is the first step in proactive stroke
prevention.
For more information visit our website: www.microlife.com/afib.
2. Using the Device for the First Time
Inserting the batteries
After you have unpacked your device, first insert the batteries. The
battery compartment
AT
is on the bottom of the device. Insert the
batteries (4 x 1.5 V, size
AAA
), thereby observing the indicated
polarity.
Setting the date and time
1. After the new batteries are fitted, the year number flashes in the
display. You can set the year by pressing either the «+» 6 or
the «-» 7 button. To confirm and then set the month, press
enter 1.
2. Press the «+» 6 or the «-» 7 button to set the month. Press
enter 1 to confirm and then set the day.
3. Follow the instructions above to set the day, hour and minutes.
4. Once you have set the minutes and pressed the time button, the
date and time are set and the time is displayed.
5. If you want to change the date and time, press and hold Date/
Time
BQ
for approx. 3 seconds until the year number starts
flashing. Now you can enter the new values as described above.
Selecting the correct cuff
Microlife offers different cuff sizes. Select the cuff size to match the
circumference of your upper arms (measured by close fitting in the
centre of the upper arm).
Only use Microlife cuffs.
Contact your local Microlife Service if the enclosed cuff AK does
not fit.
Connect the cuff to the device by inserting the cuff connector AL
into the cuff socket 4 as far as it will go.
Selecting the user
This device allows to store the results for 2 individual users. In
addition, there is a guest mode in which results are not stored.
Before each measurement, set the user indicator BM for the
intended user: user 1, user 2 or guest mode.
Press and hold the user indicator BM for approx. 2 seconds until
the user symbol starts flashing. Now select user 1, user 2 or
guest mode by pressing the user indicator again. Wait 2-
3 seconds to confirm your selection.
The first person to measure should select user 1.
Selecting standard or AFIB/MAM mode
Before each measurement, select standard (single measurement)
or AFIB/MAM mode (automatic triple measurement). In AFIB/MAM
mode, 3 measurements are automatically taken in succession and
the result is then automatically analysed and displayed. Because
the blood pressure constantly fluctuates, a result obtained in this
way is more reliable than when a single measurement is
performed.
When you select the 3 measurements, the AFIB/MAM-symbol
BN appears in the display.
The bottom, right hand section of the display shows a 1, 2 or 3 to
indicate which of the 3 measurements is currently being taken.
There is a break of 15 seconds between the measurements.
A count down indicates the remaining time.
The individual results are not displayed. Your blood pressure will
only be displayed after all 3 measurements are taken.
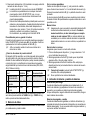
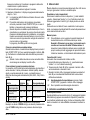
Cuff size for circumference of upper arm
S 17 - 22 cm
M 22 - 32 cm
M - L 22 - 42 cm
L 32 - 42 cm
L - XL 32 - 52 cm

4
Do not remove the cuff between measurements.
If one of the individual measurements was questionable, a fourth
one is automatically taken.
AF detection is only activated in AFIB/MAM mode.
3. Checklist for Taking a Reliable Measurement
Avoid activity, eating or smoking immediately before the
measurement.
Sit down on a back-supported chair and relax for 5 minutes.
Keep the feet flat on the floor and do not cross your legs.
Always measure on the same arm (normally left). It is recom-
mended that doctors perform double arm measurements on a
patients first visit in order to determine which arm to measure in
the future. The arm with the higher blood pressure should be
measured.
Remove close-fitting garments from the upper arm. To avoid
constriction, shirt sleeves should not be rolled up - they do not
interfere with the cuff if they are laid flat.
Always ensure that the correct cuff size is used (marking on the
cuff).
Fit the cuff closely, but not too tight.
Make sure that the cuff is positioned 1-2 cm above the elbow.
The artery mark on the cuff (ca. 3 cm long bar) must lie over
the artery which runs down the inner side of the arm.
Support your arm so it is relaxed.
Ensure that the cuff is at the same height as your heart.
4. Taking a Blood Pressure Measurement
1. Slide the lock switch 3 down to the «unlock» position.
2. Select standard (single measurement) or AFIB/MAM mode
(automatic triple measurement): see details in chapter «2.».
3. Press the START/STOP button AN to start the measurement.
4. The cuff will now pump up automatically. Relax, do not move
and do not tense your arm muscles until the measurement
result is displayed. Breathe normally and do not talk.
5. When the correct pressure is reached, the pumping stops and the
pressure falls gradually. If the required pressure was not reached,
the device will automatically pump some more air into the cuff.
6. During the measurement, the pulse indicator BR flashes in the
display.
7. The result, comprising the systolic AP and the diastolic AQ blood
pressure and the pulse rate AR is displayed. Note also the
explanations on further display symbols in this booklet.
8. When the device has finished measuring, remove the cuff.
9. Switch off the device. (The monitor does switch off automatically
after approx. 1 min.).
AF detection is only activated in AFIB/MAM mode.
You can stop the measurement at any time by pressing the
START/STOP button (e.g. if you feel uneasy or an
unpleasant pressure sensation).
This monitor is specially tested for use in pregnancy and
pre-eclampsia. When you detect unusual high readings in
pregnancy, you should measure after a short while again
(eg. 1 hour). If the reading is still too high, consult your
doctor or gynecologist.
In pregnancy the AFIB symbol can be ignored.
How not to store a reading
As soon as the reading is displayed press and hold the START/
STOP button AN until «M» AO is flashing. Confirm to delete the
reading by pressing the M-button AO.
«CL» is displayed when the reading is deleted from the
memory successfully.
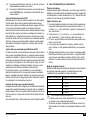
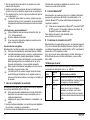
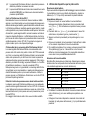
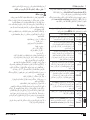
How do I evaluate my blood pressure?
The LED traffic light indicator on the left-hand side of the display
BP
indicates within which range the measured blood pressure lies. The
value is either within the optimum (green), elevated (yellow) or high
(red) range. The classification corresponds to the following ranges
defined by international guidelines (
ESH, ESC, JSH
). Data in mmHg.
The higher value is the one that determines the evaluation.
Example: a blood pressure value of 140/80 mmHg or a value of
130/90 mmHg indicates «blood pressure too high».
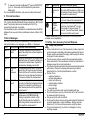
Range Systolic Diastolic Recommendation
1. blood pressure
too high
≥135 ≥85 Seek medical
advice
2. blood pressure
elevated
130 - 134 80 - 84 Self-check
3. blood pressure
normal
<130 <80 Self-check

5BP A7 Touch BT
EN
5. Data Memory
This device automatically stores up to 99 measurement values for
each of the 2 users and guest mode.
Viewing the stored values
Switch the lock switch 3 to «unlock» position. Select either user
1 or 2 with the user indicator BM. Press the M-button AO briefly. The
display shows an average value.
Pressing the M-button again displays the previous value. Pressing
the M-button repeatedly enables you to move from one stored
value to another.
Memory full
Pay attention that the maximum memory capacity of 99
memories per user is not exceeded.
When the 99 memory is
full, the oldest value is automatically overwritten with the
100th value.
Values should be evaluated by a doctor before
the memory capacity is reached – otherwise data will be lost.
Clearing all values
Make sure the correct user is activated.
1. Firstly unlock the device 3, then select either 1 or 2 with the
user indicator BM.
2. Hold down the M-button
AO
until «
CL
» appears and then release
the button.
3. Press the M-button while «CL» is flashing to permanently clear
all values of the selected user.
Cancel deletion:
press START/STOP button
AN
while «
CL
»
is flashing.
Individual values cannot be cleared.
6. Battery Indicator and Battery change
Low battery
When the batteries are approximately ¾ empty the battery symbol
AS
will flash as soon as the device is switched on (partly filled battery
displayed). Although the device will continue to measure reliably, you
should obtain replacement batteries.
Flat battery – replacement
When the batteries are flat, the battery symbol AS will flash as soon
as the device is switched on (flat battery displayed). You cannot
take any further measurements and must replace the batteries.
1. Open the battery compartment AT at the back of the device.
2. Replace the batteries – ensure correct polarity as shown by the
symbols in the compartment.
3. To set date and time, follow the procedure described in
«Section 2.».
The memory retains all values although date and time must
be reset – the year number therefore flashes automatically
after the batteries are replaced.
Which batteries and which procedure?
Use 4 new, long-life 1.5 V, size AAA alkaline batteries.
Do not use batteries beyond their date of expiry.
Remove batteries if the device is not going to be used for a
prolonged period.
Using rechargeable batteries
You can also operate this device using rechargeable batteries.
Only use «NiMH» type reusable batteries.
Batteries must be removed and recharged when the flat
battery symbol appears. They should not remain inside the
device as they may become damaged (total discharge as a
result of low use of the device, even when switched off).
Always remove the rechargeable batteries if you do not
intend to use the device for a week or more.
Batteries cannot be charged in the blood pressure monitor.
Recharge batteries in an external charger and observe the
information regarding charging, care and durability.
7. Using a Mains Adapter
You can operate this device using the Microlife mains adapter
(DC 6V, 600 mA).
Only use the
Microlife
mains adapter available as an original
accessory appropriate for your supply voltage.
Ensure that neither the mains adapter nor the cable are
damaged.
1. Plug the adapter cable into the mains adapter socket 9 in the
blood pressure monitor.
2. Plug the adapter plug into the wall socket.
When the mains adapter is connected, no battery current is consumed.
8. Bluetooth
®
Function
This device can be used in conjunction with a smartphone running
the «Microlife Connected Health+» App. The Bluetooth
®
connec-
tion is automatically active after the measurement has been
completed.

6
To manually activate the Bluetooth
®
, press START/STOP
AN for 5 - 6 seconds until the Bluetooth symbol starts
flashing BS.
For more detailed information visit www.microlife.com/connect.
9. PC-Link Functions
This device can be used in conjunction with a personal computer
(PC) running the Microlife Blood Pressure Analyzer+ (BPA+) soft-
ware. The memory data can be transferred to the PC by
connecting the monitor via a cable.
If no download-voucher and cable is included download the BPA+
software from www.microlife.com/software and use a Micro-USB
cable.
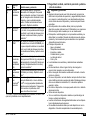
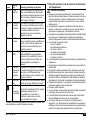
10.Error Messages
If an error occurs during the measurement, the measurement is
interrupted and an error message, e.g. «Err 3», is displayed.
* Please immediately consult your doctor, if this or any other
problem occurs repeatedly.
11.Safety, Care, Accuracy Test and Disposal
Safety and protection
Follow instructions for use. This document provides important
product operation and safety information regarding this device.
Please read this document thoroughly before using the device
and keep for future reference.
This device may only be used for the purposes described in
these instructions. The manufacturer cannot be held liable for
damage caused by incorrect application.
This device comprises sensitive components and must be treated
with caution. Observe the storage and operating conditions
described in the «Technical Specifications» section.
Protect it from:
- water and moisture
- extreme temperatures
- impact and dropping
- contamination and dust
- direct sunlight
- heat and cold
The cuffs are sensitive and must be handled with care.
Do not exchange or use any other kind of cuff or cuff connector
for measuring with this device.
Only pump up the cuff once fitted.
Do not use this device close to strong electromagnetic fields such
as mobile telephones or radio installations. Keep a minimum
distance of 3.3 m from such devices when using this device.
Do not use this device if you think it is damaged or notice
anything unusual.
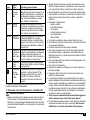
Error Description Potential cause and remedy
«
Err 1
»Signal too
weak
The pulse signals on the cuff are too
weak. Re-position the cuff and repeat the
measurement.*
«
Err 2
»
BK
Error signal
During the measurement, error signals were
detected by the cuff, caused for instance by
movement or muscle tension. Repeat the
measurement, keeping your arm still.
«
Err 3
»
BT
Abnormal
cuff
pressure
An adequate pressure cannot be gener-
ated in the cuff. A leak may have occurred.
Check that the cuff is correctly connected
and is not too loose. Replace the batteries
if necessary. Repeat the measurement.
«
Err 5
» Abnormal
result
The measuring signals are inaccurate and
no result can therefore be displayed. Read
through the checklist for performing reli-
able measurements and then repeat the
measurement.*
«
Err 6
»
AFIB/MAM
Mode
There were too many errors during the
measurement in
AFIB/MAM
mode,
making it impossible to obtain a final
result. Read through the checklist for
performing reliable measurements and
then repeat the measurement.*
«
HI
» Pulse or cuff
pressure too
high
The pressure in the cuff is too high (over
299 mmHg) OR the pulse is too high (over
200 beats per minute). Relax for 5 minutes
and repeat the measurement.*
«
LO
» Pulse too
low
The pulse is too low (less than 40 beats
per minute). Repeat the measurement.*
Problem
with Blue-
tooth
®
connection
If any problem occurs with the Bluetooth
connection, the Bluetooth
®
icon BS
blinks rapidly for approximately 10
seconds. To solve the problem, please
visit www.microlife.com/connect.
Error Description Potential cause and remedy

7BP A7 Touch BT
EN
Never open this device.
If the device is not going to be used for a prolonged period the
batteries should be removed.
Read the additional safety information provided within the indi-
vidual sections of this instruction manual.
The measurement results given by this device is not a diag-
nosis. It is not replacing the need for the consultation of a physi-
cian, especially if not matching the patient’s symptoms. Do not
rely on the measurement result only, always consider other
potentially occurring symptoms and the patient’s feedback.
Calling a doctor or an ambulance is advised if needed.
Permanently high blood pressure values can damage your
health and must be treated by your doctor!
Always discuss your values with your doctor and tell him/her if
you have noticed anything unusual or feel unsure. Never rely
on single blood pressure readings.
Under no circumstances should you alter the dosages of
drugs or initiate a treatment without consulting your doctor.
Deviations between measurements taken by your doctor or in
the pharmacy and those taken at home are quite normal, as
these situations are completely different.
The pulse display is not suitable for checking the
frequency of heart pacemakers!
If you are pregnant, you should monitor your blood pressure
regularly as it can change drastically during this time.
Ensure that children do not use this device unsupervised;
some parts are small enough to be swallowed. Be aware of
the risk of strangulation in case this device is supplied with
cables or tubes.
Device care
Clean the device only with a soft, dry cloth.
Cleaning the cuff
Carefully remove spots on the cuff with a damp cloth and soap-
suds.
WARNING: Under no circumstances may you wash the
inner bladder!
Accuracy test
We recommend this device is tested for accuracy every 2 years or
after mechanical impact (e.g. being dropped). Please contact your
local Microlife-Service to arrange the test (see foreword).
Disposal
Batteries and electronic devices must be disposed of in
accordance with the locally applicable regulations, not with
domestic waste.
12.Guarantee
This device is covered by a 5 year guarantee from the date of
purchase. During this guarantee period, at our discretion, Microlife
will repair or replace the defective product free of charge.
Opening or altering the device invalidates the guarantee.
The following items are excluded from the guarantee:
Transport costs and risks of transport.
Damage caused by incorrect application or non-compliance
with the instructions for use.
Damage caused by leaking batteries.
Damage caused by accident or misuse.
Packaging/storage material and instructions for use.
Regular checks and maintenance (calibration).
Accessories and wearing parts: Batteries, power adapter
(optional).
The cuff is covered by a functional guarantee (bladder tightness)
for 2 years.
Should guarantee service be required, please contact the dealer
from where the product was purchased, or your local Microlife
service. You may contact your local Microlife service through our
website:
www.microlife.com/support
Compensation is limited to the value of the product. The guarantee
will be granted if the complete product is returned with the original
invoice. Repair or replacement within guarantee does not prolong
or renew the guarantee period. The legal claims and rights of
consumers are not limited by this guarantee.

8
13.Technical Specifications
This device complies with the requirements of the Medical Device
Directive 93/42/EEC.
Technical alterations reserved.
The Bluetooth
®
word mark and logos are registered trademarks
owned by Bluetooth SIG, Inc. and any use of such marks by Micro-
life Corp. is under license. Other trademarks and trade names are
those of their respective owners.
Operating conditions:
10 - 40 °C / 50 - 104 °F
15 - 95 % relative maximum humidity
Storage conditions:
-20 - +55 °C / -4 - +131 °F
15 - 95 % relative maximum humidity
Weight:
312
g (including batteries)
Dimensions:
160 x 82 x 35
mm
Measuring procedure:
oscillometric, corresponding to Korotkoff
method: Phase I systolic, Phase V diastolic
Measurement range:
20 - 280
mmHg – blood pressure
40 - 200 beats per minute – pulse
Cuff pressure
display range:
0 - 299 mmHg
Resolution:
1 mmHg
Static accuracy:
pressure within ± 3 mmHg
Pulse accuracy:
± 5 % of the readout value
Communication: Bluetooth
®
4.0
Compatibility: iOS: iOS 10.0 or newer
Android: Android OS 5 or newer
Voltage source:
4 x 1.5 V alkaline batteries; size AAA
Mains adapter DC 6V, 600 mA (optional)
Battery lifetime: approx. 400 measurements
(using new batteries)
IP Class: IP20
Reference to
standards:
EN 1060-1 /-3 /-4; IEC 60601-1;
IEC 60601-1-2 (EMC); IEC 60601-1-11
Expected service life: Device: 5 years or 10000 measurements
Accessories: 2 years

9BP A7 Touch BT
ES
Pantalla
Lea atentamente las instrucciones antes de utilizar este
dispositivo.
Pieza aplicada tipo BF
Uso previsto:
Este monitor de presión arterial oscilométrico está diseñado para
medir la presión arterial no invasiva en personas de 12 años o
más.
Está clínicamente validado en pacientes con hipertensión, hipo-
tensión, diabetes, embarazo, preeclampsia, aterosclerosis, enfer-
medad renal en etapa terminal, obesidad y adultos mayores.
El dispositivo puede detectar un pulso irregular sugestivo de fibri-
lación atrial (FA). Tenga en cuenta que el dispositivo no está dise-
ñado para diagnosticar FA. El diagnóstico de FA solo puede
confirmarse mediante ECG. Se le aconseja al paciente que vea a
un médico.
Estimado cliente,
Este dispositivo ha sido desarrollado en colaboración con médicos
y su muy alta precisión ha sido probada en ensayos clínicos.*
Microlife AFIBsens es la tecnología de medición digital de presión
arterial líder en el mundo para la detección de la fibrilación atrial
(FA) y la hipertensión arterial. Estos son los dos principales
factores de riesgo de sufrir un derrame cerebral o una enfermedad
cardíaca. Es importante detectar la FA y la hipertensión en una
etapa temprana, aunque es posible que no experimente ningún
síntoma. La detección de FA en general y por lo tanto, también con
el algoritmo Microlife AFIB, se recomienda para personas de 65
años en adelante. El algoritmo AFIB indica que la fibrilación atrial
puede estar presente. Por esta razón, se recomienda que visite a
su médico cuando el dispositivo emita una señal AFIB durante la
medición de la presión arterial. El algoritmo AFIB de Microlife ha
sido investigado clínicamente por varios investigadores clínicos
destacados y demostró que el dispositivo detecta pacientes con
AFIB con una certeza de 97-100%.
1,2
Si tiene cualquier pregunta o problema o si desea pedir piezas de
recambio, no dude en contactar con su servicio de atención al
cliente de Microlife local. Su distribuidor o farmacia podrá indicarle
la dirección del distribuidor de Microlife en su país. También puede
visitarnos en Internet en www.microlife.com donde encontrará
información útil sobre nuestros productos.
¡Cuide su salud con Microlife AG!
Microlife BP A7 Touch BT
ES
1
Enter
2
Pantalla
3
Interruptor de bloqueo
4
Enchufe para manguito
5
Interruptor AFIB/MAM
6
Botón «+» (avance)
7
Botón «-» (retroceso)
8
Puerto USB
9
Enchufe para adaptador de corriente
AT
Compartimento de baterías
AK
Brazalete
AL
Conector del manguito
AM
Tubo de brazalete
AN
Botón START/STOP (Encendido/Apagado)
AO
Botón M (Memoria)
AP
Valor sistólico
AQ
Valor diastólico
AR
Frecuencia del pulso
AS
Indicador de batería
BT
Indicador de comprobación del manguito
BK
Indicador de movimiento del brazo
BL
Indicador de la fibrilación auricular (AFIB)
BM
Indicador de usuario
BN
Modo AFIB/MAM
BO
Tiempo de intervalo AFIB/MAM
BP
Indicador de semáforo
BQ
Fecha/Hora
BR
Indicador del pulso
BS
Bluetooth
®
activo
Mantener en lugar seco

10
* Este dispositivo usa la misma tecnología de medición que el
premiado modelo «BP 3BTO-A» probado de acuerdo con el proto-
colo de la Sociedad Británica e Irlandesa de Hipertensión (BIHS).
1
Kearley K, Selwood M, Van den Bruel A, Thompson M, Mant D,
Hobbs FR et al.: Triage tests for identifying atrial fibrillation in
primary care: a diagnostic accuracy study comparing single-lead
ECG and modified BP monitors. BMJ Open 2014; 4:e004565.
2
Wiesel J, Arbesfeld B, Schechter D: Comparison of the Microlife
blood pressure monitor with the Omron blood pressure monitor for
detecting atrial fibrillation. Am J Cardiol 2014; 114:1046-1048.
Índice
1.Aspecto del indicador de fibrilación atrial para la detec-
ción temprana (activo solo en modo AFIB/MAM)
• ¿Qué es fibrilación auricular (FA)?
• ¿Quién debe ser examinado para fibrilación atrial?
• Factores de riesgos que le permite controlar
2. Uso del dispositivo por primera vez
• Colocar las baterías
• Ajuste de fecha y hora
• Elegir el manguito correcto
• Seleccionar el usuario
• Seleccionando el modo estándar o AFIB/MAM
3. Lista de verificación para tomar una medida confiable
4. Medición de la presión arterial
• Procedimiento para no guardar la lectura
• ¿Cómo he de evaluar mi presión arterial?
5. Memoria de datos
• Ver los valores guardados
• Memoria llena
• Borrar todos los valores
6. Indicador de baterías y cambio de baterías
• Baterías con poca carga
• Baterías descargadas – cambio
• ¿Qué baterías y qué procedimiento?
• Uso de baterías recargables
7. Uso de un adaptador de corriente
8. Función Bluetooth
®
9. Funciones de conexión con el PC
10. Mensajes de error
11. Seguridad, cuidado, control de precisión y eliminación de
residuos
• Seguridad y protección
• Cuidado del dispositivo
• Limpieza del brazalete
• Control de precisión
• Eliminación de residuos
12. Garantía
13. Especificaciones técnicas
Tarjeta de garantía (véase reverso)
1. Aspecto del indicador de fibrilación atrial para la
detección temprana (activo solo en modo AFIB/
MAM)
Este dispositivo puede detectar la fibrilación atrial (FA). Este
símbolo BL indica que se detectó fibrilación atrial durante la medi-
ción. Consulte el párrafo siguiente para obtener información sobre
la consulta con su médico.
Mantenga el brazo quieto durante la medición para evitar
lecturas falsas.
Este dispositivo puede detectar o no detectar la fibrilación
atrial en personas con marcapasos o desfibriladores.
Información para su médico en caso de indicación de
fibrilación auricular frecuente
Este dispositivo es un tensiómetro oscilométrico que también
analiza la frecuencia de las pulsaciones durante la medición. El
dispositivo ha sido probado clínicamente.
El símbolo AFIB se muestra después de la medición, si se
produjo fibrilación atrial durante la medición. Si aparece el
símbolo AFIB después de haber realizado un episodio completo
de medición de la presión sanguínea (mediciones por triplicado),
se recomienda al paciente realizar otro episodio de medición
(mediciones por triplicado). Si el símbolo AFIB aparece nueva-
mente, recomendamos que el paciente busque asistencia
médica.
Si el símbolo AFIB aparece en la pantalla del monitor de presión
arterial, indica la posible presencia de fibrilación atrial. Sin
embargo, el diagnóstico de fibrilación atrial debe ser realizado
por un cardiólogo según la interpretación del ECG.

11BP A7 Touch BT
ES
En presencia de fibrilación auricular, el valor de la presión
arterial diastólica puede no ser exacto.
En presencia de fibrilación auricular se recomienda usar el
modo AFIB/MAM para una medición más confiable de la
presión arterial.
¿Qué es fibrilación auricular (FA)?
Normalmente, el corazón se contrae y relaja con un ritmo regular.
Ciertas células del corazón producen señales eléctricas que
hacen que el órgano se contraiga y bombee la sangre. La fibrila-
ción auricular se produce cuando en las dos aurículas (las
cámaras superiores del corazón) se dan señales rápidas e irregu-
lares. Esto hace que las aurículas se contraigan de manera irre-
gular (fibrilación). La fibrilación auricular es la forma más común
de arritmia cardiaca. Si bien a menudo no se manifiesta mediante
síntomas, hace que el riesgo de infarto cerebral aumente signifi-
cativamente. Necesitará la ayuda de un médico para controlar
este problema.
¿Quién debe ser examinado para fibrilación atrial?
La detección de FA se recomienda para personas mayores de 65
años, ya que la posibilidad de tener un accidente cerebrovascular
aumenta con la edad. La detección de FA también se recomienda
para personas mayores de 50 años que tienen presión arterial alta
(por ejemplo, SYS superior a 159 o DIA superior a 99), así como
aquellos con diabetes, insuficiencia cardíaca coronaria o para
aquellos que han tenido un accidente cerebrovascular.
En personas jóvenes o en el embarazo no se recomienda el
examen de detección de FA, ya que podría generar resultados
falsos y ansiedad innecesaria. Además, las personas jóvenes con
fibrilación atrial tienen un riesgo bajo de sufrir un derrame cerebral
en comparación con las personas mayores.
Factores de riesgos que le permite controlar
El diagnóstico precoz de FA seguido de un tratamiento adecuado
puede reducir significativamente el riesgo de sufrir un accidente
cerebrovascular. Conocer su presión arterial y saber si tiene FA es
el primer paso en la prevención proactiva del accidente cerebro-
vascular.
Para más información, visite nuestra web: www.microlife.com/afib.
2. Uso del dispositivo por primera vez
Colocar las baterías
Después de desembalar el dispositivo, en primer lugar, inserte las
baterías. El compartimento de las baterías AT está en la parte infe-
rior del dispositivo. Inserte las baterías (4 x 1,5 V, tamaño AAA) de
acuerdo con las marcas de polaridad indicadas.
Ajuste de fecha y hora
1. Una vez activadas las baterías, el número del año parpadea en
la pantalla. Puede seleccionar el año pulsando el botón «+» 6
o el botón «-» 7. Para confirmarlo y ajustar a continuación el
mes, pulse Enter 1.
2. Pulse el botón «+» 6 o el botón «-» 7 para seleccionar el
mes. Pulse Enter 1 para confirmar y seleccione el día.
3. Por favor, siga las instrucciones anteriores para ajustar el día,
la hora y los minutos.
4. Una vez que haya ajustado los minutos y pulsado el botón
Hora, la fecha y la hora quedan establecidas y se visualiza la
hora.
5. Si desea cambiar la fecha y la hora, pulse y mantenga pulsado
Date/Time (Fecha/Hora) BQ durante aprox. 3 segundos hasta
que comience a parpadear el número del año. Ahora, podrá
introducir los nuevos valores tal como se ha descrito anterior-
mente.
Elegir el manguito correcto
Microlife ofrece diferentes tamaños de manguitos. Elija el tamaño
de manguito adecuado según la circunferencia de su brazo
(medida de forma ajustada en el centro del brazo).
Use únicamente manguitos Microlife.
Contacte su servicio al cliente de Microlife local, si el manguito
AK incluido no es el adecuado para usted.
Conecte el manguito al dispositivo insertando el conector AL
del manguito en el enchufe 4 del manguito hasta que no entre
más.
Tamaño de manguito para una circunferencia del brazo
S 17 - 22 cm
M 22 - 32 cm
M - L 22 - 42 cm
L 32 - 42 cm
L - XL 32 - 52 cm

12
Seleccionar el usuario
Este dispositivo permite almacenar los resultados de 2 usuarios.
Además, hay un modo de huéspede en el que los resultados no se
almacenan.
Antes de cada medición, ajuste el indicador de usuario BM
para el usuario previsto: usuario 1, usuario 2 o modo de invi-
tado.
Pulse y mantenga pulsado el indicador de usuario BM durante
aprox. 2 segundos hasta que el símbolo de usuario comienza a
parpadear. Ahora seleccione Usuario 1, Usuario 2 o modo de
huespede pulsando el indicador de usuario nuevo. Espere 2-
3 segundos para confirmar su selección.
La primera persona que realice la medición debe selec-
cionar usuario 1.
Seleccionando el modo estándar o AFIB/MAM
Antes de cada medición, seleccione estándar (medición única) o
modo AFIB/MAM (triple medición automática). En modo AFIB/
MAM, 3 mediciones se toman automáticamente en sucesión y la
el resultado se analiza automáticamente y se muestra. Debido a
que la presión arterial fluctúa constantemente, un resultado obte-
nido de esta manera es más confiable que cuando se realiza una
única medición.
Cando seleccione las 3 mediciones, el símbolo AFIB/MAM BN
aparecerá en la pantalla.
En la parte inferior izquierda de la pantalla aparecen 1, 2 o 3
para indicar cuál de las 3 mediciones se está realizando en ese
momento.
Hay un descanso de 15 segundos entre las mediciones. Una
cuenta regresiva indica el tiempo restante.
Los resultados individuales no se visualizan. Su presión arterial
sólo se visualizará una vez que se hayan efectuado las 3 medi-
ciones.
No retire el manguito entre las mediciones.
Si una de las mediciones individuales ha sido dudosa, se toma
automáticamente una cuarta.
La detección de AF solo se activa en modo AFIB/MAM.
3. Lista de verificación para tomar una medida
confiable
Evite comer o fumar, así como cualquier otra actividad inmedia-
tamente antes de la medición.
Siéntese en una silla con respaldo y relájese durante 5 minutos.
Mantenga los pies planos sobre el piso y no cruce las piernas.
Efectúe la medición siempre en el mismo brazo (normal-
mente en el izquierdo). Es recomendable que su médico realice
dos mediciones en cada brazo durante la primera visita para
determinar de qué brazo se tomarán las mediciones en el
futuro. Las mediciones se deben efectuar en el brazo con
presión arterial más alta.
Quítese las prendas de vestir ajustadas a su brazo. Para evitar
la constricción, no se deben arremangar las mangas de
camisa, ya que no interfieren con el manguito si se encuentran
en contacto con el brazo.
Asegúrese de utilizar el tamaño correcto del manguito
(marcado en el manguito).
Coloque el manguito de tal forma que esté ajustado, pero
que no quede demasiado apretado.
Asegúrese de que el manguito esté colocado 1-2 cm por
encima del codo.
La marca de la arteria en el manguito (barra larga de 3 cm)
debe descansar sobre la arteria que va en el lado interior del
brazo.
Coloque el brazo de tal forma que esté relajado.
Asegúrese de que el manguito se encuentre a la misma
altura que su corazón.
4. Medición de la presión arterial
1. Desbloquee el interruptor de bloqueo 3.
2. Seleccione el modo estándar (medición única) o AFIB/MAM
(automático medición triple): ver detalles en el capítulo «2.».
3. Presione el botón START/STOP AN para iniciar la medición.
4. Ahora, el manguito se inflará automáticamente. Relájese, no se
mueva y no tense los músculos del brazo hasta que se visua-
lice el resultado de la medición. Respire normalmente y no
hable.
5. Una vez alcanzada la presión correcta, el inflado se detiene y
la presión disminuye gradualmente. Si no se alcanzó la presión
necesaria, el dispositivo bombeará automáticamente más aire
al manguito.
6. Durante la medición, el indicador de pulso BR parpadea en la
pantalla.
7. Se visualiza el resultado compuesto por la presión arterial sistó-
lica AP, diastólica AQ, y la frecuencia del pulso AR. Tenga en
cuenta también las explicaciones de otras indicaciones en este
manual.
8. Retire el manguito cuando la medición haya terminado.

13BP A7 Touch BT
ES
9. Desconecte el dispositivo. (El tensiómetro se apaga automáti-
camente al cabo de aprox. 1 min).
La detección de AF solo se activa en modo AFIB/MAM.
La medición se puede detener en cualquier momento
presionando el botón START/STOP (p.ej. si no se
encuentra bien o en caso de tener una sensación de
presión desagradable).
Este monitor está especialmente probado para su uso en el
embarazo y la preeclampsia. Cuando detecta altas lecturas
inusuales en el embarazo, debe medir después de un
tiempo breve (por ejemplo, 1 hora). Si la lectura es dema-
siado alta, consulte a su médico o ginecólogo.
En el embarazo, se puede ignorar el símbolo AFIB.
Procedimiento para no guardar la lectura
Cuando la lectura aparezca en la pantalla mantenga pulsado el
botón START/STOP AN hasta que «M» AO parpadee. Confirme
que desea borrar la lectura pulsando el botón M AO.
«CL» se muestra cuando la lectura se elimina de la
memoria con éxito.
¿Cómo he de evaluar mi presión arterial?
El indicador LED de semáforo en el lado izquierdo de la pantalla
BP indica dentro de qué rango se encuentra la presión arterial
medida. El valor está dentro del óptimo (verde), elevado (amarillo)
o rango alto (rojo) La clasificación corresponde a la siguiente
rangos definidos por las directrices internacionales (ESH, ESC,
JSH). Datos en mmHg.
El valor superior es el que determina la evaluación. Ejemplo: un
valor de la presión arterial de 140/80 mm Hg o 130/90 mm Hg
indica «presión arterial demasiado alta».
5. Memoria de datos
Este dispositivo almacena automáticamente hasta 99 mediciones
por cada usuario y modo invitado.
Ver los valores guardados
Cambie el interruptor de bloqueo 3 a la posición de «desblo-
queo». Seleccione el usuario 1 o 2 con el indicador de usuario BM.
Presione brevemente el botón M AO. La pantalla muestra un valor
promedio.
Al volver a pulsar el botón M se vuelve a visualizar el valor anterior.
Pulsando el botón M repetidamente se puede cambiar de un valor
guardado a otro.
Memoria llena
Asegúrese de que no exceder la capacidad máxima de 99
memorias de almacenamiento por usuario. Cuando la
memoria está llena, el valor más antiguo es reempla-
zado por el valor número 100. Los valores deberán ser
evaluados por un médico antes de alcanzar la capacidad
máxima de la memoria - en caso contrario, se perderán los
datos.
Borrar todos los valores
Asegúrese que el usuario correcto está activado.
1. Primero desbloquee el dispositivo 3, luego seleccione 1 ó 2
con el indicador de usuario BM.
2. Mantenga pulsado el botón M AO hasta que en la pantalla
aparezca «CL». Deje de pulsar el botón.
3. Mantenga pulsado el botón M mientras «CL» esté parpa-
deando para borrar permanente todos los valores del usuario
seleccionado.
Cancelar el borrado: pulse el botón START/STOP AN
mientras «CL» esté parpadeando.
No es posible borrar valores individuales.
6. Indicador de baterías y cambio de baterías
Baterías con poca carga
Cuando las baterías están gastadas aproximadamente ¾, el
símbolo de baterías AS parpadea al momento de encender el
dispositivo (se visualiza una batería parcialmente cargada).
Aunque el dispositivo seguirá midiendo de manera fiable, tenga a
mano baterías de recambio.
Baterías descargadas – cambio
Cuando las baterías están gastadas, el símbolo de baterías AS
parpadea al momento de encender el dispositivo (se visualiza una
batería descargada). Ya no se puede realizar ninguna medición y
es preciso cambiar las baterías.
Nivel Sistólico
Diastó-
lico Recomendación
1. presión arterial
demasiado alta
≥135 ≥85 Acudir al médico
2. presión arterial
elevada
130 - 134 80 - 84 Autocontrol
3. presión arterial
normal
<130 <80 Autocontrol

14
1. Abra el compartimento de baterías AT situado en la parte
posterior del dispositivo.
2. Sustituya las baterías; asegúrese de que la polaridad sea la
correcta, tal como lo indican los signos en el compartimiento.
3. Para ajustar la fecha y la hora, siga el procedimiento descrito
en el «Apartado 2.».
La memoria retiene todos los valores, aunque haya que
resetear la fecha y la hora; para este fin, el número del año
parpadea automáticamente después de cambiar las bate-
rías.
¿Qué baterías y qué procedimiento?
Utilice 4 baterías alcalinas nuevas de tamaño AAA, de
1,5 V, de larga duración.
No utilice baterías caducadas.
Si no va a usar el dispositivo durante un período prolon-
gado, extraiga las baterías.
Uso de baterías recargables
Este dispositivo también se puede usar con baterías recargables.
Utilice únicamente baterías reutilizables del tipo «NiMH».
Las baterías se deben extraer y recargar, cuando aparezca
el símbolo de batería (batería descargada). No deben
permanecer en el interior del dispositivo, ya que se pueden
dañar (descarga total como resultado de un uso poco
frecuente del dispositivo, incluso estando apagado).
Retire siempre las baterías recargables si no va a usar el
dispositivo en una semana o más.
¡Las baterías NO se pueden recargar dentro del tensió-
metro! Recargue las baterías en un cargador externo y
observe la información relativa a la recarga, el cuidado y a
la duración.
7. Uso de un adaptador de corriente
Este dispositivo se puede hacer funcionar utilizando el adaptador
de corriente de Microlife (DC 6V, 600 mA).
Utilice únicamente el adaptador de corriente de Microlife
disponible como accesorio original, apropiado para su
voltaje de alimentación.
Asegúrese de que no estén dañados ni el adaptador ni el
cable.
1. Inserte el cable del adaptador en el enchufe para el adaptador
de corriente 9 situado en el dispositivo.
2. Inserte la clavija del adaptador en una caja de enchufe.
Mientras esté conectado el adaptador de corriente, no se
consume corriente de las baterías.
8. Función Bluetooth
®
Este dispositivo se puede usar junto con un teléfono inteligente
que ejecute la aplicación «Microlife Connected Health+». La
conexión Bluetooth
®
se activa automáticamente después de
completar la medición.
Para activar manualmente el Bluetooth
®
, presione START/
STOP AN para 5 - 6 segundos hasta que el símbolo de
Bluetooth comience a destellar BS.
Para obtener información más detallada, visite
www.microlife.com/connect.
9. Funciones de conexión con el PC
Este dispositivo se puede utilizar junto con un ordenador personal
(PC) con el software Microlife Blood Pressure Analyzer+ (BPA+).
Los datos almacenados se pueden transferir al PC conectando el
tensiómetro al PC mediante un cable.
Si no se incluye el cupón de descarga ni el cable, descargue el
BPA software de www.microlife.com/software y use un cable
Micro-USB.
10.Mensajes de error
Si se produce un error durante la medición, esta se interrumpe y
se visualiza un mensaje de error, p. ej., «Err 3».
Error
Descrip-
ción Posible causa y solución
«
Err 1
»
Señal
demasiado
débil
Las señales del pulso en el manguito
son demasiado débiles. Vuelva a colocar
el manguito y repita la medición.*
«
Err 2
»
BK
Señal de
error
Durante la medición se han detectado
señales de error por el manguito,
causadas, por ejemplo, por el movi-
miento o la contracción de un músculo.
Repita la medición manteniendo el brazo
quieto.

15BP A7 Touch BT
ES
* Por favor, consulte inmediatamente a su médico, si este o cual-
quier otro problema ocurre repetidamente.
11.Seguridad, cuidado, control de precisión y elimina-
ción de residuos
Seguridad y protección
Siga las instrucciones de uso. Este documento proporciona
información importante de operación y seguridad del producto
con respecto a este dispositivo. Lea atentamente este docu-
mento antes de usar el dispositivo y consérvelo para futuras
consultas.
Este dispositivo sólo se debe utilizar para los propósitos
descritos en estas instrucciones. El fabricante no se responsa-
biliza de ningún daño causado por un uso inadecuado.
El dispositivo está integrado por componentes sensibles y se
debe tratar con cuidado. Respete las indicaciones de almace-
namiento y funcionamiento que se describen en el apartado
«Especificaciones técnicas».
Proteja el dispositivo de:
- Agua y humedad.
- Temperaturas extremas.
- Impactos y caídas.
- Contaminación y polvo.
- Luz directa del sol.
- Calor y frío.
Los brazaletes son sensibles y deben tratarse cuidadosa-
mente.
No intercambie ni utilice ningún otro tipo de manguito o
conector del manguito con este dispositivo.
Infle el manguito únicamente cuando está colocado correcta-
mente en el brazo.
No use el dispositivo cerca de fuertes campos eléctricos tales
como teléfonos móviles o equipos de radio. Mantenga el dispo-
sitivo a una distancia mínima de 3,3 m de estos aparatos
cuando lo utilice.
No utilice el dispositivo si cree que puede estar roto o detecta
alguna anomalía.
Nunca abra el dispositivo.
Si no va a utilizar el dispositivo durante un periodo largo de
tiempo, extraiga las baterías.
Lea las instrucciones de seguridad adicionales en los disposi-
tivos individuales de este manual.
El resultado de medición dado por este dispositivo no es un
diagnóstico. No está reemplazando la necesidad para la
«
Err 3
»
BT
Presión
anormal de
brazalete
No se puede generar una presión
adecuada en el manguito. Se puede
haber producido una fuga. Compruebe
que el manguito esté conectado correc-
tamente y que no esté demasiado
suelto. Cambie las baterías si fuese
necesario. Repita la medición.
«
Err 5
»
Resultado
anormal
Las señales de medición son imprecisas
y, por ello, no se puede visualizar ningún
resultado. Lea la lista de chequeo para
efectuar mediciones fiables y repita la
medición.*
«
Err 6
»
Modo AFIB/
MAM
Ha habido demasiados errores durante
la medición en el modo AFIB/MAM, por
lo que es imposible obtener un resultado
final. Lea la lista de chequeo para efec-
tuar mediciones fiables y repita la medi-
ción.*
«
HI
»
Pulso o
presión de
manguito
demasiado
alto
La presión en el manguito es demasiado
alta (superior a 299 mm Hg) o el pulso es
demasiado alto (más de 200 latidos por
minuto). Relájese durante 5 minutos y
repita la medición.*
«
LO
»
Pulso
demasiado
bajo
El pulso es demasiado bajo (menos de
40 latidos por minuto). Repita la medi-
ción.*
Problema
con
Bluetooth
®
conexión
Si ocurre algún problema con la
conexión Bluetooth, el ícono de Blue-
tooth
®
icon BS parpadea rápidamente
durante aproximadamente 10 segundos.
Para resolver el problema, visite
www.microlife.com/connect.
Error
Descrip-
ción Posible causa y solución

16
consulta de un médico, especialmente si no coincide con los
síntomas del paciente. No confíe sólo en el resultado de la
medición, considere siempre otros síntomas potencialmente
presentes y la retroalimentación del paciente. Se aconseja
llamar a un médico o una ambulancia si es necesario.
¡Una presión arterial permanentemente alta puede perju-
dicar su salud y debe ser tratada por su médico!
Consulte siempre con su médico los valores medidos y comén-
tele si ha notado algo inusual o si tiene alguna duda. No confíe
nunca en una sola lectura de presión arterial.
Bajo ninguna circunstancia debe modificar las dosis de
medicamentos o iniciar un tratamiento sin consultar a su
médico
Las diferencias entre las mediciones tomadas por su médico
o en la farmacia y las tomadas en casa son muy normales,
debido a que estas situaciones son completamente diferentes.
¡El indicador de pulsaciones no es apropiado para
comprobar la frecuencia de los marcapasos!
Si está embarazada, debe controlar su presión arterial con
regularidad, ya que puede cambiar drásticamente durante este
tiempo.
Asegúrese de que los niños no utilicen el dispositivo sin
supervisión, puesto que podrían tragarse algunas de las
piezas más pequeñas. Tenga en cuenta el riesgo de
estrangulamiento en caso de que este dispositivo se sumi-
nistre con cables o tubos.
Cuidado del dispositivo
Limpie el dispositivo únicamente con un paño suave y seco.
Limpieza del brazalete
Para limpiar el manguito hágalo cuidadosamente con un paño
húmedo y jabón neutro.
ATENCIÓN: ¡No debe lavarse, en ningún caso, la cámara
de aire localizada en el interior!
Control de precisión
Recomendamos someter este dispositivo a un control de precisión
cada 2 años o después de un impacto mecánico (p. ej., si se ha
caído). Por favor, contacte su servicio al cliente Microlife local para
concertar la revisión (ver introducción).
Eliminación de residuos
Las baterías y los dispositivos electrónicos se deben
eliminar según indique la normativa local pertinente y no se
deben desechar junto con la basura doméstica.
12.Garantía
Este dispositivo tiene una garantía de 5 años a partir de la fecha
de compra. Durante este período de garantía, a nuestra discre-
ción, Microlife reparará o reemplazará el producto defectuoso de
forma gratuita.
La garantía no será válida si abre o manipula el dispositivo.
Los siguientes artículos están excluidos de la garantía:
Costos de transporte y riesgos del transporte.
Daños causados por la aplicación incorrecta o el incumpli-
miento de las instrucciones de uso.
Daño causado por fugas de baterías.
Daño causado por accidente o mal uso.
Material de embalaje / almacenamiento e instrucciones de uso.
Comprobaciones periódicas y mantenimiento (calibración).
Accesorios y piezas de desgaste: Baterías, adaptador de
corriente (opcional).
El brazalete está cubierto por una garantía funcional (estan-
queidad de la vejiga) durante 2 años.
En caso de que se requiera un servicio de garantía, comuníquese
con el distribuidor donde adquirió el producto o con su servicio
local de Microlife. Puede ponerse en contacto con su servicio local
Microlife a través de nuestro sitio web:
www.microlife.com/support
La compensación se limita al valor del producto. La garantía se
otorgará si el producto completo se devuelve con la factura
original. La reparación o el reemplazo dentro de la garantía no
prolonga ni renueva el período de garantía. Los reclamos y dere-
chos legales de los consumidores no están limitados por esta
garantía.

17BP A7 Touch BT
ES
13.Especificaciones técnicas
Este dispositivo esta en conformidad con los requerimientos de la
Directiva 93/42/CEE relativa a productos sanitarios.
Reservado el derecho a realizar modificaciones técnicas.
Las marca Bluetooth
®
y sus logotipos son marcas registradas
propiedad de Bluetooth SIG, Inc. y cualquier uso de dichas marcas
por parte de Microlife Corp. es bajo licencia. Otras marcas y
nombres comerciales pertenecen a sus respectivos dueños.
Condiciones de
funcionamiento:
10 - 40 °C / 50 - 104 °F
15 - 95% de humedad relativa máxima
Condiciones de
almacenamiento:
-20 - +55 °C / -4 - +131 °F
15 - 95% de humedad relativa máxima
Peso: 312 g (incluyendo baterías)
Tamaño: 160 x 82 x 35 mm
Procedimiento de
medición:
oscilométrico, según el método Korotkoff:
Fase I sistólica, fase V diastólica
Nivel de medición: 20 - 280 mm Hg – presión arterial
40 - 200 latidos por minuto – pulso
Intervalo de indica-
ción de la presión del
manguito: 0 - 299 mm Hg
Resolución: 1 mm Hg
Precisión estática: presión dentro de ± 3 mm Hg
Precisión del pulso: ± 5% del valor medido
Comunicación:
Bluetooth
®
4.0
Compatibilidad: iOS: iOS 10.0 o posterior
Android: Android OS 5 o posterior
Fuente de corriente:
4 baterías alcalinas 1,5 V; tamaño AAA
Adaptador de voltaje c.a. 6V,
600 mA (opcional)
Duración de la
batería:
aprox. 400 mediciones (usando baterías
nuevas)
Clase IP: IP20
Referencia a los
estándares:
EN 1060-1 /-3 /-4; IEC 60601-1;
IEC 60601-1-2 (EMC); IEC 60601-1-11
Vida útil esperada: Dispositivo: 5 años o 10000 mediciones
Accesorios: 2 años

18
Sayfa yükleniyor...
Sayfa yükleniyor...
Sayfa yükleniyor...
Sayfa yükleniyor...
Sayfa yükleniyor...
Sayfa yükleniyor...
Sayfa yükleniyor...
Sayfa yükleniyor...
Sayfa yükleniyor...
Sayfa yükleniyor...
Sayfa yükleniyor...
Sayfa yükleniyor...
Sayfa yükleniyor...
Sayfa yükleniyor...
Sayfa yükleniyor...
Sayfa yükleniyor...
Sayfa yükleniyor...
Sayfa yükleniyor...
Sayfa yükleniyor...
Sayfa yükleniyor...
Sayfa yükleniyor...
Sayfa yükleniyor...
Sayfa yükleniyor...
Sayfa yükleniyor...
Sayfa yükleniyor...
Sayfa yükleniyor...
Sayfa yükleniyor...
Sayfa yükleniyor...
Sayfa yükleniyor...
Sayfa yükleniyor...
Sayfa yükleniyor...
Sayfa yükleniyor...
Sayfa yükleniyor...
Sayfa yükleniyor...
Sayfa yükleniyor...
Sayfa yükleniyor...
Sayfa yükleniyor...
Sayfa yükleniyor...
Sayfa yükleniyor...
Sayfa yükleniyor...
Sayfa yükleniyor...
Sayfa yükleniyor...
Sayfa yükleniyor...
Sayfa yükleniyor...
Sayfa yükleniyor...
Sayfa yükleniyor...
Sayfa yükleniyor...
Sayfa yükleniyor...
Sayfa yükleniyor...
Sayfa yükleniyor...
Sayfa yükleniyor...
Sayfa yükleniyor...
Sayfa yükleniyor...
Sayfa yükleniyor...
Sayfa yükleniyor...
Sayfa yükleniyor...
Sayfa yükleniyor...
Sayfa yükleniyor...
Sayfa yükleniyor...
Sayfa yükleniyor...
Sayfa yükleniyor...
Sayfa yükleniyor...
Sayfa yükleniyor...
Sayfa yükleniyor...
Sayfa yükleniyor...
Sayfa yükleniyor...
Sayfa yükleniyor...
Sayfa yükleniyor...
Sayfa yükleniyor...
Sayfa yükleniyor...
Sayfa yükleniyor...
Sayfa yükleniyor...
Sayfa yükleniyor...
Sayfa yükleniyor...
Sayfa yükleniyor...
Sayfa yükleniyor...
Sayfa yükleniyor...
Sayfa yükleniyor...
Sayfa yükleniyor...
Sayfa yükleniyor...
Sayfa yükleniyor...
-
 1
1
-
 2
2
-
 3
3
-
 4
4
-
 5
5
-
 6
6
-
 7
7
-
 8
8
-
 9
9
-
 10
10
-
 11
11
-
 12
12
-
 13
13
-
 14
14
-
 15
15
-
 16
16
-
 17
17
-
 18
18
-
 19
19
-
 20
20
-
 21
21
-
 22
22
-
 23
23
-
 24
24
-
 25
25
-
 26
26
-
 27
27
-
 28
28
-
 29
29
-
 30
30
-
 31
31
-
 32
32
-
 33
33
-
 34
34
-
 35
35
-
 36
36
-
 37
37
-
 38
38
-
 39
39
-
 40
40
-
 41
41
-
 42
42
-
 43
43
-
 44
44
-
 45
45
-
 46
46
-
 47
47
-
 48
48
-
 49
49
-
 50
50
-
 51
51
-
 52
52
-
 53
53
-
 54
54
-
 55
55
-
 56
56
-
 57
57
-
 58
58
-
 59
59
-
 60
60
-
 61
61
-
 62
62
-
 63
63
-
 64
64
-
 65
65
-
 66
66
-
 67
67
-
 68
68
-
 69
69
-
 70
70
-
 71
71
-
 72
72
-
 73
73
-
 74
74
-
 75
75
-
 76
76
-
 77
77
-
 78
78
-
 79
79
-
 80
80
-
 81
81
-
 82
82
-
 83
83
-
 84
84
-
 85
85
-
 86
86
-
 87
87
-
 88
88
-
 89
89
-
 90
90
-
 91
91
-
 92
92
-
 93
93
-
 94
94
-
 95
95
-
 96
96
-
 97
97
-
 98
98
-
 99
99
-
 100
100
-
 101
101


Microlife Bluetooth® blood pressure monitor Kullanım kılavuzu
- Kategori
- Kan basıncı birimleri
- Tip
- Kullanım kılavuzu
diğer dillerde
- español: Microlife Bluetooth® blood pressure monitor Manual de usuario
- français: Microlife Bluetooth® blood pressure monitor Manuel utilisateur
- italiano: Microlife Bluetooth® blood pressure monitor Manuale utente
- Deutsch: Microlife Bluetooth® blood pressure monitor Benutzerhandbuch
- português: Microlife Bluetooth® blood pressure monitor Manual do usuário
- English: Microlife Bluetooth® blood pressure monitor User manual
- Nederlands: Microlife Bluetooth® blood pressure monitor Handleiding
İlgili makaleler
-
Microlife BP B3 AFIB Kullanım kılavuzu
-
Microlife BP A7 Touch Kullanım kılavuzu
-
Microlife BP A7 Touch Advanced blood pressure monitor Kullanım kılavuzu
-
Microlife BP A6 BT Kullanım kılavuzu
-
-
-
Microlife BP A6 PC Kullanım kılavuzu
-
-
-