Pelco Sarix IBP Series Environmental Bullet Camera Hızlı başlangıç Kılavuzu
- Tip
- Hızlı başlangıç Kılavuzu

1
Sarix
®
IBP Series
Environmental
Bullet Camera with
IR
Quick Start
Installation
C2276M-A_ML (8/14)

2
Important Safety Instructions
1. Read these instructions.
2. Keep these instructions.
3. Heed all warnings.
4. Follow all instructions.
5. Do not use this apparatus near water.
6. Clean only with dry cloth.
7. Do not block any ventilation openings. Install in accordance with the manufacturer’s instructions.
8. Do not install near any heat sources such as radiators, heat registers, stoves, or other apparatus (including amplifiers) that produce
heat.
9. Do not defeat the safety purpose of the polarized or grounding-type plug. A polarized plug has two blades with one wider than the
other. A grounding plug has two blades and a third grounding prong. The wide blade or the third prong are provided for your safety. If
the provided plug does not fit into your outlet consult an electrician for replacement of the obsolete outlet.
10. Protect the power cord from being walked on or pinched particularly at plugs, convenience receptacles, and the points where they exit
from the apparatus.
11. Only use attachments/accessories specified by the manufacturer.
12. Use only with the cart, stand, tripod, bracket, or table specified by the manufacturer, or sold with the apparatus. When a cart is used,
use caution when moving the cart/apparatus combination to avoid injury from tip-over.
13. Unplug this apparatus during lightning storms or when unused for long periods of time.
14. Refer all servicing to qualified service personnel. Servicing is required when the apparatus has been damaged in any way, such as
power-supply cord or plug is damaged, liquid has been spilled or objects have fallen into the apparatus, the apparatus has been
exposed to rain or moisture, does not operate normally, or has been dropped.
15. Apparatus shall not be exposed to dripping or splashing and that no objects filled with liquids, such as vases shall be placed on the
apparatus.
16. WARNING: To reduce the risk of fire or electric shock, do not expose this apparatus to rain or moisture.
17. Installation should be done only by qualified personnel and conform to all local codes.
18. Unless the unit is specifically marked as a NEMA Type 3, 3R, 3S, 4, 4X, 6, or 6P enclosure, it is designed for indoor use only and it
must not be installed where exposed to rain and moisture.
19. Use only installation methods and materials capable of supporting four times the maximum specified load.
20. Use stainless steel hardware to fasten the mount to outdoor surfaces.
21. To prevent damage from water leakage when installing a mount outdoors on a roof or wall, apply sealant around the bolt holes
between the mount and mounting surface.
22. An all-pole mains switch with a contact separation of at least 3 mm in each pole shall be incorporated in the electrical installation of the
building.
23. A readily accessible disconnect device shall be incorporated in the building installation wiring.
24. The socket-outlet shall be installed near the equipment and shall be easily accessible.
CAUTION: These servicing instructions are for use by qualified service personnel only. To reduce the risk of electric shock do not perform any servicing
other that contained in the operating instructions unless you are qualified to do so.
CAUTION: Only use replacement parts recommended by Pelco.
The product and/or manual may bear the following marks:
This symbol indicates that dangerous voltage constituting a risk of electric shock is present within this unit.
CAUTION: RISK OF ELECTRIC SHOCK. DO NOT OPEN.
This symbol indicates that there are important operating and maintenance instructions in the literature accompanying this unit
Denotes Class II double insulated device.
WARNING: This product is sensitive to Electrostatic Discharge (ESD). To avoid ESD damage to this product, use ESD safe practices
during installation. Before touching, adjusting or handling this product, correctly attach an ESD wrist strap to your wrist and
appropriately discharge your body and tools. For more information about ESD control and safe handling practices of electronics,
please refer to ANSI/ESD S20.20-1999 or contact the Electrostatic Discharge Association (www.esda.org).
UL Safety Notices
The product is intended to be supplied by a Listed Power Unit marked "L.P.S." (or "Limited Power Source") and rated output 48Vdc, 0.1A minimum or
24Vac, 0.32A minimum.
The product shall be installed by a qualified service person and the installation shall conform to all local codes.

3
Description
The Sarix Professional Range IBP Series Camera is ideal for outdoor application. Before installing it, review your model and its components and read
this guide carefully.
Package Contents
One IR Bullet Camera
One resource CD
One printed quick installation guide
One mounting template
One mounting kit with screws and wall inserts
One 24V connector
One alarm connector
One T-20 pin Torx screw driver
Optional Accessories
IBPBBAP-ES: a Sarix Environmental Surface mount for Bullet
IBPBBAP-EI: a Sarix Environmental In-Ceiling Mount for Bullet
Installation
You can install the Sarix Series dome camera using one of the following installation methods:
Surface Mount (refer to Surface Installation).
In-Ceiling Mount (refer to In-Ceiling Installation).
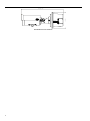
Connecting the Wires
This unit supports one of the following options as power supply.
24 VAC: Connect 24V (~) cables to terminals ~24 VAC
PoE: Connect the RJ-45 network connector to a PoE compatible network device that supplied power through the
Ethernet cable.
(Optional) Insert audio cable and alarm cable to the unit, and connect the network cable to the RJ-45 network port
of a switch.
Caution: To avoid damage to the unit, never connect more than one type of power supply (PoE IEEE802.3 Ethernet
Class 3 or AC 24V power plug) at the same time.
Surface Installation
- Ceiling or Wall
Refer to the below figures for ceiling or wall installation.
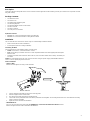
MOUNTING THE BRACKET CABLE CONNECTION
1. Use the supplied Guide Pattern to drill six 5mm mounting holes.
2. Insert the supplied anchors into the holes.
3. Pass all the signal cables through the mounting bracket.
4. Connect the camera power/video cable and external power/video cable together. The mounting bracket also has a cable relief if the mounting
surface cannot be penetrated.
5. Tighten the screws and finish the installation.
- With IBPBBAP-ES
Also, you can mount the camera to the wall with IBPBBAP-ES, a Sarix Environmental Surface Mount for Bullet.
Refer to the figure below for surface installation with IBPBB-ES.

4
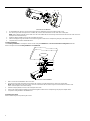
①
②
③
④
⑤
SURFACE MOUNT WITH IBPBB-ES
1. Fix the IBPBBAP-ES back box (#1) to the desirable surface by drilling three holes and fastening it with screws.
2. Pass all the signal cables through the hole of rubber (#5), and then insert the rubber into the center hole of metal plate.
NOTE: Please identify both sides of the rubber. The side of the rubber with the inclined angle must be towards the terminals of the cables and
metal plate to avoid water leakage.
3. Install the adaptor plate(#2) in the back box and tighten the screws
4. Insert screws (#4) through the bracket’s screw holes and tighten screws into the corresponding hole (#3) of the adaptor metal.
5. Complete surface installation with IBPBBAP-ES.
In-Ceiling Installation
The In-Ceiling Installation is mounting the camera into the ceiling with IBPBBAP-EI, a Sarix Environmental In-Ceiling Mount for Bullet.
Refer to the figure below for in-ceiling installation with IBPBBAP-EI.
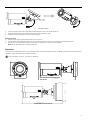
①
②
③
④
⑤
IN-CEILING INSTALLATION WITH IBPBB-EI
1. Make a round hole for IBPBBAP-EI back box to fit in.
2. Pass all the signal cables through the hole of rubber (#5), and then insert the rubber into the center hole of metal plate.
NOTE: Please identify both sides of the rubber. The side of the rubber with the inclined angle must be towards the terminals of the
cables and metal plate to avoid water leakage.
3. Install the adaptor plate(#2) in the back box and tighten the screws
4. Insert screws (#4) through the bracket’s screw holes and tighten screws into the corresponding hole (#3) of the adaptor metal.
5. Complete in-ceiling installation with IBPBBAP-EI.
Positioning the Camera
Refer to the below figures for positioning the camera.

5
POSITIONING THE CAMERA
1. Loosen the locking screws (left and right) first (just rotate slightly one circle or the screws will fall out).
2. Rotate the retaining ring then you will be able to hold the camera and adjust its angle.
3. Fasten the screws and retaining ring to ensure the desired angle.
Adjusting the Focus
1. View the camera image using the browser (refer to the user manual).
2. Use the settings in the Web interface (refer to the user manual) to adjust the zoom and focus of the lens to the desired field of view.
3. Also the focus can be adjusted by moving the zoom slider and using the Focus options in the live webpage.
NOTE: Focus adjustment is done exclusively with Web UI.
Dimensions
The Sarix Series network bullet camera has two installation methods (refer to the Installation section). The following illustrations show the bullet camera
dimensions and the camera dimensions with back box options.
VALUES IN PARENTHESES ARE INCHES; ALL OTHERS ARE
CENTIMETERS.
26.96(10.61)
15.54(6.11)
11.51(4.53)
10.65(4.19)
9(3.54)
IBPX19-1ER
32.76(12.89)
15.52(6.11)
IBPX19-1ER WITH SURFACE MOUNT
Locking
screws

6
37.06(14.59)
15(5.9)
IBPX19-1ER WITH IN-CEILING MOUNT

7
Instructions importantes relatives à la sécurité
1. Lisez ces instructions.
2. Conservez ces instructions.
3. Prenez en compte tous les avertissements.
4. Suivez toutes les instructions.
5. N'utilisez pas l'appareil à proximité d'eau.
6. Essuyez uniquement avec un chiffon doux.
7. Ne bloquez aucune ouverture de ventilation. Installez en accord avec les instructions du fabricant.
8. N'installez pas à proximité de sources de chaleur telles que des radiateurs, poêles, cheminées ou autres appareils (amplificateurs
compris) produisant de la chaleur.
9. Attention à ne pas endommager les prises polarisées ou de mise à la terre. Une prise polarisée possède deux lames, l'une étant plus
large que l'autre. Une prise de mise à la terre possède deux lames et une troisième broche de mise à la terre. La lame large de la
troisième broche est fournie à des fins de sécurité. Si la fiche fournie de rentre pas dans votre prise, consultez un électricien pour
remplacer la prise obsolète.
10. Protégez le câble d'alimentation contre les pincements et les risques d'écrasement, en particulier au niveau des fiches, des récepteurs
et des endroits auxquels le câble sort de l'appareil.
11. Utilisez uniquement des accessoires conseillés par le fabricant.
12. Utilisez uniquement des chariots, supports, trépieds ou tables indiqués par le fabricant ou vendus avec l'appareil. Si vous utilisez un
chariot, faites attention lors du déplacement de l'ensemble chariot/appareil pour éviter les blessures dues aux trébuchements.
13. Débranchez cet appareil lors d'orages ou de longues périodes d'inutilisation.
14. Confiez toutes les réparations à un personnel qualifié. Les réparations sont requises lorsque l'appareil a été endommagé de quelque
façon que ce soit, par exemple si le cordon d'alimentation ou sa fiche sont endommagés, si du liquide s'est renversé sur l'appareil ou
que des objets sont tombés dedans, si l'appareil a été exposé à la pluie ou l'humidité ou s'il est tombé.
15. L'appareil ne doit pas être exposé aux chutes et aux éclaboussures de liquides et aucun objet contenant un liquide, un vase par
exemple, ne doit être placé dessus.
16. AVERTISSEMENT : Pour réduire les risques d'incendies ou d'électrocution, n'exposez pas cet appareil à la pluie ou à l'humidité.
17. L’installation doit être confiée à un technicien qualifié et respecter toutes les normes locales en vigueur.
18. Sauf si l'unité est marquée en tant qu'appareil NEMA Type 3, 3R, 3S, 4, 4X, 6, ou 6P, elle est conçue pour une utilisation en intérieur et
ne doit pas être installée dans des lieux exposés à la pluie et à l'humidité.
19. Utilisez uniquement des méthodes d’installation et des matériaux capables de supporter quatre fois le poids maximum spécifié.
20. Utilisez des composants en acier inox pour attacher le support sur des surfaces à l'extérieur.
21. Pour éviter les dommages par l'eau lorsque vous installez le support à l'extérieur sur un toit ou un mur, utilisez du mastic autour des
trous de vis entre le montage et la surface de montage.
22. Un interrupteur d'alimentation omnipolaire avec une ouverture de contact d'au moins 3 mm dans chaque pôle doit être intégré à
l'installation électrique du bâtiment.
23. Un appareil de déconnexion facilement accessible doit être intégré au câblage de l'installation du bâtiment.
24. La fiche-prise doit être installée à proximité de l'équipement et être facilement accessible.
AVERTISSEMENT : Ces instructions de réparation doivent être utilisées uniquement par un personnel qualifié. Pour réduire les risques d'électrocution,
n'effectuez aucune réparation autre que celles indiquées dans les instructions sauf si vous possédez les qualifications pour le faire.
AVERTISSEMENT : N'utilisez que des pièces de remplacement conseillées par Pelco.
Le produit et/ou le manuel peut présenter les symboles suivants :
Ce symbole indique qu'une tension dangereuse constitue un risque d'électrocution avec le produit.
AVERTISSEMENT : RISQUE D'ÉLECTROCUTION. NE PAS OUVRIR.
Ce symbole indique la présence d'instructions de maintenance et d'utilisation importantes dans la documentation accompagnant l'unité
Indique un appareil doublement isolé de classe II.
AVERTISSEMENT : Ce produit est sensible aux décharges électrostatiques (ESD). Pour éviter de causer des dommages ESD au
produit, suivez les pratiques de sécurité ESD lors de l'installation. Avant de toucher, d'ajuster ou de manipuler ce produit, attachez
correctement une dragonne ESD à votre poignet et déchargez vos outils de façon appropriée. Pour plus d'informations sur le contrôle
ESD et les pratiques de manipulation sûres pour les produits électroniques, veuillez vous reporter à ANSI/ESD S20.20-1999 ou contacter
l'Association sur les décharges électrostatiques (www.esda.org).
NOTIFICATIONS DE SÉCURITÉ UL
Ce produit est conçu pour être alimenté par une unité d’alimentation répertoriée marquée du sigle « L.P.S. » (ou source d’alimentation limitée) avec une
sortie de 48 V c.c., 0,1 A minium ou 24 V c.a., 0,32 A minimum.
Ce produit doit être installé par une personne qualifiée et l’installation doit être conforme aux réglementations locales.

8
Wichtige Sicherheitshinweise
1. Anweisungen lesen.
2. Anweisungen aufbewahren.
3. Alle Warnhinweise beachten.
4. Alle Anweisungen befolgen.
5. Dieses Gerät nicht in der Nähe von Wasser verwenden.
6. Nur mit einem trockenen Tuch reinigen.
7. Keine Belüftungsöffnungen blockieren. Entsprechend den Herstelleranweisungen installieren.
8. Gerät nicht in der Nähe von Wärmequellen wie Heizungen, Heizgittern, Ö fen oder anderen wärmeerzeugenden Geräten (inklusive
Verstärkern) installieren.
9. Sicherheitsmerkmal des polarisierten oder geerdeten Steckers nicht außer Kraft setzen. Ein polarisierter Stecker hat zwei Kontakte,
von denen einer breiter ist als der andere. Ein geerdeter Stecker hat zwei kontakte und eine dritte Erdungsklammer. Der breitere
Kontakt bzw. die dritte Klammer dienen Ihrer Sicherheit. Falls der mitgelieferte Stecker nicht in ihre Steckdose passt, lassen Sie die
veraltete Steckdose bitte von einem Elektriker austauschen.
10. Verlegen Sie das Netzkabel so, dass niemand darauf treten oder darüber stolpern kann, insbesondere an Steckern,
Mehrfachsteckdosen und der Stelle, an der es aus dem Gerät herauskommt.
11. Verwenden Sie nur vom Hersteller angegebene Erweiterungen/Zubehörteile.
12. Verwenden Sie das Gerät nur mit den vom Hersteller angegebenen oder mit dem Produkt gelieferten Wägen, Ständern, Stativen,
Halterungen oder Tischen. Achten Sie beim Einsatz eines Wagens darauf, die Wagen/Geräte-Kombination zur Vermeidung von
Verletzungen durch Umkippen vorsichtig zu bewegen.
13. Trennen Sie dieses Gerät während eines Gewitters oder bei langer Nichtbenutzung vom Stromnetz.
14. Ü berlassen Sie Wartungs- und Reparaturarbeiten ausschließlich qualifizierten Fachleuten. Eine Reparatur ist erforderlich, wenn das
Gerät auf irgendeine Weise beschädigt wurde, d. h. wenn Netzkabel oder -stecker beschädigt sind, Flüssigkeiten über dem Gerät
verschüttet wurden bzw. Gegenstände hineingefallen sind, das Gerät Regen oder Feuchtigkeit ausgesetzt war, nicht normal
funktioniert oder fallen gelassen wurde.
15. Das Gerät darf keinem Tropf- oder Spritzwasser ausgesetzt sein; stellen Sie keine mit Flüssigkeiten gefüllten Gegenstände wie z. B.
Vasen auf das Gerät.
16. WARNUNG: Setzen Sie dieses Gerät zur Reduzierung von Brand- und Stromschlaggefahr keinem Regen oder Feuchtigkeit aus.
17. Installationsarbeiten sollten ausschließlich von qualifizierten Fachkräften und unter Einhaltung örtlicher Vorgaben vorgenommen
werden.
18. Sofern das Gerät nicht spezifisch als NEMA Typ 3-, 3R-, 3S-, 4-, 4X-, 6- oder 6P-Gehäuse gekennzeichnet ist, wurde es ausschließlich
zum Einsatz in Innenräumen entwickelt und darf nicht an Orten installiert werden, an denen es Regen und Feuchtigkeit ausgesetzt ist.
19. Verwenden Sie ausschließlich Installationsverfahren und Materialien, die mit dem Vierfachen der angegebenen Last belastet werden
können.
20. Befestigen Sie die Halterung bei Montage im Freien mit Edelstahlteilen.
21. Damit bei Außeninstallation keine Schäden durch eindringendes Wasser verursacht werden, geben Sie Dichtmittel um die
Schraublöcher zwischen Halterung und Befestigungsstelle.
22. Ein allpoliger Netzschalter mit einem Kontaktabstand von mindestens 3 mm je Pol muss in die elektrische Installation des Gebäudes
integriert sein.
23. Die Verkabelung der Gebäudeinstallation muss über eine leicht zugängliche Trennvorrichtung verfügen.
24. Die Steckdose muss sich in der Nähe des Gerätes befinden und leicht zugänglich sein.
Vorsicht: Diese Wartungsanweisungen sind ausschließlich qualifiziertem Servicepersonal vorbehalten. Zur Reduzierung der Stromschlaggefahr dürfen
Sie ausschließlich in den Bedienungsanweisungen enthaltene Wartungsmaßnahmen durchführen, sofern Sie nicht entsprechend qualifiziert sind.
Vorsicht: Verwenden Sie nur von Pelco empfohlene Ersatzteile.
Produkt und/oder Anleitung können folgende Kennzeichnungen tragen:
Dieses Symbol zeigt gefährliche Spannung im Inneren dieses Gerätes an, die einen Stromschlag verursachen kann.
VORSICHT: Stromschlaggefahr. Nicht öffnen.
Dieses Symbol weist auf wichtige Bedienungs- und Wartungsanweisungen in der mit diesem Gerät gelieferten Literatur hin.
Kennzeichnet doppelisoliertes Gerät der Klasse II.
WARNUNG: Dieses Produkt ist empfindlich gegenüber elektrostatischer Entladung. Zur Vermeidung von Schäden durch elektrostatische
Entladung an diesem Produkt, müssen Sie während der Installation entsprechende Anti-Statik-Maßnahmen ergreifen. Bringen Sie vor
Berühren, Anpassen und Handhaben dieses Produktes ein Anti-Statik-Band an Ihrem Handgelenk an und entladen Sie Ihren Körper und
Werkzeuge ordnungsgemäß. Weitere Informationen zu Kontroll- und Sicherheitsmaßnahmen rund um die elektrostatische Entladung im
Umgang mit Elektronikprodukten entnehmen Sie bitte der ANSI/ESD S20.20-1999 oder wenden Sie sich an die Electrostatic Discharge
Association (www.esda.org).
UL-Sicherheitshinweise
Das Produkt ist darauf ausgelegt, über eine gelistete Stromversorgung (mit „L.P.S.“ oder „Limited Power Source“ gekennzeichnet) und einen
Nennausgang von 48 V Gleichspannung, 0,1 A (Minimum) oder 24 V Wechselspannung, 0,32 A (Minimum) mit Strom versorgt zu werden.
Das Produkt muss von einer qualifizierten Servicefachkraft und unter Einhaltung der lokalen Codes installiert werden.

9
Importanti istruzioni per la sicurezza
1. Leggere le presenti istruzioni.
2. Conservare le presenti istruzioni.
3. Osservare tutte le avvertenze.
4. Osservare tutte le istruzioni.
5. Non utilizzare l’apparecchio in prossimità di acqua.
6. Pulire solo con un panno asciutto.
7. Non ostruire le bocchette di ventilazione. Installare osservando le istruzioni del produttore.
8. Non installare l'apparecchio in prossimità di fonti di calore quali caloriferi, diffusori di aria calda, stufe o altri apparecchi (compresi gli
amplificatori) che producono calore.
9. Non vanificare lo scopo di sicurezza della spina polarizzata o con messa a terra. Le spine polarizzate hanno due lamelle di cui una più
larga dell’altra. Una spina con la messa a terra ha due lamelle e un terzo spinotto di messa a terra. La lamella più larga o il terzo
spinotto servono a garantire la sicurezza. Qualora la spina fornita non sia adatta alla presa di rete, rivolgersi ad un elettricista per
sostituire la presa obsoleta.
10. Proteggere il cavo di alimentazione evitando che venga calpestato o schiacciato, in particolare vicino alle spine, alle prese e ai punti in
cui fuoriescono dall'apparecchio.
11. Usare solamente attacchi/accessori specificati dal produttore.
12. Utilizzare solo con carrelli, supporti, treppiedi, staffe o tavoli specificati dal produttore o venduti insieme all’apparecchio. Quando si usa
un carrello, prestare attenzione quando si sposta il carrello con l'apparecchio per evitare che si ribalti causando lesioni.
13. Scollegare l’apparecchio dalla presa di rete durante i temporali o quando non è usato per un periodo di tempo prolungato.
14. Per tutti i tipi di manutenzione, fare riferimento a personale di assistenza qualificato. Si deve procedere alla manutenzione quando
l’apparecchio ha subito danni, ad esempio danni al cavo o alla spina di alimentazione, quando del liquido o oggetti estranei sono
penetrati all’interno dell’apparecchio, se l’apparecchio è stato esposto a pioggia o a umidità, quando non funziona in modo normale
oppure quando l’apparecchio è stato fatto cadere.
15. L'apparecchio non deve essere esposto a gocciolamento o spruzzi e nessun oggetto contenente liquidi, quali vasi o simili, deve essere
collocato sopra lo stesso.
16. AVVISO: per ridurre il rischio di incendi o scosse elettriche, non esporre questo apparecchio a pioggia o umidità.
17. L'installazione deve essere effettuata solo da personale qualificato e nel rispetto di tutte le normative locali.
18. A meno che l'unità non sia specificamente contrassegnata come involucro NEMA Tipo 3, 3R, 3S, 4, 4X, 6 o 6P, è progettata per il solo
uso interno e non deve essere installata in luoghi in cui sia esposta a pioggia o umidità.
19. Utilizzare solo metodi e materiali di installazione in grado di sostenere quattro volte il carico massimo specificato.
20. Utilizzare componenti in acciaio inossidabile per fissare il supporto sulle superfici esterne.
21. Per evitare danni causati dalla fuoriuscita di acqua durante l'installazione di un supporto all'esterno su un tetto o una parete, applicare
sigillante intorno ai fori dei bulloni tra il supporto e la superficie di montaggio.
22. Nell‘impianto elettrico dell‘edificio deve essere previsto un interruttore di rete onnipolare con un‘apertura di contatto di almeno 3 mm in
ciascuna lamella.
23. Prevedere nel cablaggio dell’edificio anche un dispositivo di disinserimento facilmente accessibile.
24. Le prese di corrente devono essere installate in prossimità dell'apparecchio ed essere accessibili.
ATTENZIONE: queste istruzioni per la manutenzione sono destinate esclusivamente a personale qualificato. Al fine di ridurre il rischio di scosse
elettriche, non eseguire altri interventi, se non quelli contenuti nelle istruzioni, a meno che non si sia qualificati ad eseguirli.
ATTENZIONE: Usare solamente pezzi di ricambio specificati da Pelco.
Il prodotto e/o il manuale possono riportare i seguenti simboli:
Questo simbolo indica la presenza all’interno di questa unità di livelli di tensione pericolosi che potrebbero costituire rischio di
scosse elettriche.
ATTENZIONE: RISCHIO DI SCOSSE ELETTRICHE. NON APRIRE.
Questo simbolo indica l’esistenza di importanti istruzioni per il funzionamento e la manutenzione contenuti nella documentazione di
corredo.
Indica un dispositivo a doppio isolamento di Classe II.
AVVISO: questo prodotto è sensibile alle scariche elettrostatiche (ESD). Onde evitare danni al prodotto causate da scariche
elettrostatiche, adottare misure di sicurezza durante l’installazione. Prima di toccare, regolare o spostare questo prodotto, fissare
correttamente un cinturino antistatico al proprio polso per garantire un’adeguata scarica a corpo ed attrezzi utilizzati. Per ulteriori
informazioni sul controllo delle scariche elettrostatiche e su misure di sicurezza adeguate per prodotti elettronici, consultare la
normativa ANSI/ESD S20.20-1999 o contattare l’Electrostatic Discharge Association (www.esda.org).
Avvisi di sicurezza UL
Il prodotto viene fornito esclusivamente con un alimentatore Listed con contrassegno "LPS" (o "Limited Power Source") e potenza nominale di 48 V CC,
0,1 A minima o 24 V CA, 0,32 A minima.
Il prodotto deve essere installato esclusivamente da personale di assistenza qualificato e l'installazione deve essere conforme a tutti i codici locali.

10
Instrucciones de seguridad importantes
1. Lea estas instrucciones.
2. Conserve estas instrucciones.
3. Respete todas las advertencias.
4. Siga todas las instrucciones.
5. No utilice este producto cerca de agua.
6. Limpie sólo con un paño seco.
7. No bloquee ninguna abertura de ventilación. Instale de acuerdo con las instrucciones del fabricante.
8. No instale el producto cerca de ninguna fuente de calor, como radiadores, salidas de aire caliente, estufas u otros dispositivos
(incluyendo amplificadores) que emanen calor.
9. No anule la seguridad de la clavija polarizada ni la de la clavija con conexión a tierra. Una clavija polarizada tiene dos patillas, una más
ancha que la otra. Una clavija con conexión a tierra tiene dos patillas y una espiga de conexión a tierra. La patilla ancha y la espiga se
proporcionan para su seguridad. Si la clavija proporcionada no puede colocarse en su tomacorriente, consulte a un electricista para
reemplazar el tomacorriente obsoleto.
10. Proteja el cable de alimentación para que nadie lo pise ni quede aplastado, especialmente en las clavijas, tomacorrientes y puntos por
donde sale del producto.
11. Utilice solamente los accesorios suministrados por el fabricante.
12. Utilice el producto sólo con el carrito, soporte, trípode, ménsula o mesa especificado por el fabricante o vendido con el propio producto.
Cuando utilice un carrito, tenga cuidado cuando mueva la combinación del carrito y la TV para evitar que se caigan y se dañen.
13. Desenchufe este producto durante las tormentas eléctricas o cuando no lo utilice durante largos períodos de tiempo.
14. Remita todas las tareas de servicio al personal técnico cualificado. Las reparaciones serán necesarias cuando se haya dañado el producto
de cualquier forma, como cuando se haya estropeado el cable o la clavija de alimentación, se hayan derramado líquidos o hayan caído
objetos en el interior del producto, cuando éste haya estado expuesto a la lluvia o a la humedad, cuando no funcione normalmente o
cuando se haya caído.
15. No se deberá exponer el producto a salpicaduras ni se deberá colocar encima de éste objetos llenos de líquidos como, por ejemplo,
floreros.
16. ADVERTENCIA: Para reducir el riesgo de incendio o descarga eléctrica, no exponga este producto a la lluvia o humedad.
17. Las tareas de instalación sólo deben ser realizadas por personal calificado y conforme todos los códigos locales.
18. A menos que este producto esté clasificado específicamente como una caja NEMA tipo 3, 3R, 3S, 4, 4X, 6 o 6P, está diseñado sólo
para uso en interiores y no se deberá instalarlo donde esté expuesto a la lluvia y humedad.
19. Utilice sólo métodos de instalación y materiales capaces de soportar cuatro veces la carga máxima especificada.
20. Utilice materiales de acero inoxidable para sujetar el soporte las superficies exteriores.
21. Para evitar daños provocados por fugas de agua cuando instale un soporte para exteriores en el techo o la pared, aplique
impermeabilizador alrededor de los orificios de los tornillos entre el soporte y la superficie de montaje.
22. Se deberá incorporar en la instalación eléctrica de la edificación un interruptor omnipolar de la red principal con una separación de
contactos de al menos 3 mm en cada polo.
23. Se deberá incorporar un dispositivo de desconexión de fácil acceso en el cableado de la instalación de la edificación.
24. Se deberá instalar la salida del tomacorriente cerca del producto y ésta deberá ser de fácil acceso.
PRECAUCIÓ N: Estas instrucciones de mantenimiento son sólo válidas para el personal de servicio técnico calificado. Para reducir el riesgo de
descargas eléctricas, no realice ninguna reparación más allá de aquellas que aparecen en las instrucciones de funcionamiento, a menos que esté
capacitado para hacerla.
PRECAUCIÓ N: Utilice sólo piezas de reemplazo recomendadas por Pelco.
El producto y/o manual podrían incluir las siguientes marcas:
Este símbolo indica que existe presente dentro de este producto voltaje peligroso que podría representar un riesgo de descarga
eléctrica.
PRECAUCIÓ N: RIESGO DE DESCARGA ELÉCTRICA. NO ABRIR.
Este símbolo indica que existen instrucciones importantes de funcionamiento y mantenimiento en la documentación que acompaña
al producto.
Indica dispositivo de aislación doble Clase II.
ADVERTENCIA: Este producto es sensible a las descargas electroestáticas (ESD). Para evitar causar daños por descargas
electroestáticas (ESD) en este producto, utilice práctica seguras para las descargas electroestáticas (ESD) durante la instalación.
Antes de tocar, ajustar o manipular este producto, colóquese correctamente una muñequera antiestática (ESD) en la muñeca y
descargue de forma apropiada su cuerpo y herramientas. Para obtener más información sobre el control de las descargas
electroestáticas (ESD) y las prácticas de manipulación seguras de los componentes electrónicos, consulte ANSI/ESD S20.20-1999
o póngase en contacto con la Asociación de Descarga Electroestática (ESD) (www.esda.org).
AVISOS DE SEGURIDAD DE UL
El producto está diseñado para obtener alimentación a través de una unidad de alimentación con aprobación UL con la denominación "L.P.S." (o
"Limited Power Source" (fuente de alimentación limitada)) y salida nominal de 48 V de CC y 0,1 A (mínimo) o 24 V de CA y 0,32 A (mínimo).
Una persona de servicio técnico calificado deberá instalar el producto y la instalación deberá cumplir con todos los códigos locales.

11
Instruções de Segurança Importantes
1. Leia estas instruções.
2. Guarde estas instruções.
3. Preste atenção a todos os avisos.
4. Siga todas as instruções.
5. Não utilize este dispositivo próximo de água.
6. Para limpar utilize apenas um pano seco.
7. Não bloqueie os orifícios de ventilação. Instale de acordo com as instruções do fabricante.
8. Não instale o dispositivo perto de fontes de calor, tais como radiadores, bocas de ar quente, fogões, ou outros aparelhos (incluindo
amplificadores) que produzam calor.
9. Não menospreze o objectivo da ficha polarizada ou da ficha com ligação à terra. Uma ficha polarizada tem dois pólos, sendo um mais
largo do que o outro. Uma ficha com ligação de terra possui dois pinos e um pólo de ligação à terra. O pólo de ligação à terra é
fornecido para sua segurança. Se a ficha fornecida não encaixar na tomada, peça a um electricista que substitua a tomada antiga.
10. Proteja o cabo de alimentação para que este não seja pisado ou apertado em especial nas fichas, tomadas e pontos onde o mesmo
sai do equipamento.
11. Utilize apenas os acessórios especificados pelo fabricante.
12. Utilize este televisor apenas com o carrinho, o suporte, o tripé ou a mesa especificado pelo fabricante, ou vendido juntamente com o
televisor. Quando utilizar um carrinho, tenha cuidado ao deslocá-lo juntamente com o aparelho para evitar os danos provocados pelo
possível derrube do mesmo.
13. Desligue o aparelho durante tempestades de relâmpagos ou sempre que não for utilizado por longos períodos de tempo.
14. As reparações devem ser realizadas apenas por pessoal qualificado. É necessário reparar o televisor sempre que este tenha sofrido
qualquer tipo de danos tais como: danos ao nível do cabo de alimentação ou da ficha, caso tenha havido derramamento de líquido ou
tenham caído objectos para o interior do televisor, este tenha sido exposto à chuva ou a humidade, o televisor não funcione
normalmente ou tenha caído.
15. O dispositivo não deve ser exposto a pingos ou salpicos e não deve colocar sobre o mesmo objectos com líquidos, tais como vasos.
16. AVISO: Para reduzir o risco de incêndio ou de choque eléctrico, não exponha este dispositivo a chuva ou humidade.
17. A instalação dever ser efectuada apenas por técnicos qualificados e deve estar em conformidade com as normais locais.
18. A unidade foi concebida para utilização no interior e não deve ser instalada num local exposto a chuva ou humidade, a não ser que a
caixa esteja especificamente marcada como NEMA Tipo 3, 3R, 3S, 4, 4X, 6 ou 6P.
19. Utilize apenas métodos de instalação e materiais capazes de suportar quatro vezes a carga máxima especificada.
20. Utilize material em aço inoxidável para fixar o suporte de montagem em superfícies no exterior.
21. Para evitar danos causados por infiltrações de água ao efectuar a instalação em tectos ou paredes exteriores, aplique um selante aos
orifícios dos parafusos entre o suporte e a superfície de montagem.
22. Deve estar incorporado na instalação eléctrica do edifício um interruptor de todos os pólos com uma distância de pelo menos 3 mm de
cada pólo.
23. Um dispositivo de interrupção deverá estar acessível e incorporado na instalação eléctrica do edifício.
24. A tomada eléctrica deverá estar instalada próximo do equipamento e ser facilmente acessível.
ATENÇ Ã O: Esta instruções de assistência são destinadas exclusivamente a técnicos de assistência qualificados. Para reduzir o risco de choque
eléctrico, não proceda a quaisquer operações de assistência para além das contidas no manual de instruções, a menos que esteja qualificado para o
fazer.
ATENÇ Ã O: Utilize apenas peças de substituição recomendadas pela Pelco.
O produto e/ou o manual poderá incluir os seguintes símbolos:
Este símbolo indica que estão presentes tensões perigosas no interior da unidade que constituem risco de choque eléctrico.
ATENÇ Ã O: RISCO DE CHOQUE ELÉCTRICO. NÃO ABRIR.
Este símbolo indica que existem instruções de utilização e manutenção importantes na literatura que acompanha esta unidade
Significa um dispositivo de Classe II com duplo isolamento.
AVISO: Este produto é sensível a Descarga Electrostática (ESD). Para evitar danos provocados por ESD neste produto, utilize
práticas de segurança contra ESD durante a instalação. Antes de tocar, ajustar ou manusear este produto, coloque correctamente
uma pulseira de ESD no pulso e faça a descarga adequada do seu corpo e ferramentas. Para obter mais informações sobre as
práticas de segurança e controlo de ESD, consulte a norma ANSI/ESD S20.20-1999 ou contacte a Electrostatic Discharge
Association (www.esda.org).
Avisos de segurança UL
O produto destina-se a ser alimentado por uma fonte de alimentação listada, assinalada como "L.P.S." (ou Fonte de alimentação limitada) e com
48Vdc de potência nominal, mínimo de 0,1A ou 24Vac, mínimo de 0,32A.
O produto deve ser instalado por um técnico qualificado e a instalação deve estar em conformidade com as normas locais.

12
Важные инструкции по технике безопасности
1. Прочитайте инструкции.
2. Сохраните инструкции.
3. Обращайте внимание на все предупреждения.
4. Выполняйте все инструкции.
5. Запрещается использовать прибор у водоемов.
6. Очистку следует выполнять сухой салфеткой.
7. Не закрывайте вентиляционные отверстия. При установке следуйте инструкциям производителя.
8. Запрещается устанавливать прибор у источников тепла, таких как радиаторы, обогреватели, плиты и другие устройства
(включая усилители), излучающие тепло.
9. В целях безопасности рекомендуется использовать полярную или заземляющую вилку. В полярной вилке имеется два
разных по ширине контакта. В заземляющей вилке имеется два контакта и заземляющий штырь. Широкий контакт или
заземляющий штырь обеспечивают безопасность. Если входящая в комплект вилка не подходит к вашей розетке,
обратитесь к электрику для замены устаревшей розетки.
10. Не наступайте на силовые кабели и не пережимайте их. Особое внимание уделяйте тем участкам, которые находятся
вблизи вилок, электрических розеток и выхода из прибора.
11. Используйте только те дополнительные приспособления и принадлежности, которые указаны производителем.
12. Используйте только те тележки, стенды, штативы, кронштейны или столы, которые указаны производителем, или
продаются вместе с прибором. При использовании тележки соблюдайте осторожность, передвигая тележку с
установленным на ней прибором, во избежание падения прибора и нанесения травмы.
13. Во время грозы, а также если прибор не используется в течение длительного времени, вынимайте вилку из розетки.
14. Все работы по обслуживанию и ремонту должен выполнять квалифицированный персонал. Ремонт выполняется в случае
каких-либо повреждений прибора, таких как повреждение силового кабеля или вилок, попадание внутрь прибора
жидкости или посторонних предметов, нахождение прибора под дождем или в условиях повышенной влажности,
появление неполадок в работе, либо падение прибора.
15. Запрещается разливать или расплескивать на прибор воду, а также ставить на него сосуды с водой, в т.ч. вазы.
16. ВНИМАНИЕ! Для уменьшения риска возгорания или поражения электрическим током, не используйте данный прибор под
дождем или при повышенной влажности.
17. Установку должен выполнять квалифицированный персонал в соответствии с местными нормами и правилами.
18. Если на корпусе прибора отсутствует маркировка NEMA тип 3, 3R, 3S, 4, 4X, 6 или 6P, это значит, что прибор
предназначен для использования только в помещении и не должен устанавливаться в тех местах, где он будет
подвергаться воздействию дождя или влаги.
19. Используйте только такие способы установки и материалы, которые способны выдержать нагрузку в четыре раза больше
расчетной.
20. При установке опоры вне помещений используйте крепеж из нержавеющей стали.
21. Чтобы защитить опору от протекания воды при ее установке вне помещений на крыше или стене, нанесите герметик
вокруг отверстий под болты между опорой и посадочной поверхностью.
22. В электропроводке здания должен быть предусмотрен полюсной выключатель с разделением контактов не менее 3 мм
для каждого полюса.
23. В электропроводку здания должно быть включено легкодоступное устройство отключения.
24. Штепсельная розетка должна находиться в доступном месте возле оборудования.
ПРЕДУПРЕЖДЕНИЕ. Данные инструкции по обслуживанию предназначены исключительно для квалифицированного персонала. Для
уменьшения риска поражения электрическим током любые операции по обслуживанию, кроме тех, которые содержатся в руководстве по
эксплуатации, должны выполняться квалифицированными специалистами.
ПРЕДУПРЕЖДЕНИЕ. Разрешается использовать только те запасные части, которые рекомендованы Pelco.
На устройстве и (или) в руководстве пользователя могут содержаться следующие обозначения:
Данный символ указывает на наличие внутри данного устройства опасного напряжения, создающего риск поражения
электрическим током.
ПРЕДУПРЕЖДЕНИЕ. РИСК ПОРАЖЕНИЯ ЭЛЕКТРИЧЕСКИМ ТОКОМ. НЕ ОТКРЫВАТЬ.
Данный символ указывает на наличие важных инструкций по эксплуатации и обслуживанию в сопровождающей литературе.
Обозначает устройство с двойной изоляцией класса II.
ВНИМАНИЕ! Данное устройство чувствительно к электростатическим разрядам (ЭСР). Во избежание повреждения
устройства электростатическим разрядом, во время установки следует принять меры по защите от ЭСР. Перед
прикосновением, регулированием или перемещением устройства правильно наденьте антистатическую манжету на запястье
и снимите электростатическое напряжение с тела и инструментов. Дополнительная информация о защите от ЭСР и технике
безопасности при работе с электронным оборудованием представлена в стандартах ANSI/ESD S20.20-1999, а также в
Ассоциации Электростатического Разряда (www.esda.org).
УВЕДОМЛЕНИЯ О БЕЗОПАСНОСТИ ЛАБОРАТОРИИ UL
Данное изделие должно поставляться в комплекте с зарегистрированным блоком питания с маркировкой «L.P.S.» (или «Источником питания с
ограниченной мощностью») и номинальной выходной мощностью 48 В пост. тока, не менее 0,1 А или 24 В пер. тока, не менее 0,32 А.
Установку изделия должен выполнять квалифицированный специалист в соответствии с местными нормами и правилами.

13
重要安全须知
1. 请阅读本说明书。
2. 请妥善保存本说明书。
3. 请注意每项警告。
4. 请遵照所有说明。
5. 该设备请勿在靠近水的地方使用。
6. 只能用干布清洁。
7. 请勿堵塞任何通风孔。请按照生产厂商的指示进行安装。
8. 请勿安装在散热器、暖风机出风口、火炉或其他发热的器具(包括放大器)等热源近旁。
9. 接地型插头有两个刀型插脚和一个第三接地插脚。设有长刀型插脚和第三接地插脚是出于安全之目的。如果提供的插头与您的电源插座
不符合,请与销售店联系将不能使用的插座更换为符合要求的插座。
10. 请保护电源线免受踩踏或紧压,特别是在插头、电源插座和从设备引出的接点处。
11. 只能使用生产厂商规定的配件/ 附件。
12. 只能与生产厂商规定或随机附送的手推车、台架、三脚架、托架或桌子一起使用。使用手推车移动该设备时要特别注意,不要因倾翻而
受伤。
13. 雷电交加的暴风雨天气或长期不使用该设备时,请拔下插头。
14. 该设备遭到损坏,比如发生电源线或插头受损、液体溅入或异物落入设备内、淋雨、受潮导致不能正常工作或设备坠落等情况时,请尽
快与经销商或维修服务中心联系。
15. 为防止水滴溅入,请不要将盛有液体的容器(如花瓶)放置在该设备上。
16. 警告:请勿将该设备置于雨水、潮湿的环境中,以免发生火灾或触电。
17. 该设备的安装应由专业安装人员遵守当地规程进行安装。
18. 该设备仅用于室内使用,除非使用符合 NEMA 类型 3、3R、3S、4、4X、6或 6P 的防护外壳,否则请勿将摄像机安装在易被暴雨淋湿
和潮湿的环境中。
19. 仅用于指定方式安装,材料能支持额定载重的 4 倍。
20. 使用不锈钢五金件来使安装固定到室外安装表面。
21. 为防止因漏水引起损坏,当安装在室外的屋顶或墙面时,应用密封胶将螺栓孔和安装表面的缝隙密封起来。
22. 在建筑中的电气装置须用全极电源开关或全极电路断路器作为断开装置,每一极触点分离至少为 3mm 。
23. 建筑安装布线需加入随时可接触到的断开装置。
24. 设备附近应安装好可方便随时使用的插座。
警告:这些操作规程仅供专业维修人员参考。为减少触电危险,请勿擅自对设备进行维修,除非你具有专业资格。
警告:仅使用 Pelco推荐的备件。
产品和/或手册可能涉及下列标志:
这个符号表示该设备有可能发生触电危险。
注意:有触电危险,请勿拆开。
这个符号表示该设备有重要操作以及维修指南。
表示为二级双重绝缘设备。
警告:本产品对静电敏感。为避免 ESD 对本产品造成损坏,安装期间请采取适当的 ESD 保护措施。触摸、调整或处理本产品前,请
务必在手腕戴好 ESD 腕带,同时对产品本体和工具适当放电。获取更多关于 ESD 操作以及安全处理电子产品的措施,请参考
ANSI/ESD S20.20-1999 或联系 ESD 协会 (www.esda.org)。
UL 安全须知
本产品需使用带"L.P.S."标识的电源,额定输出电压为 48Vdc,0.1A 最低或 24Vac,0.32A最低。
本设备的安装应由专业安装人员遵守当地规程进行安装。

14
중요한 안전 지침
1. 이 지침을 숙지하십시오.
2. 이 지침서를 보관하십시오.
3. 모든 경고사항에 유의하십시오.
4. 모든 지침을 준수하십시오.
5. 이 장비를 습기가 있는 곳에서 사용하지 마십시오.
6. 반드시 마른 천으로 닦으십시오.
7. 환기 구멍을 막지 마십시오. 제조업체의 지침에 따라 장비를 설치하십시오.
8. 라디에이터, 히트 레지스터, 스토브와 같은 열원이나 기타 열을 방출하는 기기(앰프 포함) 부근에 설치하지 마십시오.
9. 유극 플러그나 접지형 플러그의 안전 용도를 위반하지 마십시오. 유극 플러그에는 한쪽 블레이드가 다른 한쪽보다 넓은 두 개의
블레이드가 있습니다. 접지형 플러그에는 두 개의 블레이드가 있으며 추가로 접지구가 하나 더 있습니다. 면적이 넓은 블레이드 또는
추가 접지구는 안전을 위해 제공됩니다. 제공된 플러그가 사용자의 콘센트에 맞지 않는 경우 전기 기술자와 상의하여 오래된 콘센트를
교체하십시오.
10. 특히 플러그나 일반 콘센트, 기기의 플러그 연결 부분, 특히 전원코드를 밟거나 전원 코드에 압력을 가하지 않도록 주의하십시오.
11. 반드시 제조업체가 지정한 부가 장치나 액세서리를 사용하십시오.
12. 반드시 제품과 함께 판매되거나 제조업체가 지정한 카트, 스탠드, 삼각대, 받침대 또는 테이블을 사용하십시오. 카트를 사용하는 경우
카트로 기기를 옮길 때 카트가 뒤집어져서 부상을 입지 않도록 주의사항에 유의하십시오.
13. 번개를 동반한 폭풍이 발생하는 경우나 장시간 사용하지 않는 경우 본 기기의 플러그를 분리해 두십시오.
14. 모든 수리 작업은 전문 기술자에 의뢰하십시오. 전원 코드가 플러그가 손상되거나 액체나 이물질이 기기 안에 들어가거나 기기가 비나
습기에 노출되는 등의 원인에 의해 기기가 정상적으로 작동하지 않거나 기기를 실수로 떨어뜨렸을 때 발생한 기기 손상은 반드시
서비스를 받아야 합니다.
15. 기기 위에 화병을 세워두는 등 물이 채워져 있는 물체나 물방울이 떨어지거나 물이 튈 위험이 있는 곳에 기기를 두어서는 안됩니다.
16. 경고: 화재나 감전의 위험을 피하려면 기기를 비나 습기에 노출시키지 마십시오.
17. 설치 작업은 반드시 자격을 갖춘 전문 기술자가 담당해야 하며 모든 지역 코드를 확인해야 합니다.
18. 기기 표면에 특별히 NEMA 타입 3, 3R, 3S, 4, 4X, 6 또는 6P 표시가 있지 않을 경우, 해당 기기는 실내 전용으로 설계된 것이므로 비가
습기가 닿는 곳에 설치해서는 안됩니다.
19. 반드시 최대 4 시간까지 지정된 하중을 버틸 수 있는 설치 방법이나 설치 자재를 사용하십시오.
20. 옥외 바닥에 받침대를 고정하려면 스테인레스 스틸 하드웨어를 사용하십시오.
21. 옥외 지붕 위나 벽에 받침대를 설치할 때 누수로 인한 손상을 막으려면 받침대와 장착 표면 사이의 볼트 구멍에 실런트를 바르십시오.
22. 극마다 최소한 3mm의 접점 간격이 있는 전극 메인 스위치는 빌딩의 전기 설치에 통합되어 있어야 합니다.
23. 쉽게 접근할 수 있는 차단 장치가 빌딩 배선 설비에 통합되어 있어야 합니다.
24. 콘센트는 기기 부근에 설치되어 있어야 하며 쉽게 접근할 수 있어야 합니다.
주의: 이 수리 지침은 자격을 갖춘 전문 기술자용입니다. 감전의 위험을 줄이려면 사용자가 해당 자격을 갖추고 있지 않는 한 기기 작동 지침에 포함되어
있지 않은 어떠한 수리도 해서는 안됩니다.
주의: Pelco가 권장하는 교체 부품만 사용해야 합니다.
제품 및/또는 사용 설명서에는 다음과 같은 표시가 있을 수 있습니다.
이 기호는 감전의 위험을 유발하는 위험한 전압이 본 기기에 존재한다는 표시입니다.
주의: 감전의 위험. 열지 마십시오.
이 기호는 본 기기와 함께 제공되는 설명서에 중요한 작동 지침과 유지보수 지침이 들어 있다는 표시입니다.
II 등급 더블 절연 장치를 나타냅니다.
경고: 이 기기는 정전기 방전(ESD)에 민감합니다. 이 기기에서 ESD으로 인한 손상을 피하려면 설치가 진행되는 동안 ESD 안전
수칙을 준수하십시오. 이 제품을 만지거나 조정하거나 다루기 전에 ESD 손목 스트랩을 손목에 착용하고 적절한 방법으로 신체나
공구를 방전시키십시오. ESD 제어나 안전한 전기 취급 요령에 대한 자세한 내용은 ANSI/ESD S20.20-1999 를 참조하거나
ESDA(Electrostatic Discharge Association)(www.esda.org)에 문의하십시오.
UL 안전 고지사항
본 제품은 "L.P.S." (또는 "Limited Power Source") 표시가 붙고 정격 출력이 최소 48Vdc, 0.1A 또는 최소 24Vac, 0.32A 인 인증된 전원 공급장치에 의해
전원을 공급 받도록 제조되었습니다.
본 제품은 자격이 있는 기술자가 모두 현지 법규를 준수하여 설치해야 합니다.

15
Önemli Güvenlik Talimatları
1. Bu talimatları okuyun.
2. Bu talimatları saklayın.
3. Tüm uyarılara önem verin.
4. Tüm talimatları izleyin.
5. Bu aygıtı su yakınında kullanmayın.
6. Yalnızca kuru bezle temizleyin.
7. Hiçbir havalandırma deliğini engellemeyin. Üreticinin talimatlarına göre kurun.
8. Radyatör, kalorifer ızgarası, soba gibi ısı kaynaklarının ya da ısı üreten diğer aygıtların (amplifikatör dahil) yakınına kurmayın.
9. Polarize ya da topraklı tip fişin güvenlik amacını bozmayın. Polarize fiş, biri diğerinden daha geniş olan iki kanada sahiptir. Topraklı fiş
iki kanada ve üçüncü bir topraklama ucuna sahiptir. Geniş kanat ya da üçüncü uç güvenliğiniz için sağlanmıştır. Sağlanan fiş prizinize
uymazsa, eskimiş prizin değiştirilmesi için bir elektrikçiye danışın.
10. Özellikle fişlerde, uygun prizlerde ve aygıttan çıktıkları noktalarda olmak üzere, güç kablosunun üzerine basılmasını ya da
sıkıştırılmasını önleyin.
11. Yalnızca üreticinin belirttiği ek parçaları/aksesuarları kullanın.
12. Yalnızca üretici tarafından belirtilen veya aygıtla birlikte satılan el arabası, sehpa, üç ayak, destek parçası ya da masayla kullanın. Bir
el arabası kullanırken, devrilmeden kaynaklı yaralanmayı önlemek için el arabası/aygıt bileşimini hareket ettirmede dikkatli olun.
13. Gök gürültülü sağanak havalarda ve uzun süre kullanılmayacağı zamanlarda aygıtın fişini çekin.
14. Tüm servis işlemlerini yetkili servis personeline yönlendirin. Aygıt, güç kablosunun hasar görmesi, aygıt içine sıvı sıçraması ya da
nesnelerin düşmesi, aygıtın yağmura ya da neme maruz kalması, normal biçimde çalışmaması veya düşürülmesi gibi herhangi bir
biçimde hasar gördüğünde servis işlemi gereklidir.
15. Aygıtı damlamaya a da sıçramaya maruz bırakılmamalı ve vazo gibi sıvı dolu nesneler aygıt üzerine yerleştirilmemelidir.
16. UYARI: Yangın ya da elektrik çarpması riskini azaltmak için bu aygıtı yağmura veya neme maruz bırakmayın.
17. Kurulum yalnızca yetkili personel tarafından yapılmalı ve tüm yerel yasalarla uyumlu olmalıdır.
18. Birim bir NEMA Tipi 3, 3R, 3S, 4, 4X, 6 ya da 6P muhafaza olarak özellikle işaretlenmediği sürece yalnızca iç mekân kullanımı için
tasarlanmıştır ve yağmurla neme maruz kalacağı yere kurulmamalıdır.
19. Yalnızca belirtilen en fazla yükün dört katını destekleme kapasitesine sahip kurulum yöntemini ve malzemeleri kullanın.
20. Dış yüzeylere yapılan montajı sabitlemek için paslanmaz çelik donanım kullanın.
21. Bir çatı ya da duvarda dış mekân montajı yaparken, su sızıntısından kaynaklı hasarı önlemek için, montaj malzemesiyle monta yüzeyi
arasındaki cıvata deliklerine sızdırmazlık malzemesi uygulayın.
22. Binanın elektrik tesisatında, her kutupta en az 3 mm temas aralığına sahip tüm kutuplu bir şebeke anahtarı bulundurulacaktır.
23. Bina kurulumu kablo tesisatında hemen erişilebilir bir kesme aygıtı bulundurulacaktır.
24. Priz ekipmanın yakınına kurulacak ve kolayca erişilebilir olacaktır.
DİKKAT: Bu servis talimatları yalnızca yetkili servis personelinin kullanımı içindir. Elektrik çarpması riskini azaltmak için, yeterliliğiniz olmadığı sürece
çalıştırma talimatlarında verilenden başka servis işlemi gerçekleştirmeyin.
DİKKAT: Yalnızca Pelco tarafından önerilen yedek parçaları kullanın.
Ürün ve/veya kılavuzda aşağıdaki işaretler bulunabilir:
Bu simge, bu ünite içinde elektrik çarpması riski taşıyan tehlikeli gerilim bulunduğunu belirtir.
DİKKAT: ELEKTRİK ÇARPMASI RİSKİ. AÇMAYIN.
Bu simge, bu üniteyle birlikte gelen belgelerde önemli çalıştırma ve bakım talimatları olduğunu belirtir.
Sınıf II çifte yalıtılmış aygıtı belirtir.
UYARI: Bu ürün Elektrostatik Boşalma (ESD) açısından hassastır. Bu üründe ESD hasarını önlemek için kurulum sırasında ESD
güvenli uygulamaları kullanın. Bu ürüne dokunmadan, ürünü ayarlamadan ya da kullanmadan önce, bileğinize bir ESD bilekliğini
doğru biçimde takın ve vücudunuzla aletlerdeki elektriği uygun şekilde boşaltın. ESD kontrolü ve elektroniklerin güvenli kullanım
uygulamaları hakkında daha fazla bilgi için lütfen ANSI/ESD S20.20-1999'a başvurun veya Elektrostatik Boşalma Birliği'yle
(www.esda.org) iletişime geçin.
UL GÜVENLİK BİLDİRİMLERİ
Ürünün, “L.P.S.” (ya da "Sınırlı Güç Kaynağı") işaretli bir Listelenen Güç Ünitesiyle ve 48Vdc, 0,1A minimum veya 24Vac, 0,32A minimum ile
sağlanması amaçlanır.
Ürün yetkili bir servis elemanı tarafından kurulmalı ve kurulum tüm yerel yasalarla uyumlu olmalıdır.

16
.
.
.
.
.
.
.
.
.
.
.
.
.
.
.
.
.
.
.
.
.
.
.
.
UL

17
This equipment contains electrical or electronic components that must be recycled properly to comply with Directive 2002/96/EC of the
European Union regarding the disposal of waste electrical and electronic equipment (WEEE). Contact your local dealer for procedures for
recycling this equipment.
WARRANTY STATEMENT
For information about Pelco's product warranty and thereto related information, refer to www.pelco.com/warranty.
Pelco, the Pelco logo, and other trademarks associated with Pelco products referred to in this publication are trademarks of Pelco, Inc. or its affiliates.
ONVIF and ONVIF logo are trademarks of ONVIF Inc. All other product names and services are the property of their respective companies.
Product specifications and availability are subject to change without notice.
Copyright 2014, Pelco, Inc.
All rights reserved.

18
-
 1
1
-
 2
2
-
 3
3
-
 4
4
-
 5
5
-
 6
6
-
 7
7
-
 8
8
-
 9
9
-
 10
10
-
 11
11
-
 12
12
-
 13
13
-
 14
14
-
 15
15
-
 16
16
-
 17
17
-
 18
18


Pelco Sarix IBP Series Environmental Bullet Camera Hızlı başlangıç Kılavuzu
- Tip
- Hızlı başlangıç Kılavuzu
diğer dillerde
- español: Pelco Sarix IBP Series Environmental Bullet Camera Guía de inicio rápido
- français: Pelco Sarix IBP Series Environmental Bullet Camera Guide de démarrage rapide
- italiano: Pelco Sarix IBP Series Environmental Bullet Camera Guida Rapida
- Deutsch: Pelco Sarix IBP Series Environmental Bullet Camera Schnellstartanleitung
- português: Pelco Sarix IBP Series Environmental Bullet Camera Guia rápido
- English: Pelco Sarix IBP Series Environmental Bullet Camera Quick start guide
- русский: Pelco Sarix IBP Series Environmental Bullet Camera Инструкция по началу работы
İlgili makaleler
-
Pelco Sarix IBP Series Environmental Bullet Camera Kullanım kılavuzu
-
-
Pelco NET5501-XT Network Video Encoder Hızlı başlangıç Kılavuzu
-
-
Pelco Sarix Enhanced 3 Bullet Yükleme Rehberi
-
-
-
Pelco Sarix Enhanced 3 Box Yükleme Rehberi
-
-
Pelco Sarix Pro 3 IBP Series Bullet Yükleme Rehberi

