Yamaha GO44 Kullanım kılavuzu
- Kategori
- Müzik Enstrümanları
- Tip
- Kullanım kılavuzu

EN
U.R.G., Pro Audio & Digital Musical Instrument Division, Yamaha Corporation
© 2006 Yamaha Corporation
Yamaha Web Site (English Only)
http://www.yamahasynth.com
Yamaha Manual Library
http://www.yamaha.co.jp/manual/
Owner‘s Manual

This product utilizes batteries or an external power
supply (adapter). DO NOT connect this product to
any power supply or adapter other than one
described in the manual, on the name plate, or
specifically recommended by Yamaha.
WARNING: Do not place this product in a position
where anyone could walk on, trip over ,or roll any-
thing over power or connecting cords of any kind.
The use of an extension cord is not recommended!
If you must use an extension cord, the minimum
wire size for a 25’ cord (or less ) is 18 AWG. NOTE:
The smaller the AWG number ,the larger the cur-
rent handling capacity. For longer extension cords,
consult a local electrician.
This product should be used only with the compo-
nents supplied or; a cart, rack, or stand that is rec-
ommended by Yamaha. If a cart, etc., is used,
please observe all safety markings and instructions
that accompany the accessory product.
SPECIFICATIONS SUBJECT TO CHANGE:
The information contained in this manual is
believed to be correct at the time of printing. How-
ever, Yamaha reserves the right to change or mod-
ify any of the specifications without notice or
obligation to update existing units.
This product, either alone or in combination with an
amplifier and headphones or speaker/s, may be
capable of producing sound levels that could cause
permanent hearing loss. DO NOT operate for long
periods of time at a high volume level or at a level
that is uncomfortable. If you experience any hear-
ing loss or ringing in the ears, you should consult
an audiologist.
IMPORTANT: The louder the sound, the shorter
the time period before damage occurs.
Some Yamaha products may have benches
and / or accessory mounting fixtures that are
either supplied with the product or as optional
accessories. Some of these items are designed
to be dealer assembled or installed. Please
make sure that benches are stable and any
optional fixtures (where applicable) are well
secured BEFORE using.
Benches supplied by Yamaha are designed for
seating only. No other uses are recommended.
NOTICE:
Service charges incurred due to a lack of knowl-
edge relating to how a function or effect works
(when the unit is operating as designed) are not
covered by the manufacturer’s warranty, and are
therefore the owners responsibility. Please study
this manual carefully and consult your dealer
before requesting service.
ENVIRONMENTAL ISSUES:
Yamaha strives to produce products that are both
user safe and environmentally friendly. We sin-
cerely believe that our products and the production
methods used to produce them, meet these goals.
In keeping with both the letter and the spirit of the
law, we want you to be aware of the following:
Battery Notice:
This product MAY contain a small non-recharge-
able battery which (if applicable) is soldered in
place. The average life span of this type of battery
is approximately five years. When replacement
becomes necessary, contact a qualified service
representative to perform the replacement.
This product may also use “household” type batter-
ies. Some of these may be rechargeable. Make
sure that the battery being charged is a recharge-
able type and that the charger is intended for the
battery being charged.
When installing batteries, do not mix batteries with
new, or with batteries of a different type. Batteries
MUST be installed correctly. Mismatches or incor-
rect installation may result in overheating and bat-
tery case rupture.
Warning:
Do not attempt to disassemble, or incinerate any
battery. Keep all batteries away from children. Dis-
pose of used batteries promptly and as regulated
by the laws in your area. Note: Check with any
retailer of household type batteries in your area for
battery disposal information.
Disposal Notice:
Should this product become damaged beyond
repair, or for some reason its useful life is consid-
ered to be at an end, please observe all local,
state, and federal regulations that relate to the dis-
posal of products that contain lead, batteries, plas-
tics, etc. If your dealer is unable to assist you,
please contact Yamaha directly.
NAME PLATE LOCATION:
The name plate is located on the bottom of the
product. The model number, serial number, power
requirements, etc., are located on this plate. You
should record the model number, serial number,
and the date of purchase in the spaces provided
below and retain this manual as a permanent
record of your purchase.
Model
Serial No.
Purchase Date
PLEASE KEEP THIS MANUAL
SPECIAL MESSAGE SECTION
92-BP (bottom)

1. IMPORTANT NOTICE: DO NOT MODIFY THIS
UNIT!
This product, when installed as indicated in the
instructions contained in this manual, meets
FCC requirements. Modifications not expressly
approved by Yamaha may void your authority,
granted by the FCC, to use the product.
2. IMPORTANT: When connecting this product to
accessories and/or another product use only
high quality shielded cables. Cable/s supplied
with this product MUST be used. Follow all
installation instructions. Failure to follow instruc-
tions could void your FCC authorization to use
this product in the USA.
3. NOTE: This product has been tested and found
to comply with the requirements listed in FCC
Regulations, Part 15 for Class “B” digital
devices. Compliance with these requirements
provides a reasonable level of assurance that
your use of this product in a residential environ-
ment will not result in harmful interference with
other electronic devices. This equipment gener-
ates/uses radio frequencies and, if not installed
and used according to the instructions found in
the users manual, may cause interference
harmful to the operation of other electronic
devices. Compliance with FCC regulations does
* This applies only to products distributed by YAMAHA CORPORATION OF AMERICA. (class B)
not guarantee that interference will not occur in
all installations. If this product is found to be the
source of interference, which can be deter-
mined by turning the unit “OFF” and “ON”,
please try to eliminate the problem by using one
of the following measures:
Relocate either this product or the device that is
being affected by the interference.
Utilize power outlets that are on different branch
(circuit breaker or fuse) circuits or install AC line
filter/s.
In the case of radio or TV interference, relocate/
reorient the antenna. If the antenna lead-in is
300 ohm ribbon lead, change the lead-in to co-
axial type cable.
If these corrective measures do not produce
satisfactory results, please contact the local
retailer authorized to distribute this type of prod-
uct. If you can not locate the appropriate
retailer, please contact Yamaha Corporation of
America, Electronic Service Division, 6600
Orangethorpe Ave, Buena Park, CA90620
The above statements apply ONLY to those
products distributed by Yamaha Corporation of
America or its subsidiaries.
FCC INFORMATION (U.S.A.)
* This applies only to products distributed by
YAMAHA CORPORATION OF AMERICA.
COMPLIANCE INFORMATION STATEMENT
(DECLARATION OF CONFORMITY PROCEDURE)
Responsible Party : Yamaha Corporation of America
Address : 6600 Orangethorpe Ave., Buena Park, Calif. 90620
Telephone : 714-522-9011
Type of Equipment : MOBILE AUDIO INTERFACE
Model Name : GO44
This device complies with Part 15 of the FCC Rules.
Operation is subject to the following conditions:
1) this device may not cause harmful interference, and
2) this device must accept any interference received including interference that
may cause undesired operation.
See user manual instructions if interference to radio reception is suspected.
(FCC DoC)

4
(3)-9
PRECAUTIONS
PLEASE READ CAREFULLY BEFORE PROCEEDING
* Please keep this manual in a safe place for future reference.
WARNING
Always follow the basic precautions listed below to avoid the possibility of serious injury or even
death from electrical shock, short-circuiting, damages, fire or other hazards. These precautions
include, but are not limited to, the following:
• Only use the voltage specified as correct for the instrument.
The required voltage is printed on the name plate of the
instrument.
• Use the specified adaptor (PA-3C or an equivalent
recommended by Yamaha) only. Using the wrong adaptor can
result in damage to the instrument or overheating.
• Check the electric plug periodically and remove any dirt or dust
which may have accumulated on it.
• Do not place the AC adaptor cord near heat sources such as
heaters or radiators, and do not excessively bend or otherwise
damage the cord, place heavy objects on it, or place it in a
position where anyone could walk on, trip over, or roll anything
over it.
• Do not open the instrument or attempt to disassemble the
internal parts or modify them in any way. The instrument
contains no user-serviceable parts. If it should appear to be
malfunctioning, discontinue use immediately and have it
inspected by qualified Yamaha service personnel.
• Do not expose the instrument to rain, use it near water or in
damp or wet conditions, or place containers on it containing
liquids which might spill into any openings.
• Never insert or remove an electric plug with wet hands.
• Do not put burning items, such as candles, on the unit.
A burning item may fall over and cause a fire.
• If the AC adaptor cord or plug becomes frayed or damaged, or
if there is a sudden loss of sound during use of the instrument,
or if any unusual smells or smoke should appear to be caused
by it, immediately disconnect the adaptor plug from the outlet,
and have the instrument inspected by qualified Yamaha service
personnel.
CAUTION
Always follow the basic precautions listed below to avoid the possibility of physical injury to you or
others, or damage to the instrument or other property. These precautions include, but are not limited
to, the following:
• When removing the electric plug from the instrument or an
outlet, always hold the plug itself and not the cord.
• Unplug the AC power adaptor when not using the instrument,
or during electrical storms.
• Do not connect the instrument to an electrical outlet using a
multiple-connector. Doing so can result in lower sound quality,
or possibly cause overheating in the outlet.
• Do not expose the instrument to excessive dust or vibrations,
or extreme cold or heat (such as in direct sunlight, near a
heater, or in a car during the day) to prevent the possibility of
panel disfiguration or damage to the internal components.
• Do not use the instrument in the vicinity of a TV, radio, stereo
equipment, mobile phone, or other electric devices. Otherwise,
the instrument, TV, or radio may generate noise.
• Do not place the instrument in an unstable position where it
might accidentally fall over.
Power supply/AC power adaptor
Do not open
Water warning
Fire warning
If you notice any abnormality
Power supply/AC power adaptor Location

5
(3)-9
• Before moving the instrument, remove all connected adaptor
and other cables.
• When setting up the instrument, make sure that the AC outlet you
are using is easily accessible. If some trouble or malfunction
occurs, immediately disconnect the plug from the outlet.
• Before connecting the instrument to other electronic
components, turn off the power for all components. Before
turning the power on or off for all components, set all volume
levels to minimum. Also, be sure to set the volumes of all
components at their minimum levels and gradually raise the
volume controls while playing the instrument to set the desired
listening level.
• When cleaning the instrument, use a soft, dry cloth. Do not use
paint thinners, solvents, cleaning fluids, or chemical-
impregnated wiping cloths.
• Never insert or drop paper, metallic, or other objects into the
gaps on the panel. If this happens, immediately unplug the
power cord from the AC outlet. Then have the instrument
inspected by qualified Yamaha service personnel.
• Do not place vinyl, plastic or rubber objects on the instrument,
since this might discolor the panel or keyboard.
• Do not rest your weight on, or place heavy objects on the
instrument, and do not use excessive force on the buttons,
switches or connectors.
• Do not use the instrument/device or headphones for a long
period of time at a high or uncomfortable volume level, since
this can cause permanent hearing loss. If you experience any
hearing loss or ringing in the ears, consult a physician.
Yamaha cannot be held responsible for damage caused by improper use or modifications to the instrument, or data that is lost or destroyed.
SPECIAL NOTICES
- This owner’s manual is the exclusive copyright of Yamaha Corporation.
- The supplied Cubase LE, HALion SE, and Groove Agent SE are the exclusive copyrights of Steinberg Media
Technologies GmbH.
- Copying of the supplied software or reproduction of this manual in whole or in part by any means is expressly
forbidden without the written consent of the manufacturer.
-Yamaha makes no representations or warranties with regard to the use of the software and documentation
and cannot be held responsible for the results of the use of this manual and the software.
- The supplied disk is a CD-ROM. Do not attempt to play the disk on an audio CD player. Doing so may result
in irreparable damage to your audio CD player.
- Copying of the commercially available musical data including but not limited to MIDI data and/or audio data
is strictly prohibited except for your personal use.
- The screen displays as illustrated in this owner’s manual are for instructional purposes, and may appear
somewhat different from the screens which appear on your computer.
- Future upgrades of application and system software and any changes in specifications and functions will be
announced separately.
-Windows is the registered trademarks of Microsoft
®
Corporation.
- Apple and Macintosh are trademarks of Apple Computer, Inc., registered in the U.S. and other countries.
- FireWire and the FireWire symbol are trademarks of Apple Computer, Inc., registered in the U.S. and other
countries. The FireWire logo is a trademark of Apple Computer, Inc.
- Steinberg, Cubase, HALion, and Groove Agent are the registered trademarks of Steinberg Media Technologies
GmbH.
- The company names and product names in this Owner’s Manual are the trademarks or registered trademarks
of their respective companies.
- Specifications and descriptions in this owner’s manual are for information purposes only.
-Yamaha Corp. reserves the right to change or modify products or specifications at any time without prior
notice. Since specifications, equipment or options may not be the same in every locale, please check with
your Yamaha dealer.
Connections
Maintenance
Handling caution

6
Welcome to the GO44
Thank you for choosing the Yamaha GO44 Mobile Audio Interface.
The GO44 is a portable IEEE1394 (FireWire
®
) audio/MIDI interface featuring multi-channel
operation and professional-quality audio. Connect the GO44 to a computer equipped with an
IEEE1394 (FireWire) port and enjoy the powerful, versatile features of digital audio recording and
editing.
In order to take full advantage of the many features and capabilities provided by the GO44, we
urge you to read this owner’s manual thoroughly before using your GO44 system, and keep the
manual in a safe, accessible location for future reference.
Table of contents
Package Contents............................................................................................ 7
About the Included Software.......................................................................... 7
Power Supply................................................................................................... 7
Software Installation — Windows users ......................................................... 8
Compatible operating systems....................................................................... 8
Preparing to Install......................................................................................... 8
Installing the driver and the Control Panel ..................................................... 9
Assigning the GO44 as the default system audio device (Windows) ............. 11
Software Installation — Macintosh users ..................................................... 12
Compatible operating systems..................................................................... 12
Installing the Control Panel.......................................................................... 12
Assigning the GO44 as the default system audio device (Mac OS X)............ 12
Connectors and controls............................................................................... 13
Front Panel .................................................................................................. 13
Rear Panel.................................................................................................... 13
I/O cable ..................................................................................................... 14
Drivers ........................................................................................................... 16
Windows drivers .......................................................................................... 16
Mac OS X drivers ......................................................................................... 18
GO44 Control Panel ...................................................................................... 19
MAIN display ............................................................................................... 19
The ASIO control panel (Windows only)....................................................... 21
The SCENES panel ....................................................................................... 21
ABOUT ........................................................................................................ 22
Specifications................................................................................................. 23
System Requirements.................................................................................... 24
Troubleshooting............................................................................................ 25

7
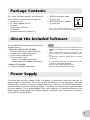
The GO44 package contains the following
items. Check the contents for missing items.
• GO44 main unit
• AC Power Adaptor (PA-3C)
*
• I/O cable
• GO44 Owner’s Manual
•2 CD-ROMs
(Windows/Macintosh hybrid CD)
• IEEE1394 (FireWire) cable
(6–pin/6–pin)
• IEEE1394 (FireWire) adaptor
(4–pin/6–pin)
* May not be included depending on your particular
area. Please check with your Yamaha dealer.
The included CD-ROMs contain the following
software (driver).
“TOOLS for GO44/GO46” CD-ROM
• Driver/Control Panel installer (Windows)
• Control Panel installer (Macintosh)
• GO44 Owner’s Manual (PDF)
• VST Instruments (VSTi)
HALion SE (Windows/Macintosh)
Groove Agent SE (Windows/Macintosh)
“Cubase LE” CD-ROM
• Cubase LE (Windows/Macintosh)
• The serial number necessary for installing Cubase LE
(Windows) is printed on a sheet included with the CD-
ROM.
• Please install Cubase LE while connected to the
internet and enter all required items during installa-
tion.
•For Macintosh computers double-click the “Cubase
LE.pkg” icon.
•To install VSTi, double-click the following file on the
“TOOLS for GO44/GO46” CD-ROM.
Windows: VSTi Set\Setup VSTi Set.exe
Macintosh: VSTi Set\Setup VSTi Set.pkg
The GO44 does not have a power switch. The power is automatically turned on when the AC
power adaptor is connected. The GO44 can also be powered via the 6–pin/6–pin IEEE1394
(FireWire) port, making an AC power adaptor unnecessary. However, not all IEEE1394 (FireWire)
controllers deliver a constant operating voltage — therefore, we recommend using the included
AC power adaptor. The AC power adaptor is also useful whenever you would like to conserve the
battery power of your laptop. The AC power adaptor is required if your computer only features a
4–pin IEEE1394 (FireWire) port.
Package Contents
About the Included Software
NOTE
Power Supply

8
Please perform the following steps in the given order. Do not connect the GO44 module to the
computer until instructed to do so.
Compatible operating systems
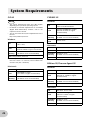
The GO44 can be used only under Windows XP (Home/Professional editions) SP (Service Pack) 1
and SP2. Other Windows versions are not supported. To check your Windows version, right click
the [My Computer] icon and select [Properties] from the context menu. You can also access this
menu item by clicking: [Start] → [Control Panel] → [System]. The Service Pack can be obtained
free of charge from the Microsoft web site (www.microsoft.com).
• Refer to the system requirements printed on the package, or in the PDF manual page 24. You can also
check the latest system requirements on the Internet.
http://www.yamahasynth.com/
• If the [System] icon is not shown in the Control Panel, click “Switch to Classic View” in the upper left of the
window to display all control panels and icons.
Preparing to Install
Select [Start] → [Control Panel] and go to [System] → [Hardware] → [Driver Signing] → [Driver
Signing Options] and check the radio button to the left of “Ignore — Install the software anyway
and don’t ask for my approval” and click [OK].
After completing the installation, make sure to restore the original setting if necessary.
Software Installation — Windows
users
NOTE
NOTE
NOTE

9
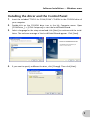
Software Installation — Windows users
Installing the driver and the Control Panel
1. Insert the included “TOOLS for GO44/GO46” CD-ROM in the CD-ROM drive of
your computer.
2. Double-click on the CD-ROM drive icon in the My Computer menu. Open
[GO44Driver_] → [GO44 Setup.exe] to start the InstallShield Wizard.
3. Select a language for the setup wizard and click [Next] to continue with the instal-
lation. The welcome message of the InstallShield Wizard appears. Click [Next].
4. If you want to specify a different location, click [Change]. Then click [Next].

10
Software Installation — Windows users
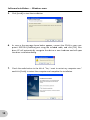
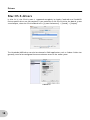
5. Click [Install] to start the installation.
6. As soon as the message shown below appears, connect the GO44 to your com-
puter’s IEEE1394 (FireWire) port using the included cable, and click [OK]. Win-
dows XP will automatically recognize the device as new hardware and will open
the driver installation dialog.
7. Check the radio button to the left of “Yes, I want to restart my computer now.”
and click [Finish] to restart the computer and complete the installation.

11
Software Installation — Windows users
8. Once the driver installation is complete, the GO44 should appear as the following
entry in the Device Manager. The Device Manager can be found on the Control
Panel under [System]
→ [Hardware]. Then click the [Device Manager] button.
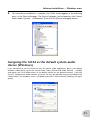
Assigning the GO44 as the default system audio
device (Windows)
If you would like to use the GO44 not only for specific audio applications, but as your default
Windows audio device, go to the Control Panel, select [Sounds and Audio Devices] → [Audio]
and specify the GO44 audio driver as the default device for the desired functions. Since the
GO44 is a professional audio interface, the levels can only be adjusted using the included GO44
Control Panel. The Windows mixer is disabled to prevent it from adversely affecting the signal
quality.

12
Compatible operating systems
The GO44 can only be used under Mac OS 10.3.4 (OS X) or higher.
Refer to the system requirements printed on the package, or in the PDF manual page 24. You can
also check the latest system requirements on the Internet.
http://www.yamahasynth.com/
Installing the Control Panel
The GO44 uses the operating system’s CoreAudio and CoreMIDI drivers. Therefore, it is not
necessary to install a device-specific driver. Simply plug the device into your IEEE1394 (FireWire)
port using the included cable and the GO44 can be used immediately. However, to take full
advantage of the advanced routing, sample rate switching, and other control features, please
install the included Control Panel.
1.
Insert the included “TOOLS for GO44/GO46” CD-ROM in the CD-ROM drive of
your computer.
2. Double-click on the CD-ROM drive icon and open [GO44Driver_] → [GO44
Setup.pkg] to start the InstallShield Wizard.
3. The welcome message of the InstallShield Wizard appears. Click [Continue].
4. Select the hard disk drive where the Mac OS is installed as the destination for the
installation. Click [Continue].
5. Click [Install] to start the installation.
6. Click [Restart] to complete the installation.
For information about the Control Panel, see page 19 of the PDF manual.
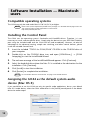
Assigning the GO44 as the default system audio
device (Mac OS X)
If you would like to use the GO44 not only for specific audio applications, but as your default
Mac OS X audio device, select the GO44 audio driver in the [Sound] control panel as the default
device for audio output.
Software Installation — Macintosh
users
NOTE
NOTE

13
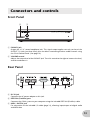
Front Panel
A PHONES jack
Output for a 1/4" stereo headphone jack. This signal output applies not only to that of the
OUTPUT 1/2 jacks (see Rear Panel), but also allows monitoring of other audio channels using
the GO44 Control Panel. (See page 19.)
B VOLUME control
Adjusts the output level of the PHONES jack. Turn this control to the right to increase the level,
and left to decrease it.
Rear Panel
C DC IN jack
Connects the AC power adaptor to this jack.
D IEEE1394 (FireWire) port
Connects the GO44 system to your computer using the included IEEE1394 (FireWire) cable.
E MIDI / DIGITAL jack
For connection of the included I/O cable (page 14), allowing input/output of digital audio
and MIDI data.
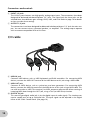
Connectors and controls
12
3 54 6 7

14
Connectors and controls
F INPUT 1/2 jacks
The GO44 System features two high-quality analog mono inputs. The connections have been
designed for balanced/unbalanced phone 1/4" jacks. The input levels for these jacks can be
selected from three different gain settings, HIGH, MID, and LOW. Refer to page 19 for details
on how to make these settings.
G OUTPUT 1/2 jacks
The connections have been designed for balanced/unbalanced phone 1/4" jacks for main out-
put. You can connect mixers, powered speakers, or amplifiers. The analog outputs operate
with instrument-compatible levels of 2.0 Vrms.
I/O cable
H MIDI IN jack
Connects MIDI devices such as MIDI keyboards and DAW controllers. For connecting MIDI
devices, connect the MIDI OUT terminal of the MIDI device to this jack using a MIDI cable.
I MIDI OUT jack
Connects to MIDI devices such as synthesizers and tone generators. For connecting MIDI
devices, connect the MIDI IN terminal of the MIDI device to this jack using a MIDI cable. This
can also be used as a MIDI Thru terminal, for MIDI sequence software that allows routing of
incoming MIDI data through the OUT jack, using a Thru (or MIDI Echo) function.
J DIGITAL IN jack
This coaxial type digital audio jack is for the digital input of audio signals. The interface can
receive sample rates of up to 24-bit/96 kHz. The input signal can be adjusted in the Digital
Mixer of the GO44 Control Panel. (See page 19.)
8 9 J K

15
Connectors and controls
When recording from a digital source, make sure that the sampling rates of both devices (e.g.
DAT recorder and laptop) are synchronized. The S/PDIF protocol contains a signal called
wordclock for this purpose. If the Master Clock switch is set to “EXTERNAL” in the GO44 Con-
trol panel, the GO44 will automatically synchronize to it and the “DIGITAL IN” channel will be
available in the mixer.
ASIO applications such as Cubase often have an option to switch the hardware from an inter-
nal to an external (sometimes also called S/PDIF) clock source. This changeover currently has
no effect on the GO44.
Make sure to use RCA pin cables specially made for digital audio applications.
K DIGITAL OUT jack
This digital audio jack is for the digital output of audio signals. The interface can transmit sam-
ple rates of up to 24-bit/96 kHz. For playback, set the routing in the Control Panel to the digi-
tal output. AC3 and DTS can also be played back via the digital output. Select “NON AUDIO”
for the digital output in the Control Panel under “ROUTING”. (See page 20.) The non-audio
signals are not sent to the analog outputs.
NOTE

16
Windows drivers
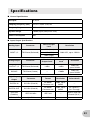
The GO44 audio interface features two kinds of audio drivers that support a variety of
applications. The audio drivers support all bit rates between 8 and 24 bits with all common
sample rates between 32 and 192 kHz. (Supports digital I/O up to 96 kHz)
MME driver
The Windows MME driver is a multi-channel driver that supports all channels of the GO44. The
specific routing options for these drivers can be found in the GO44 Control Panel. In most
Windows programs, you will encounter MME drivers with the designation “GO44(GO44 (1)) In
1” for input channel and “GO44(GO44 (1)) MC Out” for output channel.
ASIO driver
ASIO (Audio Streaming Input Output) is an audio transfer protocol developed by Steinberg. The
advantage of the ASIO driver is the extremely low audio recording and playback delay times, also
known as latency. Values of around 5 ms on fast, cleanly configured systems — at sample rates
exceeding 96 kHz — are quite realistic. The format also supports sound cards with multiple
inputs and outputs — so-called multi-I/O cards, as well as direct monitoring and multi-client
mode (ASIO 2.0 or later). In the programs that make use of Steinberg’s ASIO interface, the ASIO
driver for the GO44 is listed as “ASIO GO4x.”
Cubase LE
Drivers

17
Drivers
For Cubase, the inputs are called “Line 1/2 left GO44”, “SPDIF left GO44”, etc. Also, the outputs
(generally called “busses” or “channels”) available in the individual programs are generally called
“Multichannel 1 GO44”, “SPDIF/AC3 left GO44”, etc.
Cubase LE
MIDI driver
This driver is for using the GO44 MIDI IN and MIDI OUT ports. The driver is designated as
“GO44(GO44 (1)) Midi In 1” (MIDI input) and “GO44(GO44 (1)) Midi Out 1” (MIDI output).
MIDI files, which can be played back using Windows’ media players, are also to be transferred to
externally connected devices such as synthesizers and tone generators. Open the “Sounds and
Audio Devices Properties” window from the Windows Control Panel, go to “Audio” and set the
“MIDI music playback” device to the driver mentioned above.
NOTE

18
Drivers
Mac OS X drivers
In Mac OS X, the GO44 system is supported completely by Apple CoreAudio and CoreMIDI.
Device-specific drivers are not required. If you would like to use the GO44 for the default system
sound output, select the GO44 audio driver in [System Preferences] → [Sound] → [Output].
The CoreAudio/MIDI driver can also be selected in DAW applications such as Cubase. Buffer sizes
generally can also be configured there to accelerate access to the audio system.
Cubase LE

19
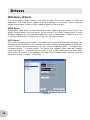
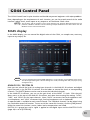
The GO44 Control Panel is quite intuitive and should not present beginners with major problems.
Here, depending on the requirements of each situation, you can have total control of the audio
interface, reduce levels, route inputs to any output or set the Master Clock values.
The functions and the positions of the control elements are generally identical between the two
platforms, Windows and Mac OS. The following example illustrations have been taken from the
Windows version of the Control Panel.
MAIN display
In the MAIN display, you can control the digital mixer of the GO44, set sample rates, route any
input to any output, etc.
If you are working with common DAW applications, you should also use the DAW for level control.
The advantage for doing this is that the settings are usually saved together with your project (song,
arrangement etc.)
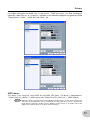
ANALOG IN / DIGITAL IN
Here you can control the levels of analog input channels in the ANALOG IN column and digital
input channels in the DIGITAL IN column. Use the faders to control the levels of corresponding
channels. The [MUTE] buttons can be used to mute the individual channels.
In the ANALOG IN column, you can set the gain levels of the INPUT 1/2 jacks. Click the pull-
down menu at the top of the ANALOG IN column and select from among the settings “LOW”,
“MID”, and “HIGH” for the input channels. Select “HIGH” to connect low-level equipment such
as microphones, and “LOW” to connect high, line-level equipment such as keyboards.
A separate fader is available for each mono channel. The individual channels can be joined using
the switchable stereo link function. To turn on/off the stereo link function, click the [PAIR] button.
While the stereo link function is active, faders and mute operations are linked.
DIGITAL IN is grayed out until a signal is applied to the digital input and the MASTER CLOCK
(page 20) is set to [EXTERNAL].
GO44 Control Panel
NOTE
NOTE

20
GO44 Control Panel
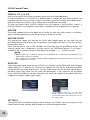
DAW IN 1/2, 3/4, 5/6
Here you can adjust the levels of the output signals sent from DAW applications.
As with the ANALOG IN / DIGITAL IN, a separate fader is available for each mono channel. The
individual channels can be joined using the switchable stereo link function (the [PAIR] button).
While the stereo link function is active, faders and mute operations are linked.
To send the mixed signal, [DIGITAL MIXER] must be assigned in the ROUTING section. If
[DIGITAL MIXER] is not assigned for any outputs, the operation of the digital mixer is ignored.
MASTER
The overall playback level of the digital mixer can be set with the Master control. In Windows,
faders and mute operations can be linked using the stereo link function.
MASTER CLOCK
This controls the sample rate used by the GO44. When digital inputs are not used, click the
[INTERNAL] button and choose from all commonly used sample rates from 32 to 192 kHz from
the pull-down menu.
When external devices such as DAT recorders are connected, click the [EXTERNAL] button. The
external sample rate is displayed in the box next to the [EXTERNAL] button. If no signal is
available or the connection has been interrupted, the message “--------” will be returned.
• When a sample rate of 192kHz is selected, only the ANALOG IN (for audio inputs) and DAW IN 1/2 (for
audio outputs) columns are available.
• When a sample rate of 192kHz is selected, avoid using MIDI inputs and outputs since this may cause some
noise and glitches in the sound.
ROUTING
Selects the output signal sent from the OUTPUT 1/2, PHONES, and DIGITAL OUT jacks. All input
signals (DAW IN 1/2, DAW IN 3/4, DAW IN 5/6, ANALOG IN, DIGITAL IN, and DIGITAL MIXER)
can be routed to the three output pairs*. Click the three buttons on the left-hand side to open a
pull-down menu from which you can select the desired pair. If you intend to use the digital
mixer, [DIGITAL MIXER] must also be selected on the input side, otherwise the signal will be sent
straight to the output, bypassing the faders.
* For the DIGITAL OUT jack, you can select
“NON AUDIO” (as shown above). In this case,
AC3 and DTS data will be transmitted only via
the digital output.
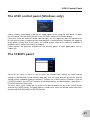
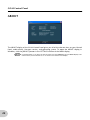
SETTINGS
Calls up the ASIO control panel (for ASIO driver settings), the SCENES panel for saving the GO44
Control Panel settings, and the ABOUT display for system related information.
NOTE
Sayfa yükleniyor ...
Sayfa yükleniyor ...
Sayfa yükleniyor ...
Sayfa yükleniyor ...
Sayfa yükleniyor ...
Sayfa yükleniyor ...
Sayfa yükleniyor ...
Sayfa yükleniyor ...
-
 1
1
-
 2
2
-
 3
3
-
 4
4
-
 5
5
-
 6
6
-
 7
7
-
 8
8
-
 9
9
-
 10
10
-
 11
11
-
 12
12
-
 13
13
-
 14
14
-
 15
15
-
 16
16
-
 17
17
-
 18
18
-
 19
19
-
 20
20
-
 21
21
-
 22
22
-
 23
23
-
 24
24
-
 25
25
-
 26
26
-
 27
27
-
 28
28


Yamaha GO44 Kullanım kılavuzu
- Kategori
- Müzik Enstrümanları
- Tip
- Kullanım kılavuzu
Diğer dillerde
- español: Yamaha GO44 Manual de usuario
- français: Yamaha GO44 Manuel utilisateur
- italiano: Yamaha GO44 Manuale utente
- svenska: Yamaha GO44 Användarmanual
- čeština: Yamaha GO44 Uživatelský manuál
- polski: Yamaha GO44 Instrukcja obsługi
- Deutsch: Yamaha GO44 Benutzerhandbuch
- português: Yamaha GO44 Manual do usuário
- English: Yamaha GO44 User manual
- dansk: Yamaha GO44 Brugermanual
- русский: Yamaha GO44 Руководство пользователя
- suomi: Yamaha GO44 Ohjekirja
- Nederlands: Yamaha GO44 Handleiding
- română: Yamaha GO44 Manual de utilizare