Schwaiger DTA4000 011 User Manual And Safety Instructions
- Tip
- User Manual And Safety Instructions

BEDIENUNGSANLEITUNG UND SICHERHEITSHINWEISE
AUSSENANTENNE DTA4000 011
USER GUIDE AND SAFETY INSTRUCTIONS
DTA4000 011 OUTDOOR AERIAL
MODE D‘EMPLOI ET CONSIGNES DE SÉCURITÉ
ANTENNE D’EXTÉRIEUR DTA4000 011
ISTRUZIONI PER L’USO E AVVERTENZE DI SICUREZZA
ANTENNA ESTERNA DTA4000 011
NÁVOD K OBSLUZE A BEZPEČNOSTNÍ POKYNY
VENKOVNÍ ANTÉNA DTA4000 011
MANUAL DE INSTRUCCIONES E INDICACIONES DE SEGURIDAD
ANTENA EXTERIOR DTA4000 011
BEDIENINGSHANDLEIDING EN VEILIGHEIDSINSTRUCTIES
BUITENANTENNE DTA4000 011
ИНСТРУКЦИЯ ПО ЭКСПЛУАТАЦИИ И УКАЗАНИЯ ПО ТЕХНИКЕ БЕЗОПАСНОСТИ
НАРУЖНАЯ АНТЕННА DTA4000 011
NÁVOD NA OBSLUHU A BEZPEČNOSTNÉ POKYNY
VONKAJŠIA ANTÉNA DTA4000 011
NAVODILA ZA UPORABO IN VARNOSTNI NAPOTKI
ZUNANJA ANTENA DTA4000 011
KULLANIM KILAVUZU VE GÜVENLİK TALİMATLARI
DTA4000 011 HARICI ANTEN
ИНСТРУКЦИИ ЗА ЕКСПЛОАТАЦИЯ И УКАЗАНИЯ ЗА БЕЗОПАСНОСТ
ВЪНШНА АНТЕНА DTA4000 011
HASZNÁLATI ÚTMUTATÓ ÉS BIZTONSÁGI TUDNIVALÓK
KÜLTÉRI ANTENNA DTA4000 011
UPUTA ZA UPORABU I SIGURNOSNE NAPOMENE
VANJSKA ANTENA DTA4000 011
INSTRUKCJA OBSŁUGI I WSKAZÓWKI BEZPIECZEŃSTWA
ANTENA ZEWNĘTRZNA DTA4000 011
INSTRUCŢIUNI DE UTILIZARE ȘI MENŢIUNI
REFERITOARE LA SIGURANŢĂ
ANTENĂ EXTERIOARĂ DTA4000 011
DTA4000 011

BEDIENUNGSANLEITUNG
2
EINFÜHRUNG
Herzlichen Glückwunsch und vielen Dank für den Kauf der Außenantenne DTA4000 011.
Diese Bedienungsanleitung soll Ihnen beim Umgang und der Bedienung mit diesem Produkt helfen. Lesen Sie die Be-
dienungsanleitung sorgfältig durch. Bewahren Sie die Anleitung während der gesamten Lebensdauer des Produktes auf
und geben diese an nachfolgende Benutzer oder Besitzer weiter.
Bitte prüfen Sie den Packungsinhalt auf Vollständigkeit und stellen Sie sicher, dass keine fehlerhaften oder beschädigten
Teile enthalten sind. Alle von uns vertriebenen Geräte entsprechen den bei Kauf gültigen Sicherheitsbestimmungen und
sind bei bestimmungsgemäßem Gebrauch grundsätzlich sicher! Zum einfacheren Lesen dieser Bedienungsanleitung wird
die Außenantenne DTA4000 011 als „Außenantenne“ bezeichnet.
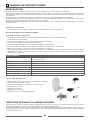
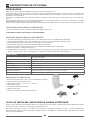
Bestimmungsgemässe Verwendung
• Die Außenantenne dient dem Empfang von digitalen Fernseh- und Radioprogrammen.
Eine andere Verwendung als angegeben ist nicht zulässig!
Sicherheitshinweise
• Bitte verwenden Sie ein passendes Steckernetzteil (siehe technische Daten). Achten Sie auf die Polarität.
• Bei dieser Außenantenne handelt es sich um ein elektronisches Produkt, welches nicht in Kinderhände gehört!
• Bewahren Sie die Außenantenne deshalb außerhalb der Reichweite von Kindern auf.
• Führen Sie keine Objekte in die Anschlüsse oder Öffnungen des Produktes ein.
• Lassen Sie die Außenantenne bei Defekten nur vom Fachmann reparieren.
• Vor Reinigung den Netzstecker ziehen
• Reinigen Sie die Außenantenne mit einem fusselfreien, maximal leicht feuchten Tuch und verwenden Sie keine ag-
gressiven Reiniger. Achten Sie hierbei besonders darauf, dass kein Wasser (keine Flüssig-/Feuchtigkeit) in das Produkt
gelangt.
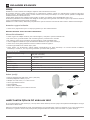
TECHNISCHE DATEN
Frequenz- / Empfangsbereich VHF (174 - 230 MHz)
UHF (470 -790 MHz)
Kanäle 5 – 12 & 21 – 60
Gewinn 36 dB
Impedanz 75 Ω
Koaxialkabel 8,5 m inklusive
Anschluss Receiver/TV 5-6 V DC 50 mA
Stromanschluss Steckernetzteil inklusive, 100-240 V AC / 12 V DC 100 mA
Schutzklasse IPX4
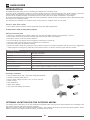
Verpackungsinhalt
• Aktive Außenantenne (UHF / VHF) mit integriertem Verstärker
• Koaxial-Anschlusskabel 8,5 m
• Steckernetzteil 100-240 V AC/ 12 V DC 100 mA
• Einschleusweiche
• Mastaufhängung
• Radio (IEC) Adapter
• Bedienungsanleitung mit Sicherheitsbestimmungen
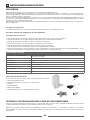
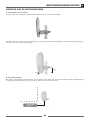
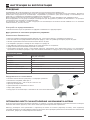
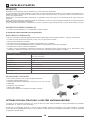
OPTIMALER AUFSTELLUNGSORT FÜR DIE AUSSENANTENNE
Um bestmöglichen Empfang zu gewährleisten, sollten Sie sicherstellen, dass zwischen dem Sender und der Außenanten-
ne möglichst wenige Hindernisse sind, die den Empfang ggfs. behindern könnten.
DVB-T(2)-Receiver haben oft eine Signalstärkeanzeige (Pegelanzeige).
Diese Anzeige ist geeignet, um die beste Antennenposition zu finden. Bitte prüfen Sie verschiedene Standorte und Aus-
richtungen der Antenne, bevor Sie diese endgültig positionieren

BEDIENUNGSANLEITUNG
3
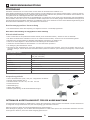
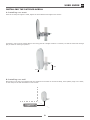
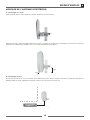
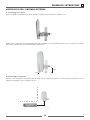
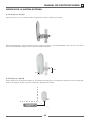
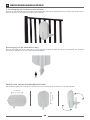
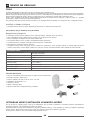
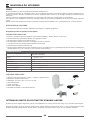
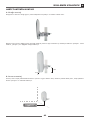
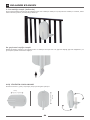
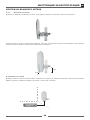
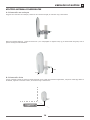
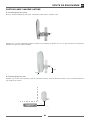
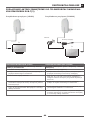
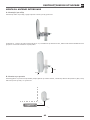
MONTAGE DER AUSSENANTENNE
A. Montage am Mast
U-Bügel durch den Mast stecken, Antennenhalterung einstellen und die Schrauben befestigen.
Binden Sie ca. 1 Meter des Koaxialkabels in ca. 0,5 m Tiefe an die Befestigungsstange, somit hat die Antenne genug Spiel
für eventuelle Änderung der Positionierung.
B. Wandmontage
Bohren Sie Löcher in die Wand entsprechend der Position der Löcher auf dem Antennenbügel. Führen Sie Kunststoffdübel
in die Löcher und befestigen Sie den Bügel an der Wand. Befestigen Sie ihn mit Schrauben.
0,5m
1m

BEDIENUNGSANLEITUNG
4
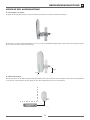
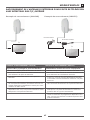
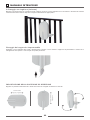
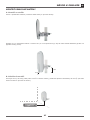
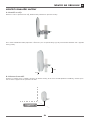
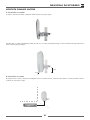
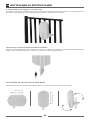
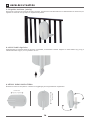
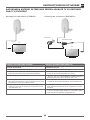
C. Geländerbefestigung (Balkon)
Montieren Sie die Antennenhalterung mit dem Bügel am Geländer. Schrauben Sie das Koaxialkabel mit den F-Stecker an
die Antenne und fixieren Sie die Antenne auf dem Drehsockel nach entsprechender Ausrichtung.
Befestigung der wasserdichten Kappe
Schließen Sie das Koaxialkabel an die F-Buchse der Antenne an und sichern Sie das Kabel. Befestigen Sie die wasser-
dichte Kappe sodass der Anschluss abgedeckt ist und kein Wasser eindringen kann.
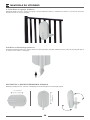
EINSTELLUNG DER EMPFANGSRICHTUNG
Stellen Sie die Antennenposition entsprechend der Ausstrahlung von horizontalen oder vertikalen Signalen ein.
VertiKal
Horizontal

BEDIENUNGSANLEITUNG
5
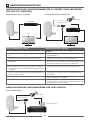
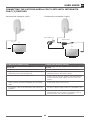
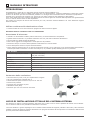
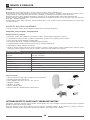
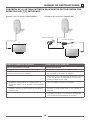
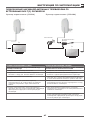
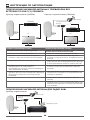
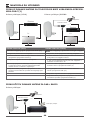
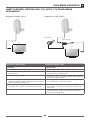
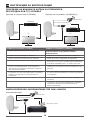
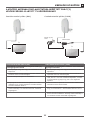
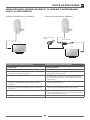
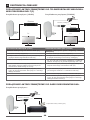
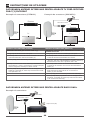
ANSCHLIESSEN DER AUSSENANTENNE FÜR TV-GERÄTE
MIT INTEGRIERTEN DVB-T(2)RECEIVER
Anschlussbeispiel (LINKS) Anschlussbeispiel (RECHTS)
ANSCHLUSSBEISPIEL (LINKS) ANSCHLUSSBEISPIEL (RECHTS)
Stromversorgung über den eingebauten
DVB-T(2)-Receiver im TV-Gerät
Stromversorgung über das
mitgelieferte externe Netzteil
1. Stellen Sie sicher, dass das Fernsehgerät ausgeschaltet
ist
1. Stellen Sie sicher, dass das Fernsehgerät ausgeschaltet
ist
2. Verbinden Sie das Koaxialkabel der Außenantenne
mit dem Antennenanschluss des TV-Gerätes.
2. Verbinden Sie das Koaxialkabel der Außenantenne mit
dem Antennenanschluss der Einschleusweiche.
3. Nun können Sie das Fernsehgerät einschalten. 3. Stecken Sie nun das Kabel des externen Netzteils in
die „DC 12 V 100 mA“ Buchse der Einschleusweiche
sowie das externe Netzteil in eine 230 V AC Steckdose.
4. Schalten Sie im Menü ihres TV-Gerätes die 5 V Strom-
versorgung ein um den externen Verstärker über das
Koaxialkabel mit Spannung zu versorgen.
4. Das kurze Koaxialkabel der Einschleus-weiche schlie-
ßen Sie an den Antenneneingang ihres TV-Gerätes an.
5. Nun können Sie nach empfangbaren Programmen
suchen. Ziehen Sie dazu ggfs. die Bedienungsanleitung
des TV-Gerätes zu Rate.
5. Ob die 5V Stromversorgung des TV-Gerätes dabei
aktiviert ist, spielt bei dieser Anschlussvariante keine
Rolle.
6. Nun können Sie das Fernsehgerät einschalten und
nach empfangbaren Programmen suchen. Ziehen Sie
dazu ggfs. die Bedienungsanleitung des TV-Gerätes
zu Rate.
TV
TV
Einschleusweiche
Power adapter

BEDIENUNGSANLEITUNG
6
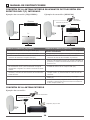
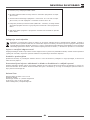
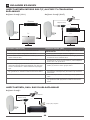
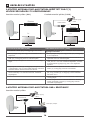
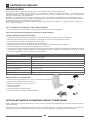
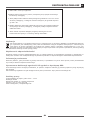
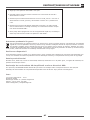
ANSCHLIESSEN DER AUSSENANTENNE FÜR TV-GERÄTE OHNE INTEGRIER-
TEN DVB-T(2)-RECEIVER
Anschlussbeispiel (LINKS) Anschlussbeispiel (RECHTS)
ANSCHLUSSBEISPIEL (LINKS) ANSCHLUSSBEISPIEL (RECHTS)
Stromversorgung über den DVB-T(2) Receiver Stromversorgung über das mitgelieferte externe
Netzteil
1. Stellen Sie sicher, dass das Fernsehgerät ausgeschaltet
ist
1. Stellen Sie sicher, dass das der DVB-T(2)-Receiver
ausgeschaltet ist.
2. Verbinden Sie das Koaxialkabel der Außenantenne mit
dem Antennen-anschluss des DVB-T(2)-Receivers.
2. Verbinden Sie das Koaxialkabel der Außenantenne mit
dem Antennenanschluss der Einspeiseweiche.
3. Nun können Sie das Fernsehgerät und den Receiver
einschalten.
3. Stecken Sie nun das Kabel des externen Netzteils in
die DC 12 V 100 mA Buchse der Einspeiseweiche sowie
das externe Netzteil in eine 230 V AC Steckdose.
4. Schalten Sie im Menü des DVB-T(2)-Receivers die 5 V
Stromversorgung ein um den in der Antenne integrier-
ten Verstärker über das Koaxialkabel mit Spannung zu
versorgen.
4. Das Koaxialkabel der Einspeiseweiche schließen Sie an
den Antenneneingang ihres DVB-T(2)-Receiver an.
5. Nun können Sie nach empfangbaren Programmen
suchen. Ziehen Sie dazu ggfs. die Bedienungsanleitung
des TV-Gerätes zu Rate.
5. Ob die 5V Stromversorgung des DVB-T(2)-Receiver
dabei aktiviert ist, spielt bei dieser Anschlussvariante
keine Rolle.
6. Nun können Sie das Fernsehgerät und den
DVB-T(2)-Receiver einschalten.
7. Jetzt können Sie nach empfangbaren Programmen
suchen. Ziehen Sie dazu ggfs. die Bedienungsanleitung
des DVB-T(2)-Receivers zu Rate.
ANSCHLIESSEN DER AUSSENANTENNE FÜR DAB+ RADIOS
Anschlussbeispiel
Receiver
TV
Receiver
TV
Einschleusweiche
Power adapter
Einschleusweiche
Power adapter
Radio (IEC) Adapter

BEDIENUNGSANLEITUNG
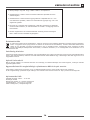
7
1. Stellen Sie sicher, dass der DAB+ Radio ausgeschaltet ist
2. Verbinden Sie das Koaxialkabel der Außenantenne mit dem Antennenan-
schluss der Einspeiseweiche.
3. Stecken Sie nun das Kabel des externen Netzteils in die DC 12 V 100 mA
Buchse der Einspeiseweiche sowie das externe Netzteil in eine 230 V AC
Steckdose.
4. Stecken Sie den beigelegten IEC Verbinder (Radio IEC Connector) auf
das kurze Koaxialkabel der Einspeiseweiche und schließen Sie das an den
Antenneneingang ihres DAB+ Empfängers an.
5. Nun können Sie nach empfangbaren Programmen suchen. Ziehen Sie dazu
ggfs. die Bedienungsanleitung des DAB+ Radios zu Rate.
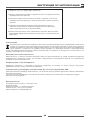
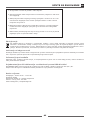
Entsorgung
Elektrische und elektronische Geräte sowie Batterien dürfen nicht mit dem Hausmüll entsorgt werden. Der Ver-
braucher ist gesetzlich verpflichtet, elektrische und elektronische Geräte sowie Batterien am Ende ihrer Lebens-
dauer an den dafür eingerichteten, öffentlichen Sammelstellen oder an die Verkaufsstelle zurückzugeben. Einzel-
heiten dazu regelt das jeweilige Landesrecht. Das Symbol auf dem Produkt, der Bedienungsanleitung bzw. der
Verpackung weist auf diese Bestimmung hin.
Haftungsausschluss
Die Schwaiger GmbH übernimmt keinerlei Haftung und Gewährleistung für Schäden die aus unsachgemäßer Installa-
tion oder Montage sowie unsachgemäßem Gebrauch des Produktes oder einer Nichtbeachtung der Sicherheitshinweise
resultieren.
Herstellerinformation
Sehr geehrter Kunde, sollten Sie technischen Rat benötigen und Ihr Fachhändler konnte Ihnen nicht weiterhelfen, kon-
taktieren Sie bitte unseren technischen Support.
Vereinfachte EU-Konformitätserklärung nach RED-Richtlinie
Hiermit erklärt die Firma SCHWAIGER GmbH, dass der Funkanlagentyp der Richtlinie 2014/53/EU entspricht.
Der vollständige Text der EU-Konformitätserklärung ist unter der folgenden Internetadresse verfügbar: http://konform.
schwaiger.de
Geschäftszeiten:
Montag bis Freitag: 08:00 - 17:00 Uhr
Schwaiger GmbH
Würzburger Straße 17 | 90579 Langenzenn
Hotline: +49 (0) 9101 702-299
www.schwaiger.de | info@schwaiger.de

USER GUIDE
8
INTRODUCTION
Congratulations and thank you for purchasing this DTA4000 011 outdoor aerial.
This user guide is designed to help you use and operate the device. Read through the User guide carefully. Store this
manual safely throughout the product‘s entire service life and pass it on to any subsequent users or owners.
Check that the supplied package is complete and ensure that none of the parts are defective or damaged.
All devices that we distribute comply with the safety regulations valid at the time of purchase, and are safe provided they
are used for the intended purpose.
For simplicity, the DTA4000 011 outdoor aerial is referred to as „outdoor aerial“ in this guide.
How to use this aerial
• The outdoor aerial is used to receive digital television and radio programmes.
It must not be used for any other purpose!
Safety instructions
• Please use a suitable plug-in power supply unit (see Technical Data). Make sure the polarity is correct.
• This outdoor aerial is an electronic product that must be kept away from children!
• Therefore, keep it out of the reach of children.
• Do not introduce any objects into the product’s connections or openings.
• Have the outdoor aerial repaired by a technician if it is defective.
• Disconnect the power plug before cleaning.
• Clean this outdoor aerial only using a lint-free, damp cloth that is as light as possible and do not use any aggressive
cleaning agents. In doing this, especially ensure that no water (no fluid or moisture) gets into the product.
TECHNICAL DATA
Frequency -/ Reception range VHF (174 - 230 MHz)
UHF (470 -790 MHz)
Channels 5 – 12 & 21 – 60
Gain 36 dB
Impedance 75 Ω
Coaxial cable 8,5 m included
Receiver/TV connection 5-6 V DC 50 mA
Electrical connection Plug-in power supply included, 100-240 V AC / 12 V DC 100 mA
Protection rating IPX4
Package content
• Active outdoor aerial (UHF / VHF) with integrated amplifier
• Coaxial connecting cable 8.5 m
• Plug-in power supply 100-240 V AC / 12 V DC 100 mA
• Power inserter
• Mast installation
• Radio (IEC) adapter
• User guide with Safety instructions
OPTIMUM LOCATION FOR THE OUTDOOR AERIAL
You should ensure that there are as few obstacles as possible which may block the signal between the transmitter and
the outdoor aerial to guarantee optimum reception.
DVB-T(2) receivers often have a signal strength indicator. This indicator will help you find the best aerial position. Check
different positions and signal directions before you finally site the aerial.

USER GUIDE
9
INSTALLING THE OUTDOOR AERIAL
A. Installing on a mast
Push the U-clamp through the mast, adjust the aerial bracket and tighten the screws.
Tie about 1 metre of the coaxial cable to the fixing post at a height of about 0.5 metres, so that the aerial has enough
play to allow for altering its position.
B. Installing on a wall
Bore holes in the wall to correspond with the positions of the holes in the aerial clamp, insert plastic plugs in the holes,
fix the clamp to the wall and fasten it with screws.
0,5m
1m

USER GUIDE
10
C. Fixing to a handrail (balcony)
Install the aerial mounting on the handrail using the clamp. Screw the coaxial cable to the aerial using the F-plug and fix
the aerial on the swivelling base after suitable directional adjustment.
Fixing the watertight cap
Connect the coaxial cable to the aerial‘s F-socket and secure the cable. Fix the watertight cap so that the connection is
covered and no water can get in.
SETTING UP THE DIRECTION FOR RECEIVING SIGNALS
Set up the position of the aerial according to the emission of horizontal or vertical signals.
Vertical
Horizontal

USER GUIDE
11
CONNECTING THE OUTDOOR AERIAL FOR TV SETS WITH INTEGRATED
DVB-T(2) RECEIVER
Connection example (left) Connection example (right)
CONNECTION EXAMPLE (LEFT) CONNECTION EXAMPLE (RIGHT)
Power supply via the built-in DVB-T(2) receiver in
the TV set
Power supply via the supplied external power sup-
ply unit
1. Make sure that the television set is switched off. 1. Make sure that the television set is switched off.
2. Plug the outdoor aerial's coaxial cable into the aerial
connection port on the television set.
2. Plug the outdoor aerial's coaxial cable into the aerial
connection port on the Power inserter.
3. You can now turn on the television set. 3. Now plug the cable of the external power supply unit
in the "12 V DC 100 mA" socket in the Power inserter
and the external power supply unit into a 230 V AC
socket.
4. Switch on the 5 V power supply on your TV screen
menu to power the external amplifier via the coaxial
cable.
4. Connect the short coaxial cable of the power inserter
to the aerial input of your TV set.
5. You can now look for channels that you can receive.
If necessary, refer to the television's user manual for
guidance.
5. When making this connection, it doesn't matter whet-
her the 5 V power supply of the TV is activated or not.
6. You can now turn on the television set and look for
channels that you can receive. If necessary, refer to
the television's user manual for guidance.
TV
TV
Power inserter
Power supply unit

USER GUIDE
12
CONNECTING THE OUTDOOR AERIAL FOR TV SETS WITHOUT INTEGRATED
DVB-T(2) RECEIVER
Connection example (LEFT) Connection example (RIGHT)
CONNECTION EXAMPLE (LEFT) CONNECTION EXAMPLE (RIGHT)
Power supply via the DVB-T(2) receiver Power supply via the supplied external power sup-
ply unit
1. Make sure that the television set is switched off. 1. Make sure that the DVB-T(2) receiver is switched off.
2. Plug the outdoor aerial's coaxial cable into the aerial
connection port on the DVB-T(2) receiver.
2. Plug the outdoor aerial's coaxial cable into the aerial
connection port on the Power inserter.
3. You can now turn on the television set and the recei-
ve r.
3. Now plug the cable of the external power supply unit
into the 12 V DC 100 mA socket of the power inserter
and the external power supply unit into a 230 V AC
socket.
4. In the menu of the DVB-T2 receiver, switch on the 5 V
power supply to power the amplifier integrated in the
aerial through the coaxial cable.
4. Connect the coaxial cable of the power inserter to the
aerial input of your DVB-T2 receiver.
5. You can now look for channels that you can receive.
If necessary, refer to the television's user manual for
guidance.
5. When making this connection, it doesn't matter whet-
her the 5 V power supply of the DVB-T2 receiver is
activated or not.
6. You can now turn on the television set and the
DVB-T(2) receiver.
7. You can now look for channels that you can receive. If
necessary, refer to the DVB-T2 receiver's user manual
for guidance.
CONNECTING THE OUTDOOR AERIAL FOR DAB+ RADIOS
Connection example:
Receiver
TV
Receiver
TV
Power inserter
Power supply unit
Power inserter
Power supply unit
Radio (IEC) adapter

USER GUIDE
13
1. Make sure that the DAB+ radio is switched off.
2. Plug the outdoor aerial‘s coaxial cable into the aerial connection port on the
Power inserter.
3. Now plug the cable of the external power supply unit into the 12 V DC 100
mA socket of the power inserter and the external power supply unit into a
230 V AC socket.
4. Plug the IEC connector provided (radio IEC connector) onto the short coaxial
cable of the power inserter and then connect that to the aerial input of your
DAB+ receiver.
5. You can now look for channels that you can receive.
If necessary, refer to the DAB+ radio user manual for guidance.
Disposal
Do not dispose of batteries or electric and electronic devices in the normal household waste. The consumer is le-
gally obliged to return electrical and electronic devices and batteries that are at the end of their useful life to the
point of sale or public collection points that have been set up for this purpose. Legislation in the country of use
governs individual details regarding disposal. The symbol on the product, the user guide or the packaging indicates
this legal requirement.
Disclaimer
Schwaiger GmbH does not accept any liability or warranty for damages that are sustained due to improper installation or
mounting, improper use of the product or non-compliance with the safety instructions.
Manufacturer‘s information
Dear Customer, Please contact our Technical Support if you need technical advice and your retailer is unable to help you.
Simplified declaration of conformity as per the RED Directive
Schwaiger GmbH hereby declares that the radio system type complies with Directive 2014/53/EU.
The complete EU declaration of conformity is available online at: http://konform.schwaiger.de
Office hours:
Monday to Friday: 8:00 a.m. - 5:00 p.m.
Schwaiger GmbH
Würzburger Straße 17 | 90579 Langenzenn
Direct line: +49 (0) 9101 702-299
www.schwaiger.de | info@schwaiger.de

MODE D‘EMPLOI
14
INTRODUCTION
Toutes nos félicitations et tous nos remerciements pour l‘achat de l‘antenne d‘extérieur DTA4000 011.
Le présent manuel est destiné à vous aider dans la manipulation et l‘utilisation de ce produit. Lisez attentivement le
mode d‘emploi. Conservez-le en lieu sûr pendant toute la durée de vie du produit et remettez-le à l‘utilisateur ou au
propriétaire suivant.
Vérifiez que le contenu du paquet est complet et assurez-vous qu‘aucun élément n‘est manquant ou abîmé.
Tous les dispositifs que nous vendons répondent aux normes de sécurité en vigueur au moment de l‘achat et sont essen-
tiellement sûrs s‘ils sont utilisés dans le cadre de l‘usage pour lequel ils sont prévus.
Afin de faciliter la lecture du présent mode d‘emploi, nous nous référons à l‘antenne d‘extérieur DTA4000 011 comme
„antenne d‘extérieur“.
Utilisation conforme à l’usage prévu
• L’antenne d‘extérieur est destinée à la réception des programmes numériques de télévision et de radio.
Toute utilisation autre que celle spécifiquement indiquée ne saurait être autorisée !
Consignes de sécurité
• Veuillez utiliser un bloc d‘alimentation approprié (voir Données techniques). Faites attention à la polarité.
• Cette antenne d‘extérieur est un produit électronique qui n‘est pas destiné aux enfants.
• Pour cette raison, conservez-la hors de la portée des enfants.
• N‘introduisez aucun objet dans les ports ou les ouvertures du produit.
• En cas de panne, ne faites réparer l’antenne d‘extérieur que par un professionnel.
• Avant tout nettoyage, débranchez la prise.
• Nettoyez l‘antenne d‘extérieur uniquement avec un chiffon non pelucheux très légèrement humide et n‘utilisez aucun
nettoyant abrasif. Faites particulièrement attention à ce qu‘aucun liquide (humidité, eau) ne pénètre dans le produit
DONNÉES TECHNIQUES
Plage de fréquence/réception VHF (174 - 230 MHz)
UHF (470 -790 MHz)
Canaux 5 – 12 & 21 – 60
Gain 36 dB
Impédance 75 Ω
Câble coaxial 8,5 m inclus
Connexion récepteur/TV 5-6 V DC 50 mA
Raccordement électrique Bloc d‘alimentation inclus, 100-240 V AC / 12 V DC 100 mA
Classe de protection IPX4
Contenu de la livraison
• Antenne d‘extérieur active (UHF / VHF) avec amplificateur intégré
• Câble coaxial de raccordement de 8,5 m
• Bloc d‘alimentation 100-240 V CA / 12 V CC 100 mA
• Alimentation auxiliaire
• Fixation pour mât
• Adaptateur radio (IEC)
• Mode d‘emploi avec consignes de sécurité
LE MEILLEUR ENDROIT POUR INSTALLER L’ANTENNE D’EXTÉRIEUR
Afin de garantir la meilleure réception, vous devez vous assurer qu’il y a le moins d’obstacles possible entre l’émetteur
et l’antenne d‘extérieur, susceptibles de gêner la réception.
Les récepteurs DVB-T(2) présentent souvent un affichage de la force du signal (indicateur de niveau). Cet affichage
est utile pour trouver la meilleure position de l’antenne. Veuillez essayer différents emplacements et orientations avant
d‘installer l’antenne dans sa position définitive.

MODE D‘EMPLOI
15
MONTAGE DE L‘ANTENNE D‘EXTÉRIEUR
A. Montage sur mât
Insérez l‘étrier dans le mât, installez le support d‘antenne et serrez les vis.
Réservez environ 1 mètre de câble coaxial en le fixant à la barre de serrage à une profondeur d‘environ 0,5 m afin que
l‘antenne ait suffisamment d‘espace pour un éventuel changement de position..
B. Montage mural
Percez des trous dans le mur en fonction de la position des trous dans le support d‘antenne, insérez des chevilles en
plastique dans les trous, appliquez le support contre le mur et fixez-le avec des vis.
0,5m
1m

MODE D‘EMPLOI
16
C. Fixation sur garde-corps (balcon)
Installez le support d‘antenne avec le collier de serrage sur le garde-corps. Vissez le câble coaxial avec le connecteur -F
à l‘antenne et fixez l‘antenne à la base pivotante dans la bonne direction.
Fixation sur garde-corps (balcon)
Connectez le câble coaxial au connecteur F de l‘antenne et fixez le câble. Serrez le capuchon étanche de façon à recouvrir
le raccord et que l‘eau ne puisse pas pénétrer.
RÉGLAGE DE LA DIRECTION DE RÉCEPTION
Ajuster la position de l‘antenne en fonction de l‘émission de signaux horizontaux et verticaux.
Vertical
Horizontal

MODE D‘EMPLOI
17
RACCORDEMENT DE L’ANTENNE D‘EXTÉRIEUR POUR POSTE DE TÉLÉVISION
AVEC RÉCEPTEUR DVB-T(2) INTÉGRÉ
Exemple de raccordement (GAUCHE) Exemple de raccordement (DROITE)
EXEMPLE DE RACCORDEMENT (GAUCHE) EXEMPLE DE RACCORDEMENT (DROITE)
Alimentation électrique par l’intermédiaire du ré-
cepteur DVB-T(2) intégré au poste de télévision
Alimentation électrique par l’intermédiaire du bloc
d'alimentation externe fourni avec l’équipement
1. Assurez-vous que le poste de télévision est éteint. 1. Assurez-vous que le poste de télévision est éteint.
2. Raccordez le câble coaxial de l’antenne d’extérieur à la
prise d’antenne du poste de télévision.
2. Raccordez le câble coaxial de l’antenne d’extérieur à la
prise d’antenne de l’alimentation auxiliaire.
3. Vous pouvez maintenant allumer votre poste de
télévision.
3. Branchez le câble du bloc d'alimentation externe dans
le port „CC 12 V 100 mA“ de l’alimentation auxiliaire,
et raccordez le bloc d'alimentation externe à une prise
230 V CA.
4. Sélectionnez l’alimentation électrique 5 V dans le menu
de votre poste de télévision, de manière à fournir un
courant électrique à l'amplificateur externe par l’inter-
médiaire du câble coaxial.
4. Connectez le câble coaxial court de l’alimentation auxi-
liaire à l'entrée d'antenne de votre poste de télévision.
5. Vous pouvez maintenant rechercher les programmes
disponibles. Pour cela, vous pouvez consulter le mode
d'emploi de votre poste de télévision.
5. L'activation ou la non-activation de l'alimentation
électrique 5 V du poste de télévision n'a aucune im-
portance dans ce type de raccordement.
6. Vous pouvez maintenant allumer votre poste de télé-
vision et rechercher les programmes disponibles. Pour
cela, vous pouvez consulter le mode d‘emploi de votre
poste de télévision.
TV
TV
alimentation auxiliaire
bloc d‘alimentation

MODE D‘EMPLOI
18
RACCORDEMENT DE L’ANTENNE D‘EXTÉRIEUR POUR POSTE DE TÉLÉVISION
SANS RÉCEPTEUR DVB-T(2) INTÉGRÉ
Exemple de raccordement (GAUCHE) Exemple de raccordement (DROITE)
EXEMPLE DE RACCORDEMENT (GAUCHE) EXEMPLE DE RACCORDEMENT (DROITE)
Alimentation électrique par l’intermédiaire du
récepteur DVB-T(2)
Alimentation électrique par l’intermédiaire du bloc
d'alimentation externe fourni avec l’équipement
1. Assurez-vous que le poste de télévision est éteint. 1. Assurez-vous que le récepteur DVB-T(2) est éteint.
2. Raccordez le câble coaxial de l’antenne d’extérieur à la
prise d’antenne du récepteur DVB-T(2).
2. Raccordez le câble coaxial de l’antenne d’extérieur à la
prise d’antenne de l’alimentation auxiliaire.
3. Vous pouvez maintenant allumer le poste de télévision
et le récepteur.
3. Branchez le câble du bloc d'alimentation externe dans
le port CC 12 V 100 mA de l’alimentation auxiliaire, et
raccordez le bloc d'alimentation externe à une prise
230 V CA.
4. Sélectionnez l’alimentation électrique 5 V dans le
menu du récepteur DVB-T(2), de manière à fournir un
courant électrique à l'amplificateur intégré à l'antenne
par l’intermédiaire du câble coaxial.
4. Connectez le câble coaxial de l’alimentation auxiliaire à
l'entrée d'antenne de votre récepteur DVB-T(2).
5. Vous pouvez maintenant rechercher les programmes
disponibles. Pour cela, vous pouvez consulter le mode
d'emploi de votre poste de télévision.
5. L'activation ou la non-activation de l'alimentation
électrique 5 V du récepteur DVB-T(2) n'a aucune
importance dans ce type de raccordement.
6. Vous pouvez maintenant allumer le poste de télévision
et le récepteur DVB-T(2).
7. Vous pouvez maintenant rechercher les programmes
disponibles. Pour cela, vous pouvez consulter le mode
d'emploi de votre récepteur DVB-T(2).
RACCORDEMENT DE L’ANTENNE D’EXTÉRIEUR POUR RADIOS DAB+
Exemple de raccordement :
Receiver
TV
Receiver
TV
alimentation auxiliaire
bloc d‘alimentation
alimentation auxiliaire
bloc d‘alimentation
Adaptateur radio (IEC)

MODE D‘EMPLOI
19
1. Assurez-vous que la radio DAB+ est éteinte.
2. Raccordez le câble coaxial de l’antenne d’extérieur à la prise d’antenne de
l’alimentation auxiliaire.
3. Branchez le câble du bloc d‘alimentation externe dans le port CC 12 V 100
mA de l’alimentation auxiliaire, et raccordez le bloc d‘alimentation externe à
une prise 230 V CA.
4. Branchez le connecteur IEC fourni (connecteur radio IEC) dans le câble co-
axial court de l‘interrupteur d‘alimentation et connectez-le à l‘entrée antenne
de votre récepteur DAB+.
5. Vous pouvez maintenant rechercher les programmes disponibles. Pour cela,
vous pouvez consulter le mode d‘emploi de votre radio DAB+.
Élimination
Les appareils électriques et électroniques, ainsi que les piles ne doivent pas être jetés avec les déchets ménagers.
Le consommateur est légalement tenu de remettre les appareils électriques et électroniques ainsi que les piles à
la fin de leur vie utile aux points de collecte publics installés dans ce but ou au point de vente. Les aspects détail-
lés en sont réglementés par le droit applicable de chaque pays. Le symbole du produit, le mode d‘emploi ainsi que
l‘emballage reportent expressément cette disposition.
Exclusion de responsabilité
Schwaiger Gmbh décline toute responsabilité ou garantie pour des dommages résultant d‘une installation ou d‘un assem-
blage incorrect, d‘une utilisation incorrecte du produit ou du non-respect des instructions de sécurité.
Informations du fabricant
Chers clients, pour toute demande de conseil technique que votre revendeur n‘a pas été en mesure de vous dispenser,
contactez notre service d‘assistance technique.
Déclaration de conformité simplifiée UE selon la directive RED
La société Schwaiger GmbH déclare par les présentes que le type d’équipement radio est conforme à la directive 2014/53/
UE. Le texte complet de la déclaration de conformité UE est disponible à l’adresse Internet suivante :
http://konform.schwaiger.de
Heures de bureau :
Du lundi au vendredi : de 08:00 à 17:00 heures
Schwaiger GmbH
Würzburger Straße 17 | 90579 Langenzenn
Hotline : +49 (0) 9101 702-299
www.schwaiger.de | info@schwaiger.de

MANUALE ISTRUZIONI
20
INTRODUZIONE
Congratulazioni e grazie di aver acquistato questa antenna esterna DTA4000 011.
La presente guida per l’utente è ideata come ausilio per l’uso del dispositivo. Legga accuratamente la guida per l’utente.
Conservi le istruzioni per tutta la durata del prodotto e le consegni all’eventuale successivo utilizzatore o proprietario.
Verifichi che il contenuto sia completo e si accerti che non siano contenute parti difettose o danneggiate.
Tutti i nostri apparecchi sono conformi alle disposizioni di sicurezza vigenti al momento dell’acquisto e sono generalmente
sicuri in caso di utilizzo conforme alle disposizioni.
Per rendere più semplice la lettura delle istruzioni per l’uso, l‘antenna esterna DTA4000 011 viene definita di seguito
antenna esterna.
Utilizzo conforme alla destinazione d’uso
• L’antenna esterna serve alla ricezione di programmi radio e televisivi digitali.
Un utilizzo diverso è indicato come non ammissibile!
Avvertenze di sicurezza
• Utilizzare un alimentatore adatto (vedere Dati tecnici). Prestare attenzione alla polarità.
• Questa antenna esterna è un prodotto elettronico che non può essere utilizzato dai bambini!
• Conservarla fuori dalla portata dei bambini.
• Non inserire oggetti nei collegamenti o nelle aperture del prodotto.
• Incaricare sempre un tecnico della riparazione dell’antenna in caso di difetti.
• Prima della pulizia estrarre la spina di alimentazione.
• Pulire l‘antenna esterna solo con un panno leggermente umido e privo di lanugine e non utilizzare detergenti abrasivi.
Prestare particolare attenzione a evitare che l‘acqua (o un prodotto liquido/umidità) penetri nel prodotto.
DATI TECNICI
Gamma di frequenze/di ricezione VHF (174 - 230 MHz)
UHF (470 -790 MHz)
Canale 5 – 12 & 21 – 60
Guadagno 36 dB
Impedenza 75 Ω
Cavo coassiale 8,5 m incluso
Collegamento ricevitore/TV 5-6 V DC 50 mA
Allacciamento elettrico Alimentatore a spina incluso, 100-240 V AC / 12 V DC 100 mA
Classe di protezione IPX4
Contenuto della confezione
• Antenna esterna (UHF / VHF) con amplificatore integrato
• Cavo di collegamento coassiale 8,5 m
• Alimentatore a spina 100-240 V CA/12 V CC 100 mA
• Inseritore di potenza
• Elemento per montaggio su palo
• Adattatore radio (IEC)
• Istruzioni per l‘uso con norme di sicurezza
LUOGO DI INSTALLAZIONE OTTIMALE DELL’ANTENNA ESTERNA
Per garantire la migliore ricezione possibile, assicurarsi che ci siano il minor numero possibile di ostacoli tra il trasmetti-
tore e l‘antenna esterna che potrebbero ostacolare la ricezione.
I ricevitori DVB-T2 in genere dispongono di un indicatore dell’intensità del segnale (indicatore del livello). Tale indicatore
è adatto a trovare la posizione migliore dell’antenna. Si prega di controllare diverse posizioni e orientamenti dell‘antenna
prima di posizionarla definitivamente
Sayfa yükleniyor ...
Sayfa yükleniyor ...
Sayfa yükleniyor ...
Sayfa yükleniyor ...
Sayfa yükleniyor ...
Sayfa yükleniyor ...
Sayfa yükleniyor ...
Sayfa yükleniyor ...
Sayfa yükleniyor ...
Sayfa yükleniyor ...
Sayfa yükleniyor ...
Sayfa yükleniyor ...
Sayfa yükleniyor ...
Sayfa yükleniyor ...
Sayfa yükleniyor ...
Sayfa yükleniyor ...
Sayfa yükleniyor ...
Sayfa yükleniyor ...
Sayfa yükleniyor ...
Sayfa yükleniyor ...
Sayfa yükleniyor ...
Sayfa yükleniyor ...
Sayfa yükleniyor ...
Sayfa yükleniyor ...
Sayfa yükleniyor ...
Sayfa yükleniyor ...
Sayfa yükleniyor ...
Sayfa yükleniyor ...
Sayfa yükleniyor ...
Sayfa yükleniyor ...
Sayfa yükleniyor ...
Sayfa yükleniyor ...
Sayfa yükleniyor ...
Sayfa yükleniyor ...
Sayfa yükleniyor ...
Sayfa yükleniyor ...
Sayfa yükleniyor ...
Sayfa yükleniyor ...
Sayfa yükleniyor ...
Sayfa yükleniyor ...
Sayfa yükleniyor ...
Sayfa yükleniyor ...
Sayfa yükleniyor ...
Sayfa yükleniyor ...
Sayfa yükleniyor ...
Sayfa yükleniyor ...
Sayfa yükleniyor ...
Sayfa yükleniyor ...
Sayfa yükleniyor ...
Sayfa yükleniyor ...
Sayfa yükleniyor ...
Sayfa yükleniyor ...
Sayfa yükleniyor ...
Sayfa yükleniyor ...
Sayfa yükleniyor ...
Sayfa yükleniyor ...
Sayfa yükleniyor ...
Sayfa yükleniyor ...
Sayfa yükleniyor ...
Sayfa yükleniyor ...
Sayfa yükleniyor ...
Sayfa yükleniyor ...
Sayfa yükleniyor ...
Sayfa yükleniyor ...
Sayfa yükleniyor ...
Sayfa yükleniyor ...
Sayfa yükleniyor ...
Sayfa yükleniyor ...
Sayfa yükleniyor ...
Sayfa yükleniyor ...
Sayfa yükleniyor ...
Sayfa yükleniyor ...
Sayfa yükleniyor ...
Sayfa yükleniyor ...
Sayfa yükleniyor ...
Sayfa yükleniyor ...
Sayfa yükleniyor ...
Sayfa yükleniyor ...
Sayfa yükleniyor ...
Sayfa yükleniyor ...
-
 1
1
-
 2
2
-
 3
3
-
 4
4
-
 5
5
-
 6
6
-
 7
7
-
 8
8
-
 9
9
-
 10
10
-
 11
11
-
 12
12
-
 13
13
-
 14
14
-
 15
15
-
 16
16
-
 17
17
-
 18
18
-
 19
19
-
 20
20
-
 21
21
-
 22
22
-
 23
23
-
 24
24
-
 25
25
-
 26
26
-
 27
27
-
 28
28
-
 29
29
-
 30
30
-
 31
31
-
 32
32
-
 33
33
-
 34
34
-
 35
35
-
 36
36
-
 37
37
-
 38
38
-
 39
39
-
 40
40
-
 41
41
-
 42
42
-
 43
43
-
 44
44
-
 45
45
-
 46
46
-
 47
47
-
 48
48
-
 49
49
-
 50
50
-
 51
51
-
 52
52
-
 53
53
-
 54
54
-
 55
55
-
 56
56
-
 57
57
-
 58
58
-
 59
59
-
 60
60
-
 61
61
-
 62
62
-
 63
63
-
 64
64
-
 65
65
-
 66
66
-
 67
67
-
 68
68
-
 69
69
-
 70
70
-
 71
71
-
 72
72
-
 73
73
-
 74
74
-
 75
75
-
 76
76
-
 77
77
-
 78
78
-
 79
79
-
 80
80
-
 81
81
-
 82
82
-
 83
83
-
 84
84
-
 85
85
-
 86
86
-
 87
87
-
 88
88
-
 89
89
-
 90
90
-
 91
91
-
 92
92
-
 93
93
-
 94
94
-
 95
95
-
 96
96
-
 97
97
-
 98
98
-
 99
99
-
 100
100


Schwaiger DTA4000 011 User Manual And Safety Instructions
- Tip
- User Manual And Safety Instructions
Diğer dillerde
- slovenčina: Schwaiger DTA4000 011
- español: Schwaiger DTA4000 011
- français: Schwaiger DTA4000 011
- italiano: Schwaiger DTA4000 011
- čeština: Schwaiger DTA4000 011
- polski: Schwaiger DTA4000 011
- Deutsch: Schwaiger DTA4000 011
- English: Schwaiger DTA4000 011
- русский: Schwaiger DTA4000 011
- Nederlands: Schwaiger DTA4000 011
- română: Schwaiger DTA4000 011
İlgili Makaleler
Diğer Belgeler
-
 One For All AMPLI 1TV SV9610 El kitabı
-
Hama 69044290 El kitabı
-
Philips SDV4235/10 Kullanım kılavuzu
-
-
-
-
Philips SDV5122P/12 Kullanım kılavuzu
-
Panasonic TX32FW334 Kullanma talimatları
-
-
