Motorola HX550 Kullanım kılavuzu
- Kategori
- Mobil kulaklıklar
- Tip
- Kullanım kılavuzu

Motorola Mobility, Inc. and the Stylized M Logo are trademarks or registered
trademarks of Motorola Mobility, Inc. Trademark Holdings, LLC. All other
product or service names are the property of their respective owners.
The Bluetooth trademark and logos are owned by the Bluetooth SIG, Inc.
and any use of such marks by Motorola Mobility, Inc. is under license.
© 2012 Motorola Mobility, Inc. All rights reserved.
68014301110
motorola.com
MOTOROLA HX550

Motorola Mobility, Inc. and the Stylized M Logo are trademarks or registered
trademarks of Motorola Mobility, Inc. Trademark Holdings, LLC. All other
product or service names are the property of their respective owners.
The Bluetooth trademark and logos are owned by the Bluetooth SIG, Inc.
and any use of such marks by Motorola Mobility, Inc. is under license.
© 2012 Motorola Mobility, Inc. All rights reserved.
68014301110
MOTOROLA HX550


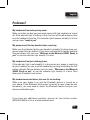
1
Figure 1
Figure 2
1
2
3
4
5
6
7
8
9

2
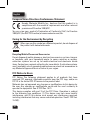
Figure 3
2
1

English
3
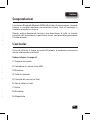
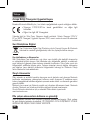
Congratulations
Your Motorola HX550 Bluetooth headset delivers everything you need to stay
connected including clear calls, hands-free texting, and custom comfort.
We’ve crammed all of the main features of your headset into this handy
guide, and in a matter of minutes you’ll see how easy your headset is to use.
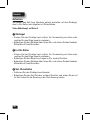
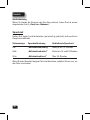
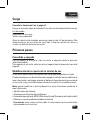
Your headset
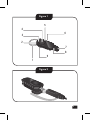
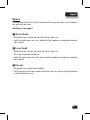
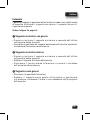
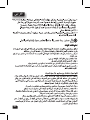
Take a moment to familiarise yourself with your new Bluetooth headset.
See figure 1 on page 1.
1 Ear hook
2 Micro-USB charging connector
3 Microphone
4 Call button
5 Volume button (on side)
6 Status light (on side)
7 Boom
8 Microphone
9 Ear speaker

English
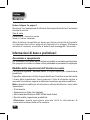
4
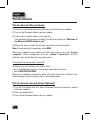
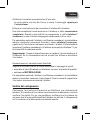
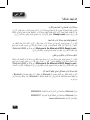
Charge it
See figure 2 on page 1.
Charge your headset before using it. Headset is not functional while charging.
Status light
Red/Yellow = charging
Green = fully charged
Note: Your battery is designed to last the life of your product. It should only
be removed by a recycling facility. Any attempt to remove or replace your
battery will damage your headset.
A few essentials to get you started
Turn on & off
To turn headset on: flip the boom to the open/extended position
To turn headset off: flip the boom to the closed/folded position
Change voice interface setting
Your headset supports English voice prompts by default.
You can select a different language or turn the voice interface off through
the settings menu: press and hold the Call button while turning on the
headset and follow the voice prompts to make changes.
Note: other features can be changed or turned on/off in the settings menu:
• Caller ID
• Multipoint (two phone) connections
• WBS (Wide-band Audio) on/off
• Reset to factory default
Caution: This action erases all pairing information stored in your headset.

English
5
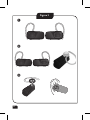
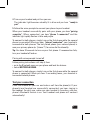
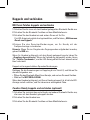
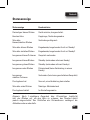
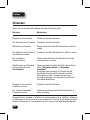
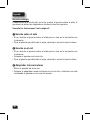
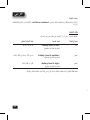
Wear it
You can optimise the fit of your headset with the on-ear hook, in-ear hook or
ear gels with no hook.
See figures 3 on page 2.
1
On-ear hook
• Rotate and turn the on-ear hook for left or right use.
• Look the hook over your ear, and point the headset microphone towards
your mouth.
2
In-ear hook
• Rotate and turn the on-ear hook for left or right use.
• Fit in-ear hook onto earpiece.
• Loop the hook over your ear, and point the headset microphone towards
your mouth.
Ear gel
• Remove on-ear hook from headset.
• Fit the ear gel on the ear piece and place it on your ear by placing the loop
in the bend of your ear.

English
6
Pair & connect
Pair & connect with your phone
1 Turn off any Bluetooth devices previously paired with your headset.
2 Turn on the Bluetooth feature on your phone.
3 Turn on your headset and put it on your ear.
The indicator light becomes steadily lit in blue and you hear “Welcome to
the Motorola HX550. Ready to pair”.
4 Follow the voice prompts to connect your phone to your headset.
Note: If prompted for the passkey, enter 0000.
When your headset successfully pairs with your phone, you hear “pairing
complete”. When connected, you hear “phone 1 connected” and the
indicator light rapidly flashes blue and purple.
Pairing with voice prompts turned off
Follow pairing instructions until step 3, then:
• go to the Bluetooth menu on your phone and look for devices.
• select MOTOROLA HX550.
When your headset successfully pairs with your phone, the indicator light
flashes purple and blue and you hear 2 ascending tones.
Pair & connect a second phone (Optional)
1 Turn off first phone and any other Bluetooth devices previously paired
with your headset.
2 Turn your headset off.
3 Turn on the Bluetooth feature on your phone.

English
7
4 Turn on your headset and put it on your ear.
The indicator light becomes steadily lit in blue and you hear “ready to
pair”.
5 Follow the voice prompts to connect your phone to your headset.
When your headset successfully pairs with your phone, you hear“pairing
complete”. When connected, you hear“phone 1 connected” and the
indicator light rapidly flashes in blue and purple.
To connect to both phones, simply turn on the first phone while the second
phone is connected. When you hear “phone 2 connected”, your headset is
connected to both phones. The last paired phone (your second phone) is
now your primary phone (or “phone 1”) for voice dial functionality.
Tip: You have 20 seconds to turn on your first phone. If reconnection fails,
turn your headset off and on.
Pairing with voice prompts turned off
Follow pairing instructions until step 4, then:
• go to the Bluetooth menu on your phone and look for devices.
• select MOTOROLA HX550.
To connect to both phones, simply turn on the first phone while the second
phone is connected. When you hear 2 ascending tones, your headset is
connected to both phones.
Test your connection
Place the headset on your ear and make a call from the phone(s). If your
phone(s) and headset are successfully connected, you hear ringing in
the headset. For daily use, make sure your headset is turned on, and your
phone’s Bluetooth feature is on. Your headset and phone will connect
automatically!

English
8
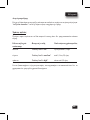
Calls
Note: Some features and phone/network dependent.
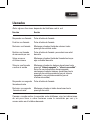
Function Action
Answer call Press the Call button.
End a call Press the Call button.
Reject call Press and hold a Volume button until you hear
an audio tone.
Make a voice dial call Press the Call button and you hear an audio tone.
Redial last call Press and hold the Call button until you hear an
audio tone.
Mute or unmute a call Press and hold both Volume buttons until you hear
“mute on” or “mute off”.
Headset with voice prompts off: press and hold
both volume buttons until you hear 1 ascending
tone (for mute on) and 1 descending tone (for mute
off).
Answer second incoming call Press the Call button.
Reject second incoming call Press and hold a Volume button until you hear a
tone.
Tip: When connected to two phones, follow the voice prompts to perform
functions such as voice dial and redial on the desired phone.

English
9
Caller ID
If your phone knows your caller’s number, then you hear “call from
<number>” on an incoming call.
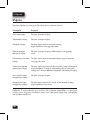
Talk time
Press and hold both Volume buttons while not on a call.
Status light Voice prompt Remaining talk time
red “battery level is low” less than 1.5 hours
yellow “battery level is medium” between 1.5 to 3.5 hours
green “battery level is high” more than 3.5 hours
To save battery power, turn off the headset when you don’t use it for an
extended time.

English
10
Status light
Status light Status
3 blue flashes Powering on/off
Steady blue Pairing/connect mode
Rapid blue/purple flashes Connection successful
Quick blue flash Incoming/outgoing call on phone 1
Quick purple flash Incoming/outgoing call on phone 2
Slow blue pulse Connected (on a call)
Slow blue flash Standby (connected to one phone)
Slow green flash Standby (connected to two phones)
Slow red flash Idle (not connected to a phone)
Slow purple pulse Connected call muted
Steady red Attempting to connect
quick red flash Low battery
Steady purple In settings mode
Note: After 1 minute on a call or 20 minutes of inactivity, the light stops
flashing to conserve power, but the headset remains on. Closing the boom
will also save battery life.

English
11
Problems?
My headset will not enter pairing mode.
Make sure that any devices previously paired with the headset are turned
off. If the indicator light is flashing in blue, first turn off the other device, then
turn the headset off and on. The indicator light becomes steadily lit in blue
and you hear “ready to pair”.
My phone doesn’t find my headset when searching.
Make sure the indicator light on your headset is steadily lit in blue when your
phone is searching for devices. If not, press and hold the Call button and both
Volume buttons until you hear “Welcome to the Motorola HX550. Ready to
pair” or see the indicator light steadily lit in blue.
My headset will not pair with my phone.
If the indicator light is not steadily lit in blue when your phone is searching
for your headset, you can reset the headset by pressing and holding the Call
button and both Volume buttons until you hear “Welcome to the Motorola
HX550. Ready to pair” or see the indicator light steadily lit in blue. Then
follow pair & connect instructions.
My headset connected before, but now it’s not working.
Make sure your phone is on and the Bluetooth feature is turned on in
your phone. If the Bluetooth feature was turned off or was turned on only
temporarily, you may need to restart the Bluetooth feature and pair your
phone and headset again.
If you have any additional questions, please call your hotline number
(0870-9010-555) or visit us at www.motorola.com .

English
12
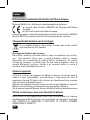
European Union Directives Conformance Statement
Hereby, Motorola Mobility Inc., declares that this product is in
compliance with the essential requirements and other relevant
provisions of Directive 1999/5/EC.
You can view your product’s Declaration of Conformity (DoC) to Directive
1999/5/EC (the R&TTE Directive) at www.motorola.com/rtte.
Caring for the Environment by Recycling
When you see this symbol on a Motorola product, do not dispose of
the product with household waste.
Recycling Mobile Phones and Accessories
Do not dispose of mobile phones or electrical accessories, such as chargers
or headsets, with your household waste. In some countries or regions,
collection systems are set up to handle electrical and electronic waste
items. Contact your regional authorities for more details. If collection systems
aren’t available, return unwanted mobile phones or electrical accessories to
any Motorola Approved Service Centre in your region.
FCC Notice to Users
FCC Notice The following statement applies to all products that have
received FCC approval. Applicable products bear the FCC logo, and/or an
FCC ID in the format FCC-ID:xxxxxx on the product label.
Motorola has not approved any changes or modifications to this device by
the user. Any changes or modifications could void the user’s authority to
operate the equipment. See 47 CFR Sec. 15.21.
This device complies with part 15 of the FCC Rules. Operation is subject
to the following two conditions: (1) This device may not cause harmful
interference, and (2) this device must accept any interference received,
including interference that may cause undesired operation. See 47 CFR Sec.
15.19(3).

English
13
European Union Directives Conformance Statement
Hereby, Motorola Mobility Inc., declares that this product is in
compliance with the essential requirements and other relevant
provisions of Directive 1999/5/EC.
You can view your product’s Declaration of Conformity (DoC) to Directive
1999/5/EC (the R&TTE Directive) at www.motorola.com/rtte.
Caring for the Environment by Recycling
When you see this symbol on a Motorola product, do not dispose of
the product with household waste.
Recycling Mobile Phones and Accessories
Do not dispose of mobile phones or electrical accessories, such as chargers
or headsets, with your household waste. In some countries or regions,
collection systems are set up to handle electrical and electronic waste
items. Contact your regional authorities for more details. If collection systems
aren’t available, return unwanted mobile phones or electrical accessories to
any Motorola Approved Service Centre in your region.
FCC Notice to Users
FCC Notice The following statement applies to all products that have
received FCC approval. Applicable products bear the FCC logo, and/or an
FCC ID in the format FCC-ID:xxxxxx on the product label.
Motorola has not approved any changes or modifications to this device by
the user. Any changes or modifications could void the user’s authority to
operate the equipment. See 47 CFR Sec. 15.21.
This device complies with part 15 of the FCC Rules. Operation is subject
to the following two conditions: (1) This device may not cause harmful
interference, and (2) this device must accept any interference received,
including interference that may cause undesired operation. See 47 CFR Sec.
15.19(3).
This equipment has been tested and found to comply with the limits for a
Class B digital device, pursuant to part 15 of the FCC Rules. These limits are
designed to provide reasonable protection against harmful interference in
a residential installation. This equipment generates, uses and can radiate
radio frequency energy and, if not installed and used in accordance with
the instructions, may cause harmful interference to radio communications.
However, there is no guarantee that interference will not occur in a particular
installation. If this equipment does cause harmful interference to radio or
television reception, which can be determined by turning the equipment off
and on, the user is encouraged to try to correct the interference by one or
more of the following measures:
• Reorient or relocate the receiving antenna.
• Increase the separation between the equipment and the receiver.
• Connect the equipment to an outlet on a circuit different from that to which
the receiver is connected.
• Consult the dealer or an experienced radio/TV technician for help.
Approved Accessories
Use of accessories not approved by Motorola, including but not limited to
batteries, antennas, and convertible covers, may cause your mobile device
to exceed RF energy exposure guidelines and may void your mobile device’s
warranty.
Motorola recommends that you always use Motorola-branded chargers.
Motorola devices are designed to work with Motorola chargers.
For approved Motorola accessories, visit our Web site at: www.motorola.com
Use & safety for battery-powered accessories
Your battery is designed to last the life of the product. It should only be
removed by a recycling facility. ANY ATTEMPT TO REMOVE OR REPLACE
YOUR BATTERY WILL DAMAGE THE PRODUCT.
• Battery life may temporarily shorten in low-temperature conditions (-10°C
for storage/use below 0°C for recharge) or permanently reduce in high
temperature conditions (above 60°C for storage/use or above 45°C for
recharge).

English
14
• Do not let your mobile device get wet.
• Do not store your accessory in a parked car or direct sunlight.
WARNING: MAY EXPLODE IF DISPOSED OF IN FIRE.
Driving Precautions
Check and obey the laws and regulations on the use of mobile devices in the
area where you drive. The use of wireless devices and their accessories in
your area may be prohibited or restricted. The use of wireless phones while
driving may cause distraction. Discontinue a call if you can’t concentrate on
driving. When using your mobile device while driving, please:
• Give full attention to driving and to the road.
• Use your hands-free solution to perform hands-free calls.
• Pull off the road and park before making or answering a call if driving
conditions so require.
Caution about high volume usage
Warning: Exposure to loud noise from any source for extended periods of
time may temporarily or permanently affect your hearing. The louder the
volume sound level, the less time is required before your hearing could be
affected. Hearing damage from loud noise is sometimes undetectable at first
and can have a cumulative effect. To protect your hearing:
• Start your volume control at a low setting and use as low a volume as
possible.
• Limit the amount of time you use headsets or headphones at high volume.
• Where possible, use your headset in a quiet environment with low
background noise.
• Avoid turning up the volume to block out noisy surrounding.
• Turn the volume down if you can’t hear people speaking near you.
If you experience hearing discomfort, including the sensation of pressure or
fullness in your ears, ringing in your ears, or muffled speech, you should stop
listening to the device through your headset or headphones and have your
hearing checked by your doctor.
Félicitations
Votre oreillette Bluetooth Motorola HX550 vous offre tout ce dont vous avez
besoin pour rester connecté : appels clairs, envoi de messages texte sans
utiliser de clavier et options de port à l’oreille pour un confort d’utilisation.
Les principales fonctions de votre oreillette sont présentées dans ce guide
pratique. En quelques minutes, vous découvrirez à quel point votre oreillette
est simple à utiliser.
Votre oreillette
Prenez le temps de vous familiariser avec votre nouvelle oreillette Bluetooth.
Voir figure 1, page 1.
1 Tour d’oreille
2 Connecteur de charge micro-USB
3 Microphone
4 Touche d’appel
5 Touche de volume (sur le côté)
6 Témoin d’état (sur le côté)
7 Tige-micro déployable
8 Microphone
9 Écouteur

Français
15
Félicitations
Votre oreillette Bluetooth Motorola HX550 vous offre tout ce dont vous avez
besoin pour rester connecté : appels clairs, envoi de messages texte sans
utiliser de clavier et options de port à l’oreille pour un confort d’utilisation.
Les principales fonctions de votre oreillette sont présentées dans ce guide
pratique. En quelques minutes, vous découvrirez à quel point votre oreillette
est simple à utiliser.
Votre oreillette
Prenez le temps de vous familiariser avec votre nouvelle oreillette Bluetooth.
Voir figure 1, page 1.
1 Tour d’oreille
2 Connecteur de charge micro-USB
3 Microphone
4 Touche d’appel
5 Touche de volume (sur le côté)
6 Témoin d’état (sur le côté)
7 Tige-micro déployable
8 Microphone
9 Écouteur

Français
16
Charge
Voir figure 2, page 1.
Chargez votre oreillette avant de l’utiliser. Vous ne pouvez pas utiliser
l’oreillette pendant sa charge.
Témoin d’état
Rouge/Jaune = en cours de charge
Vert = charge terminée
Remarque : la batterie de votre produit a été conçue pour fonctionner
pendant toute la durée de vie de celui-ci. Seul un centre de recyclage
est autorisé à extraire la batterie. Toute tentative d’extraction ou de
remplacement de la batterie endommagera votre oreillette.
Quelques bases pour commencer
Mise sous/hors tension
Pour allumer l’oreillette: déployer la tige micro
Pour éteindre l’oreillette: replier la tige-micro
Modification du paramètre de l’interface vocale
Par défaut, votre oreillette prend en charge les instructions vocales en anglais.
Vous pouvez sélectionner une autre langue ou désactiver l’interface vocale
via le menu des paramètres : appuyez sur la touche d’appel et maintenez-la
enfoncée tout en mettant l’oreillette sous tension, puis suivez les instructions
vocales afin de procéder aux modifications.
Remarque : il est possible de modifier ou d’activer/désactiver d’autres
fonctions dans le menu des paramètres :
• Identication de l’appelant
• Connexions multipoint (deux téléphones)
• Activer/désactiver WBS (Téléphonie à large bande)
• Restaurer les paramètres congurés par défaut
Attention : cette opération entraîne la suppression de toutes les
informations préalablement enregistrées sur votre oreillette.

Français
17
Installation de votre oreillette
Vous avez la possibilité de porter l’oreillette de différentes manières : avec
le tour d’oreille seul, avec le tour d’oreille et un support intra-auriculaire ou
avec un embout gel seul.
Voir figures 3, page 2.
1 Avec tour d’oreille
• Tournez le tour d’oreille an de l’adapter à une utilisation à l’oreille droite
ou gauche.
• Placez le tour d’oreille autour de votre oreille et orientez le microphone
vers votre bouche.
2 Avec le tour d’oreille et support intra-auriculaire
• Tournez le tour d’oreille an de l’adapter à une utilisation à l’oreille droite
ou gauche.
• Ajoutez le support intra-auriculaire à l’écouteur.
• Placez le tour d’oreille autour de votre oreille et orientez le microphone
vers votre bouche.
Avec un embout gel
• Enlevez le tour d’oreille de l’oreillette.
• Ajoutez l’embout gel à l’écouteur et placez-le dans l’oreille en insérant
l’anneau gel dans le creux de l’oreille.
Sayfa yükleniyor ...
Sayfa yükleniyor ...
Sayfa yükleniyor ...
Sayfa yükleniyor ...
Sayfa yükleniyor ...
Sayfa yükleniyor ...
Sayfa yükleniyor ...
Sayfa yükleniyor ...
Sayfa yükleniyor ...
Sayfa yükleniyor ...
Sayfa yükleniyor ...
Sayfa yükleniyor ...
Sayfa yükleniyor ...
Sayfa yükleniyor ...
Sayfa yükleniyor ...
Sayfa yükleniyor ...
Sayfa yükleniyor ...
Sayfa yükleniyor ...
Sayfa yükleniyor ...
Sayfa yükleniyor ...
Sayfa yükleniyor ...
Sayfa yükleniyor ...
Sayfa yükleniyor ...
Sayfa yükleniyor ...
Sayfa yükleniyor ...
Sayfa yükleniyor ...
Sayfa yükleniyor ...
Sayfa yükleniyor ...
Sayfa yükleniyor ...
Sayfa yükleniyor ...
Sayfa yükleniyor ...
Sayfa yükleniyor ...
Sayfa yükleniyor ...
Sayfa yükleniyor ...
Sayfa yükleniyor ...
Sayfa yükleniyor ...
Sayfa yükleniyor ...
Sayfa yükleniyor ...
Sayfa yükleniyor ...
Sayfa yükleniyor ...
Sayfa yükleniyor ...
Sayfa yükleniyor ...
Sayfa yükleniyor ...
Sayfa yükleniyor ...
Sayfa yükleniyor ...
Sayfa yükleniyor ...
Sayfa yükleniyor ...
Sayfa yükleniyor ...
Sayfa yükleniyor ...
Sayfa yükleniyor ...
Sayfa yükleniyor ...
Sayfa yükleniyor ...
Sayfa yükleniyor ...
Sayfa yükleniyor ...
Sayfa yükleniyor ...
Sayfa yükleniyor ...
Sayfa yükleniyor ...
Sayfa yükleniyor ...
Sayfa yükleniyor ...
Sayfa yükleniyor ...
Sayfa yükleniyor ...
Sayfa yükleniyor ...
Sayfa yükleniyor ...
Sayfa yükleniyor ...
Sayfa yükleniyor ...
Sayfa yükleniyor ...
Sayfa yükleniyor ...
Sayfa yükleniyor ...
Sayfa yükleniyor ...
Sayfa yükleniyor ...
Sayfa yükleniyor ...
Sayfa yükleniyor ...
Sayfa yükleniyor ...
Sayfa yükleniyor ...
Sayfa yükleniyor ...
Sayfa yükleniyor ...
Sayfa yükleniyor ...
Sayfa yükleniyor ...
Sayfa yükleniyor ...
Sayfa yükleniyor ...
Sayfa yükleniyor ...
Sayfa yükleniyor ...
Sayfa yükleniyor ...
Sayfa yükleniyor ...
Sayfa yükleniyor ...
Sayfa yükleniyor ...
Sayfa yükleniyor ...
Sayfa yükleniyor ...
-
 1
1
-
 2
2
-
 3
3
-
 4
4
-
 5
5
-
 6
6
-
 7
7
-
 8
8
-
 9
9
-
 10
10
-
 11
11
-
 12
12
-
 13
13
-
 14
14
-
 15
15
-
 16
16
-
 17
17
-
 18
18
-
 19
19
-
 20
20
-
 21
21
-
 22
22
-
 23
23
-
 24
24
-
 25
25
-
 26
26
-
 27
27
-
 28
28
-
 29
29
-
 30
30
-
 31
31
-
 32
32
-
 33
33
-
 34
34
-
 35
35
-
 36
36
-
 37
37
-
 38
38
-
 39
39
-
 40
40
-
 41
41
-
 42
42
-
 43
43
-
 44
44
-
 45
45
-
 46
46
-
 47
47
-
 48
48
-
 49
49
-
 50
50
-
 51
51
-
 52
52
-
 53
53
-
 54
54
-
 55
55
-
 56
56
-
 57
57
-
 58
58
-
 59
59
-
 60
60
-
 61
61
-
 62
62
-
 63
63
-
 64
64
-
 65
65
-
 66
66
-
 67
67
-
 68
68
-
 69
69
-
 70
70
-
 71
71
-
 72
72
-
 73
73
-
 74
74
-
 75
75
-
 76
76
-
 77
77
-
 78
78
-
 79
79
-
 80
80
-
 81
81
-
 82
82
-
 83
83
-
 84
84
-
 85
85
-
 86
86
-
 87
87
-
 88
88
-
 89
89
-
 90
90
-
 91
91
-
 92
92
-
 93
93
-
 94
94
-
 95
95
-
 96
96
-
 97
97
-
 98
98
-
 99
99
-
 100
100
-
 101
101
-
 102
102
-
 103
103
-
 104
104
-
 105
105
-
 106
106
-
 107
107
-
 108
108


Motorola HX550 Kullanım kılavuzu
- Kategori
- Mobil kulaklıklar
- Tip
- Kullanım kılavuzu
Diğer dillerde
- español: Motorola HX550 Manual de usuario
- français: Motorola HX550 Manuel utilisateur
- italiano: Motorola HX550 Manuale utente
- Deutsch: Motorola HX550 Benutzerhandbuch
- English: Motorola HX550 User manual
İlgili Makaleler
-
Motorola H720 Hızlı başlangıç Kılavuzu
-
-
Motorola H790 - Headset - Monaural Hızlı başlangıç Kılavuzu
-
Motorola HK200 Hızlı başlangıç Kılavuzu
-
-
-
-
-
-
