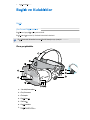
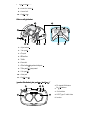
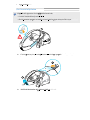
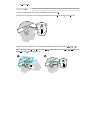
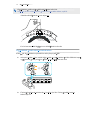
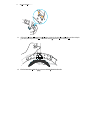
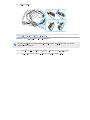
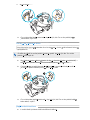
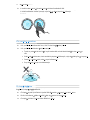
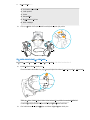
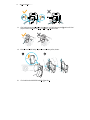
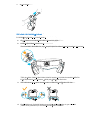
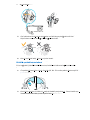
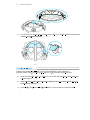
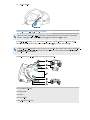
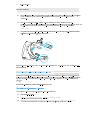
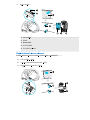
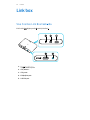
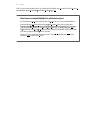
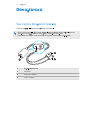
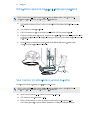
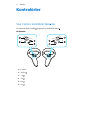
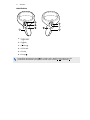
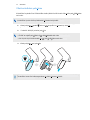
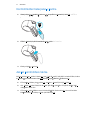
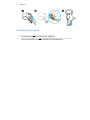
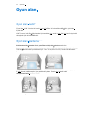
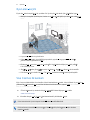
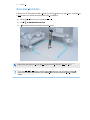
Vive Cosmos Kullanici rehberi

Tip
Kullanici rehberi
VIVE Cosmos User guide
VIVE Kullan m K lavuzu
Contents
System requirements
What's inside the box? 5
What are the system requirements? 5
Headset and headphones
Headset 7
Headphones 24
Common solutions 35
Link box
About the link box for VIVE Cosmos 36
Connecting the headset to your computer via the link box 37
Restarting the link box 37
Can I use older versions of the link box with VIVE Cosmos? 37
Can I use a laptop with VIVE Cosmos? 38
Converter
About the converter for VIVE Cosmos 39
Connecting the headset to your computer via the converter 40
Restarting the converter for VIVE Cosmos 40
Can I use a laptop with VIVE Cosmos? 41
Controllers
About the VIVE Cosmos controllers 42
Inserting the batteries into the controller 44
Removing the batteries from the controller 45
Attaching the lanyards to the controllers 45
Turning the controllers on or off 46
Pairing the controllers with the headset 47
Checking the battery level of the controllers 47
Play area
What is the play area? 48
Planning your play area 48
Choosing the play area 49
Setting up VIVE Cosmos for the first time 49
Setting up the play area 50
Resetting the play area 51
What is the recommended space for the play area? 51
Can I include space occupied by furniture for the play area? 51
Does VIVE Cosmos store my room or environment image? 51
Will VR apps that are for limited spaces or stationary experiences only work with a room-scale setup? 51
How do I resolve download errors during VIVE Setup installation? 51
I can't complete the room setup. What should I do? 52
2 Contents
çerik
Sistem Gereklilikleri
Kutu çeri i
Sistem gereksinimleri nelerdir?
çerik
Ba l k ve Kulakl klar
Ba l k
Kulakl klar
Ortak Çözümler
Link box
Vive Cosmos link box hakk nda
Link box ile vive cosmosu bilgisayara ba lama
Link box yeniden ba latma
Eski link box ile Vive Cosmos kullanabilir miyim?
Vive Cosmos'u diziüstü bilgisayar ile kullanabilir miyim?
Çevirici
Vive Cosmos çevirisi hakk nda
Çevirici aparat ile Vive Cosmos bilgisayara ba lama
Vive Cosmos için çeviriciyi yeniden ba latmak
Vive Cosmos'u diziüstü bilgisayar ile kullanabilir miyim?
Kontrolcüler
Kontrolcüler Hakk nda
Kontrolcülere pillerin yerle tirilmesi
Kontrolcülerden pillerin ç kart lmas
Ask lar n kontrolcülere ba lanmas
Kontrolcülerin açma ve kapama
Ba l k ile kontrolcüleri e le tirme
Kontrolcülerin pil seviyesini kontrol etme
Oyun Alan
Oyun alan nedir?
Oyun alan n n planlama
Oyun alan seçimi
Vive Cosmos ilk kurulum
Oyun alan kurulumu
Oyun alan resetleme
Oyun alan için tavsiye edilen ölçüler
çerisinde e yalar olan alan oyun alan olarak kullanabilir miyim?
Vive Cosmos benim oyun alan m n resimlerini ve bilgilerini al rm
S n rl alanlar ve sabit deneyimler kullan labilir mi ? Vive Cosmos sadece oda ölçe inde mi çal r?
Vive kurulumu esnas nda indirme hatalar n nas l engelleyebilirim?
Oda kurulumunu tamamlayam yorum, ne yapmal y m?
VIVE Reality System
What is VIVE Reality System? 53
What is Lens? 53
What is Origin? 54
Settings
Disabling Volume limit 56
Capturing screenshots in VR 56
Seeing real surroundings 56
Enabling motion compensation 57
Updating the firmware 57
Troubleshooting VIVE Cosmos 57
Joining the VIVE Cosmos beta program 58
Setting the power supply frequency 58
What do the error codes and messages mean? What can I do? 58
Trademarks and copyrights
Index
3 Contents
VIVE Reality Sistemi
Vive Reality sistemi nedir
Lens Nedir
Origin nedir?
Ayarlar
Ses seviyesi s n r n devre d b rakma
VR içerisinde ekran görüntüsü alma
Gerçek dünyay görüntüleme
Hareket telafisini etkinle tirme
Yaz l m güncelleme
Vive Cosmos sorun giderme
Vive Cosmos Beta program na kat lma
Güç kayna frekans n ayarlama
Hata kodlar ve mesajlar ne anlama gelir? Ne yapmal y m?
Ticari markalar ve Telif haklar
ndeks
çerik
About this guide
We use the following symbols to indicate useful and important information:
This is a note. It provides detailed information for setup, common questions, and what to do in
specific situations.
This is a tip. It will give you an alternative way to do a particular step or procedure that you may
find helpful.
This indicates important information that you need in order to accomplish a certain task or to
get a feature to work properly.
This is a warning. Take note to avoid potential problems or prevent damage to your hardware.
Information contained in this guide may have changed. For the most up-to-date information,
including the latest version of this guide, go to VIVE Support.
Before using the product, carefully review VIVE safety information and follow all product safety
and operating instructions on https://www.vive.com/legal/.
4 About this guide
K lavuz Hakk nda
K lavuz hakk nda
A a daki sembolleri kullan l ve önemli noktalr not etmek için kullan yoruz
Bu bir nottur. Kurulum, s k sorulan sorular ve belirli durumlarda ne yap lmas gerekti i hakk nda
ayr nt l bilgi sa lar
Bu bir ipucu. Size tam yard m bulabilece iniz belirli bir ad m veya prosedürü uygulaman z
için alternatif bir yol sunar.
Bu, belirli bir görevi yerine getirmek veya düzgün çal abilmek için bir özellik elde etmek için
ihtiyac n z olan önemli bilgileri gösterir.
Bu bir uyar d r. Potansiyel sorunlar önlemek veya donan m n za zarar gelmesini önlemek için
not al n.
güncel bilgiler için VIVE Destek bölümüne gidin.
Bu k lavuzdaki bilgiler de i mi olabilir. Bu k lavuzun en son sürümü de dahil olmak üzere en
Ürünü kullanmadan önce VIVE güvenlik bilgilerini dikkatlice gözden geçirin ve tüm ürün güvenli i
ve çal t rma talimatlar n https://www.vive.com/legal/ adresinde izleyin.
System requirements
What's inside the box?
Your VIVE Cosmos comes with the following items, which you'll use to experience immersive VR
environments:
Main
component
Accessories
VIVE Cosmos §Headset cable (attached)
§Audio cable (attached)
§Top strap (attached)
§Face cushion frame with cushions (attached)
§Cleaning cloth
§On-ear headphones (attached)
To use your own headphones with VIVE Cosmos, you'll need the replacement kit for
headphones. For details on how to order the kit, contact customer care.
Link box §Power adapter
§DisplayPort cable
§USB 3.0 cable
Controllers
(x2)
§Lanyards (attached, x2)
§AA alkaline batteries (x4)
What are the system requirements?
To use VIVE Cosmos, your computer must meet the following system requirements.
Component Minimum system requirements Recommended system
requirements
Processor Intel® Core i5-4590/AMD FX
8350 equivalent or better
Intel Core i5-4590/AMD FX 8350
equivalent or better
5 System requirements
Sistem Gereksinimleri
Sistem gereksinimleri
Kutu içerisinde neler var?
Vive Cosmos etkileyici sanal gerçeklik deneyimi için a a dakiler ile birlikte gelir;
AksesuarlarAna
Ürünler
Ses kablosu (dahili)
Üst kay (dahili)
Ön ve arka paedler (dahili)
Temizleme mendili
Kulak üstü kulakl klar (dahili)
Detaylar ve sipari için mü teri hizmetleri ile ileti ime geçin.
Vive Cosmos ile kendi kulakl klar n z kullanmak için de i im kitine ihtiyac n z olacak.
DisplayPort
Güç adaptörü
kablosu
USB 3.0 kablosu
Ask lar (dahili, x2)
AA alkali pil (x4)
Kontrolcüler
Sistem gereksinimleri nelerdir?
Vive Cosmos kullanmak için bilgisayar n z n a a daki özelliklerde olmas gereklidir
Parçalar Minimum sistem gereksinimi Tavsiye edilen sistem gereksinimi
8350 dengi veya daha iyisi dengi veya daha iyisi
Ba l k kablosu ( dahili)
Component Minimum system requirements Recommended system
requirements
GPU NVIDIA® GeForce® GTX 970 4GB,
AMD Radeon R9 290 4GB
equivalent or better VR Ready
graphics card.
Refer to AMD or NVIDIA's VR Ready
website for a list of VR Ready
graphics cards.
NVIDIA GeForce GTX 1070/Quadro
P5000 equivalent or better, AMD
Radeon Vega 56 equivalent or better
VR Ready graphics card.
Refer to AMD or NVIDIA's VR Ready
website for a list of VR Ready graphics
cards.
Memory 4 GB RAM or more 8 GB RAM or more
Video output DisplayPort 1.2 or newer DisplayPort 1.2 or newer
USB port 1x USB 3.0 or newer 1x USB 3.0 or newer
Operating
system
Windows® 10 Windows 10
6 System requirements
Parçalar Minimum sistem gereksinimleri Tavsiye edilen sistem
gereksinimleri
dengi veya daha iyisi ekran kart P5000 dengi veya daha iyisi, AMD
Radeon Vega 56 dengi veya daha iyisi
VR haz r ekran kart .
AMD ve NVIDIA's VR Ready
kartlar için websitelerini
kontrol edin
AMD ve NVIDIA's VR Ready
kartlar için websitelerini
kontrol edin .
Ram 8 GB RAM veya daha fazlas4 GB RAM veya daha fazlas
DisplayPort 1.2 veya daha yenisi DisplayPort 1.2 or veya daha yenisi
1x USB 3.0 veya daha yenisi 1x USB 3.0 veya daha yenisi
Windows 10 Windows 10
Video Ç k
USB port
letim
Sistemi
Sistem gereksinimleri
Headset and headphones
Headset
About the VIVE Cosmos headset
The headset is your window to the VR environment.
The headset has cameras that are used for inside-out tracking.
The cameras on the headset are sensitive. Do not cover or scratch the cameras.
Front and side views
1. Side/tracking cameras
2. Dual cameras
3. Front cover
4. Headset band
5. Top strap
6. Headset cable
7. Headset cable strip
7 Headset and headphones
Ba l k ve Kulakl klar
Ba l k
Vive Cosmos Ba l k Hakk nda
Ba l k sanal gerçekli e aç lan pencerenizdir
Ba l k içten d a tarama için üzerinde kameralar bulundurur
Ba l k üzerindeki kameralar hassast r üzerini örtmeyin veya çizmeyin
Ön ve yan görüntüler
Ön kapak
Ba l k kay
Ön çift camera
Yan takip kameralar
Üst kay
Ba l k kablosu
Ba l k kablosu tutucu
Ba l k ve kulakl klar
8. On-ear headphone
9. Status light
10. Headset button
Back and bottom views
1. Adjustment dial
2. Side cushion
3. Front pad
4. Mic
5. Visor
6. Nose rest
7. Interpupillary distance (IPD) knob
8. Face cushion frame
9. Face cushion
10. Back pad
11. Headset band
Inner view (face cushion frame removed)
1. Front cover lock button
2. Headset cable
3. Audio cable
4. USB Type-C cable slot
5. Lenses
8 Headset and headphones
Kulak üstü kulakl k
Durum ledi
Ba l k tu u
Arka ve alt görünüm
Ön ped
Ayar kadran
Mikrofon
Vizör
Yan yast k
Burunluk
Göz bebe i ayarlama topac
Yüz yast çerçevesi
Ba l k kay
Yüz yast
Arka ped
çerden Görünüm (yüz yast ç kart lm ) Ön kapak kilit butonu
Ba l k kablosu
Ses kablosu
Lensler
USB Type-C kablo slotu
Ba l k ve kulakl klar
Putting on the VIVE Cosmos headset
Before wearing the headset for the first time, make sure to:
§Peel off the protective film on the lenses.
§Fully loosen the band and peel off the protective film starting from the left side of the band.
1. Detach the velcro fastener on the top strap, and then loosen the band by turning the
adjustment dial counter-clockwise.
2. While holding the visor with one hand, pull up the band.
9 Headset and headphones
Ba l k ve kulakl klar
Vive Cosmos kafaya takma
Ba l k ilk defa giymeden önce a a dakileri kontol edin;
Lensler üzerindeki koruyucular ç kar n
Band tamamen gev etin ve band n sol taraf ndan ba layan koruyucu filmi soyun.
Üst kay tutucuyu aç n ve ba l k kadran n sola do ru gev etin
Vizörü tek elle tutarken ba l k band n kald r n
3. Hold the visor to your eyes. Adjust the position of the visor until you see a clear image
inside the headset.
4. Pull down the headset band around the back of your head until you hear a click. The click
indicates that the headset band has locked into place.
When you pull down the band, make sure the headset cable is not caught in between the band
and your head. Let the headset cable run straight down your back.
5. Turn the adjustment dial clockwise until the headset fits snugly.
10 Headset and headphones
Ba l k ve kulakl klar
Vizörü gözünüze tutun ve ba l k içerisinde görüntüyü netle tirene kadar ayarlama yap n.
Ba l k band n kilik sesi duyana kadar ba n z n arkas na do ru indirin, bu ses ba l n
kilitlendi ini ifade eder.
Ba l k band n a a do ru çekerken kablonun ba l k ile kafa aras nda s k mad ndan emin
olun. Kablonun arkan zdan a a sal nmas n sa lay n.
Ayar kadran n sola do ru çevirin ve tam oturana kadar s k n.
Make sure the visor faces straight ahead. If the band sits too low or high on the back of
your head, the visor will be tilted. It will also be difficult to position the on-ear headphones
properly on your ears. If there's light leakage around the areas of your nose or cheeks,
adjust the position of the band.
6. Adjust the top strap until snug, and then fasten the velcro strap.
11 Headset and headphones
Vizörün kafaya tam oturdu undan emin olun. E er ba l k band ba n z n çok alt na veya
üstüne gelirse ba l k e ik durur. Ayr ca kulakl klar n za tam olarak takman zda zorla acakt r.
Burnunuzun veya yanaklar n z n çevresinde k s z nt lar varsa ba l k band n n pozisyonunu
de i tirin.
Ba l k band n n iyice s k n ve son olarak üst band sabitleyin.
Ba l k ve kulakl klar
If there's light leakage around the areas of your nose or cheeks, readjust the strap and
reposition the band.
Can I wear my prescription glasses while using VIVE Cosmos?
Most glasses fit inside the headset.
Make sure that no part of your glasses scratch the headset lenses.
Adjusting the IPD on the headset
Interpupillary distance (IPD) is the distance between the centers of your pupils. A quick way to get
an estimate is by facing a mirror and holding a millimeter ruler against your brow. Use this
measurement as a guide to adjust the distance between the lenses of the headset so that you'll
have a better viewing experience.
To increase the distance between the lenses, rotate the IPD knob clockwise. To decrease, rotate
the IPD knob counterclockwise.
As you adjust the IPD, you'll see a prompt indicating the current distance between the centers of
the lenses.
12 Headset and headphones
Ba l k ve Kulakl klar
Burun veya yanak kenarlar n zdan k s zmas var ise ba l ve kay lar tekrar ayarlay n
Vive Cosmos'u kullan rken numaral gözlüklerimi kullabilir miyim?
Ço u gözlük vizör içerisine s abilir.
Gözlü ünüzün ba l n lenslerini çizmemesine dikkat edin.
Göz bebe i mesafesi ayarlama.
(IPD) göz bebeklerinizin merkezleri aras ndaki mesafedir. Bunu ö renmenin en kolay yoluda
aynan n kar s na geçerek ka lar n z n ortas n baz alarak ölçmektir. Bu ölçüm size lensler aras
uzakl n daha net olmas için referans olacakt r.
Göz bebe i mesafesini ayarlarken, lenslerin merkezleri aras ndaki geçerli mesafeyi belirten bir
bilgi istemi görürsünüz
Lensler aras ndaki mesafeyi artt rmak için göz bebe i mesafesi ayar topuzunu saat yönünde çevirin.
Küçültmek için göz bebe i mesafesi ayar topuzunu saat yönünün tersine çevirin.
Flipping up the visor
Quickly take a break from VR to check your surroundings.
While wearing VIVE Cosmos, hold the visor with one or both hands, and then gently flip it up.
To return it to its original position, tilt the visor down until it completely covers your eyes.
If you wear large glasses, you may need to adjust the headset to sit higher on your head when
flipping the visor up or down.
13 Headset and headphones
Vizörü kald rma
Çevrenizi kontrol etmek için sanal gerçeklikten hemen bir mola al n.
VIVE Cosmos'u giyerken vizörü bir veya iki elinizle tutun ve ard ndan yava ça yukar çevirin.
Orijinal konumuna getirmek için vizörü tamamen gözlerinizi örtünceye kadar a a do ru e in.
büyük gözlükler kullan yorsan z vizörü yukar a a hareket ettirmek için ba l ba n z n biraz daha
yukar s na yerle tirmeniz gerekecek.
Ba l k ve kulakl klar
Connecting a USB device to VIVE Cosmos
You can connect a compatible USB Type-C device to VIVE Cosmos using a USB cable.
1. While holding the visor with one hand, pull up the band.
2. Detach the face cushion frame from the headset. To release the frame from its latches,
gently pull on any side of the frame starting from the bottom, and then pull one side at a
time on the top.
Avoid pulling or squeezing on the sides of the face cushion frame to prevent damaging the
frame.
3. Insert the cable connector of the device into the USB Type-C port on the headset.
14 Headset and headphones
Ba l k ve kulakl klar
Vive Cosmos'a usb cihaz ba lama
Bir USB kablosu kullanarak uyumlu bir USB C Tipi cihaz VIVE Cosmos'a ba layabilirsiniz.
Vizörü bir elinizle tutarken, band yukar çekin.
çerçevenin alt ndan ba layarak herhangi bir taraf n hafifçe çekin ve ard ndan bir seferde
bir taraf yukar do ru çekin.
Yüz koruyucu çerçeveyi ba l ktan ç kar n. Çerçeveyi mandallar ndan serbest b rakmak için,
.
Çerçeveye zarar vermemek için yüz yast çerçevesinin yanlar ndan çekmekten veya
s kmaktan kaç n n
Cihaz n kablo konektörünü ba l ktaki USB Type-C portuna tak n.
4. Align and push the tabs on the face cushion frame into their corresponding slots on the
headset. Make sure to position the ridge of the face cushion frame below the headset,
audio, and USB cables. You'll hear a click when the face cushion frame locks in place.
5. Connect the other end of the USB cable to USB Type-C device.
Removing the face cushions
You can remove the face cushions for cleaning. To learn how to clean the face cushion, see
Cleaning the face cushions on page 22.
1. To remove the face cushions, gently peel starting from the bottom ends of each face
cushion until they detach from the face cushion frame.
15 Headset and headphones
Ba l k ve Kulakl klar
Yüz yast çerçevesindeki t rnaklar ba l ktaki kar l k gelen yuvalara hizalay n ve itin
Yüz yast çerçevesinin s rt n ba l n, kulakl n ve usb kablolar n alt na yerle ti inden emin olun.
Yüz yast k çerçevesi yerine oturdu unda bir kilik sesi duyars n z.
USB kablosunun di er ucunu USB Type-C cihaz na ba lay n.
Padleri Ç karma
Temizlik için yüz yast klar n ç karabilirsiniz. Yüz yast n n nas l temizlenece ini ö renmek için,
bkz. yüz yast klar temizleme sayfa 22.
Yüz yast klar n ç karmak için, her yüz yast n n alt uçlar ndan ba layarak yüz yast
çerçevesinden ayr lana kadar yava ça soyun.
2. To reattach, align one end of the face cushion with the marker on the bottom part of the
face cushion frame. Press down the face cushion against the outline of the frame, and then
check that the other end of the face cushion lines up with the marker on the top part of the
frame.
Make sure that the velcro and adhesive strips attach firmly.
Removing the front and back pads
You can remove the front and back pads from the headset band for cleaning.
To remove the front and back pads, peel starting from the ends of each pad until they detach
from the headset band.
16 Headset and headphones
Ba l k ve kulakl klar
Yeniden takmak için, yüz yast n n bir ucunu yüz yast çerçevesinin alt taraf ndaki
i aretleyiciyle hizalay n. Yüz yast n çerçevenin d çizgisine do ru bast r n ve sonra yüz
yast n n di er ucunun çerçevenin üst k sm ndaki i aretleyiciyle ayn hizada oldu unu kontrol
edin.
C rt ve yap kan zeminlerin s k ca ba land ndan emin olun
Ön ve arka pedleri ç karma
Temizleme için ön ve arka pedleri ba l k band ndan ç karabilirsiniz.
kadar soyun.
Ön ve arka pedleri ç karmak için, her pedin uçlar ndan ba layarak ba l k band ndan ç k ncaya
Reattaching the front and back pads to the headset
Always make sure that the front and back pads are attached to the headset.
1. While holding the visor with one hand, pull up the band.
2. Starting from the middle, align the front pad tabs with their corresponding slots on the
band, and then press along the front pad. You may need to gently bend the ends of the
front pad to align the outermost tabs with the slots on the band.
Make sure to minimize the gap between the pad and the band and that all tabs are fully
locked into place.
3. Align the back pad tabs with their corresponding slots on the band, and then press along
the back pad to reattach.
17 Headset and headphones
Ön ve arka pedleri kulakl a tekrar takma
Her zaman ön ve arka pedlerin kulakl a tak l oldu undan emin olun.
Vizörü bir elinizle tutarken, band yukar çekin.
Ortadan ba layarak, ön ped t rnaklar n banttaki kar l k gelen yuvalarla hizalay n ve ard ndan
ön ped boyunca bast r n. En d taki t rnaklar bant üzerindeki yuvalarla hizalamak için ön yast n
uçlar n yava ça bükmeniz gerekebilir.
Ped ve bant aras ndaki bo lu u en aza indirdi inizden ve tüm t rnaklar n yerine tam
oturdu undan emin olun.
Arka ped t rnaklar n banttaki kar l k gelen yuvalarla hizalay n ve ard ndan yeniden takmak
için arka ped boyunca bast r n.
Ba l k ve kulakl klar
Check that the headset cable strip is properly attached. For details, see Reattaching the
headset cable strip to the back pad on page 18.
You'll hear a click when the tabs are inserted.
Make sure to minimize the gap between the pad and the band.
Reattaching the headset cable strip to the back pad
The fabric strip guides the headset cable, and is inserted on the back pad.
1. Insert the back pad tabs second to the left-most corner tabs into the holes of the headset
cable strip with its flap down. Make sure that the strip is firmly attached.
12
2. Reattach the top strap to the headset band. For details, see Attaching the top strap to the
headset band on page 21.
18 Headset and headphones
Sekmeler eklendi inde bir t k sesi duyars n z.
Ayr nt lar için, bkz. Kulakl k kablosu eridini arka k sma tekrar takma, sayfa 18.
Ped ve bant aras ndaki bo lu u en aza indirdi inizden emin olun.
Ba l k kablosu eridini arka k sma tekrar takma
Ba l k kablosu eridinin do ru ekilde tak ld ndan emin olun.
Kuma erit, ba l k kablosunu yönlendirir ve arka yüzeye yerle tirilir.
a a bakacak ekilde yerle tirin. eridin s k ca tak ld ndan emin olun.
Arka ped t rnaklar n ikinci soldaki kö e t rnaklar na, ba l k kablosu eridinin deliklerine kapa
Üst kay ba l k band na tekrar tak n. Ayr nt lar için, bkz. Üst kay kulakl k band na
takma sayfa 21.
Ba l k ve kulakl klar
3. Align the back pad tabs with their corresponding slots on the band, and then press along
the back pad to reattach. You'll hear a click when the tabs are inserted.
4. Make sure to minimize the gap between the pad and the band.
19 Headset and headphones
Ba l k ve kulakl klar
Arka ped t rnaklar n banttaki kar l k gelen yuvalarla hizalay n ve ard ndan yeniden takmak
için arka ped boyunca bast r n. Sekmeler oturdu unda bir t k sesi duyars n z.
Ped ve bant aras ndaki bo lu u en aza indirdi inizden emin olun.
Detaching the top strap from the headset band
If you want to, you can detach the top strap from the headset band.
You'll need to first remove the front and back pads on the headset. For details, see Removing
the front and back pads on page 16.
1. Starting from the rear of the headset band, pull down the strap to unhook it.
2. On the other end of the strap, pull down and out the strap to unhook it.
20 Headset and headphones
Ba l k ve Kulakl klar
Üst kay n ba l k band ndan ç kar lmas
sterseniz, üst kay ba l k band ndan ç karabilirsiniz.
Öncelikle ba l ktaki ön ve arka pedleri ç karman z gerekir. Ayr nt lar için, bkz. Ön ve arka
pedleri ç karma sayfa 16.
Kulakl k band n n arkas ndan ba layarak, ç karmak için kay a a çekin.
Kay n di er ucunda, kancay ç karmak için a a çekerek ç kar n.
  • Page 1 1
  • Page 2 2
  • Page 3 3
  • Page 4 4
  • Page 5 5
  • Page 6 6
  • Page 7 7
  • Page 8 8
  • Page 9 9
  • Page 10 10
  • Page 11 11
  • Page 12 12
  • Page 13 13
  • Page 14 14
  • Page 15 15
  • Page 16 16
  • Page 17 17
  • Page 18 18
  • Page 19 19
  • Page 20 20
  • Page 21 21
  • Page 22 22
  • Page 23 23
  • Page 24 24
  • Page 25 25
  • Page 26 26
  • Page 27 27
  • Page 28 28
  • Page 29 29
  • Page 30 30
  • Page 31 31
  • Page 32 32
  • Page 33 33
  • Page 34 34
  • Page 35 35
  • Page 36 36
  • Page 37 37
  • Page 38 38
  • Page 39 39
  • Page 40 40
  • Page 41 41
  • Page 42 42
  • Page 43 43
  • Page 44 44
  • Page 45 45
  • Page 46 46
  • Page 47 47
  • Page 48 48
  • Page 49 49
  • Page 50 50
  • Page 51 51
  • Page 52 52
  • Page 53 53
  • Page 54 54
  • Page 55 55
  • Page 56 56
  • Page 57 57
  • Page 58 58
  • Page 59 59
  • Page 60 60
  • Page 61 61
  • Page 62 62
  • Page 63 63
  • Page 64 64

Vive Cosmos Kullanici rehberi

Tip
Kullanici rehberi

Diğer dillerde