
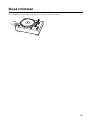
Turntable
Platine Vinyle
Βиниловый проигрыватель
Owner’s Manual
Mode d’emploi
Bedienungsanleitung
Bruksanvisning
Manuale di istruzioni
Manual de instrucciones
Gebruikershandleiding
Инструкция По Эксплуатации


3
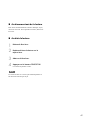
English . . . . . . . . . . . . . . . 5
Français . . . . . . . . . . . . . 29
Deutsch . . . . . . . . . . . . . 53
Svenska . . . . . . . . . . . . . 77
Italiano . . . . . . . . . . . . . 101
Español . . . . . . . . . . . . 125
Nederlands . . . . . . . . . . 149
. . . . . . . . . . . . 173

4

5
Congratulations on your purchase of this Yamaha product!
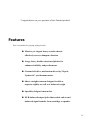
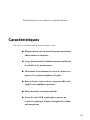
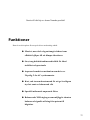
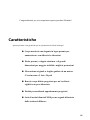
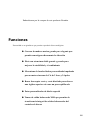
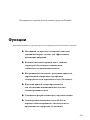
Features
This is a turntable for playing analog records.
Massive yet elegant heavy wooden chassis
eectively serve to dampen vibration
Large, heavy double-structured platter for
enhanced stability and performance
Custom belt-drive mechanism driven by 24-pole,
2-phase AC synchronous motor
Short, straight tonearm designed to deliver
superior rigidity as well as a balanced weight
Specially-designed custom feet
XLR balanced output jacks that enable end-to-end
balanced signal transfer from cartridge to speaker

6
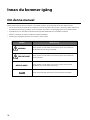
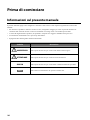
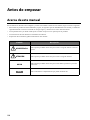
Before you start
About this manual
This manual explains how to set up and operate this unit. When reading this manual, please note the following:
• To use the product properly and safely, we suggest that you read this manual and the included Safety Brochure
thoroughly. Keep the manual in a safe, accessible place for future reference.
• Specicationsandappearancearesubjecttochangewithoutnoticeinordertoimprovetheproduct.
• The illustrations in this manual are for instructional purposes only.
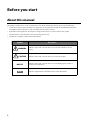
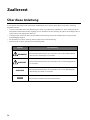
• Explanation of graphic symbols used in this manual:
Symbol Description
WARNING
Indicatespointsthatyoumustobservetoavoidriskofdeathorserious
injury.
CAUTION
Indicatespointsthatyoumustobservetoavoidriskofinjury.
NOTICE
Indicatespointsthatyoumustobservetoavoiddamagingtheproductor
causing it to malfunction.
Note
Indicatessupplementaryinformationthatyoumaynduseful.

7
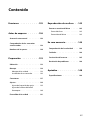
Table of contents
Features . . . . . . . . . . . . 5
Before you start . . . . . . . . 6
About this manual . . . . . . . . . . 6
Checking the supplied accessories . . . 8
Part names . . . . . . . . . . . . . . 10
Getting ready . . . . . . . . 13
Location . . . . . . . . . . . . . . . 13
Assembly . . . . . . . . . . . . . . . 14
Assembling the unit . . . . . . . . . . . 14
Installing a cartridge . . . . . . . . . . . 16
Making connections . . . . . . . . . 17
Making adjustments . . . . . . . . . 19
Adjusting the stylus pressure . . . . . . 19
Adjusting the tonearm height . . . . . 20
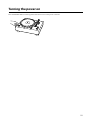
Turning the power on . . . . . . . . . 21
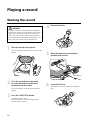
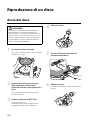
Playing a record . . . . . . . 22
Starting the record . . . . . . . . . . 22
Pausing the record . . . . . . . . . . . . 23
Stopping the record . . . . . . . . . . . 23
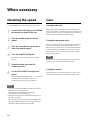
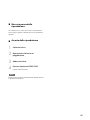
When necessary . . . . . . . 24
Checking the speed . . . . . . . . . . 24
Care . . . . . . . . . . . . . . . . . 24
Replacing the belt . . . . . . . . . . . 25
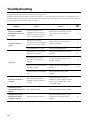
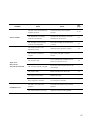
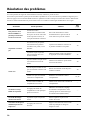
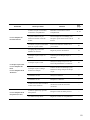
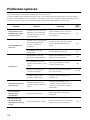
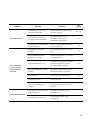
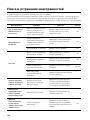
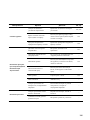
Troubleshooting . . . . . . . . . . . 26
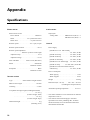
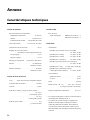
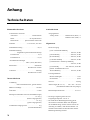
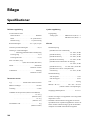
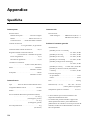
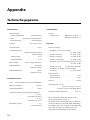
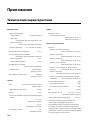
Appendix . . . . . . . . . . 28
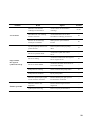
Specications . . . . . . . . . . . . . 28

8
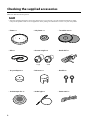
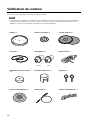
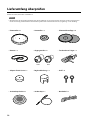
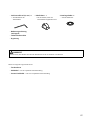
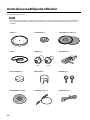
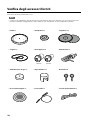
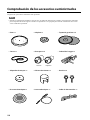
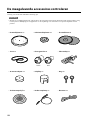
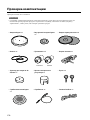
Checking the supplied accessories
Makesurethatallitemsarepresent.
Note
• Storethepackagingmaterials,suchasthepackingbox.Ifyourelocate,youwillneedthesematerialstosafely
transportthisproduct.Refertothe“Supplement”inthepackageforinformationonhowtore-packtheproduct.
• Platter ×1 • Sub platter ×1 • Turntable mat ×2
• Belt ×1 • Counter weight ×2
Large Small
• Head shell ×1
• 45 rpm adaptor ×1 • Dial cover ×1 • Handle ×2
• Stroboscopic disc ×1 • Strobe light ×1 • Power cord ×1

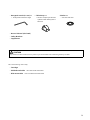
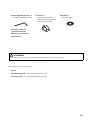
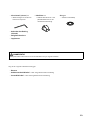
9
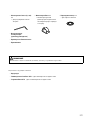
• Hexagonal wrench (2.5mm) ×1
* To adjust the tonearm height
• Owner’s Manual (this book)
• Safety Brochure
• Supplement
• Cable clamp ×1
* Use this clamp if you connect
a phono cable directly to the
tonearm.
• Washer ×1
* For the head shell
CAUTION
Payattentiontothesesmallaccessoryitemstopreventchildrenfromswallowingthembyaccident.
Havethefollowingitemsready:
• Cartridge
• XLR balanced cable
* For a balanced connection
• RCA stereo cable
* For an unbalanced connection

10
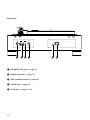
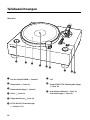
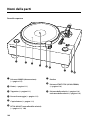
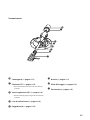
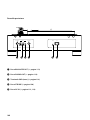
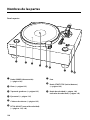
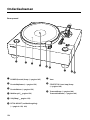
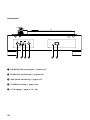
Part names
Top panel
A.
POWER button (
ð
page 21)
B.
Platter (
ð
page 15)
C.
Turntable mat (
ð
page 15)
D.
Center spindle (
ð
page 15)
E.
Dial cover (
ð
page 15)
F.
PITCH ADJUST (speed control)
(
ð
pages 15, 24)
G.
Foot
H.
START/STOP button (
ð
page 22)
I.
Speed button (
ð
page 22)
Speed indicator (
ð
page 22)


13
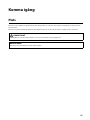
Getting ready
Location
Sinceaturntableandthesoundofarecordareeasilyaectedbyvibration,youshouldplacetheunitonalevelsurface
that is extremely stable.
Placetheturntablesucientlyfarfromyourspeakersystemsothatitwillnotbeaectedbysoundpressureorvibration.
CAUTION
Ifyouneedtoliftorrelocatetheunit,makesurethattwoormorepeoplewilldoso.
NOTICE
Do not attempt to rotate the feet. Otherwise, they might be damaged.

14
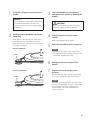
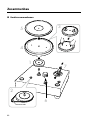
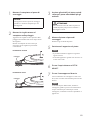
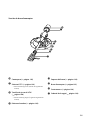
Assembly
Assembling the unit
1
6
7
4
5
2
3
Pulley

15
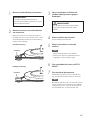
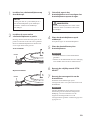
1
Install the sub platter onto the center
spindle.
NOTICE
Do not apply force to the center spindle when
you install the sub platter onto the center
spindle. Otherwise, the center spindle might
be damaged.
2
Install the belt around the sub platter
and pulley.
Hook the belt to the upper groove on the pulley
while making sure that the belt is not twisted.
Rotate the sub platter clockwise to ensure that the
belt will be well seated.
Pulley
Pulley
Correct installation
Incorrect installation
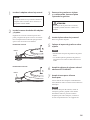
3
Screw the handles into the platter,
and then lift the platter by holding the
handles.
CAUTION
Take care not to drop the platter. Dropping it
might cause injury, or damage the unit.
4
Install the platter onto the center
spindle.
Remove the handles from the platter.
5
Place the turntable mat on the platter.
Note
• You can use the rubber or felt turntable mat.
• The side of the rubber turntable mat with a dent
in the center should face upward.
6
Attach the dial cover to the PITCH
ADJUST.
7
Attach the counter weight to the
tonearm.
With the markings on the counter weight facing
you, slide it onto the back end of the tonearm.
Note
Depending on the weight of the cartridge, install
the large or small counter weight. For information
about acceptable cartridge weights for each
counterweight,refertothe“Specications”
section on page 28.

16
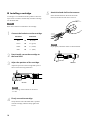
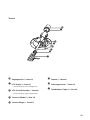
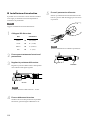
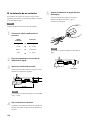
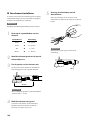
Installing a cartridge
Acartridgeisnotincludedwiththisproduct.Followthe
stepsbelowtoinstallacommercially-availablecartridge
into the head shell.
Note
Refer to the instruction manual for the cartridge.
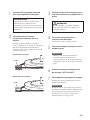
1
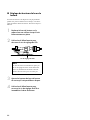
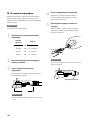
Connect the lead wires to the cartridge.
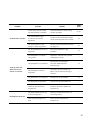
Lead wire Connector
Red
Æ
R+ (red)
Green
Æ
R– (green)
White
Æ
L+ (white)
Blue
Æ
L– (blue)
2
Provisionally secure the cartridge to
the head shell.
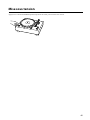
3
Adjust the position of the cartridge.
Adjustthepositionofthecartridgeandstylusas
shown in the following illustration.
52 mm
Note
Theoverhangofthetonearmonthisunitis
−17mm.
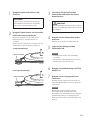
4
Firmly secure the cartridge.
Verify that the side of the head shell is parallel
withthecartridge,andthenrmlytightenthe
screws.
5
Attach the head shell to the tonearm.
Insert the head shell into the front end of the
tonearm,andturnthelocknuttosecureit.
Note
If you prefer, attach the washer to the head shell.
Washer

17
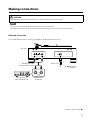
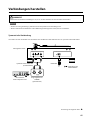
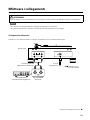
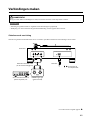
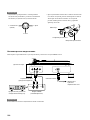
Making connections
CAUTION
FinishmakingallotherconnectionsbeforeyouconnectthepowercordtoanACoutlet.
Note
• Do not use both balanced and unbalanced connections at the same time.
• Foradditionalinformation,pleaserefertotheowner’smanualsforthedevicethatyouareconnecting.
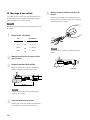
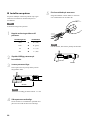
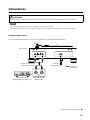
Balanced connection
UseanXLRbalancedcabletoconnectyourampliertotheBALANCEDOUTjacks.
STROBE
AC IN
BALANCED OUTBALANCED OUTPHONO OUT
GND
R
R
Power cord
Connect to
AC outlet
XLR balanced cable
(commercially available)
PHONO inputs
(balanced)
This unit
Pre-main amp or
phono equalizer, etc.
Continue to the next page
Æ

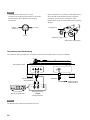
18
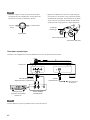
Note
• ConnecttheturntabletotheXLRbalancedinputjacks
onyouramplier.Thepinassignmentsforthesejacks
are shown below.
1: ground
(earth)
2: hot
3: cold
• When connecting, be sure to match the pins and insert
the connector of the “female” XLR balanced cable.
When disconnecting, pull out the “female” XLR
balancedcablewhilepressingdownthelatchlockon
the plug.
“Male” XLR connector
“Female” XLR connector
Latch lock
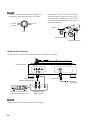
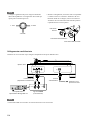
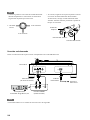
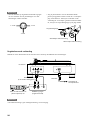
Unbalanced connection
UseanRCAstereocabletoconnecttheampliertothePHONOOUTjacks.
STROBE
AC IN
BALANCED OUTBALANCED OUTPHONO OUT
GND
R
R
GNDPHONO
Power cord
Connect to
AC outlet
RCA stereo cable
(commercially available)
PHONO inputs
(Unbalanced)
Pre-main amp or
phono equalizer, etc.
This unit
Note
TheGNDterminalisnotasafetygrounding(earthing)system.

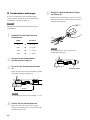
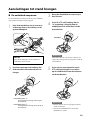
19
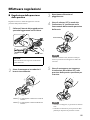
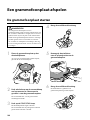
Making adjustments
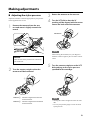
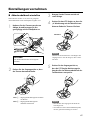
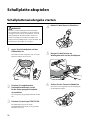
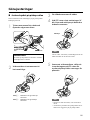
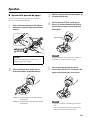
Adjusting the stylus pressure
Adjustthetonearmsothattheappropriatestyluspressure
will be applied to the record.
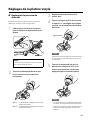
1
Remove the tonearm from the arm
rest and move it slightly towards the
record.
NOTICE
Takecarethatthestylusdoesnotcontactany
part of the unit.
2
Turn the counter weight so that the
tonearm will be horizontal.
1
2
Toward
1
: Counter weight moves forward
on the tonearm.
Toward
2
: Counter weight moves backward
on the tonearm.
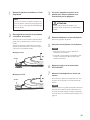
3
Return the tonearm to the arm rest.
4
Turn the VTF dial so that the “0”
marking will be aligned with the center
line on the back end of the tonearm.
Center line
Note
WhenturningtheVTFdial,useyourngersto
hold the counter weight in place so that it will not
rotate.
5
Turn the counter weight to set the VTF
dial markings to the stylus pressure
specied for the cartridge.
Note
• TurningthecounterweightalsoturnstheVTF
dial.
• Use a stylus pressure gauge to set an accurate
stylus pressure.

20
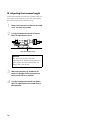
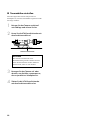
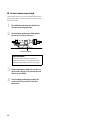
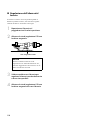
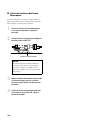
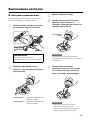
Adjusting the tonearm height
If the tonearm and the record are not in parallel when you
lowerthestylusontotherecord,youwillneedtoadjust
thetonearmheight.Followthestepsbelow:
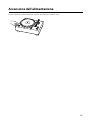
1
Return the tonearm to the arm rest and
set it securely in position.
2
Use the hexagonal wrench to loosen
the VTA adjustment screw.
VTA adjustment screw
NOTICE
ThetonearmissecuredbytheVTA
adjustmentscrew.Beforelooseningthescrew,
gently support the entire tonearm with your
hand so that it will not fall.
3
Move the tonearm up and down to
adjust its height so that the tonearm
and record will be in parallel.
4
Use the hexagonal wrench to tighten
the VTA adjustment screw and secure
the tonearm.
Sayfa yükleniyor...
Sayfa yükleniyor...
Sayfa yükleniyor...
Sayfa yükleniyor...
Sayfa yükleniyor...
Sayfa yükleniyor...
Sayfa yükleniyor...
Sayfa yükleniyor...
Sayfa yükleniyor...
Sayfa yükleniyor...
Sayfa yükleniyor...
Sayfa yükleniyor...
Sayfa yükleniyor...
Sayfa yükleniyor...
Sayfa yükleniyor...
Sayfa yükleniyor...
Sayfa yükleniyor...
Sayfa yükleniyor...
Sayfa yükleniyor...
Sayfa yükleniyor...
Sayfa yükleniyor...
Sayfa yükleniyor...
Sayfa yükleniyor...
Sayfa yükleniyor...
Sayfa yükleniyor...
Sayfa yükleniyor...
Sayfa yükleniyor...
Sayfa yükleniyor...
Sayfa yükleniyor...
Sayfa yükleniyor...
Sayfa yükleniyor...
Sayfa yükleniyor...
Sayfa yükleniyor...
Sayfa yükleniyor...
Sayfa yükleniyor...
Sayfa yükleniyor...
Sayfa yükleniyor...
Sayfa yükleniyor...
Sayfa yükleniyor...
Sayfa yükleniyor...
Sayfa yükleniyor...
Sayfa yükleniyor...
Sayfa yükleniyor...
Sayfa yükleniyor...
Sayfa yükleniyor...
Sayfa yükleniyor...
Sayfa yükleniyor...
Sayfa yükleniyor...
Sayfa yükleniyor...
Sayfa yükleniyor...
Sayfa yükleniyor...
Sayfa yükleniyor...
Sayfa yükleniyor...
Sayfa yükleniyor...
Sayfa yükleniyor...
Sayfa yükleniyor...
Sayfa yükleniyor...
Sayfa yükleniyor...
Sayfa yükleniyor...
Sayfa yükleniyor...
Sayfa yükleniyor...
Sayfa yükleniyor...
Sayfa yükleniyor...
Sayfa yükleniyor...
Sayfa yükleniyor...
Sayfa yükleniyor...
Sayfa yükleniyor...
Sayfa yükleniyor...
Sayfa yükleniyor...
Sayfa yükleniyor...
Sayfa yükleniyor...
Sayfa yükleniyor...
Sayfa yükleniyor...
Sayfa yükleniyor...
Sayfa yükleniyor...
Sayfa yükleniyor...
Sayfa yükleniyor...
Sayfa yükleniyor...
Sayfa yükleniyor...
Sayfa yükleniyor...
Sayfa yükleniyor...
Sayfa yükleniyor...
Sayfa yükleniyor...
Sayfa yükleniyor...
Sayfa yükleniyor...
Sayfa yükleniyor...
Sayfa yükleniyor...
Sayfa yükleniyor...
Sayfa yükleniyor...
Sayfa yükleniyor...
Sayfa yükleniyor...
Sayfa yükleniyor...
Sayfa yükleniyor...
Sayfa yükleniyor...
Sayfa yükleniyor...
Sayfa yükleniyor...
Sayfa yükleniyor...
Sayfa yükleniyor...
Sayfa yükleniyor...
Sayfa yükleniyor...
Sayfa yükleniyor...
Sayfa yükleniyor...
Sayfa yükleniyor...
Sayfa yükleniyor...
Sayfa yükleniyor...
Sayfa yükleniyor...
Sayfa yükleniyor...
Sayfa yükleniyor...
Sayfa yükleniyor...
Sayfa yükleniyor...
Sayfa yükleniyor...
Sayfa yükleniyor...
Sayfa yükleniyor...
Sayfa yükleniyor...
Sayfa yükleniyor...
Sayfa yükleniyor...
Sayfa yükleniyor...
Sayfa yükleniyor...
Sayfa yükleniyor...
Sayfa yükleniyor...
Sayfa yükleniyor...
Sayfa yükleniyor...
Sayfa yükleniyor...
Sayfa yükleniyor...
Sayfa yükleniyor...
Sayfa yükleniyor...
Sayfa yükleniyor...
Sayfa yükleniyor...
Sayfa yükleniyor...
Sayfa yükleniyor...
Sayfa yükleniyor...
Sayfa yükleniyor...
Sayfa yükleniyor...
Sayfa yükleniyor...
Sayfa yükleniyor...
Sayfa yükleniyor...
Sayfa yükleniyor...
Sayfa yükleniyor...
Sayfa yükleniyor...
Sayfa yükleniyor...
Sayfa yükleniyor...
Sayfa yükleniyor...
Sayfa yükleniyor...
Sayfa yükleniyor...
Sayfa yükleniyor...
Sayfa yükleniyor...
Sayfa yükleniyor...
Sayfa yükleniyor...
Sayfa yükleniyor...
Sayfa yükleniyor...
Sayfa yükleniyor...
Sayfa yükleniyor...
Sayfa yükleniyor...
Sayfa yükleniyor...
Sayfa yükleniyor...
Sayfa yükleniyor...
Sayfa yükleniyor...
Sayfa yükleniyor...
Sayfa yükleniyor...
Sayfa yükleniyor...
Sayfa yükleniyor...
Sayfa yükleniyor...
Sayfa yükleniyor...
Sayfa yükleniyor...
Sayfa yükleniyor...
Sayfa yükleniyor...
Sayfa yükleniyor...
Sayfa yükleniyor...
Sayfa yükleniyor...
Sayfa yükleniyor...
Sayfa yükleniyor...
Sayfa yükleniyor...
Sayfa yükleniyor...
Sayfa yükleniyor...
Sayfa yükleniyor...
Sayfa yükleniyor...
Sayfa yükleniyor...
Sayfa yükleniyor...
Sayfa yükleniyor...
Sayfa yükleniyor...
-
 1
1
-
 2
2
-
 3
3
-
 4
4
-
 5
5
-
 6
6
-
 7
7
-
 8
8
-
 9
9
-
 10
10
-
 11
11
-
 12
12
-
 13
13
-
 14
14
-
 15
15
-
 16
16
-
 17
17
-
 18
18
-
 19
19
-
 20
20
-
 21
21
-
 22
22
-
 23
23
-
 24
24
-
 25
25
-
 26
26
-
 27
27
-
 28
28
-
 29
29
-
 30
30
-
 31
31
-
 32
32
-
 33
33
-
 34
34
-
 35
35
-
 36
36
-
 37
37
-
 38
38
-
 39
39
-
 40
40
-
 41
41
-
 42
42
-
 43
43
-
 44
44
-
 45
45
-
 46
46
-
 47
47
-
 48
48
-
 49
49
-
 50
50
-
 51
51
-
 52
52
-
 53
53
-
 54
54
-
 55
55
-
 56
56
-
 57
57
-
 58
58
-
 59
59
-
 60
60
-
 61
61
-
 62
62
-
 63
63
-
 64
64
-
 65
65
-
 66
66
-
 67
67
-
 68
68
-
 69
69
-
 70
70
-
 71
71
-
 72
72
-
 73
73
-
 74
74
-
 75
75
-
 76
76
-
 77
77
-
 78
78
-
 79
79
-
 80
80
-
 81
81
-
 82
82
-
 83
83
-
 84
84
-
 85
85
-
 86
86
-
 87
87
-
 88
88
-
 89
89
-
 90
90
-
 91
91
-
 92
92
-
 93
93
-
 94
94
-
 95
95
-
 96
96
-
 97
97
-
 98
98
-
 99
99
-
 100
100
-
 101
101
-
 102
102
-
 103
103
-
 104
104
-
 105
105
-
 106
106
-
 107
107
-
 108
108
-
 109
109
-
 110
110
-
 111
111
-
 112
112
-
 113
113
-
 114
114
-
 115
115
-
 116
116
-
 117
117
-
 118
118
-
 119
119
-
 120
120
-
 121
121
-
 122
122
-
 123
123
-
 124
124
-
 125
125
-
 126
126
-
 127
127
-
 128
128
-
 129
129
-
 130
130
-
 131
131
-
 132
132
-
 133
133
-
 134
134
-
 135
135
-
 136
136
-
 137
137
-
 138
138
-
 139
139
-
 140
140
-
 141
141
-
 142
142
-
 143
143
-
 144
144
-
 145
145
-
 146
146
-
 147
147
-
 148
148
-
 149
149
-
 150
150
-
 151
151
-
 152
152
-
 153
153
-
 154
154
-
 155
155
-
 156
156
-
 157
157
-
 158
158
-
 159
159
-
 160
160
-
 161
161
-
 162
162
-
 163
163
-
 164
164
-
 165
165
-
 166
166
-
 167
167
-
 168
168
-
 169
169
-
 170
170
-
 171
171
-
 172
172
-
 173
173
-
 174
174
-
 175
175
-
 176
176
-
 177
177
-
 178
178
-
 179
179
-
 180
180
-
 181
181
-
 182
182
-
 183
183
-
 184
184
-
 185
185
-
 186
186
-
 187
187
-
 188
188
-
 189
189
-
 190
190
-
 191
191
-
 192
192
-
 193
193
-
 194
194
-
 195
195
-
 196
196
-
 197
197
-
 198
198
-
 199
199
-
 200
200


diğer dillerde
- español: Yamaha GT-5000 El manual del propietario
- français: Yamaha GT-5000 Le manuel du propriétaire
- italiano: Yamaha GT-5000 Manuale del proprietario
- svenska: Yamaha GT-5000 Bruksanvisning
- Deutsch: Yamaha GT-5000 Bedienungsanleitung
- English: Yamaha GT-5000 Owner's manual
- dansk: Yamaha GT-5000 Brugervejledning
- русский: Yamaha GT-5000 Инструкция по применению
- suomi: Yamaha GT-5000 Omistajan opas
- Nederlands: Yamaha GT-5000 de handleiding