Samsung PS50C670G3S Kullanım kılavuzu
- Kategori
- LCD TV'ler
- Tip
- Kullanım kılavuzu

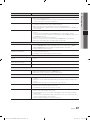
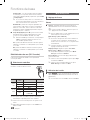
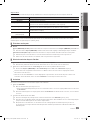
Contact SAMSUNG WORLDWIDE
If you have any questions or comments relating to Samsung products, please contact the SAMSUNG customer care centre.
Country
Customer Care Centre
Web Site
AUSTRIA 0810 - SAMSUNG (7267864, € 0.07/min) www.samsung.com/at
BELGIUM 02-201-24-18 www.samsung.com/be (Dutch)
www.samsung.com/be_fr (French)
CZECH 800 - SAMSUNG (800-726786) www.samsung.com/cz
Samsung Zrt., česká organizační složka, Oasis Florenc, Sokolovská394/17, 180 00, Praha 8
DENMARK 70 70 19 70 www.samsung.com/dk
FINLAND 030 - 6227 515 www.samsung.com/
FRANCE 01 48 63 00 00 www.samsung.com/fr
GERMANY 01805 - SAMSUNG (726-7864 € 0,14/Min) www.samsung.de
HUNGARY 06-80-SAMSUNG (726-7864) www.samsung.com/hu
ITALIA 800-SAMSUNG (726-7864) www.samsung.com/it
LUXEMBURG 261 03 710 www.samsung.com/lu
NETHERLANDS 0900-SAMSUNG (0900-7267864) (€ 0,10/Min) www.samsung.com/nl
NORWAY 815-56 480 www.samsung.com/no
POLAND 0 801 1SAMSUNG (172678)
022-607-93-33
www.samsung.com/pl
PORTUGAL 80820-SAMSUNG (726-7864) www.samsung.com/pt
SLOVAKIA 0800-SAMSUNG (726-7864) www.samsung.com/sk
SPAIN 902 - 1 - SAMSUNG (902 172 678) www.samsung.com/es
SWEDEN 0771 726 7864 (SAMSUNG) www.samsung.com/se
Turkey 444 77 11 www.samsung.com/tr
U.K 0845 SAMSUNG (7267864) www.samsung.com/uk
EIRE 0818 717100 www.samsung.com/ie
Switzerland 0848 - SAMSUNG (7267864, CHF 0.08/min) www.samsung.com/ch
www.samsung.com/ch_fr/(French)
LITHUANIA 8-800-77777 www.samsung.com/lt
LATVIA 8000-7267 www.samsung.com/lv
ESTONIA 800-7267 www.samsung.com/ee
© 2010 Samsung Electronics Co., Ltd. All rights reserved.
BN68-02695A-00
Plasma TV user manual
Plasma TV
user manual
imagine the possibilities
Thank you for purchasing this Samsung product.
To receive more complete service, please register
your product at
www.samsung.com/register
Model _____________ Serial No. _____________
[PC670_W-Euro]BN68-02695A-00L09.indb 1 2010-03-10 오전 11:25:28
Sayfa yükleniyor ...

3
ENGLISH
English
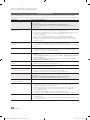
Contents
Getting Started
4
4 Accessories
5 Viewing the Control Panel
6 Viewing the Remote Control
7 Connecting to an Antenna
7 Plug & Play (Initial Setup)
Connections
8
8 Connecting to an AV Device
9 Connecting to an Audio Device
10 Changing the Input Source
Basic Features
11
11 How to Navigate Menus
11 Using the INFO button (Now & Next guide)
11 Planning Your Viewing
13 Channel Menu
16 Picture Menu
18 Sound Menu
20 Setup Menu
23 Support Menu
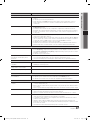
Advanced Features
24
24 Connecting to a PC
25 Network Connection
31 Media Play
38 Anynet+
41 AllShare
Other Information
43
43 Analogue Channel Teletext Feature
44 Installing the Wall Mount
45 Assembling the Cables
45 Securing the TV to the wall
46 Troubleshooting
49 Specifications
50 Securing the Installation Space
51 Index
Check the Symbol!
This function can be used by
pressing the TOOLS button on the
remote control.
Note One-Touch Button
TOOLS
[PC670_W-Euro]BN68-02695A-00L09.indb 3 2010-03-10 오전 11:25:29
Sayfa yükleniyor ...

5
01 Getting Started
English
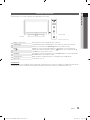
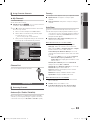
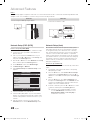
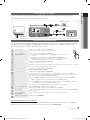
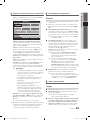
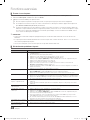
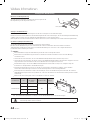
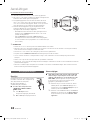
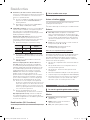
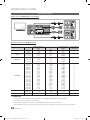
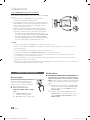
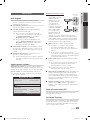
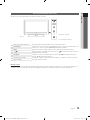
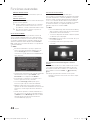
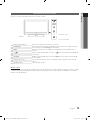
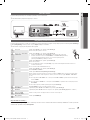
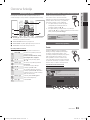
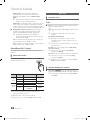
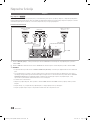
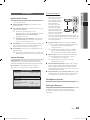
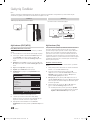
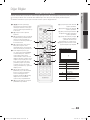
Viewing the Control Panel
✎
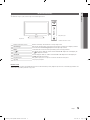
The product colour and shape may vary depending on the model.
Remote control sensor Aim the remote control towards this spot on the TV.
SOURCE
Toggles between all the available input sources. In the on-screen menu, use this
button as you would use the ENTER
button on the remote control.
MENU Displays an on-screen menu, the OSD (on screen display), of your TV’s features.
Adjusts the volume. In the OSD, use the
buttons as you would use the ◄
and ► buttons on the remote control.
Changes the channels. In the OSD, use the
buttons as you would use the
▼ and ▲ buttons on the remote control.
Power Indicator Blinks and turns off when the power is on and lights up in standby mode.
(Power)
Turns the TV on or off.
Standby mode
Do not leave your TV in standby mode for long periods of time (when you are away on a holiday, for example). A small amount
of electric power is still consumed even when the power button is turned off. It is best to unplug the power cord.
Remote control sensor
Speakers
Power Indicator
[PC670_W-Euro]BN68-02695A-00L09.indb 5 2010-03-10 오전 11:25:31

6
Getting Started
English
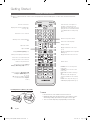
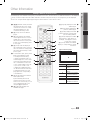
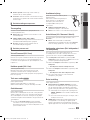
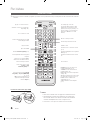
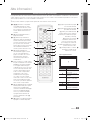
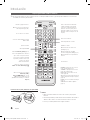
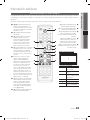
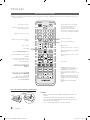
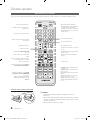
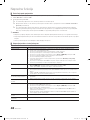
Viewing the Remote Control
✎
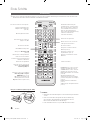
This is a special remote control for the visually impaired and has Braille points on the Power, Channel and Volume
buttons.
Installing batteries (Battery size: AAA)
✎
NOTE
x
Use the remote control within 23 feet from the TV.
x
Bright light may affect the performance of the remote control.
Avoid using nearby special fluorescent light or neon signs.
x
The colour and shape may vary depending on the model.
CH LIST
MUTE
POWER
SOURCE
PRE-CH
GUIDE
MEDIA.P
MENU
TOOLS
RETURN
P.MODE
AD
P.SIZE
SUBT.
S.MODE
DUAL
EXIT
INFO
TTX/MIX
A B C D
f-g
ON/OFF
Turns the TV on and off.
Turns the remote control light on or
off. When on, the buttons become
illuminated for a moment when pressed.
(Using the remote control with this button
set to ON will reduce the battery usage
time.)
Returns to the previous channel.
Cuts off the sound temporarily.
Changes channels.
Displays channel lists on the screen
(p. 13).
Displays the EPG (Electronic Programme
Guide) (p. 11).
Displays information on the TV screen.
Exits the menu.
Have direct access to channels.
Adjusts the volume.
Alternately selects Teletext, Double or
Mix.
Opens the OSD.
Displays Media Play (USB) (p. 31).
Quickly select frequently used functions.
Returns to the previous menu.
Selects the on-screen menu items and
changes the values seen on the menu.
These buttons are for the Channel
Manager, Media Play (USB) menu, etc.
Use these buttons in Media Play (USB)
and Anynet+ (HDMI-CEC) modes
(p. 31, 38).
(
: Controls recording for Samsung
recorders that have the Anynet+
feature.)
P.MODE: Press to select the picture
mode (p. 16).
S.MODE: Press to select the sound
mode (p. 18).
DUAL -: Sound effect selection (p.
20).
AD: Turns the audio description on
and off (not available in some locations)
(p.19).
P.SIZE: Selects the picture size (p. 17).
SUBT.: Displays digital subtitles (p. 22).
Displays and selects the available video
sources (p. 10).
[PC670_W-Euro]BN68-02695A-00L09.indb 6 2010-03-10 오전 11:25:31

7
01 Getting Started
English
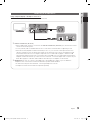
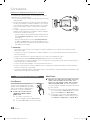
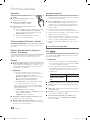
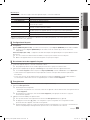
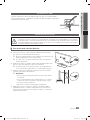
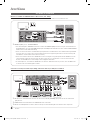
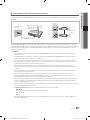
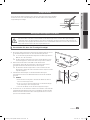
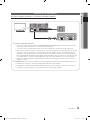
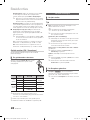
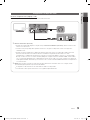
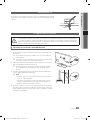
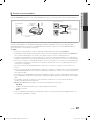
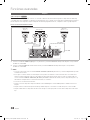
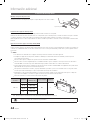
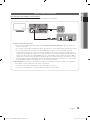
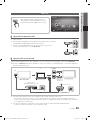
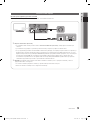
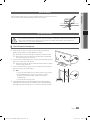
Connecting to an Antenna
When the TV is initially powered on, basic settings proceed automatically.
✎
Preset: Connecting the mains and antenna.
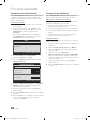
Plug & Play (Initial Setup)
When the TV is initially powered on, a sequence of on-screen prompts will assist in configuring basic settings. Press the
POWER
button. Plug & Play is available only when the Input source is set to TV.
✎
To return to the previous step, press the Red button.
1
Selecting a language
Press the ▲ or ▼ button, then press the ENTER
button.
Select the desired OSD (On Screen Display) language.
P
POWER
2
Selecting Store Demo or
Home Use
Press the ◄ or ► button, then press the ENTER
button.
• Select the Home Use mode. Store Demo Mode is for retail environments.
• To return the unit’s settings from Store Demo to Home Use (standard): Press
the volume button on the TV. When the OSD volume is displayed, press and hold
MENU for 5 sec.
3
Selecting a country
Press the ▲ or ▼ button, then press the ENTER
button.
Select the appropriate country.
✎
After selecting the country in the Country menu, some models may proceed with an additional option to
setup the pin number.
✎
When you input the PIN number, 0-0-0-0 is not available.
4
Selecting an antenna
Press the ▲ or ▼ button, then press the ENTER
button.
Select Air, Cable or Satellite.
5
Selecting a channel
Press the ▲ or ▼ button, then press the ENTER
button.
Select the channel source to memorise. When setting the antenna source to Cable, a step appears allowing
you to assign numerical values (channel frequencies) to the channels. For more information, refer to Channel →
Auto Store (p. 13).
✎
When Air or Cable is selected first: After all Air or Cable channels are stored, the step for storing Satellite
channels is displayed.
✎
When Satellite is selected first: After all Satellite channels are stored, the step for storing Air or Cable
channels is displayed.
✎
Press the ENTER
button at any time to interrupt the memorisation process.
6
Setting the Clock Mode Set the Clock Mode automatically or manually.
Press the ▲ or ▼ button to select Auto, then press the ENTER
button.
7
Time Zone
Press the ▲ or ▼ button to select the your time zone, then press the ENTER
button. (depending on the
country)
8
Viewing the HD Connection
Guide.
The connection method for the best HD screen quality is displayed.
9
Enjoy your TV.
Press the ENTER
button.
If You Want to Reset This Feature...
Select Setup - Plug & Play (Initial Setup). Enter your 4 digit PIN number. The default PIN number is “0-0-0-0.” If you want to
change the PIN number, use the Change PIN function.
ANT OUT
Satellite Antenna
VHF/UHF Antenna
or
Cable
Power Input
[PC670_W-Euro]BN68-02695A-00L09.indb 7 2010-03-10 오전 11:25:32
Sayfa yükleniyor ...

9
English
02 Connections
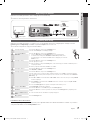
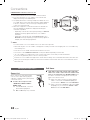
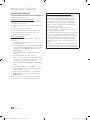
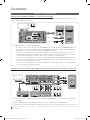
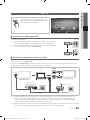
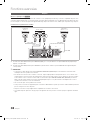
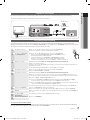
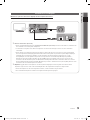
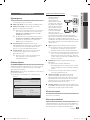
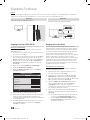
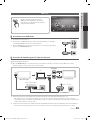
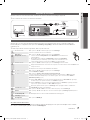
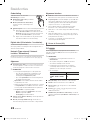
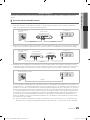
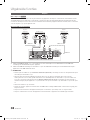
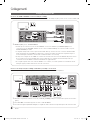
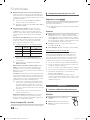
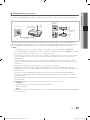
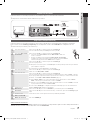
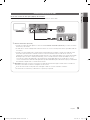
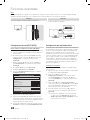
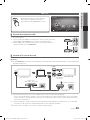
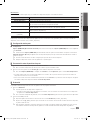
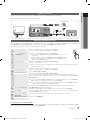
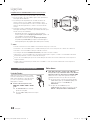
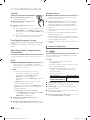
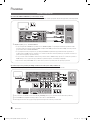
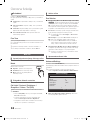
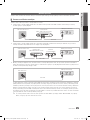
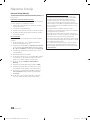
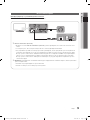
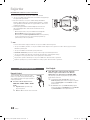
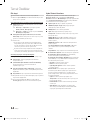
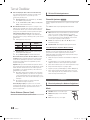
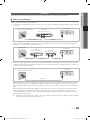
Connecting to an Audio Device
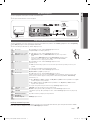
Using an Optical (Digital) or Headphone Connection
Available devices: digital audio system, amplifier, DVD home theatre
✎
DIGITAL AUDIO OUT (OPTICAL)
x
When a digital audio system is connected to the DIGITAL AUDIO OUT (OPTICAL) jack, decrease the volume
of both the TV and the system.
x
5.1 CH (channel) audio is available when the TV is connected to an external device supporting 5.1 CH.
x
When the receiver (amplifier or DVD home theatre) is set to on, you can hear sound output from the TV’s
optical jack. When the TV is receiving a DTV signal, the TV will send 5.1 CH sound to the amplifier or DVD
home theatre. When the source is a digital component such as a DVD / Blu-ray player / cable box / STB
(Set-Top-Box) satellite receiver and is connected to the TV via HDMI, only 2 CH audio will be heard from the
amplifier or DVD home theatre. If you want to hear 5.1 CH audio, connect the digital audio out jack from your
DVD / Blu-ray player / cable box / STB satellite receiver directly to an amplifier or home theatre.
✎
Headphones
: You can connect your headphones to the headphones output on your set. While the
headphones are connected, the sound from the built-in speakers will be disabled.
x
Sound function may be restricted when connecting headphones to the TV.
x
Headphone volume and TV volume are adjusted separately.
DVD
OPTICAL
digital audio system
[PC670_W-Euro]BN68-02695A-00L09.indb 9 2010-03-10 오전 11:25:34
Sayfa yükleniyor ...
Sayfa yükleniyor ...

12
English
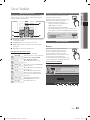
Basic Features
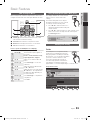
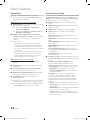
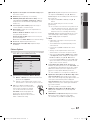
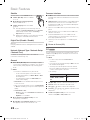
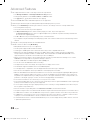
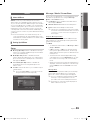
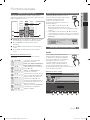
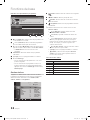
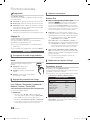
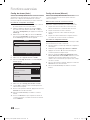
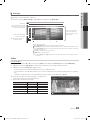
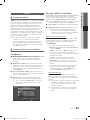
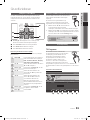
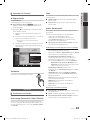
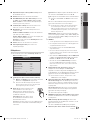
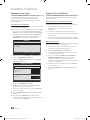
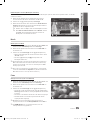
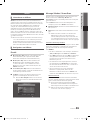
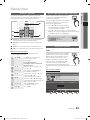
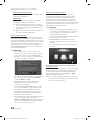
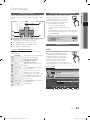
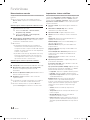
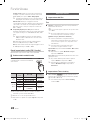
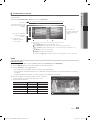
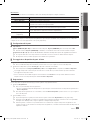
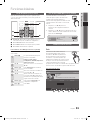
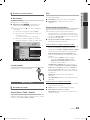
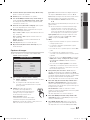
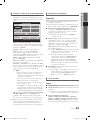
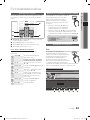
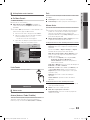
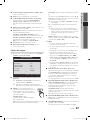
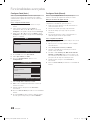
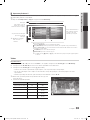
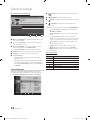
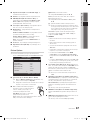
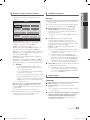
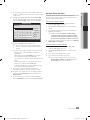
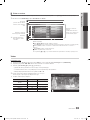
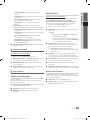
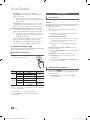
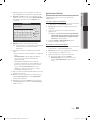
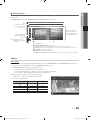
Using Scheduled View
1
Red (View Mode): View the list of programmes that
are playing now or coming up.
2
Yellow (+24 Hours): Viewing the list of programmes to
be broadcasted after 24 hours.
3
Blue (Ch. Mode): Select the type of channels you
want to display on the Channel View window.
– The Ch. Mode differs according to the antenna
source.
4 Information: Displays details of the selected
programme.
5
(Page): Move to next or previous page.
6 ENTER
button
– When selecting the current programme, you can
watch the selected programme.
– When selecting the future programme, you can
reserve to watch the selected programme. To cancel
the schedule, press the ENTER
button again and
select Cancel Schedules.
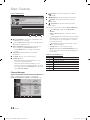
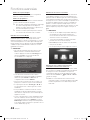
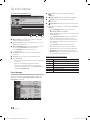
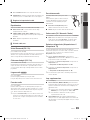
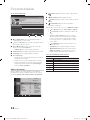
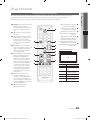
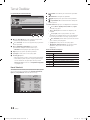
Channel Manager
Delete or set favourites channels and use the programme
guide for digital broadcasts. Select a channel in the
Channels, My Channels, Satellite or Scheduled screen.
■ Channels: Shows the channel list according to
channel type.
■
My Channels: Shows the group of the channel.
■
Satellite: Shows the channel list according to
satellite signal.
■
Scheduled: Shows all the currently reserved
programmes.
✎
Using the colour buttons with the Channel Manager
x
Red (Antenna): Toggle among Air, Cable or
Satellite.
x
B
Green (Zoom): Enlarges or shrinks a channel
number.
x
Yellow (Select): Select desired channels and press
the Yellow button to set all the selected channels at
the same time. The
mark appears to the left of
the selected channels.
x
Blue (Sort): Change the list ordered by channel
name or channel number.
x
(Page): Move to next or previous page.
x
(Tools): Displays the Channel Manager option
menu. (The options menus may differ depending on
the situation.)
Channel Status Display Icons
Icons Operations
An analogue channel.
A channel selected.
A channel set as a Favourite.
A programme currently being broadcast.
A locked channel.
A reserved programme.
DTV Air 800 five
Family Affairs
18:00 - 18:30
Drama
Tanya confesses all to a stunned Babs. Conrad is anxious to hear...
18:30
19:15
Today
Today
)
Family Affairs
)
Dark Angel
800
800
five
five
800 five
View Mode Information
Cancel
2:10 Tue 1 Jun
Guide
Scheduled View
1 4 6
c 1 1futech
2 * 24ore.tv
15 abc1
3 BBC World
23 bid-up.tv
33 Boonerang
32 Cartoon Nwk
5 Class News
4 Coming Soon
27 Discovery
Satellite Antenna
B
Zoom Select Sort
Page
Tools
Channels
All
TV
Radio
Data/Other
Free
Scrambled
Searched
[PC670_W-Euro]BN68-02695A-00L09.indb 12 2010-03-10 오전 11:25:37
Sayfa yükleniyor ...
Sayfa yükleniyor ...
Sayfa yükleniyor ...
Sayfa yükleniyor ...
Sayfa yükleniyor ...
Sayfa yükleniyor ...
Sayfa yükleniyor ...
Sayfa yükleniyor ...
Sayfa yükleniyor ...
Sayfa yükleniyor ...
Sayfa yükleniyor ...

24
English
Advanced Features
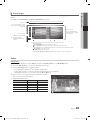
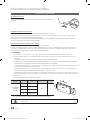
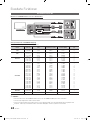
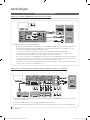
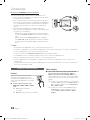
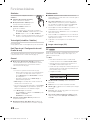
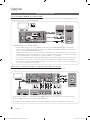
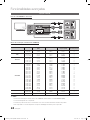
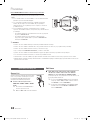
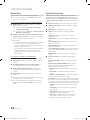
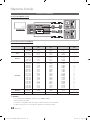
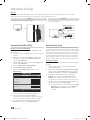
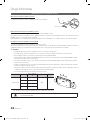
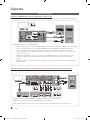
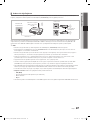
Connecting to a PC
Using an HDMI/DVI Cable / a D-sub Cable
AUDIO OUT
AUDIO OUT
PC OUT
DVI OUT
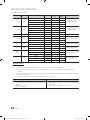
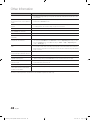
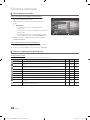
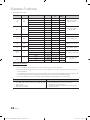
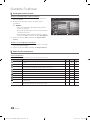
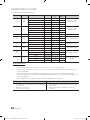
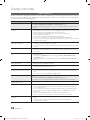
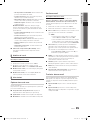
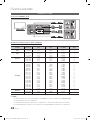
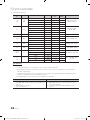
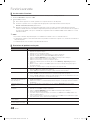
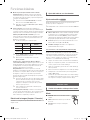
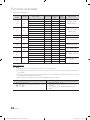
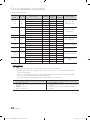
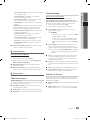
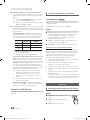
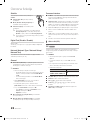
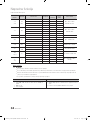
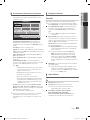
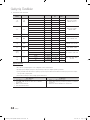
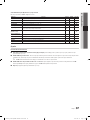
Display Modes (D-Sub and HDMI/DVI Input)
Optimal resolution is 1920 X 1080 @ 60 Hz.
Mode Resolution
Horizontal Frequency
(KHz)
Vertical Frequency
(Hz)
Pixel Clock Frequency
(MHz)
Sync Polarity
(H / V)
IBM
640 x 350
720 x 400
31.469
31.469
70.086
70.087
25.175
28.322
+/-
-/+
MAC
640 x 480
832 x 624
1152 x 870
35.000
49.726
68.681
66.667
74.551
75.062
30.240
57.284
100.000
-/-
-/-
-/-
VESA CVT
720 x 576
1152 x 864
1280 x 720
1280 x 960
35.910
53.783
56.456
75.231
59.950
59.959
74.777
74.857
32.750
81.750
95.750
130.000
-/+
-/+
-/+
-/+
VESA DMT
640 x 480
640 x 480
640 x 480
800 x 600
800 x 600
800 x 600
1024 x 768
1024 x 768
1024 x 768
1152 x 864
1280 x 1024
1280 x 1024
1280 x 720
1280 x 800
1280 x 800
1280 x 960
1360 x 768
1440 x 900
1440 x 900
1680 x 1050
31.469
37.861
37.500
37.879
48.077
46.875
48.363
56.476
60.023
67.500
63.981
79.976
45.000
49.702
62.795
60.000
47.712
55.935
70.635
65.290
59.940
72.809
75.000
60.317
72.188
75.000
60.004
70.069
75.029
75.000
60.020
75.025
60.000
59.810
74.934
60.000
60.015
59.887
74.984
59.954
25.175
31.500
31.500
40.000
50.000
49.500
65.000
75.000
78.750
108.000
108.000
135.000
74.250
83.500
106.500
108.000
85.500
106.500
136.750
146.250
-/-
-/-
-/-
+/+
+/+
+/+
-/-
-/-
+/+
+/+
+/+
+/+
+/+
-/+
-/+
+/+
+/+
-/+
-/+
-/+
VESA GTF
1280 x 720
1280 x 1024
52.500
74.620
70.000
70.000
89.040
128.943
-/+
-/-
VESA DMT / DTV CEA
1920 x 1080p 67.500 60.000 148.500 +/+
✎
NOTE
x
For HDMI/DVI cable connection, you must use the HDMI IN 1(DVI) jack.
x
The interlace mode is not supported.
x
The set might operate abnormally if a non-standard video format is selected.
x
Separate and Composite modes are supported. SOG(Sync On Green) is not supported.
[PC670_W-Euro]BN68-02695A-00L09.indb 24 2010-03-10 오전 11:25:43
Sayfa yükleniyor ...

26
English
Advanced Features
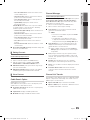
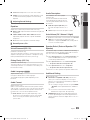
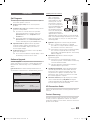
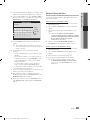
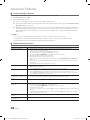
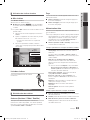
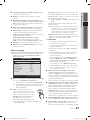
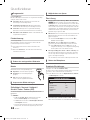
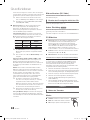
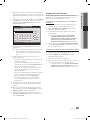
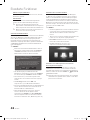
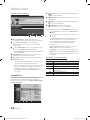
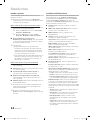
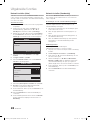
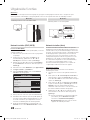
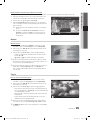
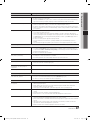
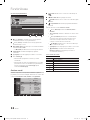
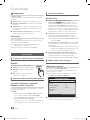
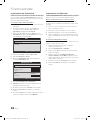
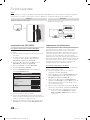
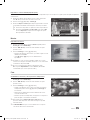
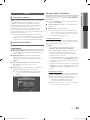
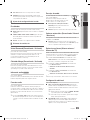
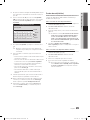
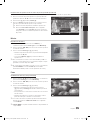
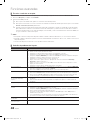
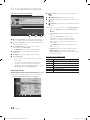
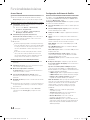
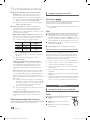
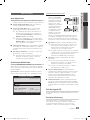
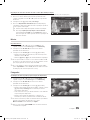
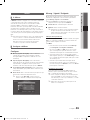
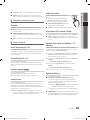
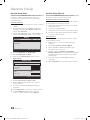
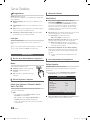
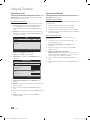
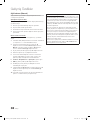
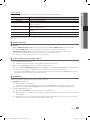
Network Setup (Auto)
Use the Automatic Network Setup when connecting your
TV to a network that supports DHCP. To set up your TV’s
cable network connection automatically, follow these steps:
How to set up automatically
1. Connect your TV to your LAN as described in the
previous section.
2. Turn on your TV, press the MENU button on your
remote, use the ▲ or ▼ button to select Setup, and
then press the ENTER
button.
3. Use the ▲ or ▼ button to select Network in the Setup
menu, and then press the ENTER
button. The
Network screen appears.
4. On the Network screen, select Network Type.
5. Set Network Type to Wired.
6. Select Network Setup. The Network Setup screen
appears.
7. Set Internet Protocol Setup to Auto.
8. Auto acquires and enters the needed Internet values
automatically.
9. When done, press the RETURN button on your remote.
10. Select Network Test to check the Internet connectivity.
11. If the Network Function has not acquired the network
connection values, go to the directions for Manual.
Network Setup (Manual)
Use the Manual Network Setup when connecting your TV to
a network that requires a Static IP address.
Getting the Network Connection Values
To get the Network connection values on most Windows
computers, follow these steps:
1. Right click the Network icon on the bottom right of the
screen.
2. In the pop-up menu that appears, click Status.
3. On the dialog that appears, click the Support tab.
4. On the Support Tab, click the Details button. The
Network connection values are displayed.
How to set up manually
To set up your TV’s cable network connection manually,
follow these steps:
1. Follow Steps 1 through 6 in the “How to set up
automatically” procedure.
2. Set Internet Protocol Setup to Manual.
3. Press the ▼ button on your remote to go to the first
entry field.
4. Enter the IP Address, Subnet Mask, Gateway, and
DNS Server values. Use the number buttons on your
remote to enter numbers and the arrow buttons to move
from one entry field to another.
5. When done, press the RETURN button on your remote.
6. Select Network Test to check the Internet connectivity.
Network
Move
Enter
Return
Network Type : Wired ►
Network Setup
Network Test
Network Setup
IP Address :
Subnet Mask :
Gateway :
DNS : Auto
DNS Server :
Move
Enter
Return
Internet Protocol Setup : Auto ►
[PC670_W-Euro]BN68-02695A-00L09.indb 26 2010-03-10 오전 11:25:44
Sayfa yükleniyor ...
Sayfa yükleniyor ...
Sayfa yükleniyor ...
Sayfa yükleniyor ...

31
English
04 Advanced Features
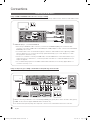
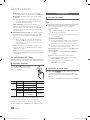
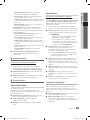
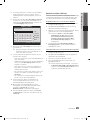
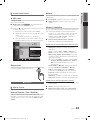
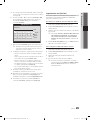
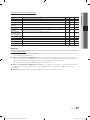
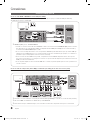
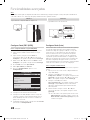
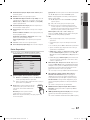
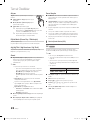
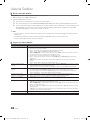
Media Play
MEDIA.P
Enjoy photos, music and/or movie fi les saved on
a USB Mass Storage Class (MSC) device and/
or your PC.
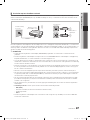
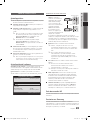
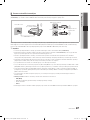
Connecting a USB Device
1. Turn on your TV.
2. Connect a USB device containing photo, music and/or movie fi les to the USB 1
or USB 2 (HDD) jack on the side of the TV.
3. When USB is connected to the TV, popup window appears. Then you can select
Media Play .
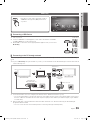
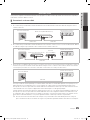
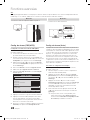
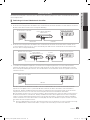
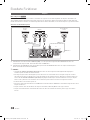
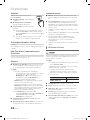
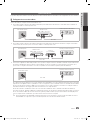
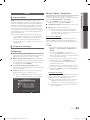
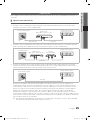
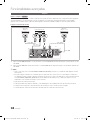
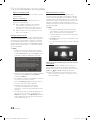
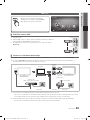
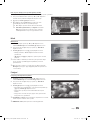
Connecting to the PC through network
You can play pictures, music and videos saved on your PC or on your TV through a network connection in the Media Play
mode.
✎
If you use Media Play through saved file on your PC, you should download “PC Share Manager” and users manual from
“www.samsung.com.”
1. For more information on how to confi gure your network, refer to “Network Connection.” (p. 25)
– You are recommended to locate both TV and PC in same subnet. The fi rst 3 parts of the subnet address of the TV and
the PC IP addresses should be the same and only the last part (the host address) should be changed. (e.g. IP Address:
123.456.789.**)
2. Using a LAN cable, connect between the external modem and the PC onto which the Samsung PC Share Manager
programme will be installed.
– You can connect the TV to the PC directly without connecting it through a Sharer (Router).
TV Side Panel
USB Drive
USB 1
USB 2
or
2
LAN Cable
PC
External Modem
(ADSL/VDSL/Cable TV)
LAN
Samsung
Wireless LAN
Adapter
Wireless IP sharer
TV Rear Panel
or
TV Side Panel
LAN Cable LAN Cable
TV Rear Panel
SUM
Change Device
View Devices
Enter
Return
MediaPlay
Videos
[PC670_W-Euro]BN68-02695A-00L09.indb 31 2010-03-10 오전 11:25:48
Sayfa yükleniyor ...

33
English
04 Advanced Features
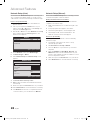
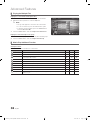
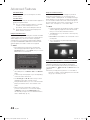
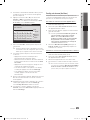
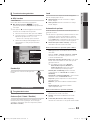
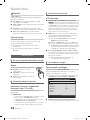
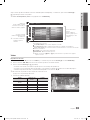
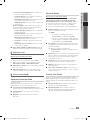
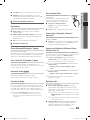
Screen Display
Move to the file you desired using the up/down/right/left buttons and then press the ENTER
or
(Play) button. The file is
played.
✎
Supports the View Devices and Home in Media Play homepage.
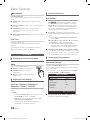
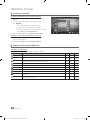
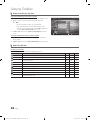
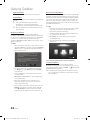
Videos
Playing Video
1. Press the ◄ or ► button to select Videos, then press the ENTER
button in the Media Play menu.
2. Press the ◄/►/▲/▼ button to select the desired file in the file list.
3. Press the ENTER
button or
(Play) button.
– The selected file is displayed on the top with its playing time.
– If video time information is unknown, play time and progress bar are not displayed.
– During playing the video, you can search using the ◄ and ► button.
✎
In this mode, you can enjoy movie clips contained on a Game,
but you cannot play the Game itself.
y Supported Subtitle Formats
Name File extension Format
MPEG-4 time-based text .ttxt XML
SAMI .smi HTML
SubRip .srt string-based
SubViewer .sub string-based
Micro DVD .sub or .txt string-based
Information:
You can ascertain the selected
file name and the number of files
and page.
Sort List Section:
Displays sorting standard.
✎
Sorting standard is
different depending on the
contents.
Operation Buttons
Red (Change Device): Selects a connected device.
B
Green (Preference): Sets the file preference. (not supported in Basic view)
Yellow (Select): Selects multiple files from file list. Selected files are marked with a symbol.
Blue (Sorting): Selects the sort list.
Tools: Displays the option menu.
✎
Using the
(REW) or
(FF) button, file list can move to next or previous page.
File List Section:
You can confirm the files
and groups that is sorted by
each category.
Jan.10.2010
Jan.10.2010
Jan.10.2010
Jan.10.2010
Jan.10.2010
Jan.10.2010
Jan.10.2010
Jan.10.2010
Jan.10.2010
Jan.10.2010
/Movie 01.avi 1/1
Movie 01.avi
SUM
Movie 03.avi
Movie 05.avi
Movie 07.avi
Movie 09.avi
Movie 02.avi
Movie 04.avi
Movie 06.avi
Movie 08.avi
Movie 10.avi
Select
Sorting
Tools
Videos
Page
Change Device
Movie 01.avi
00:04:03 / 00:07:38 1/1
SUM
Pause
Jump
Tools
Return
[PC670_W-Euro]BN68-02695A-00L09.indb 33 2010-03-10 오전 11:25:50

34
English
Advanced Features
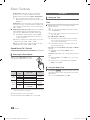
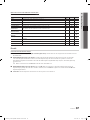
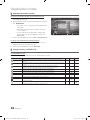
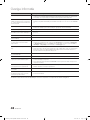
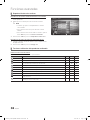
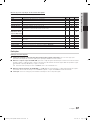
y Supported Video Formats
File Extension Container Video Codec Resolution
Frame rate
(fps)
Bit rate
(Mbps)
Audio Codec
*.avi
*.mkv
AVI
MKV
Divx 3.11 / 4.x / 5.1 / 6.0 1920x1080 6 ~ 30 8
MP3 / AC3 / LPCM /
ADPCM / DTS Core
XviD 1920x1080 6 ~ 30 8
H.264 BP / MP / HP 1920x1080 6 ~ 30 25
MPEG4 SP / ASP 1920x1080 6 ~ 30 8
*.asf ASF
Divx 3.11 / 4.x / 5.1 / 6.0 1920x1080 6 ~ 30 8
MP3 / AC3 / LPCM /
ADPCM / WMA
XviD 1920x1080 6 ~ 30 8
H.264 BP / MP / HP 1920x1080 6 ~ 30 25
MPEG4 SP / ASP 1920x1080 6 ~ 30 8
*.wmv ASF Window Media Video v9 1920x1080 6 ~ 30 25 WMA
*.mp4 MP4
H.264 BP / MP / HP 1920x1080 6 ~ 30 25
MP3 / ADPCM / AACMPEG4 SP / ASP 1920x1080 6 ~ 30 8
XVID 1920x1080 6 ~ 30 8
*.3gp 3GPP
H.264 BP / MP / HP 1920x1080 6 ~ 30 25
ADPCM / AAC / HE-AAC
MPEG4 SP / ASP 1920x1080 6 ~ 30 8
*.vro
VRO
VOB
MPEG1 1920x1080 24 / 25 / 30 30
AC3 / MPEG / LPCM
MPEG2 1920x1080 24 / 25 / 30 30
*.mpg
*.mpeg
PS
MPEG1 1920x1080 24 / 25 / 30 30
AC3 / MPEG / LPCM / AACMPEG2 1920x1080 24 / 25 / 30 30
H.264 1920x1080 6 ~ 30 25
*.ts
*.tp
*.trp
TS
MPEG2 1920x1080 24 / 25 / 30 30
AC3 / AAC / MP3 / DD+ /
HE-AAC
H.264 1920x1080 6 ~ 30 25
VC1 1920x1080 6 ~ 30 25
Other Restrictions
✎
NOTE
x
If there are problems with the contents of a codec, the codec will not be supported.
x
If the information for a Container is incorrect and the file is in error, the Container will not be able to play
correctly.
x
Sound or video may not work if the contents have a standard bitrate/frame rate above the compatible Frame/sec
listed in the table above.
x
If the Index Table is in error, the Seek (Jump) function is not supported.
Video Decoder Audio Decoder
• Supports up to H.264, Level 4.1
• H.264 FMO / ASO / RS, VC1 SP / MP / AP L4 and AVCHD are not
supported.
• GMC is not supported.
• H.263 is not supported.
• Supports up to WMA 7, 8, 9, STD
• WMA 9 PRO does not support 2 channel excess multi channel or
lossless audio.
• WMA sampling rate 22050Hz mono is not supported.
[PC670_W-Euro]BN68-02695A-00L09.indb 34 2010-03-10 오전 11:25:50

35
English
04 Advanced Features
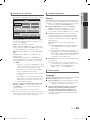
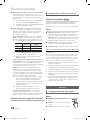
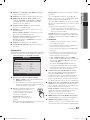
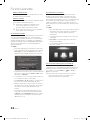
Playing movie file continuously (Resume Play)
If you exit the playing videos function, it can be played later from the point where it was stopped.
1. Select the movie file you want to play continuously by pressing
the ◄ or ► button to select it from the file list section.
2. Press the
(Play) / ENTER
button.
3. Select Play Continuously (Resume Play) by pressing the Blue
button. The Movie will begin to play from where it was stopped.
✎
The Blue button is available when resuming play.
✎
If the Cont. movie play help function is set to On in the
Settings menu, a pop-up message will appear when you
resume play a movie file.
Music
Playing Music
1. Press the ◄ or ► button to select Music, then press the
ENTER
button in the Media Play menu.
2. Press the ◄/►/▲/▼ button to select the desired file in the file
list.
3. Press the ENTER
button or
(Play) button.
– During playing the music, you can search using the ◄ and ►
button.
–
(REW) and
(FF) buttons do not function during play.
✎
Only displays the files with MP3 and PCM file extension. Other
file extensions are not displayed, even if they are saved on the
same USB device.
✎
If the sound is strange when playing MP3 files, adjust the
Equalizer in the Sound menu. (An over-modulated MP3 file
may cause a sound problem.)
Photos
Viewing a Photo (or Slide Show)
1. Press the ◄ or ► button to select Photos, then press the
ENTER
button in the Media Play menu.
2. Press the ◄/►/▲/▼ button to select the desired file in the file
list.
3. Press the ENTER
button or
(Play) button.
– While a photo list is displayed, press the
(Play) /
ENTER
button on the remote control to start slide show.
– All files in the file list section will be displayed in the slide show.
– During the slide show, files are displayed in order from
currently being shown.
✎
Music files can be automatically played during the Slide Show if
the Background Music is set to On.
✎
The BGM mode cannot be changed until the BGM has finished
loading.
3/15
I Love you
Jhon
Music 1
No Singer
Music 2
No Singer
Music 3
No Singer
Music 4
No Singer
Music 5
No Singer
I Love You
Jhon
1st Album
Pop
2010
4.2MB
01:10 / 04:02
SUM
Pause
Jump
Tools
Return
Playlist
Image1024.jpg 1024x768 2010/2/1 3/15
SUM
Pause
Previous/Next
Tools
Return
Normal
Movie 01.avi
00:04:03 / 00:07:38 1/1
SUM
Play continuously
Pause
Jump
Tools
Return
Resumes playing from the last viewed
scene.
Play continuously
[PC670_W-Euro]BN68-02695A-00L09.indb 35 2010-03-10 오전 11:25:52
Sayfa yükleniyor ...

37
English
04 Advanced Features
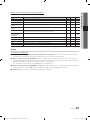
Videos/Music/Photos Play Option menu
During playing a file, press the TOOLS button.
Category Operations Videos Music Photos
Title You can move the other file directly.
Repeat Mode You can play movie and music files repeatedly.
Picture Size You can adjust the picture size for preference.
Picture Setting You can adjust the picture setting. (p. 16, 17, 18)
Sound Setting You can adjust the sound setting. (p. 18, 19, 20)
Subtitle Setting You can play the video file with Subtitle. This function only works if the subtitles are the same
file name as the video file.
Stop Slide Show /
Start Slide Show
You can start or stop a slide show.
Slide Show Speed You can select the slide show speed during the slide show.
Background Music You can set and select background music when watching a slide show.
Zoom You can zoom into images in full screen mode.
Rotate You can rotate images in full screen mode.
Information You can see detailed information about the played file.
Settings
Using the Setup Menu
■ Cont. movie play help (Resume Play) (On / Off): Select to display the help pop-up message for continuous movie
playback.
■ Get the DivX® VOD registration code: Shows the registration code authorized for the TV. If you connect to the DivX web
site and register the registration code with a personal account, you can download VOD registration file. If you play the VOD
registration using Media Play, the registration is completed.
✎
For more information on DivX® VOD, visit “www.DivX.com.”
■ Get the DivX® VOD deactivation code: When DivX® VOD is not registered, the registration deactivation code is
displayed. If you execute this function when DivX® VOD is registered, the current DivX® VOD registration is deactivated.
■ Information: Select to view information about the connected device.
[PC670_W-Euro]BN68-02695A-00L09.indb 37 2010-03-10 오전 11:25:54
Sayfa yükleniyor ...
Sayfa yükleniyor ...
Sayfa yükleniyor ...
Sayfa yükleniyor ...
Sayfa yükleniyor ...

43
English
05 Other Information
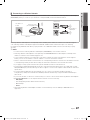
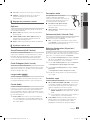
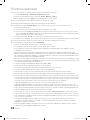
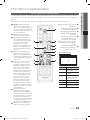
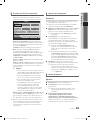
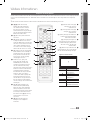
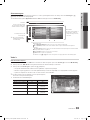
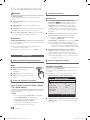
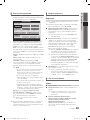
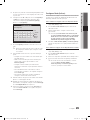
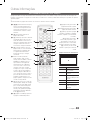
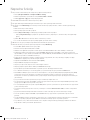
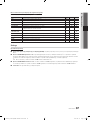
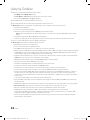
Analogue Channel Teletext Feature
The index page of the Teletext service gives you information on how to use the service. For Teletext information to be displayed
correctly, channel reception must be stable. Otherwise, information may be missing or some pages may not be displayed.
✎
You can change Teletext pages by pressing the numeric buttons on the remote control.
1
(Teletext on/mix): Activates
the Teletext mode for the current
channel. Press it twice to overlap
the Teletext display onto the
current broadcasting screen.
2
(store): Stores the Teletext
pages.
3
(size): Displays the teletext
on the upper half of the screen in
double-size. To move the text to
the lower half of the screen, press
it again. For normal display, press
it once again.
4
(hold): Holds the display at
the current page, in the case that
there are several secondary pages
that follow automaticially. To undo,
press it again.
5
Colour buttons (red, green, yellow,
blue): If the FASTEXT system
is used by the broadcasting
company, the different topics on
a Teletext page are colour-coded
and can be selected by pressing
the coloured buttons. Press the
colour corresponding to the topic
of your choice. A new colour-
coded page is displayed. Items
can be selected in the same way.
To display the previous or next
page, press the corresponding
coloured button.
6
(mode): Selects the Teletext
mode (LIST/ FLOF).
If pressed during LIST mode,
switches the mode to List save
mode. In List save mode, you can
save a Teletext page into a list
using the
(store) button.
7
(sub-page): Displays the
available sub-page.
(page up): Displays the next
Teletext page.
8
(page down): Displays the
previous Teletext page.
9
(index): Displays the index
(contents) page at any time while
you are viewing Teletext.
0
(reveal): Displays the hidden
text (answers to quiz games, for
example). To display the normal
screen, press it again.
!
(cancel): Shrinks the Teletext
display to overlap with the current
broadcast.
@
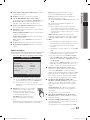
Typical Tetetext page
Part Contents
A Selected page
number.
B Broadcasting channel
identity.
C Current page number
or search indications.
D Date and time.
E Text.
F Status information.
FASTEXT information.
CH LIST
SOURCE
PRE-CH
MENU
TOOLS
RETURN
EXIT
INFO
TTX/MIX
A B C D
6
7
8
9
!
@
0
1
3
2
4
5
Other Information
[PC670_W-Euro]BN68-02695A-00L09.indb 43 2010-03-10 오전 11:25:56
Sayfa yükleniyor ...
Sayfa yükleniyor ...
Sayfa yükleniyor ...
Sayfa yükleniyor ...
Sayfa yükleniyor ...

49
English
05 Other Information
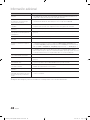
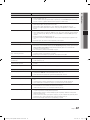
Specifications
Panel native 1920 x 1080 @ 60 Hz
Environmental Considerations
Operating Temperature
Operating Humidity
Storage Temperature
Storage Humidity
10°C to 40°C (50°F to 104°F)
10% to 80%, non-condensing
-20°C to 45°C (-4°F to 113°F)
5% to 95%, non-condensing
TV System Analogue: B/G, D/K, L, I (Depending on your country selection)
Digital: DVB-T/DVB-C/DVB-S
Colour/Video System Analogue: PAL, SECAM, NTSC-4.43, NTSC-3.58, PAL60
Digital: MPEG-2 MP@ML, MPEG-4, H.264/AVC MP@L3, [email protected], [email protected]
Sound System BG. OK NICAM. MPEGl
HDMI IN 1 ~ 4 Video: 1080 24p, 1080p, 1080i, 720p, 576p, 576i, 480p, 480i
Audio: 2Ch Linear PCM 32/44.1/48kHz, 16/20/24bits.
Analogue audio input (HDMI IN1 only)
PC input (HDMI IN1 only)
Stand Swivel (Left / Right) -20˚ ~ 20˚
Model Name PS50C670
Screen Size
(Diagonal) 50 inches
Sound
(Output) 10W x 2
Dimensions (WxDxH)
Body
With stand
1214.6 x 69.5 x 732.4 mm
1214.6 x 290.0 x 799.7 mm
Weight
Without Stand
With Stand
24.0 kg
28.6 kg
✎
Design and specifications are subject to change without prior notice.
✎
For information about power supply, and more about power consumption, refer to the label attached to the product.
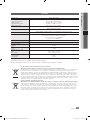
Correct Disposal of This Product (Waste Electrical & Electronic Equipment)
(Applicable in the European Union and other European countries with separate collection systems)
This marking on the product, accessories or literature indicates that the product and its electronic accessories (e.g. charger,
headset, USB cable) should not be disposed of with other household waste at the end of their working life. To prevent possible
harm to the environment or human health from uncontrolled waste disposal, please separate these items from other types of waste
and recycle them responsibly to promote the sustainable reuse of material resources. Household users should contact either the
retailer where they purchased this product, or their local government office, for details of where and how they can take these items
for environmentally safe recycling. Business users should contact their supplier and check the terms and conditions of the purchase
contract. This product and its electronic accessories should not be mixed with other commercial wastes for disposal.
Correct disposal of batteries in this product
(Applicable in the European Union and other European countries with separate battery return systems)
This marking on the battery, manual or packaging indicates that the batteries in this product should not be disposed of with other
household waste at the end of their working life. Where marked, the chemical symbols Hg, Cd or Pb indicate that the battery
contains mercury, cadmium or lead above the reference levels in EC Directive 2006/66. If batteries are not properly disposed of,
these substances can cause harm to human health or the environment. To protect natural resources and to promote material
reuse, please separate batteries from other types of waste and recycle them through your local, free battery return system.
[PC670_W-Euro]BN68-02695A-00L09.indb 49 2010-03-10 오전 11:25:58

50
English
Other Information
Licence
Manufactured under licence from Dolby Laboratories. Dolby and the double-D symbol are
trademarks of Dolby Laboratories.
Manufactured under licence under U.S. Patent #’s: 5,451,942; 5,956,674; 5,974,380; 5,978,762;
6,487,535 & other U.S. and worldwide patents issued & pending. DTS and the Symbol are
registered trademarks. & DTS 2.0 Channel and the DTS logos are trademarks of DTS, Inc. Product
Includes software. © DTS, Inc. All Rights Reserved.
DivX Certified to play DivX video up to HD 1080p, including premium content.
ABOUT DIVX VIDEO: DivX® is a digital video format created by DivX,Inc. This is an official DivX Certified device that plays DivX video. Visit www.divx.
com for more information and software tools to convert your files into DivX video.
ABOUT DIVX VIDEO-ON-DEMAND: This DivX Certified® device must be registered in order to play DivX Video-on-Demand (VOD) content.
To generate the registration code, locate the DivX VOD section in the device setup menu.
Go to vod.divx.com with this code to complete the registration process and learn more about DivX VOD. Pat. 7,295,673; 7,460,688; 7,519,274
Open Source Licence Notice
In the case of using open source software, Open Source Licences are available on the product menu.
Open Source Licence Notice is written only English.
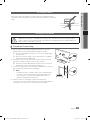
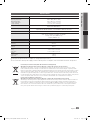
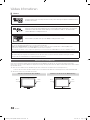
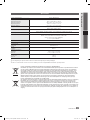
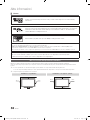
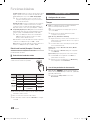
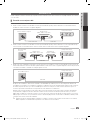
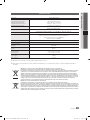
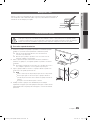
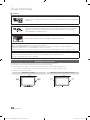
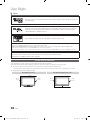
Securing the Installation Space
Keep the required distances between the product and ther objects (e.g. walls) to ensure proper ventilation.
Failing to do so may result in fire or a problem with the product due to an increase in the internal temperature of the product.
✎
When using a stand or wall-mount, use parts provided by Samsung Electronics only.
x
If you use parts provided by another manufacturer, it may result in a problem with the product or an injury due to the product falling.
✎
The appearance may differ depending on the product.
Installation with a stand. Installation with a wall-mount.
10 cm
10 cm
10 cm
10 cm
10 cm10 cm
10 cm
[PC670_W-Euro]BN68-02695A-00L09.indb 50 2010-03-10 오전 11:25:59

51
English
05 Other Information
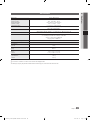
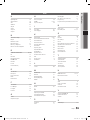
Index
A
AllShare 41
Amplify 19
Antenna 13
Anynet+ 38
Auto Adjustment 18
Auto Volume 19
B
Background Music 37
Balance L/R 19
Basic View 36
Batteries 6
Black Tone 16
Blanking Bracket 44
Brightness 16
C
Cable Tie 4, 45
Change PIN 21
Channel Manager 12
Channel Menu 13
Clock 20
Colour Tone 17
Component 8
Connecting to a PC 24
Connecting to an Audio Device 9
D
DIGITAL AUDIO OUT 9, 38
DivX® VOD 37
D-sub 24
Dynamic 16
Dynamic Contrast 17
E
Eco Sensor 16
Edit Name 10
Editing Channels 15
Energy Saving 16
EPG
(Electronic Programme Guide) 11
Equalizer 19
External Speaker 19
F
Film Mode 18
Fine Tune 16
Flesh Tone 17
Frequency 13
H
HDMI 8, 38
Headphones 9
Home Theatre 9, 38
I
Installation Space 50
L
Language 21
Licence 50
Lock 15
M
Media Play 31
Melody 22
Menu Transparency 22
Music 35
My Channels 13
N
Navigate 11
Network Connection 25
Network Setup 26
Now & Next guide 11
O
Optimal resolution 24
P
Photos 35
Picture Size 17, 37
PIP (Picture in Picture) 22
Plug & Play 7
Power Indicator 5
R
Receiver 40
Recording 39
Remote Control 6
Repeat Mode 37
RGB Only Mode 17
Rotate 37
S
Select All 16
Self Diagnosis 23
Sharpness 16
Signal Information 23
Sleep Timer 20
Slide Show 35
Software Upgrade 23
Source List 10
Speaker Select 19
Specifications 49
Standby mode 5
Subtitle 22
Symbol 3
T
Timer 21
Title 36
Tools 3
Troubleshooting 46
TV Speaker 19
U
USB Drive 23, 31
Using Channel View 11
Using Scheduled View 12
Using Favourite Channels 13
V
VCR 8
Video Formats 34
Videos 33
Virtual Surround 19
Volume 5
W
Wall Mount 44
Warm 17
White Balance 17
[PC670_W-Euro]BN68-02695A-00L09.indb 51 2010-03-10 오전 11:25:59
Sayfa yükleniyor ...

3
FRANÇAIS
Français
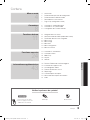
Vérifiez la présence du symbole!
Cette fonction peut être utilisée
lorsque vous appuyez sur le bouton
TOOLS de la télécommande.
Remarque Bouton tactile
TOOLS
Contenu
Mise en route
4
4 Accessoires
5 Présentation du panneau de configuration
6 Présentation de la télécommande
7 Raccordement à une antenne
7 Plug & Play (configuration initiale)
Connexions
8
8 Connexion à un périphérique AV
9 Connexion à un système audio
10 Changement de la source d'entrée
Fonctions de base
11
11 Navigation dans les menus
11 Utilisation du bouton INFO (Guide Now & Next)
11 Planification des émissions à regarder
13 Menu Canal
16 Menu Image
18 Menu Son
20 Menu Configuration
23 Menu Assistance
Fonctions avancées
24
24 Connexion à un ordinateur
25 Connexion réseau
31 Media Play
38 Anynet+
41 AllShare
Informations supplémentaires
43
43 Fonction Télétexte de chaîne analogique
44 Installation du support mural
45 Assemblage des câbles
45 Fixation du téléviseur au mur
46 Dépannage
49 Caractéristiques techniques
50 Sécurisation de l'espace d'installation
51 Index
[PC670_W-Euro]BN68-02695A-00L09.indb 3 2010-03-10 오전 11:26:00

4
Français
Mise en route
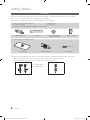
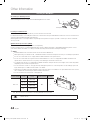
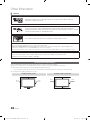
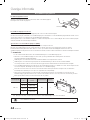
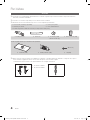
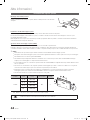
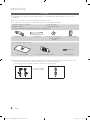
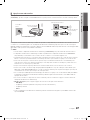
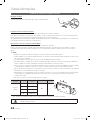
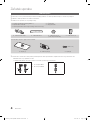
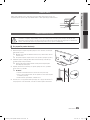
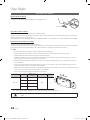
Accessoires
✎
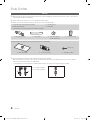
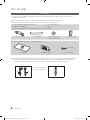
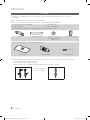
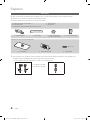
Vérifiez que les éléments suivants sont inclus avec votre téléviseur à écran plasma. S'il manque des éléments, contactez
votre revendeur.
✎
Les couleurs et les formes des éléments peuvent varier en fonction des modèles.
✎
Les câbles qui ne se trouvent pas dans le contenu de l'emballage peuvent être achetés séparément.
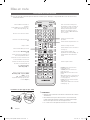
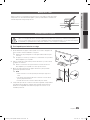
y Télécommande et piles (AAA x 2)
y Manuel d'utilisation
y Chiffon de nettoyage
y Cordon d'alimentation
y Carte de garantie / Manuel de sécurité (non disponible dans certains pays)
y Cache y Attache de câble y Anneau de support (4EA)
(Uniquement modèle en
46 pouces)
y Blindage magnétique
(3EA)
Pour installer le pied, consultez le guide approprié.
(M4 X L12)
y Pied (1EA) y Support de guidage (1EA) y Vis (9EA)
✎
Blindage magnétique : le blindage magnétique sert à protéger les câbles des interférences. Lors de la connexion
d'un câble, ouvrez le blindage magnétique et rabattez-le autour du câble près de la prise, comme illustré.
x
Distance entre le blindage magnétique et une extrémité du cordon insérée dans le téléviseur
A
B
y A : moins de 50 mm
y B : moins de 20 mm
[PC670_W-Euro]BN68-02695A-00L09.indb 4 2010-03-10 오전 11:26:01
Sayfa yükleniyor ...
Sayfa yükleniyor ...
Sayfa yükleniyor ...
Sayfa yükleniyor ...
Sayfa yükleniyor ...
Sayfa yükleniyor ...
Sayfa yükleniyor ...
Sayfa yükleniyor ...
Sayfa yükleniyor ...
Sayfa yükleniyor ...
Sayfa yükleniyor ...
Sayfa yükleniyor ...
Sayfa yükleniyor ...
Sayfa yükleniyor ...
Sayfa yükleniyor ...
Sayfa yükleniyor ...
Sayfa yükleniyor ...
Sayfa yükleniyor ...
Sayfa yükleniyor ...
Sayfa yükleniyor ...
Sayfa yükleniyor ...
Sayfa yükleniyor ...
Sayfa yükleniyor ...
Sayfa yükleniyor ...
Sayfa yükleniyor ...
Sayfa yükleniyor ...
Sayfa yükleniyor ...
Sayfa yükleniyor ...
Sayfa yükleniyor ...
Sayfa yükleniyor ...
Sayfa yükleniyor ...
Sayfa yükleniyor ...
Sayfa yükleniyor ...
Sayfa yükleniyor ...
Sayfa yükleniyor ...
Sayfa yükleniyor ...
Sayfa yükleniyor ...
Sayfa yükleniyor ...
Sayfa yükleniyor ...
Sayfa yükleniyor ...
Sayfa yükleniyor ...
Sayfa yükleniyor ...
Sayfa yükleniyor ...
Sayfa yükleniyor ...
Sayfa yükleniyor ...
Sayfa yükleniyor ...
Sayfa yükleniyor ...
Sayfa yükleniyor ...
Sayfa yükleniyor ...
Sayfa yükleniyor ...
Sayfa yükleniyor ...
Sayfa yükleniyor ...
Sayfa yükleniyor ...
Sayfa yükleniyor ...
Sayfa yükleniyor ...
Sayfa yükleniyor ...
Sayfa yükleniyor ...
Sayfa yükleniyor ...
Sayfa yükleniyor ...
Sayfa yükleniyor ...
Sayfa yükleniyor ...
Sayfa yükleniyor ...
Sayfa yükleniyor ...
Sayfa yükleniyor ...
Sayfa yükleniyor ...
Sayfa yükleniyor ...
Sayfa yükleniyor ...
Sayfa yükleniyor ...
Sayfa yükleniyor ...
Sayfa yükleniyor ...
Sayfa yükleniyor ...
Sayfa yükleniyor ...
Sayfa yükleniyor ...
Sayfa yükleniyor ...
Sayfa yükleniyor ...
Sayfa yükleniyor ...
Sayfa yükleniyor ...
Sayfa yükleniyor ...
Sayfa yükleniyor ...
Sayfa yükleniyor ...
Sayfa yükleniyor ...
Sayfa yükleniyor ...
Sayfa yükleniyor ...
Sayfa yükleniyor ...
Sayfa yükleniyor ...
Sayfa yükleniyor ...
Sayfa yükleniyor ...
Sayfa yükleniyor ...
Sayfa yükleniyor ...
Sayfa yükleniyor ...
Sayfa yükleniyor ...
Sayfa yükleniyor ...
Sayfa yükleniyor ...
Sayfa yükleniyor ...
Sayfa yükleniyor ...
Sayfa yükleniyor ...
Sayfa yükleniyor ...
Sayfa yükleniyor ...
Sayfa yükleniyor ...
Sayfa yükleniyor ...
Sayfa yükleniyor ...
Sayfa yükleniyor ...
Sayfa yükleniyor ...
Sayfa yükleniyor ...
Sayfa yükleniyor ...
Sayfa yükleniyor ...
Sayfa yükleniyor ...
Sayfa yükleniyor ...
Sayfa yükleniyor ...
Sayfa yükleniyor ...
Sayfa yükleniyor ...
Sayfa yükleniyor ...
Sayfa yükleniyor ...
Sayfa yükleniyor ...
Sayfa yükleniyor ...
Sayfa yükleniyor ...
Sayfa yükleniyor ...
Sayfa yükleniyor ...
Sayfa yükleniyor ...
Sayfa yükleniyor ...
Sayfa yükleniyor ...
Sayfa yükleniyor ...
Sayfa yükleniyor ...
Sayfa yükleniyor ...
Sayfa yükleniyor ...
Sayfa yükleniyor ...
Sayfa yükleniyor ...
Sayfa yükleniyor ...
Sayfa yükleniyor ...
Sayfa yükleniyor ...
Sayfa yükleniyor ...
Sayfa yükleniyor ...
Sayfa yükleniyor ...
Sayfa yükleniyor ...
Sayfa yükleniyor ...
Sayfa yükleniyor ...
Sayfa yükleniyor ...
Sayfa yükleniyor ...
Sayfa yükleniyor ...
Sayfa yükleniyor ...
Sayfa yükleniyor ...
Sayfa yükleniyor ...
Sayfa yükleniyor ...
Sayfa yükleniyor ...
Sayfa yükleniyor ...
Sayfa yükleniyor ...
Sayfa yükleniyor ...
Sayfa yükleniyor ...
Sayfa yükleniyor ...
Sayfa yükleniyor ...
Sayfa yükleniyor ...
Sayfa yükleniyor ...
Sayfa yükleniyor ...
Sayfa yükleniyor ...
Sayfa yükleniyor ...
Sayfa yükleniyor ...
Sayfa yükleniyor ...
Sayfa yükleniyor ...
Sayfa yükleniyor ...
Sayfa yükleniyor ...
Sayfa yükleniyor ...
Sayfa yükleniyor ...
Sayfa yükleniyor ...
Sayfa yükleniyor ...
Sayfa yükleniyor ...
Sayfa yükleniyor ...
Sayfa yükleniyor ...
Sayfa yükleniyor ...
Sayfa yükleniyor ...
Sayfa yükleniyor ...
Sayfa yükleniyor ...
Sayfa yükleniyor ...
Sayfa yükleniyor ...
Sayfa yükleniyor ...
Sayfa yükleniyor ...
Sayfa yükleniyor ...
Sayfa yükleniyor ...
Sayfa yükleniyor ...
Sayfa yükleniyor ...
Sayfa yükleniyor ...
Sayfa yükleniyor ...
Sayfa yükleniyor ...
Sayfa yükleniyor ...
Sayfa yükleniyor ...
Sayfa yükleniyor ...
Sayfa yükleniyor ...
Sayfa yükleniyor ...
Sayfa yükleniyor ...
Sayfa yükleniyor ...
Sayfa yükleniyor ...
Sayfa yükleniyor ...
Sayfa yükleniyor ...
Sayfa yükleniyor ...
Sayfa yükleniyor ...
Sayfa yükleniyor ...
Sayfa yükleniyor ...
Sayfa yükleniyor ...
Sayfa yükleniyor ...
Sayfa yükleniyor ...
Sayfa yükleniyor ...
Sayfa yükleniyor ...
Sayfa yükleniyor ...
Sayfa yükleniyor ...
Sayfa yükleniyor ...
Sayfa yükleniyor ...
Sayfa yükleniyor ...
Sayfa yükleniyor ...
Sayfa yükleniyor ...
Sayfa yükleniyor ...
Sayfa yükleniyor ...
Sayfa yükleniyor ...
Sayfa yükleniyor ...
Sayfa yükleniyor ...
Sayfa yükleniyor ...
Sayfa yükleniyor ...
Sayfa yükleniyor ...
Sayfa yükleniyor ...
Sayfa yükleniyor ...
Sayfa yükleniyor ...
Sayfa yükleniyor ...
Sayfa yükleniyor ...
Sayfa yükleniyor ...
Sayfa yükleniyor ...
Sayfa yükleniyor ...
Sayfa yükleniyor ...
Sayfa yükleniyor ...
Sayfa yükleniyor ...
Sayfa yükleniyor ...
Sayfa yükleniyor ...
Sayfa yükleniyor ...
Sayfa yükleniyor ...
Sayfa yükleniyor ...
Sayfa yükleniyor ...
Sayfa yükleniyor ...
Sayfa yükleniyor ...
Sayfa yükleniyor ...
Sayfa yükleniyor ...
Sayfa yükleniyor ...
Sayfa yükleniyor ...
Sayfa yükleniyor ...
Sayfa yükleniyor ...
Sayfa yükleniyor ...
Sayfa yükleniyor ...
Sayfa yükleniyor ...
Sayfa yükleniyor ...
Sayfa yükleniyor ...
Sayfa yükleniyor ...
Sayfa yükleniyor ...
Sayfa yükleniyor ...
Sayfa yükleniyor ...
Sayfa yükleniyor ...
Sayfa yükleniyor ...
Sayfa yükleniyor ...
Sayfa yükleniyor ...
Sayfa yükleniyor ...
Sayfa yükleniyor ...
Sayfa yükleniyor ...
Sayfa yükleniyor ...
Sayfa yükleniyor ...
Sayfa yükleniyor ...
Sayfa yükleniyor ...
Sayfa yükleniyor ...
Sayfa yükleniyor ...
Sayfa yükleniyor ...
Sayfa yükleniyor ...
Sayfa yükleniyor ...
Sayfa yükleniyor ...
Sayfa yükleniyor ...
Sayfa yükleniyor ...
Sayfa yükleniyor ...
Sayfa yükleniyor ...
Sayfa yükleniyor ...
Sayfa yükleniyor ...
Sayfa yükleniyor ...
Sayfa yükleniyor ...
Sayfa yükleniyor ...
Sayfa yükleniyor ...
Sayfa yükleniyor ...
Sayfa yükleniyor ...
Sayfa yükleniyor ...
Sayfa yükleniyor ...
Sayfa yükleniyor ...
Sayfa yükleniyor ...
Sayfa yükleniyor ...
Sayfa yükleniyor ...
Sayfa yükleniyor ...
Sayfa yükleniyor ...
Sayfa yükleniyor ...
Sayfa yükleniyor ...
Sayfa yükleniyor ...
Sayfa yükleniyor ...
Sayfa yükleniyor ...
Sayfa yükleniyor ...
Sayfa yükleniyor ...
Sayfa yükleniyor ...
Sayfa yükleniyor ...
Sayfa yükleniyor ...
Sayfa yükleniyor ...
Sayfa yükleniyor ...
Sayfa yükleniyor ...
Sayfa yükleniyor ...
Sayfa yükleniyor ...
Sayfa yükleniyor ...
Sayfa yükleniyor ...
Sayfa yükleniyor ...
Sayfa yükleniyor ...
Sayfa yükleniyor ...
Sayfa yükleniyor ...
Sayfa yükleniyor ...
Sayfa yükleniyor ...
Sayfa yükleniyor ...
Sayfa yükleniyor ...
Sayfa yükleniyor ...
Sayfa yükleniyor ...
Sayfa yükleniyor ...
Sayfa yükleniyor ...
Sayfa yükleniyor ...
Sayfa yükleniyor ...
Sayfa yükleniyor ...
Sayfa yükleniyor ...
Sayfa yükleniyor ...
Sayfa yükleniyor ...
Sayfa yükleniyor ...
Sayfa yükleniyor ...
Sayfa yükleniyor ...
Sayfa yükleniyor ...
Sayfa yükleniyor ...
Sayfa yükleniyor ...
Sayfa yükleniyor ...
Sayfa yükleniyor ...
Sayfa yükleniyor ...
Sayfa yükleniyor ...
Sayfa yükleniyor ...
Sayfa yükleniyor ...
Sayfa yükleniyor ...
Sayfa yükleniyor ...
Sayfa yükleniyor ...
Sayfa yükleniyor ...
Sayfa yükleniyor ...
Sayfa yükleniyor ...
Sayfa yükleniyor ...
Sayfa yükleniyor ...
Sayfa yükleniyor ...
Sayfa yükleniyor ...
Sayfa yükleniyor ...
Sayfa yükleniyor ...
Sayfa yükleniyor ...
Sayfa yükleniyor ...
Sayfa yükleniyor ...
Sayfa yükleniyor ...
Sayfa yükleniyor ...
Sayfa yükleniyor ...
Sayfa yükleniyor ...
Sayfa yükleniyor ...
Sayfa yükleniyor ...
Sayfa yükleniyor ...
Sayfa yükleniyor ...
Sayfa yükleniyor ...
Sayfa yükleniyor ...
Sayfa yükleniyor ...
Sayfa yükleniyor ...
Sayfa yükleniyor ...
Sayfa yükleniyor ...
Sayfa yükleniyor ...
Sayfa yükleniyor ...
Sayfa yükleniyor ...
Sayfa yükleniyor ...
Sayfa yükleniyor ...
Sayfa yükleniyor ...
Sayfa yükleniyor ...
Sayfa yükleniyor ...
Sayfa yükleniyor ...
Sayfa yükleniyor ...
Sayfa yükleniyor ...
Sayfa yükleniyor ...
Sayfa yükleniyor ...
Sayfa yükleniyor ...
Sayfa yükleniyor ...
Sayfa yükleniyor ...
Sayfa yükleniyor ...
Sayfa yükleniyor ...
Sayfa yükleniyor ...
Sayfa yükleniyor ...
Sayfa yükleniyor ...
Sayfa yükleniyor ...
Sayfa yükleniyor ...
Sayfa yükleniyor ...
Sayfa yükleniyor ...
Sayfa yükleniyor ...
Sayfa yükleniyor ...
Sayfa yükleniyor ...
Sayfa yükleniyor ...
Sayfa yükleniyor ...
Sayfa yükleniyor ...
Sayfa yükleniyor ...
Sayfa yükleniyor ...
Sayfa yükleniyor ...
Sayfa yükleniyor ...
-
 1
1
-
 2
2
-
 3
3
-
 4
4
-
 5
5
-
 6
6
-
 7
7
-
 8
8
-
 9
9
-
 10
10
-
 11
11
-
 12
12
-
 13
13
-
 14
14
-
 15
15
-
 16
16
-
 17
17
-
 18
18
-
 19
19
-
 20
20
-
 21
21
-
 22
22
-
 23
23
-
 24
24
-
 25
25
-
 26
26
-
 27
27
-
 28
28
-
 29
29
-
 30
30
-
 31
31
-
 32
32
-
 33
33
-
 34
34
-
 35
35
-
 36
36
-
 37
37
-
 38
38
-
 39
39
-
 40
40
-
 41
41
-
 42
42
-
 43
43
-
 44
44
-
 45
45
-
 46
46
-
 47
47
-
 48
48
-
 49
49
-
 50
50
-
 51
51
-
 52
52
-
 53
53
-
 54
54
-
 55
55
-
 56
56
-
 57
57
-
 58
58
-
 59
59
-
 60
60
-
 61
61
-
 62
62
-
 63
63
-
 64
64
-
 65
65
-
 66
66
-
 67
67
-
 68
68
-
 69
69
-
 70
70
-
 71
71
-
 72
72
-
 73
73
-
 74
74
-
 75
75
-
 76
76
-
 77
77
-
 78
78
-
 79
79
-
 80
80
-
 81
81
-
 82
82
-
 83
83
-
 84
84
-
 85
85
-
 86
86
-
 87
87
-
 88
88
-
 89
89
-
 90
90
-
 91
91
-
 92
92
-
 93
93
-
 94
94
-
 95
95
-
 96
96
-
 97
97
-
 98
98
-
 99
99
-
 100
100
-
 101
101
-
 102
102
-
 103
103
-
 104
104
-
 105
105
-
 106
106
-
 107
107
-
 108
108
-
 109
109
-
 110
110
-
 111
111
-
 112
112
-
 113
113
-
 114
114
-
 115
115
-
 116
116
-
 117
117
-
 118
118
-
 119
119
-
 120
120
-
 121
121
-
 122
122
-
 123
123
-
 124
124
-
 125
125
-
 126
126
-
 127
127
-
 128
128
-
 129
129
-
 130
130
-
 131
131
-
 132
132
-
 133
133
-
 134
134
-
 135
135
-
 136
136
-
 137
137
-
 138
138
-
 139
139
-
 140
140
-
 141
141
-
 142
142
-
 143
143
-
 144
144
-
 145
145
-
 146
146
-
 147
147
-
 148
148
-
 149
149
-
 150
150
-
 151
151
-
 152
152
-
 153
153
-
 154
154
-
 155
155
-
 156
156
-
 157
157
-
 158
158
-
 159
159
-
 160
160
-
 161
161
-
 162
162
-
 163
163
-
 164
164
-
 165
165
-
 166
166
-
 167
167
-
 168
168
-
 169
169
-
 170
170
-
 171
171
-
 172
172
-
 173
173
-
 174
174
-
 175
175
-
 176
176
-
 177
177
-
 178
178
-
 179
179
-
 180
180
-
 181
181
-
 182
182
-
 183
183
-
 184
184
-
 185
185
-
 186
186
-
 187
187
-
 188
188
-
 189
189
-
 190
190
-
 191
191
-
 192
192
-
 193
193
-
 194
194
-
 195
195
-
 196
196
-
 197
197
-
 198
198
-
 199
199
-
 200
200
-
 201
201
-
 202
202
-
 203
203
-
 204
204
-
 205
205
-
 206
206
-
 207
207
-
 208
208
-
 209
209
-
 210
210
-
 211
211
-
 212
212
-
 213
213
-
 214
214
-
 215
215
-
 216
216
-
 217
217
-
 218
218
-
 219
219
-
 220
220
-
 221
221
-
 222
222
-
 223
223
-
 224
224
-
 225
225
-
 226
226
-
 227
227
-
 228
228
-
 229
229
-
 230
230
-
 231
231
-
 232
232
-
 233
233
-
 234
234
-
 235
235
-
 236
236
-
 237
237
-
 238
238
-
 239
239
-
 240
240
-
 241
241
-
 242
242
-
 243
243
-
 244
244
-
 245
245
-
 246
246
-
 247
247
-
 248
248
-
 249
249
-
 250
250
-
 251
251
-
 252
252
-
 253
253
-
 254
254
-
 255
255
-
 256
256
-
 257
257
-
 258
258
-
 259
259
-
 260
260
-
 261
261
-
 262
262
-
 263
263
-
 264
264
-
 265
265
-
 266
266
-
 267
267
-
 268
268
-
 269
269
-
 270
270
-
 271
271
-
 272
272
-
 273
273
-
 274
274
-
 275
275
-
 276
276
-
 277
277
-
 278
278
-
 279
279
-
 280
280
-
 281
281
-
 282
282
-
 283
283
-
 284
284
-
 285
285
-
 286
286
-
 287
287
-
 288
288
-
 289
289
-
 290
290
-
 291
291
-
 292
292
-
 293
293
-
 294
294
-
 295
295
-
 296
296
-
 297
297
-
 298
298
-
 299
299
-
 300
300
-
 301
301
-
 302
302
-
 303
303
-
 304
304
-
 305
305
-
 306
306
-
 307
307
-
 308
308
-
 309
309
-
 310
310
-
 311
311
-
 312
312
-
 313
313
-
 314
314
-
 315
315
-
 316
316
-
 317
317
-
 318
318
-
 319
319
-
 320
320
-
 321
321
-
 322
322
-
 323
323
-
 324
324
-
 325
325
-
 326
326
-
 327
327
-
 328
328
-
 329
329
-
 330
330
-
 331
331
-
 332
332
-
 333
333
-
 334
334
-
 335
335
-
 336
336
-
 337
337
-
 338
338
-
 339
339
-
 340
340
-
 341
341
-
 342
342
-
 343
343
-
 344
344
-
 345
345
-
 346
346
-
 347
347
-
 348
348
-
 349
349
-
 350
350
-
 351
351
-
 352
352
-
 353
353
-
 354
354
-
 355
355
-
 356
356
-
 357
357
-
 358
358
-
 359
359
-
 360
360
-
 361
361
-
 362
362
-
 363
363
-
 364
364
-
 365
365
-
 366
366
-
 367
367
-
 368
368
-
 369
369
-
 370
370
-
 371
371
-
 372
372
-
 373
373
-
 374
374
-
 375
375
-
 376
376
-
 377
377
-
 378
378
-
 379
379
-
 380
380
-
 381
381
-
 382
382
-
 383
383
-
 384
384
-
 385
385
-
 386
386
-
 387
387
-
 388
388
-
 389
389
-
 390
390
-
 391
391
-
 392
392
-
 393
393
-
 394
394
-
 395
395
-
 396
396
-
 397
397
-
 398
398
-
 399
399
-
 400
400
-
 401
401
-
 402
402
-
 403
403
-
 404
404
-
 405
405
-
 406
406
-
 407
407
-
 408
408
-
 409
409
-
 410
410
-
 411
411
-
 412
412
-
 413
413
-
 414
414
-
 415
415
-
 416
416
-
 417
417
-
 418
418
-
 419
419
-
 420
420
-
 421
421
-
 422
422
-
 423
423
-
 424
424
-
 425
425
-
 426
426
-
 427
427
-
 428
428
-
 429
429
-
 430
430
-
 431
431
-
 432
432
-
 433
433
-
 434
434
-
 435
435
-
 436
436
-
 437
437
-
 438
438
-
 439
439
-
 440
440
-
 441
441
-
 442
442
-
 443
443
-
 444
444
-
 445
445
-
 446
446
-
 447
447
-
 448
448
-
 449
449
-
 450
450
-
 451
451
-
 452
452


Samsung PS50C670G3S Kullanım kılavuzu
- Kategori
- LCD TV'ler
- Tip
- Kullanım kılavuzu
Diğer dillerde
- español: Samsung PS50C670G3S Manual de usuario
- français: Samsung PS50C670G3S Manuel utilisateur
- italiano: Samsung PS50C670G3S Manuale utente
- Deutsch: Samsung PS50C670G3S Benutzerhandbuch
- português: Samsung PS50C670G3S Manual do usuário
- English: Samsung PS50C670G3S User manual
- Nederlands: Samsung PS50C670G3S Handleiding
İlgili Makaleler
-
Samsung LE40B620R3W Kullanım kılavuzu
-
Samsung PS50C490B3W Kullanım kılavuzu
-
Samsung LE46C530F1W Kullanım kılavuzu
-
Samsung PS58C6500TW Kullanım kılavuzu
-
Samsung PS64D8000FS Hızlı başlangıç Kılavuzu
-
Samsung UE26C4000PW Kullanım kılavuzu
-
Samsung PS50C530C1W El kitabı
-
Samsung PS59D550C1W Hızlı başlangıç Kılavuzu
-
-
Diğer Belgeler
-
Canon MF5980dw Kullanım kılavuzu
-
LG L1100.VNMDG Kullanım kılavuzu
-
Trust Digital TV & Radio Yükleme Rehberi
-
Hama 00047564 Kullanım kılavuzu
-
 US Robotics MAXg 9108 Yükleme Rehberi
-
Hama 00083210 El kitabı
-
Philips SDV5122P/12 Kullanım kılavuzu
-
JVC KS-BTA200 El kitabı
-
Xerox 3100MFP Kullanım kılavuzu
-
Kathrein 310 Kullanım kılavuzu
