Chicco Baby Hug 4 in 1 Air Kullanım kılavuzu
- Tip
- Kullanım kılavuzu


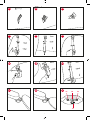
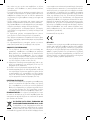
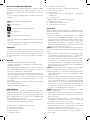
3

3
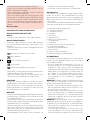
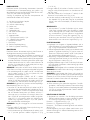
A BA2
D
G
L M
G1
I
G2
E
F
C
A1

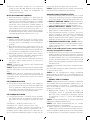
4
5
6
1
4
7B
7
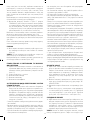
2
5
7C
5A
7A
3
3A
N

4
5
15
8A
12
9
11
10A
13 14
9A
11A
10B
8

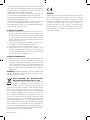
6
7
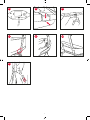
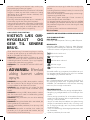
23A
21
18
23
20
22
19
17B 17C
17A1715

6
7
26
25A
27 F3 F4
F1
F2
25C
26A
25B
2524C 24D
24B24A24

8
9
33
32A
31 32
28 3029

8
9
BABY HUG 4 IN 1 può essere usata come culla, sdraietta,
seggiolone e prima sedia.
• La modalità Culla: è adatta dalla nascita no a quan-
do il bambino non è in grado di stare seduto da solo
(5/6 mesi di età) e sino a 9 kg di peso massimo.
• La modalità Sdraietta: è adatta dalla nascita no a
quando il bambino impara a mettersi seduto da solo
(approssimativamente 5/6 mesi e sino a 9 kg di peso
massimo).
• La modalità Seggiolone: è consentito quando il
bambino è in grado di stare seduto da solo (approssi-
mativamente 6 mesi ) no ai 36 mesi e sino a 15 kg di
peso massimo.
• La modalità Prima sedia al tavolo: E’ consentito
quando il bambino cammina ed è in grado di sedersi
e alzarsi da solo (approssimativamente 10/12 mesi) 18
kg max.
• Solo per uso domestico.
ATTENZIONE: PER EVITARE RISCHI DI SOFFOCAMEN-
TO, RIMUOVERE QUESTA COPERTURA PLASTICA PRIMA
DELL’USO DEL PRODOTTO. QUESTA COPERTURA PLA-
STICA DOVREBBE ESSERE DISTRUTTA O TENUTA LONTA-
NA DALLA PORTATA DEI NEONATI E BAMBINI.
• ATTENZIONE: Non lasciare mai il bambino incustodito.
• ATTENZIONE: Non lasciare che altri bambini giochino
incustoditi nelle vicinanze del prodotto.
• ATTENZIONE: Il montaggio di questo prodotto e di tutti
i componenti deve essere eettuato solo da un adulto.
• ATTENZIONE: Non aggiungere corde per allungare
i sistemi di ssaggio del pendente della barra gioco e
non praticare nodi/occhielli: ciò potrebbe consentire
la formazione accidentale di nodi scorsoi che potreb-
bero creare rischi di strangolamento.
• Una prolungata esposizione al sole potrebbe creare
variazione ai toni di colore del prodotto. Dopo una
prolungata esposizione del prodotto alle alte tempe-
rature attendere qualche minuto prima di sistemare il
bambino all’interno del prodotto.
• Assicurarsi che gli utilizzatori del prodotto siano a co-
noscenza dell’esatto funzionamento dello stesso.
• Non utilizzare mai il prodotto senza il rivestimento.
• Non utilizzare il prodotto con più di un bambino alla volta.
• Non lasciare nel prodotto piccoli oggetti che possano
essere ingoiati dal bambino.
• Le attività di apertura, regolazione e chiusura del prodot-
to devono essere svolte esclusivamente da un adulto.
• Quando il bambino è nel prodotto, posizionare il prodot-
to esclusivamente su una supercie orizzontale e stabile.
• Non collocare mai il prodotto in vicinanza di scale, gra-
dini o su tappeti.
• Non appendere alla struttura del prodotto borse o pesi
per non sbilanciarla.
• Non eettuare le operazioni di apertura e chiusura del
prodotto con il bambino seduto.
• Vericare prima dell’assemblaggio che il prodotto e
tutti i suoi componenti non presentino eventuali dan-
neggiamenti dovuti al trasporto, in tal caso il prodotto
non deve essere utilizzato e dovrà essere tenuto lonta-
no dalla portata dei bambini.
• Non usare accessori o parti di ricambio che non siano
approvati dal costruttore.
• ATTENZIONE: L’utilizzo del gioco deve avvenire sem-
pre sotto la sorveglianza di un adulto.
• Quando il prodotto è in uso, le rotelle devono essere
sempre bloccate.
• ATTENZIONE: Vericare regolarmente lo stato di usu-
ra del prodotto e la presenza di eventuali rotture. In
caso di danneggiamenti non utilizzare la barra gioco
e il gioco pendente e tenerlo fuori dalla portata dei
bambini.
• Quando non in uso, tenere il prodotto lontano dalla
portata dei bambini.
0 ÷ 6 M MODALITA’ CULLA
IMPORTANTE :
LEGGERE ATTENTA-
MENTE E CONSER-
VARE PER FUTURO
RIFERIMENTO.
AVVERTENZE
ATTENZIONE: IN MODALITÀ CULLA, SI DEVONO
RIMUOVERE COMPLETAMENTE LE CINTURE DI SI-
CUREZZA, AVENDO CURA DI CONSERVARLE LON-
TANO DALLA PORTATA DEL BAMBINO.
• ATTENZIONE: Non utilizzare questo pro dotto senza
aver letto prima le istruzioni d’uso.
• ATTENZIONE: L’uso del prodotto è consentito ad un
bambino di età compresa tra 0 - 6 mesi, sino ad un
massimo di 9 kg di peso.
• ATTENZIONE: Quando il bambino è in grado di stare
seduto, in ginocchio o tirarsi su, il prodotto non deve
più essere utilizzato per questo bambino.
• ATTENZIONE: Il posizionamento di qual siasi prodotto
aggiuntivo potrebbe causa re soocamento.
• Il prodotto deve essere sempre collocato su un piano
orizzontale. Non lasciare mai il prodotto su un piano
inclinato con il bambino all’interno.
• ATTENZIONE: Il prodotto è pronto all’uso solo quan-
do tutti i meccanismi di bloccaggio sono inseriti. Veri-
care con attenzione che siano inseriti prima dell’uso.
• ATTENZIONE: Non utilizzare la culla se qualsiasi parte
è rotta, strappata o mancante.
• ATTENZIONE: NON USARE il prodotto se qualsiasi
componente è assente, danneggiato o rotto. Con-
tattare Artsana SPA per parti di ricambio e istruzioni
d’uso se necessarie. NON SOSTITUIRE parti mancanti,
danneggiate o rotte con componenti non originali ed
ISTRUZIONI D’USO

10
11
approvate da Artsana SPA.
• ATTENZIONE: Prestare attenzione al rischio di brucia-
ture da sigarette, amme libere e altre fonti di forte ca-
lore come stufe elettriche, stufe a gas, ecc. in vicinanza
della culla.
• Tutti i componenti devono essere sempre adeguata-
mente ingaggiati; fare inoltre attenzione che non vi
siano cerniere aperte, in quanto potrebbero incastrarsi
parti del corpo o dell’abbigliamento dei bambini (strin-
ghe, collane, nastri di ciucci per neonati, ecc.), costi-
tuendo quindi il rischio di strangolamento.
• Non utilizzare la culla senza il telaio.
• Lo spessore del materasso deve essere tale che l’altez-
za verticale (supercie superiore materasso no al bor-
do superiore dei lati del prodotto) sia almeno 200 mm.
• Quando il prodotto è in uso, le rotelle devono essere
sempre bloccate.
• ATTENZIONE: Non posizionare il prodotto vicino a
un altro prodotto, che potrebbe rappresentare un pe-
ricolo di soocamen to o strangolamento, ad es. corde,
tende o simili. Per evitare rischi di strangolamento, non
dare al bambino e non riporre vicino al bambino og-
getti muniti di corde.
• ATTENZIONE: Non usare più di un materasso nel pro-
dotto. Utilizzare solo il materasso fornito con la culla.
• ATTENZIONE: Utilizzare solo il materasso venduto
con questa culla, non aggiungere un secondo mate-
rasso, rischio di soocamento. Dimensioni materasso
750 x 380 x 30 mm.
• ATTENZIONE: I neonati possono soocare a causa di
biancheria e coperte morbide. Evitare di posizionare
cuscini oppure oggetti simili sotto il neonato per mag-
giore comfort durante il sonno.
• Non lasciare all’interno del prodotto alcun oggetto che
possa ridurne la profondità.
• Non posizionare la culla in prossimità di muri e ostacoli,
per prevenire rischi di intrappolamento.
• Il prodotto deve essere tenuto lontano da cavi elet-
trici e corde: non mettere il prodotto vicino a nestre,
dove corde, tende o simili potrebbero causare il soo-
camento o lo strangolamento del bambino. Per evitare
rischi di strangolamento, non dare al bambino e non
riporre vicino al bambino oggetti muniti di corde.
0 ÷ 6 M MODALITA’ SDRAIETTA
IMPORTANTE!
TENERE PER RIFERI-
MENTI FUTURI.
AVVERTENZE
• ATTENZIONE: Non utilizzare la sdraietta se il bambi-
no e in grado di stare seduto da solo, se è capace di
rotolare su se stesso o se si sa alzare puntando mani,
ginocchia e piedi.
• ATTENZIONE: Età di utilizzo consentita: dalla nascita
no a 9 kg (6 mesi).
• ATTENZIONE: Questa sdraietta non è intesa per pro-
lungati periodi di sonno.
• ATTENZIONE: E’ pericoloso utilizzare la sdraietta su
una supercie sopraelevata, per esempio tavoli ecc.
• ATTENZIONE: Utilizzare sempre i sistemi di ritenuta.
• Utilizzare sempre il sistema di ritenuta quando il bam-
bino è seduto nella sdraietta; regolare eventualmente
la loro lunghezza con gli appositi regolatori.
• ATTENZIONE: Non utilizzare la barra gioco per tra-
sportare la sdraietta.
• ATTENZIONE: La sdraietta non sostituisce un letto o
una culla. Se il bambino necessita di dormire, dovreb-
be essere posto in un letto o culla adatta.
• ATTENZIONE: Non usare la sdraietta se qualsiasi parte
fosse rotta o mancante.
• Non lasciare mai la sdraietta su piani non perfettamen-
te orizzontali.
• Per evitare rischi o principi di incendi non lasciare la
sdraietta nelle vicinanze di fonti di calore, di apparec-
chi elettrici, a gas, ecc.
• Assicurarsi sempre che tutti i componenti siano corret-
tamente agganciati e montati.
• Controllare periodicamente eventuali parti usurate, viti
allentate, materiali usurati o scuciti e sostituire imme-
diatamente le eventuali parti danneggiate.
• Non mettere la sdraietta con il bambino vicino a ne-
stre o muri, dove corde, tende o altro potrebbe essere
utilizzato dal bambino per arrampicarsi o essere causa
di soocamento o strangolamento.
• Non mettere la sdraietta vicino a nestre o muri per
evitare il rischio che il bambino possa sbilanciarsi e
cadere.
6 ÷ 36 M MODALITA’ SEGGIOLONE
IMPORTANTE :
LEGGERE ATTENTA-
MENTE E CONSER-
VARE PER FUTURO
RIFERIMENTO.
AVVERTENZE
ATTENZIONE: IN QUESTA CONFIGURAZIONE LA
BARRA GIOCO DEVE ESSERE POSIZIONATA SEM-
PRE DIETRO LO SCHIENALE.
• ATTENZIONE: Utilizzare sempre il sistema di ritenuta.
• ATTENZIONE: Pericolo di caduta: non lasciare che il
bambino si arrampichi sul prodotto.
• ATTENZIONE: Non utilizzare il prodotto a meno che
tutti i componenti non siano correttamente aggancia-
ti e regolati.
• ATTENZIONE: Prestare attenzione al rischio generato
da amme libere e altre fonti di forte calore nelle vici-
nanze del prodotto.

10
11
• ATTENZIONE: Prestare attenzione al rischio di ribalta-
mento del prodotto nel caso in cui il bambino si spin-
ga con i piedi contro il tavolo o qualsiasi altra struttura.
• ATTENZIONE: Assicurarsi che i sistemi di ritenuta sia-
no correttamente montati prima dell’uso.
• ATTENZIONE: Prima dell’uso vericare sempre la sicu-
rezza e la stabilità del seggiolone.
• ATTENZIONE: Prima dell’uso assicurarsi che tutti i
meccanismi di sicurezza siano correttamente innestati.
In particolare assicurarsi che il Seggiolone sia bloccato
in posizione aperta.
• ATTENZIONE: Inserire sempre il dispositivo frenante,
quando il prodotto non è in movimento.
• Non utilizzare il Seggiolone no a quando il bambino
non è in grado di stare seduto da solo.
• L’utilizzo del Seggiolone è consigliato per bambini in
grado di stare seduti da soli e di età compresa tra i 6
mesi ed i 36 mesi e non oltre i 15 kg.
• Non usare il seggiolone se alcune parti sono rotte,
strappate o mancanti.
• Nelle operazioni di apertura e chiusura assicurarsi che
il bambino sia a debita distanza. Nelle operazioni di re-
golazione (inclinazione dello schienale) assicurarsi che
le parti mobili del Seggiolone non vengano a contatto
con il corpo del bambino.
• L’uso delle cinture di sicurezza con spartigambe in
tessuto correttamente ssato alla seduta e con sparti-
gambe rigido è indispensabile per garantire la sicurez-
za del bambino, nella congurazioni di utilizzo come
seggiolone.
• Non spostare mai il seggiolone con il bambino all’interno.
• Non lasciare che altri bambini giochino senza sorve-
glianza nelle vicinanze del seggiolone o si arrampichi-
no su di esso.
• Non mettere il seggiolone vicino a nestre o muri,
dove corde, tende o altro potrebbero essere utilizzate
dal bambino per arrampicarsi o essere causa di soo-
camento o strangolamento.
12 M+ MODALITA’ PRIMA SEDIA
IMPORTANTE: LEG-
GERE ATTENTAMEN-
TE E CONSERVARE
PER FUTURO RIFE-
RIMENTO.
• Età di utilizzo consentita: Da quando il bambino cam-
mina ed è in grado di sedersi e alzarsi da solo (appros-
simativamente 10/12 mesi) 18 kg max.
• ATTENZIONE: Prima utilizzare la sedia, occorre ri-
muovere le cinture di sicurezza (spartigambe e cin-
ghia addominale) e posizionarle nelle apposite sedi.
Rimuovere anche la barra gioco o posizionarla dietro
lo schienale.
• ATTENZIONE: LA SEDIA DEVE ESSERE UTILIZZATA
CON LO SCHIENALE COMPLETAMENTE SOLLEVATO.
• ATTENZIONE: NON
LASCIARE MAI IL
BAMBINO INCUSTO-
DITO.
• ATTENZIONE: NON POSIZIONARE questo prodotto vi-
cino a una nestra, potrebbe essere utilizzato dal bam-
bino come gradino, pericolo di caduta dalla nestra.
• ATTENZIONE: Prestare attenzione al rischio generato
da amme libere e altre fonti di forte calore nelle vici-
nanze del prodotto.
• ATTENZIONE: NON POSIZIONARE questo prodotto
vicino a una nestra, la cinghia della tapparella o le
corde delle tende potrebbero strangolare e bambino.
• ATTENZIONE: Non usare il prodotto se qualsiasi parte
fosse rotta, strappata o mancante.
• ATTENZIONE: Non usare accessori o parti di ricambio
che non siano approvati dal costruttore.
• Posizionare esclusivamente su superci piane e stabili.
• ATTENZIONE: Vericare che lo spazio nel quale verrà
utilizzata la sedia sia libero da oggetti o arredi che ne
ostacolino o che pregiudichino il corretto utilizzo.
• Non permettere al bambino di alzarsi in piedi sulla se-
dia per evitare il rischio di cadute.
• Non lasciare sedere sulla sedia, più di un bambino alla
volta per non comprometterne la stabilità.
• Questa sedia è destinata ad un uso prettamente do-
mestico e su superci asciutte.
• Non eettuare alcuna modica: qualsiasi variazione
potrebbe comprometterne la sicurezza.
• Una prolungata esposizione del prodotto al sole po-
trebbe causare uno scolorimento dei tessuti. Dopo
una prolungata esposizione alle alte temperature at-
tendere qualche minuto prima di utilizzare il prodotto.
• Non spostare mai la sedia con il bambino seduto.
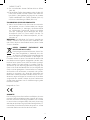
EN 17191: 2021
CONSIGLI PER LA PULIZIA E LA MANUTENZIONE
COMPOSIZIONE TESSILE
RIVESTIMENTO:
Esterno: 100% Poliestere / Imbottitura: 100% Poliestere.
MINIRIDUTTORE:
Esterno: 100% Poliestere / Imbottitura: 100% Poliestere.
(Solo per il mercato UK: Esterno 45% cotone - 55% po-
liestere).
• Per il lavaggio attenersi alle indicazioni riportate sull’e-
tichetta del prodotto:
Lavare a mano in acqua fredda
Non candeggiare
30° C

12
13
Non asciugare meccanicamente
Non stirare
Non lavare a secco
• Dopo ogni lavaggio vericare la resistenza del tessuto
e delle cuciture.
• Una prolungata esposizione del prodotto al sole po-
trebbe causare uno scolorimento dei tessuti.
PULIZIA
Pulire le parti in plastica con un panno inumidito con
acqua. Non usare mai detergenti abrasivi o solventi. In
caso di contatto con acqua asciugare le parti in metallo
al ne di evitare la formazione di ruggine.
MANUTENZIONE
• Questo prodotto necessita di manutenzione periodica.
• Le operazioni di pulizia e manutenzione devono essere
eettuate solo da un adulto.
• Controllare periodicamente il prodotto per vericarne
eventuali rotture, danneggiamenti o parti mancanti: in
tal caso non utilizzare.
• Pulire da polvere, sporco e sabbia, tutte le parti in pla-
stica che scorrono sui tubi in metallo al ne di evitare
attriti che possono compromettere il corretto funzio-
namento del prodotto.
• In caso di necessità lubricare le parti mobili con olio
secco al silicone.
• Tenere il prodotto in un posto asciutto.
COMPONENTI
Il prodotto arriva completamente smontato, vericare la
presenza dei componenti come indicato nella lista sot-
to, qualora dovesse mancare qualche parte, contattare
il CUSTOMER SERVICE di ARTSANA.
L’assemblaggio del prodotto e di tutti i suoi componenti
deve essere eseguito esclusivamente da un adulto.
A - Telaio piedistallo regolabile in altezza
A1 - 4 rotelle con freni
A2 - Supporto centrale
B - Telaio seduta
C - Struttura seduta
D - Tubolare telaio seduta
E - Tessile (con spallacci)
F - Miniriduttore
G - Barra gioco
G1 - Pulsantiera gioco luminoso / sonoro
G2 - 3 giochi morbidi
I - Cerniere tessili superiori
L - Clip plastiche
M - Pedale regolazione altezza
N - Leva inclinazione schienale
ASSEMBLAGGIO
Il prodotto arriva smontato, per poterlo utilizzare devo-
no essere eseguite le seguenti operazioni di montaggio:
1. La prima operazione da compiere è il montaggio del-
le rotelle “A1” sul telaio piedistallo regolabile in altezza
“A”. Per fare ciò posizionare il telaio su un tappeto o
supercie morbida, per non rovinare il pavimento o
il telaio. Assemblare le 4 rotelle “A1” facendo entrare i
perni nei 4 fori presenti sotto il telaio piedistallo rego-
labile in altezza “A” come indicato in gura 1.
ATTENZIONE: Inserire completamente il perno della
rotella nel foro del piedistallo. A questo punto è possibi-
le appoggiare a terra il piedistallo.
2. Inserire gli innesti del telaio seduta “B” nei rispettivi
tubi presenti sulla struttura seduta “C” sin ad udire un
click di avvenuto ingaggio (Fig. 2).
3. Assemblare il gruppo seduta (telaio seduta “B” + strut-
tura seduta “C” ) sul piedistallo: inserire i due tubolari
del piedistallo “A” nei rispettivi fori del telaio seduta “B”
sino ad udire un click di completo ingaggio (Fig. 3).
ATTENZIONE: Lo schienale deve essere rivolto verso il
pedale di regolazione altezza (I) come indicato in Fig. 3a.
4. Inserire il tubolare “D” negli appositi fori del telaio sedu-
ta “B” sino ad udire un click di avvenuto ingaggio (Fig. 4).
5. Per assemblare il tessile “E” è necessario far combacia-
re le asole presenti nello stesso ai sistemi di ritenuta
installate sulla struttura seduta “C”. Far passare i due
braccetti laterali del telaio seduta “B” nelle asole tessili
laterali (FIG. 5), inserire i perni dei braccetti nei fori po-
sizionati lateralmente allo schienale (FIG. 5a) , sino ad
udire un click di avvenuto ingaggio.
ATTENZIONE: Assicurarsi che entrambi i braccetti sia-
no correttamente montati.
6. Vincolare il tessile “E” mediante le due cerniere peri-
metrali superiori al telaio seduta “B” (Fig. 6).
7. Far passare lo spartigambe e le cinghie girovita pre-
senti sulla struttura seduta “C” nelle asole del tessile “E”
(Fig. 7-7a-7b-7c).
8. Fissare il tessile (E) al fondo della struttura seduta “C”,
avendo cura di inserire tutte le clip plastiche nelle ap-
posite sedi (Fig. 8-8a).
9. Spingere la parte inferiore della struttura seduta “C”
verso il basso in modo da incastrarla al tubo del telaio
“A” (Fig. 9-9A).
10. Inserire il supporto centrale “A2” sotto lo snodo del
telaio “A” (Fig. 10a-10b). Nel compiere questa opera-
zione, assicurarsi che il prodotto non sia alla massi-
ma altezza.
MINIRIDUTTORE
11. Il cuscino riduttore “F” è ideale dalla nascita e può es-
sere posizionato o rimosso a seconda delle esigenze.
Per ssarlo alla seduta, adagiarlo sul tessile, far pas-
sare lo spartigambe e le cinghie girovita nelle asole
del miniriduttore “F” (uso sdraietta), (Fig. 11), nell’uso
seggiolone, occorrerà inserire anche gli spallacci nel-
le asole del miniriduttore (Fig. 11A).
BARRA GIOCO
12. I giochini possono essere agganciati alla barra gioco
inserendo i nastri nelle apposite fessure plastiche pre-
senti sulla barra (Fig. 12), vincolandoli con il velcro.
13. Montare la barra gioco (con la luce posizionata verso
la leva inclinazione schienale “N”) inserendo i perni
della stessa nei fori del telaio seduta “B” sino ad udire

12
13
un click di avvenuto ingaggio (Fig. 13).
14. Per regolare l’inclinazione della barra gioco, nelle tre
posizioni possibili, è necessario agire contempora-
neamente sui pulsanti laterali (Fig. 14).
15. Per rimuovere la barra gioco, occorre agire sui pul-
santi interni del supporto barra e tirare verso l’alto
(Fig. 15).
ATTENZIONE: Il montaggio di questo gioco deve esse-
re eseguito esclusivamente da un adulto.
ATTENZIONE: Assicurarsi sempre che la barra gioco sia
agganciata correttamente prima di ogni utilizzo.
ATTENZIONE: Per evitare eventuali lesioni da impiglia-
mento, rimuovere questo giocattolo quando il bambino
comincia a tentare di alzarsi sulle mani e sulle ginocchia
in posizione di gattonamento.
REGOLAZIONE IN ALTEZZA
16. Il prodotto una volta montato, in tutte le congu-
razioni, è regolabile in diverse altezze, per eseguire
questa operazione, occorre tener premuto il pedale
regolazione altezza “M” (Fig. 16) e sollevare od abbas-
sare la seduta sino all’altezza desiderata.
REGOLAZIONE SCHIENALE
17. Lo schienale è regolabile in quattro diverse posizioni,
per eettuare questo operazione, occorre agire sulla
leva inclinazione schienale “N” (Fig. 17).
Posizione 1 – Modalità culla (Fig. 17A)
Posizione 2/3 – Modalità sdraietta (Fig. 17B)
Posizione 4 – Modalità seggiolone e prima sedia al ta-
volo (Fig. 17C)
Questa regolazione può essere eseguita anche con il
bambino adagiato nel prodotto. In questo caso l’opera-
zione risulterà leggermente più dicoltosa.
ATTENZIONE: Controllare sempre che lo schienale sia
opportunamente bloccato prima dell’utilizzo.
UTILIZZO CINTURE DI SICUREZZA
18. Con il tessile “E” montato sulla struttura della seduta
“B”, saranno presenti lo spartigambe, due cinghie gi-
rovita e due spallacci (Fig. 18).
19. MODALITA’ CULLA - ATTENZIONE: Si devono ri-
muovere completamente tutte le cinture di sicurez-
za, avendo cura di conservarle lontano dalla portata
del bambino (Fig. 19).
20. MODALITA’ SDRAIETTA - ATTENZIONE: Si devo-
no utilizzare i sistemi di ritenuta a tre punti: sparti-
gambe + cinghie girovita (Fig. 20).
21. Dopo aver adagiato il bambino nella seduta, moda-
lità sdraietta, allacciare le cinture facendo passare le
due forchette attraverso la bbia dello spartigambe;
regolare le cinghie girovita così da farli aderire alla
vita del bambino (Fig. 21).
22. MODALITA’ SEGGIOLONE: Si devono utilizzare
i sistemi di ritenuta a cinque punti: spartigambe +
cinghie girovita + spallacci (Fig. 22).
ATTENZIONE: In queste modalità, la barra gioco
deve essere posizionata sempre dietro lo schienale.
23. Dopo aver adagiato il bambino nella seduta moda-
lità seggiolone, allacciare le cinture facendo passare
le due forchette attraverso la bbia degli spallacci
(Fig. 23) e poi in quella dello spartigambe (Fig. 23A);
regolare l’altezza degli spallacci così da farli aderire
alle spalle del bambino.
Assicurarsi che le cinture siano sempre allacciate corret-
tamente.
Per sganciare la cintura, premere e tirare le forchette
laterali.
ATTENZIONE: Quando in uso, allacciare sempre le cin-
ture inserendole nello spartigambe, vericare sia il cor-
retto tensionamento che il corretto ssaggio.
24. MODALITA’ PRIMA SEDIA AL TAVOLO
ATTENZIONE: Prima utilizzare la poltroncina, occorre
rimuovere le cinture di sicurezza (spartigambe e cin-
ghia addominale) e posizionarle nelle apposite sedi (Fig.
24-24A-24B-24C-24D). Rimuovere anche la barra gioco
o posizionarla dietro lo schienale.
25. Regolare la seduta all’altezza desiderata come in-
dicato al punto 16 del paragrafo REGOLAZIONE IN
ALTEZZA, lo schienale deve essere completamente
sollevato, come indicato al punto 17 del paragrafo
REGOLAZIONE SCHIENALE.
ATTENZIONE: Controllare sempre che lo schienale sia
opportunamente bloccato prima dell’utilizzo.
ATTENZIONE: Quando il prodotto è in uso, tutte e
quattro le rotelle devono essere frenate.
26. Le cinture di sicurezza sono removibili (per l’uso nel-
la congurazione culla / sdraietta o per il lavaggio).
Per rimuovere le cinture occorre slare le cinghie girovi-
ta e lo spartigambe dalle apposite asole nel tessile (Fig.
24-24A-24B) sino a nasconderle sul telaio della seduta
e rimuovere le cinghie degli spallacci dalle asole tessili
presenti sullo schienale (Fig. 24C -24D). Dopo la rimo-
zione delle cinture di sicurezza assicurarsi che le cinture
siano riassemblate correttamente.
Per rimontare i sistemi di ritenuta seguire attentamente
la sequenza indicata sotto:
27. Seguire il punto 7 del paragrafo ASSEMBLAGGIO per
rimontare le cinghie girovita e spartigambe. Per gli
spallacci, inserire la cinghia nell’asola come indicato
in Fig. 25 facendo attenzione che il regolatore della
lunghezza sia posizionato come in gura.
Impugnare l’asola plastica degli spallacci ed inserirla
nell’anello tessile della cinghia (Fig. 25A).
Dopo aver eseguito correttamente questa operazione,
tirare verso il basso la cinghia no a risvoltare l’anello
tessile (Fig. 25B-25C).
Al termine del montaggio, le cinture devono essere nuo-
vamente regolate in base alla taglia del vostro bambino.
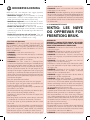
FRENI
28. Tutte e 4 le rotelle sono dotate di freni; per azionare
i freni, occorre spingere verso il basso la levetta pre-
sente sulle rotelle (Fig. 26)
ATTENZIONE: Quando il prodotto è in uso, tutte e
quattro le rotelle devono essere frenate.
Per sbloccare il sistema frenante è suciente spingere
verso l’alto le levette presenti sulle rotelle (Fig. 26A).
BARRA GIOCO CON LUCI E SUONI
29. La barra gioco è dotata di un pannello luce e suoni
che viene attivato tramite i pulsanti posti sulla parte

14
15
superiore (Fig. 27).
F1 : Tasto accensione - volume
F2 : Attiva musiche divertenti
F3 : Attiva Ninna Nanna
F4 : Attiva luci
AVVERTENZE PARTI ELETTRICHE BARRA GIOCO
30. Per inserire o sostituire le pile: allentare la vite dello
sportello sulla barra gioco con un cacciavite, aprire
lo sportello (Fig. 28), rimuovere dal vano le pile sca-
riche, inserire le pile nuove, facendo attenzione a
rispettare la corretta polarità di inserimento (come
indicato sul prodotto), riposizionare lo sportello e
serrare a fondo la vite ( 2 Pile AA 1,5 V ).
• La sostituzione delle pile deve essere sempre eettua-
ta da un adulto.
• Utilizzare pile alcaline uguali o equivalenti al tipo rac-
comandato per il funzionamento di questo prodotto
(2 Pile AA 1,5V ).
• Le pile devono essere inserite rispettando la corretta
polarità.
• Non mischiare tipi diversi di pile o pile scariche con
pile nuove.
• Non lasciare le pile o eventuali utensili a portata dei
bambini.
• Non porre in corto circuito i morsetti di alimentazione.
• Rimuovere sempre le pile scariche dal prodotto per
evitare che eventuali perdite di liquido possano dan-
neggiare il prodotto.
• Rimuovere sempre le pile in caso di non utilizzo pro-
lungato del prodotto.
• Rimuovere le pile dalla barra gioco prima del suo smal-
timento.
• Non buttare le pile scariche nel fuoco o disperderle
nell’ambiente, ma smaltirle operando la raccolta die-
renziata.
• Nel caso le pile dovessero generare delle perdite di li-
quido, sostituirle immediatamente, avendo cura di pu-
lire l’alloggiamento delle pile e lavarsi accuratamente
le mani in caso di contatto col liquido fuoriuscito.
• Gettare immediatamente le batterie che perdono liqui-
do: potrebbero causare ustioni cutanee o altre lesioni.
• Non tentare di ricaricare le pile non ricaricabili: potreb-
bero esplodere.
• Non è consigliato l’utilizzo di batterie ricaricabili, po-
trebbe diminuire la funzionalità del gioco.
• Nel caso di utilizzo di batterie ricaricabili, estrarle dal
gioco prima di ricaricarle.
• Non lasciare incautamente il prodotto sotto la pioggia; le
inltrazioni d’acqua danneggiano il circuito elettronico.
• Le batterie ricaricabili devono essere ricaricate solo sot-
to la supervisione di un adulto.
SFODERABILITA’
31. Per slare la fodera dalla struttura del prodotto, por-
tare la seduta in posizione orizzontale (culla), sgan-
ciare le clip plastiche dalla struttura seduta, per com-
piere questa azione occorre spingere verso l’interno
la linguetta e tirare verso il basso la clip, ripetere la
stessa azione per tutte le clip presenti (Fig. 29).
32. Slare i sistemi di ritenuta dalle asole del tessile (se
presenti), vedere paragrafo CINTURE DI SICUREZZA.
33. Svincolare le cerniere perimetrali superiori (Fig. 30).
34. Disassemblare il braccetto laterale, premendo il pin
verso l’interno e tirando verso l’esterno il braccetto
(Fig. 31), ripetere la medesima operazione anche per
l’altro braccetto. Sollevare il braccetto (Fig. 32) e s-
larlo dal tessile (Fig. 32A).
CHIUSURA DEL PRODOTTO
35. Per compattare il prodotto ai ni dello stoccaggio
occorre agire sulla leva inclinazione schienale “N”,
regolare lo schienale in posizione completamente
orizzontale, rimuovere la barra gioco agendo sui pul-
santi (Fig. 33). Abbassare completamente la seduta
agendo sul pedale regolazione altezza “M”.
ATTENZIONE: Le operazioni di chiusura non devono
mai essere eettuate con il bambino posizionato all’in-
terno della sdraietta. Togliere il bambino dal prodotto
prima di chiudere la struttura.
QUESTO PRODOTTO È CONFORME ALLA
DIRETTIVA 2012/19/UE.
Il simbolo del cestino barrato riportato sull’ap-
parecchio indica che il prodotto, alla ne della
propria vita utile, dovendo essere trattato se-
paratamente dai riuti domestici, deve essere conferito
in un centro di raccolta dierenziata per apparecchia-
ture elettriche ed elettroniche oppure riconsegnato al
rivenditore al momento dell’acquisto di una nuova ap-
parecchiatura equivalente. L’utente e responsabile del
conferimento dell’apparecchio a ne vita alle appropriate
strutture di raccolta. L’adeguata raccolta dierenziata per
l’avvio successivo dell’apparecchio dismesso al riciclag-
gio, al trattamento e allo smaltimento ambientalmente
compatibile contribuisce ad evitare possibili eetti ne-
gativi sull’ambiente e sulla salute e favorisce il riciclo dei
materiali di cui e composto il prodotto. Lo smaltimento
abusivo del prodotto da parte dell’utente comporta delle
sanzioni amministrative di cui al D.lgs. n. 22/1997 (art.50 e
seguenti del D.lgs 22/97). Per informazioni più dettagliate
inerenti i sistemi di raccolta disponibili, rivolgersi al servi-
zio locale di smaltimento riuti, o al negozio in cui e stato
eettuato l’acquisto.
Fabbricato in Cina
GARANZIA
Il prodotto è garantito contro ogni difetto di conformità
in normali condizioni di utilizzo secondo quanto previ-
sto dalle istruzioni d’uso. La garanzia non sarà applicata,
dunque, in caso di danni derivanti da un uso improprio,
usura o eventi accidentali. Per la durata della garanzia
sui difetti di conformità si rinvia alle speciche previsioni
delle normative nazionali applicabili nel paese d’acqui-
sto, dove previste.

14
15
BABY HUG 4 IN 1 can be used as a crib, reclined cradle,
high chair and rst chair.
• Crib mode: suitable from birth until your child is able
to sit up unaided (5-6 months), up to a maximum
weight of 9 kg.
• Reclined cradle mode: suitable from birth until your
child learns to sit up unaided (5-6 months approx.,
weighing a maximum of 9 kg).
• High chair: permitted when your child is able to sit
up unaided (from 6 months approx.), up to 36 months
and weighing a maximum of 15 kg.
• First Chair at the table mode: Permitted when your
child starts walking and is able to sit down and stand
up by himself (about 10/12 months, max. 18 kg).
• Only for domestic use.
WARNING: TO AVOID DANGER OF SUFFOCATION
REMOVE THIS PLASTIC COVER BEFORE USING THE
PRODUCT. THIS COVER SHOULD BE DESTROYED OR
KEPT AWAY FROM BABIES AND CHILDREN.
• WARNING: Never leave the child unattended.
• WARNING: Do not allow other children to play unsu-
pervised near the product.
• WARNING: The product and all of its components
must always be assembled by an adult.
• WARNING: Do not attach any strings to extend the fas-
tening systems of the toybar’s hanging toy and do not
make knots/loops: this may cause the accidental forma-
tion of slip knots that could cause strangling hazards.
• Prolonged exposure to direct sunlight may cause the
product colours to fade. After prolonged exposure of
the product to high temperatures, wait a few minutes
prior to putting your child in it.
• Make sure that the person using the product knows
how to do so in the safest way.
• Never use the product without its cover.
• Do not use the product with more than one child at a time.
• Do not leave small objects on the product that could
be swallowed by children.
• The product must only be opened, adjusted and
closed by an adult.
• Always place the product on a horizontal, stable sur-
face when your child is seated in it.
• Never place the product near stairs or steps or on carpets.
• Do not hang bags or weights on the product frame as
this may aect its stability.
• Do not open and close the product when your child
is sitting in it.
• Before assembly, check that neither the product nor
any of its components have been damaged during
transportation. In this case, do not use and keep out
of reach of children.
• Do not use accessories or replacement parts other
than those approved by the manufacturer.
• WARNING: This product must only be used under
adult supervision.
• When the product is being used, the wheels must
always be locked.
• WARNING: Regularly inspect the product for signs of
wear and damage. Should any parts on the toybar or
hanging toy be damaged, do not use them and keep
out of reach of children.
• Keep the product out of reach of children when it is
not in use.
0 - 6 MONTHS CRIB MODE
IMPORTANT:
READ CAREFULLY
AND KEEP FOR FU-
TURE REFERENCE.
WARNINGS
WARNING: WHEN IN CRIB MODE, COMPLETELY RE-
MOVE THE SAFETY BELTS MAKING SURE THEY ARE
KEPT OUT OF YOUR CHILD’S REACH.
• WARNING: Do not use this product with out reading
the instructions for use rst.
• WARNING: The product is intended for use by children
aged 0 to 6 months, weighing a maximum of 9 kg.
• WARNING: Stop using the product as soon as the
child can sit or kneel or pull itself up.
• WARNING: Placing additional items in the product
may cause suocation.
• The product must always be placed on a horizontal
surface. Never leave the product on a sloping surface
with your child inside.
• WARNING: The product is ready for use only when all
locking mechanisms are engaged. Make sure they are
securely engaged before use.
• WARNING: Do not use the crib if any part is broken,
torn or missing.
• WARNING: DO NOT USE the product in “Crib Congu-
ration” and if any part is missing, dam aged or broken.
Contact Artsana SpA for spare parts and user instruc-
tions if needed. DO NOT REPLACE missing, damaged
or bro ken parts with non-OEM components or com-
ponents not approved by Artsana SpA.
• WARNING: Be aware of the risk of burns from ciga-
rettes, naked ames and other heat sources, like elec-
tric or gas heaters, that are near the crib.
• All components must be rmly xed in place at all
times; also make sure that there are no open zippers as
your child’s body parts or clothing could get caught in
them (laces, necklaces, pacier chains etc.), constitut-
ing a strangulation hazard.
• Do not use the body of the crib without its frame.
• When the product is being used, the wheels must al-
ways be locked.
• The thickness of the mattress must be such that the
vertical height (upper surface of the mattress until the
upper edge of the product’s sides) is at least 200 mm.
INSTRUCTIONS

16
17
• WARNING: Do not place the product close to another
product, which could present a danger of suocation
or strangu lation, e.g. strings, blind/curtain cords, etc
To avoid strangulation hazards, never give children
objects with strings attached, or leave these objects
within their reach.
• WARNING: Do not use more than one mattress in the
product. Only use the mattress supplied with the crib.
• WARNING: Only use the mattress sold with the crib.
Do not add a second mattress, choking hazard. Di-
mension mattress 750 x 380 x 30 mm.
• WARNING: Newborn babies can suocate on soft
bedding. Avoid placing pillows or similar items under
newborn babies for additional comfort during sleep.
• Do not leave anything inside the product that might
reduce its depth.
• To prevent the child being trapped, do not place the
crib close to walls of obstacles.
• The product must be kept away from electrical cables
and cords: do not position close to windows where
cords, curtains or similar could pose a suocation or
choking hazard. To avoid all risks of strangulation, nev-
er give children objects with cords or strings attached,
or leave them within their reach.
0 - 6 MONTHS RECLINED CRADLE MODE
IMPORTANT! KEEP
FOR FUTURE REFER-
ENCE.
WARNINGS
• WARNING: Do not use the reclined cradle once your
child can sit unaided, roll over or stand up pushing on
their hands, knees and feet.
• WARNING: Age range: from birth to 9 kg (6 months).
• WARNING: This reclined cradle is not intended for
prolonged periods of sleeping.
• WARNING: It is dangerous to use this reclined cradle
on an elevated surface, e.g. a table.
• WARNING: Always use the restraint system.
• Always use the restraint system when your child is in the
reclined cradle; adjust the length of the straps as necessary.
• WARNING: Do not use the toybar to carry the reclined
cradle.
• WARNING: The reclined cradle is not a substitute for a
bed or a crib. If your child needs to sleep they should
be placed in a suitable bed or cradle.
• WARNING: Do not use the reclined cradle if any com-
ponents are broken or missing.
• Never leave the reclined cradle on surfaces that are not
perfectly horizontal.
• To prevent re hazards, do not leave the reclined cradle
near sources of heat, electrical or gas devices etc.
• Make sure that all parts are correctly hooked to the
mounts.
• Periodically check for any worn parts, loose screws,
worn or unstitched materials and replace any dam-
aged parts immediately.
• Do not place the reclined cradle with your child in it
near windows or walls where strings, curtains or other
objects could be used by the child to climb or pose
choking or strangling hazards.
• To avoid the risk of your child overbalancing and falling
do not place the reclined cradle near windows or walls.
6 - 36 MONTHS HIGH CHAIR
IMPORTANT:
READ CAREFULLY
AND KEEP FOR FU-
TURE REFERENCE.
WARNINGS
WARNING: IN THIS CONFIGURATION THE TOY-
BAR MUST ALWAYS BE POSITIONED BEHIND THE
BACKREST.
• WARNING: Always use the restraint system.
• WARNING: Falling hazard: Prevent your child from
climbing on the product.
• WARNING: Do not use the product unless all compo-
nents are correctly tted and adjusted.
• WARNING: Be aware of the risk of open re and other
sources of strong heat in the vicinity of the product.
• WARNING: Be aware of the risk of tilting when your child
can push its feet against a table or any other structure.
• WARNING: Make sure that any harness is correctly t-
ted before using.
• WARNING: Always check the safety and the stability
of the high chair before use.
• WARNING: Before using, ensure that all the safety de-
vices are tted and working correctly. In particular, make
sure that the high chair is locked in the open position.
• WARNING: Always apply the parking device when it
is not being moved.
• Do not use the high chair until the child can sit up un-
aided.
• The highchair is intended for use for children who can
sit up alone and are between 6 and 36 months of age,
weighing up to 15 kg.
• Do not use the high chair if any part is broken, torn or
missing.
• Make sure your child is at a safe distance when open-
ing and closing the product. Make sure that during ad-
justment operations (tilting the backrest) the adjusta-
ble parts of the high chair do not come into contact
with your child.
• The use of the safety harness with fabric crotch strap
correctly fastened to the seat and with crotch bar is
necessary to ensure the safety of your child when the
chair is used as a high chair.
• Never move the high chair with your child seated in it.
• Do not allow other children to play unsupervised near

16
17
30° C
the high chair, or allow them to climb it.
• Do not place the high chair near windows or walls where
strings, curtains or other objects could be used by the
child to climb or pose choking or strangling hazards.
12 M+ FIRST CHAIR MODE
IMPORTANT: READ
CAREFULLY AND
KEEP FOR FUTURE
REFERENCE.
• Age range intended for use: From when your child
starts walking and is able to sit down and stand up by
himself (about 10/12 months, max. 18 kg).
• WARNING: Before using as a chair, remove the safe-
ty harness (crotch strap and waist belt) and position
them in the relevant spaces. Remove also toy bar or
place it behind the backrest.
• WARNING: CHAIR MUST BE USED WITH THE BACK-
REST COMPLETELY RAISED.
• WARNING: NEVER
LEAVE THE CHILD UN-
ATTENDED.
• WARNING: DO NOT place this product near a window
as it can be used as a step by the child and cause the
child to fall out of the window.
• WARNING: Be aware of the risk of open res and other
sources of strong heat in the vicinity of the product.
• WARNING: DO NOT place this product near a window
where cords from blinds or curtains could strangle a child.
• WARNING: Do not use the product if any compo-
nents are broken, torn or missing.
• WARNING: Do not use accessories or replacement
parts other than those approved by the manufacturer.
• Place only on at and stable surfaces.
• WARNING: Check that the space where the chair will
be used is free of objects or furniture that may obstruct
the product or compromise its correct use.
• Do not let your child stand up on the chair to avoid the
risk of falling.
• Do not allow more than one child at a time to sit on the
chair in order not to compromise its stability.
• This chair is intended solely for domestic use and on
dry surfaces.
• Do not make any modications: any modication may
prejudice its safety.
• Prolonged exposure to direct sunlight can cause the
fabric to fade. After prolonged exposure to high tem-
peratures, wait a few minutes before using the product.
• Never move the chair while the child is seated on it.
EN 17191: 2021
TIPS FOR CLEANING AND MAINTENANCE
FABRIC COMPOSITION
COVER:
Outer cover: 55% Polyester + 45% Cotton / Padding:
100% Polyester.
BOOSTER CUSHION:
Outer cover: 100% Polyester / Padding: 100% Polyester.
• Please refer to the care label for instructions on wash-
ing the product:
Wash by hand in cold water
Do not bleach
Do not tumble dry
Do not iron
Do not dry clean
• Check that the fabric and stitching are in good condi-
tion each time you wash it.
• Prolonged exposure to direct sunlight can cause the
fabric to fade.
CLEANING
Clean the plastic parts with a soft damp cloth. Never use
abrasive detergents or solvents. If the high chair comes
into contact with water, dry the metal parts to prevent
the formation of rust.
MAINTENANCE
• This product requires periodical maintenance.
• Cleaning and maintenance operations must only be
carried out by an adult.
• Periodically check the product for broken, damaged or
missing parts: do not use it in this case.
• To avoid friction that may compromise the correct
functioning of the product, ensure that all the moving
plastic parts located along the metal frame are free of
dust, dirt and sand.
• If necessary, lubricate the moving parts with dry sili-
cone lubricant.
• Store the product in a dry place.
COMPONENTS
The product is completely disassembled when pur-
chased; check that all of the components listed below
are present. If any part is missing contact ARTSANA’s
CUSTOMER SERVICES.
The product and all of its components must always be
assembled by an adult.
A - Height adjustable pedestal frame
A1 - 4 wheels with brakes
A2 - Central support
B - Seat frame
C - Seat structure

18
19
D - Tubular seat frame
E - Fabric (with shoulder straps)
F - Booster cushion
G - Toybar
G1 - Light / sound game buttons
G2 - 3 soft toys
I - Upper fabric zips
L - Plastic clips
M - Height adjustment pedal
N - Backrest recline lever
ASSEMBLY
The product is not assembled when purchased. To use
it, carry out the following assembly operations:
1. The rst thing to do is assemble the “A1” wheels on
height adjustable base frame “A”. To do this place the
frame on a rug or soft surface so as not to damage the
oor or frame. Assemble the 4 “A1” wheels inserting
the pins in the 4 holes under height adjustable base
frame “A” as shown in gure 1.
WARNING: Fully insert the wheel pin into the hole in
the base. At this point the base can be rested on the
oor.
2. Insert the fasteners of seat frame “B” into the respec-
tive tubes on seat structure “C” until they click into
place (Fig. 2).
3. Assemble the seat (seat frame “B” + seat structure
“C”) on the base: insert the two tubes on base “A”
into the corresponding holes on seat frame “B” until
they click into place (Fig. 3).
WARNING: The backrest must face the height adjust-
ment pedal (I) as shown in Fig. 3a.
4. Insert tube “D” into the corresponding holes on seat
frame “B” until they click into place (Fig. 4).
5. To assemble fabric “E” line up the holes on the fabric
with the restraint system installed on seat structure
“C”. Pass the two lateral arms of seat frame “B” through
the side fabric holes (FIG. 5), insert the pins of the
arms into the holes on either side of the backrest (FIG.
5a) until they click into place.
WARNING: Check that both arms are assembled cor-
rectly.
6. Attach fabric “E” using the two perimeter zips above
seat frame “B” (Fig. 6).
7. Pass the crotch strap and waist straps on seat struc-
ture “C” through the holes of fabric “E” (Fig. 7-7a-7b-
7c).
8. Attach the fabric (E) to the bottom of seat structure
“C”, making sure to insert all of the plastic clips in the
right slots (Fig. 8-8a).
9. Press down on the lower part of the seat frame “C”
until it locks to the tube on the frame “A” (Fig. 9-9A).
10. Insert the central support “A2” under the joint of the
frame “A” (Fig. 10a-10b). Be sure that the product is
not at its maximum height when carrying out this
operation.
BOOSTER CUSHION
11. Reducer cushion “F” is ideal from birth and can be
used or removed as necessary. To attach it to the
seat, place it on the fabric, pass the crotch strap and
waste straps through the holes in booster cushion
“F” (reclined cradle mode), (Fig. 11). In high chair
mode it is also necessary to pass the shoulder straps
through the holes of the booster cushion (Fig. 11a).
TOYBAR
12. The toys can be attached to the toybar by passing the
straps through the plastic openings on the bar (Fig.
12) and fastening the velcro.
13. Assemble the toybar (with the light positioned to-
wards backrest recline lever “N”) inserting the pins of
the bar into the holes on seat frame “B” until it clicks
into place (Fig. 13).
14. To incline the toybar in the three possible positions
press the side buttons (Fig. 14).
15. To remove the toybar press the buttons on the inside
of the bar support and pull upwards (Fig. 15).
WARNING: This toy must be assembled by adults only.
WARNING: Always check that the toybar is properly
fastened before using it.
WARNING: To prevent possible injury by entaglement,
remove this toy when the child starts trying to get up
on its hands and knees in a crowling position.
HEIGHT ADJUSTMENT
16. Once assembled, the product can be adjusted to
various heights in all congurations. To adjust its
height, hold down height adjustment pedal “M” (Fig.
16) and lift or lower the seat to the desired height.
ADJUSTING THE BACKREST
17. The backrest can be adjusted to four dierent posi-
tions. To do this, push down on backrest recline lever
“N” (Fig. 17).
Position 1 – Crib mode (Fig. 17a)
Position 2-3 – Reclined cradle mode (Fig. 17b)
Position 4 – High chair and rst chair at the table mode
(Fig. 17c)
These adjustments can also be made with your child
seated in the product. In this case it will be slightly more
dicult.
WARNING: Always check that the backrest is properly
locked before use.
USING THE SAFETY HARNESS
18. With fabric “E” assembled on seat structure “B”, there
will be a crotch strap, two waist straps and two
shoulder straps (Fig. 18).
19. CRIB MODE - WARNING: Completely remove all
safety harnesses making sure to keep them out of
the reach of your child (Fig. 19).
20. RECLINED CRADLE MODE - WARNING: A 3-point
restraint system must be used: crotch strap + waist
straps (Fig. 20).
21. After placing your child in the seat, reclined cradle
mode, fasten the straps by passing the two prongs
through the crotch strap buckle; adjust the waist
straps so that they t closely around your child’s
waist (Fig. 21).

18
19
22. HIGH CHAIR - WARNING: A 5-point restraint sys-
tem must be used: crotch strap + waist straps +
shoulder straps (Fig. 22).
WARNING: In this conguration the toybar must al-
ways be positioned behind the backrest.
23. After placing your child in the seat in high chair
mode, fasten the straps by passing the two prongs
through the shoulder strap buckle (Fig. 23) and then
through the crotch strap buckle (Fig. 23a); Adjust the
height of the shoulder straps so that they correctly
t your child’s shoulders.
Always make sure that the straps are fastened correctly.
To unfasten the strap, press and pull the side prongs.
WARNING: When using the product, always fasten the
straps by inserting them in the crotch strap and check
that they are tight enough and properly fastened.
24. FIRST SEAT AT THE TABLE MODE
WARNING: Before using as a chair, remove the safety
harness (crotch strap and waist belt) and position them
in the relevant spaces (Fig. 24-24A-24B-24C-24D). Re-
move also toy bar or place it behind the backrest.
25. Adjust the seat to the desired height as indicated
in point 16 of the HEIGHT ADJUSTMENT paragraph,
the backrest must be completely raised, as indicated
in point 17 of ADJUSTING THE BACKREST paragraph.
WARNING: Always check that the backrest is properly
locked before use.
WARNING: When the product is in use, all four casters
must be braked.
26. The safety harness straps can be removed (for washing
or for use in the crib/reclined cradle conguration).
To remove the harnesses pull the waist and crotch straps
out from the holes in the fabric (Fig. 24-24a-24b) until
they are hidden on the seat frame and pull the shoulder
straps out from the fabric holes on the backrest (Fig. 24c
-24d). After removing the safety harnesses, make sure
that the harnesses are correctly re-assembled.
To re-assemble the safety harnesses, carefully follow the
steps below:
27. Follow point 7 of the ASSEMBLY paragraph to re-
assemble the waist straps and crotch strap. For the
shoulder straps, pass the strap through the hole as
shown in Fig. 25, making sure that the length adjust-
er is positioned as shown in the gure.
Take the plastic hole of the shoulder straps and pass it
through the fabric ring of the harness (Fig. 25a).
Having performed this operation correctly, pull the har-
ness downwards until the fabric ring is turned inside out
(Fig. 25b-25c).
Once assembled, the belts must be adjusted once again
according to the size of your child.
BRAKES
28. All 4 wheels have brakes; to activate the brakes push
down the little lever on the wheels (Fig. 26).
WARNING: When the product is in use, all 4 wheels
must be locked at all times.
To release the brakes push the little levers on the wheels
upwards (Fig. 26a).
TOYBAR WITH LIGHTS AND SOUNDS
29. The toybar comes complete with a sounds and
lights panel that is activated by pressing the buttons
on the upper section (Fig. 27).
F1 : On button - volume
F2 : Plays fun music
F3 : Plays lullabies
F4 : The lights come on
WARNINGS REGARDING TOYBAR ELECTRICAL
PARTS
30. To insert or change the batteries: loosen the screw
on the toybar battery compartment cover with a
screwdriver and open (FIG. 28). Remove the at bat-
teries and t new ones, making sure that the battery
polarity is correct (as shown on the product); close
the battery compartment cover and tighten the
screw rmly (2 x 1.5 V AA batteries).
• Batteries must only be replaced by an adult.
• Only use alkaline batteries of the same type or equiva-
lent to the type recommended for this product (2 x 1.5
V AA batteries).
• Make sure the battery polarity is correct.
• Never mix new and old or dierent types of batteries.
• Always keep batteries and tools out of the reach of
children.
• Do not short-circuit the power terminals.
• Always remove at batteries from the product to pre-
vent any possible liquid leaks from damaging it.
• Always remove the batteries if the product will not be
used for a long period of time.
• Remove the batteries from the toybar before disposing
of the product.
• Do not throw dead batteries in re or leave them in
the environment; they must be disposed of through
waste sorting.
• If the batteries are leaking liquid, replace them im-
mediately, making sure to clean the battery compart-
ment; thoroughly wash your hands if they have come
into contact with the liquid.
• Always dispose of leaking batteries immediately: they
can cause burns or other types of injuries.
• Do not try to recharge non-rechargeable batteries:
they may explode.
• The use of rechargeable batteries is not recommended
as the toy may not work properly.
• If using rechargeable batteries, remove them from the
toy before recharging them.
• Do not leave the product outside in the rain; water will
damage the electronic circuit.
• Rechargeable batteries must be charged only under
adult supervision.
REMOVING THE COVER
31. To remove the cover from the frame of the product, put
the seat in the horizontal position (crib) and unfasten
the plastic clips from the seat structure. To do this it is
necessary to push the tab inwards and pull the clip
down, repeating this procedure for all clips (Fig. 29).

20
21
32. Pull the restraint system out through the fabric holes
(if present), see SAFETY HARNESS paragraph.
33. Undo the zips along the upper edge (Fig. 30).
34. Disassemble the lateral arm, pushing the pin inwards
and pulling the arm in an outwards direction (Fig.
31). Repeat this procedure for the other arm. Lift the
arm (Fig. 32) and remove from the fabric (Fig. 32a).
CLOSING THE PRODUCT
35. To close the product for storage purposes press
down on backrest recline lever “N”, put the backrest
in a completely horizontal position and remove the
toybar by pressing the buttons (Fig. 33). Complete-
ly lower the seat by pressing on height adjustment
pedal “M”.
WARNING: The reclined cradle must never be closed
with a child sitting in it. Remove your child from the
product before closing the frame.
THIS PRODUCT COMPLIES WITH DIREC
TIVE 2012/19/EU.
The crossed bin symbol on the appliance in-
dicates that the product, at the end of its life,
must be disposed of separately from domestic
waste, either by taking it to a separate waste disposal site
for electric and electronic appliances or by returning it
to your dealer when you buy another similar appliance.
The user is responsible for taking the appliance to a spe-
cial waste disposal site at the end of its life. If the dis-
used appliance is collected correctly as separate waste,
it can be recycled, treated and disposed of ecologically;
this avoids a negative impact on both the environment
and health, and contributes towards the recycling of the
product’s materials. For further information regarding
the waste disposal services available, contact your local
waste disposal agency or the shop where you bought
the appliance.
Made in China
WARRANTY
The product is guaranteed against any conformity de-
fect in normal conditions of use as provided for by the
instructions. The warranty shall not therefore apply in
the case of damage caused by improper use, wear or
accidental events. For the duration of warranty on con-
formity defects please refer to the specic provisions
of national laws applicable in the country of purchase,
where provided.
Sayfa yükleniyor...
Sayfa yükleniyor...
Sayfa yükleniyor...
Sayfa yükleniyor...
Sayfa yükleniyor...
Sayfa yükleniyor...
Sayfa yükleniyor...
Sayfa yükleniyor...
Sayfa yükleniyor...
Sayfa yükleniyor...
Sayfa yükleniyor...
Sayfa yükleniyor...
Sayfa yükleniyor...
Sayfa yükleniyor...
Sayfa yükleniyor...
Sayfa yükleniyor...
Sayfa yükleniyor...
Sayfa yükleniyor...
Sayfa yükleniyor...
Sayfa yükleniyor...
Sayfa yükleniyor...
Sayfa yükleniyor...
Sayfa yükleniyor...
Sayfa yükleniyor...
Sayfa yükleniyor...
Sayfa yükleniyor...
Sayfa yükleniyor...
Sayfa yükleniyor...
Sayfa yükleniyor...
Sayfa yükleniyor...
Sayfa yükleniyor...
Sayfa yükleniyor...
Sayfa yükleniyor...
Sayfa yükleniyor...
Sayfa yükleniyor...
Sayfa yükleniyor...
Sayfa yükleniyor...
Sayfa yükleniyor...
Sayfa yükleniyor...
Sayfa yükleniyor...
Sayfa yükleniyor...
Sayfa yükleniyor...
Sayfa yükleniyor...
Sayfa yükleniyor...
Sayfa yükleniyor...
Sayfa yükleniyor...
Sayfa yükleniyor...
Sayfa yükleniyor...
Sayfa yükleniyor...
Sayfa yükleniyor...
Sayfa yükleniyor...
Sayfa yükleniyor...
Sayfa yükleniyor...
Sayfa yükleniyor...
Sayfa yükleniyor...
Sayfa yükleniyor...
Sayfa yükleniyor...
Sayfa yükleniyor...
Sayfa yükleniyor...
Sayfa yükleniyor...
Sayfa yükleniyor...
Sayfa yükleniyor...
Sayfa yükleniyor...
Sayfa yükleniyor...
Sayfa yükleniyor...
Sayfa yükleniyor...
Sayfa yükleniyor...
Sayfa yükleniyor...
Sayfa yükleniyor...
Sayfa yükleniyor...
Sayfa yükleniyor...
Sayfa yükleniyor...
Sayfa yükleniyor...
Sayfa yükleniyor...
Sayfa yükleniyor...
Sayfa yükleniyor...
Sayfa yükleniyor...
Sayfa yükleniyor...
Sayfa yükleniyor...
Sayfa yükleniyor...
Sayfa yükleniyor...
Sayfa yükleniyor...
Sayfa yükleniyor...
Sayfa yükleniyor...
Sayfa yükleniyor...
Sayfa yükleniyor...
Sayfa yükleniyor...
Sayfa yükleniyor...
Sayfa yükleniyor...
Sayfa yükleniyor...
Sayfa yükleniyor...
Sayfa yükleniyor...
Sayfa yükleniyor...
Sayfa yükleniyor...
Sayfa yükleniyor...
Sayfa yükleniyor...
Sayfa yükleniyor...
Sayfa yükleniyor...
Sayfa yükleniyor...
Sayfa yükleniyor...
Sayfa yükleniyor...
Sayfa yükleniyor...
Sayfa yükleniyor...
Sayfa yükleniyor...
Sayfa yükleniyor...
Sayfa yükleniyor...
Sayfa yükleniyor...
Sayfa yükleniyor...
Sayfa yükleniyor...
Sayfa yükleniyor...
Sayfa yükleniyor...
Sayfa yükleniyor...
Sayfa yükleniyor...
Sayfa yükleniyor...
Sayfa yükleniyor...
Sayfa yükleniyor...
-
 1
1
-
 2
2
-
 3
3
-
 4
4
-
 5
5
-
 6
6
-
 7
7
-
 8
8
-
 9
9
-
 10
10
-
 11
11
-
 12
12
-
 13
13
-
 14
14
-
 15
15
-
 16
16
-
 17
17
-
 18
18
-
 19
19
-
 20
20
-
 21
21
-
 22
22
-
 23
23
-
 24
24
-
 25
25
-
 26
26
-
 27
27
-
 28
28
-
 29
29
-
 30
30
-
 31
31
-
 32
32
-
 33
33
-
 34
34
-
 35
35
-
 36
36
-
 37
37
-
 38
38
-
 39
39
-
 40
40
-
 41
41
-
 42
42
-
 43
43
-
 44
44
-
 45
45
-
 46
46
-
 47
47
-
 48
48
-
 49
49
-
 50
50
-
 51
51
-
 52
52
-
 53
53
-
 54
54
-
 55
55
-
 56
56
-
 57
57
-
 58
58
-
 59
59
-
 60
60
-
 61
61
-
 62
62
-
 63
63
-
 64
64
-
 65
65
-
 66
66
-
 67
67
-
 68
68
-
 69
69
-
 70
70
-
 71
71
-
 72
72
-
 73
73
-
 74
74
-
 75
75
-
 76
76
-
 77
77
-
 78
78
-
 79
79
-
 80
80
-
 81
81
-
 82
82
-
 83
83
-
 84
84
-
 85
85
-
 86
86
-
 87
87
-
 88
88
-
 89
89
-
 90
90
-
 91
91
-
 92
92
-
 93
93
-
 94
94
-
 95
95
-
 96
96
-
 97
97
-
 98
98
-
 99
99
-
 100
100
-
 101
101
-
 102
102
-
 103
103
-
 104
104
-
 105
105
-
 106
106
-
 107
107
-
 108
108
-
 109
109
-
 110
110
-
 111
111
-
 112
112
-
 113
113
-
 114
114
-
 115
115
-
 116
116
-
 117
117
-
 118
118
-
 119
119
-
 120
120
-
 121
121
-
 122
122
-
 123
123
-
 124
124
-
 125
125
-
 126
126
-
 127
127
-
 128
128
-
 129
129
-
 130
130
-
 131
131
-
 132
132
-
 133
133
-
 134
134
-
 135
135
-
 136
136


