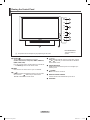
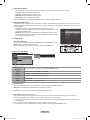
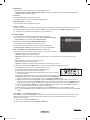
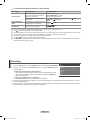
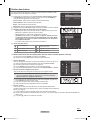
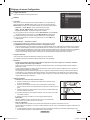
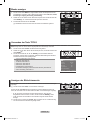
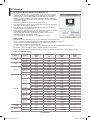
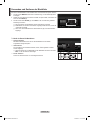
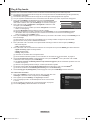
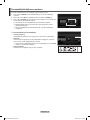
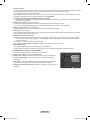
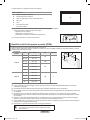
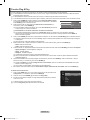
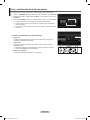
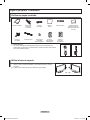
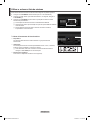
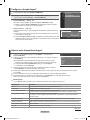
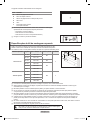
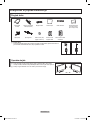
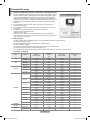
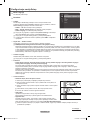
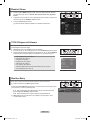
Samsung PS50B550 Kullanım kılavuzu
- Kategori
- LCD TV'ler
- Tip
- Kullanım kılavuzu

imagine the possibilities
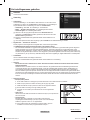
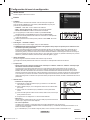
Thank you for purchasing this Samsung product.
To receive more complete service, please register
your product at
www.samsung.com/register
Model Serial No.
BN68-02331A-03
BN68-02331A
Plasma TV
user manual
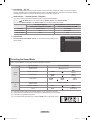
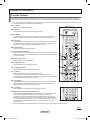
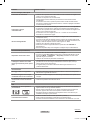
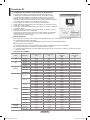
Contact SAMSUNG WORLD-WIDE
If you have any questions or comments relating to Samsung products, please contact the SAMSUNG customer care centre.
Country
Customer Care Centre
Web Site
AUSTRIA 0810 - SAMSUNG(7267864, € 0.07/min) www.samsung.com/at
BELGIUM 02 201 2418
www.samsung.com/be (Dutch)
www.samsung.com/be_fr (French)
CZECH REPUBLIC 800 - SAMSUNG (800-726786) www.samsung.com/cz
DENMARK 8 - SAMSUNG(7267864) www.samsung.com/dk
EIRE 0818 717 100 www.samsung.com/ie
FINLAND 30 - 6227 515 www.samsung.com/fi
FRANCE 01 4863 0000 www.samsung.com/fr
GERMANY 01805 - SAMSUNG(726-7864 € 0,14/Min) www.samsung.de
HUNGARY 06-80-SAMSUNG(726-7864) www.samsung.com/hu
ITALIA 800-SAMSUNG(726-7864) www.samsung.com/it
LUXEMBURG 02 261 03 710 www.samsung.com/lu
NETHERLANDS 0900-SAMSUNG (0900-7267864) (€ 0,10/Min) www.samsung.com/nl
NORWAY 3 - SAMSUNG(7267864) www.samsung.com/no
POLAND
"0 801 1SAMSUNG(172678)
022-607-93-33"
www.samsung.com/pl
PORTUGAL 80820-SAMSUNG(726-7864) www.samsung.com/pt
SLOVAKIA 0800-SAMSUNG(726-7864) www.samsung.com/sk
SPAIN 902 - 1 - SAMSUNG (902 172 678) www.samsung.com/es
SWEDEN 0771 726 7864 (SAMSUNG) www.samsung.com/se
Switzerland 0848 - SAMSUNG(7267864, CHF 0.08/min)
www.samsung.com/ch
www.samsung.com/ch_fr/(French)
U.K 0845 SAMSUNG (7267864) www.samsung.com/uk
BN68-02331A-Eng.indb 1 2009-10-22 �� 3:45:27
Sayfa yükleniyor...
Sayfa yükleniyor...

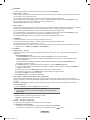
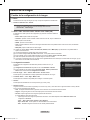
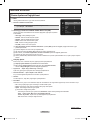
English - 4
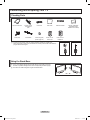
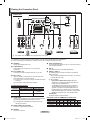
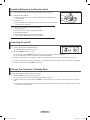
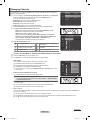
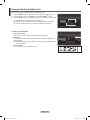
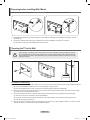
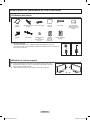
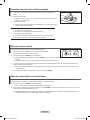
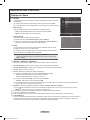
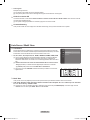
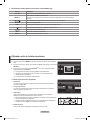
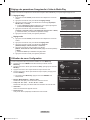
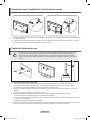
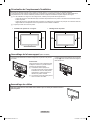
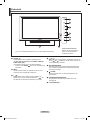
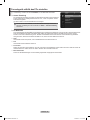
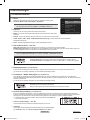
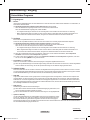
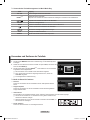
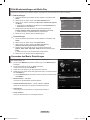
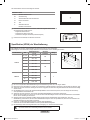
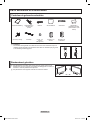
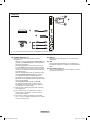
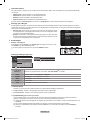
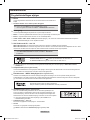
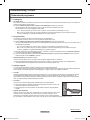
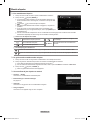
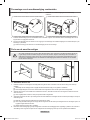
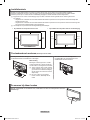
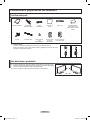
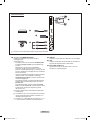
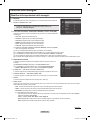
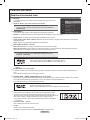
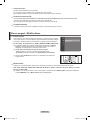
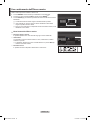
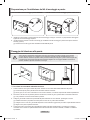
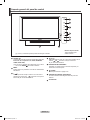
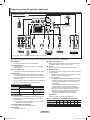
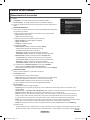
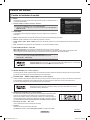
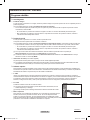
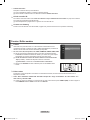
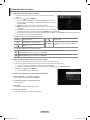
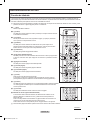
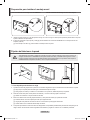
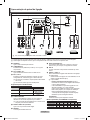
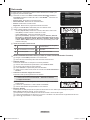
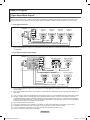
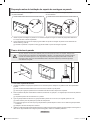
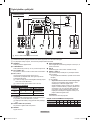
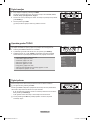
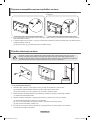
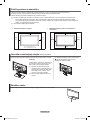
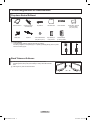
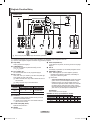
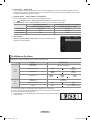
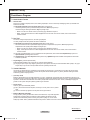
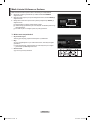
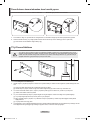
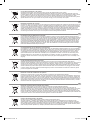
Using the Stand-Base
Two or more people should carry the PDP. Never lay the PDP on the oor N
because of possible damage to the screen. Always keep the PDP upright.
The PDP can rotate 20 degrees in right and left directions.
N
-20° ~ 20°
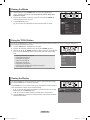
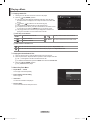
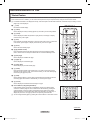
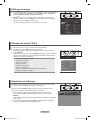
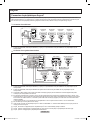
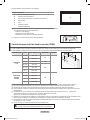
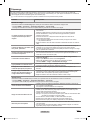
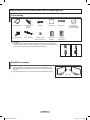
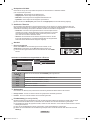
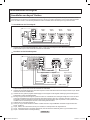
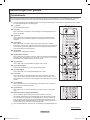
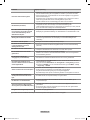
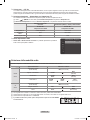
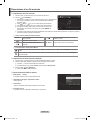
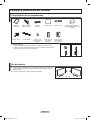
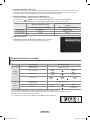
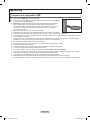
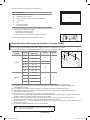
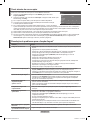
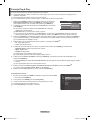
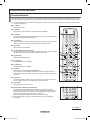
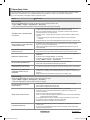
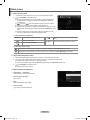
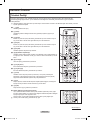
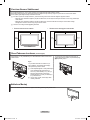
Checking Parts
Owner’s Instructions Remote Control/
AAA Batteries
(2ea)
Power Cord Cloth-Clean Holder-Wire Cable Warranty Card/Safety
Guide Manual (Not
available in all locations)
Screw (4ea) Cover-Bottom Holder-Ring (4ea)
(Refer to page 41)
Ferrite Core for
Power Cord
Ferrite Core for
Headphone
Ferrite CoreThe ferrite cores are used to shield the cables from interference. N
When connecting a cable, open the ferrite core and clip it around the cable near the
plug as shown in the gure.
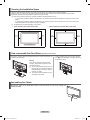
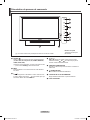
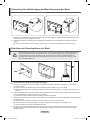
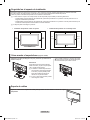
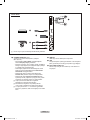
Connecting and Preparing Your TV
BN68-02331A-Eng.indb 4 2009-10-22 �� 3:45:30
Sayfa yükleniyor...
Sayfa yükleniyor...
Sayfa yükleniyor...
Sayfa yükleniyor...
Sayfa yükleniyor...

English - 10
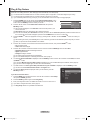
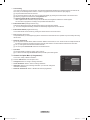
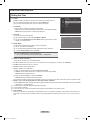
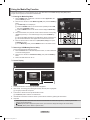
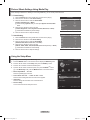
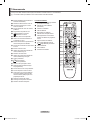
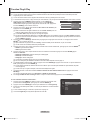
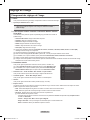
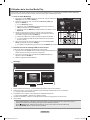
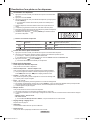
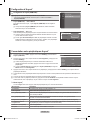
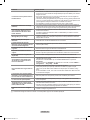
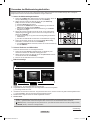
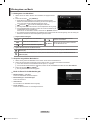
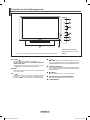
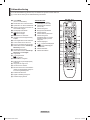
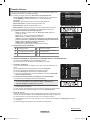
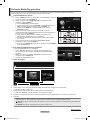
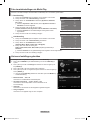
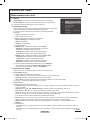
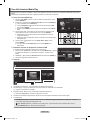
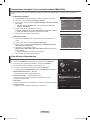
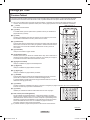
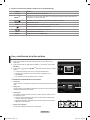
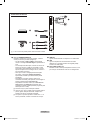
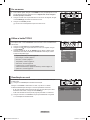
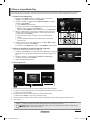
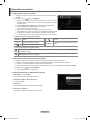
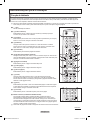
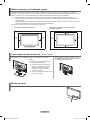
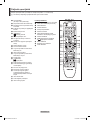
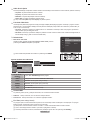
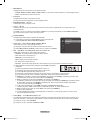
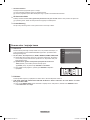
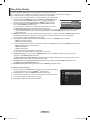
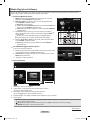
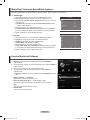
Viewing the Menus
1. With the power on, press the MENU button. The main menu appears on the
screen. The menu’s left side has icons: Picture, Sound, Channel, Setup, Input,
Application, Support.
2. Press the ▲ or ▼ button to select one of the icons. Then press the ENTER
E
button to access the icon’s sub-menu.
3. Press the EXIT button to exit.
The on-screen menus disappear from the screen after about one minute.
N
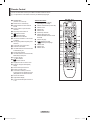
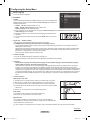
Using the TOOLS Button
You can use the TOOLS button to select your frequently used functions quickly and easily. The Tools menu changes depending on
which external input mode you are viewing.
1. Press the TOOLS button. The Tools menu will appear.
2. Press the ▲ or ▼ button to select a menu, then press the ENTER
E
button.
3. Press the ▲ / ▼ / ◄ / ► / ENTER
E
buttons to display, change, or use the selected
items. For a more detailed description of each function, refer to the corresponding
page.
Anynet •
+
(HDMI-CEC), see page 36
Picture Mode, see page 16 •
Sound Mode, see page 21 •
Sleep Timer, see page 23 •
SRS TS HD, see page • 21
Energy Saving, see page 25 •
Add to Favourite (or Delete from Favourite), see page 14 •
Auto Adjus • tment, see page 19
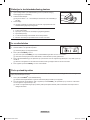
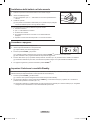
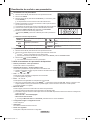
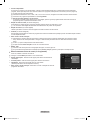
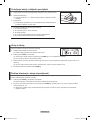
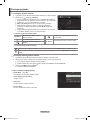
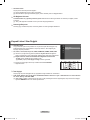
Viewing the Display
The display identifies the current channel and the status of certain audio-video settings.
Press the
O INFO button to viewing the information.
Press the INFO button on the remote control. The TV will display the channel, the type of
sound, and the status of certain picture and sound settings.
▲, ▼: You can view other channel’s information. If you want to move to the currently •
selected channel, press ENTERE button.
◄, ►: You can view the desired program’s information at the current channel. •
Press the
N INFO button once more or wait approximately 10 seconds and the display
disappears automatically.
Mode : Standard
Cell Light : 7
Contrast : 95
Brightness : 45
Sharpness : 50
Colour : 50
Tint (G/R) : G50/R50
Advanced Settings
Picture
Tools
Anynet+ (HDMI-CEC)
Picture Mode : Standard
Sound Mode : Custom
Sleep Timer : Off
SRS TS HD : Off
Energy Saving : Off
Add to Favourite
U
Move
E
Enter
e
Exit
DTV Air
15
abc1
18:00 ~ 6:00
18:11 Thu 6 Jan
Life On Venus Avenue
Unclassified
No Detaild Information
E Watch
' Information
BN68-02331A-Eng.indb 10 2009-10-22 �� 3:45:35
Sayfa yükleniyor...
Sayfa yükleniyor...
Sayfa yükleniyor...

English - 14
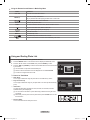
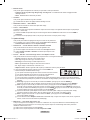
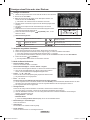
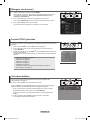
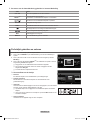
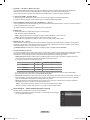
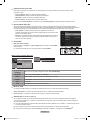
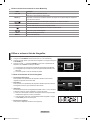
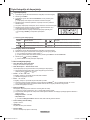
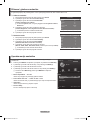
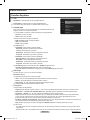
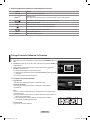
Managing Channels
Using this menu, you can Add / Delete or set Favourite channels and use the programme
guide for digital broadcasts.
Select a channel in the
N All Channels, Added Channels, Favourites, or Programmed
screen by pressing the ▲ / ▼ buttons, and pressing the ENTER
E
button.
Then you can watch the selected channel.
All Channels • : Shows all currently available channels.
Added Channels • : Shows all added channels.
Favourites • : Shows all favourite channels.
Programmed • : Shows all current reserved programmes.
Press the
O CH LIST button on the remote control to bring up the channel lists.
Using the Colour buttons with the Channel List
N
Red - (Channel Type): Toggle between your TV, Radio, Data/Other and All.
Green - (Zoom): Enlarges or shrinks a channel number.
Yellow - (Select): Selects multiple channel lists.
T - (Tools): Displays the Delete (or Add), Add to Favourite (or Delete from
Favourite), Timer Viewing, Edit Channel Name, Edit Channel Number, Sort,
Lock (or Unlock), Select All (or Deselect All), or Auto Store menu.
(The Tools menus may differ depending on the situation.)
Channel Status Display Icons
N
A
An Analogue channel.
c
A channel selected by pressing the
yellow button.
♥
A channel set as a Favourite.
(
A programme currently being
broadcast.
\
A locked channel.
)
A reserved programme
Channel List Tools Menu (
❑
in All Channels / Added Channels / Favourites)
Press the N TOOLS button to use the option menu.
The
N Tools menu items may differ depending on the channel status.
Add / Delete
You can delete or add a channel to display the channels you want.
All deleted channels will be shown on
N All Channels menu.
A gray-coloured channel indicates the channel has been deleted.
N
The N Add menu only appears for deleted channels.
You can also delete a channel to the
N Added Channels or Favourite menu in the
same manner.
Add to Favourite / Delete from Favourite
You can set channels you watch frequently as favourites.
Press the
T
TOOLS button to display Tools menu.
You can also add the favourite channel by selecting Tools → Add to Favourite
(or Delete from Favourite).
To select the Favourite channels you have set up, press the
O FAV.CH button on the
remote control.
The “♥” symbol will be displayed and the channel will be set as a favourite.
N
All favourite channels will be shown on Favourite menu. N
Lock / Unlock
You can lock a channel so that the channel cannot be selected and viewed. This function is available only when the Child Lock is
set to on. (see page 25)
The PIN number input screen appears. Enter your 4 digit PIN number.
N
The default PIN number of a new TV set is ‘0-0-0-0’. You can change the PIN, by selecting Change PIN from the menu. N
The “ N \” symbol will be displayed and the channel will be locked.
Channel
Mini Guide
Default Guide : Full Guide
Channel List
Channel Mode : Added Ch.
Fine Tune
824 UKTV Gold
825 UKTV style
A
1 C --
A
2 C
--
A
3
♥
C
--
A
4 C
--
A
5 C
--
A
6 C
--
A
7 C
--
A
8 C
--
Added Channels
All
Channel Type
Zoom
Select
Tools
824 UKTV Gold
825 UKTV style
A
1 C --
A
2 C
--
A
3
C
--
A
4 C
--
A
5 C
--
A
6 C
--
A
7 C
--
A
8 C
--
All Channels
All
Channel Type
Zoom
Select
Tools
Delete
Add to Favourite
Lock
Timer Viewing
Edit Channel Name
Sort
▼
Continued...
BN68-02331A-Eng.indb 14 2009-10-22 �� 3:45:36

English - 15
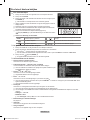
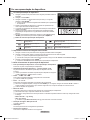
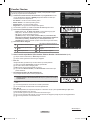
Timer Viewing
If you reserve a programme you want to watch, the channel is automatically switched to the reserved channel in the Channel List;
even when you are watching another channel. To reserve a programme set the current time rst. (See page 23)
Only memorised channels can be reserved.
N
You can set the channel, month, day, year, hour and minute directly by pressing the number buttons on the remote control. N
Reserving a programme will be shown on N Programmed menu.
Digital Programme Guide and Viewing Reservation
N
When a digital channel is selected, and you press the ► button, the Programme Guide for the channel appears.
You can reserve a programme according to the procedures described above.
Edit Channel Name (Analogue channel only)
Channels can labeled so that their call letters appear whenever the channel is selected.
The names of digital broadcasting channels are automatically assigned and cannot be labeled. N
Edit Channel Number (Digital channel only)
You can also edit the channel number by pressing the number buttons on the remote control.
Sort (Analogue channel only)
This operation allows you to change the programme numbers of the stored channels. This operation may be necessary after using
the auto store.
Select All / Deselect All
You can perform the Add / Delete, Add to Favourites / Delete from Favourites, or Lock / Unlock function for multiple channels at N
the same time. Select the required channels and press the yellow button to set all the selected channels at the same time.
The
N c mark appears to the left of the selected channels.
You can only select
N Deselect All when there is a selected channel.
Auto Store
For further details on setting up options, refer to page 12. N
If a channel is locked using the N Child Lock function, the PIN input window appears.
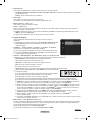
Channel List Option Menu (
❑
in Programmed )
You can view, modify or delete a reservation.
Press the
N TOOLS button to use the option menu.
Change Info : Select to change a viewing reservation.
Cancel Schedules
: Select to cancel a viewing reservation.
Information
: Select to view a viewing reservation. (You can also change the
reservation information.)
Select All / Deselect All
: Select or deselect all reserved programmes.
Programmed
1 / 1 / 2009
13:59 5 TV1 Quincy, M.E
18:59 2 TV3 The Equalizer
20:59 2 TV3 McMillan & Wife
21:59 2 TV3 M.Spillane’s mike Hammer
Change Info
Cancel Schedules
Information
Select All
All
Zoom
Select
Tools
Information
BN68-02331A-Eng.indb 15 2009-10-22 �� 3:45:36
Sayfa yükleniyor...
Sayfa yükleniyor...
Sayfa yükleniyor...

English - 19
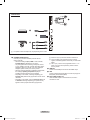
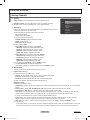
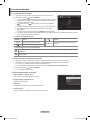
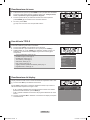
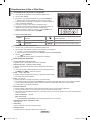
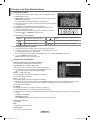
Setting up the TV with your PC
Preset: Press the N SOURCE button to select PC mode.
Auto Adjustment
❑
Auto Adjustment allows the PC screen of set to self-adjust to the incoming PC video
signal. The values of ne, coarse and position are adjusted automatically.
This function does not work in DVI-HDMI mode.
N
Press the
T
TOOLS button to display Tools menu.
You can also set the adjustment by selecting Tools → Auto Adjustment.
Screen
❑
The purpose of picture quality adjustment is to remove or reduce picture noise. If the noise is not removed by Fine-tuning alone,
then adjust the frequency as best as possible (Coarse) and Fine-tune again. After the noise has been reduced, readjust the picture
so that it is aligned on the center of screen.
Coarse
Adjusts the frequency when vertical noise appears on the screen.
Fine
Adjusts the screen to be clearer.
PC Position
Adjust the PC’s screen positioning if it does not t the TV screen. Press the ▲ or ▼ button to adjusting the Vertical-Position.
Press the ◄ or ► button to adjust the Horizontal-Position.
Image Reset
You can replace all image settings with the factory default values.
Brightness : 45
Sharpness : 50
Auto Adjustment ►
Screen
Advanced Settings
Picture Options
Picture Reset
Picture
BN68-02331A-Eng.indb 19 2009-10-22 �� 3:45:37

English - 20
PC Display
Setting Up Your PC Software (Based on Windows XP)
❑
The Windows display-settings for a typical computer are shown below. The actual
screens on your PC will probably be different, depending upon your particular version
of Windows and your particular video card. However, even if your actual screens
look different, the same basic set-up information will apply in almost all cases. (If not,
contact your computer manufacturer or Samsung Dealer.)
1. First, click on ‘Control Panel’ on the Windows start menu.
2. When the control panel window appears, click on ‘Appearance and Themes’ and a
display dialog-box will appear.
3. When the control panel window appears, click on ‘Display’ and a display dialog-box
will appear.
4. Navigate to the ‘Settings’ tab on the display dialog-box.
The correct size setting (resolution)
Optimum: 1920 X 1080 pixels
If a vertical-frequency option exists on your display settings dialog box, the correct
value is ‘60’ or ‘60 Hz’. Otherwise, just click ‘OK’ and exit the dialog box.
Display Modes
❑
Both screen position and size will vary depending on the type of PC monitor and its resolution.
The resolutions in the table are recommended.
When using an HDMI/DVI cable connection, you must use the HDMI IN 2(DVI) jack.
N
The interlace mode is not supported.
N
The set might operate abnormally if a non-standard video format is selected.
N
Separate and Composite modes are supported. SOG is not supported.
N
Too long or low quality VGA cable can cause picture noise at high resolution modes (1920x1080).
N
D-Sub and HDMI/DVI Input
Mode Resolution Horizontal Frequency (kHz) Vertical Frequency (Hz) Pixel Clock Frequency (MHz) Sync Polarity (H/V)
IBM
640 x 350 31.469 70.086 25.175 + / -
720 x 400 31.469 70.087 28.322 - / +
MAC
640 x 480 35.000 66.667 30.240 - / -
832 x 624 49.726 74.551 57.284 - / -
1152 x 870 68.681 75.062 100.000 - / +
VESA CVT
720 x 576 35.910 59.950 32.750 - / +
1152 x 864 53.783 59.959 81.750 - / +
1280 x 720
44.772 59.855 74.500 - / +
56.456 74.777 95.750 - / +
1280 x 960 75.231 74.857 130.000 - / +
VESA DMT
640 x 480
31.469 59.940 25.175 - / -
37.861 72.809 31.500 - / -
37.500 75.000 31.500 - / -
800 x 600
37.879 60.317 40.000 + / +
48.077 72.188 50.000 + / +
46.875 75.000 49.500 + / +
1024 x 768
48.363 60.004 65.000 - / -
56.476 70.069 75.000 - / -
60.023 75.029 78.750 + / +
1152 x 864 67.500 75.000 108.000
+ / +
1280 x 800
49.702 59.810 83.500
- / +
62.795 74.934 106.500
- / +
1280 x 960 60.000 60.000 108.000
+ / +
1280 x 1024
63.981 60.020 108.000
+ / +
79.976 75.025 135.000
+ / +
1360 x 768 47.712 60.015 85.500
+ / +
1440 x 900
55.935 59.887 106.500
- / +
70.635 74.984 136.750
- / +
1680 x 1050 65.290 59.954 146.250
- / +
VESA DMT /
DTV CEA
1920 x 1080p 67.500 60.000 148.500
+ / +
VESA GTF
1280 x 720 52.500 70.000 89.040
- / +
1280 x 1024 74.620
70.000
128.943
- / -
BN68-02331A-Eng.indb 20 2009-10-22 �� 3:45:37

English - 21
Changing the Sound Setting
Mode
❑
You can select the type of special sound effect to be used when watching a given
broadcast.
Standard / Music / Movie / Clear Voice / Custom
Press the T TOOLS button to display Tools menu.
You can also congure the sound mode by selecting Tools → Sound Mode.
Equalizer
❑
The sound settings can be adjusted to suit your personal preferences.
Mode : You can select a sound mode to suit your personal preferences.
Balance
: Controls the balance between the right and left speakers.
100Hz / 300Hz / 1KHz / 3KHz / 10KHz
(Bandwidth Adjustment): Adjusts the level of different bandwidth frequencies
Reset
: Resets the equalizer settings to the default values.
SRS TruSurround HD → Off / On
❑
SRS TruSurround HD is the combined technology of TruSurround and FOCUS, TruBass.
SRS TruSurround HD is down mixing technology that makes the Surround Sound effect of virtual 5.1 channel via two speakers.
This function provide not only rich deep bass at a low-pitched sound but also improve the resolution at a high-pitched sound.
Press the
T
TOOLS button to display Tools menu.
You can also set the SRS TruSurround HD by selecting Tools → SRS TS HD.
TruSurround HD, SRS and the symbol are trademarks of SRS Labs, Inc.
TruSurround HD technology is incorporated under license from SRS Labs, Inc.
If the sound is abnormal while TV is playing music, please adjust the equalizer and
N SRS TruSurround HD (Off/On).
Audio Language
❑
(Digital channel only)
You can change the default value for audio languages. Displays the language information for the incoming stream.
You can only select the language among the actual languages being broadcast.
N
Audio Format → MPEG / Dolby Digital
❑
(Digital channel only)
When sound is emitted from both the main speaker and the audio receiver, a sound echo may occur due to the decoding speed
difference between the main speaker and the audio receiver. In this case, use the TV Speaker function.
You can only select the language among the actual languages being broadcast.
N
Manufactured under license from Dolby Laboratories.
Dolby and the double-D symbol are trademarks of Dolby Laboratories.
Audio Description
❑
(Digital channel only)
This is an auxiliary audio function that provides an additional audio track for visually
challenged persons. This function handles the Audio Stream for the AD (Audio
Description), when it is sent along with the Main audio from the broadcaster. Users can
turn the Audio Description On or Off and control the volume.
You can select these options simply by pressing the
O
AD button on the remote control.
Audio Description → Off / On
Turn the audio description function on or off.
Volume
You can adjust the audio description volume.
Volume
N is active when Audio Description is set to On.
Sound Control
Mode : Custom
►
Equalizer
SRS TruSurround HD : Off
Audio Language : ----
Audio Format : ----
Audio Description
Auto Volume : Off
Speaker Select : TV Speaker
Sound
BN68-02331A-Eng.indb 21 2009-10-22 �� 3:45:38

English - 22
Auto Volume → Off / On
❑
Each broadcasting station has its own signal conditions, and so it is not easy to adjust the volume every time the channel is
changed. This feature lets you automatically adjust the volume of the desired channel by lowering the sound output when the
modulation signal is high or by raising the sound output when the modulation signal is low.
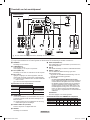
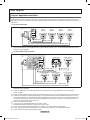
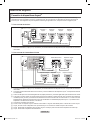
Speaker Select → External Speaker / TV Speaker
❑
If you want to hear the sound through separate speakers, cancel the internal amplier.
The
N – +, M MUTE buttons do not operate when the Speaker Select is set to External Speaker.
If you select
N External Speaker in the Speaker Select menu, the sound settings will be limited.
TV's Internal Speakers
Audio Out (Optical, L / R Out) to Sound System
TV / Ext. / AV / Component / PC / HDMI
TV / Ext. / AV / Component / PC / HDMI
TV Speaker Speaker Output Sound Output
External Speaker Mute Sound Output
Video No Signal Mute Mute
Sound Reset
❑
Reset All / Reset Sound Mode / Cancel :
You can restore the Sound settings to the
factory defaults.
Selecting the Sound Mode
When you set to Dual l ll, the current sound mode is displayed on the screen.
Type of broadcast
On-screen indication
NICAM
Stereo
Regular broadcast
(Standard audio)
Mono (Normal use)
Regular + NICAM Mono
NICAM
Mono
(Normal)
NICAM-Stereo
NICAM
Stereo
Mono
(Normal)
NICAM Dual-I/II
NICAM
Dual-1
NICAM
Dual-2
Mono
(Normal)
A2
Stereo
Regular broadcast
(Standard audio)
Mono (Normal use)
Bilingual or DUAL-I/II
Dual I Dual II
Stereo Stereo
Mono
(Forced mono)
If the stereo signal is weak and an automatic switching occurs, then switch to the mono. N
This function is only activated in stereo sound signal. It is deactivated in mono sound signal. N
This function is only available in N TV mode.
You can select these options simply by pressing the
O DUAL button on the remote control.
Auto Volume : Off
Speaker Select : TV Speaker
Sound Reset ►
Sound
BN68-02331A-Eng.indb 22 2009-10-22 �� 3:45:38
Sayfa yükleniyor...
Sayfa yükleniyor...
Sayfa yükleniyor...
Sayfa yükleniyor...

English - 27
Source List / Edit Name
Source List
❑
Use to select TV or other external input sources such as DVD players or Cable Box /
Satellite receivers (Set-Top Box) connected to the TV. Use to select the input source of
your choice.
TV, Ext.1, Ext.2, AV, Component, PC, HDMI1, HDMI2/DVI, HDMI3, HDMI4, USB.
You can choose only those external devices that are connected to the TV. In the N
Source List, connected inputs will be highlighted and sorted to the top. Inputs that
are not connected will be sorted to the bottom.
Using the Colour buttons on the remote with the Source list
N
- Red (Refresh): Refreshes the connecting external devices.
- T (Tools): Displays the Edit Name and Information menus.
Press the
O SOURCE button on the remote control to view an external signal
source.
Edit Name
❑
You can name the device connected to the input jacks to make your input source selection easier.
VCR / DVD / Cable STB / Satellite STB / PVR STB / AV Receiver / Game / Camcorder / PC / DVI / DVI PC / TV / IPTV /
Blu-ray / HD DVD / DMA
When a PC with a resolution of 1920 x 1080@60Hz is connected to the N HDMI IN 2(DVI) port, you should set the HDMI2 / DVI
mode to PC in the Edit Name of the Input mode.
Alternative Software
Replace the current software with the alternative.
If software was changed, existing software is displayed.
N
You can change current software to alternative software by Alternative Software. N
HD Connection Guide
❑
The brief instruction on How to get the best performance from your new HDTV is displayed. We offer the connection method for
HD devices.
You can move the previous or next page by pressing the ◄ or ► button.
N
Contact Samsung
❑
You can know the Samsung Call center, website and information for product.
Source List
Edit Name
Input
BN68-02331A-Eng.indb 27 2009-10-22 �� 3:45:39
Sayfa yükleniyor...

English - 29
Using the Media Play Function
This function enables you to view and listen to photo, music files saved on a USB Mass Storage Class (MSC) device.
It might not work properly with unlicensed multimedia files.
Entering the Media Play Menu
❑
1. Press the MENU button. Press the ▲ or ▼ button to select Application, then
press the ENTER
E
button.
2. Press the ▲ or ▼ button to select Media Play (USB), then press the ENTER
E
button.
The
N
Media Play menu is displayed.
Press the
O SOURCE button on the remote control repeatedly to select USB,
then press the ENTER
E
button.
Press the
O MEDIA.P button on the remote control to display the Media Play
menu.
3. Press the Red button, then press the ▲ or ▼ button to select the corresponding
USB Memory Device (i.e. if connected through a hub). Press the ENTER
E
button.
This function differs depending on the USB Memory Device connected to TV.
N
The selected USB device name appears at the bottom left of the screen.
N
4. Press the ◄ or ► button to select an icon (Photo, Music, Setup), then press
the ENTER
E
button.
To exit
N
Media Play mode, press the MEDIA.P button on the remote control.
Removing a USB Memory Device Safely
❑
You can remove the device safely from the TV.
1. Press the TOOLS button in the Media Play le list screen, or while a Slide Show
or music le is being played.
2. Press the ▲ or ▼ button to select Remove Safely, then press the ENTER
E
button.
3. Remove the USB device from the TV.
Screen Display
❑
1. Currently selected le: The currently selected le is highlighted.
2. View Groups: The sorting group including the currently selected photo is highlighted.
One group involves the nine photos.
N
3. Current Device: Shows the currently selected device name.
Red (
N Device) button: Selects a connected device.
4. Item Selection Information: Shows the number of photos that are selected by pressing the Yellow button.
5. Help Items
Yellow • (Select) button: Selects le from the le list. Selected les are marked with a symbol c. Press the yellow button
again to cancel a le selection.
• TOOLS (Tools) button: Displays the option menus. (The tools menu changes according to the current status.)
R • RETURN (Return) button: Return to previous menu.
Media Play
Photo Music Setup
PHOTO
USB : USB name
148.48MB/995.00MB Free
R
Return
USB
Device
IMG_0335.JPG
4/6
IMG_0349.
JPG
▶
▶
IMG_0346.
JPG
1
IMG_0345.
JPG
1
Slide Show
Play Current Group
Information
Remove Safely
USB
USB
Device
Select
T
Tools R Upper Folder
IMG_0343.
JPG
▶
▶
IMG_03496.
JPG
IMG_03496.
JPG
IMG_0335.JPG
1/67
▶
▶
◀
IMG_03496.
JPG
1
2
3
1File(s) Selected
4
5
USB
Device
Select
T
To ols R Upper Folder
▶
▶
1
1
USB
BN68-02331A-Eng.indb 29 2009-10-22 �� 3:45:43

English - 30
Using and Sorting Photo List
You can sort photos in the Photo List by a particular standard.
1. Press the MEDIA.P button on the remote control to display the Media Play menu.
2. Press the ◄ or ► button to select Photo, then press the ENTER
E
button.
3. Press the
(Play)/
ENTER
E
button to start the Slide Show in the order selected
by the user.
The information of a photo le is automatically set.
N
Photos for which information cannot be displayed are set as N Unclassified.
PTP does not support folder sort mode.
N
Photo List Tools Menu
❑
Slide Show
You can play a Slide Show using the photo les on the USB memory device.
Play Current Group
You can play a Slide Show using only the photo les in the currently selected sorting
group.
Information
The photo le information including the name, the size, the resolution, the date
modied and the path is displayed.
You can view the information of photo les during a Slide Show using the same
N
procedures.
Alternatively, select a photo from the photo list and press the
O INFO button to view
the information.
Remove Safely
You can remove the device safely from the TV.
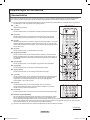
Using the Remote Control Button in Media Play Menu
❑
Button Operations
▲/▼/◄/► Move the cursor and select an item.
ENTER
E
Select the currently selected item.
Play or pause the files while playing the slide show or music files.
Play or pause the Slide Show or Music file.
RETURN
Return to the previous menu.
TOOLS
Run various functions from the Photo, Music and Movie menus.
Stop the current slide show, Music or Movie file.
Jump to previous group/Jump to next group.
INFO
Show file information.
MEDIA.P
Exit Media Play mode.
P
/
Stop Media Play mode and Returns to TV mode.
EXIT
Stop the current function and return to the Media Play main menu.
IMG_0343.
JPG
▶
▶
IMG_03496.
JPG
IMG_03496.
JPG
IMG_0335.JPG
1/67
▶
▶
◀
IMG_03496.
JPG
USB
Device
Select
T
T o ols R Return
▶
▶
1
1
USB
IMG_0335.JPG
4/6
IMG_0349.
JPG
▶
▶
IMG_0346.
JPG
1
IMG_0345.
JPG
1
Slide Show
Play Current Group
Information
Remove Safely
USB
USB
Device
Select
T
Tools R Return
BN68-02331A-Eng.indb 30 2009-10-22 �� 3:45:47
Sayfa yükleniyor...

English - 32
Using and Sorting the Music List
You can sort music files in the Music List by a particular standard.
1. Press the MEDIA.P button on the remote control to display the Media Play menu.
2. Press the ◄ or ► button to select Music, then press the ENTER
E
button.
3. Press the ENTER
E
button to start playing music in the order selected by the user.
The information of the music les is automatically set.
N
Music les for which information cannot be displayed are set to Unclassied. N
If there is no title information for a music le, the lename is displayed. N
Music List Tools Menu
❑
Play Current Group
You can only play music les in the currently selected sorting group.
Information
The music le information including the name, the size, the date modied and the
path is displayed.
Alternatively, select a music le from the music list and press the
O INFO button to
view the information.
Remove Safely
You can remove the device safely from the TV.
1
When I Dream
3/4
Energetic
Carol kidd
Mr A-Z
2005
Pop
Heaven
usermanual
NPKI
▶
1
▶
▶
▶
▶
USB
USB
Device
Select
T
To ols R Upper Folder
T
Tools R Upper FolderSelect
1
1
▶
▶
USB
Sky
When I Dream
3/4
Energetic
Carol kidd
Mr A-Z
2005
Pop
NPKI
Heavenusermanual
NPKI
Play Current Group
Information
Remove Safely
USB
Device
Select
T
Tools R Upper Folder
BN68-02331A-Eng.indb 32 2009-10-22 �� 3:45:48
Sayfa yükleniyor...

English - 34
Picture / Music Settings Using Media Play
When watching a Slide Show or listening to music using Media Play, you can set the picture and sound.
Picture Setting
❑
1. Press the TOOLS button during a Slide Show or while music is playing.
2. Press the ▲ or ▼ button to select Picture Setting.
3. Press the ◄ or ► button to select the Picture Mode
(Dynamic, Standard, Eco, or Movie).
When selecting
N
Dynamic, Eco, you can't adjust Dynamic Contrast, Black
Tone.
4. Press the ▲ or ▼ button to move to an item.
(Contrast, Brightness, Colour, Dynamic Contrast, Black Tone, or Reset)
Select Reset to initialize the picture settings.
N
5. Press the ◄ or ► button to adjust the settings.
Sound Setting
❑
1. Press the TOOLS button during a Slide Show or while music is playing.
2. Press the ▲ or ▼ button to select Sound Setting.
3. Press the ◄ or ► button to select the Sound Mode.
(Standard, Music, Movie, Clear voice, or Custom)
4. Press the ▲ or ▼ button to move to an item.
(Balance, 100Hz, 300Hz, 1kHz, 3kHz,10kHz (Bandwidth Adjustment), or Reset)
Select Reset to initialize the sound settings.
N
5. Press the ◄ or ► button to adjust the settings.
Using the Setup Menu
Setup displays the user settings of the Media Play menu.
1. Press the MEDIA.P button on the remote control to display the Media Play menu.
2. Press the ◄ or ► button to select Setup, then press the ENTER
E
button.
3. Press the ▲ or ▼ button to select the desired option.
4 . Press the ◄ or ► button to select the option, then press the ENTER
E
button.
To exit
N Media Play mode, press the MEDIA.P button on the remote control.
Music Repeat Mode → On / Off
Select to repeatedly play music les.
Screen Saver Run Time → 10 min / 20 min / 1 hour
Select to set the waiting time before the screen saver appears.
Information
Select to viewing the information of the connected device.
Remove Safely
You can remove the device safely from the TV.
Picture Setting
Picture Mode ◄ Standard ►
Contrast : 95
Brightness : 45
Color : 50
Dynamic Contrast : Medium
Black Tone : Off
Reset
U
Move
L
Adjust
E
Enter
R
Return
Sound Setting
Sound Mode ◄ Custom ►
Balance : L50 R50
100Hz : 0
300Hz : 0
1KHz : 0
3KHz : 0
10KHz : 0
Reset
U
Move
L
Adjust
E
Enter
R
Return
Media Play
USB : USB name
851.98MB/995.00MB Free
SETUP
Photo Music Setup
e
Exit
USB
Device
U
Move
lr
Adjust
R
Return
Music Repeat Mode ◄ Off ►
Screen Saver Run Time 10 min
Information
Remove Safely
USB
Device
BN68-02331A-Eng.indb 34 2009-10-22 �� 3:45:49
Sayfa yükleniyor...
Sayfa yükleniyor...
Sayfa yükleniyor...
Sayfa yükleniyor...
Sayfa yükleniyor...

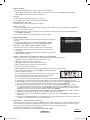
English - 40
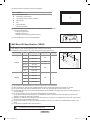
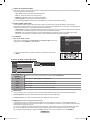
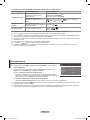
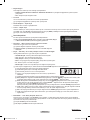
The teletext pages are organized according to six categories:
Part Contents
A Selected page number.
B Broadcasting channel identity.
C Current page number or search indications.
D Date and time.
E Text.
F Status information.
FASTEXT information.
Teletext information is often divided between several pages displayed in sequence,
N
which can be accessed by:
Entering the page number -
Selecting a title in a list -
Selecting a coloured heading (FASTEXT system) -
Press the
O TV button to exit from the teletext display.
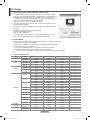
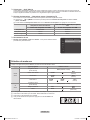
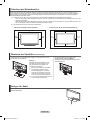
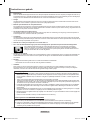
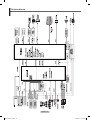
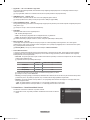
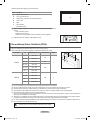
Wall Mount Kit Specifications (VESA)
Install your wall mount on a solid wall perpendicular to the floor.
When attaching to other building materials, please contact your nearest dealer.
If installed on a ceiling or slanted wall, it may fall and result in severe personal injury.
Product Family inch VESA Spec. (A * B) Standard Screw Quantity
LCD-TV
19" ~22" 100 * 100
M4
4
23"~29" 200 * 100
30"~40" 200 * 200 M6
46"~55" 400 * 400
M857"~70" 800 * 400
80" ~ 1400 * 800
PDP-TV
42"~ 50" 400 * 400
M8 4
58"~ 63" 600 * 400
70" ~ 800 * 400
80" ~ 1400 * 800
We provided the standard dimensions for wall mount kits as shown in the table above.
N
When purchasing our wall mount kit, a detailed installation manual and all parts necessary for assembly are provided. N
Do not use screws longer than the standard dimension, as they may cause damage to the inside of the TV set. N
For wall mounts that do not comply with the VESA standard screw specications, the length of the screws may differ depending on N
their specications.
Do not use screws that do not comply with the VESA standard screw specications.
N
Do not use fasten the screws too strongly, this may damage the product or cause the product to fall, leading to personal injury.
Samsung is not liable for these kinds of accidents.
Samsung is not liable for product damage or personal injury when a non-VESA or non-specied wall mount is used or the consumer
N
fails to follow the product installation instructions.
Our 57” and 63” models do not comply with VESA Specications. Therefore, you should use our dedicated wall mount kit for this
N
model.
Do not exceed 15 degrees tilt when mounting this TV.
N
Do not install your Wall Mount Kit while your TV is turned on.
It may result in personal injury due to electric shock.
BN68-02331A-Eng.indb 40 2009-10-22 �� 3:45:51
Sayfa yükleniyor...
Sayfa yükleniyor...
Sayfa yükleniyor...
Sayfa yükleniyor...
Sayfa yükleniyor...

English - 46
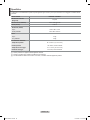
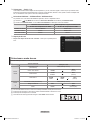
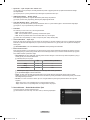
Specifications
The descriptions and characteristics in this booklet are given for information purposes only and are subject to modification without
notice.
Model Name PS50B550 / PS50B551
Screen Size (Diagonal) 50 inch
PC Resolution (Optimum) 1920 x 1080 @ 60 Hz
Sound (Output) 10 W x 2
Dimension (W x H x D)
Body
With stand
1240 x 766 x 74 mm
1240 x 822 x 290 mm
Weight
Body
With stand
33 kg
38 kg
Environmental Considerations
Operating Temperature
Operating Humidity
Storage Temperature
Storage Humidity
50 °F to 104 °F (10 °C to 40 °C)
10% to 80%, non-condensing
-4 °F to 113 °F (-20 °C to 45 °C)
5% to 95%, non-condensing
This device is a Class B digital apparatus.
N
Design and specications are subject to change without prior notice. N
For the power supply and Power Consumption, refer to the label attached to the product. N
BN68-02331A-Eng.indb 46 2009-10-22 �� 3:45:56
Sayfa yükleniyor...
Sayfa yükleniyor...
Sayfa yükleniyor...
Sayfa yükleniyor...
Sayfa yükleniyor...
Sayfa yükleniyor...
Sayfa yükleniyor...
Sayfa yükleniyor...
Sayfa yükleniyor...
Sayfa yükleniyor...
Sayfa yükleniyor...

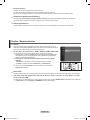
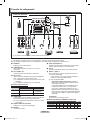
Français - 4
Utilisation de la base-support
L’écran à plasma doit être soulevé par au moins deux personnes. Ne posez N
jamais l’écran à plasma sur le sol, car cela pourrait l’endommager. Conservez
toujours l’écran en position verticale.
L’écran à plasma peut pivoter de 20 degrés vers la droite et la gauche. N
-20° ~ 20°
Branchement et installation de votre téléviseur
Vérification des pièces
Manuel
d’utilisation
Télécommande / Piles
AAA (2ea)
Cordon d’alimentation Chiffon de
nettoyage
Serre-câbles Carte de garantie /
Manuel de sécurité
(non disponible dans tous
les pays)
Vis (4ea) Capot inférieur Anneau de support
(4ea)
(Reportez-vous à la
page 41)
Blindage
magnétique
pour cordon
d’alimentation
Blindage magnétique
de casque
Blindage magnétique N
Le blindage magnétique sert à protéger les câbles des interférences. Lors de la
connexion d’un câble, ouvrez le blindage magnétique et rabattez-le autour du câble près
de la prise comme illustré.
BN68-02331A-FRA.indb 4 10/21/2009 10:00:22 AM
Sayfa yükleniyor...
Sayfa yükleniyor...
Sayfa yükleniyor...
Sayfa yükleniyor...
Sayfa yükleniyor...

Français - 10
Affichage des menus
1. Une fois l’appareil allumé, appuyez sur le bouton MENU. Le menu principal apparaît
à l’écran. Plusieurs icônes s’afchent sur le côté gauche du menu : Image, Son,
Canal, Conguration, Entrée, Application, Assistance.
2. ENTER
E
Appuyez sur la touche ▲ ou ▼ pour sélectionner l’une des icônes.
Appuyez ensuite sur le bouton ENTER
E
pour accéder au sous-menu de l’icône.
3. Appuyez sur le bouton EXIT pour quitter le menu.
Les menus disparaissent de l’écran après environ une minute. N
Utilisation du bouton TOOLS
Vous pouvez utiliser le bouton TOOLS pour sélectionner simplement et rapidement les fonctions que vous utilisez le plus souvent.
Le menu Outils change en fonction du mode d’entrée externe affiché.
1. Appuyez sur le bouton TOOLS. Le menu Outils s’afche.
2. Appuyez sur le bouton ▲ ou ▼ pour sélectionner un menu, puis appuyez sur le
bouton ENTER
E
.
3. Appuyez sur les boutons ▲ / ▼ /
◄
/
►
/ ENTER
E
pour afcher, changer ou utiliser les
options de menu sélectionnés. Pour une description plus détaillée de chaque fonction,
reportez-vous à la page correspondante.
Anynet •
+
(HDMI-CEC), voir page 36
Mode Image, voir page 16 •
Mode Son, voir page 21 •
Veille, voir page 23 •
SRS TS HD, voir page • 21
Mode éco., voir page 25 •
Ajouter aux favoris (ou Supprimer des favoris), voir page 14 •
Réglage Automatique, voir page 19 •
Visualisation de laffichage
L’affichage identifie la chaîne en cours et l’état de certains paramètres audio et vidéo.
Appuyez sur le bouton O INFO pour afcher les informations.
Appuyez sur le bouton INFO de la télécommande. La télévision affiche la chaîne,
le type de son et l’état de certains paramètres de son et d’image.
▲, ▼: Vous pouvez afcher des informations relatives à une autre chaîne. •
Pour accéder à la chaîne actuellement sélectionnée, appuyez sur le bouton
ENTERE.
◄, ►: Vous pouvez afcher les informations relatives au programme souhaité de la •
chaîne actuelle.
Appuyez de nouveau sur le bouton N INFO ou attendez environ 10 secondes
pour que l'affichage disparaisse automatiquement.
Outils
Anynet+ (HDMI-CEC)
Mode Image : Standard
Mode Son : Personnel
Veille : Arrêt
SRS TS HD : Arrêt
Mode éco. : Arrêt
Réglage Automatique
U
Dépl.
E
Entrer
e
Quitter
DTV Air
15
abc1
18:00 ~ 6:00
18:11 Thu 6 Jan
Life On Venus Avenue
Unclassified
No Detaild Information
E Watch
' Information
Mode : Standard
Lum. Cellules : 7
Contraste : 95
Luminosité : 45
Netteté : 50
Couleur : 50
Teinte (V/R) : V50/R50
Paramètres avancés
Image
BN68-02331A-FRA.indb 10 10/21/2009 10:00:31 AM
Sayfa yükleniyor...
Sayfa yükleniyor...
Sayfa yükleniyor...
Sayfa yükleniyor...
Sayfa yükleniyor...
Sayfa yükleniyor...
Sayfa yükleniyor...
Sayfa yükleniyor...
Sayfa yükleniyor...

Français - 20
Ecran du PC
Configuration de votre logiciel PC (instructions basées sur Windows XP)
❑
Les paramètres d’afchage Windows indiqués ci-dessous sont ceux d’un ordinateur
type. Les afchages à l’écran sur votre PC seront probablement différents, en
fonction de votre version de Windows et votre carte vidéo. Cependant, même si les
afchages diffèrent, les informations de conguration de base s’appliquent dans la
plupart des cas. )Dans le cas contraire, contactez le fabricant de votre ordinateur ou
votre revendeur Samsung).
1. Cliquez sur “Panneau de conguration” dans le menu Démarrer de Windows.
2. Lorsque vous êtes sur l’écran du panneau de conguration, cliquez sur “Apparence
et thèmes”. Une boîte de dialogue apparaît.
3. Cliquez sur “Afchage”. Une boîte de dialogue vous propose des options d’afchage.
4. Sélectionnez l’onglet “Paramètres” dans la boîte de dialogue. Le réglage correct de la
taille (résolution)
optimal : 1920 X 1080 pixels
S’il existe une option de
fréquence verticale sur votre boîte de dialogue des paramètres d’afchage, la valeur
correcte est “60” ou “60 Hz”. Sinon, cliquez simplement sur “OK” pour quitter la boîte
de dialogue.
Modes d’affichage
❑
La taille et la position de l’écran varient en fonction du type d’écran et de sa résolution. Les résolutions indiquées dans le tableau
ci-dessous sont recommandées.
Lorsque vous utilisez une connexion avec câble HDMI/DVI, vous devez utiliser la borne HDMI IN 2(DVI).
N
Le mode entrelacé n’est pas pris en charge.
N
Le téléviseur peut fonctionner de façon anormale si le format vidéo sélectionné n’est pas standard.
N
Les modes Séparé et Composite sont pris en charge. SOG (SVSV) n’est pas pris en charge.
N
Un câble VGA trop long ou de qualité médiocre peut être source de parasites visuels dans les modes haute résolution
N
(1920 x 1080).
Entrée D-Sub et HDMI/DVI
Mode Résolution
Fréquence horizontale
(KHz)
Fréquence verticale
(kHz)
Fréquence de l’horloge
pixels (MHhz)
Polarité synchronisée
(H/V)
IBM
640 x 350 31.469 70.086 25.175 + / -
720 x 400 31.469 70.087 28.322 - / +
MAC
640 x 480 35.000 66.667 30.240 - / -
832 x 624 49.726 74.551 57.284 - / -
1152 x 870 68.681 75.062 100.000 - / +
VESA CVT
720 x 576 35.910 59.950 32.750 - / +
1152 x 864 53.783 59.959 81.750 - / +
1280 x 720
44.772 59.855 74.500 - / +
56.456 74.777 95.750 - / +
1280 x 960 75.231 74.857 130.000 - / +
VESA DMT
640 x 480
31.469 59.940 25.175 - / -
37.861 72.809 31.500 - / -
37.500 75.000 31.500 - / -
800 x 600
37.879 60.317 40.000 + / +
48.077 72.188 50.000 + / +
46.875 75.000 49.500 + / +
1024 x 768
48.363 60.004 65.000 - / -
56.476 70.069 75.000 - / -
60.023 75.029 78.750 + / +
1152 x 864 67.500 75.000 108.000
+ / +
1280 x 800
49.702 59.810 83.500
- / +
62.795 74.934 106.500
- / +
1280 x 960 60.000 60.000 108.000
+ / +
1280 x 1024
63.981 60.020 108.000
+ / +
79.976 75.025 135.000
+ / +
1360 x 768 47.712 60.015 85.500
+ / +
1440 x 900
55.935 59.887 106.500
- / +
70.635 74.984 136.750
- / +
1680 x 1050 65.290 59.954 146.250
- / +
VESA DMT /
DTV CEA
1920 x 1080p 67.500 60.000 148.500
+ / +
VESA GTF
1280 x 720 52.500 70.000 89.040
- / +
1280 x 1024 74.620
70.000
128.943
- / -
BN68-02331A-FRA.indb 20 10/21/2009 10:00:37 AM
Sayfa yükleniyor...

Français - 22
Volume auto → Arrêt / Marche
❑
Chaque station de télédiffusion possède ses propres conditions de signal. Il n’est donc pas facile de régler le volume chaque fois
que vous changez de chaîne. Cette fonction permet de régler automatiquement le volume du canal désiré en réduisant la sortie son
lorsque le signal de modulation est puissant ou en l’augmentant lorsque le signal est faible.
Sélection du haut-parleur → Haut-parleur externe / Haut-parleur TV
❑
Pour entendre le son par l’intermédiaire d’enceintes séparées, désactivez l’amplicateur interne.
Les boutons N – +, M MUTE ne fonctionnent pas lorsque la fonction Sélection du haut-parleur est dénie sur Haut-
parleur externe.
Si vous sélectionnez N Haut-parleur externe dans le menu Sélection du haut-parleur, les réglages du son sont limités.
Haut-parleurs internes du téléviseur
Sortie audio (Optique, Sortie G/D) vers système
audio
TV / Ext. / AV / Composant / PC / HDMI
TV / Ext. / AV / Composant / PC / HDMI
Haut-parleur TV Sortie enceinte Sortie son
Haut-parleur externe Silence Sortie son
Absence de signal vidéo Silence Silence
Réinitialisation du son
❑
Réinitial. tout / Réinitial. mode son / Annuler :
Vous pouvez rétablir les valeurs
par défaut des paramètres audio.
Sélection du mode son
Lorsque vous réglez cette option sur Dual l ll, le mode son actuel est affiché à l’écran.
Type de programme
Indication à l’écran
NICAM
Stéréo
Programme normal
(Audio standard)
Mono (utilisation normale)
Normal + Mono NICAM
NICAM
Mono
(Normal)
NICAM Stéréo
NICAM
Stereo
Mono
(Normal)
NICAM Dual-I/II
NICAM
Dual-1
NICAM
Dual-2
Mono
(Normal)
A2
Stéréo
Programme normal
(Audio standard)
Mono (utilisation normale)
Bilingue ou DUAL-I/II
Dual I Dual II
Stéréo Stéréo
Mono
(Mono forcé)
Si le signal stéréo est faible et qu’une commutation automatique se produit, passez alors en Mono. N
Cette fonction n’est activée qu’en son stéréo. Elle est désactivée en mode mono. N
Cette fonction n’est disponible qu’en mode N TV.
Vous pouvez sélectionner ces options en appuyant sur le bouton O DUAL de la
télécommande.
Volume auto : Arrêt
Sélection Haut-parleur : Haut-parleur TV
Réinitialisation du son ►
Son
BN68-02331A-FRA.indb 22 10/21/2009 10:00:38 AM
Sayfa yükleniyor...
Sayfa yükleniyor...
Sayfa yükleniyor...
Sayfa yükleniyor...
Sayfa yükleniyor...
Sayfa yükleniyor...
Sayfa yükleniyor...
Sayfa yükleniyor...
Sayfa yükleniyor...
Sayfa yükleniyor...
Sayfa yükleniyor...
Sayfa yükleniyor...
Sayfa yükleniyor...
Sayfa yükleniyor...
Sayfa yükleniyor...
Sayfa yükleniyor...
Sayfa yükleniyor...
Sayfa yükleniyor...
Sayfa yükleniyor...
Sayfa yükleniyor...
Sayfa yükleniyor...
Sayfa yükleniyor...
Sayfa yükleniyor...
Sayfa yükleniyor...
Sayfa yükleniyor...
Sayfa yükleniyor...
Sayfa yükleniyor...
Sayfa yükleniyor...
Sayfa yükleniyor...
Sayfa yükleniyor...
Sayfa yükleniyor...
Sayfa yükleniyor...
Sayfa yükleniyor...
Sayfa yükleniyor...
Sayfa yükleniyor...
Sayfa yükleniyor...
Sayfa yükleniyor...
Sayfa yükleniyor...
Sayfa yükleniyor...
Sayfa yükleniyor...
Sayfa yükleniyor...
Sayfa yükleniyor...
Sayfa yükleniyor...
Sayfa yükleniyor...
Sayfa yükleniyor...
Sayfa yükleniyor...
Sayfa yükleniyor...
Sayfa yükleniyor...
Sayfa yükleniyor...
Sayfa yükleniyor...
Sayfa yükleniyor...
Sayfa yükleniyor...
Sayfa yükleniyor...
Sayfa yükleniyor...
Sayfa yükleniyor...
Sayfa yükleniyor...
Sayfa yükleniyor...
Sayfa yükleniyor...
Sayfa yükleniyor...
Sayfa yükleniyor...
Sayfa yükleniyor...
Sayfa yükleniyor...
Sayfa yükleniyor...
Sayfa yükleniyor...
Sayfa yükleniyor...
Sayfa yükleniyor...
Sayfa yükleniyor...
Sayfa yükleniyor...
Sayfa yükleniyor...
Sayfa yükleniyor...
Sayfa yükleniyor...
Sayfa yükleniyor...
Sayfa yükleniyor...
Sayfa yükleniyor...
Sayfa yükleniyor...
Sayfa yükleniyor...
Sayfa yükleniyor...
Sayfa yükleniyor...
Sayfa yükleniyor...
Sayfa yükleniyor...
Sayfa yükleniyor...
Sayfa yükleniyor...
Sayfa yükleniyor...
Sayfa yükleniyor...
Sayfa yükleniyor...
Sayfa yükleniyor...
Sayfa yükleniyor...
Sayfa yükleniyor...
Sayfa yükleniyor...
Sayfa yükleniyor...
Sayfa yükleniyor...
Sayfa yükleniyor...
Sayfa yükleniyor...
Sayfa yükleniyor...
Sayfa yükleniyor...
Sayfa yükleniyor...
Sayfa yükleniyor...
Sayfa yükleniyor...
Sayfa yükleniyor...
Sayfa yükleniyor...
Sayfa yükleniyor...
Sayfa yükleniyor...
Sayfa yükleniyor...
Sayfa yükleniyor...
Sayfa yükleniyor...
Sayfa yükleniyor...
Sayfa yükleniyor...
Sayfa yükleniyor...
Sayfa yükleniyor...
Sayfa yükleniyor...
Sayfa yükleniyor...
Sayfa yükleniyor...
Sayfa yükleniyor...
Sayfa yükleniyor...
Sayfa yükleniyor...
Sayfa yükleniyor...
Sayfa yükleniyor...
Sayfa yükleniyor...
Sayfa yükleniyor...
Sayfa yükleniyor...
Sayfa yükleniyor...
Sayfa yükleniyor...
Sayfa yükleniyor...
Sayfa yükleniyor...
Sayfa yükleniyor...
Sayfa yükleniyor...
Sayfa yükleniyor...
Sayfa yükleniyor...
Sayfa yükleniyor...
Sayfa yükleniyor...
Sayfa yükleniyor...
Sayfa yükleniyor...
Sayfa yükleniyor...
Sayfa yükleniyor...
Sayfa yükleniyor...
Sayfa yükleniyor...
Sayfa yükleniyor...
Sayfa yükleniyor...
Sayfa yükleniyor...
Sayfa yükleniyor...
Sayfa yükleniyor...
Sayfa yükleniyor...
Sayfa yükleniyor...
Sayfa yükleniyor...
Sayfa yükleniyor...
Sayfa yükleniyor...
Sayfa yükleniyor...
Sayfa yükleniyor...
Sayfa yükleniyor...
Sayfa yükleniyor...
Sayfa yükleniyor...
Sayfa yükleniyor...
Sayfa yükleniyor...
Sayfa yükleniyor...
Sayfa yükleniyor...
Sayfa yükleniyor...
Sayfa yükleniyor...
Sayfa yükleniyor...
Sayfa yükleniyor...
Sayfa yükleniyor...
Sayfa yükleniyor...
Sayfa yükleniyor...
Sayfa yükleniyor...
Sayfa yükleniyor...
Sayfa yükleniyor...
Sayfa yükleniyor...
Sayfa yükleniyor...
Sayfa yükleniyor...
Sayfa yükleniyor...
Sayfa yükleniyor...
Sayfa yükleniyor...
Sayfa yükleniyor...
Sayfa yükleniyor...
Sayfa yükleniyor...
Sayfa yükleniyor...
Sayfa yükleniyor...
Sayfa yükleniyor...
Sayfa yükleniyor...
Sayfa yükleniyor...
Sayfa yükleniyor...
Sayfa yükleniyor...
Sayfa yükleniyor...
Sayfa yükleniyor...
Sayfa yükleniyor...
Sayfa yükleniyor...
Sayfa yükleniyor...
Sayfa yükleniyor...
Sayfa yükleniyor...
Sayfa yükleniyor...
Sayfa yükleniyor...
Sayfa yükleniyor...
Sayfa yükleniyor...
Sayfa yükleniyor...
Sayfa yükleniyor...
Sayfa yükleniyor...
Sayfa yükleniyor...
Sayfa yükleniyor...
Sayfa yükleniyor...
Sayfa yükleniyor...
Sayfa yükleniyor...
Sayfa yükleniyor...
Sayfa yükleniyor...
Sayfa yükleniyor...
Sayfa yükleniyor...
Sayfa yükleniyor...
Sayfa yükleniyor...
Sayfa yükleniyor...
Sayfa yükleniyor...
Sayfa yükleniyor...
Sayfa yükleniyor...
Sayfa yükleniyor...
Sayfa yükleniyor...
Sayfa yükleniyor...
Sayfa yükleniyor...
Sayfa yükleniyor...
Sayfa yükleniyor...
Sayfa yükleniyor...
Sayfa yükleniyor...
Sayfa yükleniyor...
Sayfa yükleniyor...
Sayfa yükleniyor...
Sayfa yükleniyor...
Sayfa yükleniyor...
Sayfa yükleniyor...
Sayfa yükleniyor...
Sayfa yükleniyor...
Sayfa yükleniyor...
Sayfa yükleniyor...
Sayfa yükleniyor...
Sayfa yükleniyor...
Sayfa yükleniyor...
Sayfa yükleniyor...
Sayfa yükleniyor...
Sayfa yükleniyor...
Sayfa yükleniyor...
Sayfa yükleniyor...
Sayfa yükleniyor...
Sayfa yükleniyor...
Sayfa yükleniyor...
Sayfa yükleniyor...
Sayfa yükleniyor...
Sayfa yükleniyor...
Sayfa yükleniyor...
Sayfa yükleniyor...
Sayfa yükleniyor...
Sayfa yükleniyor...
Sayfa yükleniyor...
Sayfa yükleniyor...
Sayfa yükleniyor...
Sayfa yükleniyor...
Sayfa yükleniyor...
Sayfa yükleniyor...
Sayfa yükleniyor...
Sayfa yükleniyor...
Sayfa yükleniyor...
Sayfa yükleniyor...
Sayfa yükleniyor...
Sayfa yükleniyor...
Sayfa yükleniyor...
Sayfa yükleniyor...
Sayfa yükleniyor...
Sayfa yükleniyor...
Sayfa yükleniyor...
Sayfa yükleniyor...
Sayfa yükleniyor...
Sayfa yükleniyor...
Sayfa yükleniyor...
Sayfa yükleniyor...
Sayfa yükleniyor...
Sayfa yükleniyor...
Sayfa yükleniyor...
Sayfa yükleniyor...
Sayfa yükleniyor...
Sayfa yükleniyor...
Sayfa yükleniyor...
Sayfa yükleniyor...
Sayfa yükleniyor...
Sayfa yükleniyor...
Sayfa yükleniyor...
Sayfa yükleniyor...
Sayfa yükleniyor...
Sayfa yükleniyor...
Sayfa yükleniyor...
Sayfa yükleniyor...
Sayfa yükleniyor...
Sayfa yükleniyor...
Sayfa yükleniyor...
Sayfa yükleniyor...
Sayfa yükleniyor...
Sayfa yükleniyor...
Sayfa yükleniyor...
Sayfa yükleniyor...
Sayfa yükleniyor...
Sayfa yükleniyor...
Sayfa yükleniyor...
Sayfa yükleniyor...
Sayfa yükleniyor...
Sayfa yükleniyor...
Sayfa yükleniyor...
Sayfa yükleniyor...
Sayfa yükleniyor...
Sayfa yükleniyor...
Sayfa yükleniyor...
Sayfa yükleniyor...
Sayfa yükleniyor...
Sayfa yükleniyor...
Sayfa yükleniyor...
Sayfa yükleniyor...
Sayfa yükleniyor...
Sayfa yükleniyor...
Sayfa yükleniyor...
Sayfa yükleniyor...
Sayfa yükleniyor...
Sayfa yükleniyor...
Sayfa yükleniyor...
Sayfa yükleniyor...
Sayfa yükleniyor...
Sayfa yükleniyor...
Sayfa yükleniyor...
Sayfa yükleniyor...
Sayfa yükleniyor...
Sayfa yükleniyor...
Sayfa yükleniyor...
Sayfa yükleniyor...
Sayfa yükleniyor...
Sayfa yükleniyor...
Sayfa yükleniyor...
Sayfa yükleniyor...
Sayfa yükleniyor...
Sayfa yükleniyor...
Sayfa yükleniyor...
Sayfa yükleniyor...
Sayfa yükleniyor...
Sayfa yükleniyor...
Sayfa yükleniyor...
Sayfa yükleniyor...
Sayfa yükleniyor...
Sayfa yükleniyor...
Sayfa yükleniyor...
Sayfa yükleniyor...
Sayfa yükleniyor...
Sayfa yükleniyor...
Sayfa yükleniyor...
-
 1
1
-
 2
2
-
 3
3
-
 4
4
-
 5
5
-
 6
6
-
 7
7
-
 8
8
-
 9
9
-
 10
10
-
 11
11
-
 12
12
-
 13
13
-
 14
14
-
 15
15
-
 16
16
-
 17
17
-
 18
18
-
 19
19
-
 20
20
-
 21
21
-
 22
22
-
 23
23
-
 24
24
-
 25
25
-
 26
26
-
 27
27
-
 28
28
-
 29
29
-
 30
30
-
 31
31
-
 32
32
-
 33
33
-
 34
34
-
 35
35
-
 36
36
-
 37
37
-
 38
38
-
 39
39
-
 40
40
-
 41
41
-
 42
42
-
 43
43
-
 44
44
-
 45
45
-
 46
46
-
 47
47
-
 48
48
-
 49
49
-
 50
50
-
 51
51
-
 52
52
-
 53
53
-
 54
54
-
 55
55
-
 56
56
-
 57
57
-
 58
58
-
 59
59
-
 60
60
-
 61
61
-
 62
62
-
 63
63
-
 64
64
-
 65
65
-
 66
66
-
 67
67
-
 68
68
-
 69
69
-
 70
70
-
 71
71
-
 72
72
-
 73
73
-
 74
74
-
 75
75
-
 76
76
-
 77
77
-
 78
78
-
 79
79
-
 80
80
-
 81
81
-
 82
82
-
 83
83
-
 84
84
-
 85
85
-
 86
86
-
 87
87
-
 88
88
-
 89
89
-
 90
90
-
 91
91
-
 92
92
-
 93
93
-
 94
94
-
 95
95
-
 96
96
-
 97
97
-
 98
98
-
 99
99
-
 100
100
-
 101
101
-
 102
102
-
 103
103
-
 104
104
-
 105
105
-
 106
106
-
 107
107
-
 108
108
-
 109
109
-
 110
110
-
 111
111
-
 112
112
-
 113
113
-
 114
114
-
 115
115
-
 116
116
-
 117
117
-
 118
118
-
 119
119
-
 120
120
-
 121
121
-
 122
122
-
 123
123
-
 124
124
-
 125
125
-
 126
126
-
 127
127
-
 128
128
-
 129
129
-
 130
130
-
 131
131
-
 132
132
-
 133
133
-
 134
134
-
 135
135
-
 136
136
-
 137
137
-
 138
138
-
 139
139
-
 140
140
-
 141
141
-
 142
142
-
 143
143
-
 144
144
-
 145
145
-
 146
146
-
 147
147
-
 148
148
-
 149
149
-
 150
150
-
 151
151
-
 152
152
-
 153
153
-
 154
154
-
 155
155
-
 156
156
-
 157
157
-
 158
158
-
 159
159
-
 160
160
-
 161
161
-
 162
162
-
 163
163
-
 164
164
-
 165
165
-
 166
166
-
 167
167
-
 168
168
-
 169
169
-
 170
170
-
 171
171
-
 172
172
-
 173
173
-
 174
174
-
 175
175
-
 176
176
-
 177
177
-
 178
178
-
 179
179
-
 180
180
-
 181
181
-
 182
182
-
 183
183
-
 184
184
-
 185
185
-
 186
186
-
 187
187
-
 188
188
-
 189
189
-
 190
190
-
 191
191
-
 192
192
-
 193
193
-
 194
194
-
 195
195
-
 196
196
-
 197
197
-
 198
198
-
 199
199
-
 200
200
-
 201
201
-
 202
202
-
 203
203
-
 204
204
-
 205
205
-
 206
206
-
 207
207
-
 208
208
-
 209
209
-
 210
210
-
 211
211
-
 212
212
-
 213
213
-
 214
214
-
 215
215
-
 216
216
-
 217
217
-
 218
218
-
 219
219
-
 220
220
-
 221
221
-
 222
222
-
 223
223
-
 224
224
-
 225
225
-
 226
226
-
 227
227
-
 228
228
-
 229
229
-
 230
230
-
 231
231
-
 232
232
-
 233
233
-
 234
234
-
 235
235
-
 236
236
-
 237
237
-
 238
238
-
 239
239
-
 240
240
-
 241
241
-
 242
242
-
 243
243
-
 244
244
-
 245
245
-
 246
246
-
 247
247
-
 248
248
-
 249
249
-
 250
250
-
 251
251
-
 252
252
-
 253
253
-
 254
254
-
 255
255
-
 256
256
-
 257
257
-
 258
258
-
 259
259
-
 260
260
-
 261
261
-
 262
262
-
 263
263
-
 264
264
-
 265
265
-
 266
266
-
 267
267
-
 268
268
-
 269
269
-
 270
270
-
 271
271
-
 272
272
-
 273
273
-
 274
274
-
 275
275
-
 276
276
-
 277
277
-
 278
278
-
 279
279
-
 280
280
-
 281
281
-
 282
282
-
 283
283
-
 284
284
-
 285
285
-
 286
286
-
 287
287
-
 288
288
-
 289
289
-
 290
290
-
 291
291
-
 292
292
-
 293
293
-
 294
294
-
 295
295
-
 296
296
-
 297
297
-
 298
298
-
 299
299
-
 300
300
-
 301
301
-
 302
302
-
 303
303
-
 304
304
-
 305
305
-
 306
306
-
 307
307
-
 308
308
-
 309
309
-
 310
310
-
 311
311
-
 312
312
-
 313
313
-
 314
314
-
 315
315
-
 316
316
-
 317
317
-
 318
318
-
 319
319
-
 320
320
-
 321
321
-
 322
322
-
 323
323
-
 324
324
-
 325
325
-
 326
326
-
 327
327
-
 328
328
-
 329
329
-
 330
330
-
 331
331
-
 332
332
-
 333
333
-
 334
334
-
 335
335
-
 336
336
-
 337
337
-
 338
338
-
 339
339
-
 340
340
-
 341
341
-
 342
342
-
 343
343
-
 344
344
-
 345
345
-
 346
346
-
 347
347
-
 348
348
-
 349
349
-
 350
350
-
 351
351
-
 352
352
-
 353
353
-
 354
354
-
 355
355
-
 356
356
-
 357
357
-
 358
358
-
 359
359
-
 360
360
-
 361
361
-
 362
362
-
 363
363
-
 364
364
-
 365
365
-
 366
366
-
 367
367
-
 368
368
-
 369
369
-
 370
370
-
 371
371
-
 372
372
-
 373
373
-
 374
374
-
 375
375
-
 376
376
-
 377
377
-
 378
378
-
 379
379
-
 380
380
-
 381
381
-
 382
382
-
 383
383
-
 384
384
-
 385
385
-
 386
386
-
 387
387
-
 388
388
-
 389
389
-
 390
390
-
 391
391
-
 392
392
-
 393
393
-
 394
394
-
 395
395
-
 396
396
-
 397
397
-
 398
398
-
 399
399
-
 400
400
-
 401
401
-
 402
402
-
 403
403
-
 404
404
-
 405
405
-
 406
406
-
 407
407
-
 408
408
-
 409
409
-
 410
410
-
 411
411
-
 412
412
-
 413
413
-
 414
414
-
 415
415
-
 416
416
-
 417
417
-
 418
418
-
 419
419


Samsung PS50B550 Kullanım kılavuzu
- Kategori
- LCD TV'ler
- Tip
- Kullanım kılavuzu
diğer dillerde
- español: Samsung PS50B550 Manual de usuario
- français: Samsung PS50B550 Manuel utilisateur
- italiano: Samsung PS50B550 Manuale utente
- Deutsch: Samsung PS50B550 Benutzerhandbuch
- português: Samsung PS50B550 Manual do usuário
- English: Samsung PS50B550 User manual
- Nederlands: Samsung PS50B550 Handleiding
İlgili makaleler
-
Samsung PS50B610S2P Kullanım kılavuzu
-
Samsung ps42b430 Kullanım kılavuzu
-
Samsung BN68-01528B-02 Kullanım kılavuzu
-
Samsung PS50A410C1 Kullanım kılavuzu
-
Samsung UE32C4000PW Kullanım kılavuzu
-
-
-
Samsung UE55C7000WW Kullanım kılavuzu
-
-
Samsung LE52A756R1M Kullanım kılavuzu