
GC9600
PerfectCare Elite Plus
EN User Manual 6
BG Ръководствозапотребителя 12
CS Uživatelskápříručka 19
EL Εγχειρίδιοχρήσης 26
ET Kasutusjuhend 33
HR Korisničkipriručnik 39
HU Felhasználóikézikönyv 45
KK Қолданушыныңнұсқасы 52
LT Vartotojovadovas 59
LV Lietotājarokasgrāmata 65
PL Instrukcjaobsługi 71
RO Manualdeutilizare 78
RU Инструкцияпоэксплуатации 84
SK Manuálpoužívateľa 92
SL Uporabniškipriročnik 99
SR Korisničkouputstvo 105
TR KullanımKılavuzu 112
UK Посібниккористувача 118
AZ İstifadəçitəlimatı 125
HY Օգտագործողիձեռնարկ 131
KA მომხმარებლისსახელმძღვანელო 139
KY Колдонуучунуннускамалары 147
TG Дастурамаликорбар 155
TK Ulanyjygollanmasy 162
UZ Foydalanuvchiqo‘llanmasi 169
MKУпатствозакорисникот 176
SQ Manualiipërdorimit 183
© 2022 Philips Domestic Appliances Holding B.V.
All rights reserved
4239.001.1876.4 (24/03/2022)
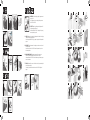
1
2
4
12
11
10
13
16
17
14
9
8
5
1918
6 7
3
15
1

2x
2 sec.
2
6
10
14
18
3
7
11
15
19
4
8
12
16
20
5
9
13
17
A
B
C
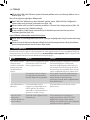
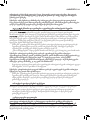
EN IMPORTANT: Perform descaling regularly for great steam and
prolonged life.
Let the appliance cool down completely, before you remove
the EASY DE-CALC KNOB.
CS DŮLEŽITÉ:
PL WAŻNE:
RO IMPORTANT:
Nu deschide butonul rotativ EASY DE-CALC atunci când aparatul este pornit sau
RU ВАЖНАЯИНФОРМАЦИЯ.
TR ÖNEMLİ:
D

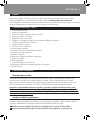
Welcome to the future!
Say hello to your new powerful smart friend and
learn how to use it in this booklet.
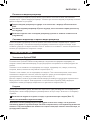
EN Intelligentautomaticsteam
Enabled by the DynamiQ sensor, steam is released
automatically when the iron is moved.
CS Inteligentníautomatickápára
DynamiQ
PL Inteligentnaautomatycznaregulacjapary
DynamiQ
RO Aburautomatinteligent
DynamiQ, aburul este eliberat
RU Интеллектуальнаяавтоматическаяподача
пара
DynamiQ
TR Akıllıotomatikbuhar
DynamiQ
verilir.

6ENGLISH
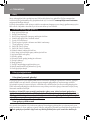
Introduction
www.philips.com/welcome.
the appliance. Save both documents for future reference.
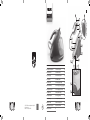
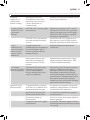
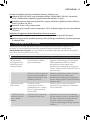
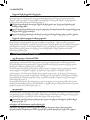
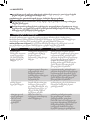
Product overview (Fig. 1)
1 Steam supply hose
2 Iron platform
3 First supply hose storage compartment
4 Mains cord with plug
5 ECO button with light
6
7 ‘Water tank empty’ light
8
9
10 Cord storage compartment
11 Second supply hose storage compartment
12
13 Carry lock
14 Carry lock release button
15 Soleplate
16 Steam trigger
17 ‘Iron ready’ light
18 Intelligent automatic steam button with light
19 Filling hole
Preparing for use
Type of water to use
demineralized water (50% demineralized/distilled water mixed with water could be used as
well) to prolong the lifetime of the appliance.
Warning: Do not use perfumed water, water from the tumble dryer, vinegar, starch,
descaling agents, ironing aids, chemically descaled water or other chemicals, as they
may cause water spitting, brown staining or damage to your appliance.
Filling the water tank
the water tank at any time during use.
1 RemovethewatertankfromtheapplianceandllitwithwateruptotheMAX
indication.

7
ENGLISH
2 Putthewatertankbackintotheappliancebyttingthebottompartintothe
appliancerst.
3 Pushinthetoppartofthewatertankuntilitlocksintoplace(‘click’).
Water tank empty light
and press the steam trigger to let the appliance heat up again. When the ‘iron ready’ light
Using your appliance
OptimalTEMP technology
without adjusting the iron temperature setting.
and rayon (Fig. 2).
Fabrics with this symbol are not ironable. These fabrics include synthetic fabrics such as
prints on garments (Fig. 3).
ironing board cover (Fig. 4).
Ironing
before you use the appliance. Save them for future reference.
1 Pressandholdthesteamtriggertostartironing(Fig.5).
Never direct steam at people.
Note: For best result on tough fabrics such as cotton, linen and jeans, keep the steam
trigger pressed continuously when you move the iron over the fabric. Then move the iron
over the same area a few more times without steam to dry the fabric.
Note: For the best results on silk and shiny synthetic fabrics, it is recommended to keep the
steam trigger pressed continuously while ironing.
sensor and intelligent automatic steam mode
The intelligent sensor inside your iron knows exactly when and how your iron is
sensor will start
recognizing the movements of your iron and will enable your iron to release the right amount
of steam automatically without you having to press the steam trigger. This will help you to get
great results faster and easier.
button on top of the iron handle. The intelligent automatic steam light turns on (Fig. 6).

8
ENGLISH
The ‘iron ready’ light moves back and forth when the iron is moving.
Note: in intelligent automatic steam mode, steam comes out automatically when you
move the iron and stops when you stop moving the iron (Fig. 7). You can still press the
steam trigger in this mode to activate the steam when the iron is not moving.
Note: for your safety, in intelligent automatic steam mode, the steam stops when the
soleplate is tilted.
to continue your ironing.
Steam boost function
releases 3 powerful shots of steam (Fig. 8).
Vertical ironing
Hot steam is emitted from the iron. Never attempt to remove creases from a garment
that someone is wearing. Do not apply steam near your or someone else’s hand.
1 Holdtheironinverticalposition,pressthesteamtriggerandtouchthegarment
slightlywiththesoleplate(Fig.9).
Note: for your safety, the intelligent automatic steam mode is not available for vertical
ironing.
ECO setting
compromising on the ironing result.
Press the ECO button. The green ECO light turns on (Fig. 10).
MAX setting
1 Pressandholdtheon/obuttonfor2secondsuntilthelightturnswhite(Fig.11).
2 TodeactivateMAXsetting,pressandholdtheon/obuttonagainfor2secondsuntil
thewhitelightturnsblue
Auto shut-o

9
ENGLISH
again.
IMPORTANT - EASY DE-CALC
It is very important to use the EASY DE-CALC function as soon as the EASY DE-CALC light
starts to ash and the appliance beeps continuously.
10 ironing sessions to indicate that the appliance needs to be descaled. Perform the following
To avoid the risk of burns, unplug the appliance and let it cool down for at least two
hours before you perform the EASY DE-CALC procedure.
1 Removetheplugfromthewallsocket(Fig.13).
2 Placetheapplianceontheedgeofthetabletop.
3 Holdacup(withacapacityofatleast350ml)undertheEASYDE-CALCknobandturn
theknobanticlockwise(Fig.14).
4RemovetheEASYDE-CALCknobandletthewaterwithscaleparticlesowintothe
cup(Fig.15).
5Whennomorewatercomesoutoftheappliance,reinserttheEASYDE-CALCknob
andturnitclockwisetofastenit(Fig.16).
6 YoucancontinueusingyourironimmediatelyaftercompletingtheEASYDE-CALC
procedure.
IMPORTANT – Descaling the soleplate
If you do not use the EASY DE-CALC function regularly, scale particles may build up in
the soleplate and brown stains may come out of the soleplate during ironing. In this
situation, you need to descale the soleplate by following the procedure below. We
advice you to repeat the procedure twice to better clean the soleplate.
To avoid the risk of burns, unplug the appliance and let it cool down for at least two
hours before you descale the soleplate.
1 Removetheplugfromthewallsocket(Fig.13).
2 Placetheapplianceontheedgeofthetabletop.
3 Makesurethatthewatertankisempty.
4Holdacup(withacapacityofatleast350ml)undertheEASYDE-CALCknobandturn
theknobanticlockwise(Fig.14).
5RemovetheEASYDE-CALCknobandletthewaterwithscaleparticlesowintothe
cup(Fig.15).
6 HoldtheapplianceinthepositionthatEASYDE-CALCopeningisfacingupandpour
900mldistilledwaterintotheopening(Fig.17).
Note: Be mindful on the heavy weight of the appliance when you tilt it.

10
ENGLISH
7 KeeptheEASYDE-CALCopeningfacingup,reinserttheEASYDE-CALCknobandturn
itclockwisetofastenit(Fig.18).
8 Puttheappliancebackonastableandevensurface.Plugintheapplianceandswitch
iton(Fig.19).
9Waitfor5minutesfortheappliancetoheatup.
10Keepthesteamtriggerpressedcontinuouslywhileyoumovetheirononapieceof
thickclothfor3minutes(Fig.20).
Warning: hot, dirty water comes out of the soleplate.
11 Stopmovingtheironwhennomorewatercomesoutorwhensteamstartscoming
out.
12 Youcancontinuetousetheapplianceimmediately.Otherwiseunplugtheappliance
afterthedescalingiscompleted.
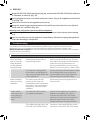
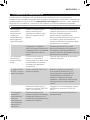
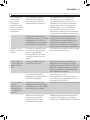
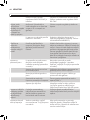
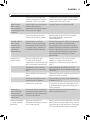
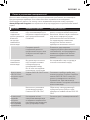
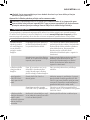
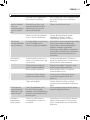
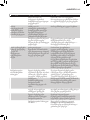
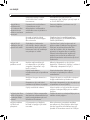
Troubleshooting
This chapter summarises the most common problems you could encounter with the
www.philips.com/support
Care Centre in your country.
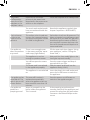
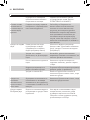
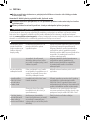
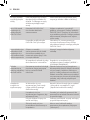
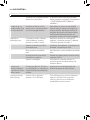
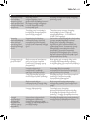
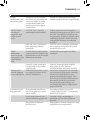
Problem Possible cause Solution
The ironing board
cover becomes
wet or there are
water droplets
on the garment
during ironing.
Steam has condensed on the
ironing board cover after a
long ironing session.
Replace the ironing board cover if the
also add an extra layer of felt material
under the ironing board cover to
prevent condensation on the ironing
cover that is not designed to
cope with the high steam rate
of the appliance.
Put an extra layer of felt material under
the ironing board cover to prevent
condensation on the ironing board.
Water droplets
come out of the
soleplate.
The steam that was still
present in the hose has
cooled down and condensed
into water. This causes water
droplets to come out of the
soleplate.
Steam away from the garment for a
few seconds.
Steam and/or
water come out
from under the
knob.
not tightened properly.
appliance cool down for 2 hours.
and screw it back onto the appliance
properly. Note: Some water may
escape when you remove the knob.
The rubber sealing ring of the
Contact an authorised Philips service

11
ENGLISH
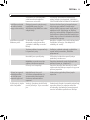
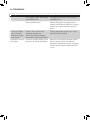
Problem Possible cause Solution
and impurities
come out of the
soleplate or the
soleplate is dirty.
Impurities or chemicals
present in the water have
deposited in the steam vents
and/or on the soleplate.
Clean the soleplate with a damp cloth.
Too much scale and minerals
have accumulated inside the
appliance.
The iron leaves
a shine or an
imprint on the
garment.
The surface to be ironed was
you were ironing over a seam
or a fold in the garment.
PerfectCare is safe on all garments. The
shine or imprint is not permanent and
you can place a cotton cloth over the
area to be ironed to avoid imprints at
seams and folds.
The appliance
does not produce
any steam.
There is not enough water
in the water tank (the ‘water
Fill the water tank (see chapter ‘Using
water tank’).
The appliance is not hot
enough to produce steam.
Wait until the ‘iron ready’ light on the
iron lights up continuously.
trigger.
Press the steam trigger and keep it
pressed while you iron.
The water tank is not placed
in the appliance properly.
Slide the water tank back into the
The appliance is not switched
on.
Insert the plug in the wall socket and
the appliance.
The appliance has
activated automatically
when the appliance has not
been used for more than 10
minutes.
switch on the appliance again.
The appliance
produces a
pumping sound.
Water is pumped into the
boiler inside the appliance.
This is normal.
If the pumping sound continues
remove the plug from the wall socket.
Contact an authorised Philips service
centre.

12
БЪЛГАРСКИ
Въведение
www.philips.com/welcome.
Преглед на продукта (Фиг. 1)
1
2
3
4
5
6
7
8
9
10
11
12
13
14
15
16
17
18
19
Подготовка за употреба
Тип вода за използване
Предупреждение: Не използвайте парфюмирана вода, вода от пералня с
центрофуга, оцет, нишесте, препарати за премахване на накип, помощни
препарати за гладене, химически декалцирана вода или други химикали, тъй като
те могат да причинят изхвърляне на вода, кафяво оцветяване или повреда на
вашия уред.

13
БЪЛГАРСКИ
Пълнене на водния резервоар
1 Свалетеводниярезервоаротуредаигонапълнетесводадообозначението
MAX.
2 Поставетеводниярезервоаробратновуреда,катопоставитепърводолнатаму
частвуреда.
3 Натиснетегорнатачастнаводниярезервоар,докатосезахваненамястотоси
(сщракване).
Светлинен индикатор за празен воден резервоар
Използване на уреда
Технология OptimalTEMP
Гладене
1 Натиснетеизадръжтеспусъказапара,задазапочнетедагладите(Фиг.5).
Никога не насочвайте парата към хора.
Забележка: за най-добър резултат при трудни тъкани като памук, лен и дънкови
панталони, дръжте спусъка за пара натиснат непрекъснато, когато движите ютията по
тъканта. След това преместете ютията по същата площ още няколко пъти без пара, за
да подсушите тъканта.

14
БЪЛГАРСКИ
Забележка: за най-добри резултати върху коприна и блестящи синтетични тъкани се
препоръчва да държите спусъка за пара натиснат непрекъснато, докато гладите.
сензор и интелигентен автоматичен режим за пара
Забележка: в интелигентния автоматичен режим на пара, парата излиза
автоматично, когато движите ютията и спира, когато спрете да я движите (Фиг. 7).
Все още можете да натиснете спусъка за пара в този режим, за да активирате парата,
когато ютията не се движи.
Забележка: за вашата безопасност в интелигентния автоматичен режим на пара
парата спира, когато гладещата повърхност е наклонена.
Функция за допълнителна пара
Вертикално гладене
Гореща пара се изпуска от ютията. Никога не се опитвайте да премахвате гънки от
дреха, която някой носи. Не прилагайте пара близо до вашата или чужда ръка.
1 Дръжтеютиятавъввертикалноположение,натискайтеспусъказапараи
докосвайтелекодрехатасгладещатаповърхностнаютията(Фиг.9).
Забележка: за вашата безопасност, интелигентният автоматичен режим на пара не е
наличен за вертикално гладене.

15
БЪЛГАРСКИ
ECO настройка
Настройка MAX
1 Натиснетеизадръжтебутоназавкл./изкл.за2секунди,докатоиндикаторът
светневбяло(Фиг.11).
2 ЗададеактивиратенастройкатаMAX,натиснетеизадръжтебутонавкл./изкл.за
2секундиотново,докатобялатасветлинанестанесиня
Автоматично изключване
ВАЖНО – ЛЕСНО ПРЕМАХВАНЕ НА НАКИП
Много е важно да използвате функцията ЛЕСНО ПРЕМАХВАНЕ НА НАКИП веднага
след като светлинният индикатор ЛЕСНО ПРЕМАХВАНЕ НА НАКИП започне да мига
и уредът издава непрекъснат звук.
За да се избегне рискът от изгаряния, изключете уреда и го оставете да изстине в
продължение на най-малко два часа преди да извършите процедурата за ЛЕСНО
ПРЕМАХВАНЕ НА НАКИП.
1 Изключетещепселаотконтакта(Фиг.13).
2 Сложетеуреданаръбанамасата.
3 Задръжтечаша(собемпоне350мл)подтапата„ЛЕСНОПРЕМАХВАНЕНА
НАКИП“изавъртететапатаобратноначасовниковатастрелка(Фиг.14).
4Свалететапата„ЛЕСНОПРЕМАХВАНЕНАНАКИП“иоставетеводатасчастиците
накипдаизтечевчашата(Фиг.15).

16
БЪЛГАРСКИ
5Когатоспредаизтичаводаотуреда,поставетеотновотапата„ЛЕСНО
ПРЕМАХВАНЕНАНАКИП“иязавъртетепопосоканачасовниковатастрелка,за
дазапушитеотвора(Фиг.16).
6 Можетедапродължитеизползванетонаютиятаведнагаследзавършванетона
процедуратазаЛЕСНОПРЕМАХВАНЕНАНАКИП.
ВАЖНО – Антикалциране на гладещата повърхност
Ако не използвате редовно функцията ЛЕСНО ПРЕМАХВАНЕ НА НАКИП, частици
накип могат да се натрупат по гладещата повърхност и могат да се появят
кафяви петна от гладещата плоча по време на гладене. В тази ситуация трябва да
премахнете накипа от гладещата повърхност, като следвате процедурата по-долу.
Ние Ви съветваме да повторите процедурата два пъти за по-добро почистване на
гладещата повърхност.
За да се избегне рискът от изгаряния, изключете уреда и го оставете да изстине в
продължение на най-малко два часа, преди да премахвате накипа от гладещата
повърхност.
1 Изключетещепселаотконтакта(Фиг.13).
2 Сложетеуреданаръбанамасата.
3 Уверетесе,чеводниятрезервоарепразен.
4Задръжтечаша(собемпоне350мл)подтапата„ЛЕСНОПРЕМАХВАНЕНА
НАКИП“изавъртететапатаобратноначасовниковатастрелка(Фиг.14).
5Свалететапата„ЛЕСНОПРЕМАХВАНЕНАНАКИП“иоставетеводатасчастиците
накипдаизтечевчашата(Фиг.15).
6 Задръжтеуредавпозицията,прикоятоотворътЛЕСНОПРЕМАХВАНЕНАНАКИП
еобърнатнагореиналейте900млдестилиранаводавотвора(Фиг.17).
Забележка: внимавайте за теглото на уреда, когато го накланяте.
7 ПазетеотвораЛЕСНОПРЕМАХВАНЕНАНАКИПобърнатнагоре,поставете
отновотапатаЛЕСНОПРЕМАХВАНЕНАНАКИПиязавъртетепочасовниковата
стрелка,задаязатегнете(Фиг.18).
8 Поставетеуредаотнововърхустабилнаиравнаповърхност.Поставетещепселав
контактаивключетеуреда(Фиг.19).
9Изчакайте5минути,задасенагрееуредът.
10Дръжтеспусъказапаранатиснатнепрекъснато,докатодвижитеютиятавърху
парчедебелплатза3минути(Фиг.20).
Предупреждение: от гладещата повърхност излиза гореща мръсна вода.
11 Спретедадвижитеютията,когатоповеченеизлизаводаиликогатозапочнеда
излизапара.
12 Можетедапродължитедаизползватеуредаведнага.Впротивенслучай
изключетеуреда,следкатопремахванетонанакипаезавършено.

17
БЪЛГАРСКИ
Отстраняване на неизправности
www.philips.com/support
Проблем Възможна причина Решение

18
БЪЛГАРСКИ
Проблем Възможна причина Решение

19ČEŠTINA
Úvod
www.philips.com/welcome.
Přehled výrobku (obr. 1)
1
2
3
4
5
6
7
8
9
10
11
12
13
14
15
16
17
18
19
Příprava kpoužití
Typ použitelné vody
Varování: Nepoužívejte parfémovanou vodu, vodu ze sušičky, ocet, škrob, odvápňovací
prostředky, přípravky pro usnadnění žehlení, vodu schemicky odstraněným vodním
kamenem nebo jiné chemikálie, protože by mohlo dojít kvystřikování vody, vzniku
hnědých skvrn nebo poškození zařízení.

20
ČEŠTINA
Naplnění nádržky na vodu
1 VyjmětenádržkunavoduzpřístrojeanaplňtejivodoupoúroveňznačkyMAX.
2 Vložtenádržkunavoduzpětdopřístrojetak,ženejprvenasadítejejíspodníčást.
3 Potézatlačtehorníčástnádržkynavodutak,abyzapadlanamísto(„cvaknutí“).
Kontrolka vyprázdnění nádržky na vodu
Příprava kpoužití
Typ použitelné vody
Varování: Nepoužívejte parfémovanou vodu, vodu ze sušičky, ocet, škrob, odvápňovací
prostředky, přípravky pro usnadnění žehlení, vodu schemicky odstraněným vodním
kamenem nebo jiné chemikálie, protože by mohlo dojít kvystřikování vody, vzniku
hnědých skvrn nebo poškození zařízení.
Naplnění nádržky na vodu
1 VyjmětenádržkunavoduzpřístrojeanaplňtejivodoupoúroveňznačkyMAX.
2 Vložtenádržkunavoduzpětdopřístrojetak,ženejprvenasadítejejíspodníčást.
3 Potézatlačtehorníčástnádržkynavodutak,abyzapadlanamísto(„cvaknutí“).
Kontrolka vyprázdnění nádržky na vodu

21
ČEŠTINA
Používání přístroje
Technologie OptimalTEMP
Žehlení
1 Chcete-lizačítžehlit,stiskněteapodržtespoušťpáry(obr.5).
Párou nikdy nemiřte na osoby.
Poznámka: Nejlepších výsledků na silných látkách, jako je bavlna, povlečení nebo džíny,
dosáhnete, když budete při pohybu žehličkou po látce držet spoušť páry stále stisknutou.
Potom žehličku párkrát znovu přemístěte do stejné oblasti bez zapnuté páry, aby se látka
vysušila.
Poznámka: Pro dosažení nejlepších výsledků na hedvábných a lesklých syntetických látkách
doporučujeme nechat během žehlení spoušť páry stisknutou.
Snímač a režim Inteligentní automatická pára
(obr. 6).
Vrežimu inteligentní automatické páry pára vychází automaticky při pohybu žehličky a
zastaví se při zastavení žehličky (obr. 7). I vtomto režimu je možné stisknout spoušť páry,
aby se pára aktivovala, když se žehlička nepohybuje.
Poznámka: pro vaši bezpečnost se vrežimu inteligentní automatické páry pára zastaví při
naklonění žehlicí plochy.

22
ČEŠTINA
Funkce parního rázu
Vertikální žehlení
Ze žehličky vychází horká pára. Nikdy se nepokoušejte odstranit záhyby zoděvu, který
má někdo na sobě. Nepoužívejte páru vblízkosti svých nebo cizích rukou.
1 Držtežehličkuvesvislépoloze,stisknětespoušťpáryazlehkapřiložtežehlicíplochu
naoděv(obr.9).
Poznámka: Zdůvodu zajištění vaší bezpečnosti není režim inteligentní automatické páry
kdispozici pro svislé žehlení.
Nastavení ECO
ECO zhasne.
Nastavení MAX
1 Stiskněteapodržtevypínačna2sekundy,dokudsekontrolkanerozsvítíbíle(obr.11).
2 Chcete-lideaktivovatnastaveníMAX,znovustiskněteapodobu2sekundpodržte
tlačítkovypínače,dokudsebarvakontrolkynezměnízbílénamodrou.
Automatické vypnutí
Sayfa yükleniyor...
Sayfa yükleniyor...
Sayfa yükleniyor...
Sayfa yükleniyor...
Sayfa yükleniyor...
Sayfa yükleniyor...
Sayfa yükleniyor...
Sayfa yükleniyor...
Sayfa yükleniyor...
Sayfa yükleniyor...
Sayfa yükleniyor...
Sayfa yükleniyor...
Sayfa yükleniyor...
Sayfa yükleniyor...
Sayfa yükleniyor...
Sayfa yükleniyor...
Sayfa yükleniyor...
Sayfa yükleniyor...
Sayfa yükleniyor...
Sayfa yükleniyor...
Sayfa yükleniyor...
Sayfa yükleniyor...
Sayfa yükleniyor...
Sayfa yükleniyor...
Sayfa yükleniyor...
Sayfa yükleniyor...
Sayfa yükleniyor...
Sayfa yükleniyor...
Sayfa yükleniyor...
Sayfa yükleniyor...
Sayfa yükleniyor...
Sayfa yükleniyor...
Sayfa yükleniyor...
Sayfa yükleniyor...
Sayfa yükleniyor...
Sayfa yükleniyor...
Sayfa yükleniyor...
Sayfa yükleniyor...
Sayfa yükleniyor...
Sayfa yükleniyor...
Sayfa yükleniyor...
Sayfa yükleniyor...
Sayfa yükleniyor...
Sayfa yükleniyor...
Sayfa yükleniyor...
Sayfa yükleniyor...
Sayfa yükleniyor...
Sayfa yükleniyor...
Sayfa yükleniyor...
Sayfa yükleniyor...
Sayfa yükleniyor...
Sayfa yükleniyor...
Sayfa yükleniyor...
Sayfa yükleniyor...
Sayfa yükleniyor...
Sayfa yükleniyor...
Sayfa yükleniyor...
Sayfa yükleniyor...
Sayfa yükleniyor...
Sayfa yükleniyor...
Sayfa yükleniyor...
Sayfa yükleniyor...
Sayfa yükleniyor...
Sayfa yükleniyor...
Sayfa yükleniyor...
Sayfa yükleniyor...
Sayfa yükleniyor...
Sayfa yükleniyor...
Sayfa yükleniyor...
Sayfa yükleniyor...
Sayfa yükleniyor...
Sayfa yükleniyor...
Sayfa yükleniyor...
Sayfa yükleniyor...
Sayfa yükleniyor...
Sayfa yükleniyor...
Sayfa yükleniyor...
Sayfa yükleniyor...
Sayfa yükleniyor...
Sayfa yükleniyor...
Sayfa yükleniyor...
Sayfa yükleniyor...
Sayfa yükleniyor...
Sayfa yükleniyor...
Sayfa yükleniyor...
Sayfa yükleniyor...
Sayfa yükleniyor...
Sayfa yükleniyor...
Sayfa yükleniyor...
Sayfa yükleniyor...
Sayfa yükleniyor...
Sayfa yükleniyor...
Sayfa yükleniyor...
Sayfa yükleniyor...
Sayfa yükleniyor...
Sayfa yükleniyor...
Sayfa yükleniyor...
Sayfa yükleniyor...
Sayfa yükleniyor...
Sayfa yükleniyor...
Sayfa yükleniyor...
Sayfa yükleniyor...
Sayfa yükleniyor...
Sayfa yükleniyor...
Sayfa yükleniyor...
Sayfa yükleniyor...
Sayfa yükleniyor...
Sayfa yükleniyor...
Sayfa yükleniyor...
Sayfa yükleniyor...
Sayfa yükleniyor...
Sayfa yükleniyor...
Sayfa yükleniyor...
Sayfa yükleniyor...
Sayfa yükleniyor...
Sayfa yükleniyor...
Sayfa yükleniyor...
Sayfa yükleniyor...
Sayfa yükleniyor...
Sayfa yükleniyor...
Sayfa yükleniyor...
Sayfa yükleniyor...
Sayfa yükleniyor...
Sayfa yükleniyor...
Sayfa yükleniyor...
Sayfa yükleniyor...
Sayfa yükleniyor...
Sayfa yükleniyor...
Sayfa yükleniyor...
Sayfa yükleniyor...
Sayfa yükleniyor...
Sayfa yükleniyor...
Sayfa yükleniyor...
Sayfa yükleniyor...
Sayfa yükleniyor...
Sayfa yükleniyor...
Sayfa yükleniyor...
Sayfa yükleniyor...
Sayfa yükleniyor...
Sayfa yükleniyor...
Sayfa yükleniyor...
Sayfa yükleniyor...
Sayfa yükleniyor...
Sayfa yükleniyor...
Sayfa yükleniyor...
Sayfa yükleniyor...
Sayfa yükleniyor...
Sayfa yükleniyor...
Sayfa yükleniyor...
Sayfa yükleniyor...
Sayfa yükleniyor...
Sayfa yükleniyor...
Sayfa yükleniyor...
Sayfa yükleniyor...
Sayfa yükleniyor...
Sayfa yükleniyor...
Sayfa yükleniyor...
Sayfa yükleniyor...
Sayfa yükleniyor...
Sayfa yükleniyor...
Sayfa yükleniyor...
Sayfa yükleniyor...
Sayfa yükleniyor...
Sayfa yükleniyor...
Sayfa yükleniyor...
Sayfa yükleniyor...
-
 1
1
-
 2
2
-
 3
3
-
 4
4
-
 5
5
-
 6
6
-
 7
7
-
 8
8
-
 9
9
-
 10
10
-
 11
11
-
 12
12
-
 13
13
-
 14
14
-
 15
15
-
 16
16
-
 17
17
-
 18
18
-
 19
19
-
 20
20
-
 21
21
-
 22
22
-
 23
23
-
 24
24
-
 25
25
-
 26
26
-
 27
27
-
 28
28
-
 29
29
-
 30
30
-
 31
31
-
 32
32
-
 33
33
-
 34
34
-
 35
35
-
 36
36
-
 37
37
-
 38
38
-
 39
39
-
 40
40
-
 41
41
-
 42
42
-
 43
43
-
 44
44
-
 45
45
-
 46
46
-
 47
47
-
 48
48
-
 49
49
-
 50
50
-
 51
51
-
 52
52
-
 53
53
-
 54
54
-
 55
55
-
 56
56
-
 57
57
-
 58
58
-
 59
59
-
 60
60
-
 61
61
-
 62
62
-
 63
63
-
 64
64
-
 65
65
-
 66
66
-
 67
67
-
 68
68
-
 69
69
-
 70
70
-
 71
71
-
 72
72
-
 73
73
-
 74
74
-
 75
75
-
 76
76
-
 77
77
-
 78
78
-
 79
79
-
 80
80
-
 81
81
-
 82
82
-
 83
83
-
 84
84
-
 85
85
-
 86
86
-
 87
87
-
 88
88
-
 89
89
-
 90
90
-
 91
91
-
 92
92
-
 93
93
-
 94
94
-
 95
95
-
 96
96
-
 97
97
-
 98
98
-
 99
99
-
 100
100
-
 101
101
-
 102
102
-
 103
103
-
 104
104
-
 105
105
-
 106
106
-
 107
107
-
 108
108
-
 109
109
-
 110
110
-
 111
111
-
 112
112
-
 113
113
-
 114
114
-
 115
115
-
 116
116
-
 117
117
-
 118
118
-
 119
119
-
 120
120
-
 121
121
-
 122
122
-
 123
123
-
 124
124
-
 125
125
-
 126
126
-
 127
127
-
 128
128
-
 129
129
-
 130
130
-
 131
131
-
 132
132
-
 133
133
-
 134
134
-
 135
135
-
 136
136
-
 137
137
-
 138
138
-
 139
139
-
 140
140
-
 141
141
-
 142
142
-
 143
143
-
 144
144
-
 145
145
-
 146
146
-
 147
147
-
 148
148
-
 149
149
-
 150
150
-
 151
151
-
 152
152
-
 153
153
-
 154
154
-
 155
155
-
 156
156
-
 157
157
-
 158
158
-
 159
159
-
 160
160
-
 161
161
-
 162
162
-
 163
163
-
 164
164
-
 165
165
-
 166
166
-
 167
167
-
 168
168
-
 169
169
-
 170
170
-
 171
171
-
 172
172
-
 173
173
-
 174
174
-
 175
175
-
 176
176
-
 177
177
-
 178
178
-
 179
179
-
 180
180
-
 181
181
-
 182
182
-
 183
183
-
 184
184
-
 185
185
-
 186
186


diğer dillerde
İlgili makaleler
-
Philips PSG7024-20 Kullanım kılavuzu
-
-
-
Philips GC9405/80R1 Kullanım kılavuzu
-
-
-
Philips GC9630/20 Kullanım kılavuzu
-
Philips GC8616/30 Kullanım kılavuzu
-