Hitachi WH 18DBAL2 Handling Instructions Manual
- Kategori
- Elektrikli aletler
- Tip
- Handling Instructions Manual
Bu kılavuz aynı zamanda aşağıdakiler için de uygundur:

Cordless Impact Driver / Wrench
Akku-Schlagschrauber
∆ραπανκατσάιδ Μπαταρίας / Κλειδί
Bezprzewodowa wkrętarka udarowa
Akkus ütvecsavarozó / Csavarkulcs
Rázový utahovák / Klíč
Akülü darbeli vidalama / anahtar
Mașină de înșurubat cu impact cu acumulator
Akumulatorski udarni vijačnik
Rázový
skrutkovač / uahovác
Ударний акумуляторний шуруповерт / гайковерт
ìÀapÌêÈ aÍÍyÏyÎÓÚopÌêÈ åypÔoÇepÚ
WH 14DBAL2
•
WH 18DBAL2
WR
14DBAL2
•
WR
18DBAL2
WR18DBAL2
Read through carefully and understand these instructions before use.
Diese Anleitung vor Benutzung des Werkzeugs sorgfältig durchlesen und verstehen.
¢È·‚¿ÛÙ ÚÔÛÂÎÙÈο Î·È Î·Ù·ÓÔ‹ÛÂÙ ·˘Ù¤˜ ÙȘ Ô‰ËÁ›Â˜ ÚÈÓ ÙË ¯Ú‹ÛË.
Przed użytkowaniem należy dokładnie przeczytać niniejszą instrukcję i zrozumieć jej treść.
Használat előtt olvassa el figyelmesen a használati utasítást.
Před použitím si pečlivě přečtěte tento návod a ujistěte se, že mu dobře rozumíte.
Aleti kullanmadan önce bu kılavuzu iyice okuyun ve talimatları anlayın.
Înainte de utilizare, citiţi cu atenţie și înţelegeţi prezentele instrucţiuni.
Pred uporabo natančno preberite in razumite ta navodila.
Pred použitím si dôkladne tieto pokyny prečítajte a pochopte ich.
Будь ласка, прочитайте інструкції і перевірте себе, чи все зрозуміло, перш ніж користуватися приладом.
BÌËÏaÚeÎëÌo ÔpoäÚËÚe ÀaÌÌyï ËÌcÚpyÍáËï Ôo íÍcÔÎyaÚaáËË ÔpeÊÀe äeÏ ÔoÎëÁoÇaÚëcÓ ËÌcÚpyÏeÌÚoÏ.
Handling instructions
Bedienungsanleitung
√‰ËÁ›Â˜ ¯ÂÈÚÈÛÌÔ‡
Instrukcja obsługi
Kezelési utasítás
Návod k obsluze
Kullanım talimatları
Instrucţiuni de utilizare
Navodila za rokovanje
Pokyny na manipuláciu
lнструкції щодо поводження з пристроєм
àÌcÚpyÍáËÓ Ôo íÍcÔÎyaÚaáËË
WH18DBAL2
001Cover_WH14DBAL2_EE 7/6/12, 1:15 PM1

1
9
1
<UC18YRSL>
9
1
<UC18YFSL>
1
2
5
4
3
H
K
J
B
C
0
D
E
G
7
6
A
F
8
I
2
1
I
1
43
65
8
7
2
00Table_WH14DBAL2_EE 12/12/13, 11:54 AM1

2
N
O
M
Q
R
J
K
L
P
109
1211
00Table_WH14DBAL2_EE 12/12/13, 11:54 AM2

3
Rechargeable battery
Latch
Battery cover
Terminals
Ventilation holes
Push
Pull out
Handle
Pilot lamp
Driver bit
Movement
Guide sleeve
Hexagonal hole in the
anvil
Hexagonal socket
Groove
Anvil
Trigger switch
Selector button
R
and
L
marks
Screw
Hook
Groove
Switch panel
Remaining battery
indicator switch
Remaining battery
indicator lamp
Light switch
High/Low indicator
lamp
High/Low selector
switch
Aufladbare Batterie
Verriegelung
Batterieabdeckung
Anschlüsse
Belüftungslöcher
Drücken
Herausziehen
Handgriff
Kontrollampe
Dreherspitze
Bewegung
Führungsmanschette
Sechskantloch in der
Schabotte
Sechskantbuchse
Nut
Schabotte
Trigger
Wählhebel
R
und
L
Zeichen
Schraube
Haken
Nut
Schalttafel
Ladezustand-
Anzeigeschalter
Ladezustand-
Kontrollleuchte
Lichtschalter
Stark/Schwach-
Anzeigeleuchte
Stark/Schwach-
Wahlschalter
∂·Ó·ÊÔÚÙÈ˙fiÌÂÓË Ì·Ù·Ú›·
ª¿Ó‰·ÏÔ
∫¿Ï˘ÌÌ· Ì·Ù·Ú›·˜
¶fiÏÔÈ
√¤˜ ÂÍ·ÂÚÈÛÌÔ‡
™ÚÒÍÂ
∆Ú·‚‹ÍÙ ¤Íˆ
ÃÂÚÔ‡ÏÈ
¢ÔÎÈÌ·ÛÙÈ΋ Ï¿Ì·
§Â›‰· ΛÓËÛ˘
∫›ÓËÛË
√‰ËÁËÙÈÎfi˜ ‚Ú·¯›ÔÓ·˜
∂Í¿ÁˆÓË ÙÚ‡· ÛÙÔÓ
¿ÎÌÔÓ·
ª·ÎÚÈ¿ ˘Ô‰Ô¯‹
∞˘Ï¿ÎˆÛË
ÕÎÌÔÓ·˜
™Î·Ó‰¿ÏË ‰È·ÎfiÙ˘
∫Ô˘Ì› ÂÈÏÔÁ¤·
R
ηÈ
L
ÛËÌ¿‰È·
ÕÁÎÈÛÙÚÔ
°¿ÓÙ˙Ô˜
∞˘Ï¿ÎÈ
¶›Ó·Î·˜ ‰È·ÎÔÙÒÓ
¢È·ÎfiÙ˘ ¤Ó‰ÂÈ͢ ˘fiÏÔÈÔ˘
ÊÔÚÙ›Ô˘ Ì·Ù·Ú›·˜
∂Ó‰ÂÈÎÙÈ΋ Ï˘¯Ó›· ˘fiÏÔÈÔ˘
ÊÔÚÙ›Ô˘ Ì·Ù·Ú›·˜
ºˆÙԉȷÎfiÙ˘
∂Ó‰ÂÈÎÙÈ΋ Ï˘¯Ó›·
À„ËÏ‹/÷ÌËÏ‹
∂ÈÏÔÁ¤·˜ À„ËÏ‹/
÷ÌËÏ‹
Akumulator
Zapadka
Pokrywa komory akumulatora
Styki
Otwory wentylacyjne
Wcisnąć
Wyciągnij
Rączka
Lampka kontrolna
Wkrętak
Ruch
Tuleja prowadnicy
Otwór sześciokątny w
kowadle
Gniazdo sześciokątne
Rowek
Kowadło
Spust
Przełącznik kierunku obrotów
Symbole
R
i
L
Śruba
Hak
Wcięcie
Panel przełączników
Przełącznik wakaźnika
pozostałej energii baterii
Lampka wakaźnika
pozostałej energii baterii
Przełącznik światła
Lampka wskaźnika
prędkości wysoka/niska
Przełącznik poziomu
prędkości wysoka/niska
English Deutsch Ελληνικά Polski
1
2
3
4
5
6
7
8
9
0
A
B
C
D
E
F
G
H
I
J
K
L
M
N
O
P
Q
R
00Table_WH14DBAL2_EE 12/12/13, 11:54 AM3

4
Os tölthető akkumulátor
Retesz
Akkumulátorfedél
Csatlakozók
Szellőzőnyílások
Benyomni
Kihúzni
Markolat
Jelzőlámpa
Behajtófej
Mozgás
Vezetőhüvely
Hatszögletű nyílás a
szárban
Hatszögletű befogópatron
Vájat
Szár
Kapcsoló ravasz
Választógomb
R
(Jobbra) és
L
(Balra) jelek
Csavar
Kampó
Horony
Kapcsolótábla
Fennmaradó tőltés
kijelzőjének kapcsolója
Fennmaradó tőltét jelző
lámpa
Fényforrás kapcsolója
Magas/alacsony
fordulatszámú fokozat
jelzőlámpája
Magas/alacsony
fordulatszámú fokozat
választókapcsolója
Akumulátor
Zámek
Kryt baterie
Koncovky
Větrací otvory
Stisknout
Zatáhnout
Držadlo
Indikátor
Hrot šroubováku
Pohyb
Vodicí objímka
Šestihranný otvor v
pevné části
Šestihranný nástrčkový klíč
Drážka
Pevná část
Tlačítkový spínač
Volba sméru
Značka pro
R
a
L
pohyb
Šroub
Páčka
Drážka
Přepínací panel
Vypínač indikátoru
zbývající energie baterie
Vypínač indikátoru
zbývající energie baterie
Vypínač světla
Indikátor Vysoké/Nízké
otáčky
Přepínač Vysoké/Nízké
otáčky
Íarj edilebilir batarya
Mandal
Batarya kapaåı
Kutuplar
Havalandırma delikleri
Ótin
Çekin
Kol
Kılavuz lamba
Tahrik ucu
Hareket
Kılavuz segmanı
Örstekki altıgen delik
Altıgen yuva
Yiv
Örs
Íalter tetiåi
Seçim düåmesi
R
ve
L
ißaretleri
Vida
Yiv
Askı
Anahtar paneli
Kalan pil göstergesi
anahtarı
Kalan pil göstergesi
lambası
Ißık anahtarı
Yüksek/Düßük göstergesi
lambası
Yüksek/Düßük seçici
anahtar
Acumulator reîncărcabil
Element de blocare
Apărătoarea acumulatorului
Terminale
Orificii de ventilare
Împingeţi
Trageţi
Mâner
Lampă pilot
Capăt de șurubelniţă
Mișcare
Manșon de ghidare
Locaș hexagonal în
mandrină
Adaptor tubular hexagonal
Canelură
Element de sprijin
Buton declanșator
Buton pentru selectare
Marcaje
R
și
L
Șurub
Element de prindere
Canelur
Întrerupător de panou
Comutator indicator
acumulator rămas
Comutator indicator
acumulator rămas
Comutator luminator
Lampă indicatoare
Ridicat/Scăzut
Comutator selectiv
Ridicat/Scăzut
Magyar Čeština Türkçe Română
1
2
3
4
5
6
7
8
9
0
A
B
C
D
E
F
G
H
I
J
K
L
M
N
O
P
Q
R
00Table_WH14DBAL2_EE 12/12/13, 11:54 AM4

5
Baterija, ki se polni
Zapah
Baterijski pokrov
Sponke
Ventilacijske odprtine
Pritisnite
Izvlecite
Ročica
Kontrolni svetlobni indikator
Sveder
Premikanje
Pinola
Šesterorobna luknja v
vtičnici
Šesterorobna vtičnica
Utor
Nakovalo
Sprožilno stikalo
Izbirna tipka
Označbi za
R
in
L
Vijak
Kljuka
Uijak
Kontrolna plošča
Stikalo indikatorja preostale
energije baterije
Lučka indikatorja preostale
energije baterije
Stikalo za svetilko
Indikatorska lučka
visoka/nizka
Izbirno stikalo visoko/
nizko
Nabíjatený akumulátor
Západka
Kryt akumulátora
Koncovky
Vetracie otvory
Stlači
Vytiahnu
Rukovä
Kontrolný indikátor
Hrot skrutkovača
Pohyb
Vodiaca objímka
Šesuholníkový otvor v
pevnej časti
Šesuholníková objímka
Drážka
Pevná čas
Spúšací spínač
Voliace tlačidlo
Značky
R
a
L
Skrutka
Hák
Drážka
Prepínací panel
Spínač kontrolky
zostávajúcej batérie
Kontrolka zostávajúcej
batérie
Spínač osvetlenie
Indikátor vysokých a
nízkych otáčok
Prepínač vysokých a
nízkych otáčok
В акумуляторна батарея
Фіксатор
Кришка батареї
Клема
Вентиляційні отвори
Натиснути
Витягнути
Рукоятка
Контрольний індикатор
Насадка для гайковерта
Напрям
Напрямна втулка
Шестигранний отвір в
упорному стрижні
Шестигранна муфта
Паз
Упорний стрижень
Пусковий перемикач
Селекторна кнопка
Мітки
R
і
L
Гвинт
Гачок
Паз
Панель перемикачів
Перемикач індикатору
залишку заряду батареї
Iндикатор залишку
заряду батареї
Перемикач освітлення
Iндикатор високого/
низького режиму
Перемикач високого/
низького режимів
AÍÍyÏyÎÓÚopÌaÓ ÄaÚapeÓ
îËÍcaÚop
KpêåÍa aÍÍyÏyÎÓÚopÌoÈ
ÄaÚapeË
èoÎïca
BeÌÚËÎÓáËoÌÌêe oÚÇepcÚËÓ
HaÊaÚë
BêÚaçËÚë
PyÍoÓÚÍa
KoÌÚpoÎëÌaÓ ÎaÏÔa
HacaÀÍa åypyÔoÇepÚa
èepeÏeçeÌËe
HaÔpaÇÎÓïçËÈ oÄoÀ
òecÚËÖpaÌÌoe oÚÇepcÚËe Ç
ÌaÍoÇaÎëÌe
òecÚËÖpaÌÌoe ÖÌeÁÀo
KaÌaÇÍa
HaÍoÇaÎëÌÓ
èycÍoÇoÈ ÔepeÍÎïäaÚeÎë
CeÎeÍÚopÌaÓ ÍÌoÔÍa
MeÚÍË
R
Ë
L
BËÌÚ
KoïäoÍ
èaÁ
KoÏÏyÚaáËoÌÌaÓ
ÔaÌeÎë
èepeÍÎïäaÚeÎë ËÌÀËÍaÚopa
ÁapÓÀa ÄaÚapeË
CÇeÚoÇoÈ ËÌÀÍaÚop
ÁapÓÀa ÄaÚapeË
BêÍÎïäaÚeÎë ÔoÀcÇeÚÍË
àÌÀËÍaÚop ÇêcoÍoÖo/
ÌËÁÍoÖo peÊËÏa
CeÎeÍÚopÌêÈ
ÔepeÍÎïäaÚeÎë ÇêcoÍoÖo/
ÌËÁÍoÖo peÊËÏa
Slovenščina Slovenčina Український PyccÍËÈ
1
2
3
4
5
6
7
8
9
0
A
B
C
D
E
F
G
H
I
J
K
L
M
N
O
P
Q
R
00Table_WH14DBAL2_EE 12/12/13, 11:54 AM5

6
Symbols
WARNING
The following show symbols
used for the machine. Be sure
that you understand their
meaning before use.
Symbole
WARNUNG
Die folgenden Symbole werden
für diese Maschine verwendet.
Achten Sie darauf, diese vor der
Verwendung zu verstehen.
™‡Ì‚ÔÏ·
¶ƒ√™√Ã∏
Τα παρακάτω δείνυν τα σύµλα
πυ ρησιµπιύνται στ µηάνηµα.
Βεαιωθείτε τι κατανείτε τη
σηµασίας τυς πριν τη ρήση.
Symbole
OSTRZEŻENIE
Następujące oznaczenia to symbole
używane w instrukcji obsługi maszyny.
Upewnij się, że rozumiesz ich
znaczenie zanim użyjesz narzędzia.
Read all safety warnings and all
instructions.
Failure to follow the warnings and
instructions may result in electric
shock, fire and/or serious injury.
Lesen Sie sämtliche
Sicherheitshinweise und
Anweisungen durch.
Wenn die Warnungen und
Anweisungen nicht befolgt
werden, kann es zu Stromschlag,
Brand und/oder ernsthaften
Verletzungen kommen.
¢È·‚¿˙ÂÙ fiϘ ÙȘ
ÚÔÂȉÔÔÈ‹ÛÂȘ ·ÛÊ·Ï›·˜ ηÈ
fiϘ ÙȘ Ô‰ËÁ›Â˜.
Η µη τήρηση των
πρειδπιήσεων και δηγιών
µπρεί να πρκαλέσει
ηλεκτρπληία, πυρκαγιά και/ή
σαρ τραυµατισµ.
Należy dokładnie zapoznać się ze
wszystkimi ostrzeżeniami i
wskazówkami bezpieczeństwa.
Nieprzestrzeganie ostrzeżeń oraz
wskazówek bezpieczeństwa może
spowodować porażenie prądem
elektrycznym, pożar i/lub odniesienie
poważnych obrażeń.
Přečtěte si všechna varování
týkající se bezpečnosti a
všechny pokyny.
Nedodržení těchto varování a
pokynů může mít za následek
elektrický šok, požár a/nebo vážné
zranění.
Symboly
UPOZORNĚNÍ
Následující text obsahuje symboly,
které jsou použity na zařízení. Ujistěte
se, že rozumíte jejich obsahu před
tím, než začnete zařízení používat.
Only for EU countries
Do not dispose of electric tools
together with household waste
material!
In observance of European
Directive 2002/96/EC on waste
electrical and electronic equipment
and its implementation in
accordance with national law,
electric tools that have reached
the end of their life must be
collected separately and returned
to an environmentally
compatible recycling facility.
Nur für EU-Länder
Werfen Sie Elektrowerkzeuge
nicht in den Hausmüll!
Gemäss Europäischer Richtlinie
2002/96/EG über Elektro- und
Elektronik- Altgeräte und
Umsetzung in nationales Recht
müssen verbrauchte
Elektrowerkzeuge getrennt
gesammelt und einer
umweltgerechten
Wiederververtung zugeführt
werden.
Mvo για τις ώρες της EE
Mηv πετάτε τα ηλεκτρικά
εργαλεία στov κάδo oικιακώv
απoρριµµάτωv!
Σύµωvα µε τηv εuρωπαϊκή
oδηγία 2002/96/EK περί
ηλεκτρικώv και ηλεκτρovικώv
σuσκεuώv και τηv εvσωµάτωσή
της στo εθvικ δίκαιo, τα
ηλεκτρικά εργαλεία πρέπει vα
σuλλέγovται εωριστά και vα
επιστρέovται για αvακύκλωση
µε τρπo ιλικ πρoς τo
περιάλλov.
Dotyczy tylko państw UE
Nie wyrzucaj elektronarzędzi wraz z
odpadami z gospodarstwa
domowego!
Zgodnie z Europejską Dyrektywą
2002/96/EC w sprawie zużytego
sprzętu elektrotechnicznego i
elektronicznego oraz
dostosowaniem jej do prawa
krajowego, zużyte elektronarzędzia
należy posegregować i zutylizować
w sposób przyjazny dla środowiska.
Jen pro státy EU
Elektrické nářadí nevyhazujte do
komunálního odpadu!
Podle evropské směrnice 2002/96/
EC o nakládání s použitými
elektrickými a elektronickými
zařízeními a odpovídajících
ustanovení právních předpisů
jednotlivých zemí se použitá
elektrická nářadí musí sbírat
odděleně od ostatního odpadu a
podrobit ekologicky šetrnému
recyklování.
Jelölések
FIGYELEM
Az alábbiakban a géphez alkalmazott
jelölések vannak felsorolva. A gép
használata előtt feltétlenül ismerje
meg ezeket a jelöléseket.
Csak EU-országok számára
Az elektromos kéziszerszámokat ne
dobja a háztartási szemétbe!
A használt villamos és elektronikai
készülékekről szóló 2002/96/EK
irányelv és annak a nemzeti jogba
való átültetése szerint az elhasznált
elektromos kéziszerszámokat külön
kell gyűjteni, és környezetbarát
módon újra kell hasznosítani.
Olvasson el minden biztonsági
figyelmeztetést és minden
utasítást.
A figyelmeztetések és utasítások be
nem tartása áramütést, tüzet és/
vagy súlyos sérülést eredményezhet.
00Table_WH14DBAL2_EE 12/12/13, 11:54 AM6

7
Citiţi toate avertismentele
privind siguranţa și toate
instrucţiunile.
Nerespectarea avertismentelor și a
instrucţiunilor poate avea ca efect
producerea de șocuri electrice,
incendii și/sau vătămări grave.
Simboluri
AVERTISMENT
În cele ce urmează sunt prezentate
simbolurile folosite pentru mașină.
Înainte de utilizare, asiguraţi-vă că
înţelegeţi semnificaţia acestora.
Numai pentru ţările membre UE
Nu aruncaţi această sculă electrică
împreună cu deșeurile menajere!
În conformitate cu Directiva
Europeană 2002/96/CE referitoare
la deșeurile reprezentând
echipamente electrice și electronice
și la implementarea acesteia în
conformitate cu legislaţiile naţionale,
sculele electrice care au ajuns la
finalul duratei de folosire trebuie
colectate separat și duse la o
unitate de reciclare compatibilă cu
mediul înconjurător.
Tüm güvenlik uyarılarını ve tüm
talimatları okuyun.
Uyarılara ve talimatlara
uyulmaması elektrik çarpmasına,
yangına ve/veya ciddi yaralanmaya
neden olabilir.
Simgeler
DÓKKAT
Aßaåıda, bu alet için kullanılan simgeler
gösterilmißtir. Aleti kullanmadan önce
bu simgelerin ne anlama geldiåini
anladıåınızdan emin olun.
Sadece AB ülkeleri için
Elektrikli el aletlerini evdeki çöp
kutusuna atmayınız!
Kullanılmıß elektrikli aletleri, elektrik
ve elektronikli eski cihazlar
hakkındaki 2002/96/EC Avrupa
yönergelerine göre ve bu
yönergeler ulusal hukuk kurallarına
göre uyarlanarak, ayrı olarak
toplanmalı ve çevre ßartlarına
uygun bir ßekilde tekrar
deåerlendirmeye gönderilmelidir.
Preberite vas varnostna
opozorila in navodila.
Z neupoštevanjem opozoril in
navodil tvegate električni udar,
požar in/ali resne telesne
poškodbe.
Simboli
OPOZORILO
V nadaljevanju so prikazani
simboli, uporabljeni pri stroju. Pred
uporabo se prepričajte, da jih
razumete.
Samo za države EU
Električnih orodij ne zavržite skupaj
z gospodinjskimi odpadki!
V skladu z evropsko direktivo
2002/96/ES o odpadni električni in
elektronski opremi in izvedbi v
skladu z državnimi zakoni, je treba
električna orodja, ki so dosegla
življenjsko dobo ločeno zbirati in
vrniti v z okoljem združljivo
ustanovo za recikliranje.
Prečítajte si všetky
bezpečnostné výstrahy a
všetky pokyny.
Nedodržanie výstrah a pokynov
môže vies k zasiahnutiu
elektrickým prúdom, požiaru a/
alebo vážnemu poraneniu osoby.
Symboly
VÝSTRAHA
V nasledujúcom sú zobrazené
symboly, ktoré sú vyobrazené na
náradí. Pred použitím náradia sa
oboznámte s významom týchto
symbolov.
èpoäÚËÚe Çce ÔpaÇËÎa
ÄeÁoÔacÌocÚË Ë ËÌcÚpyÍáËË.
He ÇêÔoÎÌeÌËe ÔpaÇËÎ Ë
ËÌcÚpyÍáËÈ ÏoÊeÚ ÔpËÇecÚË Í
ÔopaÊeÌËï íÎeÍÚpËäecÍËÏ
ÚoÍoÏ, ÔoÊapy Ë/ËÎË cepëeÁÌoÈ
ÚpaÇÏe.
CËÏÇoÎê
èPEÑìèPEÜÑEHàE
HËÊe ÔpËÇeÀeÌê cËÏÇoÎê,
ËcÔoÎëÁyeÏêe ÀÎÓ ÏaåËÌê.
èepeÀ ÌaäaÎoÏ paÄoÚê
oÄÓÁaÚeÎëÌo yÄeÀËÚecë Ç ÚoÏ,
äÚo Bê ÔoÌËÏaeÚe Ëx ÁÌaäeÌËe.
ToÎëÍo ÀÎÓ cÚpaÌ EC
He ÇêÍËÀêÇaÈÚe íÎeÍÚpoÔpËÄopê
ÇÏecÚe c oÄoêäÌêÏ ÏycopoÏ!
B cooÚÇeÚcÚÇËË c eÇpoÔeÈcÍoÈ
ÀËpeÍÚËÇoÈ 2002/96/EC oÄ
yÚËÎËÁaáËË cÚapêx
íÎeÍÚpËäecÍËx Ë íÎeÍÚpoÌÌêx
ÔpËÄopoÇ Ë Ç cooÚÇeÚcÚÇËË c
ÏecÚÌêÏË ÁaÍoÌaÏË
íÎeÍÚpoÔpËÄopê, ÄêÇçËe Ç
íÍcÔÎyaÚaáËË, ÀoÎÊÌê
yÚËÎËÁoÇêÇaÚëcÓ oÚÀeÎëÌo
ÄeÁoÔacÌêÏ ÀÎÓ oÍpyÊaïçeÈ
cpeÀê cÔocoÄoÏ.
Iba pre krajiny EÚ Elektrické
náradie nezneškodňujte spolu s
komunálnym odpadom z
domácností!
Aby ste dodržali ustanovenia
európskej smernice 2002/96/ES
o odpadových elektrických a
elektronických zariadeniach a jej
implementáciu v zmysle národnej
legislatívy, je potrebné elektrické
zariadenie po uplynutí jeho doby
životnosti separova a doruči na
environmentálne prijatené miesto
recyklovania.
Прочитайте всі правила
безпеки та вказівки.
Невиконання цих правил та
інструкцій може призвести до
удару струмом, пожежі та/або
серйозної травми.
Символи
ПОПЕРЕДЖЕННЯ
Тут показані символи,
використані в керівництві. Будь
ласка, переконайтеся, що
правильно розумієте їхнє
значення.
Лише для країн ЄС
НЕ викидайте електричні
інструменти із побутовими
відходами!
Згідно Європейської Директиви
2002/96/EC про відходи
електронного та електричного
виробництва і її запровадження
згідно місцевих законів,
електроінструменти, які
відслужили робочий строк слід
утилізувати окремо і повертати
до установ, що займаються
екологічною переробкою брухту.
00Table_WH14DBAL2_EE 12/12/13, 11:54 AM7

English
8
GENERAL POWER TOOL SAFETY WARNINGS
WARNING
Read all safety warnings and all instructions.
Failure to follow the warnings and instructions may result in electric shock, fire
and/or serious injury.
Save all warnings and instructions for future reference.
The term “power tool” in the warnings refers to your mains-operated (corded)
power tool or battery-operated (cordless) power tool.
1) Work area safety
a) Keep work area clean and well lit.
Cluttered or dark areas invite accidents.
b) Do not operate power tools in explosive atmospheres, such as in
the presence of flammable liquids, gases or dust.
Power tools create sparks which may ignite the dust or fumes.
c) Keep children and bystanders away while operating a power tool.
Distractions can cause you to lose control.
2) Electrical safety
a) Power tool plugs must match the outlet.
Never modify the plug in any way.
Do not use any adapter plugs with earthed (grounded) power tools.
Unmodified plugs and matching outlets will reduce risk of electric
shock.
b) Avoid body contact with earthed or grounded surfaces, such as
pipes, radiators, ranges and refrigerators.
There is an increased risk of electric shock if your body is earthed
or grounded.
c) Do not expose power tools to rain or wet conditions.
Water entering a power tool will increase the risk of electric shock.
d) Do not abuse the cord. Never use the cord for carrying, pulling or
unplugging the power tool.
Keep cord away from heat, oil, sharp edges or moving parts.
Damaged or entangled cords increase the risk of electric shock.
e) When operating a power tool outdoors, use an extension cord
suitable for outdoor use.
Use of a cord suitable for outdoor use reduces the risk of electric
shock.
f) If operating a power tool in a damp location is unavoidable, use
a residual current device (RCD) protected supply.
Use of an RCD reduces the risk of electric shock.
3) Personal safety
a) Stay alert, watch what you are doing and use common sense when
operating a power tool.
Do not use a power tool while you are tired or under the influence
of drugs, alcohol or medication.
A moment of inattention while operating power tools may result in
serious personal injury.
b) Use personal protective equipment. Always wear eye protection.
Protective equipment such as dust mask, non-skid safety shoes, hard
hat, or hearing protection used for appropriate conditions will reduce
personal injuries.
c) Prevent unintentional starting. Ensure the switch is in the off position
before connecting to power source and/or battery pack, picking up
or carrying the tool.
Carrying power tools with your finger on the switch or energising
power tools that have the switch on invites accidents.
d) Remove any adjusting key or wrench before turning the power tool
on.
A wrench or a key left attached to a rotating part of the power tool
may result in personal injury.
e) Do not overreach. Keep proper footing and balance at all times.
This enables better control of the power tool in unexpected situations.
f) Dress properly. Do not wear loose clothing or jewellery. Keep your
hair, clothing and gloves away from moving parts.
Loose clothes, jewellery or long hair can be caught in moving parts.
g) If devices are provided for the connection of dust extraction and
collection facilities, ensure these are connected and properly used.
Use of dust collection can reduce dust related hazards.
4) Power tool use and care
a) Do not force the power tool. Use the correct power tool for your
application.
The correct power tool will do the job better and safer at the rate
for which it was designed.
b) Do not use the power tool if the switch does not turn it on and
off.
Any power tool that cannot be controlled with the switch is dangerous
and must be repaired.
c) Disconnect the plug from the power source and/or the battery pack
from the power tool before making any adjustments, changing
accessories, or storing power tools.
Such preventive safety measures reduce the risk of starting the
power tool accidentally.
d) Store idle power tools out of the reach of children and do not allow
persons unfamiliar with the power tool or these instructions to
operate the power tool.
Power tools are dangerous in the hands of untrained users.
e) Maintain power tools. Check for misalignment or binding of moving
parts, breakage of parts and any other condition that may affect
the power tools operation.
If damaged, have the power tool repaired before use.
Many accidents are caused by poorly maintained power tools.
f) Keep cutting tools sharp and clean.
Properly maintained cutting tools with sharp cutting edges are less
likely to bind and are easier to control.
g) Use the power tool, accessories and tool bits etc. in accordance
with these instructions, taking into account the working conditions
and the work to be performed.
Use of the power tool for operations different from those intended could
result in a hazardous situation.
5) Battery tool use and care
a) Recharge only with the charger specified by the manufacturer.
A charger that is suitable for one type of battery pack may create
a risk of fire when used with another battery pack.
b) Use power tools only with specifically designated battery packs.
Use of any other battery packs may create a risk of injury and fire.
c) When battery pack is not in use, keep it away from other metal
objects like paper clips, coins, keys, nails, screws, or other small
metal objects that can make a connection from one terminal to
another.
Shorting the battery terminals together may cause burns or a fire.
d) Under abusive conditions, liquid may be ejected from the battery;
avoid contact. If contact accidentally occurs, flush with water. If
liquid contacts eyes, additionally seek medical help.
Liquid ejected from the battery may cause irritation or burns.
6) Service
a) Have your power tool serviced by a qualified repair person using only
identical replacement parts.
This will ensure that the safety of the power tool is maintained.
PRECAUTION
Keep children and infirm persons away.
When not in use, tools should be stored out of reach of children and infirm persons.
PRECAUTIONS FOR CORDLESS IMPACT
DRIVER (WH14DBAL2 / WH18DBAL2)
1. Hold power tool by insulated gripping surfaces, when performing an
operation where the fastener may contact hidden wiring. Fasteners
contacting a "live" wire may make exposed metal parts of the power
tool "live" and could give the operator an electric shock.
2. This is portable tool for tightening and loosenig screws. Use it only
for these operation.
3. Use the earplugs if using for a long time.
4. One-hand operation is extremely dangerous; hold the unit firmly with
both hands when operating.
5. After installing the driver bit, pull lightly out the bit to make sure that
it does not come loose. If the bit is not installed properly, it can come
loose during use, which can be dangerous.
6. Use the bit that matches the screw.
(Original instructions)
01Eng_WH14DBAL2_EE 12/12/13, 11:56 AM8

English
9
7. Tightening a screw with the impact driver at an angle to that screw
can damage the head of the screw and the proper force will not be
transmitted to the screw. Tighten with this impact driver lined up
straight with the screw.
8. Always charge the battery at a temperature of 0 – 40°C.
A temperature of less than 0°C will result in over charging which is
dangerous. The battery cannot be charged at a temperature greater
than 40°C.
The most suitable temperature for charging is that of 20 – 25°C.
9. Do not use the charger continuously.
When one charging is completed, leave the charger for about 15
minutes before the next charging of battery.
10. Do not allow foreign matter to enter the hole for connecting the
rechargeable battery.
11. Never disassemble the rechargeable battery and charger.
12. Never short-circuit the rechargeable battery.
Short-circuiting the battery will cause a great electric current and
overheat. It results in burn or damage to the battery.
13. Do not dispose of the battery in fire.
If the battery burnt, it may explode.
14. Do not insert object into the air ventilation slots of the charger.
Inserting metal objects or inflammables into the charger air ventilation
slots will result in electrical shock hazard or damaged charger.
15. Bring the battery to the shop from which it was purchased as soon
as the post-charging battery life becomes too short for practical use.
Do not dispose of the exhausted battery.
16. Using an exhausted battery will damage the charger.
PRECAUTIONS FOR CORDLESS IMPACT
WRENCH (WR14DBAL2 / WR18DBAL2)
1. Hold power tool by insulated gripping surfaces, when performing an
operation where the fastener may contact hidden wiring. Fasteners
contacting a "live" wire may make exposed metal parts of the power
tool "live" and could give the operator an electric shock.
2. This is a portable tool for tightening and loosening bolts and nuts.
Use it only for these operation.
3. Use the earplugs if using for a long time.
4. One-hand operation is extremely dangerous; hold the unit firmly with
both hands when operating.
5. Check that the socket is not cracked or broken.
Broken or cracked sockets are dangerous. Check the socket before using
it.
6. Secure the socket with the socket pin and the ring.
If the socket pin or ring securing the socket is damaged, the socket may
come off from the impact wrench, which is quite dangerous. Do not use
socket pins or rings that are deformed, worn out, cracked, or in any other
way damaged. Always make sure to install the socket pin and ring in the
correct position.
7. Check the tightening torque.
The appropriate torque for tightening a bolt depends on the material
the bolt is made of, its dimensions, grade, etc.
Also, the tightening torque generated by this impact wrench depends
on the materials and dimensions of the bolt, how long the impact wrench
is applied for the way in which the socket is installed, etc.
Also the torque when the battery has just been charged and when it
is about to run out are slightly different. Use a torque wrench to check
that the bolt has been tightened with the appropriate torque.
8. Stop the impact wrench before switching the direction of rotation.
Always release the switch and wait for impact wrench to stop before
switching the direction of rotation.
9. Never touch the turning part.
Do not allow the turning socket section to get near your hands or any
other part of your body. You could be cut or caught in the socket. Also,
be careful not to touch the socket after using continuously it for a long
time. It gets quite hot and could burn you.
10. Never let the impact wrench turn without a load when using the
universal joint.
If the socket turns without being connected to a load, the universal joint
causes the socket to turn wildly.
You could get hurt or the movement of the socket could shake the
impact wrench so much as to make you drop it.
11. Always charge the battery at a temperature of 0 – 40°C.
A temperature of less than 0°C will result in over charging which is
dangerous. The battery cannot be charged at a temperature greater
than 40°C.
The most suitable temperature for charging is that of 20 – 25°C.
12. Do not use the charger continuously.
When one charging is completed, leave the charger for about 15
minutes before the next charging of battery.
13. Do not allow foreign matter to enter the hole for connecting the
rechargeable battery.
14. Never disassemble the rechargeable battery and charger.
15. Never short-circuit the rechargeable battery.
Short-circuiting the battery will cause a great electric current and
overheat. It results in burn or damage to the battery.
16. Do not dispose of the battery in fire.
If the battery burnt, it may explode.
17. Do not insert object into the air ventilation slots of the charger.
Inserting metal objects or inflammables into the charger air ventilation
slots will result in electrical shock hazard or damaged charger.
18. Bring the battery to the shop from which it was purchased as soon
as the post-charging battery life becomes too short for practical use.
Do not dispose of the exhausted battery.
19. Using an exhausted battery will damage the charger.
CAUTION ON LITHIUM-ION BATTERY
To extend the lifetime, the lithium-ion battery equips with the protection
function to stop the output.
In the cases of 1 to 3 described below, when using this product, even if you
are pulling the switch, the motor may stop. This is not the trouble but the
result of protection function.
1. When the battery power remaining runs out, the motor stops.
In such case, charge it up immediately.
2. If the tool is overloaded, the motor may stop. In this case, release
the switch of tool and eliminate causes of overloading. After that, you
can use it again.
3. If the battery is overheated under overload work, the battery power
may stop.
In this case, stop using the battery and let the battery cool. After that,
you can use it again.
Furthermore, please heed the following warning and caution.
WARNING
In order to prevent any battery leakage, heat generation, smoke emission,
explosion and ignition beforehand, please be sure to heed the following
precautions.
1. Make sure that swarf and dust do not collect on the battery.
䡬
During work make sure that swarf and dust do not fall on the battery.
䡬
Make sure that any swarf and dust falling on the power tool during work
do not collect on the battery.
䡬
Do not store an unused battery in a location exposed to swarf and dust.
䡬
Before storing a battery, remove any swarf and dust that may adhere to it
and do not store it together with metal parts (screws, nails, etc.).
2. Do not pierce battery with a sharp object such as a nail, strike with
a hammer, step on, throw or subject the battery to severe physical
shock.
3. Do not use an apparently damaged or deformed battery.
4. Do not use the battery in reverse polarity.
5. Do not connect directly to an electrical outlets or car cigarette lighter
sockets.
6. Do not use the battery for a purpose other than those specified.
7. If the battery charging fails to complete even when a specified recharging
time has elapsed, immediately stop further recharging.
8. Do not put or subject the battery to high temperatures or high pressure
such as into a microwave oven, dryer, or high pressure container.
9. Keep away from fire immediately when leakage or foul odor are
detected.
10. Do not use in a location where strong static electricity generates.
11. If there is battery leakage, foul odor, heat generated, discolored or
deformed, or in any way appears abnormal during use, recharging or
storage, immediately remove it from the equipment or battery charger,
and stop use.
01Eng_WH14DBAL2_EE 12/12/13, 11:56 AM9

English
10
CAUTION
1. If liquid leaking from the battery gets into your eyes, do not rub your
eyes and wash them well with fresh clean water such as tap water
and contact a doctor immediately.
If left untreated, the liquid may cause eye-problems.
2. If liquid leaks onto your skin or clothes, wash well with clean water
such as tap water immediately.
There is a possibility that this can cause skin irritation.
3. If you find rust, foul odor, overheating, discolor, deformation, and/or
other irregularities when using the battery for the first time, do not
use and return it to your supplier or vendor.
WARNING
If an electrically conductive foreign object enters the terminals of the lithium ion
battery, a short-circuit may occur resulting in the risk of fire. Please observe the
following matters when storing the battery.
䡬
Do not place electrically conductive cuttings, nails, steel wire, copper
wire or other wire in the storage case.
䡬
Either install the battery in the power tool or store by securely pressing
into the battery cover until the ventilation holes are concealed to
prevent short-circuits (See Fig. 1).
SPECIFICATIONS
POWER TOOL
PRECAUTIONS REGARDING THE DUST-
RESISTANCE AND WATER-PROOFING
FUNCTIONS
This product conforms to IP56 protection class ratings (dust-resistance and water-proofing) for electrical equipment as stipulated by the international IEC regulations.
(Only the main unit conforms to the IP56 protection class ratings when equipped with a battery.)
[Descriptions of IP Codes]
IP56
Protection rating for water penetration
Must be no adverse effects on the equipment when sprayed with powerful jets of water from all directions (water-proofed.)
(100 L of water per minute sprayed for approximately three minutes from a distance of approximately three meters with the use of a spray nozzle with a
diameter of 12.5 mm.)
Protection rating for external assault by solid objects
Dust that may cause adverse effects on the equipment must not be able to enter (dust-resistance.)
(The equipment to be left non-operable in a test chamber in which particles of talcum powder with a diameter of less than 75
are floating in the air with
the use of an agitation pump at a rate of 2 kg per cubic meter for eight hours.)
The equipment has been designed to withstand the effects of dust and water, but there is no guarantee that it will not malfunction. Do not use or leave the equipment
in locations where it is subject to excessive amounts of dust, or in locations where it is submerged in water or subject to rainwater.
Model WH14DBAL2 WH18DBAL2
Voltage 14.4 V 18 V
High mode 0 – 2800 min
–1
0 – 2900 min
–1
No-load speed
Medium mode 0 – 2200 min
–1
0 – 2200 min
–1
Low 2 mode 0 – 1500 min
–1
0 – 1500 min
–1
Low 1 mode 0 – 900 min
–1
0 – 900 min
–1
Capacity
Ordinary bolt M5 – M14
High tension bolt M5 – M12
Tightening torque (Maximum) 160 N·m 160 N·m
Rechargeable battery
BSL1430: Li-ion BSL1440: Li-ion BSL1830: Li-ion BSL1840: Li-ion
14.4 V (3.0 Ah 8 cells) 14.4 V (4.0 Ah 8 cells) 18 V (3.0 Ah 10 cells) 18 V (4.0 Ah 10 cells)
Weight 1.4 kg 1.5 kg
Model WR14DBAL2 WR18DBAL2
Voltage 14.4 V 18 V
High mode 0 – 2800 min
–1
0 – 2900 min
–1
No-load speed
Medium mode 0 – 2200 min
–1
0 – 2200 min
–1
Low 2 mode 0 – 1500 min
–1
0 – 1500 min
–1
Low 1 mode 0 – 900 min
–1
0 – 900 min
–1
Capacity
Ordinary bolt M6 – M16
High tension bolt M6 – M12
Tightening torque (Maximum) 165 N·m 165 N·m
Rechargeable battery
BSL1430: Li-ion BSL1440: Li-ion BSL1450: Li-ion BSL1830: Li-ion BSL1840: Li-ion BSL1850: Li-ion
14.4 V (3.0 Ah 8 cells) 14.4 V (4.0 Ah 8 cells) 14.4 V (5.0 Ah 8 cells) 18 V (3.0 Ah 10 cells) 18 V (4.0 Ah 10 cells) 18 V (5.0 Ah 10 cells)
Weight 1.4 kg 1.5 kg
01Eng_WH14DBAL2_EE 12/12/13, 11:56 AM10

English
11
STANDARD ACCESSORIES
In addition to the main unit (1), the package contains the accessories listed in the
table below.
Standard accessories are subject to change without notice.
OPTIONAL ACCESSORIES
(Sold separately)
䡬
Battery
(BSL1430, BSL1440, BSL1450) (BSL1830, BSL1840, BSL1850)
Optional accessories are subject to change without notice.
APPLICATION
< WH14DBAL2 / WH18DBAL2 >
䡬
Driving and removing of machine screws, wood screws, tapping screws,
etc.
< WR14DBAL2 / WR18DBAL2 >
䡬
Tightening and loosening of all types of bolts and nuts, used for securing
structural items
BATTERY REMOVAL/INSTALLATION
1. Battery removal
Hold the handle tightly and push the battery latch to remove the battery (see
Fig. 2).
CAUTION
Never short-circuit the battery.
2. Battery installation
Insert the battery while observing its polarities (see Fig. 2).
CHARGING
Before using the power tool, charge the battery as follows.
1. Connect the charger’s power cord to a receptacle.
When the power cord is connected, the charger’s pilot lamp will blink in red.
(At 1-second intervals)
2. Insert the battery into the charger.
Firmly insert the battery into the charger, as shown in Fig. 3, 4.
3. Charging
When inserting a battery in the charger, charging will commence and the
pilot lamp will light continuously in red.
When the battery becomes fully recharged, the pilot lamp will blink in red.
(At 1-second intervals) (See Table 1)
(1) Pilot lamp indication
The indications of the pilot lamp will be as shown in Table 1, according to
the condition of the charger or the rechargeable battery.
1
Charger ........................................................................ 1
2
Battery ......................................................................... 2
3
Plastic case .................................................................. 1
4
Battery cover ............................................................... 1
WH14DBAL2
WH18DBAL2
WR14DBAL2
WR18DBAL2
(2) Regarding the temperatures of the rechargeable battery
The temperatures for rechargeable batteries are as shown in Table 2, and
batteries that have become hot should be cooled for a while before being
recharged.
Table 2 Recharging ranges of batteries
CHARGER
Model UC18YRSL UC18YFSL
Charging voltage 14.4 V – 18 V
Weight 0.6 kg 0.5 kg
Table 1
Indications of the pilot lamp
Lights for 0.5 seconds. Does not light for 0.5 seconds.
(off for 0.5 seconds)
Lights continuously
Lights for 0.5 seconds. Does not light for 0.5 seconds.
(off for 0.5 seconds)
Lights for 0.1 seconds. Does not light for 0.1 seconds.
(off for 0.1 seconds)
Lights continuously
Lights for 1 seconds. Does not light for 0.5 seconds.
(off for 0.5 seconds)
Before
charging
While
charging
Charging
complete
Charging
impossible
Blinks
(red)
Lights
(red)
Blinks
(red)
Flickers
(red)
Lights
(green)
〈UC18YRSL〉
Malfunction in the battery or the
charger
The pilot
lamp lights
or blinks.
Overheat
standby
Blinks
(red)
〈UC18YFSL〉
Battery overheated.
Unable to charge. (Charging will
commence when battery cools)
Rechargeable batteries
Temperatures at which the
battery can be recharged
BSL1430, BSL1440, BSL1450
0°C – 50°C
BSL1830, BSL1840, BSL1850
01Eng_WH14DBAL2_EE 12/12/13, 11:56 AM11

English
12
(3) Regarding recharging time
Depending on the combination of the charger and batteries, the charging
time will become as shown in Table 3.
Table 3 Charging time (At 20°C)
NOTE
The charging time may vary according to temperature and power source
voltage.
4. Disconnect the charger’s power cord from the receptacle.
5. Hold the charger firmly and pull out the battery.
NOTE
After operation, pull out batteries from the charger first, and then keep the
batteries properly.
Regarding electric discharge in case of new batteries, etc.
As the internal chemical substance of new batteries and batteries that have
not been used for an extended period is not activated, the electric discharge
might be low when using them the first and second time. This is a temporary
phenomenon, and normal time required for recharging will be restored by
recharging the batteries 2-3 times.
How to make the batteries perform longer
(1) Recharge the batteries before they become completely exhausted.
When you feel that the power of the tool becomes weaker, stop using the
tool and recharge its battery. If you continue to use the tool and exhaust the
electric current, the battery may be damaged and its life will become
shorter.
(2) Avoid recharging at high temperatures.
A rechargeable battery will be hot immediately after use. If such a battery is
recharged immediately after use, its internal chemical substance will
deteriorate, and the battery life will be shortened. Leave the battery and
recharge it after it has cooled for a while.
CAUTION
䡬
When the battery charger has been continuosly used, the battery charger
will be heated, thus constituting the cause of the failures. Once the charging
has been completed, give 15 minutes rest until the next charging.
䡬
If the battery is recharged when it is warm due to battery use or exposure to
sunlight, the pilot lamp map light in green.
The battery will not be recharged. In such a case, let the battery cool before
charging.
䡬
When the pilot lamp flickers in red (at 0.2-second intervals), check for and
take out any foreign objects in the charger’s battery installation hole. If there
are no foreign objects, it is probable that the battery or charger is
malfunctioning. Take it to your authorized Service Center.
PRIOR TO OPERATION
1. Preparing and checking the work environment
Make sure that the work site meets all the conditions laid forth in the
precautions.
2. Checking the battery
Make sure that the battery is installed firmly. If it is at all loose it could come
off and cause an accident.
3. Installing the bit (WH14DBAL2 / WH18DBAL2)
Always follow the following procedure to install driver bit. (Fig. 5)
(1) Pull the guide sleeve away from front of the tool.
(2) Insert the bit into the hexagonal hole in the anvil.
(3) Release the guide sleeve and it returns to its original position.
CAUTION
If the guide sleeve does not return to its original position, then the bit is not
installed properly.
4. Selecting the socket matched to the bolt (WR14DBAL2 / WR18DBAL2)
Be sure to use a socket which is matched to the bolt to be tightened. Using
an improper socket will not only result in insufficient tightening but also in
damage to the socket or nut.
A worn or deformed hex. or square-holed socket will not give an adequate
tightness for fitting to the nut or anvil, consequently resulting in loss of
tightening torque.
Pay attention to wear of socket hole, and replace before further wear has
developed.
5. Installing a socket (WR14DBAL2 / WR18DBAL2)
Select the socket to be used.
䢇
Pin, O-ring type
(1) Align the hole in the socket with the hole in the anvil and insert the anvil into
the socket.
(2) Insert the pin into the socket.
(3) Attach the ring to the groove on the socket.
䢇
Plunger type (Fig. 6)
Align the plunger located in the square part of the anvil with the hole in the
hex. socket. Then push the plunger, and mount the hex. socket on the anvil.
Check that the plunger is fully engaged in the hole. When removing the
socket, reverse the sequence.
䢇
Retaining ring type
(1) Align the square portions of the socket and the anvil with each other.
(2) Make sure to firmly install the socket by pushing it all the way into the anvil.
(3) When removing the socket, pull it out of the anvil.
CAUTION
䡬
Please use the designated attachments which are listed in the operations
manual and Hitachi’s catalog. Accidents or injuries could result from not
doing so.
䡬
Make sure to firmly install the socket in the anvil. If the socket is not firmly
installed it might come out and cause injuries.
HOW TO USE
1. Check the rotational direction
The bit rotates clockwise (viewed from the rear side) by pushing the R-side
of the push button.
The L-side of the push button is pushed to turn the bit counterclockwise.
(See Fig. 7) (The
L
and
R
marks are provided on the body.)
2. Switch operation
䡬
When the trigger switch is depressed, the tool rotates. When the trigger is
released, the tool stops.
䡬
The rotational speed of the drill can be controlled by varying the amount
that the trigger switch is pulled. Speed is low when the trigger switch is
pulled slightly and increases as the trigger switch is pulled more.
NOTE
A buzzing noise is produced when the motor is about to rotate. This is only
a noise, not a machine failure.
3. Using the hook
The hook is used to hang up the power tool to your waist belt while working.
CAUTION
䡬
When using the hook, hang up the power tool firmly not to drop accidentally.
If the power tool is dropped, it may lead to an accident.
䡬
When carrying the power tool with hooked to your waist belt, do not fit any
bit to the tip of power tool. If the sharp bit such as drill is fitted to the power
tool when carrying it with hooked to your waist belt, you will be injured.
䡬
Install securely the hook. Unless the hook is securely installed, it may cause
an injury while using.
(1) Removing the hook.
Remove the screws fixing the hook with Philips screw driver. (Fig. 8)
(2) Replacing the hook and tightening the screws.
Install securely the hook in the groove of power tool and tighten the
screws to fix the hook firmly. (Fig. 9)
Charger
UC18YRSL / UC18YFSL
Battery
BSL1430, BSL1830 Approx. 45 min.
BSL1440, BSL1840 Approx. 60 min.
BSL1450, BSL1850 Approx. 75 min.
01Eng_WH14DBAL2_EE 12/12/13, 11:56 AM12

English
13
4. About Remaining Battery Indicator
When pressing the remaining battery indicator switch, the remaining battery
indicator lamp lights and the battery remaining power can be checked.
(Fig.10) When releasing your finger from the remaining battery indicator
switch, the remaining battery indicator lamp goes off. The table 4 shows the
state of remaining battery indicator lamp and the battery remaining power.
As the remaining battery indicator shows somewhat differently depending
on ambient temperature and battery characteristics, read it as a reference.
NOTE
䡬
Do not give a strong shock to the switch panel or break it.It may lead to a
trouble.
䡬
To save the battery power consumption, the remaining battery indicator
lamp lights while pressing the remaining battery indicator switch.
5. How to use the LED light
Every time you press the light switch on the switch panel, the LED light
lights or goes off. (Fig. 11)
To prevent the battery power consumption, turn off the LED light
frequently.
CAUTION
Do not expose directly your eye to the light by looking into the light.
If your eye is continuously exposed to the light, your eye will be hurt.
NOTE
To prevent the battery power consumption caused by forgetting to turn off
the LED light, the light goes off automatically in about 15 minutes.
6. Tightening mode selector function (Fig. 12)
CAUTION
䡬
Do not subject the switch panel to shock or damage.
䡬
Select high/low mode while the trigger switch is released. Failure to do so
could result in malfunction.
(1) High/Low selector switch
The rotation speed changes in 4 steps (900, 1500, 2200, 2800/2900 min
-1
)
each time the high/low selector switch is pressed.
NOTE
䡬
The appropriate mode differs depending on the screw and the material
being screwed. Drive in a few test screws and adjust the mode setting
accordingly.
䡬
The high/low selector switch can only be set after the battery has been
installed in the driver and the trigger switch has been pulled once.
7. Tightening and loosening screws (WH14DBAL2 / WH18DBAL2)
Install the bit that matches the screw, line up the bit in the grooves of the head
of the screw, then tighten it.
Push the impact driver just enough to keep the bit fitting the head of the
screw.
CAUTION
Applying the impact driver for too long tightens the screw too much and
can break it.
Tightening a screw with the impact driver at an angle to that screw can
damage the head of the screw and the proper force will not be transmitted
to the screw.
Tighten with this impact driver lined up straight with the screw.
8. Tightening and loosening bolts
A hex. socket matching the bolt or nut must first be selected. Then mount
the socket on the anvil, and grip the nut to be tightened with the hex. socket.
Holding the wrench in line with the bolt, press the power switch to impact
the nut for several seconds.
If the nut is only loosely fitted to the bolt, the bolt may turn with the nut,
therefore mistaking proper tightening. In this case, stop impact on the nut
and hold the bolt head with a wrench before restarting impact, or manually
tighten the bolt and nut to prevent them slipping.
OPERATIONAL CAUTIONS
1. Resting the unit after continuous work
After use for continuous bolt-tightening work, rest the unit for 15 minutes or
so when replacing the battery. The temperature of the motor, switch, etc.,
will rise if the work is started again immediately after battery replacement,
eventually resulting in burnout.
NOTE
Do not touch the metal parts, as it gets very hot during continuous work.
2. Cautions on use of the speed control switch
This switch has a built-in, electronic circuit which steplessly varies the
rotation speed. Consequently, when the switch trigger is pulled only slightly
(low speed rotation) and the motor is stopped while continuously driving in
screws, the components of the electronic circuit parts may overheat and be
damaged.
Examples of tightening mode selector function settings
Low 1 Low 2 Medium High
Rotation speed
2800 min
-1
900 min
-1
1500 min
-1
2000 min
-1
/2900 min
-1
Use
“Delicate work”
Tightening small diameter
screws (M6 or similar), etc.
“Light load work”
Affixing plasterboard (select according to the hardness of the
base material) etc.
“Heavy load work”
Tightening long screws,
coach screws, bolts, etc.
State of lamp Battery Remaining Power
The battery remaining power is enough.
The battery remaining power is a half.
The battery remaining power is nearly
empty.
Re-charge the battery soonest possible.
Table 4
01Eng_WH14DBAL2_EE 12/12/13, 11:56 AM13

English
14
3. Use a tightening time suitable for the screw
The appropriate torque for a screw differs according to the material and size
of the screw, and the material being screwed etc., so please use a tightening
time suitable for the screw. In particular, if a long tightening time is used in
the case of screws smaller than M8, there is a danger of the screw breaking,
so please confirm the tightening time and the tightening torque beforehand.
4. Work at a tightening torque suitable for the bolt under impact
The optimum tightening torque for nuts or bolts differs with material and
size of the nuts or bolts. An excessively large tightening torque for a small
bolt may stretch or break the bolt. The tightening torque increases in
proportion to the operaton time. Use the correct operating time for the bolt.
5. Holding the tool
Hold the impact wrench firmly with both hands. In this case hold the wrench
in line with the bolt.
It is not necessary to push the wrench very hard. Hold the wrench with a
force just sufficient to counteract the impact force.
6. Confirm the tightening torque
The following factors contribute to a reduction of the tightening torque. So
confirm the actual tightening torque needed by screwing up some bolts
before the job with a hand torque wrench. Factors affecting the tightening
torque are as follows.
(1) Voltage
When the discharge margin is reached, voltage decreases and tightening
torque is lowered.
(2) Operating time
The tightening torque increases when the operating time increases. But the
tightening torque does not increase above a certain value even if the tool is
driven for a long time.
(3) Diameter of bolt
The tightening torque differs with the diameter of the bolt. Generally a larger
diameter bolt requires larger tightening torque.
(4) Tightening conditions
The tightening torque differs according to the torque ratio; class, and length
of bolts even when bolts with the same size threads are used. The tightening
torque also differs according to the condition of the surface of workpiece
through which the bolts are to be tightened. When the bolt and nut turn
together, torque is greatly reduced.
(5) Using optional parts (WR14DBAL2 / WR18DBAL2)
The tightening torque is reduced a little when an extension bar, universal
joint or a long socket is used.
(6) Clearance of the socket (WR14DBAL2 / WR18DBAL2)
A worn or deformed hex. or a square-holed socket will not give an adequate
tightness to the fitting between the nut or anvil, consequently resulting in
loss of tightening torque.
Using an improper socket which does not match to the bolt will result in an
insufficient tightening torque.
(7) Tightening torque varies, depending on the battery’s charge level.
MAINTENANCE AND INSPECTION
1. Inspecting the driver bit (WH14DBAL2 / WH18DBAL2)
Using a broken bit or one with a worn out tip is dangerous because the bit
can slip. Replace it.
2. Inspecting the socket (WR14DBAL2 / WR18DBAL2)
A worn or deformed hex. or a square-holed socket will not give an adequate
tightness to the fitting between the nut or anvil, consequently resulting in
loss of tightening torque. Pay attention to wear of a socket holes periodically,
and replace with a new one if needed.
3. Inspecting the mounting screws
Regularly inspect all mounting screws and ensure that they are properly
tightened. Should any of the screws be loose, retighten them immediately.
Failure to do so may result in serious hazard.
4. Maintenance of the motor
The motor unit winding is the very “heart” of the power tool.
Exercise due care to ensure the winding does not become damaged and/or
wet with oil or water.
5. Cleaning of the outside
When the impact driver is stained, wipe with a soft dry cloth or a cloth
moistened with soapy water. Do not use chloric solvents, gasoline or paint
thinner, as they melt plastics.
6. Storage
Store the impact driver in a place in which the temperature is less than 40°C,
and out of reach of children.
NOTE
Make sure that the battery is fully charged when stored for a long period (3
months or more). The battery with smaller capacity may not be able to be
charged when used, if stored for a long period.
NOTE
Storing lithium-ion batteries
Make sure the lithium-ion batteries have been fully charged before storing
them.
Prolonged storage of batteries with a low charge may result in performance
deterioration, significantly reducing battery usage time or rendering the
batteries incapable of holding a charge.
However, significantly reduced battery usage time may be recovered by
repeatedly charging and using the batteries two to five times.
If the battery usage time is extremely short despite repeated charging and
use, consider the batteries dead and purchase new batteries.
7. Service parts list
A: Item No.
B: Code No.
C: No. Used
D: Remarks
CAUTION
Repair, modification and inspection of Hitachi Power Tools must be
carried out by a Hitachi Authorized Service Center.
This Parts List will be helpful if presented with the tool to the Hitachi
Authorized Service Center when requesting repair or other maintenance.
In the operation and maintenance of power tools, the safety regulations
and standards prescribed in each country must be observed.
MODIFICATIONS
Hitachi Power Tools are constantly being improved and modified to
incorporate the latest technological advancements.
Accordingly, some parts (i.e. code numbers and/or design) may be changed
without prior notice.
Important notice on the batteries for the Hitachi cordless power tools
Please always use one of our designated genuine batteries. We cannot
guarantee the safety and performance of our cordless power tool when
used with batteries other than these designated by us, or when the
battery is disassembled and modified (such as disassembly and
replacement of cells or other internal parts).
GUARANTEE
We guarantee Hitachi Power Tools in accordance with statutory/country specific
regulation. This guarantee does not cover defects or damage due to misuse,
abuse, or normal wear and tear. In case of complaint, please send the Power
Tool, undismantled, with the GUARANTEE CERTIFICATE found at the end of this
Handling instruction, to a Hitachi Authorized Service Center.
NOTE
Due to HITACHI’s continuing program of reserch and development, the
specifications herein are subject to change without prior notice..
01Eng_WH14DBAL2_EE 12/12/13, 11:56 AM14

English
15
Information concerning airborne noise and vibration
The measured values were determined according to EN60745 and declared in
accordance with ISO 4871.
Measured A-weighted sound power level: WH14DBAL2: 92 dB (A)
WH18DBAL2: 91 dB (A)
WR14DBAL2: 91 dB (A)
WR18DBAL2: 91 dB (A)
Measured A-weighted sound pressure level: WH14DBAL2: 73 dB (A)
WH18DBAL2: 72 dB (A)
WR14DBAL2: 72 dB (A)
WR18DBAL2: 72 dB (A)
Uncertainty KpA: 3 dB (A).
Wear hearing protection.
Vibration total values (triax vector sum) determined according to EN60745.
Impact tightening of fasteners of the maximum capacity of the tool:
Vibration emission value
a
h
= WH14DBAL2: 9.2 m/s
2
WH18DBAL2: 10.6 m/s
2
WR14DBAL2: 8.9 m/s
2
WR18DBAL2: 8.6 m/s
2
Uncertainty K = 1.5 m/s
2
The declared vibration total value has been measured in accordance with a
standard test method and may be used for comparing one tool with another.
It may also be used in a preliminary assessment of exposure.
WARNING
䡬
The vibration emission during actual use of the power tool can differ from
the declared total value depending on the ways in which the tool is used.
䡬
Identify safety measures to protect the operator that are based on an
estimation of exposure in the actual conditions of use (taking account of all
parts of the operating cycle such as the times when the tool is switched off
and when it is running idle in addition to the trigger time).
01Eng_WH14DBAL2_EE 12/12/13, 11:56 AM15

Deutsch
16
ALLGEMEINE SICHERHEITSHINWEISE FÜR
ELEKTROGERÄTE
WARNUNG
Lesen Sie sämtliche Sicherheitshinweise und Anweisungen durch
Wenn die Warnungen und Anweisungen nicht befolgt werden, kann es zu
Stromschlag, Brand und/oder ernsthaften Verletzungen kommen.
Bitte bewahren Sie alle Warnhinweise und Anweisungen zum späteren
Nachschlagen auf.
Der Begriff „Elektrowerkzeug“ bezieht sich in den Warnhinweisen auf
Elektrowerkzeuge mit Netz- (schnurgebunden) oder Akkubetrieb (schnurlos).
1) Sicherheit im Arbeitsbereich
a) Sorgen Sie für einen sauberen und gut ausgeleuchteten Arbeitsbereich.
Zugestellte oder dunkle Bereiche ziehen Unfälle förmlich an.
b) Verwenden Sie Elektrowerkzeuge niemals an Orten, an denen
Explosionsgefahr besteht – zum Beispiel in der Nähe von leicht
entflammbaren Flüssigkeiten, Gasen oder Stäuben.
Bei der Arbeit mit Elektrowerkzeugen kann es zu Funkenbildung
kommen, wodurch sich Stäube oder Dämpfe entzünden können.
c) Sorgen Sie bei der Arbeit mit Elektrowerkzeugen dafür, dass sich
keine Zuschauer (insbesondere Kinder) in der Nähe befinden.
Wenn Sie abgelenkt werden, können Sie die Kontrolle über das
Werkzeug verlieren.
2) Elektrische Sicherheit
a) Elektrowerkzeuge müssen mit passender Stromversorgung betrieben
werden.
Nehmen Sie niemals irgendwelche Änderungen am Anschlussstecker
vor.
Verwenden Sie bei Elektrowerkzeugen mit Schutzkontakt (geerdet)
niemals Adapterstecker.
Stecker im Originalzustand und passende Steckdosen reduzieren das
Stromschlagrisiko.
b) Vermeiden Sie Körperkontakt mit geerdeten Gegenständen wie
Rohrleitungen, Heizungen, Herden oder Kühlschränken.
Bei Körperkontakt mit geerdeten Gegenständen besteht ein erhöhtes
Stromschlagrisiko.
c) Setzen Sie Elektrowerkzeuge niemals Regen oder sonstiger
Feuchtigkeit aus.
Wenn Flüssigkeiten in ein Elektrowerkzeug eindringen, erhöht sich
das Stromschlagrisiko.
d) Verwenden Sie das Anschlusskabel nicht missbräuchlich. Tragen Sie
das Elektrowerkzeug niemals an der Anschlussschnur, ziehen Sie
es nicht damit heran und ziehen Sie den Stecker nicht an der
Anschlussschnur aus der Steckdose.
Halten Sie die Anschlussschnur von Hitzequellen, Öl, scharfen Kanten
und beweglichen Teilen fern.
Beschädigte oder verdrehte Anschlussschnüre erhöhen das
Stromschlagrisiko.
e) Wenn Sie ein Elektrowerkzeug im Freien benutzen, verwenden Sie
ein für den Außeneinsatz geeignetes Verlängerungskabel.
Ein für den Außeneinsatz geeignetes Kabel vermindert das
Stromschlagrisiko.
f) Falls sich der Betrieb des Elektrowerkzeuges in feuchter Umgebung
nicht vermeiden lässt, verwenden Sie eine Stromversorgung mit
Fehlerstromschutzeinrichtung (Residual Current Device, RCD).
Durch den Einsatz einer Fehlerstromschutzeinrichtung wird das Risiko
eines elektrischen Schlages reduziert.
3) Persönliche Sicherheit
a) Bleiben Sie wachsam, achten Sie auf das, was Sie tun, und setzen
Sie Ihren Verstand ein, wenn Sie mit Elektrowerkzeugen arbeiten.
Benutzen Sie keine Elektrowerkzeuge, wenn Sie müde sind oder
unter Einfluss von Drogen, Alkohol oder Medikamenten stehen.
Bei der Arbeit mit Elektrowerkzeugen können bereits kurze Phasen
der Unaufmerksamkeit zu schweren Verletzungen führen.
b) Benutzen Sie eine persönliche Schutzausrüstung. Tragen Sie immer
einen Augenschutz.
Schutzausrüstung wie Staubmaske, rutschsichere Sicherheitsschuhe,
Schutzhelm und Gehörschutz senken das Verletzungsrisiko bei
angemessenem Einsatz.
c) Vermeiden Sie unbeabsichtigtes Einschalten. Achten Sie darauf,
dass sich der Schalter in der Aus- (Off-) Position befindet, ehe Sie
das Gerät mit der Stromversorgung und/oder
Batteriestromversorgung verbinden, es aufheben oder herumtragen.
Das Herumtragen von Elektrowerkzeugen mit dem Finger am Schalter
oder das Herstellen der Stromversorgung bei betätigtem Schalter zieht
Unfälle regelrecht an.
d) Entfernen Sie sämtliche Einstellwerkzeuge (Einstellschlüssel), ehe
Sie das Elektrowerkzeug einschalten.
Ein an einem beweglichen Teil des Elektrowerkzeugs angebrachter
Schlüssel kann zu Verletzungen führen.
e) Sorgen Sie für einen festen Stand. Achten Sie jederzeit darauf, sicher
zu stehen und das Gleichgewicht zu bewahren.
Dadurch haben Sie das Elektrowerkzeug in unerwarteten Situationen
besser im Griff.
f) Kleiden Sie sich richtig. Tragen Sie keine lose Kleidung oder Schmuck.
Halten Sie Haar, Kleidung und Handschuhe von beweglichen Teilen
fern.
Lose Kleidung, Schmuck oder langes Haar kann von beweglichen
Teilen erfasst werden.
g) Wenn Anschlüsse für Staubabsaug- und -sammelvorrichtungen
vorhanden sind, sorgen Sie dafür, dass diese richtig angeschlossen
und eingesetzt werden.
Durch Entfernen des Staubes können staubbezogene Gefahren
vermindert werden.
4) Einsatz und Pflege von Elektrowerkzeugen
a) Überanspruchen Sie Elektrowerkzeuge nicht. Benutzen Sie das richtige
Elektrowerkzeug für Ihren Einsatzzweck.
Das richtige Elektrowerkzeug erledigt seine Arbeit bei
bestimmungsgemäßem Einsatz besser und sicherer.
b) Benutzen Sie das Elektrowerkzeug nicht, wenn es sich nicht am Schalter
ein- und ausschalten lässt.
Jedes Elektrowerkzeug, das nicht mit dem Schalter betätigt werden
kann, stellt eine Gefahr dar und muss repariert werden.
c) Stecken Sie den Stecker der Stromversorgung oder
Batteriestromversorgung vom Gerät ab, ehe Sie Einstellarbeiten
vornehmen, Zubehörteile tauschen oder das Elektrowerkzeug
verstauen.
Solche präventiven Sicherheitsmaßnahmen verhindern den
unbeabsichtigten Anlauf des Elektrowerkzeugs und die damit
verbundenen Gefahren.
d) Lagern Sie nicht benutzte Elektrowerkzeuge außerhalb der Reichweite
von Kindern, lassen Sie nicht zu, dass Personen das Elektrowerkzeug
bedienen, die nicht mit dem Werkzeug selbst und/oder diesen
Anweisungen vertraut sind.
Elektrowerkzeuge in ungeschulten Händen sind gefährlich.
e) Halten Sie Elektrowerkzeuge in Stand. Prüfen Sie auf
Fehlausrichtungen, sicheren Halt und Leichtgängigkeit beweglicher
Teile, Beschädigungen von Teilen und auf jegliche andere Zustände,
die sich auf den Betrieb des Elektrowerkzeugs auswirken können.
Bei Beschädigungen lassen Sie das Elektrowerkzeug reparieren, ehe
Sie es benutzen.
Viele Unfälle mit Elektrowerkzeugen sind auf schlechte Wartung
zurückzuführen.
f) Halten Sie Schneidwerkzeuge scharf und sauber.
Richtig gewartete Schneidwerkzeuge mit scharfen Schneidkanten
bleiben weniger häufig hängen und sind einfacher zu beherrschen.
g) Benutzen Sie Elektrowerkzeuge, Zubehör, Werkzeugspitzen und Ähnliches
in Übereinstimmung mit diesen Anweisungen – beachten Sie dabei die
jeweiligen Arbeitsbedingungen und die Art und Weise der auszuführenden
Arbeiten.
Der Gebrauch des Elektrowerkzeuges für andere als die vorgesehenen
Anwendungen kann zu gefährlichen Situationen führen.
5) Verwendung und Pflege der Batterie
a) Laden Sie das Gerät nur mit dem vom Hersteller empfohlenen
Ladegerät auf.
Ein Ladegerät für einen speziellen Batterietyp kann bei Verwendung
mit anderen Batterien zu Gefahren führen.
b) Verwenden Sie für das Gerät nur die speziell empfohlenen Batterien.
Eine Verwendung von anderen Batterien kann zu Verletzungen und
Bränden führen.
(Übersetzung der Original-Gebrauchsanweisung)
02Ger_WH14DBAL2_EE 12/12/13, 11:56 AM16

Deutsch
17
c) Ist die Batterie nicht in Gebrauch, achten Sie darauf, dass sie nicht
mit metallischen Gegenständen, beispielsweise Büroklammern,
Münzen, Schlüssel, Nägel, Schrauben in Kontakt kommt, da diese
Gegenstände einen Kurzschluss der Anschlüsse verursachen könnten.
Ein Kurzschluss der Batterieanschlüsse kann zu Verbrennungen oder
Bränden führen.
d) Im Falle von Störungen, kann Flüssigkeit aus der Batterie austreten.
Vermeiden Sie in diesem Fall jeglichen Kontakt. Sollten Sie dennoch
mit der Batterie in Berührung kommen, waschen Sie die betroffene
Stelle gründlich mit Wasser ab. Ist die Flüssigkeit ins Auge geraten,
suchen Sie einen Arzt auf.
Ausgetretene Batterieflüssigkeiten können zu Reizungen oder
Verbrennungen führen.
6) Service
a) Lassen Sie Elektrowerkzeuge durch qualifizierte Fachkräfte und unter
Einsatz passender, zugelassener Originalteile warten.
Dies sorgt dafür, dass die Sicherheit des Elektrowerkzeugs nicht
beeinträchtigt wird.
VORSICHT
Von Kindern und gebrechlichen Personen fernhalten.
Werkzeuge sollten bei Nichtgebrauch außerhalb der Reichweite von Kindern und
gebrechlichen Personen aufbewahrt werden.
VORSICHTSMASSNAHMEN FÜR DEN AKKU-
SCHLAGSCHRAUBER
(WH14DBAL2 / WH18DBAL2)
1. Halten Sie das Elektrowerkzeug an seinen isolierten Griffen fest, wenn
Sie Arbeiten ausführen, bei denen die Befestigungsvorrichtung mit
verdeckten Verdrahtungen in Kontakt kommen könnte. Wenn
Befestigungsvorrichtungen mit einem "stromführenden" Draht in Kontakt
kommen, könnten die metallischen Teile des Elektrowerkzeugs "unter
Strom stehen" und die Bedienungsperson erhält dann einen elektrischen
Schlag.
2. Dies ist ein tragbares Werkzeuggerät zum Anziehen und Lösen von
Schrauben. Es sollte nur für diesen Zweck eingesetzt werden.
3. Bei längerem Arbeiten Ohrstöpsel verwenden.
4. Es ist äußerst gefährlich, das Gerät nur mit einer Hand zu bedienen. Das
Gerät ist beim Betrieb mit beiden Händen festzuhalten.
5. Nachdem das Schraubstück angebracht wurde, sollte ein wenig daran
gezogen werden, um sicherzugehen, daß es festsitzt. Wenn das
Schraubstück nicht richtig aufgesetzt wird, kann es sich während des
Betriebs lösen, was Verletzungsgefahr bedeutet.
6. Das Schrubstück gemäß der anzuziehenden Schraube verwenden.
7. Sollte versucht werden, mit dem Schlag-Schrauber eine Schraube
anzuziehen, wenn sich der Schlag-Schrauber in einem Winkel zur Schraube
befindet, kann die Preßkraft des Geräts nicht voll zur Geltung kommen;
außer dem kann der Schraubenkopf beschädigt werden. Anziehen, wenn
sich der Schlag-Schrauber mit der Schraube auf einer Linie befindet.
8. Die Batterie immer bei einer Temperatur von 0 – 40°C laden.
Laden bei einer Temperatur die niedriger als 0°C is twird gefährliche
Überladung verursachen. Die Batterie kann nicht bei einer Temperatur
über 40°C geladen werden. Die beste Temperatur zum Laden wäre von 20
– 25°C.
9. Das Ladegerät nicht fortlaufend laden.
Nach Beendung einer Ladung, lassen Sie das Ladegerät ungefähr 15
Minuten ruhen bevor die nächste Batterieladung unternommen wird.
10. Keine Fremdkörper durch das Anschlußloch der Batterie eindringen lassen.
11. Niemals die Batterie und das Ladegerät auseinandernehmen.
12. Niemals die Batterie kurzschließen.
Kurzschluß der Batterie verursacht eine zu große Stromzufuhr und
Überhitzung, wodurch Durchbrennen oder Schaden beider Batterie
ensteht.
13. Die Batterie nicht ins Feuer werfen.
Sie könnte dabei explodieren.
14. Darauf achten, daß keine Gegenstände durch Belüftungsschlitze das
Ladegeräts in das Gerät eindringen.
Wenn Metallobjekte oder entzü ndliche Gegenstände durch die
Belüftungsschlitze des Ladegeräts eindringen, kann dies zu elektrischen
Schlägen führen oder das Ladegerät beschädigen.
15. Bringen Sie die Batterie zum Geschäft, wo Sie sie gekauft haben, sobald
die Lebensdauer der Batterie zur Neige geht. Die leere Batterie nicht
wegwerfen.
16. Das Benutzen einer leeren Batterie beschädigt das Ladegerät.
VORSICHTSMASSNAHMEN FÜR DEN AKKU-
SCHLAGSCHRAUBER
(WR14DBAL2 / WR18DBAL2)
1. Halten Sie das Elektrowerkzeug an seinen isolierten Griffen fest, wenn
Sie Arbeiten ausführen, bei denen die Befestigungsvorrichtung mit
verdeckten Verdrahtungen in Kontakt kommen könnte. Wenn
Befestigungsvorrichtungen mit einem "stromführenden" Draht in Kontakt
kommen, könnten die metallischen Teile des Elektrowerkzeugs "unter
Strom stehen" und die Bedienungsperson erhält dann einen elektrischen
Schlag.
2. Dies ist ein tragbares Werkzeuggerät zum Anziehen und Lösen von
Schrauben. Es sollte nur für diesen Zweck eingesetzt werden.
3. Bei längerem Arbeiten Ohrstöpsel verwenden.
4. Es ist äußerst gefährlich, das Gerät nur mit einer Hand zu bedienen. Das
Gerät ist beim Betrieb mit beiden Händen festzuhalten.
5. Nachprüfen, ob die Buchse gesprungen oder gebrochen ist. Gebrochene
und gesprungene Buchsen sind gefährlich, daher die Buchse vor Gebrauch
prüfen.
6. Die Buchse mit Buchsenstift und-ring sichern. Sollte der Buchsenstift oder-
ring beschädigt sein, kann die Buchse vom Schlag-Schraubenschlüssel
geschleudert werden, was gefährlich ist. Niemals Buchsenstifte oder-ring
verwenden, die deformiert, abgenutzt, gesprungen oder sonstwie
beschädigt sind. Immer darauf achten, daß Buchsenstift und -ring in
der richtigen Position sind.
7. Das Anzugsdrehmoment prüfen.
Das geeignete Drehmoment für das Anziehen einer Schraube hängt vom
Material, der Art, den Abmessungen, usw. der Schraube ab.
Außerdem hängt das von diesem Schlag-Schraubenschlüssel erzeugte
Auzugsdrehmoment vom Material und den Abmessungen der Schraube,
für welche zeitdauer der Schlag-Schraubenschlüssel angewendet wird,
wie die Bushse angebracht ist, usw. ab.
Das Drehmomentvariiert auch leicht, wenn die Batterie gerade aufgeladen
wurde und wenn sie kurz vor dem Erschöpfen steht. Mit einem
Anzugsdrehmomentschlüssel nachprüfen, ob die Schraube mit dem
richtigen Drehmoment angezogen wurde.
8. Den Schlag-Schraubenschlüssel zuerst stoppen, wenn die
Rotationsrichtung geändert werden soll. Den Schalter immer erst freigeben
und warten, bis der Schlag-Schraubenschlüssel stoppt, bevor auf die
entgegengesetzte Rotationsrichtung geschaltet wird.
9. Niemals die rotierenden Teile berühren.
Darauf achten, daß sich der rotierende Buchsenteil immer in genügendem
Abstand zum Körper und den Händen befindet, da die Gefahr besteht,
sich zu schneiden oder sich in der Buchse zu verfangen. Die Buchse sollte
auch nicht direkt nach langer kontinuierlicher Benutzuntg berührt werden,
da durch die erzeugte Hitze Verbrennungsgefhr besteht.
10. Den Schlag-Schraubenschlüssel bei Benutzung des Universalgelenks
niemals ohne Einspannung rotieren lassen.
Wenn sich die Buchse ohne eingespannt zu sein dreht verusacht das
Universalgelenk ein wildes Rotieren der Buchse.
Durch die schnelle Rotation der Buchse kann der Schlag-Schrauber so
stark vibrieren, daß er losgelassen werden muß.
11. Die Batterie immer bei einer Temperatur von 0 - 40°C laden.
Laden bei einer Temperatur die niedriger als 0°C is twird gefährliche
Überladung verursachen. Die Batterie kann nicht bei einer Temperatur
über 40°C geladen werden. Die beste Temperatur zum Laden wäre von 20
- 25°C.
12. Das Ladegerät nicht fortlaufend laden.
Nach Beendung einer Ladung, lassen Sie das Ladegerät ungefähr 15
Minuten ruhen bevor die nächste Batterieladung unternommen wird.
13. Keine Fremdkörper durch das Anschlußloch der Batterie eindringen lassen.
02Ger_WH14DBAL2_EE 12/12/13, 11:56 AM17

Deutsch
18
14. Niemals die Batterie und das Ladegerät auseinandernehmen.
15. Niemals die Batterie kurzschließen.
Kurzschluß der Batterie verursacht eine zu große Stromzufuhr und
Überhitzung, wodurch Durchbrennen oder Schaden beider Batterie
ensteht.
16. Die Batterie nicht ins Feuer werfen.
Sie könnte dabei explodieren.
17. Darauf achten, dass keine Gegenstände durch die Lüftungsschlitze des
Ladegeräts in das Gerät eindringen.
Wenn Metallobjekte oder brennbare Gegenstände durch die
Lüftungsschlitze des Ladegeräts eindringen, kann dies zu elektrischen
Schlägen führen oder das Ladegerät beschädigen.
18. Bringen Sie die Batterie zum Geschäft, wo Sie sie gekauft haben sobald
die Lebensdauer der Batterie abgelaufen ist. Die unbrauchbare Batterie
nicht wegwerfen.
19. Die Benutzung verbrauchter Batterie beschädigt das Ladegerät.
WARNUNG ZUM LITHIUM-IONEN-AKKU
Um die Lebensdauer des Lithium-Ionen-Akkus zu verlängern, ist dieser mit einer
Schutzfunktion zum Stoppen der Leistungsabgabe ausgestattet.
In den unten beschriebenen Fällen 1 bis 3 kann bei der Benutzung dieses
Produkts der Motor abschalten, selbst wenn Sie den Schalter drücken. Dies ist
kein Defekt sondern das Resultat der Schutzfunktion.
1. Wenn die verbleibende Akkuleistung nicht mehr ausreicht, schaltet der
Motor ab.
Laden Sie in einem solchen Fall den Akku umgehend auf.
2. Wenn das Werkzeug überlastet ist, kann es zum Abschalten des Motors
kommen. Lassen Sie in diesem Fall den Schalter des Geräts los und
beseitigen Sie die Ursache der Überlastung. Danach können Sie das
Gerät wieder verwenden.
3. Kommt es während des Betriebs zu einer Erhitzung der Batterie, wird das
Gerät unter Umständen angehalten. Unterbrechen Sie in diesem Fall Ihre
Arbeit und lassen Sie die Batterie abkühlen. Anschließend können Sie
das Gerät wieder normal verwenden.
Bitte beachten Sie die folgenden Warnhinweise.
WARNUNG
Zur Vermeidung einer ausgelaufenen Batterie, Erwärmung, Rauchentwicklung,
Explosionen und vorzeitiger Zündung beachten Sie bitte die folgenden
Vorsichtsmaßnahmen.
1. Stellen Sie sicher, dass sich Späne und Staub nicht auf der Batterie
ansammeln.
䡬
Stellen Sie während der Arbeit sicher, dass Späne und Staub nicht auf die
Batterie fallen.
䡬
Stellen Sie sicher, dass Staub und Späne, die während der Bearbeitung
auf das Elektrowerkzeug fallen, nicht in die Batterie gelangen.
䡬
Lagern Sie ungebrauchte Batterien nicht an Plätzen, an denen Staub oder
Späne anfallen.
䡬
Vor dem Einlagern einer Batterie sind sämtlicher Staub und Späne zu
entfernen. Weiterhin ist zu berücksichtigen, dass die Batterie nicht
gemeinsam mit Metallteilen (Schrauben, Nägel, usw.) zu lagern ist.
2. Achten Sie darauf, dass die Batterie nicht durch einen spitzen Gegenstand,
beispielsweise einen Nagel, beschädigt wird. Vermeiden Sie Schläge mit
dem Hammer. Treten Sie nicht gegen die Batterie, werfen Sie diese nicht,
und vermeiden Sie Stöße.
3. Beschädigte oder verformte Batterien dürfen nicht weiter verwendet
werden.
4. Achten Sie auf den richtigen Anschluss der Pole.
5. Schließen Sie die Batterie nicht direkt an elektrische Ausgänge oder
Zigarettenanzünder im Auto an.
6. Verwenden Sie die Batterie nur für den angegebenen Zweck.
7. Falls die Batterie nach Verstreichen der angegebenen Ladezeit nicht
vollständig aufgeladen ist, brechen Sie den Ladevorgang unverzüglich
ab.
8. Vermeiden Sie hohe Temperaturen und hohen Druck, wie er beispielsweise
in der Mikrowelle, einem Trockner oder einem Hochdruckbehälter auftritt.
9. Wenn Sie ein Leck oder Rußgeruch feststellen, vermeiden Sie jeglichen
Kontakt mit Feuerstellen.
10. Vermeiden Sie eine Verwendung an Orten, an denen starke statische
Elektrizität erzeugt wird.
11. Werden ein Leck, Rußgeruch, Erwärmung, Verfärbungen, Verformungen
oder sonstige Anomalitäten während der Verwendung, des Aufladens
oder der Lagerung festgestellt, entfernen Sie die Batterie unverzüglich
vom Gerät oder dem Ladegerät und beenden Sie die Anwendung.
VORSICHT
1. Tritt die auslaufende Flüssigkeit in Kontakt mit Ihren Augen, reiben Sie diese
nicht, sondern waschen Sie sie mit sauberem (Leitungs-) Wasser gut aus
und suchen Sie unverzüglich einen Arzt auf.
Ohne sachgemäße Behandlung können Augenverletzungen auftreten.
2. Wenn die ausgelaufene Flüssigkeit auf Haut oder Kleidung trifft, waschen
Sie diese unverzüglich mit sauberem Wasser ab.
Es besteht die Gefahr von Hautreizungen.
3. Beim Auftreten von Rost, Rußgeruch, Erwärmung, Verfärbungen,
Verformungen oder sonstigen Anomalitäten während der ersten
Verwendung der Batterie, ist diese nicht weiter zu verwenden. Bringen
Sie die Batterie zum Händler oder Verkäufer zurück.
WARNUNG
Wenn ein elektrischer Fremdkörper an die Anschlüsse des Lithium-Ionen-Akkus
gelangt, kann es zu einem Kurzschluss und der Gefahr eines Feuers kommen.
Beachten Sie folgende Vorsichtsmaßnahmen bei der Aufbewahrung des Akkus.
䡬
Legen Sie keine elektrisch leitenden Späne, Nägel, Stahldraht, Kupferdraht
oder anderen Draht in den Aufbewahrungskoffer.
䡬
Setzen Sie den Akku entweder in das Gerät ein oder lagern Sie ihn, um
Kurzschlüsse zu vermeiden, indem Sie ihn in die Batterieabdeckung
hineindrücken, bis die Belüftungslöcher verdeckt sind. (Siehe Abb. 1)
VORSICHTSMASSNAHMEN HINSICHTLICH DER
WIDERSTANDSFÄHIGKEIT GEGEN STAUB UND
WASSER
Dieses Produkt entspricht der IP-Schutzart 56 (Schutz gegen das Eindringen von Festkörpern und Wasser) für elektrische Geräte nach den internationalen IEC-
Vorschriften. (Ausschließlich ein mit einer Batterie ausgestattetes Hauptgerät entspricht der IP-Schutzart 56.)
[Beschreibung der IP-Schutzarten]
IP56
Schutz gegen das Eindringen von Wasser
Ein Wasserstrahl, der aus allen Richtungen gegen das Gerät gerichtet wird, darf keine schädliche Wirkung haben (strahlwassergeschützt).
(Das Gerät wird unter Einsatz einer Düse mit einem Durchmesser von 12,5 mm ca. drei Minuten lang aus einer Entfernung von ca. drei Metern mit 100 l
Wasser pro Minute bespritzt.)
Schutz gegen das Eindringen von Festkörpern
Staub, der schädliche Auswirkungen auf das Gerät haben könnte, darf nicht eindringen können (staubgeschützt).
(Das Gerät wird in ausgeschaltetem Zustand für acht Stunden in eine Staubkammer gestellt, in der Talkumpuderpartikel (2 kg/m
3
Kammer) mit einem
Durchmesser von weniger als 75
mithilfe einer Staubumlaufpumpe in der Schwebe gehalten werden).
Das Gerät wurde so konstruiert, dass es den Einflüssen von Staub und Wasser standhält, eine Fehlfunktion kann jedoch nicht ausgeschlossen werden. Verwenden
oder lagern Sie das Gerät nicht an Orten, an denen es übermäßigen Mengen von Staub bzw. Regenwasser ausgesetzt ist oder unter Wasser steht.
02Ger_WH14DBAL2_EE 12/12/13, 11:56 AM18

Deutsch
19
STANDARDZUBEHÖR
Zusätzlich zum Hauptgerät (1) sind im Lieferumfang auch die in der
untenstehenden Tabelle aufgeführten Zubehörteile enthalten.
Das Standardzubehör kann ohne vorherige Bekanntmachung jederzeit geändert
werden.
SONDERZUBEHÖR (separat zu beziehen)
䡬
Batterie
(BSL1430, BSL1440, BSL1450) (BSL1830, BSL1840, BSL1850)
STANDARDZUBEHÖR
ELEKTRO-WERKZEUG
Modell WH14DBAL2 WH18DBAL2
Spannung 14,4 V 18 V
Stark-Modus 0 – 2800 min
–1
0 – 2900 min
–1
Leerlaufdrehzahl
Mittel-Modus 0 – 2200 min
–1
0 – 2200 min
–1
Schwach 2-Modus 0 – 1500 min
–1
0 – 1500 min
–1
Schwach 1-Modus 0 – 900 min
–1
0 – 900 min
–1
Kapazität
Üblicher Bolzen M5 – M14
Hochzugfester Bolzen M5 – M12
Kapazität (Üblicher Bolzen) 160 N·m 160 N·m
Wiederaufladbare Batterie
BSL1430: Li-ion BSL1440: Li-ion BSL1830: Li-ion BSL1840: Li-ion
14,4 V (3,0 Ah 8 zellen) 14,4 V (4,0 Ah 8 zellen) 18 V (3,0 Ah 10 zellen) 18 V (4,0 Ah 10 zellen)
Gewicht 1,4 kg 1,5 kg
Modell WR14DBAL2 WR18DBAL2
Spannung 14,4 V 18 V
Stark-Modus 0 – 2800 min
–1
0 – 2900 min
–1
Leerlaufdrehzahl
Mittel-Modus 0 – 2200 min
–1
0 – 2200 min
–1
Schwach 2-Modus 0 – 1500 min
–1
0 – 1500 min
–1
Schwach 1-Modus 0 – 900 min
–1
0 – 900 min
–1
Kapazität
Üblicher Bolzen M6 – M16
Hochzugfester Bolzen M6 – M12
Kapazität (Üblicher Bolzen) 165 N·m 165 N·m
BSL1430: BSL1440: BSL1450: BSL1830: BSL1840: BSL1850:
Wiederaufladbare Batterie Li-ion 14,4 V Li-ion 14,4 V Li-ion 14,4 V Li-ion 18 V Li-ion 18 V Li-ion 18 V
(3,0 Ah 8 zellen) (4,0 Ah 8 zellen) (5,0 Ah 8 zellen) (3,0 Ah 10 zellen) (4,0 Ah 10 zellen) (5,0 Ah 10 zellen)
Gewicht 1,4 kg 1,5 kg
1
Ladegerät ..................................................................... 1
2
Batterie ........................................................................ 2
3
Plastikgehäuse ............................................................ 1
4
Batterieabdeckung ..................................................... 1
WH14DBAL2
WH18DBAL2
WR14DBAL2
WR18DBAL2
Das Sonderzubehör kann ohne vorherige Bekanntmachung jederzeit geändert
werden.
ANWENDUNG
<WH14DBAL2 / WH18DBAL2>
䡬
Einschrauben und Entfernung von Maschinenschrauben, Holzschrauben,
Schneidschrauben, etc.
<WR14DBAL2 / WR18DBAL2>
䡬
Festspannen aller Arten von Bolzen und Muttern, verwendet zum Befestigen
von Konstruktionsteilen.
HERAUSNEHMEN/EINSETZEN DER BATTERIE
1
. Herausnehmen der Batterie
Den Handgriff festhalten und die Batterieverriegelungen drücken, um die Batterie
herauszunehmen (siehe Abb. 2).
ACHTUNG
Die Kontakte des Batterie niemals kurzschließen.
2. Einsetzen des Batterie
Den Batterie unter Beachtung der richtigen Richtung in das Gerät
einsetzen (siehe Abb. 2).
LADEN
Vor Gebrauch des Elektrogeräts die Batterie wie folgt laden.
1. Den Netzstecker des Ladegerätes in eine Steckdose einstecken.
Beim Anschluss des Ladegeräts an eine Netzsteckdose blickt die
Kontrollampe rot auf. (In Sekundenabständen)
LADEGERÄT
Modell UC18YRSL UC18YFSL
Ladespannung 14,4 V – 18 V
Gewicht 0,6 kg 0,5 kg
02Ger_WH14DBAL2_EE 12/12/13, 11:56 AM19
Sayfa yükleniyor...
Sayfa yükleniyor...
Sayfa yükleniyor...
Sayfa yükleniyor...
Sayfa yükleniyor...
Sayfa yükleniyor...
Sayfa yükleniyor...
Sayfa yükleniyor...
Sayfa yükleniyor...
Sayfa yükleniyor...
Sayfa yükleniyor...
Sayfa yükleniyor...
Sayfa yükleniyor...
Sayfa yükleniyor...
Sayfa yükleniyor...
Sayfa yükleniyor...
Sayfa yükleniyor...
Sayfa yükleniyor...
Sayfa yükleniyor...
Sayfa yükleniyor...
Sayfa yükleniyor...
Sayfa yükleniyor...
Sayfa yükleniyor...
Sayfa yükleniyor...
Sayfa yükleniyor...
Sayfa yükleniyor...
Sayfa yükleniyor...
Sayfa yükleniyor...
Sayfa yükleniyor...
Sayfa yükleniyor...
Sayfa yükleniyor...
Sayfa yükleniyor...
Sayfa yükleniyor...
Sayfa yükleniyor...
Sayfa yükleniyor...
Sayfa yükleniyor...
Sayfa yükleniyor...
Sayfa yükleniyor...
Sayfa yükleniyor...
Sayfa yükleniyor...
Sayfa yükleniyor...
Sayfa yükleniyor...
Sayfa yükleniyor...
Sayfa yükleniyor...
Sayfa yükleniyor...
Sayfa yükleniyor...
Sayfa yükleniyor...
Sayfa yükleniyor...
Sayfa yükleniyor...
Sayfa yükleniyor...
Sayfa yükleniyor...
Sayfa yükleniyor...
Sayfa yükleniyor...
Sayfa yükleniyor...
Sayfa yükleniyor...
Sayfa yükleniyor...
Sayfa yükleniyor...
Sayfa yükleniyor...
Sayfa yükleniyor...
Sayfa yükleniyor...
Sayfa yükleniyor...
Sayfa yükleniyor...
Sayfa yükleniyor...
Sayfa yükleniyor...
Sayfa yükleniyor...
Sayfa yükleniyor...
Sayfa yükleniyor...
Sayfa yükleniyor...
Sayfa yükleniyor...
Sayfa yükleniyor...
Sayfa yükleniyor...
Sayfa yükleniyor...
Sayfa yükleniyor...
Sayfa yükleniyor...
Sayfa yükleniyor...
Sayfa yükleniyor...
Sayfa yükleniyor...
Sayfa yükleniyor...
Sayfa yükleniyor...
Sayfa yükleniyor...
Sayfa yükleniyor...
Sayfa yükleniyor...
Sayfa yükleniyor...
Sayfa yükleniyor...
Sayfa yükleniyor...
Sayfa yükleniyor...
Sayfa yükleniyor...
Sayfa yükleniyor...
Sayfa yükleniyor...
Sayfa yükleniyor...
Sayfa yükleniyor...
Sayfa yükleniyor...
Sayfa yükleniyor...
Sayfa yükleniyor...
Sayfa yükleniyor...
Sayfa yükleniyor...
-
 1
1
-
 2
2
-
 3
3
-
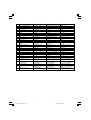 4
4
-
 5
5
-
 6
6
-
 7
7
-
 8
8
-
 9
9
-
 10
10
-
 11
11
-
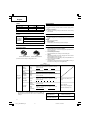 12
12
-
 13
13
-
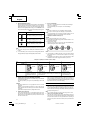 14
14
-
 15
15
-
 16
16
-
 17
17
-
 18
18
-
 19
19
-
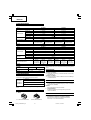 20
20
-
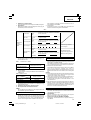 21
21
-
 22
22
-
 23
23
-
 24
24
-
 25
25
-
 26
26
-
 27
27
-
 28
28
-
 29
29
-
 30
30
-
 31
31
-
 32
32
-
 33
33
-
 34
34
-
 35
35
-
 36
36
-
 37
37
-
 38
38
-
 39
39
-
 40
40
-
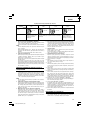 41
41
-
 42
42
-
 43
43
-
 44
44
-
 45
45
-
 46
46
-
 47
47
-
 48
48
-
 49
49
-
 50
50
-
 51
51
-
 52
52
-
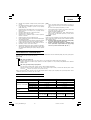 53
53
-
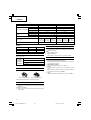 54
54
-
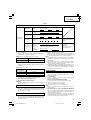 55
55
-
 56
56
-
 57
57
-
 58
58
-
 59
59
-
 60
60
-
 61
61
-
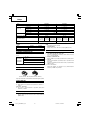 62
62
-
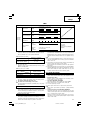 63
63
-
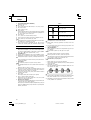 64
64
-
 65
65
-
 66
66
-
 67
67
-
 68
68
-
 69
69
-
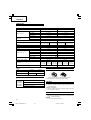 70
70
-
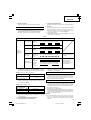 71
71
-
 72
72
-
 73
73
-
 74
74
-
 75
75
-
 76
76
-
 77
77
-
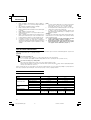 78
78
-
 79
79
-
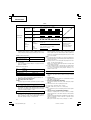 80
80
-
 81
81
-
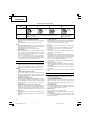 82
82
-
 83
83
-
 84
84
-
 85
85
-
 86
86
-
 87
87
-
 88
88
-
 89
89
-
 90
90
-
 91
91
-
 92
92
-
 93
93
-
 94
94
-
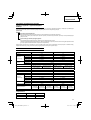 95
95
-
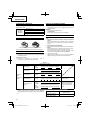 96
96
-
 97
97
-
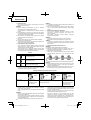 98
98
-
 99
99
-
 100
100
-
 101
101
-
 102
102
-
 103
103
-
 104
104
-
 105
105
-
 106
106
-
 107
107
-
 108
108
-
 109
109
-
 110
110
-
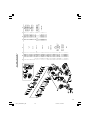 111
111
-
 112
112
-
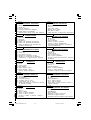 113
113
-
 114
114
-
 115
115
-
 116
116


Hitachi WH 18DBAL2 Handling Instructions Manual
- Kategori
- Elektrikli aletler
- Tip
- Handling Instructions Manual
- Bu kılavuz aynı zamanda aşağıdakiler için de uygundur:
diğer dillerde
- slovenčina: Hitachi WH 18DBAL2
- polski: Hitachi WH 18DBAL2
- română: Hitachi WH 18DBAL2
İlgili makaleler
-
Hikoki WH14DCL Kullanım kılavuzu
-
Hikoki WH 18DSL Kullanım kılavuzu
-
Hitachi WH 18DL Handling Instructions Manual
-
Hikoki WM 18DBL Kullanım kılavuzu
-
-
-
-
-
-