Electrolux EUF2042AOW Kullanım kılavuzu
- Kategori
- Dondurucular
- Tip
- Kullanım kılavuzu
Bu kılavuz aynı zamanda aşağıdakiler için de uygundur:


CONTENTS
1. SAFETY INFORMATION...................................................................................... 3
2. SAFETY INSTRUCTIONS.....................................................................................4
3. PRODUCT DESCRIPTION................................................................................... 6
4. OPERATION........................................................................................................ 6
5. DAILY USE.......................................................................................................... 8
6. HINTS AND TIPS............................................................................................... 10
7. CARE AND CLEANING......................................................................................11
8. TROUBLESHOOTING........................................................................................12
9. INSTALLATION..................................................................................................14
10. TECHNICAL INFORMATION............................................................................17
WE’RE THINKING OF YOU
Thank you for purchasing an Electrolux appliance. You’ve chosen a product that
brings with it decades of professional experience and innovation. Ingenious and
stylish, it has been designed with you in mind. So whenever you use it, you can be
safe in the knowledge that you’ll get great results every time.
Welcome to Electrolux.
Visit our website for:
Get usage advice, brochures, trouble shooter, service information:
www.electrolux.com
Register your product for better service:
www.registerelectrolux.com
Buy Accessories, Consumables and Original spare parts for your appliance:
www.electrolux.com/shop
CUSTOMER CARE AND SERVICE
Always use original spare parts.
When contacting our Authorised Service Centre, ensure that you have the following
data available: Model, PNC, Serial Number.
The information can be found on the rating plate.
Warning / Caution-Safety information
General information and tips
Environmental information
Subject to change without notice.
www.electrolux.com2

1. SAFETY INFORMATION
Before the installation and use of the appliance, carefully
read the supplied instructions. The manufacturer is not
responsible if an incorrect installation and use causes
injuries and damages. Always keep the instructions with
the appliance for future reference.
1.1 Children and vulnerable people safety
• This appliance can be used by children aged from 8
years and above and persons with reduced physical,
sensory or mental capabilities or lack of experience and
knowledge if they have been given supervision or
instruction concerning use of the appliance in a safe
way and understand the hazards involved.
• Do not let children play with the appliance.
• Cleaning and user maintenance shall not be made by
children without supervision.
•
Keep all packaging away from children.
1.2 General Safety
• This appliance is intended to be used in household and
similar applications such as:
– Farm houses; staff kitchen areas in shops, offices
and other working environments
– By clients in hotels, motels, bed and breakfast and
other residential type environments
• Keep ventilation openings, in the appliance enclosure or
in the built-in structure, clear of obstruction.
• Do not use mechanical devices or other means to
accelerate the defrosting process, other than those
recommended by the manufacturer.
• Do not damage the refrigerant circuit.
• Do not use electrical appliances inside the food storage
compartments of the appliance, unless they are of the
type recommended by the manufacturer.
• Do not use water spray and steam to clean the
appliance.
ENGLISH
3

• Clean the appliance with a moist soft cloth. Only use
neutral detergents. Do not use abrasive products,
abrasive cleaning pads, solvents or metal objects.
• Do not store explosive substances such as aerosol
cans with a flammable propellant in this appliance.
• If the supply cord is damaged, it must be replaced by
the manufacturer, its Authorised Service Centre or
similarly qualified persons in order to avoid a hazard.
2. SAFETY INSTRUCTIONS
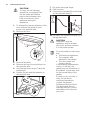
2.1 Installation
WARNING!
Only a qualified person must
install this appliance.
• Remove all the packaging.
• Do not install or use a damaged
appliance.
• Obey the installation instruction
supplied with the appliance.
• Always be careful when you move the
appliance because it is heavy. Always
wear safety gloves.
• Make sure the air can circulate around
the appliance.
• Wait at least 4 hours before connecting
the appliance to the power supply. This
is to allow the oil to flow back in the
compressor.
• Do not install the appliance close to
radiators or cookers, oven or hobs.
• The rear of the appliance must stand
against the wall.
• Do not install the appliance where
there is direct sunlight.
• Do not install this appliance in areas
that are too humid or too colds, such
as the construction appendices,
garages or wine cellars.
• When you move the appliance, lift it by
the front edge to avoid scratching the
floor.
2.2 Electrical connection
WARNING!
Risk of fire and electrical
shock.
• The appliance must be earthed.
• Make sure that the electrical
information on the rating plate agrees
with the power supply. If not, contact
an electrician.
• Always use a correctly installed
shockproof socket.
• Do not use multi-plug adapters and
extension cables.
• Make sure not to cause damage to the
electrical components (e.g. mains plug,
mains cable, compressor). Contact the
Authorised Service Centre or an
electrician to change the electrical
components.
• The mains cable must stay below the
level of the mains plug.
• Connect the mains plug to the mains
socket only at the end of the
installation. Make sure that there is
access to the mains plug after the
installation.
• Do not pull the mains cable to
disconnect the appliance. Always pull
the mains plug.
2.3 Use
WARNING!
Risk of injury, burns, electrical
shock or fire.
• Do not change the specification of this
appliance.
• Do not put electrical appliances (e.g.
ice cream makers) in the appliance
unless they are stated applicable by
the manufacturer.
• Be careful not to cause damage to the
refrigerant circuit. It contains isobutane
(R600a), a natural gas with a high level
www.electrolux.com4

of environmental compatibility. This gas
is flammable.
• If damage occurs to the refrigerant
circuit, make sure that there are no
flames and sources of ignition in the
room. Ventilate the room.
• Do not let hot items to touch the plastic
parts of the appliance.
• Do not put soft drinks in the freezer
compartment. This will create pressure
on the drink container.
• Do not store flammable gas and liquid
in the appliance.
• Do not put flammable products or
items that are wet with flammable
products in, near or on the appliance.
• Do not touch the compressor or the
condenser. They are hot.
• Do not remove or touch items from the
freezer compartment if your hands are
wet or damp.
• Do not freeze again food that has been
thawed.
• Obey the storage instructions on the
packaging of frozen food.
2.4 Care and cleaning
WARNING!
Risk of injury or damage to
the appliance.
• Before maintenance, deactivate the
appliance and disconnect the mains
plug from the mains socket.
• This appliance contains hydrocarbons
in the cooling unit. Only a qualified
person must do the maintenance and
the recharging of the unit.
• Regularly examine the drain of the
appliance and if necessary, clean it. If
the drain is blocked, defrosted water
collects in the bottom of the appliance.
2.5 Disposal
WARNING!
Risk of injury or suffocation.
• Disconnect the appliance from the
mains supply.
• Cut off the mains cable and discard it.
• Remove the door to prevent children
and pets to be closed inside of the
appliance.
• The refrigerant circuit and the insulation
materials of this appliance are ozone-
friendly.
• The insulation foam contains flammable
gas. Contact your municipal authority
for information on how to discard the
appliance correctly.
• Do not cause damage to the part of
the cooling unit that is near the heat
exchanger.
ENGLISH
5

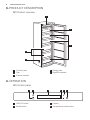
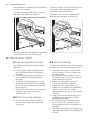
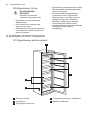
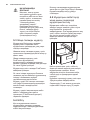
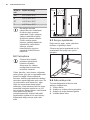
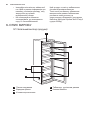
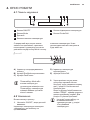
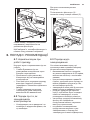
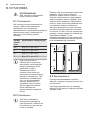
3. PRODUCT DESCRIPTION
3.1 Product overview
4
2
5
3
1
1
Control panel
2
Flap
3
Freezer baskets
4
Rating plate
5
MaxiBox baskets
4. OPERATION
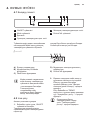
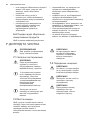
4.1 Control panel
1 2 3 4 5 6
1
ON/OFF button
2
Mode button
3
Display
4
Temperature colder button
www.electrolux.com6

5
Temperature warmer button
6
DrinksChill button
It is possible to change predefined sound
of buttons to a loudly one by pressing
together Mode and temperature colder
button for some seconds. Change is
reversible.
Display
A B C D
E
A) Alarm indicator
B) Freezer EcoMode function
C) FastFreeze function
D) Freezer temperature indicator
E) DrinksChill function
After selection of Mode or the
temperature button the
animations starts.
After selection of the
temperature the animation
flashes for a few minutes.
4.2 Switching on
Connect the mains plug to the power
socket
1. Press the ON/OFF if the display is off.
The temperature indicators show the set
default temperature.
2. The alarm buzzer may sound after a
few seconds.
To reset the alarm refer to "High
temperature alarm".
If "DEMO" appears on the display, the
appliance is in demonstration mode.
Refer to "Troubleshooting...".
To select a different set
temperature refer to
"Temperature regulation".
4.3 Switching off
Press ON/OFF for 3 seconds.
The display switches off.
To disconnect the appliance from the
power, disconnect the mains plug from
the power socket.
4.4 Temperature regulation
The set temperature of the freezer may be
adjusted by pressing the temperature
button.
Set default temperature: -18°C for the
freezer.
The temperature indicator shows the set
temperature.
The set temperature will be reached within
24 hours.
After a power failure the set
temperature remains stored.
4.5 DrinksChill mode
The DrinksChill mode is to be used to set
an acoustic alarm at the preferred time,
useful for example when a recipe requires
to cool down a mixture for a certain period
of time, or when a reminder is needed in
order not to forget the bottles placed in
the freezer for fast cooling.
1. To switch on the function press
DrinksChill .
The DrinksChill indicator appears.
The timer shows the set value (30
minutes).
2. Press the temperature colder button
and temperature warmer button to
change the timer set value from 1 to
90 minutes.
The timer indicator is shown (min).
ENGLISH
7

At the end of the countdown the
DrinksChill indicator flashes and an audible
alarm sounds
3. Remove any drinks contained in the
freezer compartment.
4. Press DrinksChill to switch off the
sound and terminate the function.
It is possible to deactivate
the function at any time
during the countdown by
pressing DrinksChill. The
DrinksChill indicator goes
off
It is possible to change
the time during the
countdown and at the
end by pressing the
temperature colder
button and the
temperature warmer
button.
4.6 FastFreeze mode
This function stops automatically after 52
hours.
1. To switch on the function press Mode
until the corresponding icon appears.
The FastFreeze indicator goes on.
2. To switch off the function press Mode
in order to select an other function or
press Mode until you can see none of
the special icons.
The FastFreeze indicator goes off.
The function switches off by
selecting a different freezer
set temperature.
4.7 EcoMode
For optimal food storage select the
EcoMode.
1. To switch on the function press Mode
until the corresponding icon appears.
The temperature indicator shows the set
temperature for the freezer: -18°C.
2. To switch off the function press Mode
in order to select an other function or
press Mode until you can see none of
the special icons.
The function switches off
by selecting a different
set temperature.
4.8 High temperature alarm
An increase in the temperature in the
freezer compartment (for example due to
an earlier power failure or door is open) is
indicated by:
• flashing the alarm and freezer
temperature indicators;
• sounding of buzzer.
To reset the alarm press any button.
The buzzer switches off.
The freezer temperature indicator shows
the highest temperature reached for a few
seconds. Then show again the set
temperature.
The alarm indicator continues to flash until
the normal conditions are restored.
When the alarm has returned
the alarm indicator goes off.
4.9 Door open alarm
An acoustic alarm will sound if the door is
left open for a few minutes. The door open
alarm conditions are indicated by:
• flashing alarm indicator;
• acoustic buzzer.
When normal conditions are restored
(door closed), the alarm will stop. During
the alarm, the buzzer can be switched off
by pressing any button.
5. DAILY USE
WARNING!
Refer to Safety chapters.
www.electrolux.com8

5.1 Initial power on
CAUTION!
Before inserting the power
plug in to the outlet and
switching on the cabinet for
the first time, leave the
appliance standing upright for
at least 4 hours. This will
assure a sufficient amount of
time for the oil to return to the
compressor. Otherwise the
compressor or electronic
components may sustain
damage.
5.2 Storage of frozen food
When first starting-up or after a period out
of use, before putting the products in the
compartment let the appliance run at least
2 hours with the FastFreeze function
turned on. The freezer drawers ensure
that it is quick and easy to find the food
package you want. If large quantities of
food are to be stored, remove all drawers
except for the bottom drawer which needs
to be in place to provide good air
circulation. On all shelves it is possible to
place food that protrude until 15 mm from
the door.
WARNING!
In the event of accidental
defrosting, for example due
to a power failure, if the
power has been off for longer
that the value shown in the
technical characteristics chart
under "rising time", the
defrosted food must be
consumed quickly or cooked
immediately and then re-
frozen (after cooling).
5.3 Freezing fresh food
The freezer compartment is suitable for
freezing fresh food and storing frozen and
deep-frozen food for a long time.
To freeze small amount of fresh foods it is
not necessary to change the present
setting.
To freeze fresh food activate the
FastFreeze function at least 24 hours
before placing the food to be frozen in the
freezer compartment.
Place the food to be frozen in the
FastFreeze compartment.
The maximum amount of food that can be
frozen in 24 hours is specified on the
rating plate, a label located on the inside
of the appliance.
The freezing process lasts 24 hours:
during this period do not add other food
to be frozen.
When the freezing process is completed,
return to the required temperature (see
"FastFreeze Function").
5.4 Thawing
Deep-frozen or frozen food, prior to being
used, can be thawed at room
temperature.
Small pieces may even be cooked still
frozen, directly from the freezer: in this
case, cooking will take longer.
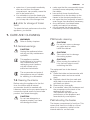
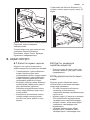
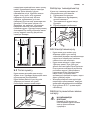
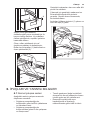
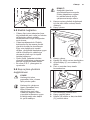
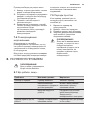
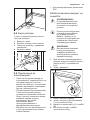
5.5 Removal of freezing baskets
and glass shelves from the
freezer
The freezing baskets have a limit stop to
prevent their accidental removal or falling
out. At the time of its removal from the
freezer, pull the basket towards yourself
and, upon reaching the end point, remove
the basket by tilting its front upwards.
2
1
At the time of putting it back, slightly lift
the front of the basket to insert it into the
freezer. Once you are over the end points,
push the baskets back in their position.
ENGLISH
9

The appliance is equipped with shelf stops
to secure the shelves.
The shelves must be lifted up (1) on each
side and than pulled outwards (2).
1
1
2
The glass shelves equipped with expander
rollers are secured with locking pins.
To remove them, loose the locking pin on
each side on the expander roller. If
necessary, use a screwdriver.
Afterwards pull out both locking pins (1)
and pull the glass shelf outwards (2).
2
1
1
1
6. HINTS AND TIPS
6.1 Normal operating sounds
The following sounds are normal during
operation:
• A faint gurgling and bubbling sound
from coils sound when refrigerant is
pumped.
• A whirring and pulsating sound from
the compressor when refrigerant is
pumped.
• A sudden cracking noise from inside
appliance caused by thermic dilatation
(a natural and not dangerous physical
phenomenon).
• A faint click noise from the temperature
regulator when the compressor
switches on or off.
6.2 Hints for energy saving
• Do not open the door frequently or
leave it open longer than absolutely
necessary.
6.3 Hints for freezing
To help you make the most of the freezing
process, here are some important hints:
• the maximum quantity of food which
can be frozen in 24 hrs. is shown on
the rating plate;
• the freezing process takes 24 hours.
No further food to be frozen should be
added during this period;
• freeze only top quality, fresh and
thoroughly cleaned, foodstuffs;
• prepare food in small portions to
enable it to be rapidly and completely
frozen and to make it possible
subsequently to thaw only the quantity
required;
• wrap up the food in aluminium foil or
polythene and make sure that the
packages are airtight;
• do not allow fresh, unfrozen food to
touch food which is already frozen,
thus avoiding a rise in temperature of
the latter;
• lean foods store better and longer than
fatty ones; salt reduces the storage life
of food;
www.electrolux.com10

• water ices, if consumed immediately
after removal from the freezer
compartment, can possibly cause the
skin to be freeze burnt;
• it is advisable to show the freezing in
date on each individual pack to enable
you to keep tab of the storage time.
6.4 Hints for storage of frozen
food
To obtain the best performance from this
appliance, you should:
• make sure that the commercially frozen
foodstuffs were adequately stored by
the retailer;
• be sure that frozen foodstuffs are
transferred from the foodstore to the
freezer in the shortest possible time;
• not open the door frequently or leave it
open longer than absolutely necessary;
• once defrosted, food deteriorates
rapidly and cannot be refrozen;
• do not exceed the storage period
indicated by the food manufacturer.
7. CARE AND CLEANING
WARNING!
Refer to Safety chapters.
7.1 General warnings
CAUTION!
Unplug the appliance before
carrying out any maintenance
operation.
This appliance contains
hydrocarbons in its cooling
unit; maintenance and
recharging must therefore
only be carried out by
authorized technicians.
The accessories and parts of
the appliance are not suitable
for washing in a dishwasher.
7.2 Cleaning the interior
Before using the appliance for the first
time, the interior and all internal
accessories should be washed with
lukewarm water and some neutral soap to
remove the typical smell of a brand-new
product, then dried thoroughly.
CAUTION!
Do not use detergents or
abrasive powders, as these
will damage the finish.
7.3 Periodic cleaning
CAUTION!
Do not pull, move or damage
any pipes and/or cables
inside the cabinet.
CAUTION!
Take care of not to damage
the cooling system.
CAUTION!
When moving the cabinet, lift
it by the front edge to avoid
scratching the floor.
The equipment has to be cleaned
regularly:
1. Clean the inside and accessories with
lukewarm water and some neutral
soap.
2. Regularly check the door seals and
wipe clean to ensure they are clean
and free from debris.
3. Rinse and dry thoroughly.
4. If accessible, clean the condenser and
the compressor at the back of the
appliance with a brush.
This operation will improve the
performance of the appliance and
save electricity consumption.
7.4 Defrosting the freezer
The freezer compartment is frost free. This
means that there is no build up of frost
when it is in operation, neither on the
internal walls nor on the foods.
ENGLISH
11

The absence of frost is due to the
continuous circulation of cold air inside the
compartment, driven by an automatically
controlled fan.
7.5 Periods of non-operation
When the appliance is not in use for long
periods, take the following precautions:
1. Disconnect the appliance from
electricity supply.
2. Remove all food.
3. Clean the appliance and all
accessories.
4. Leave the door/doors open to prevent
unpleasant smells.
WARNING!
If the cabinet will be kept on,
ask somebody to check it
once in a while to prevent the
food inside from spoiling in
case of a power failure.
8. TROUBLESHOOTING
WARNING!
Refer to Safety chapters.
8.1 What to do if...
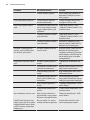
Problem Possible cause Solution
The appliance does not op-
erate.
The appliance is switched
off.
Switch on the appliance.
The mains plug is not
connected to the mains
socket correctly.
Connect the mains plug to
the mains socket correctly.
There is no voltage in the
mains socket.
Connect a different electrical
appliance to the mains sock-
et. Contact a qualified electri-
cian.
The appliance is noisy. The appliance is not sup-
ported properly.
Check if the appliance stands
stable.
Audible or visual alarm is
on.
The cabinet has been re-
cently switched on or the
temperature is still too
high.
Refer to "Door Open Alarm"or
"High Temperature Alarm".
The temperature in the
appliance is too high.
Refer to "Door Open Alarm"or
"High Temperature Alarm".
The temperature in the
appliance is too high.
Contact a qualified electrician
or contact the nearest Au-
thorised Service Centre.
A rectangular symbol is
shown instead of numbers
on the Temperature Dis-
play.
Temperature sensor prob-
lem.
Contact the nearest Author-
ised Service Centre (the cool-
ing system will continue to
keep food products cold, but
temperature adjustment will
not be possible).
www.electrolux.com12

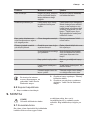
Problem Possible cause Solution
The compressor operates
continually.
Temperature is set incor-
rectly.
Refer to "Operation" chapter.
Many food products were
put in at the same time.
Wait some hours and then
check the temperature again.
The room temperature is
too high.
Refer to climate class chart
on the rating plate.
Food products placed in
the appliance were too
warm.
Allow food products to cool
to room temperature before
storing.
The door is not closed
correctly.
Refer to "Closing the door".
The FastFreeze function is
switched on.
Refer to "FastFreeze func-
tion".
There is too much frost and
ice.
The door is not closed
correctly or the gasket is
deformed/dirty.
Refer to "Closing the door".
The compressor does not
start immediately after
pressing the FastFreeze, or
after changing the tempera-
ture.
This is normal, no error
has occurred.
The compressor starts after a
period of time.
Water flows on the floor. The melting water outlet is
not connected to the
evaporative tray above the
compressor.
Attach the melting water out-
let to the evaporative tray.
Temperature cannot be set. The FastFreeze or Shop-
pingMode function is
switched on.
Switch off FastFreeze or
ShoppingMode manually, or
wait until the function resets
automatically to set the tem-
perature. Refer to "FastFreeze
or ShoppingMode function".
Door is misaligned or inter-
feres with ventilation grill.
The appliance is not level-
led.
Refer to "Levelling".
The temperature in the ap-
pliance is too low/too high.
The temperature regulator
is not set correctly.
Set a higher/lower tempera-
ture.
The food products' tem-
perature is too high.
Let the food products tem-
perature decrease to room
temperature before storage.
The door has been
opened often.
Open the door only if neces-
sary.
The FastFreeze function is
switched on.
Refer to "FastFreeze func-
tion".
ENGLISH
13

Problem Possible cause Solution
There is no cold air circu-
lation in the appliance.
Make sure that there is cold
air circulation in the appli-
ance.
If the advice does not lead to
the desired result, contact the
nearest Authorised Service
Centre.
8.2 Closing the door
1. Clean the door gaskets.
2. If necessary, adjust the door. Refer to
"Installation".
3. If necessary, replace the defective
door gaskets. Contact the Authorised
Service Centre.
9. INSTALLATION
WARNING!
Refer to Safety chapters.
9.1 Positioning
This appliance can be installed in a dry,
well ventilated indoor where the ambient
temperature corresponds to the climate
class indicated on the rating plate of the
appliance:
Climate
class
Ambient temperature
SN +10°C to + 32°C
N +16°C to + 32°C
ST +16°C to + 38°C
T +16°C to + 43°C
Some functional problems
might occur for some types
of models when operating
outside of that range. The
correct operation can only be
guaranteed within the
specified temperature range.
If you have any doubts
regarding where to install the
appliance, please turn to the
vendor, to our customer
service or to the nearest
Authorised Service Centre.
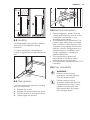
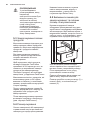
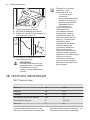
9.2 Location
It must be possible to
disconnect the appliance
from the mains power supply;
the plug must therefore be
easily accessible after
installation.
The appliance should be installed well
away from sources of heat such as
radiators, boilers, direct sunlight etc.
Ensure that air can circulate freely around
the back of the cabinet. To ensure best
performance, if the appliance is positioned
below an overhanging wall unit, the
minimum distance between the top of the
cabinet and the wall unit must be at least
100 mm . Ideally, however, the appliance
should not be positioned below
overhanging wall units. Accurate levelling
is ensured by one or more adjustable feet
at the base of the cabinet.
www.electrolux.com14

A
B
min.
100 mm
20 mm
9.3 Levelling
Accurate levelling prevents the vibration
and noise of the appliance during
operation.
To adjust the heigh of the appliance
loosen or tighten the two adjustable front
feet.
9.4 Rear spacers
You can find the two spacers in the bag
with documentation.
1. Release the screw.
2. Engage the spacer below the screw.
3. Turn the spacer to the right position.
4. Tighten again the screws.
2
4
3
1
9.5 Electrical connection
• Before plugging in, ensure that the
voltage and frequency shown on the
rating plate correspond to your
domestic power supply.
• The appliance must be earthed. The
power supply cable plug is provided
with a contact for this purpose. If the
domestic power supply socket is not
earthed, connect the appliance to a
separate earth in compliance with
current regulations, consulting a
qualified electrician.
• The manufacturer declines all
responsibility if the above safety
precautions are not observed.
• This appliance complies with the E.E.C.
Directives.
9.6 Door reversibility
WARNING!
Before carrying out any
operations, remove the plug
from the power socket.
Before carrying out any
operation, please be sure that
the appliance is empty. If not,
please move all goods into
right temperature for proper
food storage reason.
ENGLISH
15

CAUTION!
To carry out the following
operations, we suggest that
this be made with another
person that will keep a firm
hold on the doors of the
appliance during the
operations.
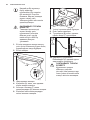
1. To change the opening direction of the
door unscrew the upper pin and
screw it on opposite side.
2. Remove the door.
2
1
3. Remove the plinth.
4. Remove the cap (A) and position it on
the opposite side .
5. Unscrew the lower hinge (C) and the
washers (B).
6. Position the pin and the washers on
the opposite side.
A
C
B
7. Re-screw the upper hinge.
8. Refit the door.
9. Unscrew the handles (B) and fix them
on the opposite side (C).
A
C
B
10. Re-insert the handle cover pins (A) on
the opposite side.
CAUTION!
Reposition, level the
appliance, wait for at least
four hours and then connect
it to the power socket.
Do a final check to make sure
that:
• All screws are tightened.
• The magnetic seal
adheres to the cabinet.
• The door opens and
closes correctly.
If the ambient temperature is
cold (i.e. in Winter), the
gasket may not fit perfectly to
the cabinet. In that case, wait
for the natural fitting of the
gasket.
In case you do not want to
carry out the above
mentioned operations,
contact the nearest
Authorised Service Centre.
The Authorised Service
specialist will carry out the
reversibility of the doors at
your cost.
www.electrolux.com16

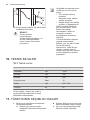
10. TECHNICAL INFORMATION
10.1 Technical data
Height mm 1544
Width mm 595
Depth mm 668
Rising time Hours 15
Voltage Volts 230 - 240
Frequency Hz 50
The technical information are situated in
the rating plate, on the external or internal
side of the appliance and in the energy
label.
11. ENVIRONMENT CONCERNS
Recycle the materials with the symbol .
Put the packaging in applicable containers
to recycle it. Help protect the environment
and human health and to recycle waste of
electrical and electronic appliances. Do
not dispose appliances marked with the
symbol with the household waste.
Return the product to your local recycling
facility or contact your municipal office.
ENGLISH
17

МАЗМҰНЫ
1. САҚТЫҚ ШАРАЛАРЫ..................................................................................... 19
2. ҚАУІПСІЗДІК НҰСҚАУЛАРЫ.......................................................................... 20
3. БҰЙЫМ СИПАТТАМАСЫ............................................................................... 22
4. ЖҰМЫС ЖҮЙЕСІ............................................................................................23
5. ӘРКҮНДІК ҚОЛДАНУ......................................................................................25
6. АҚЫЛ-КЕҢЕС.................................................................................................. 27
7. КҮТУ МЕНЕН ТАЗАЛАУ................................................................................. 28
8. АҚАУЛЫҚТЫ ТҮЗЕТУ.....................................................................................29
9. ОРНАТУ........................................................................................................... 32
10. ТЕХНИКАЛЫҚ АҚПАРАТ..............................................................................35
СІЗ ОЙЫМЫЗДА БОЛДЫҢЫЗ
Electrolux құрылғысын сатып алғаныңызға рахмет. Сіз ондаған жылдар
бойғы кәсіби тәжірибе мен инновацияға сүйеніп жасалған құрылғыны
таңдадыңыз. Тапқырлықтың туындысы болған, көз тартарлық бұл құрылғыны
жасау барысында сіз ойымызда болдыңыз. Сондықтан, қолданған сайын
тамаша нәтижеге қол жеткізе алатыныңызға сенімді болыңыз.
Electrolux әлеміне қош келдіңіз.
Біздің веб-сайтқа барып келесіні қараңыз:
Қолдануға қатысты кеңестер, кітапшалар, ақаулықты түзету, қызмет
көрсету туралы ақпарат:
www.electrolux.com
Сізге барынша жақсы қызмет көрсету үшін өніміңізді мына жерге тіркеңіз:
www.registerelectrolux.com
Құрылғыңызға қажетті керек-жарақтарды, шығынды материалдарды және
фирмалық қосалқы бөлшектерді сатып алу үшін:
www.electrolux.com/shop
ТҰТЫНУШЫҒА ҚЫЗМЕТ КӨРСЕТУ
Фирмалық заттарды қолдануды ұсынамыз.
Қызмет көрсету орталығына хабарласқанда келесі деректердің дайын
болуын қамтамасыз етіңіз. Үлгісі, Өнім нөмірі, Сериялық нөмірі.
Деректерді техникалық ақпарат тақтайшасынан алуға болады.
Ескерту / Қауіп-қатерден сақтандыру ақпараты
Жалпы ақпарат және ақыл-кеңес
Қоршаған ортаға қатысты ақпарат
Өндіруші ескертусіз өзгеріс енгізу құқығына ие.
www.electrolux.com18

1. САҚТЫҚ ШАРАЛАРЫ
Құрылғыны орнатып іске қолданар алдында бірге
жеткізілген нұсқауларды мұқият оқып шығыңыз.
Құрылғыны дұрыс орнатпау мен дұрыс пайдаланбау
нәтижесінде адам жарақат алса және ақаулық орын
алса өндіруші жауапты емес. Нұсқаулықты
келешекте қарап жүру үшін үнемі сақтап қойыңыз.
1.1 Балалар мен дәрменсіз адамдардың
қауіпсіздігі
• Бұл құрылғыны 8 жастан асқан балалар мен
денесіне, сезім жүйесіне не ақыл-есіне зақым
келген адамдар не тәжірибесі аз адамдар өз
қауіпсіздіктерін қамтамасыз ететін адамның
қадағалауы немесе құрылғыны қауіпсіз қолдану
бойынша берген нұсқауына сүйеніп, дұрыс
қолданбау салдарын түсінсе қолдануына болады.
• Балаларға құрылғымен ойнауға рұқсат бермеңіз.
• Балалар тазалау және күтім көрсету жұмыстарын
басқаның бақылауынсыз орындамауға тиіс.
• Орам материалдарының барлығын балалардан
алыс ұстаңыз.
1.2 Қауіпсіздік туралы жалпы ақпарат
• Бұл құрылғы үйде және сол сияқты төменде
аталған жерлерде қолдануға арналған:
– Фермадағы үйлердің; дүкендердегі, кеңселер
мен басқа жұмыс орындарындағы
қызметкерлерге арналған ас бөлмелерде
– Қонақ үйлерде, мотельдерде, төсек және таңғы
аспен қамтамасыз ететін қонақжайларда және
басқа тұрғынды жерлерде
• Құрылғының корпусындағы немесе кіріктірілген
элементіндегі желдеткіш саңылауларды бітемей,
ашық ұстаңыз.
ҚАЗАҚ 19

• Жібіту үдерісін жылдамдату үшін өндіруші ұсынған
құралдардан басқа құралдарды немесе
механикалық құралдарды қолданбаңыз.
• Салқындатқыш жүйенің контурын зақымдамаңыз.
• Құрылғының ішіндегі азық-түлікті сақтауға арналған
бөліктерге электр құрылғыларын, егер оларды
өндіруші ұсынбаған болса қолданбаңыз.
• Құрылғыны тазалау үшін сулы спрейді және буды
қолданбаңыз.
• Құрылғыны дымқыл, жұмсақ шүберекпен
тазалаңыз. Тек бейтарап тазартқыш заттарды
қолданыңыз. Жеміргіш заттарды, түрпілі жөкені,
еріткіштерді немесе темір заттарды
пайдаланбаңыз.
• Құрылғы ішінде жанатын заты бар аэрозоль
сауыттары тәрізді жарылатын затты сақтамаңыз.
• Егер қуат cымына зақым келсе, қатерден сақтану
үшін оны өндіруші немесе уәкілетті қызмет көрсету
орталығы немесе сол сияқты білікті маман
ауыстыруға тиіс.
2. ҚАУІПСІЗДІК НҰСҚАУЛАРЫ
2.1 Орнату
НАЗАРЫҢЫЗДА
БОЛСЫН!
Бұл құрылғыны тек білікті
маман ғана орнатуға тиіс.
• Орам материалдарының барлығын
алыңыз
• Бүлінген құрылғыны орнатпаңыз
немесе іске қоспаңыз.
• Құрылғымен бірге берілген орнату
бойынша нұсқауларды орындаңыз.
• Құрылғыны жылжытқан кезде үнемі
абай болыңыз, себебі салмағы
ауыр. Әрқашан қорғаныс қолғабын
киіңіз.
• Құрылғының айналасында ауа
айналып тұруын қамтамасыз етіңіз.
• Құрылғыны тоққа қосар алдында
кем дегенде 4 сағат күтіңіз. Бұл
майдың компрессорға қайта
құйылуына мүмкіндік беру үшін
қажет.
• Құрылғыны радиаторға немесе
пештерге, тұмшапешке немесе
пештің үстіне жақын орнатпаңыз.
• Құрылғының артқы жағы қабырғаға
қарап тұруға тиіс.
• Құрылғыны күннің жарығы тура
түсетін жерге қоймаңыз.
• Құрылғыны аса дымқыл немесе өте
суық, құрылыс алаңдары, гараж
немесе шарап жерқоймасы тәрізді
жерлерге орнатуға болмайды.
• Құрылғыны жылжытқан кезде,
еденді сызып кетпес үшін алдыңғы
жағынан көтеріңіз.
www.electrolux.com20
Sayfa yükleniyor...
Sayfa yükleniyor...
Sayfa yükleniyor...
Sayfa yükleniyor...
Sayfa yükleniyor...
Sayfa yükleniyor...
Sayfa yükleniyor...
Sayfa yükleniyor...
Sayfa yükleniyor...
Sayfa yükleniyor...
Sayfa yükleniyor...
Sayfa yükleniyor...
Sayfa yükleniyor...
Sayfa yükleniyor...
Sayfa yükleniyor...
Sayfa yükleniyor...
Sayfa yükleniyor...
Sayfa yükleniyor...
Sayfa yükleniyor...
Sayfa yükleniyor...
Sayfa yükleniyor...
Sayfa yükleniyor...
Sayfa yükleniyor...
Sayfa yükleniyor...
Sayfa yükleniyor...
Sayfa yükleniyor...
Sayfa yükleniyor...
Sayfa yükleniyor...
Sayfa yükleniyor...
Sayfa yükleniyor...
Sayfa yükleniyor...
Sayfa yükleniyor...
Sayfa yükleniyor...
Sayfa yükleniyor...
Sayfa yükleniyor...
Sayfa yükleniyor...
Sayfa yükleniyor...
Sayfa yükleniyor...
Sayfa yükleniyor...
Sayfa yükleniyor...
Sayfa yükleniyor...
Sayfa yükleniyor...
Sayfa yükleniyor...
Sayfa yükleniyor...
Sayfa yükleniyor...
Sayfa yükleniyor...
Sayfa yükleniyor...
Sayfa yükleniyor...
Sayfa yükleniyor...
Sayfa yükleniyor...
Sayfa yükleniyor...
Sayfa yükleniyor...
-
 1
1
-
 2
2
-
 3
3
-
 4
4
-
 5
5
-
 6
6
-
 7
7
-
 8
8
-
 9
9
-
 10
10
-
 11
11
-
 12
12
-
 13
13
-
 14
14
-
 15
15
-
 16
16
-
 17
17
-
 18
18
-
 19
19
-
 20
20
-
 21
21
-
 22
22
-
 23
23
-
 24
24
-
 25
25
-
 26
26
-
 27
27
-
 28
28
-
 29
29
-
 30
30
-
 31
31
-
 32
32
-
 33
33
-
 34
34
-
 35
35
-
 36
36
-
 37
37
-
 38
38
-
 39
39
-
 40
40
-
 41
41
-
 42
42
-
 43
43
-
 44
44
-
 45
45
-
 46
46
-
 47
47
-
 48
48
-
 49
49
-
 50
50
-
 51
51
-
 52
52
-
 53
53
-
 54
54
-
 55
55
-
 56
56
-
 57
57
-
 58
58
-
 59
59
-
 60
60
-
 61
61
-
 62
62
-
 63
63
-
 64
64
-
 65
65
-
 66
66
-
 67
67
-
 68
68
-
 69
69
-
 70
70
-
 71
71
-
 72
72


Electrolux EUF2042AOW Kullanım kılavuzu
- Kategori
- Dondurucular
- Tip
- Kullanım kılavuzu
- Bu kılavuz aynı zamanda aşağıdakiler için de uygundur:
diğer dillerde
- English: Electrolux EUF2042AOW User manual
İlgili makaleler
-
Electrolux EUT1106AW2 Kullanım kılavuzu
-
Electrolux EUX2245AOX Kullanım kılavuzu
-
-
Electrolux EUF2042AOW Kullanım kılavuzu
-
-
-
-
-
Electrolux EUF2748AOX Kullanım kılavuzu
-