HOTPOINT/ARISTON WDD 9640BX EU Kullanici rehberi
- Kategori
- Çamaşır makineleri
- Tip
- Kullanici rehberi

GB
1
! This symbol reminds you to read this instruction manual.
Contents
Installation, 2-3
Unpacking and levelling
Connecting the electricity and water supplies
The first wash cycle
Technical data
Description of the washer-dryer, 4-5
Control panel
Display
How to run a wash cycle or a drying cycle, 6
Wash cycles and functions, 7
Table of wash cycles
Wash functions
Detergents and laundry, 8
Detergent dispenser drawer
Preparing the laundry
Special wash cycles
Load balancing system
Precautions and tips, 9
General safety
Disposal
Opening the porthole door manually
Care and maintenance, 10
Cutting off the water or electricity supply
Cleaning the washer-dryer
Cleaning the detergent dispenser drawer
Caring for the door and drum of your appliance
Cleaning the pump
Checking the water inlet hose
Troubleshooting, 11
Service, 12
WDD 9640
Instructions for use
WASHER-DRYER
English,1
GB
Magyar,13
HU
HU
Türkçe,25
TR

2
GB
Levelling the machine correctly will provide it with stability,
help to avoid vibrations and excessive noise and prevent it
from shifting while it is operating. If it is placed on carpet or
a rug, adjust the feet in such a way as to allow a sufficient
ventilation space underneath the washer-dryer.
Connecting the electricity and water
supplies
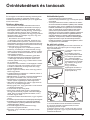
Connecting the water inlet hose
1. Connect the supply pipe
by screwing it to a cold
water tap using a ¾ gas
threaded connection (see
figure).
Before performing the con-
nection, allow the water to
run freely until it is perfectly
clear.
2. Connect the inlet hose
to the washer-dryer by
screwing it onto the corre-
sponding water inlet of the
appliance, which is situa-
ted on the top right-hand
side of the rear part of the
appliance (see figure).
3. Make sure that the hose is not folded over or bent.
! The water pressure at the tap must fall within the values
indicated in the Technical details table (see page 3).
! If the inlet hose is not long enough, contact a specialised
shop or an authorised technician.
! Never use second-hand hoses.
! Use the ones supplied with the machine.
! This instruction manual should be kept in a safe place for
future reference. If the washer-dryer is sold, transferred or
moved, make sure that the instruction manual remains with
the machine so that the new owner is able to familiarise
himself/herself with its operation and features.
! Read these instructions carefully: they contain vital infor-
mation relating to the safe installation and operation of the
appliance.
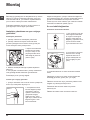
Unpacking and levelling
Unpacking
1. Remove the washer-dryer from its packaging.
2. Make sure that the washer-dryer has not been damaged
during the transportation process. If it has been damaged,
contact the retailer and do not proceed any further with the
installation process.
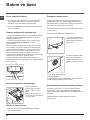
3. Remove the 4 protective
screws (used during tran-
sportation) and the rubber
washer with the correspon-
ding spacer, located on the
rear part of the appliance
(see figure).
4. Close off the holes using the plastic plugs provided.
5. Keep all the parts in a safe place: you will need them
again if the washer-dryer needs to be moved to another
location.
! Packaging materials should not be used as toys for
children.
Levelling
1. Install the washer-dryer on a flat sturdy floor, without re-
sting it up against walls, furniture cabinets or anything else.
2. If the floor is not perfectly
level, compensate for any
unevenness by tightening
or loosening the adjusta-
ble front feet (see figure);
the angle of inclination,
measured in relation to the
worktop, must not exceed
2°.
Installation

GB
3
65 - 100 cm
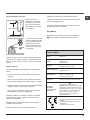
Connecting the drain hose
Connect the drain hose,
without bending it, to a drai-
nage duct or a wall drain
located at a height between
65 and 100 cm from the
floor;
alternatively, rest it on
the side of a washbasin
or bathtub, fastening the
duct supplied to the tap
(see figure). The free end
of the hose should not be
underwater.
! We advise against the use of hose extensions; if it is
absolutely necessary, the extension must have the same
diameter as the original hose and must not exceed 150 cm
in length.
Electrical connections
Before plugging the appliance into the electricity socket,
make sure that:
• the socket is earthed and complies with all applicable
laws;
• the socket is able to withstand the maximum power load
of the appliance as indicated on the Technical Data Plate
fixed on the machine;
• the power supply voltage falls within the values indicated
on the Technical Data Plate fixed on the machine;
• the socket is compatible with the plug of the washer-dr-
yer. If this is not the case, replace the socket or the plug.
! The washer-dryer must not be installed outdoors, even
in covered areas. It is extremely dangerous to leave the
appliance exposed to rain, storms and other weather
conditions.
! When the washer-dryer has been installed, the electricity
socket must be within easy reach.
! Do not use extension cords or multiple sockets.
! The cable should not be bent or compressed.
! The power supply cable must only be replaced by autho-
rised technicians.
Warning! The company shall not be held responsible in the
event that these regulations are not respected.
The first wash cycle
Once the appliance has been installed, and before you use
it for the first time, run a wash cycle with detergent and no
laundry, using the wash cycle (60°C).
Technical data
Model
WDD 9640
Dimensions
width 59.5 cm
height 85 cm
depth 60,5 cm
Capacity
from 1 to 9 kg for the wash programme
from 1 to 6 kg for the drying programme
Electrical
connections
please refer to the technical data plate
fixed to the machine
Water connections
maximum pressure 1 MPa (10 bar)
minimum pressure 0.05 MPa (0.5 bar)
drum capacity 62 litres
Spin speed
up to 1400 rotations per minute
Energy rated
programmes
according to
regulation
EN 50229
Wash: programme
; temperature 60°C
(2nd press of the button); using a load of 9 kg.
Drying: the smaller load must be dried by
selecting the “EXTRA” dryness level. The
load must consist of 3 sheets, 2 pillowca-
ses and 1 hand towel;
the remainder of the load must be dried by
selecting the “EXTRA” dryness level.
This appliance conforms to the following
EC Directives:
- 2004/108/EC (Electromagnetic Compatibility)
- 2006/95/EC (Low Voltage)
- 2002/96/EC

4
GB
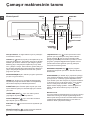
Detergent dispenser drawer: used to dispense deter-
gents and washing additives (see “Detergents and laundry”).
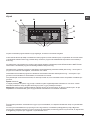
ON/OFF button : press this briefly to switch the ma-
chine on or off. The START/PAUSE indicator light, which
flashes slowly in a green colour shows that the machine
is switched on. To switch off the washer-dryer during the
wash cycle, press and hold the button for approximately 3
seconds; if the button is pressed briefly or accidentally the
machine will not switch off. If the machine is switched off
during a wash cycle, this wash cycle will be cancelled.
WASH CYCLE SELECTOR buttons: used to set the
desired wash cycle (see “Table of wash cycles”).
MEMORY button: press and hold the button to store a
cycle with your own set of preferences in the memory of
the machine. To recall a previously stored cycle, press the
MEMORY button.
FUNCTION buttons: press the button to select the
desired function. The corresponding indicator light on the
display will switch on.
CLEANING ACTION
button : to select the desired
wash intensity.
ANTI ALLERGY RINSE
button : press to select
the desired rinse type.
DRYING button : press to set a drying cycle.
TEMPERATURE button : press to decrease the tem-
perature: the value will be shown on the display.
CHILD LOCK button : to activate the control panel
lock, press and hold the button for approximately 2
seconds. When the symbol is illuminated, the control
panel is locked. This means it is possible to prevent wash
cycles from being modified accidentally, especially where
there are children in the home. To deactivate the control
panel lock, press and hold the button for approximately 2
seconds.
DELAY TIMER button : press to set a delayed start
time for the selected wash cycle. The delay time will be
shown on the display.
START/PAUSE button with indicator light: when the gre-
en indicator light flashes slowly, press the button to start a
wash cycle. Once the cycle has started the indicator light
will remain lit in a fixed manner. To pause the wash cycle,
press the button again; the indicator light will flash in an
orange colour. If the symbol is not illuminated, the door
may be opened. To start the wash cycle from the point at
which it was interrupted, press the button again.
Standby mode
This washer-dryer, in compliance with new energy saving
regulations, is fitted with an automatic standby system
which is enabled after about 30 minutes if no activity is
detected. Press the ON-OFF button briefly and wait for the
machine to start up again.
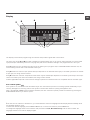
Description of the washer-dryer
Control panel
TEMPERATURE
button
WASH
CYCLE
SELECTOR
buttons
Detergent dispenser drawer
FUNCTION
buttons
ON/OFF
button
START/PAUSE
button with
indicator light
CHILD LOCK
button
DISPLAY
DELAY
TIMER
button
MEMORY
button
CLEANING
ACTION
button
ANTI
ALLERGY
RINSE
button
DRYING
button

GB
5
Display
The display is useful when programming the machine and provides a great deal of information.
The upper two strings A and B are used to display the selected wash cycle or the type of drying selected, the current wash
cycle phase (the selected dryness level or drying time) and all the indications relating to the progress status of the cycle.
String C shows the time remaining until the end of the wash cycle in progress and, if a DELAYED START has been set, the
time remaining until the start of the selected wash cycle.
String D shows the maximum spin speed value (this depends on the selected wash cycle); if the wash cycle does not include
a spin cycle, the string remains unused.
String E shows the maximum temperature value which may be selected (this depends on the wash cycle used); if the tempe-
rature of the wash cycle cannot be modified, the string remains unused.
Indicator lights F correspond to the functions and light up when the selected function is compatible with the set wash cycle.
Door locked symbol
If the symbol is lit, this indicates that the washer-dryer door is blocked to prevent it from being opened accidentally. To pre-
vent any damage from occurring, wait for the symbol to switch itself off before opening the appliance door.
N.B.: if the DELAYE TIMER function has been activated, the door cannot be opened; pauses the machine by pressing the
START/PAUSE button if you wish to open it.
! The first time the machine is switched on, you will be asked to select the language and the display will automatically show
the language selection menu.
To select the desired language press the X and Y buttons; to confirm the selection press the Z button.
To change the language switch off the machine and press buttons X, Y, Z simultaneously until an alarm is heard: the
language-selection menu will be displayed again.
A
B
C
D
E
F
Z
X
Y

6
GB
How to run a wash cycle or a
drying cycle
1. SWITCH THE MACHINE ON. Press the On/Off button ;
the text POWER ON will appear on the display and the START/
PAUSE indicator light will flash slowly in a green colour.
2. LOAD THE LAUNDRY. Open the porthole door. Load the
laundry, making sure you do not exceed the maximum load value
indicated in the table of programmes on the following page.
3. MEASURE OUT THE DETERGENT. Open the detergent
dispenser drawer and pour the detergent into the relevant
compartments as described in “Detergents and laundry”.
4. CLOSE THE DOOR.
5. SELECT THE WASH CYCLE. Press one of the WASH
CYCLE SELECTOR buttons to select the required wash
cycle; the name of the wash cycle will appear on the display.
A temperature and spin speed is set for each wash cycle;
these may be adjusted. The duration of the cycle will appear
on the display.
6. CUSTOMISE THE WASH CYCLE. Use the relevant buttons:
Modifying the temperature. The machine automatically
select the maximum temperature set for the selected
wash cycle; this values cannot therefore be increased. The
temperature can be decreased by pressing the button,
until the cold wash “OFF” setting is reached. If this button is
pressed again, the maximum values are restored.
! Exception: if the
60°C (2nd press of the button)
programme is selected, the temperature can be increased
up to a value of 90°C.
Setting a delayed start.
To set a delayed start for the selected programme, press
the corresponding button repeatedly until the required delay
period has been reached. When this option is enabled, the
symbol lights up on the display. To remove the delayed
start function press the button until the text “OFF” appears
on the display.
Setting the drying cycle.
The desired drying cycle type may be set by pressing the
DRYING button once or several times. Two options are
available:
A - Based on the how damp the clothes are once they have
been dried:
Iron: suitable for clothes which will need ironing afterwards.
the remaining dampness softens creases, making them easier
to remove.
Hanger: ideal for clothes which do not need to be dried fully.
Cupboard: suitable for laundry which can be put back in a
cupboard without being ironed.
Extra: suitable for garments which need to be dried
completely, such as sponges and bathrobes.
B - Based on a set time period: between 20 and 180 minutes.
To exclude the drying phase press the relevant button until the
text OFF appears on the display.
If your laundry load to be washed and dried is much greater
than the maximum stated load, perform the wash cycle, and
when the cycle is complete, divide the garments into groups
and put some of them back in the drum. At this point, follow
the instructions provided for a “Drying only” cycle. Repeat this
procedure for the remainder of the load. A cooling-down period
is always added to the end of each drying cycle.
Drying only
Use the cycle selector knob to select a drying cycle (
) in accordance with the type of fabric. The desired drying
level or time may also be set using the DRYING button .
Selecting the cotton drying cycle through the programme
selector knob and pressing the “Eco” button activates an
automatic drying cycle that allows for saving energy, thanks to
an optimal combination of air temperature and cycle duration;
the display will visualise the “Eco” dryness level.
Set the desired wash intensity.
Option makes it possible to optimise washing based on
the level of soil in the fabrics and on desired wash cycle intensity.
Select the wash programme: the cycle will be automatically
set to “Normal” as optimised for garments with an
average level of soil (this setting is not applicable to the
“Wool” cycle, which is automatically set to “Delicate”).
For heavily-soiled garments press button until the
“Super Wash” level is reached. This level ensures a high-
performance wash due to a larger quantity of water used
in the initial phase of the cycle and due to increased drum
rotation. It is useful when removing the most stubborn stains.
It can be used with or without bleach. If you wish to bleach the
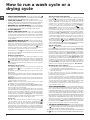
items insert the additional compartment (4) into compartment
1. When pouring the bleach, be careful not to exceed the
“max” level marked on the central pivot (see figure pag. 8).
For lightly-soiled garments or a more delicate treatment of the
fabrics, press button “ ” until the “Delicate” level is reached.
The cycle will reduce the drum rotation to ensure washing results are
perfect for delicate garments. If the current selection can be neither
set nor changed, the display will show “Not allowed”.
Set the rinse type.
Option makes it possible to select the desired rinse type
for sensitive skin. Press the button once for the “Extra Rinse”
level, which makes it possible to select an additional rinse after
the standard cycle rinse and remove all traces of detergent.
Press the button again for the “Sensitive Skin” level, which
makes it possible to select two additional rinses to the standard
cycle rinses; it is recommended for very sensitive skin. Press
the button for the third time for the “Anti allergy Rinse” level,
which makes it possible to select three additional rinses to the
standard cycle rinses and remove major allergens such as pollen,
mites, cat and dog hair. Press the button again to go back to
the “Normal Rinse” rinse type. If the current adjustment can be
neither set nor changed, the display will show “Not allowed”.
Modifying the cycle settings.
• Press the button to enable the function; the indicator light
corresponding to the button will switch on.
• Press the button again to disable the function; the indicator
light will switch off.
! If the selected function is not compatible with the
programmed wash cycle, the indicator light will flash and the
function will not be activated.
! If the selected function is not compatible with another
function which has been selected previously, the indicator
light corresponding to the first function selected will flash and
only the second function will be activated; the indicator light
corresponding to the enabled function will remain lit.
! The functions may affect the recommended load value and/
or the duration of the cycle.
7. START THE PROGRAMME. Press the START/PAUSE button.
The corresponding indicator light will become green, remaining
lit in a fixed manner, and the door will be locked (the DOOR
LOCKED symbol will be on). During the wash cycle, the name
of the phase in progress will appear on the display. To change a
wash cycle while it is in progress, pause the washer-dryer using
the START/PAUSE button (the START/PAUSE indicator light will
flash slowly in an orange colour); then select the desired cycle
and press the START/PAUSE button again. To open the door
while a cycle is in progress, press the START/PAUSE button; if
the DOOR LOCKED symbol is switched off the door may
be opened. Press the START/PAUSE button again to restart the
wash cycle from the point at which it was interrupted.
8. THE END OF THE WASH CYCLE. This will be indicated by the
text “END OF CYCLE” on the display; when the DOOR LOCKED
symbol switches off the door may be opened. Open the door,
unload the laundry and switch off the machine.
! If you wish to cancel a cycle which has already begun, press and hold
the button. The cycle will be stopped and the machine will switch off.

GB
7
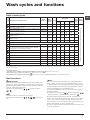
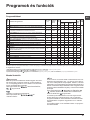
Wash cycles and functions
Table of wash cycles
Wash
cycles
Description of the wash cycle
Max.
temp. (°C)
Max.
speed
(rpm)
Drying
Detergents
Max.
load
(kg)
Cycle
duration
Pre-
Wash
Wash Bleach
Fabric
softener
Anti Stain
40° 1400
-
-
5
Cotton Prewash (1st press of the button): extremely soiled
whites and resistant colours.
90° 1400
-
9
White Cottons (1) (2nd press of the button): heavily soiled
whites and delicate colours.
60°
(Max. 90°C)
1400
-
9
Cottons Coloured (2) (3rd press of the button): lightly soiled
whites and delicate colours.
40° 1400
-
9
Synthetics Resistant (1st press of the button): heavily soiled
resistant colours.
60° 800
-
4
Synthetics Delicate (2nd press of the button): lightly soiled
resistant colours.
40° 800
-
4
Delicates
30° 0
-
-
1
M
Memory: allows for any wash cycle to be stored.
Woolmark Platinum (Wool): for wool, cashmere, etc. 40° 800
-
-
2
Fastwash 30' (1st press of the button): to refresh lightly
soiled garments quickly (not suitable for wool, silk and
clothes which require washing by hand).
30° 800
-
-
3.5
Ready to Wear (2nd press of the button)
30° 1400
-
-
1
Cotton Dry (1st press of the button)
- -
- - - - 6
Synthetics Dry (2nd press of the button)
- -
- - - - 4
Wool Dry (3rd press of the button)
- -
- - - - 2
Spin (1st press of the button) - 1400
- - - - 9
Rinse (2nd press of the button) - 1400
- - -
9
Pump out (3rd press of the button) - 0 - - - - - 9
The duration of the wash cycles can be checked on the display.
The length of cycle shown on the display or in this booklet is an estimation only and is calculated assuming standard working conditions. The actual duration can
vary according to factors such as water temperature and pressure, the amount of detergent used, the amount and type of load inserted, load balancing and any
wash options selected.
For all Test Institutes:
1) Test wash cycle in compliance with regulation EN 50229: set wash cycle 60°C (2nd press of the button).
2) Long wash cycle for cottons: set wash cycle 40°C (3rd press of the button).
3) Long wash cycle for synthetics: set wash cycle 60°C (1st press of the button); temperature of 40°C (press TEMPERATURE button).
Wash functions
Timer Saver
If you select this option, the wash cycle duration will be redu-
ced by up to 50%, depending on the selected cycle, thereby
guaranteeing simultaneous water and energy saving. Use this
cycle for lightly soiled garments.
! It cannot be used with the , , , “Ready to Wear”,
, .
Press this button to reduce the spin speed.
! It cannot be used with the , , , , and “Pump
out”.
Eco
The Eco function saves energy by not heating the water
used to wash your laundry – an advantage both to the en-
vironment and to your energy bill. Instead, intensified wash
action and water optimisation ensure great wash results in
the same average time of a standard cycle.
For the best washing results we recommend the usage of
a liquid detergent.
! It cannot be used with the , (Cotton Prewash), ,
, “Ready to Wear”, “Synthetics Dry”, “Wool Dry”, .
By selecting the drying function as well, an automatic
drying cycle automatically activates at the end of the wash
cycle – it too allows for saving energy, thanks to the opti-
mal combination of air temperature and cycle duration; the
display will visualise the “Eco” dryness level,
! It can be activated with programmes “White Cottons” and
“Cottons Coloured”.

8
GB
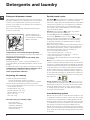
Detergent dispenser drawer
Good washing results also depend on the correct dose of
detergent: adding too much detergent will not necessarily
result in a more efficient wash, and may in fact cause a
build up on the inside of your appliance and contribute to
environmental pollution.
! Do not use hand washing detergents because these
create too much foam.
Open the detergent di-
spenser drawer and pour
in the detergent or washing
additive, as follows.
compartment 1: Pre-wash detergent (powder)
Before pouring in the detergent, make sure that extra com-
partment 4 has been removed.
compartment 2: Detergent for the wash cycle
(powder or liquid)
If liquid detergent is used, it is recommended that the
removable plastic partition A (supplied) be used for proper
dosage.
If powder detergent is used, place the partition into slot B.
compartment 3: Additives (fabric softeners, etc.)
The fabric softener should not overflow the grid.
extra compartment 4: Bleach
Preparing the laundry
• Divide the laundry according to:
- the type of fabric/the symbol on the label
- the colours: separate coloured garments from whites.
• Empty all garment pockets and check the buttons.
• Do not exceed the listed values, which refer to the weight
of the laundry when dry:
Durable fabrics: max. 9 kg
Synthetic fabrics: max. 4 kg
Delicate fabrics: max. 2 kg
Wool: max. 2 kg
Silk: max. 2 kg
How much does your laundry weigh?
1 sheet 400-500 g
1 pillow case 150-200 g
1 tablecloth 400-500 g
1 bathrobe 900-1200 g
1 towel 150-250 g
Special wash cycles
Anti Stain : this programme is suitable to heavily-soiled
garments with resistant colours. It ensures a washing
class that is higher than the standard class (A class). When
running the programme, do not mix garments of different
colours. We recommend the use of powder detergent.
Pre-treatment with special additives is recommended if
there are obstinate stains.
Delicates: use programme to wash very delicate
garments having strasses or sequins.
To wash silk garments and curtains select the cycle
and set the “Delicate” level from option .
We recommend turning the garments inside out before
washing and placing small items into the special bag
for washing delicates. Use liquid detergent on delicate
garments for best results.
When selecting an exclusively time-based drying function,
a drying cycle is performed at the end of the wash cycle
that is particularly delicate, thanks to light handling and
appropriate temperature control of the water jet.
The recommended durations are:
1 kg of synthetic garments --> 150 min
1 kg of synthetic and cotton garments --> 180 min
1 kg of cotton garments --> 180 min
The degree of dryness depends on the load and fabric
composition.
Wool: the wool wash cycle on this Hotpoint-Ariston
machine has been tested and approved by The Woolmark
Company for washing wool garments labelled as hand wa-
shable provided that the garments are washed according
to the instructions on the garment label and those issued
by the manufacturer of this washing machine. Hotpoint-
Ariston is the first washing machine brand to be approved
by The Woolmark Company for Apparel Care- Platinum for
its washing performance and consumption of energy and
water (M1127)
Ready to Wear: select programme (2nd press of the button)
for washing and drying lightly soiled garments (Cotton and
Synthetic) in a short time. This cycle may be used to wash
and dry a laundry load of up to 1 kg in just 45 minutes.
To achieve optimum results, use liquid detergent and pre-
treat cuffs, collars and stains.
Load balancing system
Before every spin cycle, to avoid excessive vibrations and
to distribute the load in a uniform manner, the drum rotates
continuously at a speed which is slightly greater than the
washing rotation speed. If, after several attempts, the load
is not balanced correctly, the machine spins at a reduced
spin speed. If the load is excessively unbalanced, the
washer-dryer performs the distribution process instead of
spinning. To encourage improved load distribution and bal-
ance, we recommend small and large garments are mixed
in the load.
M
AX
1
2
4
3
A
B
Detergents and laundry

GB
9
Precautions and tips
! This washer-dryer was designed and constructed in
accordance with international safety regulations. The fol-
lowing information is provided for safety reasons and must
therefore be read carefully.
General safety
• This appliance is not intended for use by persons (inclu-
ding children) with reduced physical, sensory or mental
capabilities, or lack of experience and knowledge,
unless they have been given supervision or instruction
concerning use of the appliance by a person responsi-
ble for their safety.
Children should be supervised to ensure that they do
not play with the appliance.
– Do not dry unwashed items in the tumble dryer.
– Items that have been soiled with substances such as
cooking oil, acetone, alcohol, petrol, kerosene, spot re-
movers, turpentine, waxes and wax removers should be
washed in hot water with an extra amount of detergent
before being dried in the tumble dryer.
– Items such as foam rubber (latex foam), shower caps,
waterproof textiles, rubber backed articles and clothes
or pillows fitted with foam rubber pads should not be
dried in the tumble dryer.
– Fabric softeners, or similar products, should be used
as specified by the fabric softener instructions.
– The final part of a tumble dryer cycle occurs without
heat (cool down cycle) to ensure that the items are left
at a temperature that ensures that the items will not be
damaged.
WARNING: Never stop a tumble dryer before the end
of the drying cycle unless all items are quickly removed
and spread out so that the heat is dissipated.
• This appliance was designed for domestic use only.
• Do not touch the machine when barefoot or with wet or
damp hands or feet.
• Do not pull on the power supply cable when unplugging
the appliance from the electricity socket. Hold the plug
and pull.
• Do not touch the drained water as it may reach extre-
mely high temperatures.
• Never force the porthole door. This could damage the safety
lock mechanism designed to prevent accidental opening.
• If the appliance breaks down, do not under any circum-
stances access the internal mechanisms in an attempt
to repair it yourself.
• Always keep children well away from the appliance while
it is operating.
• If it must be moved, proceed with the help of two or th-
ree people and handle it with the utmost care. Never try
to do this alone, because the appliance is very heavy.
• Before loading laundry into the washer dryer, make sure
the drum is empty.
• During the drying phase, the door tends to get quite hot.
• Do not use the appliance to dry clothes that have
been washed with flammable solvents (e.g.
trichlorethylene).
• Do not use the appliance to dry foam rubber or
similar elastomers.
• Make sure that the water tap is turned on during
the drying cycles.
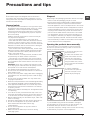
Opening the porthole door manually
In the event that it is not possible to open the porthole
door due to a powercut, and if you wish to remove the
laundry, proceed as follows:
1. remove the plug from the
electrical socket.
2. make sure the water level
inside the machine is lower
than the door opening; if it
is not, remove excess water
using the drain hose, collec-
ting it in a bucket as indicated
in the figure.
3. using a screwdriver,
remove the cover panel on
the lower front part of the
washer-dryer (see figure).
4. pull outwards using the tab as indicated in the figure,
until the plastic tie-rod is freed from its stop position; pull
downwards and open the door at the same time.
5. reposition the panel, making sure the hooks are securely
in place before you push it onto the appliance.
20
Disposal
• Disposing of the packaging materials: observe local regu-
lations so that the packaging may be re-used.
• The European Directive 2002/96/EC on Waste Electrical
and Electronic Equipment, requires that old household
electrical appliances must not be disposed of in the normal
unsorted municipal waste stream. Old appliances must be
collected separately in order to optimise the recovery and
recycling of the materials they contain and reduce the im-
pact on human health and the environment. The crossed
out “wheeled bin” symbol on the product reminds you of
your obligation, that when you dispose of the appliance it
must be separately collected. Consumers should contact
their local authority or retailer for information concerning the
correct disposal of their old appliance.

10
GB
Care and maintenance
Cutting off the water and electricity
supplies
• Turn off the water tap after every wash cycle. This will limit
wear on the hydraulic system inside the washer-dryer and
help to prevent leaks.
• Unplug the washer-dryer when cleaning it and during all
maintenance work.
Cleaning the washer-dryer
• The outer parts and rubber components of the applian-
ce can be cleaned using a soft cloth soaked in lukewarm
soapy water. Do not use solvents or abrasives.
• The washer-dryer has a “Auto Clean” programme for its
internal parts that must be run with no load in the drum.
For maximum performance you may want to use either
the detergent (i.e. a quantity 10% the quantity specified
for lightly-soiled garments) or special additives to clean the
washer-dryer. We recommend running a cleaning program-
me every 40 wash cycles.
To start the programme press buttons A and B simulta-
neously for 5 seconds (see figure).
The programme will start automatically and will last appro-
ximately 70 minutes. To stop the cycle press the START/
PAUSE button.
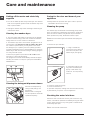
Cleaning the detergent dispenser drawer
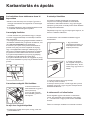
Remove the dispenser by
raising it and pulling it out
(see figure).
Wash it under running wa-
ter; this operation should be
repeated frequently.
Caring for the door and drum of your
appliance
• Always leave the porthole door ajar in order to prevent
unpleasant odours from forming.
Cleaning the pump
The washer-dryer is fitted with a self-cleaning pump which
does not require any maintenance. Sometimes, small items
(such as coins or buttons) may fall into the pre-chamber
which protects the pump, situated in its bottom part.
! Make sure the wash cycle has finished and unplug the
appliance.
To access the pre-chamber:
1. using a screwdriver,
remove the cover panel on
the lower front part of the
washer-dryer (see figure);
2. unscrew the lid by rota-
ting it anti-clockwise (see
figure): a little water may
trickle out. This is perfectly
normal;
3. clean the inside thoroughly;
4. screw the lid back on;
5. reposition the panel, making sure the hooks are securely
in place before you push it onto the appliance.
Checking the water inlet hose
Check the inlet hose at least once a year. If there are any
cracks, it should be replaced immediately: during the wash
cycles, water pressure is very strong and a cracked hose
could easily split open.
! Never use second-hand hoses.
1
2
A
B

GB
11
Troubleshooting
Your washer-dryer could fail to work. Before contacting the Technical Assistance Centre (see “Assistance”), make sure that
the problem cannot be not solved easily using the following list.
Problem:
The washer-dryer does not switch on.
The wash cycle does not start.
The washer-dryer does not take in
water (the text “NO WATER, CHECK
SUPPLY” appears on the display).
The washer-dryer continuously
takes in and
drains water.
The washer-dryer does not drain or
spin.
The washer-dryer vibrates a lot
during the spin cycle.
The washer-dryer leaks.
The machine is locked and the display
flashes, indicating an error code (e.g.
F-01, F-..).
There is too much foam.
The washer-dryer does not dry.
Possible causes / Solutions:
• The appliance is not plugged into the socket fully, or is not making contact.
• There is no power in the house.
• The washer-dryer door is not closed properly.
• The ON/OFF button has not been pressed.
• The START/PAUSE button has not been pressed.
• The water tap has not been opened.
• A delayed start has been set (see “How to run a wash cycle or a drying cycle”).
• The water inlet hose is not connected to the tap.
• The hose is bent.
• The water tap has not been opened.
• There is no water supply in the house.
• The pressure is too low.
• The START/PAUSE button has not been pressed.
• The drain hose is not fitted at a height between 65 and 100 cm from the floor
(see “Installation”).
• The free end of the hose is under water (see “Installation”).
• The wall drainage system is not fitted with a breather pipe.
If the problem persists even after these checks, turn off the water tap, switch
the appliance off and contact the Assistance Service. If the dwelling is on one of
the upper floors of a building, there may be problems relating to water drainage,
causing the washer-dryer to fill with water and drain continuously. Special anti-
draining valves are available in shops and help to avoid this inconvenience.
• The wash cycle does not include draining: some wash cycles require the drain
phase to be started manually (see “Wash cycles and functions”).
• The drain hose is bent (see “Installation”).
• The drainage duct is clogged.
• The drum was not unlocked correctly during installation (see “Installation”).
• The washer-dryer is not level (see “Installation”).
• The washer-dryer is trapped between cabinets and walls (see “Installation”).
• The water inlet hose is not screwed on properly (see “Installation”).
• The detergent dispenser drawer is blocked (for cleaning instructions, see “Care
and maintenance”).
• The drain hose is not fixed properly (see “Installation”).
• Switch off the machine and unplug it, wait for approximately 1 minute and then
switch it back on again. If the problem persists, contact the Technical Assi-
stance Service.
• The detergent is not suitable for machine washing (it should display the text
“for washing machines” or “hand and machine wash”, or the like).
• Too much detergent was used.
• The appliance is not plugged into the socket, or not enough to make contact.
• There has been a power failure.
• The appliance door is not shut properly.
• A DELAY TIMER has been set.
• DRYING is in the OFF position.

12
GB
Before calling for Assistance:
• Check whether you can solve the problem alone (see “Troubleshooting”);
• Restart the programme to check whether the problem has been solved;
• If this is not the case, contact an authorised Technical Assistance Centre using the telephone number provided on the
guarantee certificate.
! Always request the assistance of authorised technicians.
Have the following information to hand:
• the type of problem;
• the appliance model (Mod.);
• the serial number (S/N).
This information can be found on the data plate applied to the rear of the washer-dryer, and can also be found on the front of
the appliance by opening the door.
Service

HU
13
Magyar
! Ez a szimbólum arra gyelmeztet, hogy olvassa el ezt a
használati utasítást.
Összefoglalás
Üzembe helyezés, 14–15
Kicsomagolás és vízszintbe állítás
Víz- és elektromos csatlakozás
Első mosási ciklus
Műszaki adatok
A mosógép leírása, 16-17
Kezelőpanel
Kijelző
A mosási ciklusok, illetve a szárítás végre-
hajtása, 18
Programok és funkciók, 19
Programtáblázat
Mosási funkciók
Mosószerek és mosandók, 20
Mosószer-adagoló ók
A mosandó ruhák előkészítése
Különleges programok
A bepakolt ruhák kiegyensúlyozására szolgáló rendszer
Óvintézkedések és tanácsok, 21
Általános biztonság
Hulladékelhelyezés
Az ajtó kézi nyitása
Karbantartás és ápolás, 22
A víz elzárása és az elektromos áram kikapcsolása
A mosógép tisztítása
A mosószer-adagoló ók tisztítása
Az ajtó és a forgódob ápolása
A szivattyú tisztítása
A vízbevezető cső ellenőrzése
Rendellenességek és elhárításuk, 23
Szerviz, 24
HU
WDD 9640
Használati utasítás
MOSÓGÉP

14
HU
! Fontos, hogy megőrizze ezt a kézikönyvet, hogy mindig
kéznél legyen. Ha a mosógépet eladná, átadná vagy má-
snál helyezné el, gondoskodjon arról, hogy e kézikönyv
a mosógéppel együtt maradjon, hogy az új tulajdonos is
megismerhesse a készülék funkcióit és az ezekre vona-
tkozó gyelmeztetéseket.
! Figyelmesen olvassa el az utasításokat: fontos infor-
mációkat tartalmaznak az üzembe helyezésről, a ha-
sználatról és a biztonságról.
Kicsomagolás és vízszintbe állítás
Kicsomagolás
1. Csomagolja ki a mosógépet.
2. Ellenőrizze, hogy a mosógép nem sérült-e meg a szál-
lítás során. Ha a gépen sérülést talál, ne csatlakoztassa,
és forduljon a viszonteladóhoz.
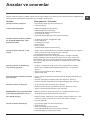
3. Csavarozza ki a gép
hátsó részén található, a
szállításhoz szükséges 4
védőcsavart, és távolítsa el
a gumibakot (lásd ábra).
4. Zárja le a furatokat a mellékelt műanyag dugókkal.
5. Minden darabot őrizzen meg: ha a mosógépet szállíta-
ni kell, előtte ezeket vissza kell szerelni.
! A csomagolóanyag nem gyermekjáték!
Vízszintbe állítás
1. A mosógépet sík és kemény padlóra állítsa, úgy, hogy
ne érjen falhoz, bútorhoz vagy máshoz.
2. Ha a padló nem töké-
letesen vízszintes, azt az
első lábak be-, illetve kic-
savarásával kompenzálha-
tja (lásd ábra). A gép felső
burkolatán mért dőlés nem
haladhatja meg a 2°-ot.
A pontos vízszintezés biztosítja a gép stabilitását, így
az a működés során nem fog rezegni, zajt okozni, illetve
elmozdulni. Szőnyegpadló vagy szőnyeg esetén a lába-
kat úgy állítsa be, hogy a mosógép alatt elegendő hely
maradjon a szellőzésre.
Víz- és elektromos csatlakozás
Vízbevezető cső csatlakoztatása
1. A vízbevezető cső csat-
lakoztatásához csavarozza
fel a csövet egy 3/4”-os
külső menettel rendelkező
hidegvíz csapra (lásd
ábra).
A csatlakoztatás előtt eres-
sze meg a csapot addig,
amíg a víz teljesen átlát-
szóvá nem válik.
2. A vízbevezető cső csat-
lakoztatásához csavarozza
a csövet a mosógép hátol-
dalán jobbra fent található
vízbemeneti csonkra (lásd
ábra)!
3. Ügyeljen arra, hogy a csövön ne legyen törés vagy
szűkület!
! A csap víznyomásának a műszaki adatok táblázatában
szereplő határértékek között kell lennie (lásd a szemben
lévő oldalt).
! Amennyiben a vízbevezető cső nem elég hosszú,
forduljon szaküzlethez vagy engedéllyel rendelkező
szakemberhez.
! Soha ne használjon korábban már használt csöveket.
! Használja a készülékhez mellékelteket.
Üzembe helyezés

HU
15
A leeresztőcső csatlakoztatása
Csatlakoztassa a
leeresztőcsövet a lefo-
lyóhoz vagy a padlótól 65
és 100 cm közötti magas-
ságban lévő fali szifonhoz
anélkül, hogy megtörné;
illetve akassza a mosdó
vagy a kád szélére úgy,
hogy a mellékelt csővezető
ívet a csaphoz erősíti (lásd
ábra). A leeresztőcső sza-
bad végének nem szabad
vízbe merülnie.
! Toldások használata nem javasolt. Amennyiben feltét-
lenül szükséges, a toldás átmérője egyezzen meg az
eredeti csőével és semmiképpen se legyen 150 cm-nél
hosszabb.
Elektromos csatlakoztatás
Mielőtt a csatlakozódugót az aljzatba dugná, bizonyoso-
djon meg arról, hogy:
• az aljzat földelése megfelel a törvény által előírtnak;
• az aljzat képes elviselni a készülék műszaki adatait
tartalmazó táblázatban megadott maximális teljesítmény-
felvételt (lásd szemben);
• a hálózat feszültsége a műszaki adatokat tartalmazó
táblázatban szereplő értékek közé esik (lásd szemben);
• az aljzat kompatibilis a mosógép csatlakozódugójával.
Ellenkező esetben cserélje ki az aljzatot vagy a csatla-
kozódugót!
! A mosógép nem állítható fel nyílt téren, még akkor sem,
ha tető van fölötte, mivel nagyon veszélyes, ha a gép
esőnek vagy zivataroknak van kitéve.
! A csatlakozódugónak a mosógép üzembe helyezett
állapotában is könnyen elérhető helyen kell lennie.
! Ne használjon hosszabbítót vagy elosztót.
! A kábel ne legyen se megtörve, se összenyomva.
! A tápkábelt csak engedéllyel rendelkező szakember
cserélheti.
Figyelem! A fenti előírások gyelmen kívül hagyása ese-
tén a gyártó elhárít minden felelősséget.
Első mosási ciklus
Üzembe helyezés után – mielőtt a mosógépet használni
kezdené – mosószerrel, mosandó ruha nélkül futtassa le
az (60°)-es mosási programot.
65 - 100 cm
Mûszaki adatok
Modell WDD 9640
Méretek
szélesség 59,5 cm
magasság 85 cm
mélység 60,5 cm
Ruhatöltet:
mosáshoz 1-tõl 9 kg között
szárításhoz 1-tõl 6 kg között
Elektromos
csatlakozás
lásd a készüléken található, muszaki
jellemzoket tartalmazó adattáblát!
Vízcsatlakozások
maximális nyomás 1 MPa (10 bar)
minimális nyomás 0,05 MPa (0,5 bar)
dob ûrtartalma 62 lite
Centrifuga
fordulatszám
1400 fordulat/perc-ig
Az EN 50229 rende-
let szerinti vizsgálati
programok
mosáshoz:
-as program; hõmérséklet
60°C (nyomja meg 2-szer a gombot);
9 kg ruhatöltettel végezve.
szárítás: egy kis adag szárításához
ki kell választani az “Extra” szárítási
szintet, az ágyneműadag 3 lepedőből, 2
párnahuzatból és 1 törölközőből álljon;
a maradandó szárítási adag végre-
hajtásához válassza ki az “Extra”
szárítási szintet.
Ez a berendezés megfelel a következõ
Uniós Elõírásoknak:
- 2004/108/CE elõírás (Elektromágne-
ses összeférhetõség)
- 2002/96/CE
- 2006/95/CE (Alacsony feszültség

16
HU
Mosószer-adagoló ók: a mosószerek és adalékanya-
gok betöltésére szolgál (lásd „Mosószerek és mosandók”).
ON/OFF gomb : a készülék be-, vagy kikapcso-
lásához nyomja meg röviden ezt a gombot. Amennyiben
az START/PAUSE lámpa zöld fénnyel lassan villog, a
készülék be van kapcsolva. A mosógép mosás közben
történő leállításához hosszan, kb. 3 másodpercig tartsa
lenyomva a nyomógombot – a gomb rövid, vagy véletlen
megnyomása nem kapcsolja le a készüléket. A mosógép
mosás közben történő leállítása magát a mosás progra-
mot is törli. A kívánt programot újból be kell állítani.
PROGRAMVÁLASZTÓ gombok: a kívánt program beál-
lítására szolgálnak (lásd „Programtáblázat”).
MEMÓRIA
gomb: az egyéni igényeknek megfelelően
beállított program tárolásához tartsa lenyomva ezt a
gombot. A korábban eltárolt programokat a MEMÓRIA
gomb megnyomásával lehet előhívni.
FUNKCIÓ gombok: a kívánt funkció kiválasztásához
nyomja meg ezt a gombot. A kijelzőn világít a megfelelő
jelzőlámpa.
MOSÁSI INTENZITÁS
gomb: A kívánt mosási
intenzitás kiválasztására szolgál.
ÖBLÍTŐ PROGRAMOK
gomb: A kívánt öblíté-
stípus kiválasztására szolgál.
SZÁRÍTÁS gomb: A szárítási ciklus beállításához
nyomja meg ezt a gombot.
HŐMÉRSÉKLET gomb: A hőmérséklet csökken-
téséhez nyomja meg ezt a gombot – az érték megjelenik
a kijelzőn.
LEZÁRVA gomb: a kezelőpanel letiltásához
nagyjából 2 másodpercig tartsa lenyomva ezt a gombot.
Ha a szimbólum világít, az azt jelenti, hogy a
gyerekzár aktiválva van. Ez a funkció megakadályozza
a programok véletlen átállítását, főképp, ha gyerekek
is vannak a lakásban. A kezelőpanel letiltásának
kikapcsolásához nagyjából 2 másodpercig tartsa
lenyomva ezt a gombot.
KÉSLELTETETT INDÍTÁS gomb: a kiválasztott pro-
gram késleltetett elindításához nyomja meg ezt a gom-
bot. A késleltetés értéke megjelenik a kijelzőn.
START/PAUSE jelzolámpás gomb: ha a zöld jelzőlámpa
lassan villog, a mosás indításához nyomja meg ezt a
gombot. A ciklus elindításával a jelzőlámpa állandó fén-
nyel kezd világítani. A mosás szüneteltetéséhez ismétel-
ten nyomja meg ezt a gombot; a jelzőlámpa narancssár-
ga fénnyel kezd el villogni. Amennyiben a szimbólum
nem világít, az ajtót ki lehet nyitni. A mosásnak a megs-
zakítás időpontjától való folytatásához nyomja meg ismét
ezt a gombot.
Készenléti üzemmód
Ez a mosógép - az energiatakarékosságra vonatkozó
legújabb eloírásoknak megfeleloen - automatikus ki-
kapcsolási (készenléti) rendszerrel van ellátva, mely a
használat 30 percnyi szüneteltetése esetén bekapcsol.
Nyomja meg röviden a ON/OFF gombot, és várjon, amíg
a készülék újrabekapcsol.
A mosógép leírása
START/PAUSE
jelzőlámpás gomb
Kezelőpanel
HŐMÉRSÉKLET
gomb
FUNKCIÓ
gombok
Mosószer-adagoló ók
ON/OFF
gomb
PROGRAMVÁLASZTÓ
gombok
LEZÁRVA
gomb
Kijelző
KÉSLELTETETT
INDÍTÁS
gomb
MEMÓRIA
gomb
MOSÁSI
INTENZITÁS
gomb
ÖBLÍTŐ
PROGRAMOK
gomb
SZÁRÍTÁS
gomb

HU
17
Kijelző
A kijelző a készülék programozásához nyújt segítséget, és számos információt szolgáltat.
A felső két feliratmező (A és B) a kiválasztott mosási programot, illetve szárítási típust, a folyamatban lévő mosási fázist
(a kiválasztott szárítási szintet vagy szárítási időt), valamint a program előrehaladásával kapcsolatos információkat je-
leníti meg.
A C feliratmező a folyamatban lévő mosási ciklus végéig hátralévő maradékidőt, illetve KÉSLELTETETT INDÍTÁS beál-
lítása esetén a kiválasztott program elindulásáig hátralévő időt jeleníti meg.
A D feliratmező a beállított programhoz választható centrifugasebesség maximális értékét jeleníti meg – amennyiben a
program nem tartalmaz centrifugálást, a feliratmező üres marad.
Az E feliratmező a beállított programhoz választható hőmérséklet maximális értékét jeleníti meg – amennyiben a pro-
gramhoz nem kell beállítani a hőmérsékletet, a feliratmező üres marad.
Az F jelzőlámpák a funkciókhoz tartoznak, és akkor kapcsolnak be, ha a kiválasztott funkció kompatibilis a beállított pro-
grammal.
Ajtózár szimbólum
A világító jelzőlámpa azt jelenti, hogy az ajtó a véletlen kinyitás megakadályozása érdekében be van zárva. A károk
elkerülése érdekében az ajtó kinyitása előtt meg kell várni, hogy a jelzőlámpa kialudjon.
Megjegyzés: Amennyiben a KÉSLELTETETT INDÍTÁS funkció be van kapcsolva, az ajtót nem lehet kinyitni. Az ajtó
kinyitásához az START/PAUSE gomb megnyomásával szüneteltesse le a készülék működését.
! Az első bekapcsoláskor a készülék kérni fogja a nyelv kiválasztását, és a kijelző automatikusan belép a nyelvválasztás
menübe.
A kívánt nyelv kiválasztásához nyomja meg a X és a Y gombokat, a kiválasztás jóváhagyásához pedig a Z gombot.
Amennyiben módosítani szeretné a nyelvet, kapcsolja ki a készüléket, és tartsa egyszerre lenyomva az X, Y, Z gombokat
a hangjelzésig. A kijelzőn újra megjelenik a nyelvválasztás menü.
A
B
C
D
E
F
Z
X
Y

18
HU
A mosási ciklusok, illetve a szárítás
végrehajtása
1. A KÉSZÜLÉK BEKAPCSOLÁSA. Nyomja meg a gombot –
a kijelzőn megjelenik az PROGRAM FOLYAMATBAN felirat, az
START/PAUSE lámpa pedig lassan, zöld fénnyel villogni kezd.
2. A MOSANDÓ RUHÁK BEPAKOLÁSA. Nyissa ki az ajtót!
Tegye be a mosandó ruhákat, ügyelve arra, hogy ne lépje túl
a következő oldalon található programtáblázatban feltüntetett
ruhatöltet-mennyiséget.
3. A MOSÓSZER ADAGOLÁSA. Vegye ki a fiókot, és a
„Mosószerek és mosandók” fejezetben leírtak szerint öntse a
mosószert a megfelelő tégelybe.
4. CSUKJA BE AZ AJTÓT.
5. A PROGRAM KIVÁLASZTÁSA. A kívánt program kiválasztásához
nyomja meg az egyik PROGRAMVÁLASZTÓ gombot – a
program neve megjelenik a kijelzőn. Mindegyik programhoz
tartozik egy hőmérséklet és egy centrifugasebesség, melyek
megváltoztatható értékek. A kijelzőn megjelenik a ciklusidő.
6. A MOSÁSI CIKLUS EGYÉNI BEÁLLÍTÁSAI. Használja a
megfelelő gombokat:
A hőmérséklet megváltoztatása. A készülék automatikusan
kiválasztja az elindított programhoz tartozó legmagasabb
hőmérsékletet. Ezen értékek további növelése nem lehetséges.
A gomb nyomogatásával a hőmérséklet fokozatosan
csökkenthető egészen a hidegmosásig „OFF”. A gomb legalsó
értéken történő megnyomásával visszatérhet a maximális
értékekhez.
! Kivétel: a (60°) (nyomja meg 2-szer a gombot)
program kiválasztása esetén a hőmérséklet egészen 90°C-ig
növelhető.
Késleltetett indítás beállítása.
A kiválasztott program késleltetett indításához nyomogassa a
megfelelő gombot addig, míg a késleltetés kívánt értékét el nem éri.
Ha a funkció be van kapcsolva, a kijelzőn világít a szimbólum.
A késleltetett indítás törléséhez nyomogassa a gombot mindaddig,
míg a kijelzőn meg nem jelenik az OFF felirat.
A szárítás beállítása
A SZÁRÍTÁS gomb egyszeri vagy többszöri megnyomásával
beállítható a kívánt szárítási típus. Két lehetőség közül
választhat:
A- Beállítás a megszárított ruhadarabok nedvességtartalma alapján:
Vasalás: Azon ruhadarabok mosására szolgál, melyeket mosás
után vasalni kell. A ruhában maradt nedvesség puhává teszik
a ráncokat, és megkönnyíti azok eltávolítását.
Akasztó: Ideális a teljes szárítást nem igénylo ruhadarabokhoz.
Szekrény: Azon mosandó ruhák mosására szolgál, melyeket
mosás után vasalás nélkül a szekrénybe lehet tenni.
Extra: Azon ruhadarabok mosására szolgál, melyek teljes
szárítást igényelnek (pl. frottírtörülközok és fürdoköpenyek).
B -az ido alapján: 20 - 180 percig.
A szárítás kikapcsolásához nyomogassa a vonatkozó gombot
mindaddig, míg a kijelzőn a OFF felirat meg nem jelenik
Ha a mosni és szárítani kívánt ruhanemű mennyisége jóval
több, mint a megengedett, végezze el a mosást, és a program
végeztével válasssza szét a ruhaneműt és egy részét
tegye vissza a dobba. Ezután kövesse a „Csak szárítás”
végrehajtásához megadott instrukciókat. Ismételje meg
ugyanezt a maradék ruhaneművel is.
Megjegyzés: A szárítás végét mindig hűtési folyamat követi.
Csak szárítás
Forgassa a PROGRAMOK tekerőgombot a kelme típusának
megfelelő szárítási beállításra ( ), azaz válassza ki a kívánt
szárítási típust a SZÁRÍTÁS tekerőgomb segítségéve.
A programválasztó gomb segítségével válassza ki a pamutszárítást,
és az “Eco” gomb lenyomásával elindul az automatikus szárítási
program, mely az optimális levegőhőmérséklet és ciklus-időtartam
kombinációnak hála energiatakarékos; A kijelzőn megjelenik az “Eco”
szárítási fokozat.
A kívánt mosási intenzitás beállítása.
Az opció a mosásnak az anyagok szennyezettségétől és a
kívánt mosási intenzitástól függő optimalizálására szolgál. Válassza
ki a mosási programot, mire a rendszer ciklust automatikusan a
közepesen szennyezett ruhadarabokra optimalizált “NORMÁL””
szintre állítja be – a beállítás nem érvényes a „Gyapjú” ciklusra, melynél
a rendszer a ciklust automatikusan a „KÉNYES” szintre állítja). Erősen
szennyezett ruhadarabok esetén nyomogassa a gombot addig,
amíg a kívánt „SUPER MOSÁS” szintet el nem éri. Ez a szint, a
ciklus kezdetén felhasznált nagy mennyiségű víznek és a nagyobb
mechanikai átmozgatásnak köszönhetően nagy mosóhatást biztosít,
ezért alkalmas a makacs szennyeződések eltávolítására. Használható
fehérítőszerrel vagy anélkül. Ha fehéríteni szeretne, tegye be a
mellékelt, 4-es berakható rekeszt az 1-es rekeszbe. A fehérítőszer
betöltése közben vigyázzon arra, hogy az a központi csapon jelzett
„max” szintet ne lépje túl (lásd 20. oldali ábra). Enyhén szennyezett
ruhadarabok esetén vagy ha a szövetek kíméletesebb kezelésére
van szükség, nyomogassa a gombot addig, amíg a kívánt
“KÉNYES” szintet el nem éri. A ciklus a kényes anyagok tökéletes
mosási eredménye érdekében lecsökkenti a mechanikus mozgatás
mértékét. Ha nem lehet beállítani vagy módosítani a meglévő beállítást,
a kijelzőn a “NEM ELÉRHETŐ” szöveg jelenik meg.
Az öblítéstípus beállítása.
Az opció az érzékeny bőrről való maximális gondoskodást biztosító
öblítéstípus kiválasztására szolgál. A gomb első megnyomásakor a
ciklust a rendszer „EXTRA ÖBLÍTÉS” szintre állítja, mely a ciklus
normál öblítéséhez egy további öblítést tesz hozzá, hogy a mosószer
minden nyoma el legyen távolítva. A gomb második megnyomásakor
a ciklust a rendszer “ÉRZÉKENY BŐR” szintre állítja, mely a ciklus
normál öblítéséhez két további öblítést tesz hozzá, ezért használata
az érzékenyebb bőrrel rendelkezők számára javasolt. A gomb
harmadik megnyomásakor a ciklust a rendszer “ANTIALLERGÉN”
szintre állítja, mely a ciklus normál öblítéséhez három további öblítést
tesz hozzá, hogy az elsődleges allergének (pl. pollenek, atkák,
macska- és kutyaszőr) el legyenek távolítva. A “NORMÁL ÖBLÍTÉS”
öblítéstípushoz való visszatéréshez nyomja meg újból a gombot. Ha
nem lehet beállítani vagy módosítani a meglévő beállítást, a kijelzőn
a “NEM ELÉRHETŐ” szöveg jelenik meg.
A program tulajdonságainak módosítása.
• A funkció bekapcsolásához nyomja meg ezt a gombot – a
gombon található jelzőlámpa világít.
• A funkció kikapcsolásához ismételten nyomja meg a gombot
– a lámpa kialszik.
! Ha a kiválasztott funkció a beállított programmal nem kompatibilis, a
jelzőlámpa villogni kezd, és a funkció nem lesz bekapcsolva.
! Ha a kiválasztott funkció egy korábban beállított programmal
nem kompatibilis, az elsőként kiválasztott funkció lámpája villogni
kezd, és csak a második funkció lesz bekapcsolva, a bekapcsolt
funkció lámpája folyamatosan világít.
! A funkciók megváltoztathatják az ajánlott ruhatöltet-
mennyiséget és/vagy a ciklusidőt.
7. A PROGRAM INDÍTÁSA. Nyomja meg az START/PAUSE gombot. A
megfelelő jelzőlámpa állandó zöld fénnyel világítani kezd, és az ajtózár
bekapcsol (az AJTÓZÁR szimbólum világítani kezd). A mosás ideje
alatt a kijelzőn a folyamatban lévő mosási fázis neve látható. A program
menet közben történő megváltoztatásához az START/PAUSE gomb
megnyomásával szüneteltesse le a készülék működését – az START/
PAUSE lámpa narancssárga fénnyel lassan villogni kezd. Ezután
válassza ki a kívánt programot, és nyomja meg újból az START/PAUSE
gombot. Az ajtó menet közbeni kinyitásához nyomja meg az START/
PAUSE gombot – ha az AJTÓZÁR szimbólum kialudt, kinyithatja
az ajtót. A mosásnak a megszakítás időpontjától való folytatásához
nyomja meg ismét az START/PAUSE gombot.
8. A PROGRAM VÉGE. Ezt a kijelzőn megjelenő „CIKLUS VÉGE”
felirat jelzi. Ha az AJTÓZÁR szimbólum kialszik, ki lehet nyitni
az ajtót. Nyissa ki az ajtót, szedje ki a mosott ruhákat, és kapcsolja
ki a készüléket.
! Amennyiben nullázni szeretne egy már elindított programot,
tartsa hosszan lenyomva a gombot. A program megszakad,
és a készülék kikapcsol.

HU
19
Programok és funkciók
Programtáblázat
Szimbólum Programleírás
Max. hőm
(°C)
Max.
sebesség
(ford./
perc)
Szár-
ítás
Mosószerek és adalékok
Max.
töltet
(kg)
Progr-
amidő
Elő-
mosás
Mosás
Fehér-
ítőszer
Öblítő
FOLTELTÁVOLÍTÁS 40° 1400
-
-
5
PAMUT ELŐMOSÁS (nyomja meg 1-szer a gombot): erősen szennyezett fehér
ruhák.
90° 1400
-
9
FEHÉR PAMUT (1) (nyomja meg 2-szer a gombot): erősen szennyezett fehér
és magasabb hőmérsékleten mosható színes ruhák.
60°
(Max. 90°)
1400
-
9
SZÍNES PAMUT (2) (nyomja meg 3-szer a gombot): erősen szennyezett
kényes fehér és színes ruhák.
40° 1400
-
9
SZINTETIKUS/ELLENÁLLÓ (nyomja meg 1-szer a gombot): erősen szennye-
zett, magasabb hőmérsékleten mosható színes ruhák.
60° 800
-
4
SZINTETIKUS/ELLENÁLLÓ (3) (nyomja meg 1-szer a gombot): erősen szen-
nyezett, magasabb hőmérsékleten mosható színes ruhák.
40° 800
-
4
SZINTETIKUS/KÉNYES (nyomja meg 2-szer a gombot): enyhén szennyezett,
magasabb hőmérsékleten mosható színes ruhák.
40° 800
-
4
KÉNYES RUHÁK 30° 0
-
-
1
M MEMÓRIA: bármilyen mosási típus memorizálását engedélyezi.
WOOLMARK PLATINUM (GYAPJÚ): gyapjú, kasmír stb. ruhaneműk
mosásához.
40° 800
-
-
2
GYORSMOSÁS 30’ (nyomja meg 1-szer a gombot): Az enyhén szennyezett
ruhadarabok gyors átöblítésére (nem javasolt gyapjú, selyem és kézzel
mosandó ruhaneműkhöz).
30° 800
-
-
3,5
MOSÁS+SZÁRÍTÁS (nyomja meg 2-szer a gombot) 30° 1400
-
-
1
PAMUT SZÁRÍTÁS (nyomja meg 1-szer a gombot) - -
- - - - 6
SZINTETIKUS SZÁRÍTÁS (nyomja meg 2-szer a gombot) - -
- - - - 4
GYAPJÚ SZÁRÍTÁS (nyomja meg 3-szer a gombot) - -
- - - - 2
CENTRIFUGA (nyomja meg 1-szer a gombot) - 1400
- - -
9
ÖBLÍTÉS, PAMUT (nyomja meg 2-szer a gombot) - 1400
- - - - 9
SZIVATTYÚZÁS (nyomja meg 3-szer a gombot) - 0 - - - - - 9
Programok
A mosási programok mosási ideje leolvasható a kijelzőről.
A viszgálószervek számára:
1) EN 50229 szabvány szerinti vezérlőprogramok: A
program 60 °C-ra állításához nyomja meg 2-szer a gombot.
2) Hosszú pamut program: a
program 40 °C-ra állításhoz nyomja meg 3-szor a gombot.
3) Hosszú műszálas program: A
program 60 °C-ra állításához nyomja meg 1-szer a gombot; a 40 °C-ra állításhoz nyomja meg a HŐMÉRSÉKLET gombot.
A kijelzőn megjelenő vagy a kézikönyben feltüntetett ciklusidők szokásos körülmények alapján becsült értékek. A tényleges időt számos tényező befolyásolhatja – pl. a
bemeneti víznyomás, a környezeti hőmérséklet, a mosószer mennyisége, a ruhatöltet mennyisége és típusa, a ruhatöltet kiegyensúlyozása, a kiválasztott további opciók.
Mosási funkciók
Gyorsmosás
Ezzel az opcióval a kiválasztott ciklustól függően akár 50%-
kal alacsonyabb programidő érhető el, egyúttal csökken a
víz- és energiafogyasztás is. Ezt a ciklust a nem különösen
koszos ruhadarabokhoz használja.
! Nem kapcsolható be a , , , “MOSÁS+SZÁRÍTÁS”,
, programoknál.
Csökkenti a centrifuga fordulatszámát.
! Nem kapcsolható be a , , , , és
“SZIVATTYÚZÁS”.
Eco
Az Eco funkció a mosandó ruhák mosóvizének fel nem me-
legítésével energiát takarít meg – ez előnyös mind a környe-
zet, mind a villanyszámla szempontjából. Valóban, a fokozott
teljesítmény és az optimalizált vízfogyasztás kitűnő eredményt
biztosít normál ciklus átlagos időtartama alatt. A legjobb mosási
eredmény elérése érdekében folyékony mosószer használatát
javasoljuk.
! Nem kapcsolható be a , (PAMUT ELŐMOSÁS),
, , “MOSÁS+SZÁRÍTÁS”, SZINTETIKUS SZÁRÍTÁS,
GYAPJÚ SZÁRÍTÁS, programoknál.
A szárítási opció kiválasztásával a mosás végén automa-
tikusan elindul egy szárítási program, mely az optimális
levegőhőmérséklet és ciklus-időtartam kombinációnak hála
energiatakarékos. A kijelzőn megjelenik az “Eco” szárítási
fokozat.
! A “FEHÉR PAMUT”-es és “SZÍNES PAMUT”-ös programo-
knál lehet aktiválni

20
HU
Mosószerek és mosandók
Mosószer-adagoló fiók
A mosás eredményessége függ a mosószer helyes
adagolásától is: ha túl sokat adagol belőle, a mosás nem
lesz hatékonyabb, de hozzájárul ahhoz, hogy lerakódás
képződjön a mosógépben, valamint a környezetet is
jobban szennyezi.
! Ne használjon kézi mosószert, mert túlzottan sok hab
képződik.
Húzza ki a mosószer-
adagoló ókot, és a
következők szerint tegye
bele a mosószert, illetve az
adalékot.
1-es rekesz: Mosószer előmosáshoz (por)
A mosószer betöltése előtt győződjön meg arról, hogy a
4-es berakható rekesz nincs ebben a rekeszben.
2-es rekesz: Mosószer mosáshoz (por vagy folyadék)
Ha folyékony mosószert használ, a megfelelő adagolás
érdekében tanácsos az A elválasztólapot használni. Ha
mosóport használ, tegye az elválasztólapot a B térbe.
3-as rekesz: Adalékok (öblítők stb.)
Az öblítő ne érjen a rács fölé.
4-es berakható rekesz: Fehérítőszer
A mosandó ruhák előkészítése
• Osztályozza a mosandókat a következők szerint:
- Szövet típusa / címkén lévő szimbólum.
- Színek Válogassa külön a színes és fehér ruhákat.
• Ürítse ki a zsebeket, és vizsgálja meg a gombokat.
• Ne lépje túl a mosandók száraz súlyára vonatkozóan
megadott értékeket:
Magasabb hőmérsékleten mosható anyagok: max. 9 kg
Műszálas anyagok: max. 4 kg
Kényes anyagok: max. 2 kg
Gyapjú: max. 2 kg
Selyem: max. 2 kg
Milyen nehezek a mosandó ruhák?
1 lepedő: 400–500 g
1 párnahuzat: 150–200 g
1 asztalterítő: 400–500 g
1 fürdőköpeny: 900–1200 g
1 törölköző: 150–250 g
Különleges programok
FOLTELTÁVOLÍTÁS: A program az ellenálló színnel
rendelkező, erősen szennyezett ruhadarabok mosására
szolgál. A program a normálnál jobb (A osztályú) mo-
sóhatást biztosít. Ne mosson együtt különböző színű
M
AX
1
2
4
3
A
B
ruhadarabokat. Folyékony mosószer használatát javaso-
ljuk. Makacs szennyeződések esetén tanácsos különle-
ges adalékkal előkezelni a szövetet.
KÉNYES RUHÁK: A nagyon kényes – pl. itterekkel,
csillogókkal ellátott – anyagok mosásához használja a
programot.
A selyem ruhadarabokhoz és függönyökhöz válassza a
ciklust, és állítsa a opcióban a szintet „KÉNYES”
értékre.
A mosás előtt tanácsos kifordítani a ruhadarabokat, és
a kisebb holmikat a kényes anyagok mosására szolgáló
megfelelő mosózsákba rakni.
A jobb mosási eredmény érdekében kényes anyagokhoz
való folyékony mosószer használatát javasoljuk.
Ha a szárítási opció csak az időtartam alapján kerül
kiválasztásra, a mosás végén egy különlegesen
kíméletes szárítási ciklus indul el gyengéd mozgatással
és megfelelően ellenőrzött levegősugárral.
A javasolt időtartamok:
1 kg műszálas --> 150 perc
1 kg műszálas és pamut --> 180 perc
1 kg pamut --> 180 perc
A szárítási fokozat a szárítandó mennyiségtől és a
ruhanemű alapanyagától függ.
GYAPJÚ: ezen Hotpoint-Ariston mosógép gyapjú” mo-
sási ciklusát a Woolmark Company tesztelte és engedél-
yezte “kézzel mosható” gyapjú ruhaneműk mosásához,
amennyiben a mosást a ruhanemű címkéjén feltűntetett
és a háztartási gép gyártója által előírt útmutatásoknak
megfelelően hajtja végre. Hotpoint-Ariston az első mo-
sógép márka, mely megszerezte a Woolmark Company
Woolmark Apparel Care - Platinum igazolását a mosási
teljesítményéért és a gazdaságos víz- és energiafogya-
sztásáért. (M1127)
Mosás+Szárítás: az enyhén szennyezett (pamut és
műszálas) ruhaneműk gyors mosásához és szárításához
használja az (nyomja meg 2-szer a gombot) programot. E
ciklussal akár 1 kg mosandó ruhát is ki lehet mosni
mindössze 45 perc alatt. A legjobb eredmény elérése
érdekében használjon folyékony mosószert. A mandzset-
tákat, gallérokat és foltokat kezelje elo.
A bepakolt ruhák kiegyensúlyozására
szolgáló rendszer
A túlzott zajhatás megelőzésére, valamint a mosandók
egyenletes eloszlása érdekében a forgódob a cen-
trifugafázis előtt a mosási centrifugasebességnél kicsit
nagyobb sebességre kapcsol. Amennyiben a töltet kiegy-
ensúlyozására irányuló próbálkozások nem vezetnek
eredményre, a készülék az elméleti centrifugasebessé-
gnél lassabb centrifugálásra kapcsol. Jelentős kiegyen-
súlyozatlanság esetén a mosógép, centrifugálás előtt
megpróbálja a töltetet megfelelően eloszlatni. A töltet
megfelelő eloszlásának biztosítása érdekében ajánlatos
a nagy ruhaneműket a kicsikkel összekeverni.
Sayfa yükleniyor ...
Sayfa yükleniyor ...
Sayfa yükleniyor ...
Sayfa yükleniyor ...
Sayfa yükleniyor ...
Sayfa yükleniyor ...
Sayfa yükleniyor ...
Sayfa yükleniyor ...
Sayfa yükleniyor ...
Sayfa yükleniyor ...
Sayfa yükleniyor ...
Sayfa yükleniyor ...
Sayfa yükleniyor ...
Sayfa yükleniyor ...
Sayfa yükleniyor ...
Sayfa yükleniyor ...
-
 1
1
-
 2
2
-
 3
3
-
 4
4
-
 5
5
-
 6
6
-
 7
7
-
 8
8
-
 9
9
-
 10
10
-
 11
11
-
 12
12
-
 13
13
-
 14
14
-
 15
15
-
 16
16
-
 17
17
-
 18
18
-
 19
19
-
 20
20
-
 21
21
-
 22
22
-
 23
23
-
 24
24
-
 25
25
-
 26
26
-
 27
27
-
 28
28
-
 29
29
-
 30
30
-
 31
31
-
 32
32
-
 33
33
-
 34
34
-
 35
35
-
 36
36


HOTPOINT/ARISTON WDD 9640BX EU Kullanici rehberi
- Kategori
- Çamaşır makineleri
- Tip
- Kullanici rehberi
Diğer dillerde
İlgili Makaleler
-
Whirlpool WDD 9640BX EU Kullanım kılavuzu
-
-
Indesit WMD 922BS EU Kullanici rehberi
-
-
-
-
-
-
Whirlpool AQD1171D 49ID TK Kullanici rehberi
-
Hotpoint AQD1071F 49ID TK Kullanici rehberi