
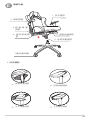
SL300C ROG CHARIOT
Installation Guide
Q16330
First Edition V1.0
March 2020

2
Contents
English .................................................................................................. 3
簡體中文 ������������������������������������������������������������������������������������������������� 16
繁體中文 ������������������������������������������������������������������������������������������������� 29
Français ..............................................................................................42
Deutsch .............................................................................................. 55
Italiano ...............................................................................................68
Русский .............................................................................................. 81
................................................................................................... 94
Čeština ............................................................................................. 107
HI ....................................................................................................... 120
Magyar ............................................................................................ 133
한국어 ............................................................................................. 146
Bahasa Melayu .............................................................................. 159
Norsk ................................................................................................ 172
Português ....................................................................................... 185
Polski ................................................................................................ 198
Română ........................................................................................... 211
Español ............................................................................................ 224
Slovensky........................................................................................ 237
Türkçe .............................................................................................. 250
ไทย ................................................................................................... 263

3
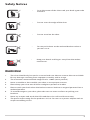
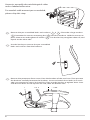
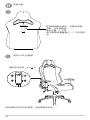
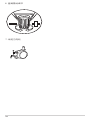
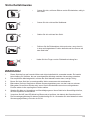
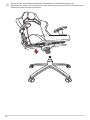
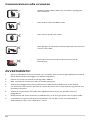
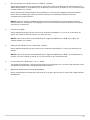
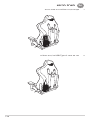
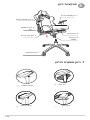
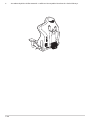
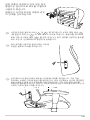
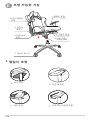
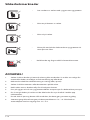
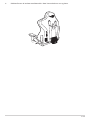
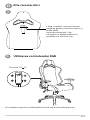
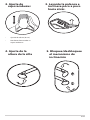
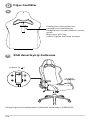
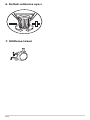
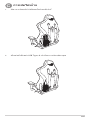
Safety Notices
Sit in the center of the
chair, with your back
to the backrest.
Do not sit at the front
edge of the chair.
Do not stand on the
chair.
Do not push down on
the backrest when a
person is reclined.
Do not place your hand
or fingers near the
recline mechanism.
• Sit in the center of the chair with your back against the
backrest.
Sit in the center of the
chair, with your back
to the backrest.
Do not sit at the front
edge of the chair.
Do not stand on the
chair.
Do not push down on
the backrest when a
person is reclined.
Do not place your hand
or fingers near the
recline mechanism.
• Do not sit on the edge of the chair.
Sit in the center of the
chair, with your back
to the backrest.
Do not sit at the front
edge of the chair.
Do not stand on the
chair.
Do not push down on
the backrest when a
person is reclined.
Do not place your hand
or fingers near the
recline mechanism.
• Do not stand on the chair.
Sit in the center of the
chair, with your back
to the backrest.
Do not sit at the front
edge of the chair.
Do not stand on the
chair.
Do not push down on
the backrest when a
person is reclined.
Do not place your hand
or fingers near the
recline mechanism.
• Do not push down on the reclined backrest when a
person is on it.
Sit in the center of the
chair, with your back
to the backrest.
Do not sit at the front
edge of the chair.
Do not stand on the
chair.
Do not push down on
the backrest when a
person is reclined.
Do not place your hand
or fingers near the
recline mechanism.
• Keep your hands and ngers away from the recline
mechanism.
WARNING!
1. This chair should only be used in a normal and non-abusive manner. We are not liable
for any damages resulting from improper assembly and/or usage.
2. The maximum recommended weight load is 120KG (264.5 pounds).
3. Never assemble or disassemble your chair in an improper manner.
4. Please keep your chair out of direct sunlight to protect its leather.
5. Please watch your back when the backrest returns back to its original position from a
reclined position.
6. To avoid damage to your chair, please do not use excessive force to pull up your
headrest.
7. Never try to open and touch the LED module as this will void the warranty.
8. The power input rating for this product is 5V/1A. Do not use a power adapter with an
output exceeding 5V/3A.

4
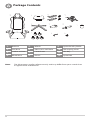
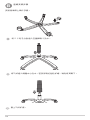
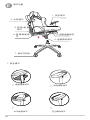
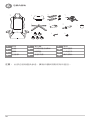
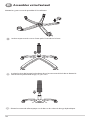
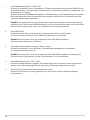
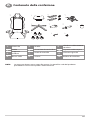
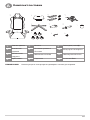
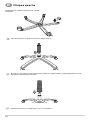
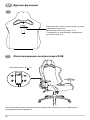
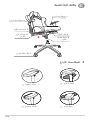
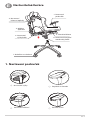
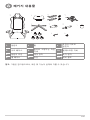
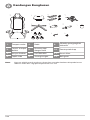
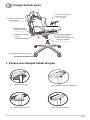
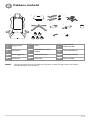
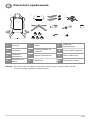
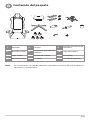
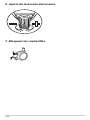
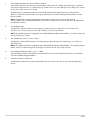
Package Contents
A
1.
Backrest
5.
Wheels
9.
Hydraulic lift cylinder
2.
Seat base
6.
Side covers with bolts
10.
Telescoping cover
3.
Lumbar cushion
7.
Control unit
11.
Hex Key
4.
Wheel base
8.
Gloves
12.
Spare bolt
Note: The illustrations are for reference only and may dier from your actual chair
in appearance and features.

5
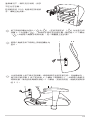
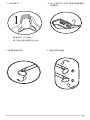
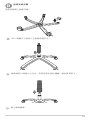
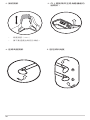
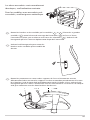
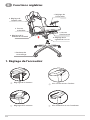
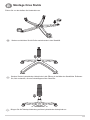
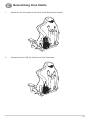
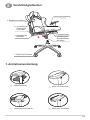
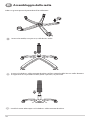
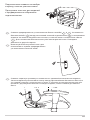
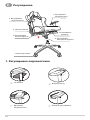
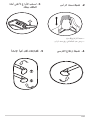
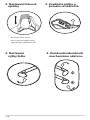
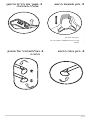
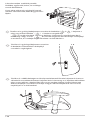
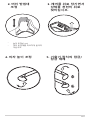
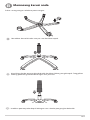
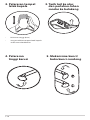
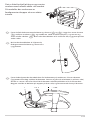
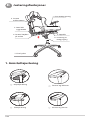
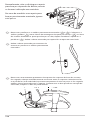
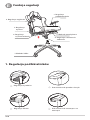
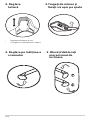
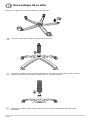
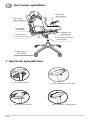
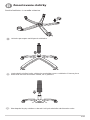
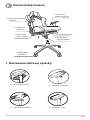
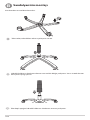
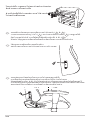
Assembling your chair
B
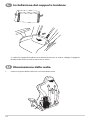
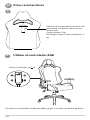
Put on the gloves before installation.
One by one, insert and push the wheels into the base.
Insert the hydraulic lift cylinder into the center hole of the base. Remove the red
protective cap on top if there was any.
Place the telescoping cover on the top of the hydraulic lift cylinder.

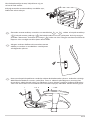
6
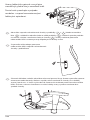
Armrests normally do not distinguish sides
unless labeled otherwise.
For models with armrest pre-assembled,
please skip this step.
Remove the pre-assembled bolts and washers (
1
&
3
). Place the 4 large washers
(
1
) between the armrest mounting bar (
2
) and the seat base. Hold the armrest in
place, then insert and tighten all 4 bolts (
3
). Use the hex key to tighten them all, and
repeat on the other side.
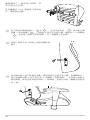
Use the hex key to remove the pre-assembled
bolts and washers from the backrest.
Remove the protective foam covers from the brackets of the seat base. Then position
the backrest carefully between the brackets. Insert and attach the 4 bolts (2 on each
side) you removed in step 5 by hand rst. Then use the hex key to tighten them. Start
with the two bolts on the top of each side, then the bottom two.

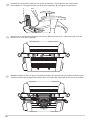
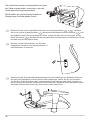
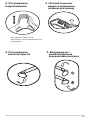
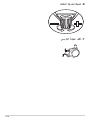
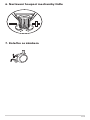
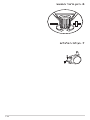
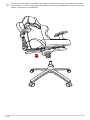
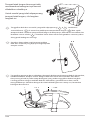
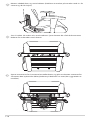
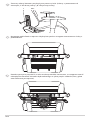
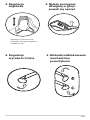
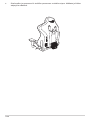
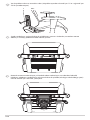
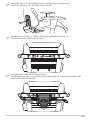
7
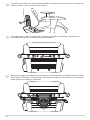
Install the side covers and tighten the bolts. (The covers are marked “L” for the left side
and “R” for the right on the inside.)
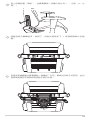
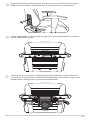
Now ip the chair over, facing down. Then remove the 4 pre-mounted bolts from the
underside with washers.
Repeat the step above to install the control unit, and then place the nut to mount the
hydraulic lift cylinder facing the back of the seat (where the backrest is installed).

8
Insert top of the hydraulic lift cylinder into the mounting hole on the control unit, and
then turn the chair over in upright position. (Two-person handling required for your
safety).

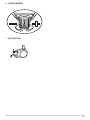
9
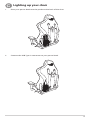
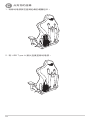
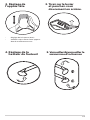
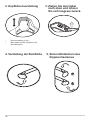
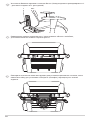
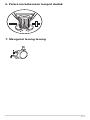
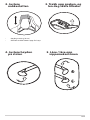
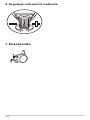
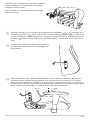
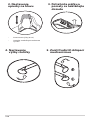
Lighting up your chair
C
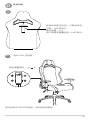
1. Place your power bank into the packet at the back of the chair.
2. Connect the USB Type-A connector to your power bank.

10
3. The packet is attached to your chair with Velcro. You can easily remove and take it
away.

11
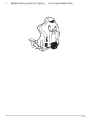
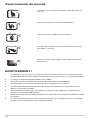
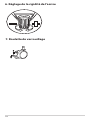
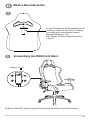
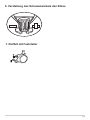
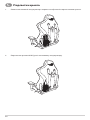
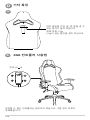
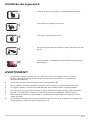
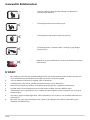
Other features
D
Hanger at the back of the chair for
hanging your bags, clothes, cups and
more.
Maximum load: 2kg
Please do not hang items over 2kg.
a
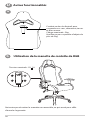
Using the RGB controller
b
1
2
3
4
Rating: 5V 1A
DO NOT remove the non-detachable controller as this will void the warranty.

12
1. Aura RGB Lighting: On / Eect / O
Press repeatedly to power the Aura RGB LEDs on or o, or cycle through the current 7
eects: (1) rainbow (2) breathing (3) color cycle (4) wave (5) glowing Yo-Yo (6) strobing
(7) static
Press the Aura RGB Lighting button for 3 seconds to terminate the lighting.
Press it to wake up again or reconnect your powerbank will keep its previous setting.
NOTE: Your powerbank may automatically adjust its output when the lighting is
terminated. Disconnect and reconnect it if the Aura RGB Lighting cannot wake up after
toggling it back on.
2. Aura RGB color
Press repeatedly to cycle through the following 8 striking colors: (1) red (2) orange (3)
yellow (4) green (5) blue (6) indigo (7) purple (8) pink
NOTE: This feature is only available on the following Aura RGB eects: (2) breathing (6)
strobing (7) static
3. Aura RGB speed: Slow / Medium / Fast
Press repeatedly to cycle through the following 3 color eect speeds: (1) Slow (2)
Medium (3) Fast
NOTE: This feature is only available on the following Aura RGB eects: (1) rainbow (2)
breathing (3) color cycle (4) wave (5) glowing Yo-Yo (6) strobing
4. Aura RGB brightness: 50% / 75% / 100%
Three brightness levels. The brightness can be switch by simple tap to t the
environment lighting and preference.
5. Reset to factory mode
Press the button (2) and button (4) simultaneously to reset your chair to its factory
defaults.

13
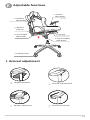
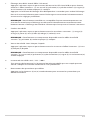
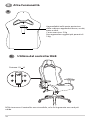
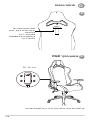
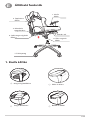
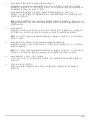
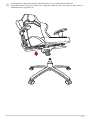
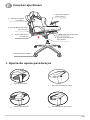
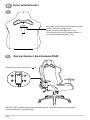
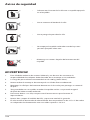
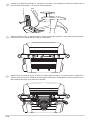
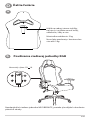
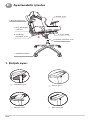
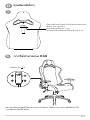
Adjustable functions
E
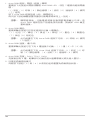
1. Armrest
adjustment
5. Tilt lock
6. Seat rockability
adjustment
4. Chair height
adjustment
3
.
Backrest
reclining
2. Headrest
adjustment
1. Armrest adjustment
Height adjustment
Forward and backward
Rotation adjustment Inward and outward
7. Locking caster

14
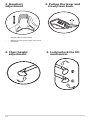
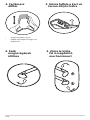
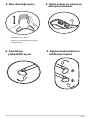
2. Headrest
adjustment
3. Pull up the lever and
slowly lean back.
• Height adjustment (6cm)
• Please do not excessively raise your
headrest.
4. Chair height
adjustment
5. Lock/unlock the tilt
mechanism

15
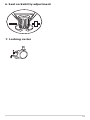
6. Seat rockability adjustment
7. Locking caster

16
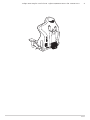
安全說明
Sit in the center of the
chair, with your back
to the backrest.
Do not sit at the front
edge of the chair.
Do not stand on the
chair.
Do not push down on
the backrest when a
person is reclined.
Do not place your hand
or fingers near the
recline mechanism.
• 請坐在座椅中央,並將背部靠在椅背上。
Sit in the center of the
chair, with your back
to the backrest.
Do not sit at the front
edge of the chair.
Do not stand on the
chair.
Do not push down on
the backrest when a
person is reclined.
Do not place your hand
or fingers near the
recline mechanism.
• 請勿坐在座椅邊緣。
Sit in the center of the
chair, with your back
to the backrest.
Do not sit at the front
edge of the chair.
Do not stand on the
chair.
Do not push down on
the backrest when a
person is reclined.
Do not place your hand
or fingers near the
recline mechanism.
• 請勿站在座椅上。
Sit in the center of the
chair, with your back
to the backrest.
Do not sit at the front
edge of the chair.
Do not stand on the
chair.
Do not push down on
the backrest when a
person is reclined.
Do not place your hand
or fingers near the
recline mechanism.
• 當他人坐在椅子上時,請勿調低椅背。
Sit in the center of the
chair, with your back
to the backrest.
Do not sit at the front
edge of the chair.
Do not stand on the
chair.
Do not push down on
the backrest when a
person is reclined.
Do not place your hand
or fingers near the
recline mechanism.
• 請勿將手和手指插入座椅調節配件中。
警告!
1. 請正常使用座椅。任何由錯誤安裝或使用導致的損壞,本公司概不負責。
2. 建議最高重量為120公斤(264.5磅)。
3. 請勿錯誤安裝或拆解您的座椅。
4. 請避免陽光直射以保護座椅皮革。
5. 當椅背由躺臥角度恢復至原位時,請小心您的背部。
6. 為避免損壞您的座椅,請不要過度用力拉您的頭枕。
7. 請勿嘗試打開或觸摸LED模塊,這可能會令保修失效。
8. 本產品電源輸入功率為 5V/1A。請勿使用輸出功率超過 5V/3A 的電源
適配器。

17
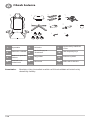
包裝內容物
A
1.
椅背
5.
萬向輪
9.
氣桿
2.
坐墊
6.
椅背側蓋及螺絲
10.
氣桿護套
3.
腰靠
7.
蝴蝶盤
11.
六角扳手
4.
五星腳
8.
安裝手套
12.
備用螺絲
注意: 此部分說明僅供參考,實物外觀與特點或有所差別。

18
座椅安裝步驟
B
安裝前請帶上保護手套。
將5個輪子分別插入五星腳每個孔中。
將氣桿插入椅腿中心孔中。若頂部有紅色防護帽,請先將其取下。
套上氣桿護套。

19
通常情況下,除非另行說明,扶手
不區分左右側。
若您購買的 ROG 電競椅已預裝扶
手,請跳過此步驟。
拆下預裝的螺絲與墊片(
1
&
3
)。在扶手固定桿(
2
)與坐墊之間
放置4個大墊圈(
1
),並將扶手固定至合適位置。隨後插入4個螺絲
(
3
)並使用六角扳手將其鎖緊,另一側重複上述步驟。
使用六角扳手拆下椅背上預裝的螺絲與
墊片。
從坐墊椅背上拆下保護泡沫罩。將椅背放在坐墊支架之間,對準螺絲孔,
插入並擰緊步驟 5 拆下的所有 4 個螺絲(每側兩個),並使用六角扳手
將其鎖緊。請先安裝每側頂部的 2 個螺絲,安裝完成後,繼續安裝底部
的2個。

20
裝上椅背側蓋(兩側),並擰緊螺絲(側蓋內側注有 L :左側,R:右
側)。
將整個椅子翻轉過來,面朝下,然後從底部卸下 4 個預裝螺絲以及墊
圈。
直接安裝蝴蝶盤并鎖緊螺絲。請確認“向前”箭頭指向椅子的前部,並且
座椅高度調節手柄與椅背調節手柄在同側。
Sayfa yükleniyor...
Sayfa yükleniyor...
Sayfa yükleniyor...
Sayfa yükleniyor...
Sayfa yükleniyor...
Sayfa yükleniyor...
Sayfa yükleniyor...
Sayfa yükleniyor...
Sayfa yükleniyor...
Sayfa yükleniyor...
Sayfa yükleniyor...
Sayfa yükleniyor...
Sayfa yükleniyor...
Sayfa yükleniyor...
Sayfa yükleniyor...
Sayfa yükleniyor...
Sayfa yükleniyor...
Sayfa yükleniyor...
Sayfa yükleniyor...
Sayfa yükleniyor...
Sayfa yükleniyor...
Sayfa yükleniyor...
Sayfa yükleniyor...
Sayfa yükleniyor...
Sayfa yükleniyor...
Sayfa yükleniyor...
Sayfa yükleniyor...
Sayfa yükleniyor...
Sayfa yükleniyor...
Sayfa yükleniyor...
Sayfa yükleniyor...
Sayfa yükleniyor...
Sayfa yükleniyor...
Sayfa yükleniyor...
Sayfa yükleniyor...
Sayfa yükleniyor...
Sayfa yükleniyor...
Sayfa yükleniyor...
Sayfa yükleniyor...
Sayfa yükleniyor...
Sayfa yükleniyor...
Sayfa yükleniyor...
Sayfa yükleniyor...
Sayfa yükleniyor...
Sayfa yükleniyor...
Sayfa yükleniyor...
Sayfa yükleniyor...
Sayfa yükleniyor...
Sayfa yükleniyor...
Sayfa yükleniyor...
Sayfa yükleniyor...
Sayfa yükleniyor...
Sayfa yükleniyor...
Sayfa yükleniyor...
Sayfa yükleniyor...
Sayfa yükleniyor...
Sayfa yükleniyor...
Sayfa yükleniyor...
Sayfa yükleniyor...
Sayfa yükleniyor...
Sayfa yükleniyor...
Sayfa yükleniyor...
Sayfa yükleniyor...
Sayfa yükleniyor...
Sayfa yükleniyor...
Sayfa yükleniyor...
Sayfa yükleniyor...
Sayfa yükleniyor...
Sayfa yükleniyor...
Sayfa yükleniyor...
Sayfa yükleniyor...
Sayfa yükleniyor...
Sayfa yükleniyor...
Sayfa yükleniyor...
Sayfa yükleniyor...
Sayfa yükleniyor...
Sayfa yükleniyor...
Sayfa yükleniyor...
Sayfa yükleniyor...
Sayfa yükleniyor...
Sayfa yükleniyor...
Sayfa yükleniyor...
Sayfa yükleniyor...
Sayfa yükleniyor...
Sayfa yükleniyor...
Sayfa yükleniyor...
Sayfa yükleniyor...
Sayfa yükleniyor...
Sayfa yükleniyor...
Sayfa yükleniyor...
Sayfa yükleniyor...
Sayfa yükleniyor...
Sayfa yükleniyor...
Sayfa yükleniyor...
Sayfa yükleniyor...
Sayfa yükleniyor...
Sayfa yükleniyor...
Sayfa yükleniyor...
Sayfa yükleniyor...
Sayfa yükleniyor...
Sayfa yükleniyor...
Sayfa yükleniyor...
Sayfa yükleniyor...
Sayfa yükleniyor...
Sayfa yükleniyor...
Sayfa yükleniyor...
Sayfa yükleniyor...
Sayfa yükleniyor...
Sayfa yükleniyor...
Sayfa yükleniyor...
Sayfa yükleniyor...
Sayfa yükleniyor...
Sayfa yükleniyor...
Sayfa yükleniyor...
Sayfa yükleniyor...
Sayfa yükleniyor...
Sayfa yükleniyor...
Sayfa yükleniyor...
Sayfa yükleniyor...
Sayfa yükleniyor...
Sayfa yükleniyor...
Sayfa yükleniyor...
Sayfa yükleniyor...
Sayfa yükleniyor...
Sayfa yükleniyor...
Sayfa yükleniyor...
Sayfa yükleniyor...
Sayfa yükleniyor...
Sayfa yükleniyor...
Sayfa yükleniyor...
Sayfa yükleniyor...
Sayfa yükleniyor...
Sayfa yükleniyor...
Sayfa yükleniyor...
Sayfa yükleniyor...
Sayfa yükleniyor...
Sayfa yükleniyor...
Sayfa yükleniyor...
Sayfa yükleniyor...
Sayfa yükleniyor...
Sayfa yükleniyor...
Sayfa yükleniyor...
Sayfa yükleniyor...
Sayfa yükleniyor...
Sayfa yükleniyor...
Sayfa yükleniyor...
Sayfa yükleniyor...
Sayfa yükleniyor...
Sayfa yükleniyor...
Sayfa yükleniyor...
Sayfa yükleniyor...
Sayfa yükleniyor...
Sayfa yükleniyor...
Sayfa yükleniyor...
Sayfa yükleniyor...
Sayfa yükleniyor...
Sayfa yükleniyor...
Sayfa yükleniyor...
Sayfa yükleniyor...
Sayfa yükleniyor...
Sayfa yükleniyor...
Sayfa yükleniyor...
Sayfa yükleniyor...
Sayfa yükleniyor...
Sayfa yükleniyor...
Sayfa yükleniyor...
Sayfa yükleniyor...
Sayfa yükleniyor...
Sayfa yükleniyor...
Sayfa yükleniyor...
Sayfa yükleniyor...
Sayfa yükleniyor...
Sayfa yükleniyor...
Sayfa yükleniyor...
Sayfa yükleniyor...
Sayfa yükleniyor...
Sayfa yükleniyor...
Sayfa yükleniyor...
Sayfa yükleniyor...
Sayfa yükleniyor...
Sayfa yükleniyor...
Sayfa yükleniyor...
Sayfa yükleniyor...
Sayfa yükleniyor...
Sayfa yükleniyor...
Sayfa yükleniyor...
Sayfa yükleniyor...
Sayfa yükleniyor...
Sayfa yükleniyor...
Sayfa yükleniyor...
Sayfa yükleniyor...
Sayfa yükleniyor...
Sayfa yükleniyor...
Sayfa yükleniyor...
Sayfa yükleniyor...
Sayfa yükleniyor...
Sayfa yükleniyor...
Sayfa yükleniyor...
Sayfa yükleniyor...
Sayfa yükleniyor...
Sayfa yükleniyor...
Sayfa yükleniyor...
Sayfa yükleniyor...
Sayfa yükleniyor...
Sayfa yükleniyor...
Sayfa yükleniyor...
Sayfa yükleniyor...
Sayfa yükleniyor...
Sayfa yükleniyor...
Sayfa yükleniyor...
Sayfa yükleniyor...
Sayfa yükleniyor...
Sayfa yükleniyor...
Sayfa yükleniyor...
Sayfa yükleniyor...
Sayfa yükleniyor...
Sayfa yükleniyor...
Sayfa yükleniyor...
Sayfa yükleniyor...
Sayfa yükleniyor...
Sayfa yükleniyor...
Sayfa yükleniyor...
Sayfa yükleniyor...
Sayfa yükleniyor...
Sayfa yükleniyor...
Sayfa yükleniyor...
Sayfa yükleniyor...
Sayfa yükleniyor...
Sayfa yükleniyor...
Sayfa yükleniyor...
Sayfa yükleniyor...
Sayfa yükleniyor...
Sayfa yükleniyor...
Sayfa yükleniyor...
Sayfa yükleniyor...
Sayfa yükleniyor...
Sayfa yükleniyor...
Sayfa yükleniyor...
Sayfa yükleniyor...
Sayfa yükleniyor...
Sayfa yükleniyor...
Sayfa yükleniyor...
Sayfa yükleniyor...
Sayfa yükleniyor...
Sayfa yükleniyor...
Sayfa yükleniyor...
Sayfa yükleniyor...
Sayfa yükleniyor...
Sayfa yükleniyor...
Sayfa yükleniyor...
Sayfa yükleniyor...
Sayfa yükleniyor...
Sayfa yükleniyor...
Sayfa yükleniyor...
Sayfa yükleniyor...
Sayfa yükleniyor...
Sayfa yükleniyor...
Sayfa yükleniyor...
Sayfa yükleniyor...
-
 1
1
-
 2
2
-
 3
3
-
 4
4
-
 5
5
-
 6
6
-
 7
7
-
 8
8
-
 9
9
-
 10
10
-
 11
11
-
 12
12
-
 13
13
-
 14
14
-
 15
15
-
 16
16
-
 17
17
-
 18
18
-
 19
19
-
 20
20
-
 21
21
-
 22
22
-
 23
23
-
 24
24
-
 25
25
-
 26
26
-
 27
27
-
 28
28
-
 29
29
-
 30
30
-
 31
31
-
 32
32
-
 33
33
-
 34
34
-
 35
35
-
 36
36
-
 37
37
-
 38
38
-
 39
39
-
 40
40
-
 41
41
-
 42
42
-
 43
43
-
 44
44
-
 45
45
-
 46
46
-
 47
47
-
 48
48
-
 49
49
-
 50
50
-
 51
51
-
 52
52
-
 53
53
-
 54
54
-
 55
55
-
 56
56
-
 57
57
-
 58
58
-
 59
59
-
 60
60
-
 61
61
-
 62
62
-
 63
63
-
 64
64
-
 65
65
-
 66
66
-
 67
67
-
 68
68
-
 69
69
-
 70
70
-
 71
71
-
 72
72
-
 73
73
-
 74
74
-
 75
75
-
 76
76
-
 77
77
-
 78
78
-
 79
79
-
 80
80
-
 81
81
-
 82
82
-
 83
83
-
 84
84
-
 85
85
-
 86
86
-
 87
87
-
 88
88
-
 89
89
-
 90
90
-
 91
91
-
 92
92
-
 93
93
-
 94
94
-
 95
95
-
 96
96
-
 97
97
-
 98
98
-
 99
99
-
 100
100
-
 101
101
-
 102
102
-
 103
103
-
 104
104
-
 105
105
-
 106
106
-
 107
107
-
 108
108
-
 109
109
-
 110
110
-
 111
111
-
 112
112
-
 113
113
-
 114
114
-
 115
115
-
 116
116
-
 117
117
-
 118
118
-
 119
119
-
 120
120
-
 121
121
-
 122
122
-
 123
123
-
 124
124
-
 125
125
-
 126
126
-
 127
127
-
 128
128
-
 129
129
-
 130
130
-
 131
131
-
 132
132
-
 133
133
-
 134
134
-
 135
135
-
 136
136
-
 137
137
-
 138
138
-
 139
139
-
 140
140
-
 141
141
-
 142
142
-
 143
143
-
 144
144
-
 145
145
-
 146
146
-
 147
147
-
 148
148
-
 149
149
-
 150
150
-
 151
151
-
 152
152
-
 153
153
-
 154
154
-
 155
155
-
 156
156
-
 157
157
-
 158
158
-
 159
159
-
 160
160
-
 161
161
-
 162
162
-
 163
163
-
 164
164
-
 165
165
-
 166
166
-
 167
167
-
 168
168
-
 169
169
-
 170
170
-
 171
171
-
 172
172
-
 173
173
-
 174
174
-
 175
175
-
 176
176
-
 177
177
-
 178
178
-
 179
179
-
 180
180
-
 181
181
-
 182
182
-
 183
183
-
 184
184
-
 185
185
-
 186
186
-
 187
187
-
 188
188
-
 189
189
-
 190
190
-
 191
191
-
 192
192
-
 193
193
-
 194
194
-
 195
195
-
 196
196
-
 197
197
-
 198
198
-
 199
199
-
 200
200
-
 201
201
-
 202
202
-
 203
203
-
 204
204
-
 205
205
-
 206
206
-
 207
207
-
 208
208
-
 209
209
-
 210
210
-
 211
211
-
 212
212
-
 213
213
-
 214
214
-
 215
215
-
 216
216
-
 217
217
-
 218
218
-
 219
219
-
 220
220
-
 221
221
-
 222
222
-
 223
223
-
 224
224
-
 225
225
-
 226
226
-
 227
227
-
 228
228
-
 229
229
-
 230
230
-
 231
231
-
 232
232
-
 233
233
-
 234
234
-
 235
235
-
 236
236
-
 237
237
-
 238
238
-
 239
239
-
 240
240
-
 241
241
-
 242
242
-
 243
243
-
 244
244
-
 245
245
-
 246
246
-
 247
247
-
 248
248
-
 249
249
-
 250
250
-
 251
251
-
 252
252
-
 253
253
-
 254
254
-
 255
255
-
 256
256
-
 257
257
-
 258
258
-
 259
259
-
 260
260
-
 261
261
-
 262
262
-
 263
263
-
 264
264
-
 265
265
-
 266
266
-
 267
267
-
 268
268
-
 269
269
-
 270
270
-
 271
271
-
 272
272
-
 273
273
-
 274
274
-
 275
275
-
 276
276
-
 277
277
-
 278
278
-
 279
279


Asus ROG Chariot Gaming Chair Kullanım kılavuzu
- Tip
- Kullanım kılavuzu
- Bu kılavuz aynı zamanda aşağıdakiler için de uygundur:
diğer dillerde
İlgili makaleler
Diğer belgeler
-
Sharkoon ELBRUS 1 Black/Blue Kullanım kılavuzu
-
mothercare Pocket Relax Kullanici rehberi
-
-
Chicco EASY RELAX El kitabı
-
-
-
-
-
Joie Dreamer Rocker Kullanım kılavuzu
-
mothercare Multiply 6in1 El kitabı