
Operating Instructions
(Household use) Rechargeable Oral Irrigator
Model No. EW-DJ86

English 3
Deutsch 19
Français 38
Italiano 55
Español 71
Nederlands 87
Português 103
Svenska 119
Dansk 135
Norsk 151
Suomi 167
Polski 183
Česky 199
Slovensky 215
Magyar 231
Română 248
Türkçe 264
2

English
Operating Instructions
(Household use) Rechargeable Oral Irrigator
Model No. EW-DJ86
Thank you for purchasing this Panasonic product.
Beforeoperatingthisunit,pleasereadtheseinstructionscompletelyandsavethemforfutureuse.
Contents
Safety precautions........................5
Important information............................7
Partsidentication.................................8
Charging..................................................9
How to use ...........................................10
Points of care........................................12
Cleaning................................................13
Changing the nozzle
(Soldseparately)..................................... 14
Troubleshooting..................................... 15
Batterylife............................................... 17
Removing the built-in rechargeable
battery...................................................... 17
Specications......................................... 18
3

English
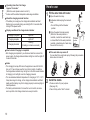
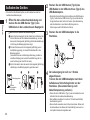
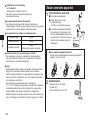
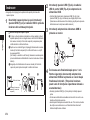
WARNING
• Do not immerse the USB power adaptor and USB cable in water or clean them
with water.
Doing so may cause electric shock or re due to a short circuit.
• Always unplug the adaptor from a household outlet when cleaning the USB
power adaptor and USB cable.
Failure to do so may cause electric shock or injury.
• Oral irrigators can be used by children aged from 8 years and above and
persons with reduced physical, sensory or mental capabilities or lack of
experience and knowledge under supervision.
• Oral irrigators shall be used only with cold or warm water, or specic
solutions as dened in the manufacturer’s instructions.
• Children shall not play with the appliance.
• Do not use anything other than the supplied USB power adaptor or USB
cable for any purpose. Also, do not use any other product with the USB
power adaptor or USB cable. (See page 8.)
Doing so may cause burns or re due to a short circuit.
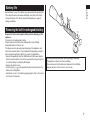
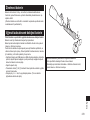
• The following symbol indicates that a specic detachable power supply unit
is required for connecting the electrical appliance to the supply mains. The
type reference of power supply unit is marked near the symbol.
4

English
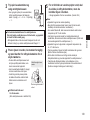
• Do not use in a way exceeding the rating of the household outlet or
the wiring.
- Exceeding the rating by connecting too many power plugs to one
household outlet may cause re due to overheating.
• Use the specied USB power adaptor (See page 8.) and USB cable.
- Failure to do so may cause burns or re due to a short circuit.
• Fully insert the power plug of the USB power adaptor.
- Failure to do so may cause re or electric shock.
• Be sure to wipe off any water droplets from the socket before
charging.
- Failure to do so may cause electric shock, injury or re.
Incaseofanabnormalityormalfunction
• Immediately stop using if there is an abnormality or malfunction.
Unplug the USB power adaptor from the household outlet when
using.
- Failure to do so may cause re, electric shock or injury.
<Abnormality or malfunction cases>
• The main unit, USB power adaptor or USB cable is deformed or
abnormally hot.
• The main unit, USB power adaptor or USB cable smells of burning.
• There is abnormal sound during use or charging of the main unit.
- Immediately request inspection or repair to an authorized service
centre.
This product
• This product has a built-in rechargeable battery. Do not throw into
re, apply heat, or charge, use, or leave in a high temperature
environment.
- Doing so may cause overheating, ignition, or explosion of the
built-in rechargeable battery.
• Do not modify or repair.
- Doing so may cause re, electric shock, or injury.
→Contact an authorized service centre for repair (battery change,
etc.).
• Never disassemble except when disposing of the product.
- Doing so may cause re, electric shock, or injury.
Safetyprecautions
To reduce the risk of injury, loss of life, electric shock, re, and damage
to property, always observe the following safety precautions.
Explanationofsymbols
The following symbols are used to classify and describe the level of
hazard, injury, and property damage caused when the denotation is
disregarded and improper use is performed.
DANGER Denotes a potential hazard that will result in
serious injury or death.
WARNING Denotes a potential hazard that could result
in serious injury or death.
CAUTION Denotes a hazard that could result in minor
injury or property damage.
WARNING
Preventing accidents
• Do not store within the reach of children or infants. Do not let them
use it.
- Doing so may cause an accident or injury due to accidental
ingestion of removable parts.
About the USB power adaptor and USB cable
• Do not place the USB power adaptor or USB cable over or near
water lled sink or bathtub.
• Do not use the appliance when the USB power adaptor or USB cable
is damaged, or when the tting into the household outlet is loose.
• Do not damage, modify, forcefully bend, pull, or twist the cord.
Also, do not place anything heavy on or pinch the cord.
- Doing so may cause electric shock or re due to a short circuit.
• Do not connect or disconnect the USB power adaptor or USB cable
to a household outlet with a wet hand.
- Doing so may cause electric shock or injury.
5

English
WARNING
Cleaning
• Always disconnect the USB plug from the main unit when cleaning
the appliance with water.
- Failure to do so may cause electric shock or injury.
• Regularly clean the power plug and the USB plugs to prevent dust
from accumulating.
- Failure to do so may cause re due to insulation failure caused by
humidity.
→Unplug the USB power adaptor from the household outlet and
wipe with a dry cloth.
CAUTION
Preventing damage to teeth and gums
• People who are unable to operate should not use this appliance.
• People with weak oral senses should not use this appliance.
- Doing so may cause injury or damage to teeth and gums.
• People who may have periodontal disease, have teeth being
treated, or are concerned about symptoms within their mouth should
consult a dentist before use.
- Failure to do so may cause injury or damage to teeth and gums.
This product
• Never use for a purpose other than oral cleaning.
- Doing so may cause an accident or injury when the stream of
water is pointed toward the eyes, nose, ears, tongue, or throat.
• Do not ll the tank with water warmer than 40 °C.
- Doing so may cause burns.
• Do not share the nozzle with your family or other people.
- Doing so may cause infection or inammation.
Note the following precautions
• Do not drop or subject to shock.
- Doing so may cause injury.
• Do not allow needles or any other foreign objects to adhere to the
power plug of the USB power adaptor or the USB plug.
- Doing so may cause electric shock or re due to a short circuit.
• Do not charge the appliance when the socket is wet.
- Doing so may cause burns or a re.
• Do not wrap the cord around the USB power adaptor when storing.
- Doing so may cause the wire in the cord to break with the load,
and may cause re due to a short circuit.
• Disconnect the USB power adaptor or the USB plug (Type-C) by
holding onto it instead of the cord.
- Failure to do so may cause burns or electric shock due to
breakage to the wire of the USB cable, or result in re due to a
short circuit.
• Disconnect the adaptor from the household outlet when not
charging.
- Failure to do so may cause electric shock or re due to electrical
leakage resulting from insulation deterioration.
• After use, clean the appliance and the nozzle and dry them.
- Failure to do so may cause damage to your health due to
propagation of mould and bacteria.
Handlingoftheremovedbatterywhendisposing
DANGER
• The rechargeable battery is exclusively for use with this appliance.
Do not use the battery with other products.
• Do not charge the battery after it has been removed from the
product.
• Do not throw into re or apply heat.
• Do not hit, disassemble, modify, or puncture with a nail.
• Do not let the positive and negative terminals of the battery get in
contact with each other through metallic objects.
• Do not carry or store the battery together with metallic jewellery
such as necklaces and hairpins.
• Do not use or leave the battery where it will be exposed to high
temperatures, such as under direct sunlight or near other sources of
heat.
• Never peel off the tube.
- Doing so may cause overheating, ignition, or explosion.
6

English
WARNING
• After removing the rechargeable battery, do not keep it within reach
of children and infants.
- The battery will harm the body if accidentally swallowed.
If this happens, consult a physician immediately.
• If the battery uid leaks out and comes in contact with the eyes, do
not rub the eyes, and thoroughly rinse with clean water, such as tap
water.
- Failure to do so may cause eye injury.
Consult a physician immediately.
CAUTION
• If the battery uid leaks out and comes in contact with the skin or
clothes, rinse off with clean water, such as tap water.
- Failure to do so may cause inammation.
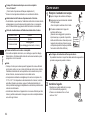
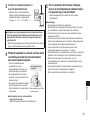
Important information
• Please use the appliance together with toothbrush.
It is hard to remove tartar or dental calculus attached to the tooth
surface just by a water jet, so a toothbrush is required to brush the
teeth. We recommend rinsing the inside of your mouth with the water
jet after brushing your teeth.
• When you rst begin using the oral irrigator, you may experience
slight bleeding of the gums even though your gums may be healthy.
This is because your gums are receiving stimulation by the oral
irrigator for the rst time. The bleeding should stop after one or two
weeks of use. Bleeding that persists for more than two weeks may be
indication of an abnormal condition of your gums, such as periodontal
disease. In this case, stop using the oral irrigator and consult your
dentist.
• The USB cable provides the overheat protection function. If charging
is abnormal or the USB plug (Type-C) heats up, disconnect the power
supply, check the socket, and remove any water or foreign objects
from the socket.
• Do not put salt, mouthwash or other chemicals into the water tank.
Doing so may cause malfunction.
• Do not dry the main unit with a dryer or a fan heater.
Doing so may cause malfunction or deformation of the parts.
• Store the appliance in a place with low humidity after use. Leaving the
appliance in a bathroom may cause malfunction.
• Charge the appliance correctly according to these Operating
Instructions. (See pages 9 and 10 "Charging".)
• This appliance contains a battery that is only replaceable by skilled
persons. Please contact an authorized service centre for the details of
repair.
7

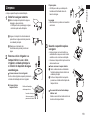
English
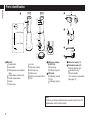
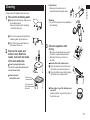
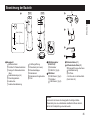
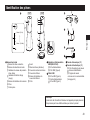
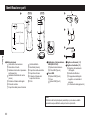
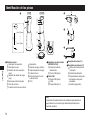
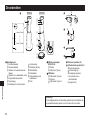
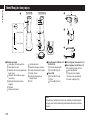
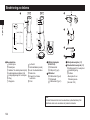
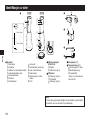
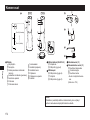
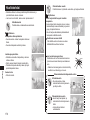
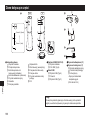
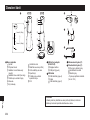
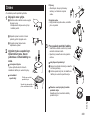
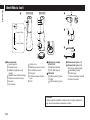
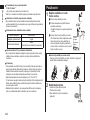
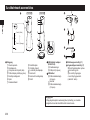
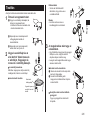
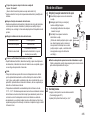
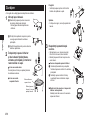
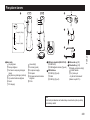
A Main unit
1 Power Switch
2 Level switch
3 Water pressure level indicator
(blue)
4 Charge status indicator (red)
5 Nozzle release button
6 Socket
7 Socket cover
8 Air vent
9 Water tank (inside)
0 Water tank cap
- Bottom cover
Bottom cover release button
Filter
B USB power adaptor
(ES-RU1-02)
Power plug
USB port (Type-A)
C USB cable
USB plug (Type-A)
Cord
USB plug (Type-C)
D Ultrasonicnozzle(×1)
E Orthodonticnozzle(×1)
Nozzle insertion port
Identication ring
Nozzle Handle
• The nozzle is a consumable.
(See page 14.)
Note
There may be moisture inside the main unit (water tank) left from the
distilled water used for product testing.
Partsidentication
AB
Front Back
C
E
D
Level 5 (Strong)
Level 1 (Weak)
8

English
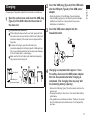
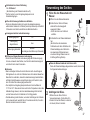
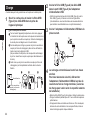
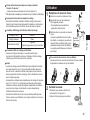
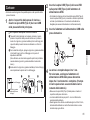
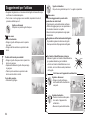
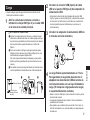
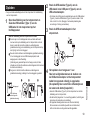
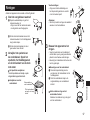
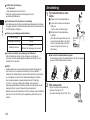
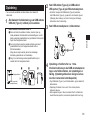
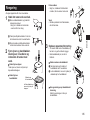
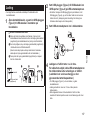
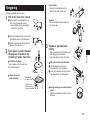
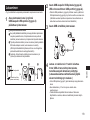
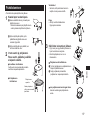
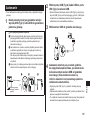
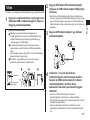
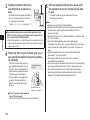
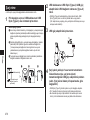
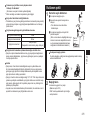
Charging
• Please wipe off any water droplets from the socket or socket cover.
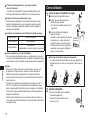
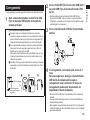
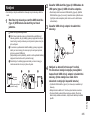
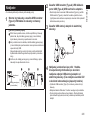
1Open the socket cover, and insert the USB plug
(Type-C)oftheUSBcableintothesocketon
themainunit.
If the socket cover comes off
a
While holding the main unit with your hand, press and hold
the socket cover with your thumb so that the soft rubber joint
(mushroom-shaped) of the socket cover is aligned with the
xing hole.
b
As shown in the gure, push the soft rubber joint
(mushroom-shaped) into the xing hole with a SIM ejector pin.
(Do not use a sharp-pointed tool as this may cause damage
to the soft rubber joint or a hand injury.)
c
Make sure that the soft rubber joint (mushroom-shaped) is
fully pushed into the xing hole.
Fixing hole
Soft rubber joint
(mushroom-shaped)
a b c
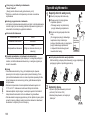
2InserttheUSBplug(Type-A)oftheUSBcable
intotheUSBport(Type-A)oftheUSBpower
adaptor.
• Check the direction of the USB plug (Type-A) terminals,
hold the USB plug (Type-A), and insert or pull it out straight.
(Deflection or insertion in a wrong direction may cause
deformation or malfunction.)
3Insert the USB power adaptor into the
householdoutlet.
2
1
3
4Chargingiscompletedafterapprox.1hour.
Forsafety,disconnecttheUSBpoweradaptor
from the household outlet after charging is
completed.(Thechargingtimemayvarywith
theremainingbatterycapacity.)
• Remove the USB plug (Type-C) from the socket, and close the
socket cover.
• Charging the battery for more than 1 hour will not affect battery
performance.
• This appliance uses a Lithium-ion battery. Therefore, the service
life of the battery will not be affected even if it is charged after
each use.
9

English
Operating time after a full charge
Approx.10minutes*
(When the water pressure level is set to 5)
* It varies with the ambient temperature and usage conditions.
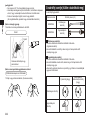
About the charging reminder function
• If the battery is running low, the charge status indicator will start
ashing (once a second) during use and light off in 5 seconds after
turning off the power switch.
Displayconditionofthechargestatusindicator
Charging in progress Lights on
Charging complete Lights off
Charging abnormal Flashing
(Flashing in red twice a second)
How to check if charging is completed
• After charging is completed, if you disconnect and then connect the
power supply, the charge status indicator will light on and then light off
in about 5 seconds.
Notes
• The charging time may differ when the appliance is used for the rst
time, or if it has not been used for more than 6 months. In addition,
the charge status indicator may not light on in the rst several minutes
of charging, but it will light on as the charging proceeds.
• The recommended ambient temperature for charging is 10 °C - 35 °C.
It may take longer to charge, or the charge status indicator will ash
rapidly and the battery may fail to charge properly in extremely high or
low temperatures.
• The battery will deteriorate if not used for over 6 months, so make
sure to perform a full charge at least once every 6 months.
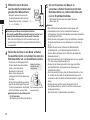
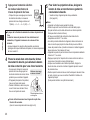
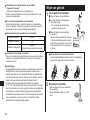
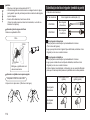
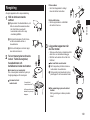
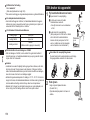
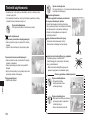
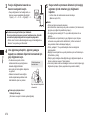
How to use
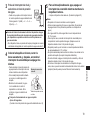
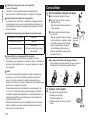
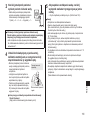
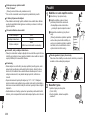
1Fillthewatertankwithwater.
a Open the water tank cap.
b Add water while keeping the main unit
level.
• Do not ll beyond the full-water
position.
c Close the water tank cap securely.
(When the full-water position is
reached, or when the water tank cap
is closed after the full-water position is
reached, a small amount of water may
ow out of the air vent.)
a
b
Full-water
position
If the water tank cap comes off
You can attach the water tank cap by following the procedure
below when it comes off.
2Installthenozzle.
• Choose a nozzle for your purpose.
(See page 12.)
• Press in rmly until a "click" is heard. Click
10

English
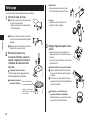
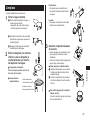
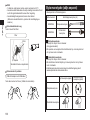
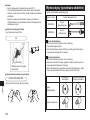
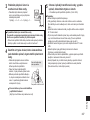
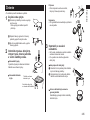
3Press the level switch, and
selectthewaterpressurelevel.
• Each time you press the level switch, the
water pressure level is switched as follows:
1 (weak) → 2 → 3 → 4 → 5 (strong) → 1...
Press
LEVEL
Aboutthewaterpressurelevelmemoryfunction
The last selected water pressure level will be remembered,
fromwhichtheappliancewillstartnexttime.
• When the appliance has not been used for a long time or when
the battery is used up, the water pressure level will return to 1.
4Placethenozzleinyourmouth,closeyour
mouthgently,andthenturnonthepower
switchtorinseyourteeth.
• You can switch the water pressure
level by pressing the level switch,
even while using the appliance.
• If the main unit is tilted too much, the
water does not come out from the
nozzle.
• During use, be careful not to cover
the air vent with your hand. Otherwise,
the water does not come out from
the nozzle. * It can also be used in a bath.
Keep your face over the
basin.
Operation time with full water
approx.60seconds.
(When the water pressure level is set to 5)
5To prevent the water from splashing about, turn
off the power switch while keeping the nozzle
inyourmouth.
• Please clean the appliance after each use. (See page 13.)
Notes
• The appliance does not work during charging.
• Always use new tap water or lukewarm water. (Do not put salt,
mouthwash or other chemicals into the water tank.)
• If you feel the water is cold, use lukewarm water with a temperature
of 40 °C or less.
• For the rst use, turn on the power switch to jet water so that
you can check the water pressure level. (Please start using the
appliance from water pressure level 1.)
• The appliance may not operate in an ambient temperature
approximately 5 °C or lower.
• Do not push the tip of the nozzle too hard against the teeth or
gums. (Except the orthodontic nozzle)
• When you feel that the irritation is strong, turn off the power switch
and use the appliance from water pressure level 1.
• Do not turn on the power switch when the water tank is empty
unless you are drying the moisture inside the main unit.
(Doing so may cause malfunction.)
11

English
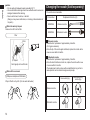
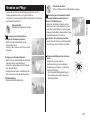
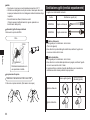
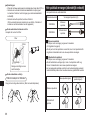
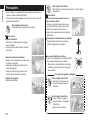
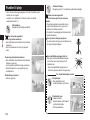
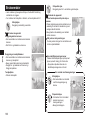
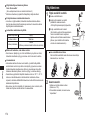
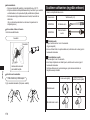
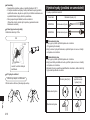
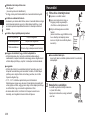
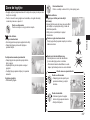
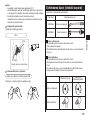
Points of care
• Adjust the angle and movement of the nozzle according to the
purpose and the area you want to clean.
• For areas where the gums are sensitive, please set the water
pressure level to 1.
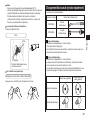
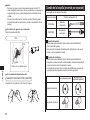
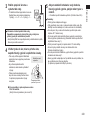
Ultrasonic nozzle
To clean with powerful water jet.
■ How to use
Interdental cleaning
• Direct the water jet onto the space between
the teeth.
• Direct from the front and rear sides of the
teeth.
Periodontal pocket cleaning
• Aim the water jet at the space between teeth
and gums.
• Slowly shift the water jet along the gums.
• Clean the front and back of the teeth and
behind the molars as well.
Gums care
• Stimulate the gums.
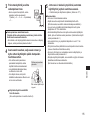
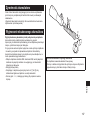
Orthodontic nozzle
To clean with 2-in-1 water jet and brush nozzle.
■ How to use
Lightlyplacethebrushtiponthecrooked
teeth.
• Place the brush tip on the area that is difcult
for a toothbrush to reach and tends to remain
unpolished.
• Wiggle the brush mainly in interdental spaces.
To adjust the orientation of the nozzle
You can adjust the direction of water jet by
rotating the nozzle handle.
Iftheidenticationringcomesoff
Align the nozzle with the identication ring
(in any direction) to install it.
• Even if the identication ring is not attached,
the performance of the nozzle is not affected.
For orthodontic bracket area
Ultrasonic nozzle
• Direct the water jet around
orthodontic brackets and
bridges.
Orthodontic nozzle
• Insert the brush to the gap
between the teeth and the
orthodontic bracket.
• Wiggle the brush tip.
12

English
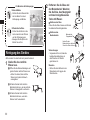
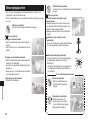
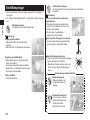
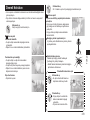
Cleaning
• Please clean the appliance after each use.
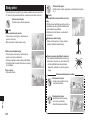
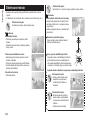
1Pourouttheremainingwater.
a Open the water tank cap, and pour out
the remaining water.
• Be sure to pour out the remaining
water after each use. a
b Turn on the power switch to drain the
remaining water in the main unit.
c Turn off the power switch when no
more water comes out. b
2Remove the nozzle and
bottomcover.Washthe
nozzle, main unit and inside
ofthetankwithwater.
How to remove the nozzle
Pull out the nozzle while pressing the
nozzle release button.
How to remove
the bottom cover Bottom cover
release button
Lift up the bottom
cover while pressing
the button.
Preparations
• Make sure the socket cover is
closed before washing with water.
Washing
• Do not hit the product on the washstand
when draining.
3Store the appliance after
drying.
• Wipe away the water with a towel and
dry them in a well-ventilated shade.
• Attach the bottom cover after it is
air-dried.
How to attach the bottom cover
a Insert the bayonet on the front end of
the bottom cover into the main unit.
b Close the bottom cover while pressing
the bottom cover release button. a
b
If the rubber ring of the bottom cover
comes off
Install the rubber ring into the groove of
the bottom cover.
13

English
Notes
• Do not wash with lukewarm water exceeding 50 °C.
• Use neutral kitchen detergent and rinse well with water to ensure no
detergent remains after cleaning.
• Never use thinners, benzine, or alcohol.
(Doing so may cause malfunction, or cracking or discolouration of
the parts.)
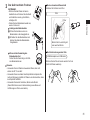
When the water jet is poor
Remove the dirt from the lter.
Filter
Filter
Brush
Rub it gently with a soft brush.
When dirt is a concern
USB power adaptor and USB cable
Wipe it off with a dry cloth. (Do not wash with water)
Changingthenozzle(Soldseparately)
• The nozzle is a consumable.
Part number Replacement Nozzle (×2)
WEW0986 Ultrasonic nozzle
WEW0984 Orthodontic nozzle
■ Ultrasonic nozzle
• Guidelines for replacement: approximately 6 months.
(For hygiene reasons)
• Once the tip of the nozzle gets deformed, replace the nozzle with a
new one even within 6 months.
■
Orthodontic nozzle
• Guidelines for replacement: approximately 3 months.
• Once the brush bristles are bent out, replace the nozzle with a new
one even within 3 months.
• The replacement nozzle comes with an identication ring so that a
same product can be shared among several people.
New nozzle (tip) Deformed (worn)
nozzle (tip)
Ultrasonic nozzle
Orthodontic nozzle
14

English
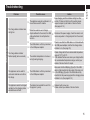
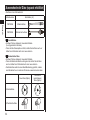
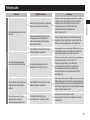
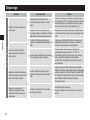
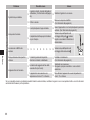
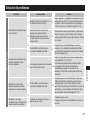
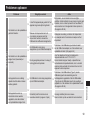
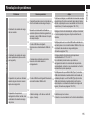
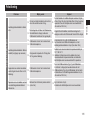
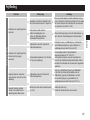
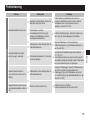
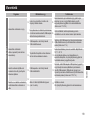
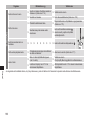
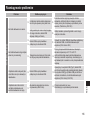
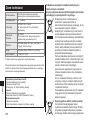
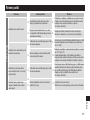
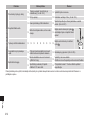
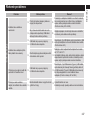
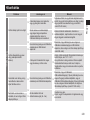
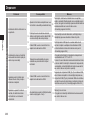
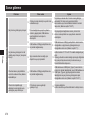
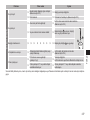
Troubleshooting
Problem Possible cause Action
While charging
The charge status indicator does
not light on.
▶The appliance was just purchased or it
has not been used for a while. ▶
Keep charging, and the indicator will light on after
a while. If it does not light on after a while, please
request a repair at your dealer or Service Centre.
(See pages 9-10.)
▶
When the socket is wet or foreign
objects adhered to the socket, the USB
cable will activate the self-protection
function.
▶Disconnect the power supply, check the socket, and
remove any water or foreign objects from the socket.
▶The USB cable is not rmly connected
to the USB power adaptor. ▶
Check to see that the USB cable is in full contact with
the USB power adaptor, and that the charge status
indicator is on. (See page 10.)
The charge status indicator
ashes rapidly (twice a second).
▶
▶The ambient temperature is too low or
too high during charging. ▶
Please charge within the recommended temperature
range of 10 °C to 35 °C.
If the indicator ashes even when you charge it within
the recommended temperature range, contact your
dealer or Service Centre for repair.
The appliance can be used for
just several minutes even after a
full charge.
▶The USB cable is not rmly connected
to the USB power adaptor. ▶
Make sure that the USB plug (Type-C) of the USB
cable is fully inserted into the socket of the main unit
or the USB plug (Type-A) of the USB cable is fully
inserted into the power supply and the charging status
indicator is on. (See pages 9-10.)
▶
The battery has reached the end of its
life (approx. 3 years). ▶Replace it with a new one.
Please contact your dealer or Service Centre.
The appliance cannot be charged
normally, but the charging status
indicator does not ash.
▶
15

English
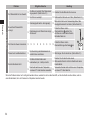
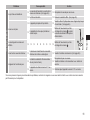
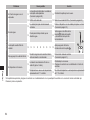
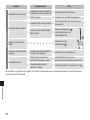
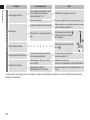
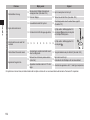
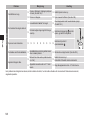
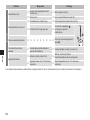
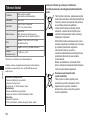
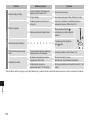
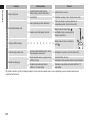
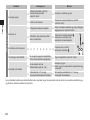
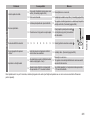
Problem Possible cause Action
While using
The water jet is poor. ▶The nozzle is clogged. The outlet of the
nozzle is squashed. (See page 14.) ▶Replace the nozzle with a new one.
▶The lter is clogged. ▶Remove the dirt from the lter. (See page 14.)
No water comes out.
▶The main unit is tilted too much. ▶Please use the appliance with the main unit upright.
(See page 11.)
▶It may take some time to suck up water. ▶
Put water into the nozzle port a,
install the nozzle, and turn on the
power switch.
b
a
The nozzle is hard to install. ▶ ▶ ▶ ▶ ▶ ▶ ▶ ▶ ▶Apply water to the nozzle insertion
port b.
Water leaks from the bottom
cover. ▶The rubber ring of the bottom cover is
cocked or misaligned. ▶Please install it properly. (See page 13.)
The appliance does not operate.
▶The battery has reached the end of its
life (approx. 3 years). ▶Replace it with a new one.
Please contact your dealer or Service Centre.
▶The appliance is used at approximately
5 °C or lower. ▶Do not use the appliance at approximately 5 °C or
lower.
If the problems still cannot be solved, contact the store where you purchased the unit or a service centre authorized by Panasonic for repair.
16

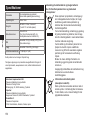
English
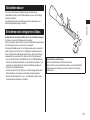
Forenvironmentalprotectionandrecyclingofmaterials
This appliance contains a Lithium-ion battery.
Please make sure that the battery is disposed of at an ofcially
assigned location, if there is one in your country.
Batterylife
Approximately 3 years. The battery may have reached its operating life
if the usage frequency decreases drastically, even after a full charge.
(The operating life of the battery may differ depending on usage or
storage conditions.)
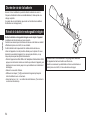
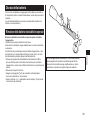
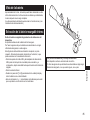
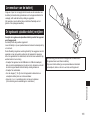
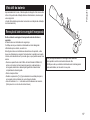
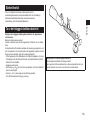
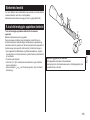
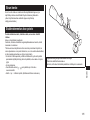
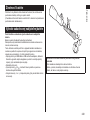
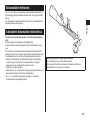
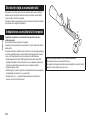
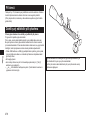
Removingthebuilt-inrechargeablebattery
Removethebuilt-inrechargeablebatterybeforedisposingofthe
appliance.
The battery is to be disposed of safely.
Please make sure that the battery is disposed of at an ofcially
designated location if there is one.
This gure must only be used when disposing of the appliance, and
must not be used to repair it. If you dismantle the appliance yourself, it
will no longer be waterproof, which may cause it to malfunction.
• Remove the appliance from the USB cable and USB power adaptor,
press the power switch to turn on the power and then keep the power
on until the battery is completely discharged.
• Remove the bottom cover.
• Perform steps 1 to 6 to disassemble the main unit and remove the
battery with a screwdriver.
• Insulate the ⊕ and ⊖ terminals by applying tape to them. (To prevent
short circuit of terminals).
17

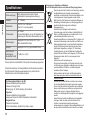
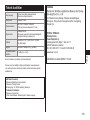
English
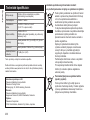
Power source See the name plate on the product
(Automatic voltage conversion)
Charging time Approx. 1 hour
Operating time LEVEL 5: Approx. 10 minutes*
(*at 20 °C when fully charged)
Tank volume
Approx. 200 mL
(For approx. 60 seconds of operation when the
water pressure level is set to 5)
Dimensions Main unit: 212 (H) x 68 (W) x 81 (D) mm
(Not including nozzle)
Mass Main unit: Approx. 275 g (Including nozzle)
Airborne
Acoustical Noise 71 (dB (A) re 1 pW)
This product is intended for household use only.
For more information about the energy efciency of the product, please
visit our website, www.panasonic.com, and enter the model number in
the search box.
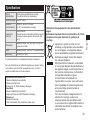
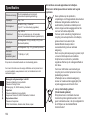
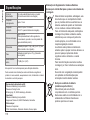
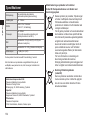
Specications Disposal of Old Equipment and Batteries
OnlyfortheEuropeanUnionandcountrieswithrecycling
systems.
These symbols on the products, packaging,
and/or accompanying documents mean that
used electrical and electronic products and
batteries must not be mixed with general
household waste.
For proper treatment, recovery and recycling
of old products and used batteries, please
take them to applicable collection points in
accordance with your national legislation.
By disposing of them correctly, you will help to
save valuable resources and prevent any
potential negative effects on human health
and the environment.
For more information about collection and
recycling, please contact your local authority.
Penalties may be applicable for incorrect
disposal of this waste, in accordance with
national legislation.
Noteforthebatterysymbol
(bottomsymbol)
This symbol might be used in combination with
a chemical symbol. In this case, it complies
with the requirement set by the Directive for
the chemical involved.
Authorized Representative in EU:
Panasonic Marketing Europe GmbH
Panasonic Testing Centre
Winsbergring 15, 22525 Hamburg, Germany
Importer:
Panasonic Marketing Europe GmbH
Hagenauer Strasse 43, 65203 Wiesbaden, Germany
Manufacturedby:
Panasonic Corporation
1006, Oaza Kadoma, Kadoma City, Osaka, Japan
18

Betriebsanleitung
(Private Verwendung) Wiederaufladbare Munddusche
Modellnr. EW-DJ86
Vielen Dank, dass Sie sich für den Kauf dieses Panasonic-Produkts entschieden haben.
Bevor Sie dieses Gerät in Betrieb nehmen, lesen Sie sich bitte diese Anleitung vollständig durch und bewahren Sie sie
für ein späteres Nachschlagen auf.
Inhalt
Deutsch
Sicherheitshinweise ...................21
Wichtige Informationen ........................24
Bezeichnung der Bauteile....................25
Auaden des Gerätes...........................26
Verwendung des Gerätes.....................27
Hinweise zur Pege ..............................29
Reinigung des Gerätes ........................30
Auswechseln der Düse
(separat erhältlich) ................................. 32
Fehlersuche ............................................ 33
Akkulebensdauer.................................... 35
Entnehmen des integrierten Akkus ...... 35
Spezikationen ....................................... 36
19

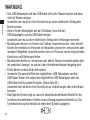
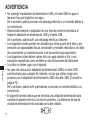
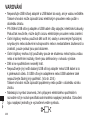
WARNUNG
• Den USB-Netzadapter und das USB-Kabel nicht unter Wasser tauchen und diese
nicht mit Wasser reinigen.
Ansonsten kann es durch einen Kurzschluss zu einem elektrischen Schlag oder
Brand kommen.
• Ziehen Sie den Netzadapter aus der Steckdose, bevor Sie den
USB-Netzadapter und das USB-Kabel reinigen.
Ansonsten kann es zu einem elektrischen Schlag oder Verletzungen kommen.
• Mundduschen können von Kindern ab 8 Jahren verwendet werden. Unter Aufsicht
können Sie ebenfalls von Personen mit reduzierten physischen, sensorischen oder
mentalen Fähigkeiten verwendet werden oder von Personen, denen entsprechende
Kenntnisse und Erfahrungen fehlen.
• Mundduschen dürfen nur mit warmem oder kaltem Wasser verwendet werden oder
mit speziellen Lösungen, so wie sie in den Herstelleranleitungen festgelegt sind.
• Kinder dürfen mit dem Gerät nicht spielen.
• Verwenden Sie ausschließlich den mitgelieferten USB-Netzadapter und das
USB-Kabel. Nutzen Sie zudem den mitgelieferten USB-Netzadapter oder das
USB-Kabel nicht für andere Produkte. (Siehe Seite 25.)
Ansonsten kann es durch einen Kurzschluss zu Verbrennungen oder einem Brand
kommen.
• Das folgende Symbol zeigt an, dass ein spezielles abnehmbares Netzteil für den
Anschluss des elektrischen Gerätes an das Versorgungsnetz erforderlich ist. Die
Typenbezeichnung des Netzteils ist neben dem Symbol angegeben.
Deutsch
20
Sayfa yükleniyor ...
Sayfa yükleniyor ...
Sayfa yükleniyor ...
Sayfa yükleniyor ...
Sayfa yükleniyor ...
Sayfa yükleniyor ...
Sayfa yükleniyor ...
Sayfa yükleniyor ...
Sayfa yükleniyor ...
Sayfa yükleniyor ...
Sayfa yükleniyor ...
Sayfa yükleniyor ...
Sayfa yükleniyor ...
Sayfa yükleniyor ...
Sayfa yükleniyor ...
Sayfa yükleniyor ...
Sayfa yükleniyor ...
Sayfa yükleniyor ...
Sayfa yükleniyor ...
Sayfa yükleniyor ...
Sayfa yükleniyor ...
Sayfa yükleniyor ...
Sayfa yükleniyor ...
Sayfa yükleniyor ...
Sayfa yükleniyor ...
Sayfa yükleniyor ...
Sayfa yükleniyor ...
Sayfa yükleniyor ...
Sayfa yükleniyor ...
Sayfa yükleniyor ...
Sayfa yükleniyor ...
Sayfa yükleniyor ...
Sayfa yükleniyor ...
Sayfa yükleniyor ...
Sayfa yükleniyor ...
Sayfa yükleniyor ...
Sayfa yükleniyor ...
Sayfa yükleniyor ...
Sayfa yükleniyor ...
Sayfa yükleniyor ...
Sayfa yükleniyor ...
Sayfa yükleniyor ...
Sayfa yükleniyor ...
Sayfa yükleniyor ...
Sayfa yükleniyor ...
Sayfa yükleniyor ...
Sayfa yükleniyor ...
Sayfa yükleniyor ...
Sayfa yükleniyor ...
Sayfa yükleniyor ...
Sayfa yükleniyor ...
Sayfa yükleniyor ...
Sayfa yükleniyor ...
Sayfa yükleniyor ...
Sayfa yükleniyor ...
Sayfa yükleniyor ...
Sayfa yükleniyor ...
Sayfa yükleniyor ...
Sayfa yükleniyor ...
Sayfa yükleniyor ...
Sayfa yükleniyor ...
Sayfa yükleniyor ...
Sayfa yükleniyor ...
Sayfa yükleniyor ...
Sayfa yükleniyor ...
Sayfa yükleniyor ...
Sayfa yükleniyor ...
Sayfa yükleniyor ...
Sayfa yükleniyor ...
Sayfa yükleniyor ...
Sayfa yükleniyor ...
Sayfa yükleniyor ...
Sayfa yükleniyor ...
Sayfa yükleniyor ...
Sayfa yükleniyor ...
Sayfa yükleniyor ...
Sayfa yükleniyor ...
Sayfa yükleniyor ...
Sayfa yükleniyor ...
Sayfa yükleniyor ...
Sayfa yükleniyor ...
Sayfa yükleniyor ...
Sayfa yükleniyor ...
Sayfa yükleniyor ...
Sayfa yükleniyor ...
Sayfa yükleniyor ...
Sayfa yükleniyor ...
Sayfa yükleniyor ...
Sayfa yükleniyor ...
Sayfa yükleniyor ...
Sayfa yükleniyor ...
Sayfa yükleniyor ...
Sayfa yükleniyor ...
Sayfa yükleniyor ...
Sayfa yükleniyor ...
Sayfa yükleniyor ...
Sayfa yükleniyor ...
Sayfa yükleniyor ...
Sayfa yükleniyor ...
Sayfa yükleniyor ...
Sayfa yükleniyor ...
Sayfa yükleniyor ...
Sayfa yükleniyor ...
Sayfa yükleniyor ...
Sayfa yükleniyor ...
Sayfa yükleniyor ...
Sayfa yükleniyor ...
Sayfa yükleniyor ...
Sayfa yükleniyor ...
Sayfa yükleniyor ...
Sayfa yükleniyor ...
Sayfa yükleniyor ...
Sayfa yükleniyor ...
Sayfa yükleniyor ...
Sayfa yükleniyor ...
Sayfa yükleniyor ...
Sayfa yükleniyor ...
Sayfa yükleniyor ...
Sayfa yükleniyor ...
Sayfa yükleniyor ...
Sayfa yükleniyor ...
Sayfa yükleniyor ...
Sayfa yükleniyor ...
Sayfa yükleniyor ...
Sayfa yükleniyor ...
Sayfa yükleniyor ...
Sayfa yükleniyor ...
Sayfa yükleniyor ...
Sayfa yükleniyor ...
Sayfa yükleniyor ...
Sayfa yükleniyor ...
Sayfa yükleniyor ...
Sayfa yükleniyor ...
Sayfa yükleniyor ...
Sayfa yükleniyor ...
Sayfa yükleniyor ...
Sayfa yükleniyor ...
Sayfa yükleniyor ...
Sayfa yükleniyor ...
Sayfa yükleniyor ...
Sayfa yükleniyor ...
Sayfa yükleniyor ...
Sayfa yükleniyor ...
Sayfa yükleniyor ...
Sayfa yükleniyor ...
Sayfa yükleniyor ...
Sayfa yükleniyor ...
Sayfa yükleniyor ...
Sayfa yükleniyor ...
Sayfa yükleniyor ...
Sayfa yükleniyor ...
Sayfa yükleniyor ...
Sayfa yükleniyor ...
Sayfa yükleniyor ...
Sayfa yükleniyor ...
Sayfa yükleniyor ...
Sayfa yükleniyor ...
Sayfa yükleniyor ...
Sayfa yükleniyor ...
Sayfa yükleniyor ...
Sayfa yükleniyor ...
Sayfa yükleniyor ...
Sayfa yükleniyor ...
Sayfa yükleniyor ...
Sayfa yükleniyor ...
Sayfa yükleniyor ...
Sayfa yükleniyor ...
Sayfa yükleniyor ...
Sayfa yükleniyor ...
Sayfa yükleniyor ...
Sayfa yükleniyor ...
Sayfa yükleniyor ...
Sayfa yükleniyor ...
Sayfa yükleniyor ...
Sayfa yükleniyor ...
Sayfa yükleniyor ...
Sayfa yükleniyor ...
Sayfa yükleniyor ...
Sayfa yükleniyor ...
Sayfa yükleniyor ...
Sayfa yükleniyor ...
Sayfa yükleniyor ...
Sayfa yükleniyor ...
Sayfa yükleniyor ...
Sayfa yükleniyor ...
Sayfa yükleniyor ...
Sayfa yükleniyor ...
Sayfa yükleniyor ...
Sayfa yükleniyor ...
Sayfa yükleniyor ...
Sayfa yükleniyor ...
Sayfa yükleniyor ...
Sayfa yükleniyor ...
Sayfa yükleniyor ...
Sayfa yükleniyor ...
Sayfa yükleniyor ...
Sayfa yükleniyor ...
Sayfa yükleniyor ...
Sayfa yükleniyor ...
Sayfa yükleniyor ...
Sayfa yükleniyor ...
Sayfa yükleniyor ...
Sayfa yükleniyor ...
Sayfa yükleniyor ...
Sayfa yükleniyor ...
Sayfa yükleniyor ...
Sayfa yükleniyor ...
Sayfa yükleniyor ...
Sayfa yükleniyor ...
Sayfa yükleniyor ...
Sayfa yükleniyor ...
Sayfa yükleniyor ...
Sayfa yükleniyor ...
Sayfa yükleniyor ...
Sayfa yükleniyor ...
Sayfa yükleniyor ...
Sayfa yükleniyor ...
Sayfa yükleniyor ...
Sayfa yükleniyor ...
Sayfa yükleniyor ...
Sayfa yükleniyor ...
Sayfa yükleniyor ...
Sayfa yükleniyor ...
Sayfa yükleniyor ...
Sayfa yükleniyor ...
Sayfa yükleniyor ...
Sayfa yükleniyor ...
Sayfa yükleniyor ...
Sayfa yükleniyor ...
Sayfa yükleniyor ...
Sayfa yükleniyor ...
Sayfa yükleniyor ...
Sayfa yükleniyor ...
Sayfa yükleniyor ...
Sayfa yükleniyor ...
Sayfa yükleniyor ...
Sayfa yükleniyor ...
Sayfa yükleniyor ...
Sayfa yükleniyor ...
Sayfa yükleniyor ...
Sayfa yükleniyor ...
Sayfa yükleniyor ...
Sayfa yükleniyor ...
Sayfa yükleniyor ...
Sayfa yükleniyor ...
Sayfa yükleniyor ...
Sayfa yükleniyor ...
Sayfa yükleniyor ...
Sayfa yükleniyor ...
Sayfa yükleniyor ...
Sayfa yükleniyor ...
Sayfa yükleniyor ...
Sayfa yükleniyor ...
Sayfa yükleniyor ...
Sayfa yükleniyor ...
Sayfa yükleniyor ...
Sayfa yükleniyor ...
Sayfa yükleniyor ...
Sayfa yükleniyor ...
Sayfa yükleniyor ...
Sayfa yükleniyor ...
-
 1
1
-
 2
2
-
 3
3
-
 4
4
-
 5
5
-
 6
6
-
 7
7
-
 8
8
-
 9
9
-
 10
10
-
 11
11
-
 12
12
-
 13
13
-
 14
14
-
 15
15
-
 16
16
-
 17
17
-
 18
18
-
 19
19
-
 20
20
-
 21
21
-
 22
22
-
 23
23
-
 24
24
-
 25
25
-
 26
26
-
 27
27
-
 28
28
-
 29
29
-
 30
30
-
 31
31
-
 32
32
-
 33
33
-
 34
34
-
 35
35
-
 36
36
-
 37
37
-
 38
38
-
 39
39
-
 40
40
-
 41
41
-
 42
42
-
 43
43
-
 44
44
-
 45
45
-
 46
46
-
 47
47
-
 48
48
-
 49
49
-
 50
50
-
 51
51
-
 52
52
-
 53
53
-
 54
54
-
 55
55
-
 56
56
-
 57
57
-
 58
58
-
 59
59
-
 60
60
-
 61
61
-
 62
62
-
 63
63
-
 64
64
-
 65
65
-
 66
66
-
 67
67
-
 68
68
-
 69
69
-
 70
70
-
 71
71
-
 72
72
-
 73
73
-
 74
74
-
 75
75
-
 76
76
-
 77
77
-
 78
78
-
 79
79
-
 80
80
-
 81
81
-
 82
82
-
 83
83
-
 84
84
-
 85
85
-
 86
86
-
 87
87
-
 88
88
-
 89
89
-
 90
90
-
 91
91
-
 92
92
-
 93
93
-
 94
94
-
 95
95
-
 96
96
-
 97
97
-
 98
98
-
 99
99
-
 100
100
-
 101
101
-
 102
102
-
 103
103
-
 104
104
-
 105
105
-
 106
106
-
 107
107
-
 108
108
-
 109
109
-
 110
110
-
 111
111
-
 112
112
-
 113
113
-
 114
114
-
 115
115
-
 116
116
-
 117
117
-
 118
118
-
 119
119
-
 120
120
-
 121
121
-
 122
122
-
 123
123
-
 124
124
-
 125
125
-
 126
126
-
 127
127
-
 128
128
-
 129
129
-
 130
130
-
 131
131
-
 132
132
-
 133
133
-
 134
134
-
 135
135
-
 136
136
-
 137
137
-
 138
138
-
 139
139
-
 140
140
-
 141
141
-
 142
142
-
 143
143
-
 144
144
-
 145
145
-
 146
146
-
 147
147
-
 148
148
-
 149
149
-
 150
150
-
 151
151
-
 152
152
-
 153
153
-
 154
154
-
 155
155
-
 156
156
-
 157
157
-
 158
158
-
 159
159
-
 160
160
-
 161
161
-
 162
162
-
 163
163
-
 164
164
-
 165
165
-
 166
166
-
 167
167
-
 168
168
-
 169
169
-
 170
170
-
 171
171
-
 172
172
-
 173
173
-
 174
174
-
 175
175
-
 176
176
-
 177
177
-
 178
178
-
 179
179
-
 180
180
-
 181
181
-
 182
182
-
 183
183
-
 184
184
-
 185
185
-
 186
186
-
 187
187
-
 188
188
-
 189
189
-
 190
190
-
 191
191
-
 192
192
-
 193
193
-
 194
194
-
 195
195
-
 196
196
-
 197
197
-
 198
198
-
 199
199
-
 200
200
-
 201
201
-
 202
202
-
 203
203
-
 204
204
-
 205
205
-
 206
206
-
 207
207
-
 208
208
-
 209
209
-
 210
210
-
 211
211
-
 212
212
-
 213
213
-
 214
214
-
 215
215
-
 216
216
-
 217
217
-
 218
218
-
 219
219
-
 220
220
-
 221
221
-
 222
222
-
 223
223
-
 224
224
-
 225
225
-
 226
226
-
 227
227
-
 228
228
-
 229
229
-
 230
230
-
 231
231
-
 232
232
-
 233
233
-
 234
234
-
 235
235
-
 236
236
-
 237
237
-
 238
238
-
 239
239
-
 240
240
-
 241
241
-
 242
242
-
 243
243
-
 244
244
-
 245
245
-
 246
246
-
 247
247
-
 248
248
-
 249
249
-
 250
250
-
 251
251
-
 252
252
-
 253
253
-
 254
254
-
 255
255
-
 256
256
-
 257
257
-
 258
258
-
 259
259
-
 260
260
-
 261
261
-
 262
262
-
 263
263
-
 264
264
-
 265
265
-
 266
266
-
 267
267
-
 268
268
-
 269
269
-
 270
270
-
 271
271
-
 272
272
-
 273
273
-
 274
274
-
 275
275
-
 276
276
-
 277
277
-
 278
278
-
 279
279
-
 280
280
-
 281
281


Diğer dillerde
- slovenčina: Panasonic EWDJ86 Návod na používanie
- français: Panasonic EWDJ86 Mode d'emploi
- italiano: Panasonic EWDJ86 Istruzioni per l'uso
- Deutsch: Panasonic EWDJ86 Bedienungsanleitung
- português: Panasonic EWDJ86 Instruções de operação
- dansk: Panasonic EWDJ86 Betjeningsvejledning
- Nederlands: Panasonic EWDJ86 Handleiding
- română: Panasonic EWDJ86 Instrucțiuni de utilizare