Thrustmaster 4069006 4060051 4068007 Kullanım kılavuzu
- Kategori
- Oyun kontrolleri
- Tip
- Kullanım kılavuzu


1/10
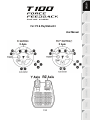
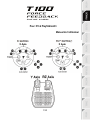
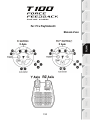
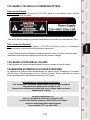
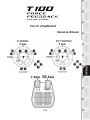
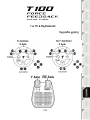
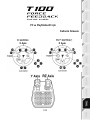
For: PC & PlayStation®3
User Manual

2/10
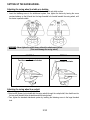
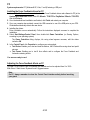
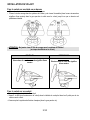
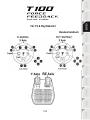
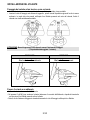
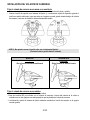
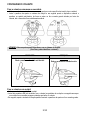
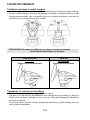
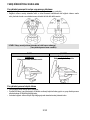
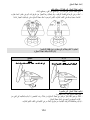
SETTING UP THE RACING WHEEL
Attaching the racing wheel to a table or a desktop
- Place the racing wheel on a table or any other horizontal, flat and stable surface.
- Insert the fastening screw in the attachment system, then tighten the device by turning the screw
counterclockwise, so that it feeds into the large threaded hole located beneath the racing wheel, until
the device is perfectly stable.
WARNING: Never tighten the screw alone, without the attachment system!
(This could damage the racing wheel).
ASSEMBLY REMOVAL
To tighten:
Turn the screw counterclockwise
To release:
Turn the screw clockwise
Attaching the racing wheel to a cockpit
- Place the racing wheel on the cockpit shelf.
- Drive two M6 screws (not included with the racing wheel) through the cockpit shelf, then feed them into
the two small threaded holes located beneath the racing wheel.
- Then, tighten the standard attachment system by inserting the fastening screw in the large threaded
hole.

3/10
CONNECTING THE RACING WHEEL TO THE MAINS
European versions only
Important note: the European version of the T100 FFB is equipped with an internal power supply, located
directly inside the racing wheel's base.
The European version must exclusively be supplied with 220V!
Never open the racing wheel base – shock hazard!
- Simply connect the racing wheel's mains connector to a 220 V power outlet.
Other versions (non-European)
Note: Contrary to the European version, the non-European T100 FFB features an external power supply;
a specific device is provided with the racing wheel.
- Connect the external adapter to the relevant connector located at the back of the racing wheel, then
connect the external mains power adapter to a standard power outlet featuring the same voltage.
CONNECTING THE PEDAL SET TO THE RACING WHEEL
Connect the pedal set to the racing wheel using the relevant connector, located at the back of the racing
wheel.
AUTOMATIC RACING WHEEL AND PEDAL SET CALIBRATION
The racing wheel calibration occurs automatically when you connect the racing wheel's power adapter and
USB connector. (This operation causes the racing wheel to move.) The pedal set calibration also occurs
automatically; simply press the pedals a few times.
Important notes to avoid calibration problems:
- Never connect the racing wheel's USB connector before connecting the pedal set
- Never press the pedals when the racing wheel starts
(when the racing wheel self-calibrates following connection, or when starting or exiting a
game)
In PlayStation®3 and PC games,
and in the Control Panel interface on PC,
the racing wheel is recognized as an F430 Force Feedback racing wheel,
which offers the same features as this one
(except buttons 13-17, which are inactive on PC).

4/10
PC
System requirements: PC (Windows® XP, Vista, 7 and 8) featuring a USB port.
Installing the Force Feedback drivers for PC
1. Access http://ts.thrustmaster.com to download the Force Feedback drivers and software for PC (in the
Updates and Downloads section, click PC / Wheels / T100 FFB or PlayStation / Wheels / T100 FFB,
then click Drivers).
2. Once the download and installation are finished, click Finish and restart your computer.
3. Once your computer has restarted, connect the USB connector to one of the USB ports on your CPU.
Windows® automatically detects the new device.
4. Installing the drivers:
Driver installation occurs automatically. Follow the instructions displayed onscreen to complete the
installation.
5. Select Start/Settings/Control Panel, then double-click Game Controllers (or Gaming Options,
according to your operating system).
The Game Controllers dialog displays; the racing wheel appears onscreen, with the status
indication OK.
6. In the Control Panel, click Properties to configure your racing wheel:
• Test Device: Enables you to test and view the buttons, the D-Pad and the racing wheel and pedal
set axes.
• Test Forces: Enables you to test 8 force effects and to configure the Force Feedback and
Automatic centering effects.
You are now ready to race!
Adjusting the Force Feedback effects on PC
On page 2 of the Control Panel, four settings are available and can be adjusted from 0 to 150% :
Main forces / Static forces / Dynamic forces / Aggressiveness
Note:
On PC, always remember to close the Control Panel interface entirely before launching
your game!

5/10
Configuring the pedal set on PC
By default, your racing wheel's accelerator and brake controls operate in "Separate" mode; this setting
means that the pedals operate on independent axes.
This mode considerably improves precision when racing.
If your game is not compatible with the "Separate" mode, the pedal set connected to your racing wheel will
not operate correctly. You will then need to exit the game and select the "Combined" mode (in which both
pedals operate on the same axis).
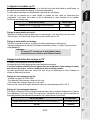
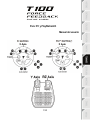
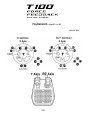
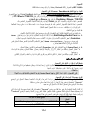
PEDAL SET MODE
Racing wheel LED
SEPARATE (this mode is recommended for most games)
RED
COMBINED
GREEN
Configuring the pedal set's mode using the software:
(This setting is stored in the device's memory, even after you restart your computer or disconnect and
reconnect your racing wheel.)
- On page 1 of the Control Panel, select the required mode, then click OK.
Configuring the pedal set's mode using the hardware:
(This setting is stored in the device's memory; it must be performed every time you start your computer or
disconnect the racing wheel)
- Press and release both pedals simultaneously (accelerator and brake) + the Force button located on the
racing wheel (F button).
Note:
If your PC game is not compatible with the pedal set's "Separate" mode, we recommend
you switch your racing wheel to the "Combined" mode.
Adjusting the automatic centering feature on PC
By default, the racing wheel's automatic centering feature is deactivated.
Most recent games feature their own automatic centering mode.
It is therefore strongly recommended (in most cases) to deactivate the racing wheel's automatic
centering feature and let your game manage this feature. The Force Feedback quality will be
improved.
The automatic centering mode should essentially be used with games that do not feature a Force
Feedback option, or feature only a "weak" automatic centering feature.
Adjusting the automatic centering feature using the software:
- Access page 2 of the Control Panel interface.
- To deactivate the automatic centering feature, select "By the game".
- To activate the automatic centering feature, select "By the wheel".
In this mode, you can adjust the automatic centering feature's intensity, from 0 to 100%.
Adjusting the automatic centering feature using the hardware:
To activate or deactivate the automatic centering featuring directly within your game, simply press the
Force button (i.e. the "F" button) on your racing wheel. When activated, the automatic centering feature's
intensity matches the value previously defined for the "By the wheel" setting in the Control Panel interface.
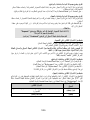
AUTOMATIC CENTERING
Racing wheel LED
INACTIVE (mode recommended for all PC Force Feedback games)
NOT FLASHING
ACTIVE
FLASHING

6/10
PLAYSTATION3
Installing the racing wheel on PlayStation®3
- Connect the USB connector to one of your console's USB ports.
You are now ready to race!
General notes for PlayStation®3
- When in the global menu, use your console's official controller (not your racing wheel) to navigate and start
your games.
= The racing wheel's mapping* feature will only run once the game is started.
- The racing wheel doesn't feature a PS button
= Use your console's official controller to exit your games and turn off your console.
- Adjusting the Force Feedback effects on PS3
= You can adjust the in-game force settings in the Options/Controls section (these options are not available in
some games).
- Adjusting the racing wheel and pedal set's sensitivity on PS3
= You can adjust the in-game sensitivity settings in the Options/Controls section (these options are not
available in some games).
- A list of PS3™ games compatible with the racing wheel's Force Feedback feature is available on
http://ts.thrustmaster.com (in the Downloads and Updates section, click PC / Wheels / T100 FFB or
PlayStation / Wheels / T100 FFB, then select Games settings).
HINT:
In some PS3™ games
(e.g. GRAN TURISMO®),
you can use the accelerator pedal to confirm a selection
and use the brake pedal to cancel it.

7/10
TROUBLESHOOTING
- The racing wheel and pedal set do not operate correctly, or calibration seems incorrect:
Turn off your computer or your console, disconnect your racing wheel entirely, then reconnect all cables
(connecting the racing wheel's USB connector last), then restart your computer or your console and your
game.
Always connect the pedal set to the racing wheel before connecting any USB connectors, and never press
any of the pedals while the racing wheels is self-calibrating at startup or the game is starting.
- The racing wheel moves on its own during gameplay:
This is normal; it is caused by the automatic centering feature that is available in some games. To stop
these movements, simply place your hands on the racing wheel or reduce the Force Feedback feature's
intensity.
- The racing wheel is detected, but doesn't work with my game:
Open your game's Options interface to configure your racing wheel. Please refer to your game's user
manual or online help for more information.
- The Force Feedback feature does not react correctly on PC:
In the racing wheel's Control Panel interface (i.e. the Game Controllers interface in Windows®), restore all
forces to their default value (100%) and deactivate the automatic centering feature (the indicator light
should not flash).
In some PC games, it is also necessary to invert the forces (in this case, select "Negative forces" or move
the cursor to "-100%" in your game's options). In other games, the forces should not be inverted (in this
case, select "Positive forces" or move the cursor to "+ 100%" in your game's options).
- The pedal set does not operate correctly in "Separate" mode on PC
(e.g. in the game, the selection cursor moves around on its' own)
Exit the game and switch your pedal set to "Combined" mode. Restart your game, then configure your
racing wheel once more via your game's options management interface.
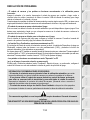
SAFETY RECOMMENDATIONS AND INFORMATION
- When connecting your racing wheel and during the automatic calibration phase: to avoid
calibration errors, do not turn the racing wheel and do not press any of the pedals or buttons.
- If you do not plan to use your racing wheel for a prolonged period of time, to avoid
pointless electricity consumption and to prevent any damage to your racing wheel,
disconnect the power adapter from the racing wheel. Remember to reconnect the power adapter
before you start playing again!
- Your racing wheel includes a Force Feedback feature: Keep young children away from your
racing wheel, particularly during the automatic calibration phases.
For safety reasons, do not use the pedal set with bare feet or when wearing only socks.
THRUSTMASTER
®
SHALL NOT BE HELD RESPONSIBLE FOR ANY PHYSICAL INJURIES
OCCURRING WHEN USING THE PEDAL SET WITHOUT SHOES.

8/10
Consumer warranty information
Worldwide, Guillemot Corporation S.A. (hereinafter “Guillemot”) warrants to the consumer that this
Thrustmaster product shall be free from defects in materials and workmanship, for a warranty
period which corresponds to the time limit to bring an action for conformity with respect to this
product. In the countries of the European Union, this corresponds to a period of two (2) years from
delivery of the Thrustmaster product. In other countries, the warranty period corresponds to the
time limit to bring an action for conformity with respect to the Thrustmaster product according to
applicable laws of the country in which the consumer was domiciled on the date of purchase of the
Thrustmaster product (if no such action exists in the corresponding country, then the warranty
period shall be one (1) year from the original date of purchase of the Thrustmaster product).
Notwithstanding the above, rechargeable batteries are covered by a warranty period of six (6)
months from the date of original purchase.
Should the product appear to be defective during the warranty period, immediately contact
Technical Support, who will indicate the procedure to follow. If the defect is confirmed, the product
must be returned to its place of purchase (or any other location indicated by Technical Support).
Within the context of this warranty, the consumer’s defective product shall, at Technical Support’s
option, be either repaired or replaced. If permitted under applicable law, the full liability of Guillemot
and its subsidiaries (including for consequential damages) is limited to the repair or replacement of
the Thrustmaster product. If permitted under applicable law, Guillemot disclaims all warranties of
merchantability or fitness for a particular purpose. The consumer’s legal rights with respect to laws
applicable to the sale of consumer goods are not affected by this warranty.
This warranty shall not apply: (1) if the product has been modified, opened, altered, or has suffered
damage as a result of inappropriate or abusive use, negligence, an accident, normal wear, or any
other cause unrelated to a material or manufacturing defect (including, but not limited to, combining the
Thrustmaster product with any unsuitable element, including in particular power supplies, rechargeable
batteries, chargers, or any other elements not supplied by Guillemot for this product); (2) in the event
of failure to comply with the instructions provided by Technical Support; (3) to software, said software
being subject to a specific warranty; (4) to consumables (elements to be replaced over the product’s
lifespan: disposable batteries, audio headset or headphone ear pads, for example); (5) to accessories
(cables, cases, pouches, bags, wrist-straps, for example); (6) if the product was sold at public auction.
This warranty is nontransferable.
Additional warranty provisions
In the United States of America and in Canada, this warranty is limited to the product’s internal
mechanism and external housing. In no event shall Guillemot or its affiliates be held liable to any
third party for any consequential or incidental damages resulting from the breach of any express or
implied warranties. Some States/Provinces do not allow limitation on how long an implied warranty
lasts or exclusion or limitation of liability for consequential or incidental damages, so the above
limitations or exclusions may not apply to you. This warranty gives you specific legal rights, and
you may also have other rights which vary from State to State or Province to Province.

9/10
Liability
If permitted under applicable law, Guillemot Corporation S.A. (hereinafter “Guillemot”) and its
subsidiaries disclaim all liability for any damages caused by one or more of the following: (1) the
product has been modified, opened or altered; (2) failure to comply with assembly instructions; (3)
inappropriate or abusive use, negligence, an accident (an impact, for example); (4) normal wear. If
permitted under applicable law, Guillemot and its subsidiaries disclaim all liability for any damages
unrelated to a material or manufacturing defect with respect to the product (including, but not
limited to, any damages caused directly or indirectly by any software, or by combining the
Thrustmaster product with any unsuitable element, including in particular power supplies,
rechargeable batteries, chargers, or any other elements not supplied by Guillemot for this product).
FCC STATEMENT
1. This device complies with Part 15 of the FCC Rules. Operation is subject to the following two
conditions:
(1) This device may not cause harmful interference, and
(2) This device must accept any interference received, including interference that may cause
undesired operation.
2. Changes or modifications not expressly approved by the party responsible for compliance could
void the user's authority to operate the equipment.
COPYRIGHT
© 2015 Guillemot Corporation S.A. All rights reserved. Thrustmaster® is a registered trademark of
Guillemot Corporation S.A. PlayStation® is a registered trademark of Sony Computer
Entertainment, Inc. Windows® is a registered trademark of Microsoft Corporation in the United
States and/or in other countries. All other trademarks and brand names are hereby acknowledged
and are the property of their respective owners. Illustrations not binding. Contents, designs and
specifications are subject to change without notice and may vary from one country to another.
Made in China.
TouchSense® Technology licensed from Immersion Corporation. Protected by one or more of the
U.S. Patents found at the following address www.immersion.com/patent-marking.html and other
patents pending.

10/10
ENVIRONMENTAL PROTECTION RECOMMENDATION
At the end of its working life, this product should not be disposed of with
standard household waste, but rather dropped off at a collection point for the
disposal of Waste Electrical and Electronic Equipment (WEEE) for recycling.
This is confirmed by the symbol found on the product, user manual or
packaging.
Depending on their characteristics, the materials may be recycled. Through
recycling and other forms of processing Waste Electrical and Electronic
Equipment, you can make a significant contribution towards helping to protect the
environment.
Please contact your local authorities for information on the collection point nearest you.
Retain this information. Colours and decorations may vary.
This product conforms to all standards regarding children 14 years of age and older. This
product is not suitable for use by children less than 14 years of age.
www.thrustmaster.com
TECHNICAL SUPPORT
http://ts.thrustmaster.com

1/10
Pour: PC & PlayStation®3
Manuel de l’utilisateur

2/10
INSTALLATION DU VOLANT
Fixer le volant sur une table ou un bureau
- Placez le volant sur une table ou autre surface plane.
- Placez la vis de serrage dans le système de fixation, puis vissez l’ensemble (dans le sens inverse des
aiguilles d’une montre) dans le gros pas de vis situé sous le volant, jusqu’à ce que ce dernier soit
parfaitement stable.
ATTENTION : Ne jamais visser la vis de serrage sans le système de fixation !
(au risque de détériorer le volant).
MONTAGE DEMONTAGE
Pour serrer :
Vissez dans le sens inverse des aiguilles d’une
montre
Pour desserrer :
Dévissez dans le sens des aiguilles
d’une montre
Fixer le volant sur un cockpit
- Placez le volant sur la tablette du cockpit.
- Vissez 2 vis M6 (non fournies avec le volant) dans la tablette du cockpit et dans les 2 petits pas de vis
situés sous le volant.
- Vissez en plus le système de fixation classique (dans le gros pas de vis).

3/10
RELIER LE VOLANT AU SECTEUR
Pour les versions européennes (uniquement)
Remarque importante : l’alimentation du T100 FFB version européenne est interne et donc située
directement dans la base du volant.
La version européenne ne doit être branchée que sur du 220V. !
Ne jamais ouvrir la base du volant sous risque de choc électrique !
- Reliez tout simplement la prise secteur du volant sur une prise de courant 220V.
Pour les autres versions (non-européennes)
Remarque : à la différence de la version européenne, l’alimentation du T100 FFB version non-européenne
est externe avec un adaptateur secteur externe spécifique fourni.
- Reliez l’adaptateur secteur externe en branchant son connecteur à l’arrière du volant, puis branchez
l’adaptateur secteur externe sur une prise de courant correspondant au même voltage.
RELIER LE PEDALIER AU VOLANT
Reliez le pédalier au volant en branchant son connecteur à l’arrière du volant.
CALIBRAGE AUTOMATIQUE DU VOLANT ET DES PEDALES
La roue du volant s’autocalibre de manière automatique une fois l’adaptateur secteur et le connecteur
USB connectés. (Cette opération entraîne des mouvements du volant.) Les pédales se calibrent
également automatiquement après quelques pressions.
Remarques importantes pour éviter des problèmes de calibration:
- Ne jamais brancher l’USB du volant avant de brancher le pédalier
- Ne jamais appuyer sur les pédales lorsque le volant démarre
(lors de l’autocalibration au branchement, au lancement ou à la sortie d’un jeu)
Dans les jeux PlayStation®3 et PC
(ainsi que dans le Panneau de configuration PC),
votre volant est reconnu comme un volant F430 Force Feedback
avec les mêmes fonctionnalités que celui-ci
(excepté les boutons 13 à 17 qui sont inactifs sur PC).

4/10
PC
Configuration requise : PC (Windows® XP, Vista, 7, 8) équipé d'un port USB.
Installation des pilotes Force Feedback PC
1. Allez sur http://ts.thrustmaster.com pour télécharger les pilotes et le logiciel Force Feedback pour PC
(dans la section Mise à jour et téléchargement, cliquez sur PC / Volant / T100 FFB ou PlayStation /
Volant / T100 FFB, puis Pilotes).
2. Une fois le téléchargement et l'installation terminés, cliquez sur Terminer et redémarrez votre
ordinateur.
3. Au redémarrage de l'ordinateur, reliez le connecteur USB à l'un des ports USB de votre unité centrale.
Windows® détectera automatiquement le nouveau périphérique.
4. Installation des pilotes :
L'installation des pilotes est automatique. Suivez les instructions affichées à l’écran pour terminer
l’installation.
5. Sélectionnez Démarrer/Paramètres/Panneau de configuration, puis double-cliquez sur Contrôleur
de jeu (ou Options de jeu selon votre système d’exploitation).
La boîte de dialogue Contrôleurs de jeu affichera le nom du volant avec l'état OK.
6. Dans le Control Panel, cliquez sur Propriétés pour configurer votre volant :
• Test du périphérique : vous permet de tester et visualiser les boutons, le D-Pad et les axes du
volant et du pédalier.
• Tester les forces : vous permet de tester 8 effets de Force et de configurer le réglage des effets
de ForceFeedback et des effets d’Autocentrage.
Vous êtes maintenant prêt à jouer !
Réglage des effets Force Feedback sur PC
Dans la page 2 du Control Panel, 4 réglages possibles de 0 à 150 % :
Forces principales / Forces statiques / Forces dynamiques / Agressivité
Remarque :
Sur PC, pensez à toujours fermer complètement le Control Panel avant de lancer votre
jeu !

5/10
Configuration du pédalier sur PC
Par défaut, les commandes d’accélérateur et de freins de votre volant fonctionnent en mode Séparé, ce
qui signifie que les pédales fonctionnent sur des axes indépendants.
Ce mode permet d’améliorer considérablement la précision de votre pilotage.
Si votre jeu ne supporte pas le mode Séparé, le pédalier de votre volant ne fonctionnera pas
correctement. Vous devez alors quitter le jeu et sélectionner le mode Combiné (où les pédales
fonctionnent sur le même axe).
MODE DU PEDALIER
LED du volant
SEPARE (mode conseillé dans la majorité des jeux)
ROUGE
COMBINE
VERT
Réglage du mode pédalier par logiciel :
(opération conservée en mémoire même après un redémarrage ou une déconnexion de votre volant)
- Dans la page 1 du Control Panel, cliquez sur le mode souhaité, puis sur Ok.
Réglage du mode pédalier par hardware :
(opération conservée en mémoire : à effectuer à chaque redémarrage ou déconnexion)
- Appuyez simultanément et relâchez les 2 pédales (accélérateur et frein) + le bouton Force situé sur le
volant (bouton F).
Remarque :
Si votre jeu PC n’accepte pas le mode Pédalier Séparé,
basculez alors votre volant en mode Pédalier Combiné
Réglage de la fonction Auto-centrage sur PC
Par défaut, l’auto-centrage du volant est désactivé.
La plupart des jeux récents proposent leur propre mode d’auto-centrage.
Il est donc fortement conseillé (dans la majorité des cas) de désactiver l’auto-centrage du volant,
pour laisser le jeu le gérer. Le Force Feedback sera alors de meilleure qualité.
Le mode auto-centrage activé sera surtout utile dans les jeux n’utilisant pas de Force Feedback ou
utilisant un faible retour au centre.
Réglage de l’auto-centrage par logiciel :
- Accédez à la page 2 du Control Panel.
- Pour désactiver l’auto-centrage, cliquez sur Via le jeu.
- Pour activer l’auto-centrage, cliquez sur Via le volant.
Dans ce mode, vous pouvez régler l’intensité du retour au centre automatique de 0 à 100 %.
Réglage de l’auto-centrage par hardware :
Pour activer ou désactiver l’auto-centrage directement dans votre jeu, appuyez simplement sur le bouton
Force (bouton « F ») de votre volant. En mode activé, l’intensité du retour au centre correspondra au
pourcentage attribué précédemment au paramètre Via le volant dans le Control Panel.
AUTO-CENTRAGE
LED du volant
DESACTIVE (mode conseillé pour tous les jeux Force Feedback PC)
NE CLIGNOTE PAS
ACTIVE
CLIGNOTE

6/10
PLAYSTATION3
Installation sur PlayStation®3
- Reliez le connecteur USB à l'un des ports USB de votre console.
Vous êtes maintenant prêt à jouer !
Remarques générales sur PlayStation®3
- Dans le menu général, utilisez votre manette officielle (et non votre volant) pour naviguer et lancer vos jeux
= Le Mapping* du volant ne sera fonctionnel qu’une fois le jeu lancé.
- Le volant ne possède pas de bouton PS
= Utilisez votre manette officielle pour quitter vos jeux ou éteindre la console.
- Réglage des effets Force Feedback sur PS3
= Dans votre jeu modifiez les paramètres de force dans « Option/Contrôles » (dans certains jeux, ces options
ne sont pas disponibles).
- Réglage de la sensibilité du volant et du pédalier sur PS3
= Dans votre jeu, modifiez les paramètres de sensibilité dans Option/Contrôles (dans certains jeux, ces options
ne sont pas disponibles).
- Liste des jeux PS3™ compatibles Force Feedback avec le volant disponible sur http://ts.thrustmaster.com
(dans la section Mise à jour et téléchargement, cliquez sur PC / Volant / T100 FFB ou PlayStation / Volant /
T100 FFB, puis Paramétrage des jeux).
ASTUCE :
Dans certains jeux PS3™
(par exemple GRAN TURISMO®),
utilisez la pédale d’accélérateur pour valider
et la pédale de frein pour annuler

7/10
DEPANNAGE
- Mon volant et mes pédales ne fonctionnent pas correctement ou semble mal calibré :
Eteignez votre ordinateur ou votre console, déconnectez entièrement votre volant, reconnectez tous les
câbles (en branchant en dernier l’USB du volant) puis redémarrez et relancez votre jeu.
Branchez toujours le pédalier au volant avant de brancher l’USB et n’appuyez jamais sur les pédales
pendant les phases d’autocalibration lorsque le volant démarre ou que le jeu se lance.
- Mon volant bouge tout seul dans le jeu :
Ceci est normal, il s'agit de la fonction d’auto-centrage disponible dans certains jeux. Pour arrêter ces
mouvements, il suffit de placer ses mains sur le volant ou de diminuer l’intensité du Force Feedback.
- Mon volant est détecté, mais ne fonctionne pas avec mon jeu :
Ouvrez l’interface de gestion des Options de votre jeu pour configurer votre volant. Reportez-vous au
manuel de l’utilisateur ou à l’aide en ligne de votre jeu pour plus d’informations.
- Le Force Feedback ne réagit pas correctement sur PC :
Dans le Control Panel du volant (= contrôleur de jeu Windows®), remettez l’ensemble des forces à leur
valeur par défaut (100 %) et désactivez l’auto-centrage = le témoin ne doit pas clignoter.
Dans certains jeux PC, il est également nécessaire d’inverser les forces (choisissez alors dans les options
du jeu Forces négatives ou positionnez le curseur sur - 100 %). Dans d’autres jeux, les forces ne doivent
pas être inversées (dans ce cas, choisissez Forces positive ou + 100 %).
- Mon pédalier ne fonctionne pas correctement en Mode Séparé sur PC
(Exemple : une fois dans le jeu, le curseur de sélection se déplace tout seul)
Quittez le jeu et basculez votre pédalier en Mode Combiné. Relancez le jeu puis configurez de nouveau
votre volant dans l’interface de gestion des options de votre jeu.
PRÉCONISATIONS ET INFORMATIONS RELATIVES À LA SÉCURITÉ
- Lors de la connexion de votre volant et pendant la phase d’auto-calibration : pour éviter
toute mauvaise calibration, ne tournez jamais le volant, n'appuyez pas sur les pédales ou sur les
boutons.
- Lors des périodes prolongées d’inactivité et pour éviter toute consommation inutile
d’énergie ou toute détérioration, débranchez le volant du secteur. Rebranchez-le avant de
reprendre la partie.
- Votre volant est à retour de force : Ne laissez jamais votre volant à la portée des jeunes
enfants surtout lors des phases d’auto-calibration.
Pour des raisons de sécurité, ne jouez pas pieds nus ou en chaussettes lorsque vous utilisez le
pédalier.
THRUSTMASTER
®
DECLINE TOUTE RESPONSABILITE EN CAS DE BLESSURE SUITE A UNE
UTILISATION DU PEDALIER SANS CHAUSSURES.

8/10
Informations relatives à la garantie aux consommateurs
Dans le monde entier, Guillemot Corporation S.A. (ci-après « Guillemot ») garantit au
consommateur que le présent produit Thrustmaster est exempt de défaut matériel et de vice de
fabrication, et ce, pour une période de garantie qui correspond au délai pour intenter une action
en conformité de ce produit. Dans les pays de l’Union Européenne, ce délai est de deux (2) ans
à compter de la délivrance du produit Thrustmaster. Dans les autres pays, la durée de la
période de garantie correspond au délai pour intenter une action en conformité du produit
Thrustmaster selon la législation en vigueur dans le pays où le consommateur avait son
domicile lors de l’achat du produit Thrustmaster (si une telle action en conformité n’existe pas
dans ce pays alors la période de garantie est de un (1) an à compter de la date d’achat d’origine
du produit Thrustmaster).
Nonobstant ce qui précède, les batteries sont garanties six (6) mois à compter de la date d’achat
d’origine.
Si, au cours de la période de garantie, le produit semble défectueux, contactez
immédiatement le Support Technique qui vous indiquera la procédure à suivre. Si le défaut
est confirmé, le produit devra être retourné à son lieu d’achat (ou tout autre lieu indiqué par
le Support Technique).
Dans le cadre de la garantie, le consommateur bénéficiera, au choix du Support Technique,
du remplacement ou de la réparation du produit défectueux. Lorsque la loi applicable
l’autorise, toute responsabilité de Guillemot et ses filiales (y compris pour les dommages
indirects) se limite à la réparation ou au remplacement du produit Thrustmaster. Lorsque la
loi applicable l’autorise, Guillemot exclut toutes garanties de qualité marchande ou
d’adaptation à un usage particulier. Les droits légaux du consommateur au titre de la
législation applicable à la vente de biens de consommation ne sont pas affectés par la
présente garantie.
Cette garantie ne s’appliquera pas : (1) si le produit a été modifié, ouvert, altéré, ou a subi des
dommages résultant d’une utilisation inappropriée ou abusive, d’une négligence, d’un accident, de
l’usure normale, ou de toute autre cause non liée à un défaut matériel ou à un vice de fabrication (y
compris, mais non limitativement, une combinaison du produit Thrustmaster avec tout élément
inadapté, notamment alimentations électriques, batteries, chargeurs, ou tous autres éléments non-
fournis par Guillemot pour ce produit) ; (2) en cas de non respect des instructions du Support
Technique ; (3) aux logiciels, lesdits logiciels faisant l’objet d’une garantie spécifique ; (4) aux
consommables (éléments à remplacer pendant la durée de vie du produit : piles, coussinets de
casque audio, par exemple) ; (5) aux accessoires (câbles, étuis, housses, sacs, dragonnes, par
exemple) ; (6) si le produit a été vendu aux enchères publiques.
Cette garantie n’est pas transférable.

9/10
Stipulations additionnelles à la garantie
Aux États-Unis d’Amérique et au Canada, cette garantie est limitée au mécanisme interne et au
boîtier externe du produit. En aucun cas, Guillemot ou ses sociétés affiliées ne sauraient être
tenues responsables envers qui que ce soit de tous dommages indirects ou dommages
accessoires résultant du non respect des garanties expresses ou implicites. Certains
États/Provinces n’autorisent pas la limitation sur la durée d’une garantie implicite, ou l’exclusion
ou la limitation de responsabilité pour les dommages indirects ou accessoires, de sorte que les
limitations ou exclusions ci-dessus peuvent ne pas vous être applicables. Cette garantie vous
confère des droits spécifiques ; vous pouvez également bénéficier d’autres droits qui peuvent
différer d’un État/Province à l’autre.
Responsabilité
Lorsque la loi applicable l’autorise, Guillemot Corporation S.A. (ci-après « Guillemot ») et ses
filiales excluent toute responsabilité pour tous dommages causés par un ou plusieurs des faits
suivants: (1) le produit a été modifié, ouvert, altéré, (2) l’irrespect des instructions de montage,
(3) l’utilisation inappropriée ou abusive, la négligence, l’accident (un choc, par exemple), (4)
l’usure normale du produit. Lorsque la loi applicable l’autorise, Guillemot et ses filiales excluent
toute responsabilité pour tout dommage dont la cause n’est pas liée à un défaut matériel ou à
un vice de fabrication du produit (y compris, mais non limitativement, tout dommage causé
directement ou indirectement par tout logiciel, ou par une combinaison du produit Thrustmaster
avec tout élément inadapté, notamment alimentations électriques, batteries, chargeurs, ou tous
autres éléments non-fournis par Guillemot pour ce produit).
COPYRIGHT
© 2015 Guillemot Corporation S.A. Tous droits réservés. Thrustmaster
®
est une marque
déposée de Guillemot Corporation S.A. PlayStation
®
est une marque déposée de Sony
Computer Entertainment Inc. Windows® est une marque déposée de Microsoft Corporation
aux Etats-Unis et/ou dans d’autres pays. Toutes les autres marques déposées et noms
commerciaux sont reconnus par les présentes et sont la propriété de leurs propriétaires
respectifs. Illustrations non contractuelles. Le contenu, la conception et les spécifications
sont susceptibles de changer sans préavis et de varier selon les pays. Fabriqué en Chine.
Technologie TouchSense® sous licence d’Immersion Corporation. Protégée par un ou
plusieurs des brevets américains dont la liste est disponible à l’adresse
www.immersion.com/patent-marking.html, et d’autres brevets en attente.
Sayfa yükleniyor ...
Sayfa yükleniyor ...
Sayfa yükleniyor ...
Sayfa yükleniyor ...
Sayfa yükleniyor ...
Sayfa yükleniyor ...
Sayfa yükleniyor ...
Sayfa yükleniyor ...
Sayfa yükleniyor ...
Sayfa yükleniyor ...
Sayfa yükleniyor ...
Sayfa yükleniyor ...
Sayfa yükleniyor ...
Sayfa yükleniyor ...
Sayfa yükleniyor ...
Sayfa yükleniyor ...
Sayfa yükleniyor ...
Sayfa yükleniyor ...
Sayfa yükleniyor ...
Sayfa yükleniyor ...
Sayfa yükleniyor ...
Sayfa yükleniyor ...
Sayfa yükleniyor ...
Sayfa yükleniyor ...
Sayfa yükleniyor ...
Sayfa yükleniyor ...
Sayfa yükleniyor ...
Sayfa yükleniyor ...
Sayfa yükleniyor ...
Sayfa yükleniyor ...
Sayfa yükleniyor ...
Sayfa yükleniyor ...
Sayfa yükleniyor ...
Sayfa yükleniyor ...
Sayfa yükleniyor ...
Sayfa yükleniyor ...
Sayfa yükleniyor ...
Sayfa yükleniyor ...
Sayfa yükleniyor ...
Sayfa yükleniyor ...
Sayfa yükleniyor ...
Sayfa yükleniyor ...
Sayfa yükleniyor ...
Sayfa yükleniyor ...
Sayfa yükleniyor ...
Sayfa yükleniyor ...
Sayfa yükleniyor ...
Sayfa yükleniyor ...
Sayfa yükleniyor ...
Sayfa yükleniyor ...
Sayfa yükleniyor ...
Sayfa yükleniyor ...
Sayfa yükleniyor ...
Sayfa yükleniyor ...
Sayfa yükleniyor ...
Sayfa yükleniyor ...
Sayfa yükleniyor ...
Sayfa yükleniyor ...
Sayfa yükleniyor ...
Sayfa yükleniyor ...
Sayfa yükleniyor ...
Sayfa yükleniyor ...
Sayfa yükleniyor ...
Sayfa yükleniyor ...
Sayfa yükleniyor ...
Sayfa yükleniyor ...
Sayfa yükleniyor ...
Sayfa yükleniyor ...
Sayfa yükleniyor ...
Sayfa yükleniyor ...
Sayfa yükleniyor ...
Sayfa yükleniyor ...
Sayfa yükleniyor ...
Sayfa yükleniyor ...
Sayfa yükleniyor ...
Sayfa yükleniyor ...
Sayfa yükleniyor ...
Sayfa yükleniyor ...
Sayfa yükleniyor ...
Sayfa yükleniyor ...
Sayfa yükleniyor ...
Sayfa yükleniyor ...
Sayfa yükleniyor ...
Sayfa yükleniyor ...
Sayfa yükleniyor ...
Sayfa yükleniyor ...
Sayfa yükleniyor ...
Sayfa yükleniyor ...
Sayfa yükleniyor ...
Sayfa yükleniyor ...
Sayfa yükleniyor ...
Sayfa yükleniyor ...
Sayfa yükleniyor ...
Sayfa yükleniyor ...
Sayfa yükleniyor ...
Sayfa yükleniyor ...
Sayfa yükleniyor ...
Sayfa yükleniyor ...
Sayfa yükleniyor ...
Sayfa yükleniyor ...
Sayfa yükleniyor ...
-
 1
1
-
 2
2
-
 3
3
-
 4
4
-
 5
5
-
 6
6
-
 7
7
-
 8
8
-
 9
9
-
 10
10
-
 11
11
-
 12
12
-
 13
13
-
 14
14
-
 15
15
-
 16
16
-
 17
17
-
 18
18
-
 19
19
-
 20
20
-
 21
21
-
 22
22
-
 23
23
-
 24
24
-
 25
25
-
 26
26
-
 27
27
-
 28
28
-
 29
29
-
 30
30
-
 31
31
-
 32
32
-
 33
33
-
 34
34
-
 35
35
-
 36
36
-
 37
37
-
 38
38
-
 39
39
-
 40
40
-
 41
41
-
 42
42
-
 43
43
-
 44
44
-
 45
45
-
 46
46
-
 47
47
-
 48
48
-
 49
49
-
 50
50
-
 51
51
-
 52
52
-
 53
53
-
 54
54
-
 55
55
-
 56
56
-
 57
57
-
 58
58
-
 59
59
-
 60
60
-
 61
61
-
 62
62
-
 63
63
-
 64
64
-
 65
65
-
 66
66
-
 67
67
-
 68
68
-
 69
69
-
 70
70
-
 71
71
-
 72
72
-
 73
73
-
 74
74
-
 75
75
-
 76
76
-
 77
77
-
 78
78
-
 79
79
-
 80
80
-
 81
81
-
 82
82
-
 83
83
-
 84
84
-
 85
85
-
 86
86
-
 87
87
-
 88
88
-
 89
89
-
 90
90
-
 91
91
-
 92
92
-
 93
93
-
 94
94
-
 95
95
-
 96
96
-
 97
97
-
 98
98
-
 99
99
-
 100
100
-
 101
101
-
 102
102
-
 103
103
-
 104
104
-
 105
105
-
 106
106
-
 107
107
-
 108
108
-
 109
109
-
 110
110
-
 111
111
-
 112
112
-
 113
113
-
 114
114
-
 115
115
-
 116
116
-
 117
117
-
 118
118
-
 119
119
-
 120
120
-
 121
121


Thrustmaster 4069006 4060051 4068007 Kullanım kılavuzu
- Kategori
- Oyun kontrolleri
- Tip
- Kullanım kılavuzu
Diğer dillerde
- español: Thrustmaster 4069006 4060051 4068007 Manual de usuario
- français: Thrustmaster 4069006 4060051 4068007 Manuel utilisateur
- italiano: Thrustmaster 4069006 4060051 4068007 Manuale utente
- polski: Thrustmaster 4069006 4060051 4068007 Instrukcja obsługi
- Deutsch: Thrustmaster 4069006 4060051 4068007 Benutzerhandbuch
- português: Thrustmaster 4069006 4060051 4068007 Manual do usuário
İlgili Makaleler
-
Thrustmaster Volant de Ferrari F1 Kullanım kılavuzu
-
-
-
-
Thrustmaster 2969097 2961061 Kullanım kılavuzu
-
-
-
-
Thrustmaster t150 Kullanım kılavuzu
-