Braun 320 S-4 SOIN GILETTE El kitabı
- Kategori
- Erkek traş makineleri
- Tip
- El kitabı
Bu kılavuz aynı zamanda aşağıdakiler için de uygundur:

www.braun.com
Series33
Type 5415, 5413
360s-4
330s-4
320s-4
+
–
360s-4
S
e
r
i
e
s
3
S
e
r
i
e
s
3
96392663_360s_320s_S01.indd 196392663_360s_320s_S01.indd 1 14.05.13 08:0514.05.13 08:05
Stapled booklet, 105 x 148 mm, 80 pages (incl. 8 pages cover), 2/2c = HKS43N + black

English 6
Français 11
Polski 17
âesk˘ 23
Slovensk˘ 28
Magyar 33
Hrvatski 38
Slovenski 43
Türkçe 48
Română 52
êÛÒÒÍËÈ 57
ì͇ªÌҸ͇ 64
77
Braun GmbH
Frankfurter Straße 145
61476 Kronberg/Germany
www.braun.com
96392663/VI-13
UK/FR/PL/CZ/SK/HU/HR/Sl/TR/RO/
RU/UA/Arab
Braun Infolines
UK 0800 783 7010
IE 1 800 509 448
FR 0 800 944 802
BE 0 800 14 592
PL 801 127 286
801 1 BRAUN
CZ 221 804 335
SK 02/5710 1135
HU (06-1) 451-1256
HR 091 66 01 777
SI 080 2822
TR 0 800 261 63 65
RO 021-224.00.47
RU 8 800 200 20 20
UA 0 800 505 000
HK 852-25249377
(Audio Supplies Company Ltd.)
www.service.braun.com
96392663_360s_320s_S02.indd 196392663_360s_320s_S02.indd 1 06.06.13 15:2806.06.13 15:28

4
+
–
+
–
3
60s-4
S
e
r
i
e
s
3
S
e
r
i
e
s
3
1
3
4
5
6
7
8
9
2
330
320
360
S
e
r
i
e
s
3
S
e
r
i
e
s
3
S
S
e
e
r
i
e
s
3
3
S
S
S
S
S
S
S
e
e
e
e
r
r
r
r
r
i
i
i
i
e
e
e
e
s
s
s
3
3
3
3
3
3
3
3
10
96392663_360s_320s_S04.indd 196392663_360s_320s_S04.indd 1 14.05.13 08:0814.05.13 08:08

5
90°
l
o
c
k
f
ul
l
f
u
ll
+
96392663_360s_320s_S05.indd 196392663_360s_320s_S05.indd 1 14.05.13 08:0814.05.13 08:08

6
English
Our products are designed to meet the highest standards of quality,
functionality and design. We hope you enjoy your new Braun Shaver.
Read this instruction completely, it contains safety information. Keep it for
future reference.
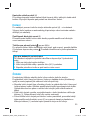
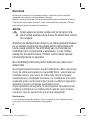
Warnings
This appliance is suitable for cleaning under running
tap water. Detach the appliance from the power
supply before cleaning it with water.
Your shaving system is provided with a special cord set,
which has an integrated Safety Extra Low Voltage power
supply. Do not exchange or tamper with any part of it,
otherwise there is risk of an electric shock. Only use the
special cord set provided with your appliance.
Do not shave with a damaged foil or cord.
This appliance can be used by children aged from 8 years
and above and persons with reduced physical, sensory or
mental capabilities or lack of experience and knowledge if
they have been given supervision or instruction concerning
the safe use of the appliance and understand the hazards
involved. Children shall not play with the appliance.
Cleaning and user maintenance shall not be made by
children unless they are older than 8 years and supervised.
Oil bottle
Keep out of reach of children. Do not swallow. Do not apply to eyes. Dispose
of properly when empty.
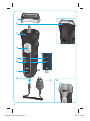
Description
1 Foil & Cutter cassette
2 Long hair trimmer
3 Precision setting switch (360s only)
96392663_360s_320s_S6-80.indd 696392663_360s_320s_S6-80.indd 6 14.06.13 11:0014.06.13 11:00

7
4 On/off switch
5 Charging lights (green)
6 Low-charge light (red)
7 Replacement light for shaving parts
8 Shaver power socket
9 Special cord set
10 Protection cap
Charging
Recommended ambient temperature for charging is 5 °C to 35 °C.
The battery may not charge properly or at all under extreme low or high
temperatures.
Recommended ambient temperature for shaving is 15 °C to 35 °C.
Do not expose the shaver to temperatures higher than 50 °C for extended
periods of time.
• Using the special cord set (9), connect the shaver to an electrical outlet with
the motor switched off. When charging for the first time
or when the shaver
is not used for a few months
, leave the shaver to charge continuously for
4 hours.
• Once the shaver is completely charged, discharge the shaver through
normal use. Then recharge to full capacity. Subsequent charges will take
about 1 hour.
• A full charge provides up to 45 minutes of cordless shaving time depending
on your beard growth. However, the maximum battery capacity will only be
reached after several charging/discharging cycles.
• If the rechargeable batteries are discharged, you may also shave by con-
necting the shaver to an electrical outlet via the special cord set.
• 5-minute quick charge is sufficient for a shave.
Charging lights (5)
The green charging lights show the charge status of the batteries
(330s/320s: 1 charging light). The green charging light blinks when the
shaver is being charged or switched on. When the battery is fully charged,
all green charging lights (330s/320s: 1 charging light) shine permanently,
provided the shaver is connected to an electrical outlet.
Low-charge light (6)
The red low-charge light flashes when the battery is running low.
You should be able to finish your shave.
96392663_360s_320s_S6-80.indd 796392663_360s_320s_S6-80.indd 7 14.06.13 11:0014.06.13 11:00

8
Shaving
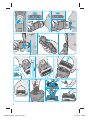
Press the on/off switch (4) to operate the shaver (picture).
The flexible shaving foils automatically adjust to every contour of your face
(picture).
Long hair trimmer (2)
To trim sideburns, moustache or beard, slide the long hair trimmer upwards.
Precision setting switch
(360s only)
For precise handling in hard to shave areas (e.g. under the nose) slide the
switch (3) to the right to position . The centre trimmer and one foil will be
lowered.
Tips for a perfect dry shave
For best results, Braun recommends you follow 3 simple steps:
1. Always shave before washing your face.
2. At all times, hold the shaver at right angles (90°) to your skin.
3. Stretch your skin and shave against the direction of your beard growth.
Cleaning
Regular cleaning ensures better shaving performance. Rinsing the shaver
head under running water after each shave is an easy and fast way to keep
it clean:
• Switch the shaver on (cordless) and rinse the shaver head under hot
running water. You may use liquid soap without abrasive substances.
Rinse off all foam and let the shaver run for a few more seconds.
• Next, switch off the shaver, remove the Foil & Cutter cassette (1) and let it
dry.
• If you regularly clean the shaver under water, then once a week apply a
drop of light machine oil onto the long hair trimmer (2) and Foil & Cutter
cassette (1) (picture).
Alternatively, you may clean the shaver using a brush:
• Switch off the shaver. Remove the Foil & Cutter cassette and tap it out on
a flat surface (picture).
96392663_360s_320s_S6-80.indd 896392663_360s_320s_S6-80.indd 8 14.06.13 11:0014.06.13 11:00

9
• Using a brush, clean the inner area of the shaver head. However, do not
clean the Foil & Cutter cassette with a brush as this may damage it
(picture).
Keeping your shaver in top shape
Replacement light for shaving parts / Reset
To maintain 100% shaving performance, replace the Foil & Cutter cassette
(1), when the replacement light for shaving parts (7) comes on (after about
18 months) or when worn.
Foil & Cutter cassette: 32S/32B
The replacement light will remind you during the next 7 shaves to replace the
Foil & Cutter cassette. Then the shaver will automatically reset the display.
After you have replaced the Foil & Cutter cassette (1), press the on/off switch
(4) for at least 5 seconds to reset the counter.
While doing so, the replacement light (7) blinks and goes off when the reset
is complete. The manual reset can be done at any time.
Preserving the batteries
In order to maintain the optimum capacity of the rechargeable batteries, the
shaver has to be fully discharged (by shaving) every six months approxima-
tely. Then recharge the shaver to full capacity.
Environmental notice
This product contains rechargeable batteries. In the interest of
protecting the environment, please do not dispose of the product in
the household waste at the end of its useful life. Disposal can take
place at a Braun Service Centre or at appropriate collection sites
provided in your country.
Subject to change without notice.
For electric specifications, see printing on the special cord set.
96392663_360s_320s_S6-80.indd 996392663_360s_320s_S6-80.indd 9 14.06.13 11:0014.06.13 11:00

10
Guarantee
We grant a 2 year guarantee on the product commencing on the date of
purchase. Within the guarantee period we will eliminate any defects in the
appliance resulting from faults in materials or workmanship, free of charge
either by repairing or replacing the complete appliance at our discretion.
This guarantee extends to every country where this appliance is supplied by
Braun or its appointed distributor.
This guarantee does not cover: damage due to improper use, normal wear or
use as well as defects that have a negligible effect on the value or operation
of the appliance.
The guarantee becomes void if repairs are undertaken by unauthorised
persons and if original Braun parts are not used.
To obtain service within the guarantee period, hand in or send the complete
appliance with your sales receipt to an authorised Braun Customer Service
Centre (address information available online at www.service.braun.com).
For UK only:
This guarantee in no way affects your rights under statutory law.
96392663_360s_320s_S6-80.indd 1096392663_360s_320s_S6-80.indd 10 14.06.13 11:0014.06.13 11:00

11
Nos produits sont conçus pour répondre aux normes les plus élevées en
matière de qualité, fonctionnalité et design. Nous espérons que vous
apprécierez votre nouveau rasoir Braun.
Lisez l’intégralité des instructions d’utilisation, elles contiennent des
informations de sécurité. Conservez ce document pour le consulter
également ultérieurement.
Attention
La tête du rasoir peut être lavée sous l’eau chaude
courante. Attention : débranchez toujours le rasoir
de la prise électrique secteur avant de nettoyer la
tête sous l’eau.
Votre rasoir est livré avec un cordon d’alimentation basse
tension. Vous ne devez pas remplacer ou modifier ses
composants, afin d’éviter tout risque d’accident. Utilisez
uniquement le cordon d’alimentation fourni avec votre
rasoir.
Ne vous rasez pas avec une grille ou un cordon endommagés.
Cet appareil peut être utilisé par des enfants de 8 ans et
plus et par des personnes dont les capacités physiques,
sensorielles ou mentales sont réduites, ou des personnes
dénuées d’expérience ou de connaissance, si elles ont pu
bénéficier, par l’intermédiaire d’une personne responsable
de leur sécurité, d’une surveillance ou d’instructions
préalables concernant l’utilisation de l’appareil en toute
sécurité et les dangers encourus. Les enfants ne doivent
pas jouer avec l’appareil. Le nettoyage et l’entretien ne
doivent pas être faits par des enfants, à moins qu’ils ne
soient âgés de plus de 8 ans et qu’ils ne soient sous
surveillance.
Français
96392663_360s_320s_S6-80.indd 1196392663_360s_320s_S6-80.indd 11 14.06.13 11:0014.06.13 11:00

12
Bouteille d’huile
Conservez hors de portée des enfants. Ne pas avaler. Ne pas appliquer sur
les yeux. Jeter la bouteille correctement lorsqu’elle est vide.
Description
1 Cassette de rasage (grille et bloc-couteaux)
2 Tondeuse rétractable pour poils longs
3 Loquet de réglage de précision (360s uniquement)
4 Bouton marche/arrêt
5 Témoins lumineux de charge (vert)
6 Témoin lumineux de décharge (rouge)
7 Indicateur lumineux de remplacement de la cassette de rasage
8 Prise d’alimentation du rasoir
9 Cordon d’alimentation
10 Capot de protection
Mise en charge du rasoir
La température ambiante recommandée pour charger le rasoir est comprise
entre 5 °C et 35 °C. La batterie peut ne pas se charger correctement ou pas
du tout à des températures extrêmement basses ou élevées. La température
ambiante recommandée pour se raser est comprise entre 15° C et 35 °C.
N’exposez pas votre rasoir à des températures supérieures à 50 °C pendant
une période prolongée.
• En utilisant le cordon d’alimentation (9), branchez le rasoir à une prise
électrique moteur arrêté. Lors de la première charge, ou si le rasoir n’a
pas été utilisé pendant plusieurs mois, laissez le rasoir se charger pendant
4 d’heures.
• Lorsque le rasoir est complètement chargé, utilisez le normalement
jusqu’à complète décharge de la batterie. Rechargez le ensuite jusqu’à
pleine capacité. Les charges suivantes prendront environ une heure.
• Une pleine charge procure jusqu’à 45 minutes d’autonomie de rasage en
fonction de l’épaisseur et de la dureté de votre barbe. Cependant, la
capacité maximale de la batterie ne sera atteinte qu’après plusieurs cycles
de charge/décharge.
• Si les batteries sont déchargées, vous pouvez aussi vous raser en
branchant le rasoir à une prise électrique via le cordon d’alimentation.
• Une charge rapide de 5 minutes est suffisante pour un rasage.
96392663_360s_320s_S6-80.indd 1296392663_360s_320s_S6-80.indd 12 14.06.13 11:0014.06.13 11:00

13
Témoins lumineux de charge (5)
Les témoins lumineux de charge indiquent le niveau de charge des batteries
(330s/320s : 1 témoin lumineux). Le témoin lumineux vert de charge clignote
lorsque le rasoir est en cours de charge ou en marche. Quand la batterie
est complètement chargée, tous les témoins lumineux verts (330s/320s :
1 témoin lumineux) de charge sont allumés, que le rasoir soit branché sur
une prise électrique.
Témoin lumineux de décharge (6)
Le voyant lumineux rouge de faible charge clignote lorsque la batterie doit
être rechargée. La charge restante est normalement suffisante pour que vous
puissiez terminer votre rasage.
Rasage
Appuyez sur le bouton marche/arrêt (4) pour mettre en marche le rasoir
(cf. schéma). Les grilles de rasage souples s’adaptent automatiquement aux
contours de votre visage (cf. schéma).
Tondeuse rétractable pour poils longs (2)
Pour tailler les pattes, la moustache ou la barbe, faites glisser la tondeuse
rétractable vers le haut.
Loquet de réglage de précision
(360s uniquement)
Pour une utilisation précise dans les zones difficiles à atteindre (par exemple,
sous le nez), poussez le loquet (3) vers la droite pour que se retrouve en
position centrale. La mini tondeuse de la cassette de rasage et une de ses
grilles seront alors abaissées.
Conseils pour un rasage parfait
Pour un résultat de rasage optimal, Braun vous recommande de suivre
3 étapes simples :
1. Rasez-vous toujours avant de vous laver le visage.
2. Tenez toujours le rasoir à angle droit (90°) par rapport à la peau.
3. Tendez votre peau et rasez-vous dans le sens opposé à la pousse du
poil.
96392663_360s_320s_S6-80.indd 1396392663_360s_320s_S6-80.indd 13 14.06.13 11:0014.06.13 11:00

14
Nettoyage
Un nettoyage régulier assure une meilleure performance de rasage. Nettoyer
la tête du rasoir sous l’eau après chaque rasage permet de garder le rasoir
propre simplement et rapidement :
• Mettez en marche le rasoir (sans cordon) et rincez la tête de rasage sous
l’eau chaude. Vous pouvez utiliser du savon liquide ne contenant pas
de substances abrasives. Rincez toute la mousse et laissez le rasoir en
marche pendant quelques secondes supplémentaires.
• Ensuite, arrêtez le rasoir, retirez la cassette de rasage (1) et laissez la
sécher.
• Si vous nettoyez régulièrement votre rasoir sous l’eau, appliquez une fois
par semaine une goutte d’huile de machine à coudre sur la tondeuse
rétractable (2) et sur la cassette de rasage (1) (cf. schéma).
Vous pouvez également nettoyer le rasoir en utilisant une brossette :
• Arrêtez le rasoir. Enlevez la cassette de rasage et tapotez-la légèrement
sur une surface plane.
• A l’aide de la brossette, nettoyez l’intérieur de la tête du rasoir. Cependant,
ne nettoyez pas la cassette de rasage avec la brossette car cela risquerait
de l’endommager (cf. schéma).
Entretien du rasoir
Témoin lumineux de remplacement de la cassette de rasage /
réinitialisation
Pour conserver 100% de la performance de votre rasoir, remplacez la
cassette de rasage (1) quand le témoin lumineux de remplacement des
pièces de rasage (7) s’allume (après environ 18 mois) ou quand elle est
usée.
Cassette de rasage Foil & Cutter: 32S/32B
Le témoin lumineux de remplacement vous rappellera lors des 7 rasages
suivants qu’il faut remplacer la cassette de rasage. Ensuite, le rasoir
réinitialisera automatiquement l’affichage.
Après avoir remplacé la cassette de rasage (1), appuyez sur le bouton
marche/arrêt (4) pendant au moins 5 secondes afin de remettre manuelle-
ment le compteur à zéro.
96392663_360s_320s_S6-80.indd 1496392663_360s_320s_S6-80.indd 14 14.06.13 11:0014.06.13 11:00

15
Pendant ce temps là, le témoin lumineux de remplacement (7) clignote et
s’éteint quand la réinitalisation est faite. La réinitialisation manuelle peut être
faite à n’importe quel moment.
Conservation des batteries
Pour maintenir la capacité optimale des batteries rechargeables, tous les
6 mois environ déchargez complètement, le rasoir en l’utilisant sans le
remettre en charge entre chaque rasage ; ensuite recharger le rasoir au
maximum.
Respect de l’environnement
Ce produit contient des batteries rechargeables. Dans un souci de
protection de l’environnement, veuillez ne pas jeter le produit avec
les ordures ménagères au terme de son cycle de vie. Vous pouvez
remettre ce produit aux centres service agréés Braun ou aux points
de collecte dans votre pays.
Sujet à toute modification sans préavis.
Voir les spécifications électriques mentionnées sur l’adaptateur basse
tension.
96392663_360s_320s_S6-80.indd 1596392663_360s_320s_S6-80.indd 15 14.06.13 11:0014.06.13 11:00

16
Garantie
Nous accordons une garantie de 2 ans sur ce produit, à partir de la date
d’achat.
Pendant la durée de la garantie, Braun prendra gratuitement à sa charge la
réparation des vices de fabrication ou de matière en se réservant le droit de
décider si certaines pièces doivent être réparées ou si l‘appareil lui-même
doit être échangé.
Cette garantie s’étend à tous les pays où cet appareil est commercialisé par
Braun ou son distributeur exclusif.
Cette garantie ne couvre pas : les dommages occasionnés par une utilisation
inadéquate, l’usure normale (par exemple, grille et bloc-couteaux) ainsi que
les défauts d’usuresqui ont un effet négligeable sur la valeur ou l’utilisation
de l’appareil. Cette garantie devient caduque si des réparations ont été
effectuées par des personnes non agréées par Braun et si des pièces de
rechange ne provenant pas de Braun ont été utilisées.
Pour toute réclamation intervenant pendant la période de garantie, retournez
ou rapportez l’appareil ainsi que l‘attestation de garantie à votre revendeur
ou à un Centre Service Agréé Braun.
Se référez à www.service.braun.com ou appelez 0 800 944 802 pour
connaitre le Centre Service Agrée Braun le plus proche de chez vous.
Clause spéciale pour la France
Outre la garantie contractuelle exposée ci-dessus, nos clients bénéficient de
la garantie légale des vices cachés prévue aux articles 1641 et suivants du
Code civil.
96392663_360s_320s_S6-80.indd 1696392663_360s_320s_S6-80.indd 16 14.06.13 11:0014.06.13 11:00

17
Polski
Nasze produkty spełniają najwyższe standardy jakości, funkcjonalności i designu.
Mamy nadzieję, ze będziesz usatysfakcjonowany naszą nową golarką Braun.
Prosimy uważnie przeczytać instrukcję przed zastosowaniem urządzenia,
zawiera informacje na temat bezpieczeństwa. Prosimy zachować instrukcję
do skorzystania w przyszłości.
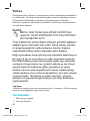
Ostrzeżenia
Głowica golarki jest przystosowana do mycia pod
bieżącą wodą. Należy odłączyć golarkę od źródła
prądu, zanim użytkownik zacznie czyścić głowicę
po bieżącą wodą.
Twój system golący wyposażony jest w specjalną stację
ładującą. Nie należy samodzielnie wymieniać lub wymonto-
wywać jakiejkolwiek jej części, gdyż grozi to porażeniem
prądem. Używaj golarki tylko z specjalny przewodem zasi-
lającym dostarczonym wraz z urządzeniem.
Urządzenia nie należy używać z uszkodzoną folią golącą lub
kablem sieciowym.
To urządzenie jest przeznaczone do używania przez dzieci
w wieku od lat 8, a także przez osoby o ograniczonych
zdolnościach fizycznych, sensorycznych lub umysłowych
oraz osoby niemające wystarczającego doświadczenia ani
wiedzy, o ile są nadzorowane albo zostały poinstruowane
w zakresie bezpiecznego użytkowania tego urządzenia
oraz świadome istniejących zagrożeń. Nie wolno zezwalać
dzieciom na zabawę urządzeniem. Dzieci w wieku do lat
8 nie mogą czyścić ani wykonywać konserwacji urządzenia
bez nadzoru.
Pojemnik z olejem
Przechowywać w miejscu niedostępnym dla dzieci. Nie połykać. Nie
wkrapiać do oczu. Po opróżnieniu zutylizować w odpowiedni sposób.
96392663_360s_320s_S6-80.indd 1796392663_360s_320s_S6-80.indd 17 14.06.13 11:0014.06.13 11:00

18
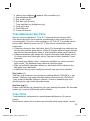
Opis
1 Kaseta z systemem noży i folii golących
2 Trymer
3 Włącznik precyzyjnego golenia
(dotyczy tylko 360s)
4 Przycisk włącznik/wyłącznik
5 Wskaźniki naładowania baterii (zielony)
6 Wskaźnik rozładowania baterii (czerwony)
7 Wskaźnik wymiany elementów golących
8 Stacja ładowania golarki
9 Przewód zasilający
10 Nasadka zabezpieczająca
Ładowanie
Zalecana temperatura otoczenia podczas ładowania wynosi 5–35 °C.
Akumulator może nie naładować się prawidłowo lub wcale się nie nałado-
wać w skrajnie niskich lub wysokich temperaturach. Zalecana temperatura
podczas golenia wynosi 15–35 °C.
Nie wolno przez dłuższy czas wystawiać
urządzenia na działanie temperatur wyższych niż 50 °C.
• Za pomocą dołączonego w zestawie przewodu zasilającego (9), należy
podłączyć wyłączoną golarkę do gniazda elektrycznego. W przypadku
pierwszego ładowania golarki lub nie używania jej przez kilka miesięcy,
należy podłączyć ją do ciągłego zasilania na 4 godziny.
• Po maksymalnym naładowaniu golarki, należy ją w czasie normalnego
użytkowania rozładować, a następnie ponownie maksymalnie naładować.
Pełne naładowanie zajmuje około 1 godziny.
• Pełne naładowanie akumulatora zapewnia 45 minut bezprzewodowego
golenia. Pełna gotowość baterii zostanie osiągnięta dopiero po kilku jej
rozładowaniach i ponownych naładowaniach.
• Jeżeli bateria golarki jest rozładowana, istnieje możliwość golenia z podłą-
czeniem za pomocą przewodu zasilającego bezpośrednio do gniazdka
elektrycznego.
• Szybkie, 5-minutowe ładowanie zapewnia czas pracy golarki wystarczający
na jedno ogolenie.
Wskaźniki naładowania baterii (5)
Zielone wskaźniki pokazują stan naładowania baterii (330s/320s: 1 wskaźniki
naładowania baterii). Wskaźniki pulsują, kiedy golarka jest w czasie ładowa-
nia, lub kiedy jest włączona. Jeżeli golarka jest włączona lub podłączona do
96392663_360s_320s_S6-80.indd 1896392663_360s_320s_S6-80.indd 18 14.06.13 11:0014.06.13 11:00

19
źródła prądu, a bateria jest w pełni naładowana, wszystkie zielone wskaźniki
(330s/320s: 1 wskaźniki naładowania baterii) świecą światłem ciągłym.
Wskaźnik rozładowania baterii (6)
W przypadku, gdy bateria jest na wyczerpaniu zapala się czerwona kontrolka.
Powinno jednak wystarczyć energii na dokończenie golenia.
Golenie
Należy włączyć golarkę za pomocą przycisku włącznik/wyłącznik (4).
Sprężyste folie golące dopasują się do kształtu każdej twarzy (rysunek).
Trymer (2)
Służy do przycinania baczków, wąsów i dłuższej brody.
Włącznik precyzyjnego golenia (dotyczy tylko 360s)
Ułatwia golenie trudnodostępnych miejsc np. pod nosem; należy przesunąć
blokadę w prawą stronę do pozycji , aby środkowa część trymera oraz folia
goląca zostały dla wygodniejszego golenia obniżone.
Porady dla najlepszych efektów golenia na sucho
Dla najlepszych efektów golenia Braun poleca 3 proste zasady:
1. Należy się golić przed umyciem twarzy.
2. Golarka w czasie golenia zawsze powinna być prowadzona pod kątem
prostym w stosunku do golonej powierzchni.
3. Należy naciągnąć skórę i golić «pod włos», odwrotnie do kierunku
porostu włosów.
Czyszczenie
Regularne czyszczenie zapewnia lepsze golenie. Opłukanie głowicy pod
bieżącą wodą po każdym goleniu, to najszybsza i najłatwiejsza droga do
utrzymania golarki w czystości i higienie:
• Należy włączyć golarkę (bezprzewodowo) i opłukać głowicę pod ciepłą,
bieżącą wodą. Można użyć mydła w płynie, jeżeli nie posiada żadnych
grudkowatych składników np. ziarenek do peelingu. Następnie należy
dokładnie opłukać głowicę z mydła i zostawić działającą golarkę na kilka
dodatkowych sekund.
• Kolejnym krokiem jest wyłączenie golarki oraz wyjęcie kasety z folią golącą
i nożykami (1). Należy pozostawić wyjęte elementy do wyschnięcia.
96392663_360s_320s_S6-80.indd 1996392663_360s_320s_S6-80.indd 19 14.06.13 11:0014.06.13 11:00

20
• Jeżeli golarka jest regularnie czyszczona pod bieżącą wodą, to wystarczy
raz na tydzień nanieść kroplę lekkiego oleju maszynowego na trymer (2)
oraz na kasetę z folią i nożykami (1). W ten sposób zostaną nasmarowane
elementy golące, które wymagają takiej ochrony.
Golarka mo˝e byç tak˝e czyszczona przy pomocy szczoteczki:
• Należy wyłączyć golarkę a następnie wyjąć kasetę z folią golącą i nożykami
(1). Delikatnie stukając kasetą o płaską powierzchnię, trzeba wysypać
wszelkie zanieczyszczenia.
• Używając szczoteczki należy oczyścić głowicę golarki oraz jej okolice.
Absolutnie nie należy używać szczoteczki do czyszczenia kasety z folią i
nożykami, gdyż można ją uszkodzić.
Jak utrzymać golarkę w najlepszym stanie
Wskaźnik wymiany elementów golących / reset
Aby golarka zawsze działała na 100% swoich możliwości, należy co 18 mie-
sięcy wymieniać kasetę z foliami i nożami (1). Przypomina o tym specjalny
wskaźnik wymiany elementów golących (7). Jeżeli elementy golące zużyją
się wcześniej, wskaźnik także o tym poinformuje.
Kasety z foliami golącymi oraz nożykami: 32S/32B
W ciągu następnych 7 goleń specjalna dioda będzie przypominać o
konieczności wymiany. Po tym czasie czyli po 7 goleniach, specjalny panel
zostanie automatycznie zresetowany a czas do następnej wymiany będzie
naliczany na nowo.
Po wymianie kasety z folią golącą i blokiem ostrzy (1), należy wcisnąć przy-
cis (4) i przytrzymać przynajmniej przez 5 sekund, aby zresetować licznik.
W czasie wykonywania tej czynności wskaźnik będzie pulsować i wyłączy
się, kiedy reset golarki zostanie zakończony. Ręczne zresetowanie może być
przeprowadzone o każdej porze i w każdym momencie.
Konserwacja baterii
Aby zachować optymalną pojemność akumulatora golarki, należy go formato-
wać raz na 6 miesięcy, czyli rozładować w czasie golenia a następnie nałado-
wać do pełna.
96392663_360s_320s_S6-80.indd 2096392663_360s_320s_S6-80.indd 20 14.06.13 11:0014.06.13 11:00

21
Ochrona środowiska
Produkt posiada akumulator. Kiedy przestanie on już być już użyteczny,
prosimy o zwrócenie go do jednego z punktów serwisowych Braun,
gdzie stara bateria, nie szkodząc środowisku, zostanie zutylizowana.
Zużyta bateria może zostać oddana także do specjalnego punktu
recyklingu. Traktowanie zużytych baterii jak zwykłych śmieci stwarza
zagrożenie dla naszego środowiska.
Powy˝sze informacje mogà ulec zmianie bez uprzedniego powiadomienia.
Specyfikacje elektryczne zosta∏y wydrukowane na specjalnym kablu
sieciowym.
Warunki gwarancji
1. Procter & Gamble International Operations SA z siedzibą w Route de
St-Georges 47, 1213 Petit Lancy 1 w Szwajcarii, gwarantuje sprawne
działanie sprzętu w okresie 24 miesięcy od daty jego wydania
Kupującemu. Ujawnione w tym okresie wady będą usuwane bezpłatnie,
przez autoryzowany punkt serwisowy, w terminie 14 dni od daty
dostarczenia sprzętu do autoryzowanego punktu serwisowego.
2. Kupujący może wysłać sprzęt do naprawy do najbliżej znajdującego się
autoryzowanego punktu serwisowego lub skorzystać z pośrednictwa
sklepu, w którym dokonał zakupu sprzętu. W takim wypadku termin
naprawy ulegnie wydłużeniu o czas niezbędny do dostarczenia i odbioru
sprzętu.
3. Kupujący powinien dostarczyć sprzęt w opakowaniu należycie
zabezpieczonym przed uszkodzeniem. Uszkodzenia spowodowane
niedostatecznym zabezpieczeniem sprzętu nie podlegają naprawom
gwarancyjnym. Naprawom gwarancyjnym nie podlegają także inne
uszkodzenia powstałe w następstwie okoliczności, za które Gwarant nie
ponosi odpowiedzialności, w szczególności zawinione przez Pocztę
Polską lub firmy kurierskie.
4. Niniejsza gwarancja jest ważna jedynie z dokumentem zakupu i
obowiązuje wyłącznie na terytorium Rzeczypospolitej Polskiej.
5. Okres gwarancji przedłuża się o czas od zgłoszenia wady lub
uszkodzenia do naprawy sprzętu i zwrotnego postawienia go do
dyspozycji Kupującego.
96392663_360s_320s_S6-80.indd 2196392663_360s_320s_S6-80.indd 21 14.06.13 11:0014.06.13 11:00
Sayfa yükleniyor...
Sayfa yükleniyor...
Sayfa yükleniyor...
Sayfa yükleniyor...
Sayfa yükleniyor...
Sayfa yükleniyor...
Sayfa yükleniyor...
Sayfa yükleniyor...
Sayfa yükleniyor...
Sayfa yükleniyor...
Sayfa yükleniyor...
Sayfa yükleniyor...
Sayfa yükleniyor...
Sayfa yükleniyor...
Sayfa yükleniyor...
Sayfa yükleniyor...
Sayfa yükleniyor...
Sayfa yükleniyor...
Sayfa yükleniyor...
Sayfa yükleniyor...
Sayfa yükleniyor...
Sayfa yükleniyor...
Sayfa yükleniyor...
Sayfa yükleniyor...
Sayfa yükleniyor...
Sayfa yükleniyor...
Sayfa yükleniyor...
Sayfa yükleniyor...
Sayfa yükleniyor...
Sayfa yükleniyor...
Sayfa yükleniyor...
Sayfa yükleniyor...
Sayfa yükleniyor...
Sayfa yükleniyor...
Sayfa yükleniyor...
Sayfa yükleniyor...
Sayfa yükleniyor...
Sayfa yükleniyor...
Sayfa yükleniyor...
Sayfa yükleniyor...
Sayfa yükleniyor...
Sayfa yükleniyor...
Sayfa yükleniyor...
Sayfa yükleniyor...
Sayfa yükleniyor...
Sayfa yükleniyor...
Sayfa yükleniyor...
Sayfa yükleniyor...
Sayfa yükleniyor...
Sayfa yükleniyor...
Sayfa yükleniyor...
Sayfa yükleniyor...
Sayfa yükleniyor...
Sayfa yükleniyor...
Sayfa yükleniyor...
Sayfa yükleniyor...
-
 1
1
-
 2
2
-
 3
3
-
 4
4
-
 5
5
-
 6
6
-
 7
7
-
 8
8
-
 9
9
-
 10
10
-
 11
11
-
 12
12
-
 13
13
-
 14
14
-
 15
15
-
 16
16
-
 17
17
-
 18
18
-
 19
19
-
 20
20
-
 21
21
-
 22
22
-
 23
23
-
 24
24
-
 25
25
-
 26
26
-
 27
27
-
 28
28
-
 29
29
-
 30
30
-
 31
31
-
 32
32
-
 33
33
-
 34
34
-
 35
35
-
 36
36
-
 37
37
-
 38
38
-
 39
39
-
 40
40
-
 41
41
-
 42
42
-
 43
43
-
 44
44
-
 45
45
-
 46
46
-
 47
47
-
 48
48
-
 49
49
-
 50
50
-
 51
51
-
 52
52
-
 53
53
-
 54
54
-
 55
55
-
 56
56
-
 57
57
-
 58
58
-
 59
59
-
 60
60
-
 61
61
-
 62
62
-
 63
63
-
 64
64
-
 65
65
-
 66
66
-
 67
67
-
 68
68
-
 69
69
-
 70
70
-
 71
71
-
 72
72
-
 73
73
-
 74
74
-
 75
75
-
 76
76


Braun 320 S-4 SOIN GILETTE El kitabı
- Kategori
- Erkek traş makineleri
- Tip
- El kitabı
- Bu kılavuz aynı zamanda aşağıdakiler için de uygundur:
diğer dillerde
- slovenčina: Braun 320 S-4 SOIN GILETTE Návod na obsluhu
- français: Braun 320 S-4 SOIN GILETTE Le manuel du propriétaire
- čeština: Braun 320 S-4 SOIN GILETTE Návod k obsluze
- polski: Braun 320 S-4 SOIN GILETTE Instrukcja obsługi
- English: Braun 320 S-4 SOIN GILETTE Owner's manual
- русский: Braun 320 S-4 SOIN GILETTE Инструкция по применению
- română: Braun 320 S-4 SOIN GILETTE Manualul proprietarului
İlgili makaleler
-
Braun 330s-4 Kullanım kılavuzu
-
Braun 360s-4, 330s-4, 320s-4, 320r-4, Series 3 Kullanım kılavuzu
-
-
-
-
Braun 390cc-4, BOSS limited edition, Series 3 Kullanım kılavuzu
-
-
-
Braun cruZer5 clean shave Kullanım kılavuzu
-