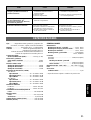
Yamaha KX-W421 El kitabı
- Kategori
- Kaset çalarlar
- Tip
- El kitabı
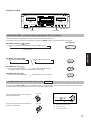
Bu kılavuz aynı zamanda aşağıdakiler için de uygundur:

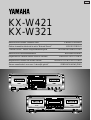
KX-W421
KX-W321
OWNER’S MANUAL
MODE D’EMPLOI
BEDIENUNGSANLEITUNG
BRUKSANVISNING
MANUALE DELL’UTENTE
MANUAL DE INSTRUCCIONES
GEBRUIKSAANWIJZING
Natural Sound Stereo Cassette Deck
Platine à cassette stéréo de la série “Natural Sound”
“Natural Sound” Stereo-Doppelkassettengerät
Natural Sound stereokassettdäck
Registratore a cassette stereo a suono naturale
Magnetófono estéreo de sonido natural
Stereo-cassettedeck voor een “natuurlijk geluid”
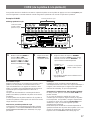
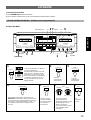
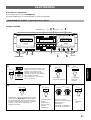
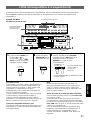
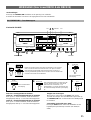
NATURAL SOUND CASSETTE DECK KX-W421
DOLBY NR
OFF/ B/ C
REC LEVELBALANCEPLAY TRIM
PHONES
STANDBY/ON
MODE
O / p / ∏ / RELAY
PLAYBACK
DECK A
L R MIN MAX
—+
CLOSE % % CLOSE
DIRECTION RESETRESET DIRECTION
! ⁄
&
SEARCH
!⁄
&
MUTE/SEARCH
PLAYPLAY
REC/PAUSE
EJECT EJECT
NORMAL HIGH
DUBBING A # B
00
NATURAL SOUND CASSETTE DECK KX-W321
DOLBY NR
OFF/ B/ C
REC LEVEL
PHONES
STANDBY/ON
MODE
O / p / ∏ / RELAY
PLAYBACK
DECK A
RECORD/PLAYBACK
DECK B
MIN MAX
RECORD/PLAYBACK
DECK B
DIRECTION RESETRESET DIRECTION
! ⁄
&
SEARCH
!⁄
&
MUTE/SEARCH
REC/PAUSE
EJECT EJECT
NORMAL HIGH
DUBBING A # B
CLOSE % % CLOSE
PLAYPLAY
B G R T

2
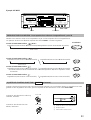
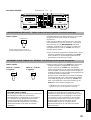
NOTE:
Please check the copyright laws in your country to
record from records, compact discs, radio, etc.
Recording of copyright material may infringe copyright
laws.
WARNING
TO REDUCE THE RISK OF FIRE OR ELECTRIC
SHOCK, DO NOT EXPOSE THIS APPLIANCE TO RAIN
OR MOISTURE.
This unit is not disconnected from the AC power source
as long as it is connected to the wall outlet, even if this
unit itself is turned off. This state is called the standby
mode. In this state, this unit is designed to consume a
very small quantity of power.
For U.K. customers
If the socket outlets in the home are not suitable for the plug
supplied with this appliance, it should be cut off and an
appropriate 3 pin plug fitted. For details, refer to the
instructions described below.
Note: The plug severed from the mains lead must be
destroyed, as a plug with bared flexible cord is hazardous if
engaged in a live socket outlet.
IMPORTANT
THE WIRES IN MAINS LEAD ARE COLOURED IN
ACCORDANCE WITH THE FOLLOWING CODE:
Blue: NEUTRAL
Brown: LIVE
As the colours of the wires in the mains lead of this
apparatus may not correspond with the coloured
markings identifying the terminals in your plug, proceed
as follows: The wire which is coloured BLUE must be
connected to the terminal which is marked with the letter
N or coloured BLACK. The wire which is coloured
BROWN must be connected to the terminal which is
marked with the letter L or coloured RED.
Making sure that neither core is connected to the earth
terminal of the three pin plug.
FOR CANADIAN CUSTOMERS
TO PREVENT ELECTRIC SHOCK, MATCH WIDE
BLADE OF PLUG TO WIDE SLOT AND FULLY
INSERT.
THIS CLASS B DIGITAL APPARATUS MEETS ALL
REQUIREMENTS OF THE CANADIAN
INTERFERENCE-CAUSING EQUIPMENT
REGULATIONS.
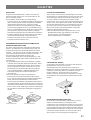
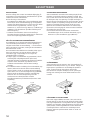
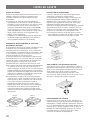
1. This unit is a sophisticated stereo cassette deck. To
ensure proper operation for the best possible
performance, please read this manual carefully.
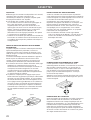
2. Choose the installation location of your unit carefully.
Avoid placing it in direct sunlight or close to source of
heat. Also avoid locations subject to vibration and
excessive dust, heat, cold or moisture. Keep it away
from sources of hum such as transformers or motors.
3. Do not open the cabinet as this may result in damage
to the deck or electrical shock. If a foreign object
should get into the deck, contact your local dealer.
4. When removing the power plug from the wall outlet,
always pull directly on the plug; never pull the cord
itself.
5. Do not apply excessive force when operating
switches and knobs.
6. When moving the deck, be sure to first pull out the
power plug and remove all cords connecting the deck
to other equipments.
7. Do not attempt to clean this unit with chemical
solvents as this may damage the finish. Use a clean,
dry cloth.
8. Never allow metallic items (e.g. screwdrivers, tools,
etc.) to come near the record/playback head
assembly. Doing so may not only scratch or damage
the head’s mirror-smooth finish, but also change the
magnetic characteristics of the heads, causing a
deterioration in reproduction quality.
9. Although the record/playback head used in this unit
is a high quality head with outstanding reproduction
characteristics, it can become dirty through the use
of old tapes or from dust accumulation over time.
This can have a serious effect on reproduction
quality. Clean the heads regularly with one of the
commonly available head cleaners or with cleaning
solutions as explained later in this manual.
10. Be sure to read the “TROUBLESHOOTING” section
of this manual for advice on common operating errors
before concluding that your unit is faulty.
11. Keep this manual in a safe place for future reference.
12. Voltage Selector (General and China Model only)
The voltage selector on the rear panel of this unit
must be set for your local mains voltage BEFORE
plugging in the AC mains supply. (Voltage
selector adjustable between 110/120/220/240 V
AC.)
Thank you for purchasing this YAMAHA stereo cassette deck.
CAUTION: READ THIS BEFORE OPERATING YOUR UNIT.

3
ENGLISHFRANÇAISDEUTSCHSVENSKAITALIANOESPAÑOLDUTCH
TABLE OF CONTENTS
FEATURES ......................................................................... 3
CONNECTIONS.................................................................. 4
NOTES ON THIS MANUAL ................................................ 4
PLAYBACK (Common to DECKs A and B)......................... 5
BASIC OPERATION........................................................ 5
SELECTION SEARCH .................................................... 7
RELAY PLAYBACK ......................................................... 8
PLAY TRIM CONTROL ADJUSTMENT (KX-W421 only) 8
RECORDING ...................................................................... 9
BASIC OPERATION........................................................ 9
REC MUTE OPERATION.............................................. 11
REC RETURN OPERATION ......................................... 11
DUBBING (From DECK A to DECK B) ............................. 12
CASSETTE TAPES .......................................................... 13
MAINTENANCE ................................................................ 14
OPTIONAL REMOTE CONTROL TRANSMITTER .......... 14
TROUBLESHOOTING ...................................................... 15
SPECIFICATIONS ............................................................ 16
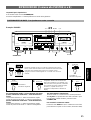
FEATURES
÷ High Quality Hard Permalloy Recording/Playback Head in
Deck B and Playback Head in Deck A
÷ Dolby B/C Noise Reduction
÷ Play Trim Control for improved playback compatibility with
other decks (KX-W421 only)
÷ Auto Tape Selector
÷ Dolby HX Pro Dynamic Bias Servo (KX-W421 only)
÷ Relay Playback from DECK A to DECK B
÷ Selection Search
÷ Recording Mute Function
÷ Rec Return Operation
÷ Easy Dubbing Operation at Selectable Speed (Normal/
High)
÷ Peak Level Meters with Peak Hold Function
÷ Remote Control Capability with Optional Remote Control
Transmitter
Dolby noise reduction and HX Pro headroom extension
manufactured under license from Dolby Laboratories
Licensing Corporation. HX Pro originated by Bang &
Olufsen.
“DOLBY”, the double-D symbol
and “HX PRO” are
trademarks of Dolby Laboratories Licensing Corporation.

4
PLAY
LINE IN-LINE OUT
L
R
TAPE PBREC OUT
L
R
3
REC
4
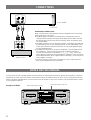
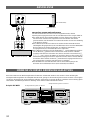
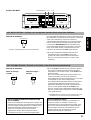
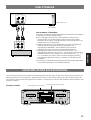
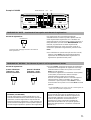
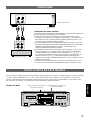
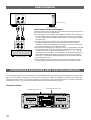
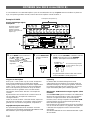
CONNECTIONS
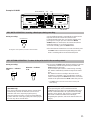
To an AC outlet
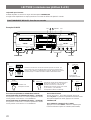
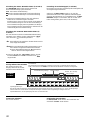
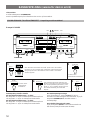
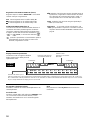
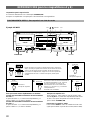
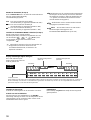
NOTES ON THIS MANUAL
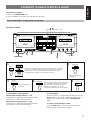
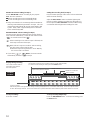
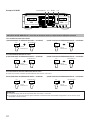
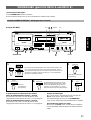
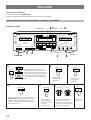
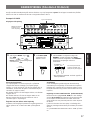
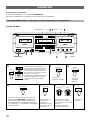
In this manual, the main operation buttons of the front panel are indicated based on DECK B when the operation is common to
both DECKs A and B. Since the locations of the buttons of DECK A and DECK B are the same, you can easily find the desired
button even when operating DECK A. This manual covers two models. In most cases, however, only model KX-W421 is shown
in the example illustrations.
Example: KX-W421
Main operation buttons of DECK A
Main operation buttons of DECK B
(U.S.A. model)
Amplifier or receiver
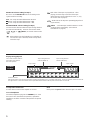
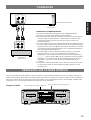
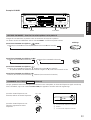
REAR PANEL CONNECTIONS
Make sure that power to both the deck and your amplifier/receiver is turned off
before making any connections.
÷ The White plug on the paired connecting cables corresponds to the Left
channel and the Red plug corresponds to the Right channel. Make sure that
the left and right channel connections are properly made, and that the plugs
are inserted firmly.
÷ The LINE OUT/PLAY jacks on the deck should be connected to the TAPE PB
(Playback/Input) jacks on your amplifier/receiver, and the LINE IN/REC jacks
on the deck should be connected to the REC OUT (Recording/Output) jacks
on your amplifier/receiver.
÷ The LINE OUT terminals on this unit are numbered 3 and the LINE IN jacks
are numbered 4. When connecting this unit to a YAMAHA amplifier or
receiver whose terminals are numbered 1, 2, 3, 4 ... (etc.), connect this
unit's LINE OUT terminals to the input terminals numbered 3 and connect this
unit's LINE IN terminals to the output terminals numbered 4 on the rear panel
of the amplifier or receiver.
÷ Connect the power cord to an AC wall outlet or to an AC outlet on the rear
panel of your amplifier/receiver (if provided).
NATURAL SOUND CASSETTE DECK KX-W421
DOLBY NR
OFF/ B/ C
REC
LEVELBALANCE
PLAY TRIM
PHONES
STANDBY/ON
MODE
O / p / ∏ / RELAY
PLAYBACK
DECK A
Stabilizer
RECORD/PLAYBACK
DECK B
L R MIN MAX
–+
CassetteStabilizerCassette
CLOSE
% %
CLOSE
DIRECTION RESETRESET DIRECTION
! ⁄
&
SEARCH
!⁄
&
MUTE/SEARCH
REC/PAUSE
PLAYPLAY
EJECT EJECT
NORMAL HIGH
DUBBING A # B
0 0

5
ENGLISHFRANÇAISDEUTSCHSVENSKAITALIANOESPAÑOLDUTCH
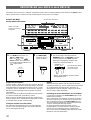
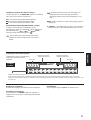
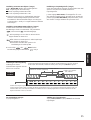
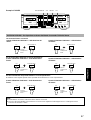
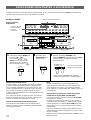
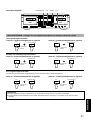
PLAYBACK (Common to DECKs A and B)
Preparation for playback
÷ Turn on the STANDBY/ON switch.
÷ Set your amplifier or receiver to cassette deck function mode.
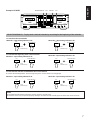
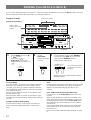
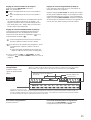
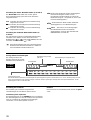
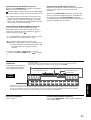
BASIC OPERATION - To play back a cassette tape
Example: KX-W421
EJECT
DOLBY NR
OFF/ B/ C
Refer to the following
description.
MODE
“/[/”/
RELAY
21
35
4
Refer to the following
description.
DIRECTION
Select the tape running direction for DECK A
or B. Each time this button is pressed, the
tape running direction changes between
forward (#) and reverse (@), and the
corresponding indicator lights on the display.
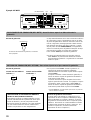
To stop playback
Press the & button. To remove the cassette tape, press the
EJECT button. The cassette compartment door opens. To
set the unit to standby mode, press the STANDBY/ON
button.
To set the counter reading to “0000”
Press the RESET button. Use the tape counter to aid in
locating a point on a tape (0000 to 9999).
To fast forward or rewind the tape
When the tape running indicator # is lit:
Pressing the ⁄ button fast forwards the tape while
pressing the ! button rewinds the tape.
When the tape running indicator @ is lit:
Pressing the ! button fast forwards the tape while
pressing the ⁄ button rewinds the tape.
Insert the cassette with the exposed tape side facing down. (The side
facing you is called the forward side and the opposite side is called the
reverse side.) To close the compartment, push the section of the
compartment door marked % CLOSE until it locks shut.
PLAY
NATURAL SOUND CASSETTE DECK KX-W421
DOLBY NR
OFF/ B/ C
REC
LEVELBALANCE
LR
PLAY TRIM
PHONES
DIRECTION
STANDBY/ON
MODE
O / p / ∏ / RELAY
! ⁄
&
SEARCH
PLAY PLAY
EJECT
NORMAL HIGH
DUBBING A # B
!⁄
&
MUTE/SEARCH REC/PAUSE
EJECT
RESET
RESET DIRECTION
Stabilizer
%
CLOSECLOSE
%
PLAYBACK
DECK A
Cassette
RECORD/PLAYBACK
DECK B
StabilizerCassette
–+
MIN MAX
0
23
1
STANDBY/ON
PHONES
RESET
!
45
⁄
&
0

6
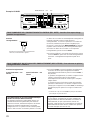
DOLBY NR selector setting (in step 2)
Be sure to set the DOLBY NR selector according to the
system used for recording.
OFF: For a tape recorded with DOLBY NR OFF.
B: For a tape recorded with DOLBY B NR.
C: For a tape recorded with DOLBY C NR.
REVERSE MODE selector setting (in step 3)
The auto reverse function allows the tape running direction
be reversed automatically. Select an auto reverse mode
(
, , or
RELAY
) or manual reverse mode
(
).
: When playback or fast forwarding (or rewinding) of
one side of a tape is finished, the deck stops at the
end of the tape.
:Both sides of the tape are played back. After
playing, the deck stops at the end of the tape.
(When the tape running direction is set to ¤, only
the reverse side is played.)
: Both sides of the tape are repeatedly played back
(up to 8 times).
RELAY
: Cassette tapes loaded in DECKs A and B
are played back sequentially. (See “RELAY
PLAYBACK” on page 8.)
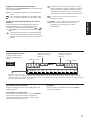
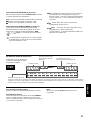
Display during playback
Tape counter
Tape counter
Peak level meters
Indicate the peaks of the signal levels during recording and playback over a –30 dB to +6 dB range. There are separate meters for each left
and right channel. These level meters have a peak hold function which holds the peak level for about 1.5 seconds.
¤
30 dB
—
A
NORM
‹
R
L
20 15 10 8 6 4 2 0 2 4 6
+
¤
B
‹
RELAY
DUB HIGH RECB C
KX-W421/
KX-W321
The A or B indicator shown in
the display represents the
last deck operated.
Note
Never press the EJECT button when the tape is in motion.
To adjust the volume level
Use the volume control of the amplifier or receiver.
To use headphones
Insert the headphones plug into the PHONES jack. Since
the sound is also heard from the speakers, operate the
amplifier to cut off the sound from the speakers for private
listening.
Tape running direction
indicator (DECK A)
Tape running direction
indicator (DECK B)

7
ENGLISHFRANÇAISDEUTSCHSVENSKAITALIANOESPAÑOLDUTCH
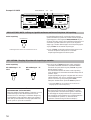
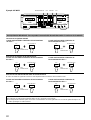
Notes
÷ The blank interval between selections must be at least 4 seconds long.
÷ Selection search may not operate properly with tapes recorded at a low recording level or which have excessive noise.
Example: KX-W421
SELECTION SEARCH - To play back a desired selection by searching for the beginning of the selection
When the @ tape running indicator is lit:
To search for the next selection
When the # tape running indicator is lit:
When the @ tape running indicator is lit:
To search for the beginning of the current selection
When the # tape running indicator is lit:
To search for the selection located before the current selection
÷ Operate the following buttons when the beginning of the current selection is being played.
When the # tape running indicator is lit:
When the @ tape running indicator is lit:
Press
simultaneously.
⁄
MUTE/SEARCH
!
MUTE/SEARCH
MUTE/SEARCH
!
Press
simultaneously.
Press
simultaneously.
⁄
MUTE/SEARCH
Press
simultaneously.
!
MUTE/SEARCH
Press
simultaneously.
MUTE/SEARCH
⁄
Press
simultaneously.
NATURAL SOUND CASSETTE DECK KX-W421
DOLBY NR
OFF/ B/ C
REC
LEVELBALANCE
PLAY TRIM
PHONES
STANDBY/ON
MODE
O / p / ∏ / RELAY
PLAYBACK
DECK A
Stabilizer
RECORD/PLAYBACK
DECK B
L R MIN MAX
–+
CassetteStabilizerCassette
DIRECTION RESETRESET DIRECTION
! ⁄
&
SEARCH
!⁄
&
MUTE/SEARCH
REC/PAUSE
EJECT EJECT
NORMAL HIGH
DUBBING A # B
0
RESET
!⁄
MUTE/SEARCH
CLOSE
% %
CLOSE
PLAYPLAY
0

8
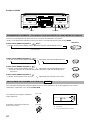
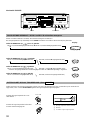
Example: KX-W421
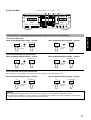
RELAY PLAYBACK - To play DECK A and DECK B sequentially
Load the cassette tapes into DECKs A and B, start playback from DECK A.
The playback patterns differ according to the setting of the MODE button. Refer to the following.
When the MODE button is set to
RELAY
:
DECK A (forward side \ reverse side) \ DECK B (forward side \ reverse side)
When the MODE button is set to
:
DECK A (forward side \ reverse side) DECK B (forward side \ reverse side)
When the MODE button is set to
:
DECK A (forward side \ reverse side) DECK B ( forward side \ reverse side)
÷ When the tape running direction is set to ™, only the reverse side is played.
When the MODE button is set to
:
DECK A (forward side or reverse side) DECK B (forward side or reverse side)
Display
5
Up to 8 times
Up to 8 times
5
Up to 8 times
RELAY
1
2
3
100
10 dB
1k
10kHz
When the level of high frequencies is either over emphasized or absent while playing a tape recorded on another cassette deck,
adjust the high frequency response with the PLAY TRIM control.
When high frequencies are too loud,
attenuate the high frequencies.
PLAY TRIM
When high frequencies are too soft, boost
the high frequencies.
0
0
1 High frequency sound is too loud.
2 Flat
3 High-frequency sound is too soft.
PLAY TRIM CONTROL ADJUSTMENT ( KX-W421 only)
5
NATURAL SOUND CASSETTE DECK KX-W421
DOLBY NR
OFF/ B/ C
REC
LEVELBALANCE
PLAY TRIM
PHONES
STANDBY/ON
MODE
O / p / ∏ / RELAY
PLAYBACK
DECK A
Stabilizer
RECORD/PLAYBACK
DECK B
L R MIN MAX
–+
CassetteStabilizerCassette
DIRECTION RESETRESET DIRECTION
! ⁄
&
SEARCH
!⁄
&
MUTE/SEARCH
REC/PAUSE
EJECT EJECT
NORMAL HIGH
DUBBING A # B
0
PLAY TRIMMODE
CLOSE
% %
CLOSE
PLAYPLAY
0
PLAY TRIM

9
ENGLISHFRANÇAISDEUTSCHSVENSKAITALIANOESPAÑOLDUTCH
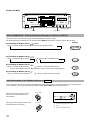
RECORDING
EJECT
Recording
starts.
Play the program source to be
recorded and adjust the
recording level and balance.
(KX-W321 does not have a
REC BALANCE control.)
LEVELBALANCE
REC
1
67
Preparation for recording
÷ Turn on the STANDBY/ON switch.
÷ Set your amplifier or receiver to cassette deck function mode.
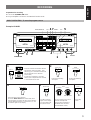
BASIC OPERATION - To record a program source
Example: KX-W421
LRMIN MAX
0
3
DOLBY NR
OFF/ B/ C
2
Insert the cassette into DECK B with the
exposed tape side facing down. (The
side facing you is called the forward side
and the opposite side is called the
reverse side.)
To close the compartment, push the
section of the compartment door marked
% CLOSE until it locks shut.
4
Select the tape running direction.
(Press the DIRECTION button for DECK B.) Each
time the button is pressed, the tape running direction
changes between forward (#) and reverse (@), and
the indicator lights on the display.
5
The REC indicator
lights on the display.
The deck enters the
Rec/Pause mode.
REC/PAUSE
DIRECTION
MODE
“/[/”/
RELAY
Refer to the following
description.
Refer to the following
description.
PLAY
NATURAL SOUND CASSETTE DECK KX-W421
DOLBY NR
OFF/ B/ C
REC
LEVELBALANCE
LR
PLAY TRIM
PHONES
DIRECTION
STANDBY/ON
MODE
O / p / ∏ / RELAY
! ⁄
&
SEARCH
EJECT
NORMAL HIGH
DUBBING A # B
!⁄
&
MUTE/SEARCH REC/PAUSE
EJECT
RESET
RESET DIRECTION
Stabilizer
PLAYBACK
DECK A
Cassette
RECORD/PLAYBACK
DECK B
StabilizerCassette
–+
MIN MAX
0
23
STANDBY/ON
PHONES
RESET
!
47
⁄
&
5
6
MUTE/SEARCH
PLAY PLAY
%
CLOSECLOSE
%
1
0

10
¤
30 dB
—
A
‹
R
L
20 15 10 8 6 4 2 0 2 4 6
+
¤
B
‹
REC
RELAY
B C
DOLBY NR selector setting (in step 2)
Set the DOLBY NR selector according to your purpose.
OFF: No noise reduction.
B: For recording the sources with Dolby B NR.
C: For recording the sources with Dolby C NR.
÷ Dolby noise reduction is an extremely effective method of
reducing undesirable background hiss on tapes. This unit
incorporates both Dolby B NR and the newer Dolby C NR
system. Dolby C NR is approximately twice as effective
as the earlier Dolby B NR.
REVERSE MODE selector setting (in step 3)
The auto reverse function allows the tape running direction
to be reversed automatically. Select the auto reverse mode
(
) or manual reverse mode ( ).
: When recording on one side of a tape is finished, the
deck stops at the end of the tape.
:Both sides of a tape are recorded. After recording,
the deck stops at the end of the tape.
÷ When the tape running direction is set to ™, only
the reverse side is recorded.
÷ If you select
or
RELAY
, the reverse mode
automatically switches to
in step 5.
Display during recording
Peak level meters
Indicate the peaks of the signal levels during recording and playback over a –30 dB to +6 dB range. There are separate meters
for each left and right channel. These level meters have a peak hold function which holds the peak level for about 1.5 seconds.
Tape counter
Use the tape counter to aid in locating a point on a tape (0000 to 9999).
To set the counter reading to “0000”, press the RESET button.
The A or B indicator shown in
the display represents the
last deck operated.
Setting the recording level (in step 6)
Play the loudest passage of the source to be recorded and
watch the meter readings.
Adjust the REC LEVEL control so that the highest peak
reaches +4 of the optimum recording level. Normally, it is
best to adjust the REC BALANCE control (KX-W421 only)
such that the left and right meter readings are even.
KX-W421/
KX-W321
To stop recording:
Press the & button.
To stop recording temporarily:
Press the REC/PAUSE button. To resume recording, press
the PLAY button.
REC indicator
DOLBY B/ C indicator
MODE indicator
Tape running direction indicator

11
ENGLISHFRANÇAISDEUTSCHSVENSKAITALIANOESPAÑOLDUTCH
Example: KX-W421
REC MUTE OPERATION - Inserting a blank space during recording
REC RETURN OPERATION - To return to the point at which the recording started
A 4-second blank interval is automatically recorded on the
tape and then the deck enters Rec/Pause mode.
If a blank interval longer than 4 seconds is desired, keep
pressing for as long as you want. When the MUTE/
SEARCH button is released, the deck enters Rec/Pause
mode after making a 4-second blank interval.
To resume recording, press the PLAY button.
÷ If a blank interval shorter than 4 seconds is desired, press
the PLAY button at the desired point during Rec mute
mode. Recording will be resumed from that point.
During recording:
During Rec mute operation, the REC indicator blinks.
During recording:
When the # indicator
is lit:
!
⁄
When the @ indicator
is lit:
÷ If you press the PLAY button during recording, Rec Return
automatically rewinds the tape to the point where the
PLAY button was pressed.*
If you reset the tape counter to “0000” during recording,
Rec Return automatically rewinds the tape to the “0000”
point.
Rec Return functions according to the most recent
operation. For example, if you reset the tape counter to
“0000” and then press the PLAY button later, Rec Return
rewinds to the point where the PLAY button was pressed.
* The PLAY button cannot be used to mark a return point
while dubbing.
MUTE/SEARCH
DOLBY HX PRO DYNAMIC BIAS SERVO SYSTEM
(KX-W421 only)
This unit incorporates the Dolby HX Pro system which
automatically controls the effective bias to reduce
distortion and noise, improving high frequency
response during recording. Tapes recorded with this
system retain the same high quality even when played
back on any other cassette deck.
Synchronized recording function
When operating this unit in combination with the
YAMAHA CD Player which has SYNCHRO button on its
remote control transmitter, CD Synchronized recording
function can be utilized. This function is operated with
the remote control transmitter of the CD Player.
(Regarding the operation, refer to the manual of the CD
Player.)
NATURAL SOUND CASSETTE DECK KX-W421
DOLBY NR
OFF/ B/ C
REC
LEVELBALANCE
PLAY TRIM
PHONES
STANDBY/ON
MODE
O / p / ∏ / RELAY
PLAYBACK
DECK A
Stabilizer
RECORD/PLAYBACK
DECK B
L R MIN MAX
–+
CassetteStabilizerCassette
DIRECTION RESETRESET DIRECTION
! ⁄
&
SEARCH
!⁄
&
MUTE/SEARCH
REC/PAUSE
EJECT EJECT
NORMAL HIGH
DUBBING A # B
0
!⁄
MUTE/SEARCH
CLOSE
% %
CLOSE
PLAYPLAY
0

12
DUBBING (From DECK A to DECK B)
12
Set the MODE selector to
or position.
If you select or
RELAY
, the reverse
mode automatically switches to
.
Set the
DIRECTION
buttons for DECKs
A and B.
3
Set the dubbing speed to either NORMAL
(normal speed) or HIGH (twice the normal
speed) with the DUBBING buttons*.
Dubbing starts automatically.
DUBBING A # B
NORMAL HIGH
The corresponding NORM
or HIGH indicator lights on
the display.
* Higher quality sound will be obtained with the
NORMAL setting.
Note
During dubbing, Dolby NR is automatically set to off and the
recorded tape can be dubbed as is. (When the tape to be
dubbed is recorded with Dolby NR, this effect is also
dubbed.)
PLAY TRIM control adjustment (KX-W421 only)
For normal use, set the PLAY TRIM control to the center
position.
When the high frequencies sound is too noticeable or too
weak while monitoring the sound of DECK B, compensate
the high frequency response with the PLAY TRIM control
before dubbing. The compensated sound can be dubbed
onto DECK B.
As the compensation result depends on the quality of the
tape loaded in DECK A, the monitored sound cannot be
recorded as it is.
Refer to “PLAY TRIM CONTROL ADJUSTMENT” on page
8.
To stop dubbing
Press the & button. (If you press the & button on DECK B,
both decks stop simultaneously and the dubbing mode is
cancelled. If you press the & button on DECK A, DECK A
stops immediately and then DECK B stops after recording a
4-second blank section.)
When the tape in DECK B reaches its end, DECK B stops
and then DECK A stops.
When the tape in DECK A reaches its end, DECK A stops
and DECK B stops after providing a blank section of about 4
seconds.
Available operations while dubbing
The Rec Return function can be carried out on DECK B.
Refer to “REC RETURN OPERATION” on the previous
page.
You can make dubbing from DECK A to DECK B. Open the cassette compartments by pressing the EJECT buttons and load a
blank cassette tape in DECK B and the original cassette tape in DECK A.
Example: KX-W421
Display during dubbing
MODE
“/[/”/
RELAY
DIRECTION
NORM or HIGH
indicator lights during
dubbing.
Lights during dubbing.
NATURAL SOUND CASSETTE DECK KX-W421
DOLBY NR
OFF/ B/ C
REC
LEVELBALANCE
PLAY TRIM
PHONES
STANDBY/ON
MODE
O / p / ∏ / RELAY
PLAYBACK
DECK A
Stabilizer
RECORD/PLAYBACK
DECK B
L R MIN MAX–+
CassetteStabilizerCassette
DIRECTION RESETRESET DIRECTION
! ⁄
&
SEARCH
!⁄
&
MUTE/SEARCH
REC/PAUSE
EJECT EJECT
NORMAL HIGH
DUBBING A # B
0
3
2
1
¤
30 dB
–
A
NORM
‹
R
L
20 15 10 8 6 4 2 0 2 4 6
+
¤
B
‹
RELAY
DUB HIGH RECB C
CLOSE
% %
CLOSE
PLAYPLAY
0

13
ENGLISHFRANÇAISDEUTSCHSVENSKAITALIANOESPAÑOLDUTCH
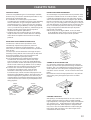
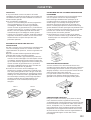
PROTECTING YOUR RECORDINGS
All cassette tapes are provided with erasure protection holes
to prevent accidental erasure of recorded contents. There is
a small tab covering the hole on each side of the cassette,
and it should be broken off after recording the tape. Without
this tab covering the hole, it is impossible to record onto that
tape. Thus, you can safely protect a recording for as long as
you wish without fear of accidental erasure. Should you wish
to use a cassette tape protected in this way for recording,
simply covering the hole with adhesive tape will permit
erasure and re-recording.
÷ When using Chrome (Type II/HIGH <CrO
2>) or Metal
(Type IV/METAL) tapes, make sure you do not cover the
hole intended for the Auto Tape Selector operation.
TAKING UP SLACK IN THE TAPE
As a precaution against tape entanglement and damage,
remove any slack in the tape before inserting cassettes into
the deck. This is accomplished by inserting a pencil, pen or
similar object into one of the spools and gently winding it
until all the slack is removed. You do not have to wind it too
tightly.
Be careful not to touch the tape part itself. It is very delicate
and touching it may damage the tape and its recorded
contents.
STORING CASSETTES
After putting a cassette tape back into its case, store it in a
location away from exposure to direct sunlight, humidity,
high temperatures, and magnetic fields (away from television
sets, speakers, etc.). High temperatures and humidity will
damage the tape itself, while exposure to magnetic fields
may cause a loss of recorded material. Avoid touching the
tape surface with your fingers, since dirt or finger oil will
contaminate the deck’s heads.
CASSETTE TAPES
CASSETTE TAPES
There are many different types of cassette tapes available.
However, they all conform to standard specifications so any
brand may be used with the deck.
÷ Classification of Cassette Tapes by Formulation:
Cassette tapes are available in four basic types depending
on their formulation, or type of magnetic material and
manufacturing process. These four types are commonly
known as Normal (Type I/NORM), Chrome (Type II/HIGH
<CrO
2>), Ferrichrome (Type III/FeCr), and Metal (Type IV/
METAL), and they each require specific tape deck
adjustments for optimum performance.
* YAMAHA does not recommend the use of 120 minute
length cassettes since the extreme thinness of the tape
makes them susceptible to mechanical and recording
problems.
AUTO TAPE SELECTOR DETECTION SLOTS
The deck has a built-in Auto Tape Selector which
automatically adjusts for the proper bias, level and
equalization according to the tape formulation — all you
have to do is to load a cassette and the Auto Tape Selector
does the rest.
The Auto Tape Selector determines which type of tape is
loaded by sensing detector slots in the top of the tape shell.
Each tape formulation has its own characteristic hole
markings standardized by the tape industry.
÷ Early model Metal (Type IV/Metal) tape formulation
cassette shells do not have the slots for Auto Tape
Selector operation. As a result, early model Metal type
tapes recorded on another deck will be played back with
the deck at the Chrome (Type II/HIGH <CrO
2>) settings.
YAMAHA does not recommend using this kind of tape.
÷ The deck does not have the required setting for
Ferrichrome (Type III/FeCr) tape, since this tape
formulation is not widely used. Should you use a
Ferrichrome tape, it will be recorded and played back at
the Normal (Type I/NORM) settings, which will result in an
unnatural high frequency emphasis. This effect may be
compensated for somewhat by adjusting the PLAY TRIM
control and/or the tone controls of your amplifier/receiver
during playback.
Detector slotsDetector slots
TYPE II TYPE IV

14
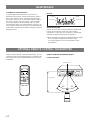
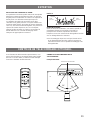
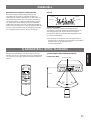
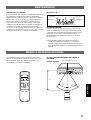
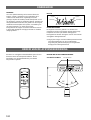
With the optional remote control transmitter RKX1, you can
operate this unit at your listening position. For details, refer
to the instruction manual supplied with the remote control
transmitter.
REMOTE CONTROL OPERATION RANGE
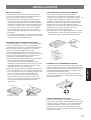
MAINTENANCE
CLEANING OF THE TAPE PATH
Continued high quality performance of your deck is
dependent upon periodic cleaning of the heads, capstan,
pinch roller, and all surfaces over which the tape travels.
Normal use will cause an accumulation of dirt and dust on
the heads, capstans, and pinch rollers. This can lead to
poor sound quality, drop outs (intervals with no sound),
unsteady tape speed, loss of high frequency response, etc.
Thus, clean the heads and all surfaces over which the tape
travels with a commercially available cleaning cassette and
fluid type cleaner.
DEMAGNETIZATION
After 20-30 hours of use, enough residual magnetism will
build up on the heads to cause poor high frequency
reproduction. At this time you should use a commercially
available cassette tape-type head demagnetizer.
÷ When cleaning the tape path or demagnetizing the heads,
be sure to follow carefully the instructions of the
concerning materials such as cleaning fluid or head
demagnetizer.
CapstanCapstan
Pinch rollerPinch roller
Heads
OPTIONAL REMOTE CONTROL TRANSMITTER
Example: KX-W421
DECK B
30°
30°
7 m (23 feet)
Remote sensor
SINGLE DECK
INTRO SCAN
DOUBLE DECK
DUBBING
DECK A/B DIR A DIR B
COUNTER
RESET
PLAY
SEARCH
REC/PAUSE REC MUTE
STOP
RKX1
s
¤‹
!
!
⁄
⁄

15
ENGLISHFRANÇAISDEUTSCHSVENSKAITALIANOESPAÑOLDUTCH
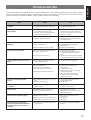
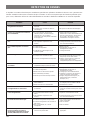
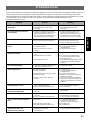
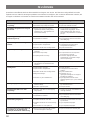
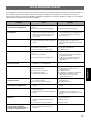
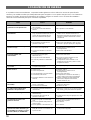
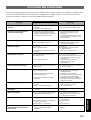
If your cassette deck fails to operate normally, check the following table. It lists common operating errors and simple measures
which you can take to correct the problem. If it cannot be corrected, or the symptom is not listed, disconnect the deck’s power
cord and contact your authorized YAMAHA dealer or authorized service center for help.
Cause
÷ Power plug is not properly plugged in.
÷ Cassette shell is warped or damaged.
÷ There is an influence of strong external
noise (lightning, excessive static
electricity, etc.) or a misoperation was
performed while using this unit.
÷ No cassette tape loaded.
÷ Protective tabs are broken off.
÷ Head is dirty.
÷ Head is magnetized.
÷ Tape is damaged or of poor quality.
÷ Tape is bad (stretched, deformed, etc.).
÷ Cassette shell is warped.
÷ Recording level is too high.
÷ Faulty connection between deck and
stereo amplifier/receiver.
÷ Head is dirty.
÷ Head is magnetized.
÷ Worn out or poor quality tape.
÷ Connection(s) improperly made.
÷ Affected by external electrical noise.
÷ Dirty capstan, pinch roller, etc., or poor
tape.
÷ Tape is wound unevenly.
÷ Slack tape, or tape spillage wound
around capstan.
÷ REC LEVEL control is set to too low.
÷ Protective tabs are broken off.
÷ Blank section is too short.
÷ Recorded section has low-level portions.
÷ Conversation, etc. has been recorded.
÷ Dolby NR-recorded tape is played back
in OFF position.
Cure
÷ Reinsert plug properly.
÷ Do not play damaged tapes.
÷ Turn the unit off and disconnect the AC
power from the AC outlet. After about
30 seconds have passed, connect the
power and try again.
÷ Load a cassette tape.
÷ Change tape or cover protective hole
with adhesive tape.
÷ Clean head.
÷ Demagnetize head using head
demagnetizer.
÷ Change to a different tape.
÷ Replace with a fresh tape.
÷ A warped cassette shell cannot be
fixed. Replace with another tape and
test.
÷ Check input level with signal level meter
and use lower rec level when recording.
÷ Check and secure connections.
÷ Clean head.
÷ Demagnetize head with head
demagnetizer.
÷ Change to better tape.
÷ Check input and output connections
and reinsert properly.
÷ Move deck away from electrical
appliances (TV, fluorescent light,
electric blanket, etc.).
÷ Clean capstan and pinch roller, or
change to better tape.
÷ Rewind tape.
÷ Insert pencil in hole in cassette shell
and turn to take up slack.
÷ Adjust REC LEVEL control.
÷ Change tape or cover protective hole
with adhesive tape.
÷ Blank sections must be at least 4
seconds long.
÷ No remedy
÷ No remedy
÷ Play back in appropriate Dolby NR
position.
Fault
Tape doesn’t move in recording or
playback.
If it happens that this unit does not
work normally.
REC/PAUSE button fails to function.
Sounds become faint and sometimes
inaudible.
Recorded sound is distorted.
Tape is playing back, but no sound is
heard.
Excessive noise.
Excessive wow (wavering of the
sound).
Tape stops in the middle of recording
or playback.
Fails to record.
Search does not operate correctly.
High frequencies in the playback
sound are emphasized and unpleasant
to listen to, and noise level (hiss) is
also high.
TROUBLESHOOTING

16
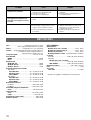
Cause
÷ Normally-recorded tape is played back in
Dolby NR.
÷ Heads are dirty.
÷ Heads are magnetized.
÷ Basic levels are different for different
cassette decks.
÷ The batteries are exhausted.
÷ The remote control transmitter is
operated from an incorrect distance or
angle.
÷ The remote control sensor is lighted
strongly.
Cure
÷ Play back in OFF position.
÷ Clean heads and carry out
demagnetization with head
demagnetizer.
÷ This is not a fault.
÷ Replace batteries.
÷ Operate it from less than 7 meters
(about 23 ft.) and 30°.
÷ Place the unit away from the strong
light.
Fault
Playback sound is muffled and high
frequencies are inaudible.
When playing back tapes recorded on
other decks, meter deflections are
greater (smaller) than when recorded.
The remote control transmitter cannot
be operated.
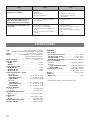
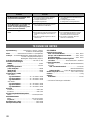
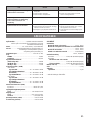
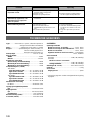
Type..................................... Auto reverse 4-track, 2-channel
recording and playback stereo double cassette deck
Motors .........................................DC servo motor x 2 (main)
Heads ....................Recording/playback: Hard Permalloy x 1
Erase: Double-gap Ferrite x 1
Playback: Hard Permalloy x 1
Rapid Transport .......................................... 100 sec. (C-60)
Wow and Flutter
WRMS ......................................................................0.08%
W.Peak ...................................................................±0.15%
Signal-to-Noise Ratio
(Dolby NR off)...........................................................58 dB
(Dolby B NR on) .......................................................66 dB
(Dolby C NR on) .......................................................74 dB
Frequency Response (–20 dB)
<KX-W421>
Type I/Normal.............................. 20 ~ 17,000 Hz ±3 dB
Type II/High (CrO
2) .................... 20 ~ 18,000 Hz ±3 dB
Type IV/Metal .............................. 20 ~ 20,000 Hz ±3 dB
<KX-W321>
Type I/Normal.............................. 20 ~ 16,000 Hz ±3 dB
Type II/High (CrO
2) .................... 20 ~ 17,000 Hz ±3 dB
Type IV/Metal .............................. 20 ~ 19,000 Hz ±3 dB
Harmonic Distortion
KX-W421 .................................................... less than 0.8%
KX-W321 .................................................... less than 1.0%
Input Sensitivity/Impedance
Line ......................................................100 mV/43 k-ohms
Output Level
Line .....................................................570 mV/1.4 k-ohms
Phones..................................................... 0.25 mV/8 ohms
Channel Separation (1 kHz)...................... more than 40 dB
Crosstalk (125 Hz) ..................................... more than 55 dB
SPECIFICATIONS
GENERAL
Power Supply
U.S.A. and Canada model ........................... 120 V, 60 Hz
Europe and U.K. model ............................... 230 V, 50 Hz
Australia model............................................ 240 V, 50 Hz
General and China model . 110/120/220/240 V, 50/60 Hz
Power Consumption
KX-W421 ............................................14 W/7 W (Standby)
KX-W321
U.S.A. and Canada model.............11 W/7 W (Standby)
Other models .................................12 W/7 W (Standby)
Dimensions (W x H x D)...................... 435 x 146 x 279 mm
(17-1/8" x 5-3/4" x 11")
Weight ........................................................... 5.0 kg (11 lbs.)
Accessory
Audio cord................................................................ 1 pair
* Specifications subject to change without notice.

17
ENGLISHFRANÇAISDEUTSCHSVENSKAITALIANOESPAÑOLDUTCH
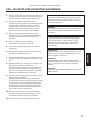
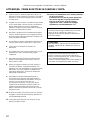
Nous vous remercions d’avoir acheté la platine à cassette stéréo YAMAHA.
ATTENTION: LIRE CECI AVANT DE FAIRE FONCTIONNER VOTRE
APPAREIL.
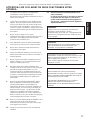
1. Cet appareil est une platine à cassette stéréo
sophistiquée. Pour en garantir un bon
fonctionnement et d’excellentes performances, lire ce
manuel avec attention.
2. Choisir avec soin l’endroit où vous installerez votre
appareil. Eviter de le placer exposé directement au
soleil ou près d’une source de chaleur. Eviter aussi
les endroits sujets aux vibrations, à la poussière, la
chaleur, le froid ou à l’humidité. L’éloigner de sources
de bourdonnement telles que des transformateurs ou
des moteurs.
3. Ne pas ouvrir le coffret car ceci risque
d’endommager la platine ou de provoquer des chocs
électriques. Si un objet pénètre dans la platine,
contacter votre revendeur local.
4. Pour débrancher la fiche du cordon d’alimentation,
saisir la fiche; ne pas tirer sur le cordon lui-même.
5. Ne pas forcer quand vous faites fonctionner les
commutateurs et boutons.
6. Quand vous déplacez l’appareil, s’assurer qu’il est
débranché et retirer tous les câbles le raccordant à
d’autres appareils.
7. Ne pas essayer de nettoyer cet appareil avec des
diluants chimiques car ceci risque d’abîmer le fini.
Utiliser un chiffon propre et sec.
8. Ne jamais approcher d’objets métalliques (par
exemple un tournevis, des outils, etc.) de l’ensemble
des têtes d’enregistrement/lecture. Ceci non
seulement rayerait ou endommagerait le fini lisse
comme un miroir des têtes mais aussi risquerait de
changer les caractéristiques magnétiques des têtes,
provoquant une détérioration de la qualité de la
reproduction.
9. Bien que la tête d’enregistrement/lecture utilisée
dans cet appareil soit une tête de haute qualité
possédant d’excellentes caractéristiques de
reproduction, elle peut se salir après l’utilisation de
bandes usagées ou à cause de l’accumulation de
poussière avec le temps. Ceci peut avoir un effet
néfaste sur la qualité de reproduction. Nettoyer
régulièrement les têtes avec un des nettoyeurs de
têtes du marché ou avec des solutions de nettoyage
comme expliqué plus loin dans ce manuel.
10. Bien lire la section “DETECTION DE PANNES” de ce
manuel pour trouver la cause d’erreurs de
fonctionnement communes avant de conclure que
votre appareil est en panne.
11. Garder ce manuel en lieu sûr pour une référence
ultérieure.
12. Sélecteur de tension (modèle général pour la
Chine seulement)
Le sélecteur de tension sur le panneau arrière de
cet appareil doit être réglé sur votre tension
secteur locale avant de brancher l'appareil sur
une prise CA. (Sélecteur de tension réglable sur
110/120/220/240 V CA.)
REMARQUE:
Vérifier les lois sur le copyright de votre pays pour
enregistrer à partir de disques, disques
audionumériques, de la radio, etc. L'enregistrement de
matériel sous copyright peut être une violation de la loi
sur le copyright.
ATTENTION
POUR EVITER TOUT RISQUE D’INCENDIE OU DE
CHOC ELECTRIQUE, NE PAS EXPOSER CET
APPAREIL A LA PLUIE NI A L’HUMIDITE.
Cet appareil n’est pas déconnecté de la source
d’alimentation CA tant qu’il est branché à la prise secteur,
même si l’appareil lui-même est mis hors tension. Cet
état est appelé mode d’attente.
Dans cet état, l’appareil consomme une très faible
quantité de courant.
POUR LES CONSOMMATEURS CANADIENS
POUR EVITER LES CHOCS ELECTRIQUES,
INTRODUIRE LA LAME LA PLUS LARGE DE LA FICHE
DANS LA BORNE CORRESPONDANTE DE LA PRISE
ET POUSSER JUSQU’AU FOND.
CET APPAREIL NUMERIQUE DE LA CLASSE B
RESPECTE TOUTES LES EXIGENCES DU
REGLEMENT SUR LE MATERIEL BROUILLEUR DU
CANADA.

18
SOMMAIRE
CARACTERISTIQUES
÷ Platine B équipée d’une tête d’enregistrement et de
lecture en Permalloy dur de haute qualité et platine A
d’une tête de lecture fabriquée dans le même matériau
÷ Réduction de bruit Dolby B/C
÷ Commande d’ajustement de lecture pour une compatibilité
améliorée de lecture avec d’autres platines à cassette
(KX-W421 seulement)
÷ Sélecteur automatique de bande
÷ Système d’extension de dynamique Dolby HX Pro
Dynamic (KX-W421 seulement)
÷ Lecture par relais de la platine A à la platine B
÷ Recherche de morceaux
÷ Fonction d’enregistrement silencieux
÷ Fonction de retour après enregistrement
÷ Fonctionnement aisé de la copie à vitesse sélectionnable
(normale/élevée)
÷ Compteurs de niveau de crête avec fonction de maintien
de crête
÷ Télécommande possible grâce à l’émetteur de
télécommande en option
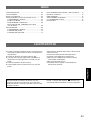
CARACTERISTIQUES...................................................... 18
CONNEXIONS .................................................................. 19
REMARQUES SUR CE MODE D’EMPLOI....................... 19
LECTURE (commune aux platines A et B) ....................... 20
FONCTIONNEMENT DE BASE .................................... 20
RECHERCHE DE MORCEAUX .................................... 22
LECTURE ENCHAINEE ................................................ 23
COMMANDE PLAY TRIM (KX-W421 seulement) ......... 23
ENREGISTREMENT......................................................... 24
FONCTIONNEMENT DE BASE .................................... 24
FONCTIONNEMENT DE L’ENREGISTREMENT
SILENCIEUX (REC MUTE) ........................................... 26
FONCTIONNEMENT DU RETOUR APRÈS
ENREGISTREMENT (REC RETURN) .......................... 26
COPIE (de la platine A à la platine B)............................... 27
CASSETTES..................................................................... 28
ENTRETIEN...................................................................... 29
EMETTEUR DE TELECOMMANDE OPTIONNEL ........... 29
DETECTION DE PANNES................................................ 30
CARACTERISTIQUES TECHNIQUES ............................. 31
Réduction de bruit Dolby et HX Pro headroom extension
fabriqués sous licence de Dolby Laboratories Licensing
Corporation. HX Pro est d’origine Bang & Olufsen.
DOLBY, le symbole double-D
et HX PRO sont des
marques de Dolby Laboratories Licensing Corporation.

19
ENGLISHFRANÇAISDEUTSCHSVENSKAITALIANOESPAÑOLDUTCH
PLAY
LINE IN-LINE OUT
L
R
TAPE PBREC OUT
L
R
3
REC
4
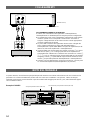
REMARQUES SUR CE MODE D’EMPLOI
Lorsque le fonctionnement des platines A et B est le même, ce mode d’emploi mentionne les touches à utiliser en prenant la
platine B pour exemple. Etant donné que l’emplacement des touches est le même sur la platine A (DECK A) et sur la platine B
(DECK B), il est très facile de localiser les touches de la platine A. Ce mode d’emploi concerne deux modèles. Toutefois, dans
la plupart des cas, seul le modèle KX-W421 est représenté sur les illustrations.
Exemple: KX-W421
CONNEXIONS
Vers une prise CA
CONNEXIONS DU PANNEAU ARRIERE
S’assurer que l’alimentation de la platine et de l’amplificateur/ampli-
syntoniseur est coupée avant d’effectuer toute connexion.
÷ La prise blanche des câbles de connexion correspond au canal de gauche
et la prise rouge au canal de droite. S’assurer que les connexions des
canaux de droite et de gauche sont correctes et que les prises sont
fermement insérées.
÷ Les prises LINE OUT/PLAY de la platine doivent être raccordées aux prises
de lecture de bande TAPE PB (lecture/entrée) de votre amplificateur/ampli-
syntoniseur et les prises LINE IN/REC de la platine doivent être connectées
aux prises de sortie d'enregistrement REC OUT (enregistrement/sortie) de
votre amplificateur/ampli-syntoniseur.
÷ Les prises LINE OUT de cet appareil portent le numéro 3 et les prises
LINE IN, le numéro 4. Lors du raccordement de cet appareil à un
amplificateur ou un récepteur Yamaha dont les prises sont numérotées 1,
2, 3, 4 ..., relier les prises LINE OUT de cet appareil aux prises d’entrée
numérotées 3 et les prises LINE IN de cet appareil aux prises de sortie
numérotées 4 que porte le panneau arrière de l’amplificateur ou du
récepteur.
÷ Connecter le cordon d'alimentation sur une prise CA murale ou sur la prise
CA du panneau arrière de votre amplificateur/ampli-syntoniseur (s'il en
comporte une).
NATURAL SOUND CASSETTE DECK KX-W421
DOLBY NR
OFF/ B/ C
REC
LEVELBALANCE
PLAY TRIM
PHONES
STANDBY/ON
MODE
O / p / ∏ / RELAY
PLAYBACK
DECK A
Stabilizer
RECORD/PLAYBACK
DECK B
L R MIN MAX
–+
CassetteStabilizerCassette
CLOSE
% %
CLOSE
DIRECTION RESETRESET DIRECTION
! ⁄
&
SEARCH
!⁄
&
MUTE/SEARCH
REC/PAUSE
PLAYPLAY
EJECT EJECT
NORMAL HIGH
DUBBING A # B
0 0
Amplificateur ou
ampli-syntoniseur
(Modèle pour les Etats-Unis)
Touches principales de la platine B (DECK B)
Touches principales de la platine A (DECK A)

20
LECTURE (commune aux platines A et B)
Préparatifs pour la lecture
÷ Mettre la platine en morche au moyen de l’interrupteur STANDBY/ON.
÷ Régler votre amplificateur ou ampli-syntoniseur sur le mode de fonction de platine à cassette.
FONCTIONNEMENT DE BASE - Pour lire une cassette
Exemple: KX-W421
EJECT
DOLBY NR
OFF/ B/ C
Se référer à la
description suivante.
MODE
“/[/”/
RELAY
1
35
4
Se référer à la
description suivante.
DIRECTION
Sélectionner la direction du défilement de la
bande pour la platine A ou B. A chaque
pression sur la touche, la direction de
défilement de la bande change vers l’avant
(#) et l’arrière (@) et l’indicateur
correspondant s’allume à l’affichage.
Pour arrêter la lecture
Presser la touche &. Pour retirer la bande, presser la
touche EJECT. La porte du compartiment cassette s’ouvre.
Pour placer l’appareil en veille, appuyez sur la touche
STANDBY/ON.
Pour remettre le compteur à zéro (“0000”)
Appuyez sur la touche RESET. Utilisez le compteur pour
localiser aisément un point sur la bande (0000 à 9999).
Pour avancer rapidement ou réembobiner la bande
Quand l’indicateur de défilement de bande # est allumé:
Une pression sur la touche ⁄ avance rapidement la bande
et une pression sur la touche ! la réembobine.
Quand l’indicateur de défilement de bande @ est allumé:
Une pression sur la touche ! avance rapidement la bande
et une pression sur la touche ⁄ la réembobine.
PLAY
2
Insérer la cassette avec le côté de la bande exposée vers le bas. (La
face tournée vers vous est appelée face avant et la face opposée face
inverse.) Pour fermer le compartiment à cassette, appuyez sur le volet à
l’endroit marqué % CLOSE de manière à obtenir la fermeture totale.
NATURAL SOUND CASSETTE DECK KX-W421
DOLBY NR
OFF/ B/ C
REC
LEVELBALANCE
LR
PLAY TRIM
PHONES
DIRECTION
STANDBY/ON
MODE
O / p / ∏ / RELAY
! ⁄
&
SEARCH
PLAY PLAY
EJECT
NORMAL HIGH
DUBBING A # B
!⁄
&
MUTE/SEARCH REC/PAUSE
EJECT
RESET
RESET DIRECTION
Stabilizer
%
CLOSECLOSE
%
PLAYBACK
DECK A
Cassette
RECORD/PLAYBACK
DECK B
StabilizerCassette
–+
MIN MAX
0
23
1
STANDBY/ON
PHONES
RESET!
45
⁄
&
0
Sayfa yükleniyor...
Sayfa yükleniyor...
Sayfa yükleniyor...
Sayfa yükleniyor...
Sayfa yükleniyor...
Sayfa yükleniyor...
Sayfa yükleniyor...
Sayfa yükleniyor...
Sayfa yükleniyor...
Sayfa yükleniyor...
Sayfa yükleniyor...
Sayfa yükleniyor...
Sayfa yükleniyor...
Sayfa yükleniyor...
Sayfa yükleniyor...
Sayfa yükleniyor...
Sayfa yükleniyor...
Sayfa yükleniyor...
Sayfa yükleniyor...
Sayfa yükleniyor...
Sayfa yükleniyor...
Sayfa yükleniyor...
Sayfa yükleniyor...
Sayfa yükleniyor...
Sayfa yükleniyor...
Sayfa yükleniyor...
Sayfa yükleniyor...
Sayfa yükleniyor...
Sayfa yükleniyor...
Sayfa yükleniyor...
Sayfa yükleniyor...
Sayfa yükleniyor...
Sayfa yükleniyor...
Sayfa yükleniyor...
Sayfa yükleniyor...
Sayfa yükleniyor...
Sayfa yükleniyor...
Sayfa yükleniyor...
Sayfa yükleniyor...
Sayfa yükleniyor...
Sayfa yükleniyor...
Sayfa yükleniyor...
Sayfa yükleniyor...
Sayfa yükleniyor...
Sayfa yükleniyor...
Sayfa yükleniyor...
Sayfa yükleniyor...
Sayfa yükleniyor...
Sayfa yükleniyor...
Sayfa yükleniyor...
Sayfa yükleniyor...
Sayfa yükleniyor...
Sayfa yükleniyor...
Sayfa yükleniyor...
Sayfa yükleniyor...
Sayfa yükleniyor...
Sayfa yükleniyor...
Sayfa yükleniyor...
Sayfa yükleniyor...
Sayfa yükleniyor...
Sayfa yükleniyor...
Sayfa yükleniyor...
Sayfa yükleniyor...
Sayfa yükleniyor...
Sayfa yükleniyor...
Sayfa yükleniyor...
Sayfa yükleniyor...
Sayfa yükleniyor...
Sayfa yükleniyor...
Sayfa yükleniyor...
Sayfa yükleniyor...
Sayfa yükleniyor...
Sayfa yükleniyor...
Sayfa yükleniyor...
Sayfa yükleniyor...
Sayfa yükleniyor...
Sayfa yükleniyor...
Sayfa yükleniyor...
Sayfa yükleniyor...
Sayfa yükleniyor...
Sayfa yükleniyor...
Sayfa yükleniyor...
Sayfa yükleniyor...
Sayfa yükleniyor...
Sayfa yükleniyor...
Sayfa yükleniyor...
Sayfa yükleniyor...
-
 1
1
-
 2
2
-
 3
3
-
 4
4
-
 5
5
-
 6
6
-
 7
7
-
 8
8
-
 9
9
-
 10
10
-
 11
11
-
 12
12
-
 13
13
-
 14
14
-
 15
15
-
 16
16
-
 17
17
-
 18
18
-
 19
19
-
 20
20
-
 21
21
-
 22
22
-
 23
23
-
 24
24
-
 25
25
-
 26
26
-
 27
27
-
 28
28
-
 29
29
-
 30
30
-
 31
31
-
 32
32
-
 33
33
-
 34
34
-
 35
35
-
 36
36
-
 37
37
-
 38
38
-
 39
39
-
 40
40
-
 41
41
-
 42
42
-
 43
43
-
 44
44
-
 45
45
-
 46
46
-
 47
47
-
 48
48
-
 49
49
-
 50
50
-
 51
51
-
 52
52
-
 53
53
-
 54
54
-
 55
55
-
 56
56
-
 57
57
-
 58
58
-
 59
59
-
 60
60
-
 61
61
-
 62
62
-
 63
63
-
 64
64
-
 65
65
-
 66
66
-
 67
67
-
 68
68
-
 69
69
-
 70
70
-
 71
71
-
 72
72
-
 73
73
-
 74
74
-
 75
75
-
 76
76
-
 77
77
-
 78
78
-
 79
79
-
 80
80
-
 81
81
-
 82
82
-
 83
83
-
 84
84
-
 85
85
-
 86
86
-
 87
87
-
 88
88
-
 89
89
-
 90
90
-
 91
91
-
 92
92
-
 93
93
-
 94
94
-
 95
95
-
 96
96
-
 97
97
-
 98
98
-
 99
99
-
 100
100
-
 101
101
-
 102
102
-
 103
103
-
 104
104
-
 105
105
-
 106
106
-
 107
107


Yamaha KX-W421 El kitabı
- Kategori
- Kaset çalarlar
- Tip
- El kitabı
- Bu kılavuz aynı zamanda aşağıdakiler için de uygundur:
diğer dillerde
- español: Yamaha KX-W421 El manual del propietario
- français: Yamaha KX-W421 Le manuel du propriétaire
- italiano: Yamaha KX-W421 Manuale del proprietario
- svenska: Yamaha KX-W421 Bruksanvisning
- Deutsch: Yamaha KX-W421 Bedienungsanleitung
- English: Yamaha KX-W421 Owner's manual
- dansk: Yamaha KX-W421 Brugervejledning
- Nederlands: Yamaha KX-W421 de handleiding
- română: Yamaha KX-W421 Manualul proprietarului