
©
2009 Yamaha Corporation All rights reserved.
Tuner
OWNER’S MANUAL
MODE D’EMPLOI
BEDIENUNGSANLEITUNG
BRUKSANVISNING
MANUALE DI ISTRUZIONI
MANUAL DE INSTRUCCIONES
GEBRUIKSAANWIJZING
ИНСТРУКЦИЯ ПО ЭКСПЛУАТАЦИИ
G
Информация для пользователей по сбору и утилизации старой
аппаратуры и использованных батареек
Эти знаки на аппаратуре, упаковках и в сопроводительных документах указывают на то, что
подержанные электрические и электронные приборы и батарейки не должны
выбрасываться вместе с обычным домашним мусором.
Для правильной обработки, хранения и утилизации старой аппаратуры и использованных
батареек, пожалуйста сдавайте их в соответствующие сборные пункты, согласно вашему
национальному законодательству и директив 2002/96/EC и 2006/66/EC.
При надлежашей утилизации этих товаров и батареек, вы помогаете сохранять ценные
ресурсы и предотвращать вредное влияние на здоровье людей и окружающую среду, которое
может возникнуть из-за несоответствующего обращения с отходами.
За более подробной информацией о сборе и утилизации старых товаров и батареек,
пожалуйста обращайтесь в вашу локальную администрацию, в ваш приёмный пункт или в
магазин где вы приобрели эти товары.
[Информация по утилизации в других странах за пределами Европейского
Союза]
Эти знаки действительны только на территории Европейского Союза. Если вы хотите
избавиться от этих предметов, пожалуйста обратитесь в вашу локальную администрацию
или продавцу и спросите о правильном способе утилизации.
Обратите внимание на знак для батареек (два знака на задней стороне):
Этот знак может использоваться в комбинации со знаком указывающим о содержании
химикалий. В этом случае это удовлетворяет требованиям установленными Директивой по
использованию химикалий.
Printed in China CQX1A1472Z

CAUTION: READ THIS BEFORE OPERATING YOUR UNIT.
i En
1 To assure the finest performance, please read this manual
carefully. Keep it in a safe place for future reference.
2 Install this unit in a well ventilated, cool, dry, clean place –
away from direct sunlight, heat sources, vibration, dust,
moisture, and/or cold. For proper ventilation, allow the
following minimum clearances.
Top : 10 cm (4 in)
Rear: 10 cm (4 in)
3 Locate this unit away from other electrical appliances, motors,
or transformers to avoid humming sounds.
4 Do not expose this unit to sudden temperature changes from
cold to hot, and do not locate this unit in an environment with
high humidity (i.e. a room with a humidifier) to prevent
condensation inside this unit, which may cause an electrical
shock, fire, damage to this unit, and/or personal injury.
5 Avoid installing this unit where foreign objects may fall onto
this unit and/or this unit may be exposed to liquid dripping or
splashing. On the top of this unit, do not place:
– Other components, as they may cause damage and/or
discoloration on the surface of this unit.
– Burning objects (i.e. candles), as they may cause fire,
damage to this unit, and/or personal injury.
– Containers with liquid in them, as they may fall and liquid
may cause electrical shock to the user and/or damage to
this unit.
6 Do not cover this unit with a newspaper, tablecloth, curtain,
etc. in order not to obstruct heat radiation. If the temperature
inside this unit rises, it may cause fire, damage to this unit,
and/or personal injury.
7 Do not plug in this unit to a wall outlet until all connections
are complete.
8 Do not operate this unit upside-down. It may overheat,
possibly causing damage.
9 Do not use force on switches, knobs and/or cords.
10 When disconnecting the power cable from the wall outlet,
grasp the plug; do not pull the cable.
11 Do not clean this unit with chemical solvents; this might
damage the finish.
12 Only voltage specified on this unit must be used. Using this
unit with a higher voltage than specified is dangerous and may
cause fire, damage to this unit, and/or personal injury. Yamaha
will not be held responsible for any damage resulting from use
of this unit with a voltage other than specified.
13 To prevent damage by lightning, keep the power cable and
outdoor antennas disconnected from a wall outlet or the unit
during a lightning storm.
14 Do not attempt to modify or fix this unit. Contact qualified
Yamaha service personnel when any service is needed. The
cabinet should never be opened for any reasons.
15 When not planning to use this unit for long periods of time
(i.e. vacation), disconnect the AC power plug from the wall
outlet.
16 Install this unit near the AC outlet and where the AC power
plug can be reached easily.
17 Be sure to read the “TROUBLESHOOTING” section on
common operating errors before concluding that this unit is
faulty.
18 Before moving this unit, press POWER downward to turn off
this unit and then disconnect the AC power plug from the wall
outlet.
CAUTION: READ THIS BEFORE OPERATING YOUR UNIT.
WARNING
TO REDUCE THE RISK OF FIRE OR ELECTRIC
SHOCK, DO NOT EXPOSE THIS UNIT TO RAIN
OR MOISTURE.
As long as this unit is connected to the AC wall outlet,
it is not disconnected from the AC power source even
if you turn off this unit by POWER.

1 En
English
PREPARATION
OPERATIONS
ADDITIONAL
INFORMATION
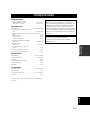
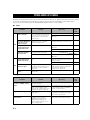
CONTROLS AND FUNCTIONS ......................... 2
Front panel ................................................................. 2
Controlling this unit with a remote control................ 2
CONNECTIONS .................................................... 3
TUNING .................................................................. 4
Automatic tuning ....................................................... 4
Manual tuning............................................................ 4
Selecting preset stations............................................. 4
PRESETTING STATIONS ................................... 5
Automatic station preset (FM stations only) ............. 5
Manual station preset................................................. 5
Clearing the preset station ......................................... 5
Receiving Radio Data System information
(FM stations only) ................................................. 6
TP Search function (FM stations only)...................... 7
TROUBLESHOOTING......................................... 8
SPECIFICATIONS ................................................ 9
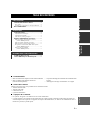
CONTENTS
PREPARATION
OPERATIONS
ADDITIONAL INFORMATION
■ Features
• 40-station FM/AM preset tuning
• Automatic station preset (FM stations only)
• Radio Data System text information display capability
• 2-line information message display
■ Supplied accessories
Please check that you have received all of the following parts.
• Indoor FM antenna
• AM loop antenna
• RCA stereo cable
• Power cable
■ About this manual
• y indicates a tip for your operation.
• This manual is printed prior to production. Design and specifications are subject to change in part as a result of
improvements, etc. In case of differences between the manual and the product, the product has priority.

2 En
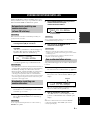
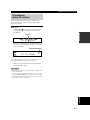
PREPARATION
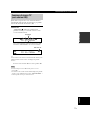
1 POWER
Press upward or downward to turn on/off this unit.
y
The POWER indicator above lights up when this unit is turned on.
2 Front panel display
Displays information of the currently tuned FM or AM
radio station or the operational status.
3 TP indicator lamp
Lights up when a Traffic Program (TP) station is received
(see page 7).
4 DIMMER
Changes brightness level of the front panel display.
Choose brightness from 4 levels by pressing this button
repeatedly.
y
This setting is retained even if you turn off this unit.
5 INFO/TEXT
Turns on and changes the Radio Data System display
mode (see page 6).
6 TP
Searches automatically for a station broadcasting a traffic
program (TP) (see page 7).
7 MEMORY
Sets this unit to the preset station memory mode when this
unit is in the FM/AM tuning mode (see page 5).
8 CLEAR
Clears the preset stations (see page 5).
9 FM MODE
Switches the FM radio wave reception mode (stereo or
monaural) when this unit is in the FM tuning mode (see
page 4).
0 FM/AM
Selects the reception band (FM or AM).
A TUNING MODE
Selects the tuning mode (automatic, manual, or preset
tuning) when this unit is in the FM/AM tuning mode (see
page 4).
B PRESET/TUNING
• Selects the preset FM or AM stations or services when
this unit is in the preset tuning mode.
• Selects the FM or AM stations or services when this
unit is not in the preset tuning mode.
This unit has a remote control sensor. It receives signals
from a remote control provided with a Yamaha amplifier
or AV receiver.
• Do not place any large obstacles between the remote control
and this unit.
• If the remote control sensor is directly illuminated by strong
lighting (especially an inverter type fluorescent lamp), you may
not be able to control this unit using the remote control. In this
case, reposition this unit to avoid direct lighting.
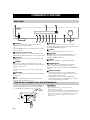
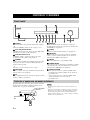
CONTROLS AND FUNCTIONS
Front panel
Controlling this unit with a remote control
30º 30º
Approximately 6 m
(20 ft)
Remote control
sensor
Notes

English
3 En
PREPARATION
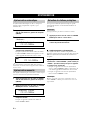
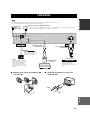
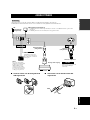
SETUP
■ Assembling the supplied AM loop
antenna
■ Connecting the wire of the AM loop
antenna
CONNECTIONS
AUDIO
LR
LR
LR
Indoor FM
antenna
(supplied)
AM loop antenna (supplied)
• The AM loop antenna should always be connected, even if an outdoor AM antenna is connected to this unit.
• The AM loop antenna should be placed away from this unit.
Outdoor AM antenna
Use a 5 to 10 m of vinyl
covered wire extended
outdoors from a window.
Ground
For maximum safety and
minimum interference,
connect the antenna GND
terminal to a good earth
ground. A good earth ground
is a metal stake driven into
moist earth.
RCA stereo cable
(supplied)
To the AC wall outlet
If you experience poor reception quality, install an outdoor antenna. Consult the nearest authorized
Yamaha dealer or service center about outdoor antennas.
Note
Amplifier
Analog audio input
Do not connect power cable until
all cable connection are complete.
CAUTION
Power cable
(supplied)
2
2
1
1
AM
GND

4 En
OPERATIONS
Automatic tuning is effective when station signals are
strong and there is no interference.
1 Press FM/AM repeatedly to select the
reception band (FM/AM).
2 Press TUNING MODE to select “Auto tune”.
3 Turn PRESET/TUNING to begin automatic
tuning.
When this unit is tuned into a station, the TUNED
indicator lights up and the frequency of the station is
shown on the front panel display.
y
If the station provides Radio Data System information, the
program service information will be shown on the front panel
display.
If the signal from the station you want to select is weak,
tune into it manually.
1 Press FM/AM repeatedly to select the
reception band (FM/AM).
2 Press TUNING MODE repeatedly to select
“Manual tune”.
3 Turn PRESET/TUNING to select the desired
frequency.
When this unit is tuned into a station, the TUNED
indicator lights up.
You can tune into any desired station simply by selecting
the preset station number.
See the next page to preset stations.
1 Press TUNING MODE repeatedly to select
“Preset tune”.
2 Turn PRESET/TUNING to select the desired
preset station number.
■ Improving FM reception
If the signal from the station is weak and the sound quality
is not good, set the FM radio wave reception mode to the
monaural tuning mode to improve reception.
Press FM MODE repeatedly to select “AUTO
STEREO” (stereo mode) or “MONO” (monaural
mode) when this unit is tuned into an FM radio
station.
• When this unit is in the stereo tuning mode, the
STEREO indicator lights up on the front panel display.
• When this unit is in the monaural tuning mode, the
STEREO indicator goes off.
Even if this unit is in the stereo tuning mode, the STEREO
indicator does not light up when the current program is monaural.
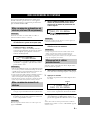
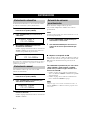
TUNING
Automatic tuning
Manual tuning
p Auto tune [
FM 87.50MHz
FM 94.90MHz
pManual tune[
FM 87.50MHz
Selecting preset stations
Note
Note

English
5 En
OPERATIONS
You can tune into stations easily by storing (presetting)
and recalling them. This function enables this unit to
preset up to 40 FM and AM stations.
To preset AM stations, see “Manual station preset” below.
1 Press FM/AM repeatedly to select the
reception band (FM).
2 Press and hold MEMORY for more than 3
seconds.
“Auto Preset” flashes on the front panel display. This
unit starts searching the stations with strong signals
and stores them automatically.
When automatic station preset is completed, this unit
tunes into the station preset to “01”.
• Only FM stations with sufficient signal strength are stored
automatically. To store a station with weak signal strength, store
it manually. See “Manual station preset” below.
• When you rerun “Automatic station preset”, all of the preset
data will be deleted and new preset data will be set to each
preset number.
• If no station is found, the search ends and this unit returns to the
previous station tuned in before the search.
1 Tune into the desired FM/AM station.
See page 4 for tuning instructions.
2 Press MEMORY.
The preset station number flashes on the front panel
display for 5 seconds.
Perform the next operation within 5 seconds after pressing
MEMORY.
3 Turn PRESET/TUNING to select the desired
preset station number while the preset
station number flashes.
Perform the next operation within 5 seconds after selecting the
preset station number.
4 Press MEMORY again to confirm the preset.
• When you preset a new station to an existing preset number,
new preset data will overwrite the existing preset data.
• The reception mode (stereo or monaural) is stored along with
the station frequency.
Follow the steps below to clear a preset station one at a
time.
1 Select the desired preset station number.
See “Selecting preset stations” on page 4.
2 Press CLEAR.
The selected preset station number flashes on the
front panel display.
If you do not perform the next operation within 5
seconds, the clearing is canceled.
3 Press CLEAR to confirm.
“PresetXX Cleared” (XX indicates the preset
number) appears on the front panel display.
y
To clear all preset stations, press and hold CLEAR for 3 seconds.
“ALL CLEAR” appears on the front panel display.
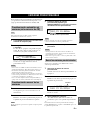
PRESETTING STATIONS
Automatic station preset
(FM stations only)
Note
Notes
Manual station preset
Note
Auto Preset
CH__ FM100.05MHz
Note
Notes
Clearing the preset station
CH01 FM 99.80MHz
Preset station number
CH01 FM 99.80MHz
p CLEAR CH01[
Flashes

6 En
PRESETTING STATIONS
Radio Data System is a data transmission system used by
FM stations in many countries. This unit can receive four
types of Radio Data System data information: Program
Service, Program Type, Radio Text, and Clock Time.
1 Tune into the desired Radio Data System
broadcasting station.
2 Press INFO/TEXT repeatedly to select the
desired Radio Data System display mode.
• Select “PROGRAM SERVICE” to display the
name of the Radio Data System program currently
being received.
• Select “PROGRAM TYPE” to display the type of
the Radio Data System program currently being
received.
• Select “RADIO TEXT” to display the information
on the Radio Data System program currently being
received.
• Select “CLOCK TIME” to display the current time.
When you select “PROGRAM TYPE,” the following
program type names are displayed.
• It may take a while for this unit to receive all of the Radio Data
System data from the station.
• If the signals being received are not strong enough, this unit
may not be able to utilize the Radio Data System data. In
particular, the “RADIO TEXT” mode requires a large amount
of data and may not be available even when the other Radio
Data System display modes are available.
• In case of poor reception condition, press FM MODE to select
the monaural reception mode (see page 4).
• If the signal strength is weakened by external interference while
this unit is receiving the Radio Data System data, the reception
may be cut off unexpectedly.
• When the “RADIO TEXT” mode is selected, this unit can
display the program information by a maximum of 128
alphanumeric characters, including the umlaut symbol.
Unavailable characters are displayed with the “_” (underscore).
The displayed information scrolls continuously.
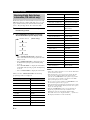
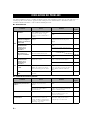
Receiving Radio Data System
information (FM stations only)
Program type Description
News News
Current Affairs Current affairs
Information General information
Sport Sports
Education Education
Drama Drama
Cultures Cultures
Science Science
Varied Speech Varied Speech
Pop Music Pop Music
PROGRAM TYPE
Frequency display
RADIO TEXT
CLOCK TIME
PROGRAM SERVICE
(default setting)
Rock Music Rock Music
Easy Listening Easy Listening
Light Classics M Light Classical Music
Serious Classics Serious Classical Music
Other Music Other Music
Weather & Metr Weather &
Meteorology
Finance Finance
Children s Progs
Children’s Program
Social Affairs Social Affairs
Religion Religion
Phone In Phone In
Travel & Touring Travel & Touring
Leisure & Hobby Leisure & Hobby
Jazz Music Jazz Music
Country Music Country Music
National Music National Music
Oldies Music Oldies Music
Folk Music Folk Music
Documentary Documentary
Alarm Test Alarm Test
Alarm-Alarm! Alarm-Alarm!
Notes
'

English
7 En
OPERATIONS
PRESETTING STATIONS
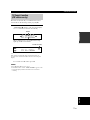
This unit can automatically search Radio Data System
stations that are broadcasting a traffic program(TP).
Press TP.
“TP SEARCH ” flashes on the front panel display
for 3 seconds and search starts automatically.
When a TP station is received, TP indicator lamp
lights up and TP search finishes.
y
If the station provides Radio Data System information, the
program service information will be shown on the front panel
display.
To search the next TP station, press TP.
• Press TP during TP search to cancel.
• If no TP Stations are found, “NO TP STATION” appears on the
front panel display and this unit returns to the state before
searching.
TP Search function
(FM stations only)
Notes
TP SEARCH [
FM 87.50MHz
Flashes
FM 91.70MHz
TP indicator lamp

8 En
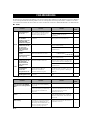
ADDITIONAL INFORMATION
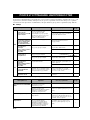
Refer to the table below when this unit does not function properly. If the problem you are experiencing is not listed below
or if the instruction below does not help, turn off this unit, disconnect the power cable, and contact the nearest authorized
Yamaha dealer or service center.
■ Tuner
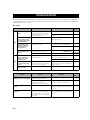
■ General
TROUBLESHOOTING
Problem Cause Remedy
See
page
FM
FM stereo reception is
noisy.
The characteristics of FM stereo
broadcasts may cause this problem
when the transmitter is too far away or
the antenna input is poor.
Check the antenna connections.
3
Try using a high-quality directional FM
antenna.
—
There is distortion, and
clear reception cannot
be obtained even with a
good FM antenna.
There is multi-path interference. Adjust the antenna position to eliminate
multi-path interference.
—
The desired station
cannot be tuned into
with the automatic
tuning method.
The signal is too weak. Use a high-quality directional FM antenna.
—
Use the manual tuning method.
4
The Radio Data System
information does not
appear.
The Radio Data System information is
not provided by the radio station.
The signal is too weak. Use a high-quality directional FM antenna.
—
AM
The desired station
cannot be tuned into
with the automatic
tuning method.
The signal is weak or the antenna
connections are loose.
Tighten the AM loop antenna connections
and orient it for the best reception.
—
Use the manual tuning method. 4
There are continuous
crackling and hissing
noises.
Noise can result from lightning,
fluorescent lamps, motors, thermostats
and other electrical equipment.
Use an outdoor antenna and a ground wire.
This will help somewhat, but it is difficult to
eliminate all noise.
—
There are buzzing and
whining noises.
A TV set is being used nearby. Move this unit away from the TV set.
—
Problem Cause Remedy
See
page
This unit fails to turn on when
POWER is pressed downward.
The power cord is not connected or the
plug is not completely inserted.
Connect the power cord firmly.
3
This unit has been exposed to a strong
external electric shock (such as
lightning or strong static electricity).
Disconnect the power cord, plug it back in
after 30 seconds, then use it normally.
—
A “humming” sound can be
heard.
Incorrect cable connections. Firmly connect the audio connection cord
plugs. If the problem persists, the cables may
be defective.
—
This unit does not operate
properly.
The internal microcomputer has been
frozen by an external electric shock
(such as lightning or excessive static
electricity) or by a power supply with
low voltage.
Disconnect the AC power plug from the
outlet and then plug it in again after about 30
seconds.
3

English
9 En
ADDITIONAL
INFORMATION
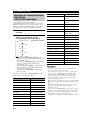
AUDIO SECTION
• Output Level/Impedance (fixed)
FM (40 kHz Dev., 1kHz) .......................................... 1.0 V/1.2 kΩ
AM (30% mod., 1 kHz) .......................................... 0.36 V/1.2 kΩ
FM SECTION
• Tuning Range ................................................. 87.50 to 108.00 MHz
• 50 dB Quieting Sensitivity (IHF, 100% mod.)
Mono .................................................................... 3 µV (20.2 dBf)
• Usable Sensitivity (Signal to Noise 30 dB)
Mono ...................................................................................... 1 µV
Image Rejection Ratio ......................................................... 80 dB
IF Rejection Ratio ................................................................ 70 dB
Selectivity (400 kHz) ........................................................... 70 dB
• Signal to Noise Ratio (IHF)
Mono/Stereo ............................................................. 80 dB/75 dB
• Harmonic Distortion (1 kHz)
Mono/Stereo ................................................................ 0.3%/0.5%
• Stereo Separation (40 kHz Dev.)
1 kHz .................................................................................... 43 dB
• Frequency response (20 Hz to 15 kHz) ................................... –3 dB
• Antenna Input (unbalanced) ..................................................... 75 Ω
AM SECTION
• Tuning Range ......................................................... 531 to 1611 kHz
• Usable Sensitivity ............................................................. 300 µV/m
• Selectivity ............................................................................... 30 dB
• Signal to Noise Ratio .............................................................. 50 dB
• Image Rejection Ratio ............................................................ 35 dB
• Harmonic Distortion ................................................................ 1.0%
GENERAL
• Power Supply ........................................................ AC 230 V, 50 Hz
• Power Consumption ................................................................... 9 W
• Dimensions (W x H x D) .................................. 435 x 94 x 450 mm
(17 1/8 x 3 3/4 x 17 3/4 in)
• Weight ..................................................................................... 5.8 kg
(12.8 lbs)
* Specifications are subject to change without notice.
SPECIFICATIONS
Taking care of this unit
When you wipe this unit, do not use chemical solvents
(ex. alcohol or thinner, etc.); this might damage the
finish. Use a clean, dry cloth. For heavy dirt, dampen a
soft cloth in detergent diluted with the water, wring it
out, and then clean this unit up with the cloth.
The screws on the side panels may loosen as wood
expands and contracts. In this case, tighten the screws.

Limited Guarantee for European Economic Area (EEA) and Switzerland
Thank you for having chosen a Yamaha product. In the unlikely event that your Yamaha product needs guarantee service, please contact the dealer from
whom it was purchased. If you experience any difficulty, please contact Yamaha representative office in your country. You can find full details on our
website (http://www.yamaha-hifi.com/ or http://www.yamaha-uk.com/ for U.K. resident).
The product is guaranteed to be free from defects in workmanship or materials for a period of two years from the date of the original purchase. Yamaha
undertakes, subject to the conditions listed below, to have the faulty product or any part(s) repaired, or replaced at Yamaha’s discretion, without any charge
for parts or labour. Yamaha reserves the right to replace a product with that of a similar kind and/or value and condition, where a model has been
discontinued or is considered uneconomic to repair.
Conditions
1. The original invoice or sales receipt (showing date of purchase, product code and dealer’s name) MUST accompany the defective product, along with a
statement detailing the fault. In the absence of this clear proof of purchase, Yamaha reserves the right to refuse to provide free of charge service and the
product may be returned at the customer’s expense.
2. The product MUST have been purchased from an AUTHORISED Yamaha dealer within the European Economic Area (EEA) or Switzerland.
3. The product must not have been the subject of any modifications or alterations, unless authorised in writing by Yamaha.
4. The following are excluded from this guarantee:
a. Periodic maintenance and repair or replacement of parts due to normal wear and tear.
b. Damage resulting from:
(1) Repairs performed by the customer himself or by an unauthorised third party.
(2) Inadequate packaging or mishandling, when the product is in transit from the customer. Please note that it is the customer’s responsibility to
ensure the product is adequately packaged when returning the product for repair.
(3) Misuse, including but not limited to (a) failure to use the product for its normal purpose or in accordance with Yamaha’s instructions on the
proper use, maintenance and storage, and (b) installation or use of the product in a manner inconsistent with the technical or safety standards in
force in the country where it is used.
(4) Accidents, lightning, water, fire, improper ventilation, battery leakage or any cause beyond Yamaha’s control.
(5) Defects of the system into which this product is incorporated and/or incompatibility with third party products.
(6) Use of a product imported into the EEA and/or Switzerland, not by Yamaha, where that product does not conform to the technical or safety
standards of the country of use and/or to the standard specification of a product sold by Yamaha in the EEA and/or Switzerland.
5. Where the guarantee differs between the country of purchase and the country of use of the product, the guarantee of the country of use shall apply.
6. Yamaha may not be held responsible for any losses or damages, whether direct, consequential or otherwise, save for the repair or replacement of the
product.
7. Please backup any custom settings or data, as Yamaha may not be held responsible for any alteration or loss to such settings or data.
8. This guarantee does not affect the consumer’s statutory rights under applicable national laws in force or the consumer’s rights against the dealer arising
from their sales/purchase contract.
Information for Users on Collection and Disposal of Old Equipment
and Used Batteries
These symbols on the products, packaging, and/or accompanying documents mean that used electrical and
electronic products and batteries should not be mixed with general household waste.
For proper treatment, recovery and recycling of old products and used batteries, please take them to
applicable collection points, in accordance with your national legislation and the Directives 2002/96/EC
and 2006/66/EC.
By disposing of these products and batteries correctly, you will help to save valuable resources and prevent
any potential negative effects on human health and the environment which could otherwise arise from
inappropriate waste handling.
For more information about collection and recycling of old products and batteries, please contact your
local municipality, your waste disposal service or the point of sale where you purchased the items.
[Information on Disposal in other Countries outside the European Union]
These symbols are only valid in the European Union. If you wish to discard these items, please contact
your local authorities or dealer and ask for the correct method of disposal.
Note for the battery symbol (bottom two symbol examples):
This symbol might be used in combination with a chemical symbol. In this case it complies with the
requirement set by the Directive for the chemical involved.

i Fr
1 Pour utiliser l’appareil au mieux de ses possibilités, lisez
attentivement ce mode d’emploi. Conservez-le soigneusement
pour référence.
2 Installez cet ensemble audio dans un endroit frais, bien aéré,
sec et propre — veillez à ce qu’il soit à l’abri de la lumière du
soleil, des sources de chaleur, des vibrations, des poussières,
de l’humidité et du froid. Afin d’assurer une bonne
ventilation, ménagez les espaces minimums suivants :
Haut : 10 cm
Arrière : 10 cm
3 Placez l’appareil loin des équipements, moteurs et
transformateurs électriques, pour éviter les ronflements
parasites.
4 N’exposez pas l’appareil à des variations brutales de
température, ne le placez pas dans un environnement très
humide (par exemple dans une pièce contenant un
humidificateur) car cela peut entraîner la condensation
d’humidité à l’intérieur de l’appareil qui elle-même peut être
responsable de décharge électrique, d’incendie, de dommage
à l’appareil ou de blessure corporelle.
5 Evitez d’installer l’appareil dans un endroit où des objets
peuvent tomber, ainsi que là où l’appareil pourrait être exposé
à des éclaboussures ou des gouttes d’eau. Sur le dessus de
l’appareil, ne placez pas :
– d’autres appareils qui peuvent endommager la surface de
l’appareil ou provoquer sa décoloration.
– des objets se consumant (par exemple, une bougie) qui
peuvent être responsables d’incendie, de dommage à
l’appareil ou de blessure corporelle.
– des récipients contenant des liquides qui peuvent être à
l’origine de décharge électrique ou de dommage à
l’appareil.
6 Ne couvrez pas l’appareil d’un journal, d’une nappe, d’un
rideau, etc. car cela empêcherait l’évacuation de la chaleur.
Toute augmentation de la température intérieure de l’appareil
peut être responsable d’incendie, de dommage à l’appareil ou
de blessure corporelle.
7 Ne branchez pas la fiche du cordon d’alimentation de
l’appareil sur une prise secteur aussi longtemps que tous les
raccordements n’ont pas été effectués.
8 Ne pas faire fonctionner l’appareil à l’envers. Il risquerait de
chauffer et d’être endommagé.
9 N’exercez aucune force excessive sur les commutateurs, les
boutons et les cordons.
10 Pour débrancher la fiche du cordon d’alimentation au niveau
de la prise secteur, saisissez la fiche et ne tirez pas sur le
cordon.
11 Ne nettoyez pas l’appareil au moyen d’un solvant chimique,
ce qui pourrait endommager la finition.
12 N’alimentez l’appareil qu’à partir de la tension prescrite.
Alimenter l’appareil sous une tension plus élevée est
dangereux et peut être responsable d’incendie, de dommage à
l’appareil ou de blessure corporelle. Yamaha ne saurait être
tenue responsable des dommages résultant de l’alimentation
de l’appareil sous une tension autre que celle prescrite.
13 Pour empêcher tout dommage causé par les éclairs,
déconnectez le cordon d’alimentation et toute antenne
extérieure de la prise murale pendant un orage.
14 Ne tentez pas de modifier ni de réparer l’appareil. Consultez
le service Yamaha compétent pour toute réparation qui serait
requise. Le coffret de l’appareil ne doit jamais être ouvert,
quelle que soit la raison.
15 Si vous envisagez de ne pas vous servir de l’appareil pendant
une longue période (par exemple, pendant les vacances),
débranchez la fiche du cordon d’alimentation au niveau de la
prise secteur.
16 Installez cet appareil à proximité de la prise secteur et à un
emplacement où la fiche du câble d’alimentation est
facilement accessible.
17 Lisez la section intitulée « GUIDE DE DEPANNAGE » où
figurent une liste d’erreurs de manipulation communes avant
de conclure que l’appareil présente une anomalie de
fonctionnement.
18 Avant de déplacer l’appareil, positionnez la touche POWER
vers le bas pour placer l’appareil en veille puis débranchez la
fiche du cordon d’alimentation au niveau de la prise secteur.
ATTENTION : VEUILLEZ LIRE CE QUI SUIT AVANT D’UTILISER L’APPAREIL.
AVERTISSEMENT
POUR RÉDUIRE LES RISQUES D’INCENDIE OU
DE DÉCHARGE ÉLECTRIQUE, N’EXPOSEZ PAS
CET APPAREIL À LA PLUIE OU À L’HUMIDITÉ.
Tant que cet appareil est raccordé à la prise secteur, il
n’est pas déconnecté de son alimentation, même si
vous éteignez l’appareil en appuyant sur POWER.

1 Fr
Français
PRÉPARATIONS
OPÉRATIONS
INFORMATIONS
COMPLÉMENTAIRES
COMMANDES ET FONCTIONS........................ 2
Face avant .................................................................. 2
Contrôle de cet appareil avec une télécommande...... 2
RACCORDEMENTS............................................. 3
SYNTONISATION................................................. 4
Syntonisation automatique......................................... 4
Syntonisation manuelle.............................................. 4
Sélection de stations préréglées................................. 4
MISE EN MÉMOIRE DE STATIONS ................ 5
Mise en mémoire automatique de stations
(stations FM uniquement) ..................................... 5
Mise en mémoire manuelle de stations...................... 5
Effacement de la station présélectionnée................... 5
Réception des informations Radio Data System
(stations FM uniquement) ..................................... 6
Fonction de recherche TP
(stations FM uniquement) ..................................... 7
GUIDE DE DÉPANNAGE .................................... 8
CARACTÉRISTIQUES TECHNIQUES............. 9
TABLE DES MATIÈRES
PRÉPARATIONS
OPÉRATIONS
INFORMATIONS COMPLÉMENTAIRES
■ Fonctionnalités
• Mise en mémoire des fréquences de 40 stations FM/AM
• Mise en mémoire automatique de stations
(stations FM uniquement)
• Capacité d’affichage des informations texte Radio Data
System
• Affichage des messages d’information sur 2 lignes
■ Accessoires fournis
Veuillez vous assurer que vous possédez bien les éléments suivants.
• Antenne intérieure FM
• Antenne cadre AM
• Câble stéréo RCA
• Cordon d’alimentation
■ À propos de ce manuel
• Le symbole y appelle votre attention sur un conseil d’utilisation.
• Ce mode d’emploi a été imprimé avant la fabrication de l’appareil. Dans l’intérêt de l’amélioration du produit, les
caractéristiques et/ou l’aspect de cet appareil sont sujets à des modifications, etc. Dans le cas de différences entre le
manuel et le produit, le produit prime.

2 Fr
PRÉPARATIONS
1 POWER
Appuyez vers le haut ou vers le bas pour mettre cet
appareil sous tension/hors tension.
y
Le témoin POWER situé au-dessus s’allume lorsque cet appareil
est mis sous tension.
2 Afficheur de la face avant
Affiche des informations concernant la station de radio
FM ou AM actuellement syntonisée ou l’état opérationnel.
3 Témoin TP
S’allume à la réception d’une station d’Infos trafic (TP)
(voir page 7).
4 DIMMER
Réglage de l’éclairage de l’afficheur de la face avant.
Choisissez parmi 4 niveaux d’éclairage en appuyant sur ce
bouton de façon répétée.
y
Ce réglage est conservé même si vous mettez cet appareil hors
tension.
5 INFO/TEXT
Allume et change le mode d’affichage Radio Data System
(voir page 6).
6 TP
Recherche automatiquement une station émettant des
informations trafic (TP) (voir page 7).
7 MEMORY
Règle cet appareil en mode de mémoire de station
présélectionnée lorsque cet appareil est réglé en mode de
syntonisation FM/AM (voir page 5).
8 CLEAR
Libère les stations présélectionnées (voir page 5).
9 FM MODE
Commute le mode de réception radio FM (stéréo ou
monaural) lorsque cet appareil est réglé en mode de
syntonisation FM (voir page 4).
0 FM/AM
Sélectionne la gamme de réception (FM ou AM).
A TUNING MODE
Sélectionne le mode de syntonisation (automatique,
manuel, syntonisation présélectionnée) lorsque cet
appareil est réglé en mode de syntonisation FM/AM (voir
page 4).
B PRESET/TUNING
• Sélectionne les stations ou services FM ou AM
présélectionnés lorsque cet appareil est dans le mode
de syntonisation présélectionné.
• Sélectionne les stations ou services FM ou AM
présélectionnés lorsque cet appareil n’est pas réglé en
mode de syntonisation présélectionné.
Cet appareil est équipé d’un capteur de télécommande. Il
reçoit les signaux émis par une télécommande fournie
avec un amplificateur Yamaha ou un récepteur AV.
• Ne pas placer d’obstacles de grande taille entre la
télécommande et cet appareil.
• Si le capteur de télécommande est directement illuminé par un
éclairage puissant (en particulier une lampe fluorescente de type
onduleur), il se peut que la télécommande ne fonctionne pas.
Dans ce cas, repositionnez cet appareil pour éviter tout
éclairage direct.
COMMANDES ET FONCTIONS
Face avant
Contrôle de cet appareil avec une télécommande
30º 30º
Environ 6 m
Capteur de
télécommande
Remarques

Français
3 Fr
PRÉPARATIONS
SETUP
■ Assemblage de l’antenne cadre AM
fournie
■ Raccordement du fil de l’antenne cadre
AM
RACCORDEMENTS
AUDIO
LR
LR
LR
Antenne
intérieure FM
(fournie)
Antenne cadre AM (fournie)
• L’antenne cadre AM doit être reliée à l’appareil, y compris dans le cas où une antenne AM extérieure est
utilisée.
• L’antenne cadre AM doit être placée à distance de cet appareil.
Antenne AM extérieure
Déployez par une fenêtre à
l’extérieur un fil isolé en vinyle
de 5 à 10 m de longueur.
Masse
Par souci de sécurité et pour
que le brouillage soit
minimum, reliez la prise GND
de l’antenne à une bonne
masse. Une bonne masse peut
être un pieu de métal enfoncé
dans un sol humide.
Câble stéréo RCA
(fourni)
À une prise secteur
Si la réception devait être mauvaise, installez une antenne extérieure. Pour de plus amples détails
concernant cette question, veuillez consulter le revendeur ou le service après-vente Yamaha.
Remarque
Amplificateur
Entrée audio analogue
Ne connectez pas le cordon
d’alimentation avant que tous les
raccordements de câbles soient
terminés.
ATTENTION
Cordon d’alimentation
(fourni)
2
2
1
1
AM
GND

4 Fr
OPÉRATIONS
La syntonisation automatique est efficace lorsque les
signaux captés sont puissants et qu’il n’y a pas
d’interférences.
1 Appuyez plusieurs fois de suite sur FM/AM
afin de sélectionner la gamme de réception
(FM/AM).
2 Appuyez sur TUNING MODE pour choisir
« Auto tune ».
3 Allumez PRESET/TUNING pour démarrer la
syntonisation automatique.
Lorsque la syntonisation sur une station est réalisée,
le témoin TUNED s’allume et la fréquence de cette
station apparaît sur l’afficheur de la face avant.
y
Si la station fournit les informations Radio Data System, les
informations concernant l ’émission apparaissent sur l’afficheur
de la face avant.
Si le signal de la station que vous désirez écouter n’est pas
assez fort, effectuez une syntonisation manuelle.
1 Appuyez plusieurs fois de suite sur FM/AM
afin de sélectionner la gamme de réception
(FM/AM).
2 Appuyez plusieurs fois de suite sur TUNING
MODE pour choisir « Manual tune ».
3 Allumez PRESET/TUNING pour choisir la
fréquence désirée.
Lorsque cet appareil a syntonisé une station, le
témoin TUNED s’allume.
Vous pouvez facilement syntoniser n’importe quelle
station présélectionnée en sélectionnant le numéro de
présélection.
Voir la page suivante pour mettre en mémoire les stations.
1 Appuyez plusieurs fois de suite sur TUNING
MODE pour choisir « Preset tune ».
2 Allumez PRESET/TUNING pour choisir le
numéro de présélection désiré.
■ Amélioration de la réception FM
Si le signal de la station est faible et la qualité du son
mauvaise, réglez le mode de réception d’ondes de la radio
FM sur la syntonisation monaurale afin d’améliorer la
réception.
Appuyez plusieurs fois sur FM MODE pour
sélectionner « AUTO STEREO » (mode stéréo) ou
« MONO » (mode monaural) lorsque cet appareil
a syntonisé une station FM.
• Lorsque cet appareil est en mode de syntonisation
stéréo, le témoin STEREO s’allume et la fréquence de
cette station apparaît sur l’afficheur de la face avant.
• Lorsque cet appareil est en mode de syntonisation
mono, le témoin STEREO s’éteint.
Même si cet appareil est en mode de syntonisation stéréo, le
témoin STEREO ne s’allume pas si l’émission en cours est de
type monaural.
SYNTONISATION
Syntonisation automatique
Syntonisation manuelle
p Auto tune [
FM 87.50MHz
FM 94.90MHz
pManual tune[
FM 87.50MHz
Sélection de stations préréglées
Remarque
Remarque

Français
5 Fr
OPÉRATIONS
Vous pouvez facilement syntoniser des stations en les
mettant en mémoire (présélection) et en les rappelant.
Cette fonction permet à cet appareil de présélectionner
plus de 40 stations FM et AM.
Pour mettre en mémoire des stations AM, voir « Mise en
mémoire manuelle de stations » ci-dessous.
1 Appuyez plusieurs fois de suite sur FM/AM afin
de sélectionner la gamme de réception (FM).
2 Maintenez le bouton MEMORY enfoncé
pendant au moins 3 secondes.
« Auto Preset » clignote sur l’affichage de la face
avant. Cet appareil démarre la recherche de stations
ayant des signaux captés puissants et les met en
mémoire automatiquement.
Lorsque la mise en mémoire automatique de stations
est terminée, cet appareil se syntonise sur la station
présélectionnée « 01 ».
• Seules les stations FM dont le signal capté est suffisamment puissant
sont concernées par la mise en mémoire automatique. Si une station
a un faible signal capté, mettez-la manuellement en mémoire. Voir
« Mise en mémoire manuelle de stations » ci-dessous.
• Lorsque vous répétez la « Mise en mémoire automatique de stations »,
toutes les données de présélection sont effacées et de nouvelles
données sont sauvegardées sous chaque numéro de présélection.
• Si aucune station n’est trouvée, la recherche se termine et l’appareil
retourne à la précédente station syntonisée avant la recherche.
1 Syntoniser la station FM/AM désirée.
Voir page 4 pour les instructions sur la syntonisation.
2 Appuyez sur MEMORY.
Le numéro de présélection de la station s’affiche sur
la face avant pendant 5 secondes.
Effectuez l’opération suivante dans les 5 secondes après avoir
appuyé sur MEMORY.
3 Allumez PRESET/TUNING afin de choisir le
numéro de présélection de station désiré
pendant que le numéro de présélection de
station clignote.
Effectuez l’opération suivante dans les 5 secondes après avoir
sélectionné le numéro présélection.
4 Appuyez sur MEMORY de nouveau pour
confirmer la mise en mémoire.
• Lorsque vous présélectionnez une nouvelle station sous un
numéro de présélection existant, la nouvelle donnée de
présélection efface la donnée de présélection existante.
• Le mode de réception (stéréo ou mono) est sauvegardé en même
temps que la fréquence de la station.
Suivez les étapes ci-dessous pour effacer chaque station
présélectionnée une par une.
1 Sélectionnez le numéro présélectionné désiré.
Voir « Sélection de stations préréglées » sur la page 4.
2 Appuyez sur CLEAR.
Le numéro de présélection de station clignote sur la
face avant.
Si vous n’effectuez pas la prochaine opération dans
les 5 secondes, l’opération d’effacement est annulée.
3 Appuyez sur CLEAR pour confirmer.
« PresetXX Cleared » (XX indique le numéro de
présélection) apparaît sur l’afficheur de la face avant.
y
Afin d’effacer toutes les stations présélectionnées, maintenez
CLEAR enfoncé pendant 3 secondes. « ALL CLEAR » apparaît
sur la face avant.
MISE EN MÉMOIRE DE STATIONS
Mise en mémoire automatique de
stations (stations FM uniquement)
Remarque
Remarques
Mise en mémoire manuelle de
stations
Remarque
Auto Preset
CH__ FM100.05MHz
Remarque
Remarques
Effacement de la station
présélectionnée
CH01 FM 99.80MHz
Numéro de présélection de station
CH01 FM 99.80MHz
p CLEAR CH01[
Clignote

6 Fr
MISE EN MÉMOIRE DE STATIONS
Le Radio Data System est un système de
radiocommunication de données utilisé par les stations
FM dans de nombreux pays. Cet appareil peut recevoir
quatre types d’informations Radio Data System : Nom
d’émission, Type d’émission, Texte Radio, et Heure.
1 Accordez la station Radio Data System
souhaitée.
2 Appuyez plusieurs fois de suite sur INFO/
TEXT afin de sélectionner le mode
d’affichage Radio Data System désiré.
• Sélectionnez « PROGRAM SERVICE » pour
afficher le nom de l’émission Radio Data System
actuellement reçue.
• Sélectionnez « PROGRAM TYPE » pour afficher
le type de l’émission Radio Data System
actuellement reçue.
• Sélectionnez « RADIO TEXT » pour afficher les
informations concernant l’émission Radio Data
System actuellement reçue.
• Sélectionnez « CLOCK TIME » pour afficher
l’heure actuelle.
Lorsque vous sélectionnez « PROGRAM TYPE », les
noms d’émission suivants apparaissent.
• Il se peut que l’appareil ne reçoive les données Radio Data
System qu’après un certain laps de temps.
• Si les signaux reçus ne sont pas assez forts, l’appareil peut ne
pas être en mesure de transmettre les données Radio Data
System. Le mode « RADIO TEXT » en particulier, diffuse
souvent un grand nombre de données qui ne pourront pas
toujours être affichées en même temps que d’autres modes
d’affichage Radio Data System.
• En cas de mauvaises conditions de réception, appuyez sur FM
MODE pour sélectionner le mode de réception monaural (voir
page 4).
• Si le signal est affaibli par des interférences externes lorsque
l’appareil reçoit le Radio Data System, il peut être
soudainement coupé.
• Lorsque le mode « RADIO TEXT » est sélectionné, le nombre
maximal de caractères alphanumériques pouvant être affichés
s’élève à 128, symbole de l’umlaut compris. Les caractères ne
pouvant pas être retranscrits sont remplacés par « _ »
(soulignement). Les informations affichées défilent en continu.
Réception des informations Radio
Data System
(stations FM uniquement)
Type d’émission Description
News Informations
Current Affairs Émissions à thème
Information Informations générales
Sport Sports
Education Éducation
Drama Pièces radiophoniques
Cultures Émissions culturelles
Science Émissions scientifiques
Varied Speech Émissions de variétés
Pop Music Musique populaire
Rock Music Musique rock
PROGRAM TYPE
Frequency display
RADIO TEXT
CLOCK TIME
PROGRAM SERVICE
(paramètres par défaut)
Easy Listening Musique légère
Light Classics M Musique classique
légère
Serious Classics Musique classique
sérieuse
Other Music Autres musiques
Weather & Metr Météorologie
Finance Finance
Children s Progs
Programmes
pour’enfants
Social Affairs Affaires sociales
Religion Religion
Phone In Tribune téléphonique
Travel & Touring Voyage et tourisme
Leisure & Hobby Loisirs & passe-temps
Jazz Music Musique jazz
Country Music Musique country
National Music Musique nationale
Oldies Music Musique nostalgique
Folk Music Musique folk
Documentary Documentaire
Alarm Test Test d’alarme
Alarm-Alarm! Alarme-Alarme !
Remarques
'

Français
7 Fr
OPÉRATIONS
MISE EN MÉMOIRE DE STATIONS
Cet appareil peut rechercher automatiquement les stations
Radio Data System émettant un programme d’information
trafic (TP).
Appuyez sur TP.
« TP SEARCH » clignote pendant 3 secondes sur
l’afficheur de la face avant, et la recherche démarre
automatiquement.
À la réception d’une station TP, le témoin TP
s’allume, et la recherche TP s’arrête.
y
Si la station émet des informations Radio Data System, les
informations concernant l ’émission apparaissent sur l’afficheur
de la face avant.
Pour rechercher la station TP suivante, appuyez sur
TP.
• Appuyez sur TP durant la recherche TP pour annuler cette
dernière.
• Si le système ne détecte aucune station TP, « NO TP
STATION » s’affiche sur l’afficheur de la face avant, et
l’appareil retourne au mode dans lequel il se trouvait avant la
recherche.
Fonction de recherche TP
(stations FM uniquement)
Remarque
TP SEARCH [
FM 87.50MHz
Clignote
FM 91.70MHz
Témoin TP
Sayfa yükleniyor...
Sayfa yükleniyor...
Sayfa yükleniyor...
Sayfa yükleniyor...
Sayfa yükleniyor...
Sayfa yükleniyor...
Sayfa yükleniyor...
Sayfa yükleniyor...
Sayfa yükleniyor...
Sayfa yükleniyor...
Sayfa yükleniyor...
Sayfa yükleniyor...
Sayfa yükleniyor...
Sayfa yükleniyor...
Sayfa yükleniyor...
Sayfa yükleniyor...
Sayfa yükleniyor...
Sayfa yükleniyor...
Sayfa yükleniyor...
Sayfa yükleniyor...
Sayfa yükleniyor...
Sayfa yükleniyor...
Sayfa yükleniyor...
Sayfa yükleniyor...
Sayfa yükleniyor...
Sayfa yükleniyor...
Sayfa yükleniyor...
Sayfa yükleniyor...
Sayfa yükleniyor...
Sayfa yükleniyor...
Sayfa yükleniyor...
Sayfa yükleniyor...
Sayfa yükleniyor...
Sayfa yükleniyor...
Sayfa yükleniyor...
Sayfa yükleniyor...
Sayfa yükleniyor...
Sayfa yükleniyor...
Sayfa yükleniyor...
Sayfa yükleniyor...
Sayfa yükleniyor...
Sayfa yükleniyor...
Sayfa yükleniyor...
Sayfa yükleniyor...
Sayfa yükleniyor...
Sayfa yükleniyor...
Sayfa yükleniyor...
Sayfa yükleniyor...
Sayfa yükleniyor...
Sayfa yükleniyor...
Sayfa yükleniyor...
Sayfa yükleniyor...
Sayfa yükleniyor...
Sayfa yükleniyor...
Sayfa yükleniyor...
Sayfa yükleniyor...
Sayfa yükleniyor...
Sayfa yükleniyor...
Sayfa yükleniyor...
Sayfa yükleniyor...
Sayfa yükleniyor...
Sayfa yükleniyor...
Sayfa yükleniyor...
Sayfa yükleniyor...
Sayfa yükleniyor...
Sayfa yükleniyor...
Sayfa yükleniyor...
Sayfa yükleniyor...
Sayfa yükleniyor...
-
 1
1
-
 2
2
-
 3
3
-
 4
4
-
 5
5
-
 6
6
-
 7
7
-
 8
8
-
 9
9
-
 10
10
-
 11
11
-
 12
12
-
 13
13
-
 14
14
-
 15
15
-
 16
16
-
 17
17
-
 18
18
-
 19
19
-
 20
20
-
 21
21
-
 22
22
-
 23
23
-
 24
24
-
 25
25
-
 26
26
-
 27
27
-
 28
28
-
 29
29
-
 30
30
-
 31
31
-
 32
32
-
 33
33
-
 34
34
-
 35
35
-
 36
36
-
 37
37
-
 38
38
-
 39
39
-
 40
40
-
 41
41
-
 42
42
-
 43
43
-
 44
44
-
 45
45
-
 46
46
-
 47
47
-
 48
48
-
 49
49
-
 50
50
-
 51
51
-
 52
52
-
 53
53
-
 54
54
-
 55
55
-
 56
56
-
 57
57
-
 58
58
-
 59
59
-
 60
60
-
 61
61
-
 62
62
-
 63
63
-
 64
64
-
 65
65
-
 66
66
-
 67
67
-
 68
68
-
 69
69
-
 70
70
-
 71
71
-
 72
72
-
 73
73
-
 74
74
-
 75
75
-
 76
76
-
 77
77
-
 78
78
-
 79
79
-
 80
80
-
 81
81
-
 82
82
-
 83
83
-
 84
84
-
 85
85
-
 86
86
-
 87
87
-
 88
88
-
 89
89


diğer dillerde
- español: Yamaha T-S1000 El manual del propietario
- français: Yamaha T-S1000 Le manuel du propriétaire
- italiano: Yamaha T-S1000 Manuale del proprietario
- svenska: Yamaha T-S1000 Bruksanvisning
- Deutsch: Yamaha T-S1000 Bedienungsanleitung
- English: Yamaha T-S1000 Owner's manual
- dansk: Yamaha T-S1000 Brugervejledning
- русский: Yamaha T-S1000 Инструкция по применению
- suomi: Yamaha T-S1000 Omistajan opas
- Nederlands: Yamaha T-S1000 de handleiding
- română: Yamaha T-S1000 Manualul proprietarului

