
3000
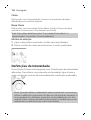
Power Flosser


6
7
12
11
10
9
13
14 15 16
8
2
3
4
5
11
17
1


English 6
Deutsch 24
Español 45
Français 64
Italiano 84
Nederlands 104
Português 124
Türkçe 144

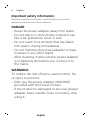
English
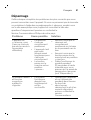
Important safety information
Read this important information carefully before you use the
appliance and save it for future reference.
DANGER
- Keep the power adapter away from water.
- Do not place or store product where it can
fall or be pulled into a tub or sink.
- Do not reach for a product that has fallen
into water. Unplug immediately.
- Do not immerse the power adapter or base
in water or any other liquid.
- After cleaning, make sure the power adapter
is completely dry before you connect it to
the mains.
WARNINGS
To reduce the risk of burns, electrocution, fire
or injury to persons:
- Only use the power adapter (WAC1001)
provided with the Power Flosser.
- If the product is damaged in any way (power
adapter, base, handle, hose or nozzle), stop
using it.
6English

- Always replace the power adapter with one
of the original type in order to avoid a
hazard.
- Keep cord away from heated surfaces
- This appliance contains no user serviceable
parts. If the appliance is damaged, contact
the Consumer Care Center in your country
(see 'Warranty and support').
- Do not use the product outdoors
- The maximum altitude of use is 4420
meters.
- This product is not intended for use by
persons (including children) with reduced
physical, sensory, or mental capabilities, or
lack of experience and knowledge, unless
they have been given supervision or
instruction concerning use of the product by
a person responsible for their safety.
- Children (ages 6+) should be supervised to
ensure that they do not play with the
product.
- Do not fill the reservoir with hot water. Hot
water may cause burns.
7
English

- Philips Sonicare Power Flosser is a personal
care device and is not intended for use by
multiple users.
- If you are not going to use the product for
an extended period of time, unplug it from
the electrical outlet, clean it and store it in a
cool and dry place away from direct
sunlight.
CAUTION
- To avoid damage to the product, do not
place the product or parts in the dishwasher
for cleaning unless otherwise instructed.
- If you have had oral or gum surgery in the
previous 2 months, consult your dentist
before you use the Philips Sonicare Power
Flosser.
- Consult your dentist if excessive bleeding
occurs after using this toothbrush or if
bleeding continues to occur after 1 week of
use.
8English

- The Philips Sonicare Power Flosser complies
with the safety standards for
electromagnetic devices. If you have a
pacemaker or other implanted device,
contact your physician or the manufacturer
of the implanted device prior to use.
- If you have medical concerns, consult your
doctor before you use the Philips Sonicare
Power Flosser.
- This product has only been designed for
cleaning teeth and gums. Do not use it for
any other purpose. (for e.g. eyes, nose and
ears). Stop using the appliance and contact
your doctor if you experience any
discomfort or pain.
- Do not use other nozzles than the ones
recommended by Philips Sonicare.
Electromagnetic fields (EMF)
This Philips appliance complies with all applicable standards and
regulations regarding exposure to electromagnetic fields.
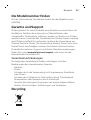
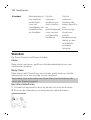
Introduction
Welcome to Philips! Congratulations on your new Sonicare Power
Flosser. To fully benefit from the support that Philips offers, register
your product at philips.com/welcome.
9
English

Intended Use
The Philips Sonicare Power Flosser is an oral irrigator intended to
remove plaque and food debris between teeth and the tooth surface
in order to reduce tooth decay and improve and maintain gum health.
This product is intended for consumer home use, normally used at
least once a day. Use by children (ages 6+) should be with adult
supervision.
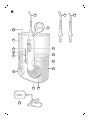
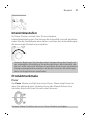
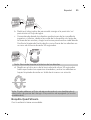
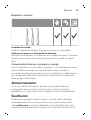
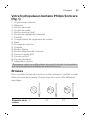
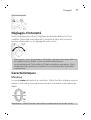
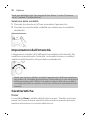
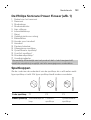
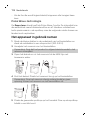
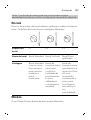
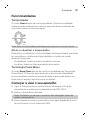
Your Philips Sonicare Power Flosser (Fig. 1)
1 Reservoir lid
2 Reservoir
3 Mode button
4 Mode indicator
5 On/off button
6 Intensity dial
7 Hose
8 Hose storage compartment
9 Base
10 Handle dock
11 Handle
12 Pause switch
13 Nozzle eject button
14 Quad Stream nozzle*
15 Comfort nozzle*
16 Standard nozzle*
17 Power adapter
*Note: The contents of the box may not include all items shown
depending on the product configuration purchased.
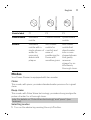
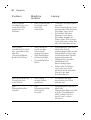
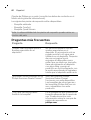
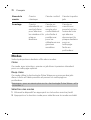
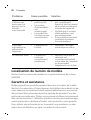
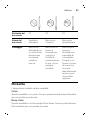
Nozzles
To see what type of nozzles you have, check the code at the base of
the nozzle. Each nozzle type provides different benefits.
10 English

Nozzle label F1 F2 F3
Nozzle Name Standard
nozzle
Comfort nozzle Quad Stream
nozzle
Benefit Standard
nozzle with a
single stream of
water for
removing
debris and
plaque.
Soft rubber
nozzle for
comfort and
ease of
positioning for
those with
sensitive gums.
Soft rubber
nozzle that
directs water
into a cross-
shaped stream
that gently
removes
plaque for an
effortlessly
thorough clean.
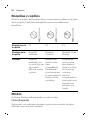
Modes
Your Power Flosser is equipped with two modes:
Clean
This mode, with pacer, provides standard water pressure for a great
clean.
Deep clean
This mode, with Pulse Wave technology, provides strong and gentle
pulses of water for a thorough clean.
Note: For details on "Pulse Wave technology" and "pacer" (see
'Features').
Selecting modes
1Turn on the device by pressing the on/off button.
11
English

2Press the mode button to select desired mode.
Intensity Settings
Your power flosser comes with 10 different intensity settings. To
manually change the intensity, turn on the base and turn the intensity
dial to the setting you prefer.
Note: For first time use, start the device from the lowest setting. It
is recommended to increase the intensity you use over the course
of a few weeks. This can give better cleaning benefits as you are
able to tolerate higher settings.
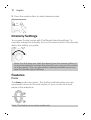
Features
Pacer
The clean mode has a pacer. This feature indicates when you are
supposed to move to the next section of your mouth via a short
pause in the waterflow.
30
sec.
30
sec.
Note: This feature is on clean mode only.
12 English

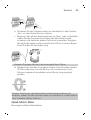
Activating or deactivating pacer
You can activate or deactivate the pacer feature by holding the
on/off button and the mode button simultaneously for 5 seconds.
- When deactivated, all the lights will flash once.
- When activated, all the lights will flash twice.
Pulse Wave technology
The deep clean mode has a "Pulse Wave technology" feature. The
flow of the water increases and decreases in intensity, providing a
brief pause during which you can move the nozzle to the next space
between your teeth.
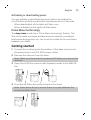
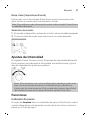
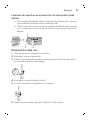
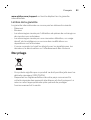
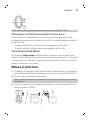
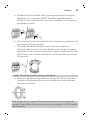
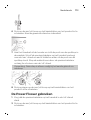
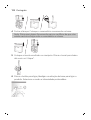
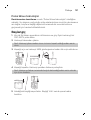
Getting started
1Connect the small plug into the bottom of the base and connect
the power plug in any 100-240V power outlet.
2Remove the reservoir from the base.
Note: Make sure the product is powered off before you remove the
reservoir.
3Open the lid, fill the reservoir with lukewarm water to the MAX fill
line.
4Close the lid. Place the reservoir back on the base.
Note: Press down firmly to ensure there is no gap between the
reservoir and the base.
13
English

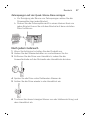
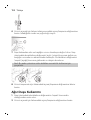
5Insert your preferred nozzle into the handle. Press the nozzle
down until you hear a "click".
6Press the on/off button on the base station to turn on the product.
Select your desired mode and intensity.
7Remove the handle from the base and point the tip of the nozzle
into the sink. Slide the pause switch on the handle to the 'on' (up)
position and wait until the water stream comes out of the tip of
the nozzle. Stop the flow of water by sliding the pause switch to
the 'off' (down) position.
Note: This step is for first time use after purchase only.
8Press the on/off button on the base again to turn off the product.
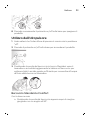
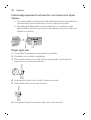
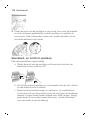
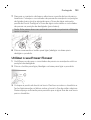
Using your Power Flosser
1Make sure that the pause switch on the handle is in the 'off'
position.
2Press the on/off button on the base to turn on the product.
14 English

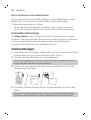
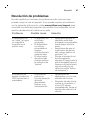
3Place the nozzle tip in your mouth. Lean over the sink and partially
close your lips over the nozzle to avoid splashing. Leave enough
space to allow water to flow from your mouth into the sink.
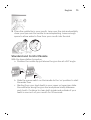
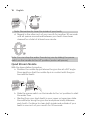
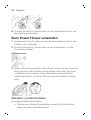
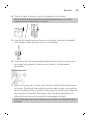
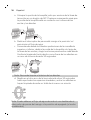
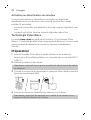
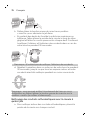
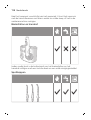
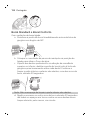
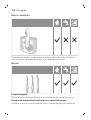
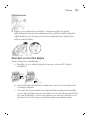
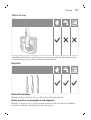
Standard and Comfort Nozzle
With the base station turned on:
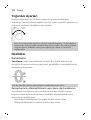
a Position the nozzle tip just above the gum line at a 90° angle.
90°
90°
b Slide the pause switch on the handle to the 'on' position to start
the water flow.
c Starting from your back teeth in your upper or lower jaw, slide
the nozzle tip along the gum line and pause briefly between
each tooth. Continue to clean both inside and outside of your
teeth in one arch of your mouth for 30 seconds.
15
English

Note: Remember to clean the inside of your teeth.
d Repeat in the other arch of your mouth for another 30 seconds
until all spaces around and between your teeth have been
cleaned for a total of at least one minute.
30
sec.
30
sec.
Note: You can stop the water flow during use by sliding the pause
switch on the handle to the 'off' position (motor will pause).
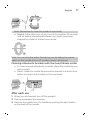
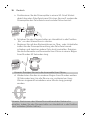
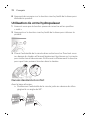
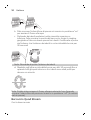
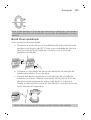
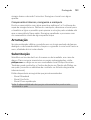
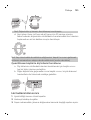
Quad Stream Nozzle
With the base station turned on:
a Position the nozzle tip just above the gum line at a 90° angle.
Press gently so that the nozzle tip is in contact with the gum
line and the teeth.
90°
90°
b Slide the pause switch on the handle to the 'on' position to start
the water flow.
c Starting from your back teeth in your upper or lower jaw, slide
the nozzle tip along the gum line and pause briefly between
each tooth. Continue to clean both inside and outside of your
teeth in one arch of your mouth for 30 seconds.
16 English

Note: Remember to clean the inside of your teeth.
d Repeat in the other arch of your mouth for another 30 seconds
until all spaces around and between your teeth have been
cleaned for a total of at least one minute.
30
sec.
30
sec.
Note: You can stop the water flow during use by sliding the pause
switch on the handle to the 'off' position (motor will pause).
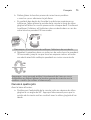
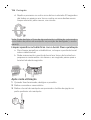
Cleaning orthodontic brackets with the Quad Stream nozzle
a To clean around orthodontic brackets, place the nozzle tip over
each bracket.
b Gently rotate the nozzle tip around the bracket in a small circle
before moving to the bracket on the next tooth.
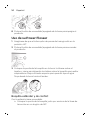
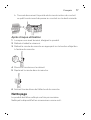
After each use
1When you are finished, turn off the product.
2Pick up and empty the reservoir.
3Remove the nozzle from the handle by pushing the eject button
on the back of the handle.
17
English

4Rinse the nozzle under the tap.
5Insert the nozzle back into the handle.
6Dry any excess water off the tether and handle.
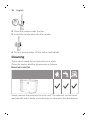
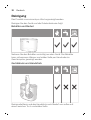
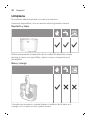
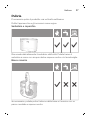
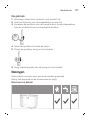
Cleaning
The product needs to be cleaned once a week.
Clean the device and the accessories as follows:
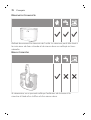
Reservoir and lid
Gently remove the reservoir from the unit. The reservoir can be hand
washed with warm water and mild soap or cleaned in the dishwasher.
18 English

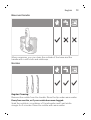
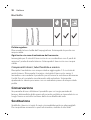
Base and handle
When necessary, you can clean the outside of the base and the
handle with a soft cloth and mild soap.
Nozzles
Regular Cleaning:
Remove the nozzle from the handle. Rinse the tip under warm water.
Every few months, or if your nozzle becomes clogged:
Soak the nozzle in a container of 2 parts water and 1 part white
vinegar for 5 minutes. Rinse the nozzle with warm water.
19
English

Internal components, hose and handle
Fill the reservoir with warm water and add 1-2 tablespoons of white
vinegar. Remove the handle, point the nozzle at the sink and turn on
the product to run the solution through the unit until the reservoir is
empty. Rinse by repeating with a full reservoir of clean warm water.
Storage
If you are not going to use the product for an extended period of
time, unplug it from the electrical outlet, clean it and store it in a cool
and dry place away from direct sunlight.
Replacement
Replace nozzles every 6 months or immediately when damaged. To
buy accessories or spare parts, visit philips.com or go to your local
Philips Sonicare dealer. You can also contact the Philips Consumer
Care Center in your country (see the international warranty leaflet for
contact details).
The following spare parts are available:
- Standard nozzle
- Comfort nozzle
- Quad Stream nozzle
Note: The availability of spare parts may differ by country.
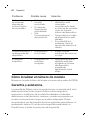
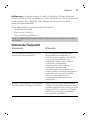
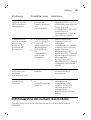
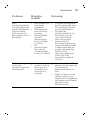
Frequently asked questions
Question Answer
Can I use mouthwash or
essential oils in my reservoir? It is not recommended to use
essential oils in the reservoir.
Mouthwash can be mixed with
water and used in the reservoir.
After using mouthwash, rinse the
device to prevent clogging by
partially filling reservoir with
warm water and running product
with tip pointed into sink until
reservoir is empty.
20 English
Sayfa yükleniyor...
Sayfa yükleniyor...
Sayfa yükleniyor...
Sayfa yükleniyor...
Sayfa yükleniyor...
Sayfa yükleniyor...
Sayfa yükleniyor...
Sayfa yükleniyor...
Sayfa yükleniyor...
Sayfa yükleniyor...
Sayfa yükleniyor...
Sayfa yükleniyor...
Sayfa yükleniyor...
Sayfa yükleniyor...
Sayfa yükleniyor...
Sayfa yükleniyor...
Sayfa yükleniyor...
Sayfa yükleniyor...
Sayfa yükleniyor...
Sayfa yükleniyor...
Sayfa yükleniyor...
Sayfa yükleniyor...
Sayfa yükleniyor...
Sayfa yükleniyor...
Sayfa yükleniyor...
Sayfa yükleniyor...
Sayfa yükleniyor...
Sayfa yükleniyor...
Sayfa yükleniyor...
Sayfa yükleniyor...
Sayfa yükleniyor...
Sayfa yükleniyor...
Sayfa yükleniyor...
Sayfa yükleniyor...
Sayfa yükleniyor...
Sayfa yükleniyor...
Sayfa yükleniyor...
Sayfa yükleniyor...
Sayfa yükleniyor...
Sayfa yükleniyor...
Sayfa yükleniyor...
Sayfa yükleniyor...
Sayfa yükleniyor...
Sayfa yükleniyor...
Sayfa yükleniyor...
Sayfa yükleniyor...
Sayfa yükleniyor...
Sayfa yükleniyor...
Sayfa yükleniyor...
Sayfa yükleniyor...
Sayfa yükleniyor...
Sayfa yükleniyor...
Sayfa yükleniyor...
Sayfa yükleniyor...
Sayfa yükleniyor...
Sayfa yükleniyor...
Sayfa yükleniyor...
Sayfa yükleniyor...
Sayfa yükleniyor...
Sayfa yükleniyor...
Sayfa yükleniyor...
Sayfa yükleniyor...
Sayfa yükleniyor...
Sayfa yükleniyor...
Sayfa yükleniyor...
Sayfa yükleniyor...
Sayfa yükleniyor...
Sayfa yükleniyor...
Sayfa yükleniyor...
Sayfa yükleniyor...
Sayfa yükleniyor...
Sayfa yükleniyor...
Sayfa yükleniyor...
Sayfa yükleniyor...
Sayfa yükleniyor...
Sayfa yükleniyor...
Sayfa yükleniyor...
Sayfa yükleniyor...
Sayfa yükleniyor...
Sayfa yükleniyor...
Sayfa yükleniyor...
Sayfa yükleniyor...
Sayfa yükleniyor...
Sayfa yükleniyor...
Sayfa yükleniyor...
Sayfa yükleniyor...
Sayfa yükleniyor...
Sayfa yükleniyor...
Sayfa yükleniyor...
Sayfa yükleniyor...
Sayfa yükleniyor...
Sayfa yükleniyor...
Sayfa yükleniyor...
Sayfa yükleniyor...
Sayfa yükleniyor...
Sayfa yükleniyor...
Sayfa yükleniyor...
Sayfa yükleniyor...
Sayfa yükleniyor...
Sayfa yükleniyor...
Sayfa yükleniyor...
Sayfa yükleniyor...
Sayfa yükleniyor...
Sayfa yükleniyor...
Sayfa yükleniyor...
Sayfa yükleniyor...
Sayfa yükleniyor...
Sayfa yükleniyor...
Sayfa yükleniyor...
Sayfa yükleniyor...
Sayfa yükleniyor...
Sayfa yükleniyor...
Sayfa yükleniyor...
Sayfa yükleniyor...
Sayfa yükleniyor...
Sayfa yükleniyor...
Sayfa yükleniyor...
Sayfa yükleniyor...
Sayfa yükleniyor...
Sayfa yükleniyor...
Sayfa yükleniyor...
Sayfa yükleniyor...
Sayfa yükleniyor...
Sayfa yükleniyor...
Sayfa yükleniyor...
Sayfa yükleniyor...
Sayfa yükleniyor...
Sayfa yükleniyor...
Sayfa yükleniyor...
Sayfa yükleniyor...
Sayfa yükleniyor...
Sayfa yükleniyor...
Sayfa yükleniyor...
Sayfa yükleniyor...
Sayfa yükleniyor...
Sayfa yükleniyor...
Sayfa yükleniyor...
Sayfa yükleniyor...
Sayfa yükleniyor...
Sayfa yükleniyor...
Sayfa yükleniyor...
Sayfa yükleniyor...
Sayfa yükleniyor...
Sayfa yükleniyor...
Sayfa yükleniyor...
Sayfa yükleniyor...
-
 1
1
-
 2
2
-
 3
3
-
 4
4
-
 5
5
-
 6
6
-
 7
7
-
 8
8
-
 9
9
-
 10
10
-
 11
11
-
 12
12
-
 13
13
-
 14
14
-
 15
15
-
 16
16
-
 17
17
-
 18
18
-
 19
19
-
 20
20
-
 21
21
-
 22
22
-
 23
23
-
 24
24
-
 25
25
-
 26
26
-
 27
27
-
 28
28
-
 29
29
-
 30
30
-
 31
31
-
 32
32
-
 33
33
-
 34
34
-
 35
35
-
 36
36
-
 37
37
-
 38
38
-
 39
39
-
 40
40
-
 41
41
-
 42
42
-
 43
43
-
 44
44
-
 45
45
-
 46
46
-
 47
47
-
 48
48
-
 49
49
-
 50
50
-
 51
51
-
 52
52
-
 53
53
-
 54
54
-
 55
55
-
 56
56
-
 57
57
-
 58
58
-
 59
59
-
 60
60
-
 61
61
-
 62
62
-
 63
63
-
 64
64
-
 65
65
-
 66
66
-
 67
67
-
 68
68
-
 69
69
-
 70
70
-
 71
71
-
 72
72
-
 73
73
-
 74
74
-
 75
75
-
 76
76
-
 77
77
-
 78
78
-
 79
79
-
 80
80
-
 81
81
-
 82
82
-
 83
83
-
 84
84
-
 85
85
-
 86
86
-
 87
87
-
 88
88
-
 89
89
-
 90
90
-
 91
91
-
 92
92
-
 93
93
-
 94
94
-
 95
95
-
 96
96
-
 97
97
-
 98
98
-
 99
99
-
 100
100
-
 101
101
-
 102
102
-
 103
103
-
 104
104
-
 105
105
-
 106
106
-
 107
107
-
 108
108
-
 109
109
-
 110
110
-
 111
111
-
 112
112
-
 113
113
-
 114
114
-
 115
115
-
 116
116
-
 117
117
-
 118
118
-
 119
119
-
 120
120
-
 121
121
-
 122
122
-
 123
123
-
 124
124
-
 125
125
-
 126
126
-
 127
127
-
 128
128
-
 129
129
-
 130
130
-
 131
131
-
 132
132
-
 133
133
-
 134
134
-
 135
135
-
 136
136
-
 137
137
-
 138
138
-
 139
139
-
 140
140
-
 141
141
-
 142
142
-
 143
143
-
 144
144
-
 145
145
-
 146
146
-
 147
147
-
 148
148
-
 149
149
-
 150
150
-
 151
151
-
 152
152
-
 153
153
-
 154
154
-
 155
155
-
 156
156
-
 157
157
-
 158
158
-
 159
159
-
 160
160
-
 161
161
-
 162
162
-
 163
163
-
 164
164
-
 165
165
-
 166
166


diğer dillerde
- español: Sonicare HX3711/20 Manual de usuario
- français: Sonicare HX3711/20 Manuel utilisateur
- italiano: Sonicare HX3711/20 Manuale utente
- Deutsch: Sonicare HX3711/20 Benutzerhandbuch
- português: Sonicare HX3711/20 Manual do usuário
- English: Sonicare HX3711/20 User manual
- Nederlands: Sonicare HX3711/20 Handleiding