Braun 190s-1, 170s-1, Series 1 Kullanım kılavuzu
- Kategori
- Erkek traş makineleri
- Tip
- Kullanım kılavuzu

190s-1
170s-1
www.braun.com
Series1
Type 5727
Type 5729
Series 1
190s-1
91094865/VIII-16
91094865_190-170s_CEE_S1.indd 191094865_190-170s_CEE_S1.indd 1 19.08.16 12:1919.08.16 12:19
Stapled booklet, 105 x 148 mm, 76 p (incl. 8 p cover), 2/2c = black + HKS43N

English 6
Français 10
Polski 15
âesk˘ 20
Slovensk˘ 24
Magyar 28
Hrvatski 32
Slovenski 37
Türkçe 41
Română (RO/MD) 47
Български 52
êÛÒÒÍËÈ 57
ì͇ªÌҸ͇ 63
74
Braun GmbH
Frankfurter Straße 145
61476 Kronberg/Germany
www.braun.com
UK/FR/PL/CZ/SK/HU/HR/SL/TR/RO/MD/
BG/RU/UA/Arab
Braun Infolines
UK 0800 783 7010
IE 1 800 509 448
FR 0 800 944 802
(service & appel gratuits)
BE 0 800 14 592
PL 801 127 286
801 1 BRAUN
CZ 221 804 335
SK 02/5710 1135
HU (06-1) 451-1256
HR 091 66 01 777
SI 080 2822
TR 0 800 261 63 65
RO 021.224.30.35
RU 8 800 200 20 20
UA 0 800 505 000
HK 2926 2300
(Jebsen Consumer
Service Centre)
ZA 0860 112 188
(Sharecall charged at
local rates)
www.service.braun.com
91094865_190-170s_CEE_S2.indd 191094865_190-170s_CEE_S2.indd 1 15.09.16 10:0615.09.16 10:06

4
90°
90°
5
4
Series 1
190s-
1
1
2
3
6
1
2
7
91094865_190-170s_CEE_S4.indd 191094865_190-170s_CEE_S4.indd 1 19.08.16 10:4219.08.16 10:42

5
91094865_190-170s_CEE_S5.indd 191094865_190-170s_CEE_S5.indd 1 19.08.16 10:4219.08.16 10:42

6
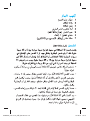
Our products are designed to meet the highest standards of quality, functionality
and design. We hope you enjoy your new Braun Shaver.
Read these instructions completely, they contain safety information. Keep
them for future reference.
Warnings
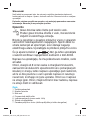
The shaver head is suitable for cleaning under
running tap water. Detach the shaver from the power
supply before cleaning the shaver head in water.
Your shaver is provided with a special cord set, which has
an integrated Safety Extra Low Voltage power supply.
Do not exchange or tamper with any part of it, otherwise
there is risk of electric shock. Only use the special cord set
provided with your appliance.
If the appliance is marked 492, you can use it
with any Braun power supply coded 492-XXXX.
Do not use the appliance with a damaged foil, trimmer or cord.
This appliance can be used by children aged from 8 years
and above and persons with reduced physical, sensory or
mental capabilities or lack of experience and knowledge if
they have been given supervision or instruction concerning
the safe use of the appliance and understand the hazards
involved. Children shall not play with the appliance.
Cleaning and user maintenance shall not be made by
children unless they are older than 8 years and supervised.
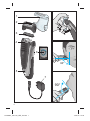
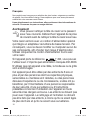
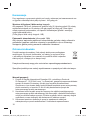
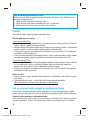
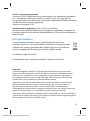
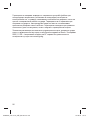
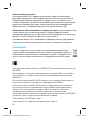
Description
1 Foil protection cap
2 Shaver foil
3 Cutter block
4 Long hair trimmer
5 Charging light (model 190s only)
6 On/off switch
7 Special cord set
(design can differ)
English
91094865_190-170s_CEE_S6-76.indd 691094865_190-170s_CEE_S6-76.indd 6 15.09.16 10:1315.09.16 10:13

7
Charging (model 190s only)
Recommended ambient temperature for charging is 5 °C to 35 °C.
The battery may not charge properly or at all under extreme low or high
temperatures. Recommended ambient temperature for shaving is 15 °C
to 35 °C. Do not expose the shaver to temperatures higher than 50 °C for
extended periods of time.
• Using the special cord set, connect the shaver to an electrical outlet with the
motor switched off.
• When charging for the first time, leave the shaver to charge continuously for
4 hours. The charging light (5) shows that the shaver is being charged. When
the battery is fully charged, the charging light intermittently blinks on and off.
This indicates that the battery maintains its full capacity.
• A full charge provides up to 30 minutes of cordless shaving time depending on
your beard growth.
• Once the shaver is completely charged, discharge the shaver through normal
use. Then recharge to full capacity. Subsequent charges will take about 1 hour.
• Maximum battery capacity will only be reached after several charging /
discharging cycles.
• If the rechargeable batteries are discharged, you may also shave by connecting
the shaver to an electrical outlet via the special cord set.
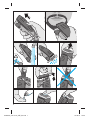
Shaving
Remove the foil protection cap (1). Activate the on/off switch (6). The floating foil
frame automatically adapts to your skin surface for a close, smooth shave.
For pre-shaving after a few days of not having shaved, use the long hair trimmer
(4) to pre-cut long hairs. For a close, smooth shave, finish with the foil.
Trimming
Slide the long hair trimmer upwards. It allows controlled trimming of moustache
and sideburns. It evenly cuts and trims larger areas: ideal for shaping sideburns,
moustaches and partial short beards.
Frequent use of the long hair trimmer may reduce the battery capacity (model
190s only).
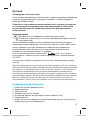
Tips for a perfect dry shave
For best shaving results, Braun recommends you to follow 3 simple steps:
1. Always shave before washing your face.
2. At all times, hold the shaver at right angles (90°) to your skin.
3. Stretch your skin and shave against the direction of your beard growth.
91094865_190-170s_CEE_S6-76.indd 791094865_190-170s_CEE_S6-76.indd 7 15.09.16 10:1315.09.16 10:13

8
Cleaning
Regular cleaning ensures better shaving performance.
Cleaning under running water:
Model 190s only:
• Switch the shaver on (cordless) and rinse the shaver head under hot running
water until all residues have been removed.
• You may use liquid soap without abrasive substances. Rinse off all foam and let
the shaver run for a few more seconds.
• Next, switch off the shaver, remove the shaver foil (2) and cutter block (3).
Then leave the disassembled shaving parts to dry.
• If you regularly clean the shaver under water, then once a week apply a drop of
light machine oil onto the long hair trimmer and shaver foil.
Model 170s only:
• Rinse the shaver head (cordless) under hot running water until all residues have
been removed. You may use liquid soap without abrasive substances. Rinse off
all foam.
• Next, remove the shaver foil (2) and cutter block (3). Then leave the
disassembled shaving parts to dry.
Cleaning with a brush:
• Switch off the shaver. Remove the shaver foil and tap it out on a flat surface.
• Using the brush, clean the cutter block and the inner area of the shaver head.
However, do not clean the shaver foil with the brush as this will damage the foil.
Keeping your shaver in top shape
If you regularly clean the shaver under water, then once a week apply a drop of
light machine oil onto the long hair trimmer and shaver foil.
Replacing the shaver foil and cutter block
To maintain 100% shaving performance, replace the shaver foil (2) and cutter
block (3) at least every 18 months or when worn. Change both parts at the same
time for a closer shave with less skin irritation.
(Shaver foil and cutter block: 10B)
Preserving the batteries (model 190s only)
In order to maintain the optimum capacity of the rechargeable batteries, the
shaver has to be fully discharged (by shaving) every 6 months approximately.
Then recharge the shaver to full capacity.
91094865_190-170s_CEE_S6-76.indd 891094865_190-170s_CEE_S6-76.indd 8 15.09.16 10:1315.09.16 10:13

9
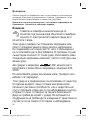
Environmental notice
Product contains batteries and/or recyclable electric waste.
For environment protection do not dispose of in household waste, but for
recycling take to electric waste collection points provided in your country.
For electric specifications, see printing on the special cord set.
Guarantee
We grant a 2 year guarantee on the product commencing on the date of
purchase. Within the guarantee period we will eliminate any defects in the
appliance resulting from faults in materials or workmanship, free of charge either
by repairing or replacing the complete appliance at our discretion.
This guarantee extends to every country where this appliance is supplied by
Braun or its appointed distributor.
This guarantee does not cover: damage due to improper use, normal wear and
tear (e.g. shaver foil or cutter block) as well as defects that have a negligible effect
on the value or operation of the appliance. The guarantee becomes void if repairs
are undertaken by unauthorised persons and if original Braun parts are not used.
To obtain service within the guarantee period, hand in or send the complete
appliance with your sales receipt to an authorised Braun Customer Service Centre
(address information available online at www.service.braun.com).
For UK only:
This guarantee in no way affects your rights under statutory law.
91094865_190-170s_CEE_S6-76.indd 991094865_190-170s_CEE_S6-76.indd 9 15.09.16 10:1315.09.16 10:13

10
Nos produits sont conçus pour satisfaire les plus hautes exigences en matière
de qualité, fonctionnalité et design. Nous espérons que vous serez pleinement
satisfait de votre nouveau rasoir Braun.
Lisez attentivement ces instructions, elles contiennent des informations de
sécurité. Conservez-les pour un usage ultérieur.
Avertissement
Vous pouvez nettoyer la tête du rasoir en le passant
sous l’eau courante. Débranchez l’appareil de la prise
de courant avant de nettoyer la tête du rasoir sous l’eau.
Votre rasoir est livré avec un cordon d’alimentation spécial
qui intègre un adaptateur sécuritaire de basse tension. Par
conséquent, vous ne devez modifier ou manipuler aucun de
ses composants, afin d’éviter tout risque d’électrocution.
Utilisez uniquement le cordon d’alimentation fourni avec
votre rasoir.
Si l’appareil porte la référence
492, vous pouvez
l’utiliser avec n’importe quel alimentation marquée 492-XXXX.
N’utilisez pas cet appareil si le câble, la tondeuse ou la grille
sont endommagés.
Cet appareil peut être utilisé par des enfants de 8 ans et
plus et par des personnes dont les capacités physiques,
sensorielles ou mentales sont réduites, ou des personnes
dénuées d’expérience ou de connaissance, si elles ont pu
bénéficier, par l’intermédiaire d’une personne responsable
de leur sécurité, d’une surveillance ou d’instructions
préalables concernant l’utilisation de l’appareil en toute
sécurité et les dangers encourus. Les enfants ne doivent pas
jouer avec l’appareil. Le nettoyage et l’entretien ne doivent
pas être faits par des enfants, à moins qu’ils ne soient âgés
de plus de 8 ans et qu’ils ne soient sous surveillance.
Français
91094865_190-170s_CEE_S6-76.indd 1091094865_190-170s_CEE_S6-76.indd 10 15.09.16 10:1315.09.16 10:13

11
Description
1 Capot de protection de la grille
2 Grille de rasage
3 Bloc-couteaux
4 Tondeuse rétractable
5 Témoin lumineux de charge (seulement sur le modèle 190s)
6 Bouton marche/arrêt
7 Cable d‘alimentation
(le design peut varier)
Mise en charge du rasoir (seulement sur le modèle 190s)
La température ambiante recommandée pour charger le rasoir est comprise entre
5 °C et 35 °C. La batterie peut ne pas se charger correctement ou pas du tout à
des températures extrêmement basses ou élevées. La température ambiante
recommandée pour se raser est comprise entre 15° C et 35 °C.
N’exposez pas
votre rasoir à des températures supérieures à 50 °C pendant une période prolongée.
• Utilisez le cordon d’alimentation, branchez le rasoir sur le secteur en veillant à
ce que l’appareil soit en position arrêt.
• Lors de la première mise en charge, laissez l’appareil branché pendant au
moins 4 heures. Le témoin de charge (5) vous indique que le rasoir est en cours
de charge. Lorsque la batterie est complètement pleine, le voyant s’éteint, puis
se rallume ponctuellement lors des auto-contrôles de charge.
• Une pleine charge procure jusqu’à 30 minutes de rasage sans fil en fonction du
type de barbe.
• Une fois que le rasoir est complètement chargé, déchargez-le en l’utilisant
normalement sans le cordon. Rechargez-le ensuite. Le temps de charge supplé-
mentaire prendra environ une heure.
• La capacité maximum de batterie sera atteinte seulement après plusieurs
cycles de charge et de décharge.
• Lorsque la batterie est déchargée, vous pouvez également vous raser avec le
rasoir branché sur le secteur grâce au cordon d’alimentation.
Rasage
Retirez le capot de protection de la grille (1). Appuyez sur le bouton marche/arrêt
pour mettre en marche le rasoir. La grille flottante s’adapte automatiquement à
votre surface de peau pour un rasage précis et doux.
Pour vous pré-raser lorsque vous ne vous êtes pas rasé depuis quelques temps,
utilisez la tondeuse rétractable (4) et ce afin de pré-coupez les poils les plus
longs.
Tondeuse
Poussez la tondeuse rétractable vers l’avant (a). Cela permet de mieux maîtriser la
tonte de votre barbe ou de vos pattes. L’appareil peut éventuellement couper ou
91094865_190-170s_CEE_S6-76.indd 1191094865_190-170s_CEE_S6-76.indd 11 15.09.16 10:1315.09.16 10:13

12
tondre des zones plus larges : idéale pour dessiner les contours de barbes, de
moustaches ou les barbes de 3 jours.
Une utilisation fréquente de la tondeuse rétractable pourrait réduire la capacité de
la batterie (seulement sur le modèle 190s).
Conseils pour un rasage parfait à sec
Pour obtenir le meilleur rasage possible, Braun vous recommande de suivre
3 simples conseils :
1. Rasez-vous toujours avant de vous laver le visage.
2. Pendant toute la durée du rasage, tenez le rasoir perpendiculairement (90°)
à la peau.
3. Tendez votre peau et rasez-vous dans le sens contraire à la pousse du poil.
Nettoyage
Un nettoyage régulier assure une meilleure performance de rasage.
Nettoyage à l’eau courante :
Précision pour le modèle 190s :
• Allumez le rasoir (sans fil) et rincez la tête de rasage sous l’eau chaude jusqu’à
ce que tous les résidus aient disparu.
• Vous pouvez utiliser un peu de savon liquide s’il ne contient aucune substance
abrasive. Rincez bien la mousse et laissez le rasoir en marche pendant
quelques secondes.
• Ensuite, arrêtez le rasoir, puis enlevez la grille de rasage (2) et le bloc-couteaux
(3). Laissez sécher.
• Si vous nettoyez régulièrement votre rasoir sous l’eau, appliquez une fois par
semaine une goutte de l’huile fournie ou d’huile de machine à coudre sur la
tondeuse et sur la grille de rasage.
Précision pour le modèle 170s :
• Rincez la tête de rasage (sans fil) sous l’eau chaude jusqu’à ce que tous les
résidus aient disparu. Vous pouvez utiliser un peu de savon liquide s’il ne
contient aucune substance abrasive. Rincez bien toute la mousse.
• Ensuite, enlevez la grille de rasage (2) et le bloc-couteaux (3) pour les laisser
sécher.
Nettoyage à la brosse :
• Arrêtez le rasoir. Enlevez la grille de rasage et tapez la légèrement sur une
surface plane.
• A l’aide de la brossette, nettoyez le bloc-couteaux et la partie intérieure de la
tête du rasoir. Cependant, ne nettoyez pas la grille de rasage avec la brossette
car cela risquerait de l’abîmer.
91094865_190-170s_CEE_S6-76.indd 1291094865_190-170s_CEE_S6-76.indd 12 15.09.16 10:1315.09.16 10:13

13
Entretien du rasoir
Nettoyez régulièrement votre rasoir en le passant sous l’eau et appliquez une fois
par semaine une goutte d’huile de machine à coudre sur la tondeuse pour poils
longs et la grille de rasage.
Remplacement de la grille de rasage et du bloc-couteaux
Pour conserver 100% de la performance de votre rasoir, remplacez la grille de
rasage (2) et le bloc-couteaux (3) tous les 18 mois au maximum ou quand ils sont
usés. Changez les 2 pièces en même temps pour assurer un rasage plus précis
avec moins d’irritations.
(Références Grille et Bloc-couteaux : 10B)
Entretien de la batterie (seulement sur le modèle 190s)
Afin de conserver la capacité maximum de la batterie, le rasoir doit être complète-
ment déchargé (en se rasant) environ tous les 6 mois. Puis rechargez le rasoir à sa
pleine capacité.
Respect de l’environnement
Dans l’intérêt de la protection de l’environnement, ne jetez pas l’appareil
en fin de vie avec les déchets ménagers. Vous pouvez le déposer dans un
Centre Service agrée Braun ou dans l’un des points de collecte adapté.
Susceptible d’être modifié sans préavis.
Pour les spécifications électriques, se référer aux inscriptions sur le cable
d’alimentation.
Garantie
Nous accordons une garantie de 2 ans sur ce produit, à partir de la date d’achat.
Pendant la durée de la garantie, Braun prendra gratuitement à sa charge la
réparation des vices de fabrication ou de matière en se réservant le droit de
décider si certaines pièces doivent être réparées ou si l’appareil lui-même doit
être échangé.
Cette garantie s’étend à tous les pays où cet appareil est commercialisé par
Braun ou son distributeur exclusif.
Cette garantie ne couvre pas : les dommages occasionnés par une utilisation
inadéquate, l’usure normale (par exemple, grille et bloc-couteaux) ainsi que les
défauts d’usures qui ont un effet négligeable sur la valeur ou l’utilisation de
91094865_190-170s_CEE_S6-76.indd 1391094865_190-170s_CEE_S6-76.indd 13 15.09.16 10:1315.09.16 10:13

14
l’appareil. Cette garantie devient caduque si des réparations ont été effectuées par
des personnes non agréées par Braun et si des pièces de rechange ne provenant
pas de Braun ont été utilisées.
Pour toute réclamation intervenant pendant la période de garantie, retournez ou
rapportez l’appareil ainsi que l’attestation de garantie à votre revendeur ou à un
Centre Service Agréé Braun.
Veuillez vous référer à www.service.braun.com ou appeler le 0 800 944 802
(service consommateurs – service & appel gratuits) pour connaître le Centre
Service Agréé Braun le plus proche de chez vous.
Clause spéciale pour la France
Outre la garantie contractuelle exposée ci-dessus, nos clients bénéficient de la
garantie légale des vices caches prévue aux articles 1641 et suivants du Code
civil.
91094865_190-170s_CEE_S6-76.indd 1491094865_190-170s_CEE_S6-76.indd 14 15.09.16 10:1315.09.16 10:13

15
Nasze wyroby spełniają najwyższe wymagania dotyczące jakości, funkcjonalności
i wzornictwa. Życzymy zadowolenia z użytkowania nowej golarki marki Braun.
Niniejszą instrukcję należy przeczytać w całości, gdyż zawiera ona informacje
dotyczące bezpieczeństwa. Należy ją zachować do późniejszego wglądu.
Ostrzeżenie
Głowica golarki jest przystosowana do czyszczenia
pod bieżącą wodą. Przed umyciem głowicy golarki
w wodzie należy wyciągnąć wtyczkę z gniazdka
sieciowego.
Golarka jest wyposażona w specjalny kabel z wbudowanym
zasilaczem zapewniającym bezpieczne, niskie napięcie.
Elementów kabla nie wolno wymieniać ani modyfikować,
ponieważ grozi to porażeniem prądem elektrycznym. Używaj
golarki tylko z specjalny przewodem zasilającym dostarczo-
nym wraz z urządzeniem.
Jeśli urządzenie jest oznakowane
492 można je
używać z kablem oznaczonym symbolem 492-XXXX.
Nie używać urządzenia kiedy uszkodzone jest folia, ostrze
trymera lub przewód zasilający.
To urządzenie może być używane przez dzieci w wieku od
lat 8, a także przez osoby o ograniczonych zdolnościach
fizycznych, sensorycznych lub umysłowych oraz osoby
niemające wystarczającego doświadczenia ani wiedzy, o ile
są nadzorowane albo zostały poinstruowane w zakresie
bezpiecznego użytkowania tego urządzenia oraz świadome
istniejących zagrożeń. Nie wolno zezwalać dzieciom na
zabawę urządzeniem. Czyszczenie i konserwacja
urządzenia nie może być wykonana przez dzieci chyba
że są one starsze niż 8 lat i nadzorowane.
Polski
91094865_190-170s_CEE_S6-76.indd 1591094865_190-170s_CEE_S6-76.indd 15 15.09.16 10:1315.09.16 10:13

16
Opis
1 Ochronna os∏ona na foli´
2 Folia golàca
3 G∏owica golàca
4 Trymer do d∏u˝szego zarostu
5 Wskaênik ∏adowania (tylko model 190s)
6 W∏àcznik/wy∏àcznik
7 Specjalny przewód zasilajàcy
(kształt może być różny)
Ładowanie (tylko model 190s)
Zalecana temperatura otoczenia podczas ładowania wynosi 5 – 35 °C. Akumulator
może nie naładować się prawidłowo lub wcale się nie naładować w skrajnie niskich
lub wysokich temperaturach. Zalecana temperatura podczas golenia wynosi
15 – 35 °C.
Nie wolno przez dłuższy czas wystawiać urządzenia na działanie temperatur
wyższych niż 50 °C.
• Przy u˝yciu specjalnego przewodu zasilajàcego pod∏àcz golark´ do gniazdka,
ale nie w∏àczaj jej.
• Za pierwszym razem golark´ nale˝y ∏adowaç bez przerwy przez 4 godziny.
Wskaênik ∏adowania (5) wskazuje, ˝e trwa ∏adowanie golarki. Gdy akumulatory
zostanà w pe∏ni na∏adowane, wskaênik zacznie migaç. Oznacza to, ˝e baterie
utrzymujà pe∏nà pojemnoÊç.
• Pe∏ne ∏adowanie zapewnia oko∏o 30 minut golenia bez zasilania w zale˝noÊci
od tego, jak szybko roÊnie Twoja broda i jak cz´sto si´ golisz.
• Po ca∏kowitym na∏adowaniu golarki, roz∏aduj jà poprzez normalne u˝ywanie, a
nast´pnie ponownie ca∏kowicie na∏aduj. Kolejne ∏adowania trwajà oko∏o
godziny.
• Maksymalna pojemnoÊç baterii osiàgana jest dopiero po kilkunastu cyklach
pe∏nego na∏adowania i roz∏adowania.
• W przypadku roz∏adowania si´ akumulatorów mo˝esz goliç si´ po pod∏àczeniu
golarki do gniazdka specjalnym przewodem zasilajàcym.
Golenie
Zdejmij z folii ochronnà os∏on´ (1). W∏àcz golark´ w∏àcznikiem (6). Elastyczna
folia automatycznie dopasowuje si´ do kszta∏tów Twojej twarzy, zapewniajàc
dok∏adne golenie i g∏adkà skór´.
W przypadku u˝ycia po kilkudniowej przerwie w goleniu u˝yj trymera do
d∏u˝szego zarostu (4), aby wst´pnie skróciç d∏u˝sze w∏osy. Reszt´ zarostu
mo˝esz zgoliç folià, dzi´ki której golenie jest dok∏adne, a Twoja skóra staje si´
g∏adka.
91094865_190-170s_CEE_S6-76.indd 1691094865_190-170s_CEE_S6-76.indd 16 15.09.16 10:1315.09.16 10:13

17
Przystrzyganie
Wysuƒ trymer do d∏u˝szego zarostu (a). Pozwala on w kontrolowany sposób
przystrzygaç wàsy i baki. Równomiernie przycina i przystrzyga wi´ksze obszary
zarostu: idealnie nadaje si´ do modelowania baków, wàsów i niewielkich bród.
Cz´ste korzystanie z trymera do d∏u˝szego zarostu mo˝e zmniejszyç pojemnoÊç
akumulatorów (tylko model 190s).
Porady dotyczące idealnego suchego golenia
Jeśli chcesz osiągnąć najlepsze efekty golenia, radzimy:
1. Zawsze golić się przed umyciem twarzy.
2. Trzymać golarkę przez cały czas przy skórze pod odpowiednim kątem (90°).
3. Naciągnąć skórę i golić pod włos.
Czyszczenie
Regularne czyszczenie zapewnia lepsze efekty golenia.
Czyszczenie pod bieżąca wodą
Tylko model 190s:
• Należy włączyć golarkę (bezprzewodowo) i przepłukać głowicę golarki pod
ciepłą bieżącą wodą, aż do usunięcia wszelkich pozostałości.
• Możesz także użyć mydła w płynie bez środków ścierających. Spłucz resztki
piany i odczekaj kilka sekund, zanim wyłączysz golarkę.
• Następnie wyłącz golarkę, zdejmij folię (2) i blok ostrzy tnących (3), a potem
poczekaj aż rozłożone części wyschną.
• Jeśli regularnie czyścisz golarkę pod bieżącą wodą, raz na tydzień nasmaruj
trymer do dłuższego zarostu i folię golącą niewielką ilością lekkiego oleju do
maszyn do szycia.
Tylko model 170s:
• Opłukać głowicę golącą (wcześniej odłączając od przewodu zasilającego) pod
ciepłą bieżącą wodą, aż wszystkie pozostałości po goleniu zostaną usunięte.
Możesz użyć mydła w płynie bez środków ścierających. Spłucz resztki piany.
• Następnie zdejmij folię (2) i blok ostrzy tnących (3), a potem poczekaj aż
rozłożone części wyschną.
Czyszczenie szczoteczką
• Wyłącz golarkę. Zdejmij folię golącą i postukaj nią o płaską powierzchnię.
• Oczyść szczoteczką blok ostrzy tnących oraz wnętrze głowicy golarki. Folii
golącej nie należy czyścić szczoteczką, ponieważ grozi to jej uszkodzeniem.
91094865_190-170s_CEE_S6-76.indd 1791094865_190-170s_CEE_S6-76.indd 17 15.09.16 10:1315.09.16 10:13

18
Konserwacja
Przy regularnym czyszczeniu golarki pod wodą, wskazane jest nasmarowanie raz
w tygodniu niewielką ilością oleju trymera i folii golących.
Wymiana folii golącej I bloku ostrzy tnących
Aby zapewnić 100 proc. skuteczność golenia, folię (2) i głowicę golarki (3) należy
wymieniać minimum co 18 miesięcy lub gdy części te zużyją się. Obie części
należy wymienić jednocześnie, co zapewni dokładniejsze golenie i zmniejszy
ryzyko podrażnień skóry.
(Folia goląca i blok ostrzy tnących: 10B)
PojemnoÊç akumulatorów (tylko model 190s)
Aby utrzymaç optymalnà pojemnoÊç akumulatorów, golark´ nale˝y ca∏kowicie
roz∏adowaç (poprzez normalne u˝ywanie) w przybli˝eniu raz na 6 miesi´cy.
Nast´pnie, golark´ nale˝y ponownie ca∏kowicie na∏adowaç.
Ochrona środowiska
Produkt zawiera akumulatory i/lub odpady elektryczne podlegające
recyklingowi. By chronić środowisko, nie należy go wyrzucać wraz
z normalnymi odpadami, lecz zanosić do punktów zbiórki odpadów
elektrycznych, dostępnych w danym kraju.
Powy˝sze informacje mogà ulec zmianie bez uprzedniego powiadomienia.
Specyfikacje elektryczne zosta∏y wydrukowane na specjalnym kablu sieciowym.
Warunki gwarancji
1. Procter & Gamble International Operation SA, z siedzibą w Route de
St-Georges 47, 1213 Petit Lancy 1 w Szwajcarii, gwarantuje sprawne działanie
sprzętu w okresie 24 miesięcy od daty jego wydania Konsumentowi.
Ujawnione w tym okresie wady będą usuwane bezpłatnie przez autoryzowany
punkt serwisowy, w terminie 14 dni od daty dostarczenia sprzętu do
autoryzowanego punktu serwisowego.
2. Konsument może wysłać sprzęt do naprawy do najbliżej znajdującego się
autoryzowanego punktu serwisowego lub skorzystać z pośrednictwa sklepu,
w którym dokonał zakupu sprzętu. W takim wypadku termin naprawy ulegnie
wydłużeniu o czas niezbędny do dostarczenia i odbioru sprzętu.
3. Konsument powinien dostarczyć sprzęt w opakowaniu należycie
zabezpieczonym przed uszkodzeniem. Uszkodzenia spowodowane
91094865_190-170s_CEE_S6-76.indd 1891094865_190-170s_CEE_S6-76.indd 18 15.09.16 10:1315.09.16 10:13

19
niedostatecznym zabezpieczeniem sprzętu nie podlegają naprawom
gwarancyjnym. Naprawom gwarancyjnym nie podlegają także inne
uszkodzenia powstałe w następstwie okoliczności, za które Gwarant nie
ponosi odpowiedzialności, w szczególności zawinione przez Pocztę Polską
lub firmy kurierskie.
4. Niniejsza gwarancja jest ważna jedynie z dokumentem zakupu i obowiązuje
w każdym kraju, w którym, to urządzenie jest rozprowadzane przez jednostkę
organizacyjną firmy Procter & Gamble lub upoważnionego przez nią
dystrybutora.
5. Dokument zakupu musi być opatrzony datą i numerem oraz określać nazwę
i model sprzętu.
6. Okres gwarancji przedłuża się o czas od zgłoszenia wady lub uszkodzenia do
naprawy sprzętu i zwrotnego postawienia go do dyspozycji Konsumenta.
7. Naprawa gwarancyjna nie obejmuje czynności przewidzianych w instrukcji,
do wykonania których, Konsument zobowiązany jest we własnym zakresie i
na własny koszt.
8. Ewentualne oczyszczenie sprzętu dokonywane jest na koszt Konsumenta
według cennika danego autoryzowanego punktu serwisowego i nie będzie
traktowane jako naprawa gwarancyjna, chyba, że oczyszczenie jest niezbędne
do usunięcia wady w ramach świadczeń objętych niniejszą gwarancją i nie
stanowi czynności, o których mowa w p. 7.
9. Gwarancją nie są objęte:
a) mechaniczne uszkodzenia sprzętu spowodowane w czasie jego
użytkowania lub w czasie dostarczania sprzętu do naprawy;
b) uszkodzenia i wady wynikłe na skutek:
– używania sprzętu do celów innych niż osobisty użytek;
– niewłaściwego lub niezgodnego z instrukcją użytkowania, konserwacji,
przechowywania lub instalacji;
– używania niewłaściwych materiałów eksploatacyjnych;
– napraw dokonywanych przez nieuprawnione osoby; stwierdzenie faktu
takiej naprawy lub samowolnego otwarcia sprzętu powoduje utratę
gwarancji;
– przeróbek, zmian konstrukcyjnych lub używania do napraw
nieoryginalnych części zamiennych firmy Braun;
– części szklane, żarówki oświetlenia;
– ostrza i folie do golarek, wymienne końcówki do szczoteczek
elektrycznych i irygatorów oraz materiały eksploatacyjne.
10. Niniejsza gwarancja na sprzedany towar konsumpcyjny nie wyłącza, nie
ogranicza ani nie zawiesza uprawnień Kupującego wynikających z przepisów
o rękojmi za wady rzeczy sprzedanej.
91094865_190-170s_CEE_S6-76.indd 1991094865_190-170s_CEE_S6-76.indd 19 15.09.16 10:1315.09.16 10:13

20
Naše výrobky jsou navrženy tak, aby splňovaly nejvyšší standardy kvality,
funkčnosti a designu. Doufáme, že budete se svým novým holicím strojkem
Braun spokojeni.
Pečlivě si přečtěte tento návod – obsahuje důležité bezpečnostní informace.
Uschovejte jej pro pozdější použití.
Varování
Hlava holicího strojku se může omývat pod tekoucí
vodou. Vždy před omýváním vodou vytáhněte strojek
ze zdroje elektrické energie.
Váš holicí strojek je vybaven speciální napájecí šňůrou se
zabudovaným zdrojem bezpečného malého napětí. Tuto
sadu nezaměňujte ani nenahrazujte žádné její části, mohli
byste se tím vystavit riziku úrazu elektrickým proudem.
Používejte pouze speciální kabely, které jsou součástí balení
tohoto spotřebiče.
V případě, že spotřebič je označen
492, můžete
jej použít s libovolným napájecím Braun napájení kódova-
ných 492-XXXX.
Přístroj nepoužívejte, pokud zaznamenáte poškození plan-
žety, zastřihovače nebo kabelu.
Děti starší 8 let a osoby se sníženou fyzickou pohyblivostí,
schopností vnímání či mentálním zdravím a osoby bez
zkušeností nebo odpovídajícího povědomí mohou tento
spotřebič používat pod dohledem nebo po obdržení pokynů
k jeho bezpečnému používání a seznámení se s možnými
riziky. Spotřebič není určen jako hračka pro děti. Děti bez
dozoru a mladší 8 let nesmí provádět čištění a údržbu přístroje.
Popis
1 Ochrann˘ kryt planÏety
2 Holicí planÏeta
âesk˘
91094865_190-170s_CEE_S6-76.indd 2091094865_190-170s_CEE_S6-76.indd 20 15.09.16 10:1315.09.16 10:13

21
3 Bfiitov˘ blok
4 Zastfiihovaã dlouh˘ch vousÛ
5 Kontrolka nabíjení (pouze u modelu 190s)
6 Spínaã zapnutí/vypnutí
7 Speciální síÈov˘ pfiívod
(provedení se může lišit)
Napájení (pouze u modelu 190s)
Doporučená okolní teplota pro nabíjení je 5 °C až 35 °C. Za extrémně nízkých
nebo vysokých teplot se baterie nemusí nabíjet správně nebo vůbec.
Doporučená okolní teplota pro holení je 15 °C až 35 °C.
Nevystavujte přístroj po delší dobu teplotám vyšším než 50 °C.
• Pfii pouÏití speciálního síÈového pfiívodu dbejte na to, aby byl holicí strojek pfii
pfiipojování k zásuvce elektrické sítû vypnut˘.
• Pfii prvním nabíjení nechejte holicí strojek nabíjet nepfietrÏitû 4 hodiny.
Kontrolka nabíjení (5) ukazuje, Ïe se holicí strojek nabíjí. KdyÏ jsou baterie
plnû nabité, kontrolka nabíjení pfieru‰ovanû bliká. Znamená to, Ïe baterie
udrÏuje svoji plnou kapacitu.
• Plné nabití umoÏÀuje aÏ 30 minut holení bez síÈového pfiívodu, v závislosti na
vzrÛstu vousÛ.
• Poté, co je holicí strojek plnû nabit˘, vybijte jej normálním pouÏíváním. Pak jej
opût dobijte na plnou kapacitu. Pfií‰tí nabíjení budou trvat pfiibliÏnû 1 hodinu.
• Maximální kapacita baterie bude dosaÏena aÏ po nûkolika cyklech nabití/vybití.
• Pokud jsou akumulátorové baterie vybity, mÛÏete se holit bez nabíjení tak, Ïe
pfiipojíte holicí strojek prostfiednictvím speciálního síÈového pfiívodu k zásuvce
elektrické sítû.
Holení
Sejmûte ochrann˘ kryt planÏety (1). Aktivujte spínaã zapnutí/vypnutí (6).
Rámeãek holicí planÏety se automaticky pfiizpÛsobuje povrchu va‰í pokoÏky, aby
se dosáhlo hladkého oholení.
Pokud jste se nûkolik dní neholili, pouÏijte zastfiihovaã dlouh˘ch vousÛ (4) pro
pfiedbûÏné zkrácení vousÛ. Pak je oholte dohladka holicí planÏetou.
Zastfiihování
VysuÀte zastfiihovaã dlouh˘ch vousÛ (a). UmoÏÀuje dobfie kontrolovat zastfiiho-
vání bradky nebo kotlet. Rovnomûrnû zastfiihuje i vût‰í partie: ideální pro tvaro-
vání kotlet, kníru a ãástí vousu.
âasté pouÏívání zastfiihovaãe dlouh˘ch vousÛ mÛÏe sniÏovat kapacitu baterie
(pouze u modelu 190s).
91094865_190-170s_CEE_S6-76.indd 2191094865_190-170s_CEE_S6-76.indd 21 15.09.16 10:1315.09.16 10:13
Sayfa yükleniyor...
Sayfa yükleniyor...
Sayfa yükleniyor...
Sayfa yükleniyor...
Sayfa yükleniyor...
Sayfa yükleniyor...
Sayfa yükleniyor...
Sayfa yükleniyor...
Sayfa yükleniyor...
Sayfa yükleniyor...
Sayfa yükleniyor...
Sayfa yükleniyor...
Sayfa yükleniyor...
Sayfa yükleniyor...
Sayfa yükleniyor...
Sayfa yükleniyor...
Sayfa yükleniyor...
Sayfa yükleniyor...
Sayfa yükleniyor...
Sayfa yükleniyor...
Sayfa yükleniyor...
Sayfa yükleniyor...
Sayfa yükleniyor...
Sayfa yükleniyor...
Sayfa yükleniyor...
Sayfa yükleniyor...
Sayfa yükleniyor...
Sayfa yükleniyor...
Sayfa yükleniyor...
Sayfa yükleniyor...
Sayfa yükleniyor...
Sayfa yükleniyor...
Sayfa yükleniyor...
Sayfa yükleniyor...
Sayfa yükleniyor...
Sayfa yükleniyor...
Sayfa yükleniyor...
Sayfa yükleniyor...
Sayfa yükleniyor...
Sayfa yükleniyor...
Sayfa yükleniyor...
Sayfa yükleniyor...
Sayfa yükleniyor...
Sayfa yükleniyor...
Sayfa yükleniyor...
Sayfa yükleniyor...
Sayfa yükleniyor...
Sayfa yükleniyor...
Sayfa yükleniyor...
Sayfa yükleniyor...
Sayfa yükleniyor...
Sayfa yükleniyor...
Sayfa yükleniyor...
-
 1
1
-
 2
2
-
 3
3
-
 4
4
-
 5
5
-
 6
6
-
 7
7
-
 8
8
-
 9
9
-
 10
10
-
 11
11
-
 12
12
-
 13
13
-
 14
14
-
 15
15
-
 16
16
-
 17
17
-
 18
18
-
 19
19
-
 20
20
-
 21
21
-
 22
22
-
 23
23
-
 24
24
-
 25
25
-
 26
26
-
 27
27
-
 28
28
-
 29
29
-
 30
30
-
 31
31
-
 32
32
-
 33
33
-
 34
34
-
 35
35
-
 36
36
-
 37
37
-
 38
38
-
 39
39
-
 40
40
-
 41
41
-
 42
42
-
 43
43
-
 44
44
-
 45
45
-
 46
46
-
 47
47
-
 48
48
-
 49
49
-
 50
50
-
 51
51
-
 52
52
-
 53
53
-
 54
54
-
 55
55
-
 56
56
-
 57
57
-
 58
58
-
 59
59
-
 60
60
-
 61
61
-
 62
62
-
 63
63
-
 64
64
-
 65
65
-
 66
66
-
 67
67
-
 68
68
-
 69
69
-
 70
70
-
 71
71
-
 72
72
-
 73
73


Braun 190s-1, 170s-1, Series 1 Kullanım kılavuzu
- Kategori
- Erkek traş makineleri
- Tip
- Kullanım kılavuzu
diğer dillerde
İlgili makaleler
-
Braun 130 S El kitabı
-
Braun MG5050 WET&DRY El kitabı
-
Braun cruZer 6 Face El kitabı
-
-
Braun 560, 550, Series 5 Kullanım kılavuzu
-
-
-
-
-
Braun WF2s, Water Flex Kullanım kılavuzu