Electrolux ESF6210LOX Kullanım kılavuzu
- Kategori
- Bulaşık makineleri
- Tip
- Kullanım kılavuzu

ESF6210LOK
ESF6210LOW
ESF6210LOX
................................................ .............................................
EN DISHWASHER USER MANUAL 2
HU MOSOGATÓGÉP HASZNÁLATI ÚTMUTATÓ 16
LT INDAPLOVĖ NAUDOJIMO INSTRUKCIJA 29
TR BULAŞIK MAKİNESİ KULLANMA KILAVUZU 42

CONTENTS
1. SAFETY INSTRUCTIONS . . . . . . . . . . . . . . . . . . . . . . . . . . . . . . . . . . . . . . . . . . . . . . . . . . 3
2. PRODUCT DESCRIPTION . . . . . . . . . . . . . . . . . . . . . . . . . . . . . . . . . . . . . . . . . . . . . . . . . 5
3. CONTROL PANEL . . . . . . . . . . . . . . . . . . . . . . . . . . . . . . . . . . . . . . . . . . . . . . . . . . . . . . . 5
4. PROGRAMMES . . . . . . . . . . . . . . . . . . . . . . . . . . . . . . . . . . . . . . . . . . . . . . . . . . . . . . . . . 6
5. BEFORE FIRST USE . . . . . . . . . . . . . . . . . . . . . . . . . . . . . . . . . . . . . . . . . . . . . . . . . . . . . . 7
6. DAILY USE . . . . . . . . . . . . . . . . . . . . . . . . . . . . . . . . . . . . . . . . . . . . . . . . . . . . . . . . . . . . . 9
7. HINTS AND TIPS . . . . . . . . . . . . . . . . . . . . . . . . . . . . . . . . . . . . . . . . . . . . . . . . . . . . . . . 11
8.
CARE AND CLEANING . . . . . . . . . . . . . . . . . . . . . . . . . . . . . . . . . . . . . . . . . . . . . . . . . . . 12
9. TROUBLESHOOTING . . . . . . . . . . . . . . . . . . . . . . . . . . . . . . . . . . . . . . . . . . . . . . . . . . . . 13
10.
TECHNICAL INFORMATION . . . . . . . . . . . . . . . . . . . . . . . . . . . . . . . . . . . . . . . . . . . . . . . 15
11. ENVIRONMENT CONCERNS . . . . . . . . . . . . . . . . . . . . . . . . . . . . . . . . . . . . . . . . . . . . . . 15
WE’RE THINKING OF YOU
Thank you for purchasing an Electrolux appliance. You’ve chosen a product that brings with it
decades of professional experience and innovation. Ingenious and stylish, it has been designed
with you in mind. So whenever you use it, you can be safe in the knowledge that you’ll get great
results every time.
Welcome to Electrolux.
Visit our website for:
Get usage advice, brochures, trouble shooter, service information:
www.electrolux.com
Register your product for better service:
www.electrolux.com/productregistration
Buy Accessories, Consumables and Original spare parts for your appliance:
www.electrolux.com/shop
CUSTOMER CARE AND SERVICE
We recommend the use of original spare parts.
When contacting Service, ensure that you have the following data available.
The information can be found on the rating plate. Model, PNC, Serial Number.
Warning / Caution-Safety information
General information and tips
Environmental information
Subject to change without notice.
2
www.electrolux.com

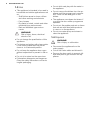
1.
SAFETY INSTRUCTIONS
Before the installation and use of the ap-
pliance, carefully read the supplied in-
structions. The manufacturer is not re-
sponsible if an incorrect installation and
use causes injuries and damages. Always
keep the instructions with the appliance
for future reference.
1.1 Children and vulnerable
people safety
WARNING!
Risk of suffocation, injury or per-
manent disability.
• Do not let persons, children included,
with reduced physical sensory, reduced
mental functions or lack of experience
and knowledge use the appliance. They
must have supervision or instruction for
the operation of the appliance by a per-
son who is responsible for their safety.
• Do not let children play with the appli-
ance.
• Keep all packaging away from children.
• Keep all detergents away from children.
• Keep children and pets away from the
appliance door when it is open.
1.2 Installation
• Remove all the packaging.
• Do not install or use a damaged appli-
ance.
• Do not install or use the appliance
where the temperature is less than 0
°C.
• Obey the installation instruction sup-
plied with the appliance.
Electrical connection
WARNING!
Risk of fire and electrical shock.
• The appliance must be earthed.
• Make sure that the electrical information
on the rating plate agrees with the pow-
er supply. If not, contact an electrician.
• Always use a correctly installed shock-
proof socket.
• Do not use multi-plug adapters and ex-
tension cables.
• Make sure not to cause damage to the
mains plug and to the mains cable.
Should the appliance power supply ca-
ble need to be replaced, this must be
carried out by our Service Centre.
• Connect the mains plug to the mains
socket only at the end of the installa-
tion. Make sure that there is access to
the mains plug after the installation.
• Do not pull the mains cable to discon-
nect the appliance. Always pull the
mains plug.
• Do not touch the mains cable or the
mains plug with wet hands.
• This appliance complies with the E.E.C.
Directives.
Water connection
• Make sure not to cause damage to the
water hoses.
• Before you connect the appliance to
new pipes or pipes not used for a long
time, let the water flow until it is clean.
• The first time you use the appliance,
make sure that there is no leakage.
• The water inlet hose has a safety valve
and a sheath with an inner mains cable.
WARNING!
Dangerous voltage.
• If the water inlet hose is damaged, im-
mediately disconnect the mains plug
from the mains socket. Contact the
Service to replace the water inlet hose.
ENGLISH 3

1.3 Use
• This appliance is intended to be used in
household and similar applications such
as:
– Staff kitchen areas in shops, offices
and other working environments
– Farm houses
– By clients in hotels, motels and other
residential type environments
– Bed and breakfast type environ-
ments.
WARNING!
Risk of injury, burns, electrical
shock or fire.
• Do not change the specification of this
appliance.
• Put knives and cutlery with sharp points
in the cutlery basket with the points
down or in a horizontal position.
• Do not keep the appliance door open
without supervision to prevent to fall on
it.
• Do not sit or stand on the open door.
• Dishwasher detergents are dangerous.
Obey the safety instructions on the de-
tergent packaging.
• Do not drink and play with the water in
the appliance.
• Do not remove the dishes from the ap-
pliance until the programme is comple-
ted. There can be detergent on the
dishes.
• The appliance can release hot steam if
you open the door while a programme
operates.
• Do not put flammable products or items
that are wet with flammable products
in, near or on the appliance.
• Do not use water spray and steam to
clean the appliance.
1.4 Disposal
WARNING!
Risk of injury or suffocation.
• Disconnect the appliance from the
mains supply.
• Cut off the mains cable and discard it.
• Remove the door catch to prevent chil-
dren and pets to get closed in the ap-
pliance.
4
www.electrolux.com

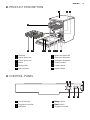
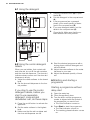
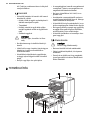
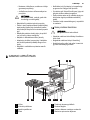
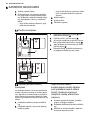
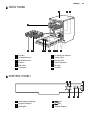
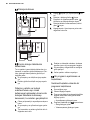
2. PRODUCT DESCRIPTION
2
3
5
4
8
10
6
7
12
9
11
1
1
Worktop
2
Upper spray arm
3
Lower spray arm
4
Filters
5
Rating plate
6
Salt container
7
Water hardness dial
8
Rinse aid dispenser
9
Detergent dispenser
10
Cutlery basket
11
Lower basket
12
Upper basket
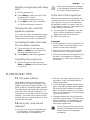
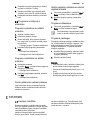
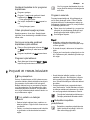
3. CONTROL PANEL
1 2 3
6 5 4
1
On/off indicator
2
Programme marker
3
Indicators
4
Delay button
5
Start button
6
Programme knob
ENGLISH 5

Indicators Description
Washing phase indicator. It comes on when the washing phase
and the rinsing phases operate.
Drying phase indicator. It comes on when the drying phase oper-
ates.
End indicator.
Salt indicator. It is always off while the programme operates.
Rinse aid indicator. It is always off while the programme operates.
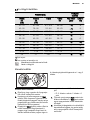
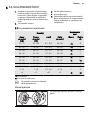
4. PROGRAMMES
Programme
1)
Degree of
soil
Type of load
Programme
phases
Duration
(min)
Energy
(kWh)
Water
(l)
2)
Normal soil
Crockery and
cutlery
Prewash
Wash 50 °C
Rinses
Dry
130 - 140 1.0 -
1.2
14 - 16
Normal soil
Crockery and
cutlery
Wash 65 °C
Rinses
Dry
100 - 110 1.4 -
1.6
19 - 21
Heavy soil
Crockery, cut-
lery, pots and
pans
Prewash
Wash 70 °C
Rinses
Dry
120 - 130 1.8 -
2.0
22 - 24
3)
Fresh soil
Crockery and
cutlery
Wash 60 °C
Rinse
30 0.9 9
4)
All Prewash 12 0.1 5
1)
The pressure and the temperature of the water, the variations of the mains supply, the
options and the quantity of dishes can change the programme duration and the
consumption values.
2)
With this programme you have the most efficient use of water and energy consumption for
crockery and cutlery with normal soil. (This is the standard programme for test institutes).
3)
With this programme you can wash a load with fresh soil. It gives good washing results in a
short time.
4)
Use this programme to quickly rinse the dishes. This prevents the remaining food to bond
on the dishes and bad odours to come out from the appliance.
Do not use detergent with this programme.
Information for test institutes
For all the necessary information for test performance. send an email to:
Write down the product number (PNC) that is on the rating plate.
6
www.electrolux.com

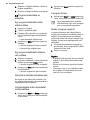
5. BEFORE FIRST USE
1.
Make sure that the set level of the wa-
ter softener agrees with the water
hardness in your area. If not, adjust
the water softener. Contact your local
water authority to know the water
hardness in your area.
2. Fill the salt container.
3.
Fill the rinse aid dispenser.
4.
Open the water tap.
5.
Processing residues can stay in the
appliance. Start a programme to re-
move them. Do not use detergent and
do not load the baskets.
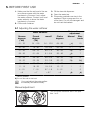
5.1 Adjusting the water softener
Water hardness
Water softener
adjustment
German
degrees
(°dH)
French
degrees
(°fH)
mmol/l Clarke
degrees
Manual Elec-
tronic
51 - 70 91 - 125 9.1 - 12.5 64 - 88
2
1)
10
43 - 50 76 - 90 7.6 - 9.0 53 - 63
2
1)
9
37 - 42 65 - 75 6.5 - 7.5 46 - 52
2
1)
8
29 - 36 51 - 64 5.1 - 6.4 36 - 45
2
1)
7
23 - 28 40 - 50 4.0 - 5.0 28 - 35
2
1)
6
19 - 22 33 - 39 3.3 - 3.9 23 - 27
2
1)
5
1)
15 - 18 26 - 32 2.6 - 3.2 18 - 22 1 4
11 - 14 19 - 25 1.9 - 2.5 13 - 17 1 3
4 - 10 7 - 18 0.7 - 1.8 5 - 12 1 2
< 4 < 7 < 0.7 < 5
1
2)
1
2)
1)
Factory position.
2)
Do not use salt at this level.
You must adjust the water soften-
er manually and electronically.
Manual adjustment
Turn the water hardness dial to the posi-
tion 1 or 2.
ENGLISH 7

Electronic adjustment
1. Make sure that the programme marker
on the knob is aligned with the on/off
indicator.
2.
Press and hold Start. At the same
time turn the knob clockwise until the
programme marker is aligned with the
first programme on the control panel.
3. Release Start when the Start and the
on/off indicator start to flash. The end
indicator starts to flash. The intermit-
tent flashing of the end indicator refers
to the current set level.
• E.g. 5 flashes + pause + 5 flashes =
level 5.
4. Press Start again and again to
change the setting. Each time you
press Start the level number increa-
ses.
5.
To confirm the setting and deactivate
the appliance, turn the knob until the
programme marker is aligned with the
on/off indicator.
5.2 Filling the salt container
1.
Turn the cap counterclockwise and
open the salt container.
2.
Put 1 litre of water in the salt contain-
er (only for the first time).
3.
Fill the salt container with dishwasher
salt.
4.
Remove the salt around the opening
of the salt container.
5.
Turn the cap clockwise to close the
salt container.
CAUTION!
Water and salt can come out from
the salt container when you fill it.
Risk of corrosion. To prevent it,
after you fill the salt container,
start a programme.
8
www.electrolux.com

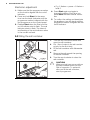
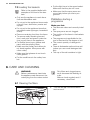
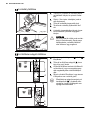
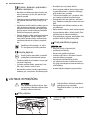
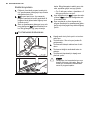
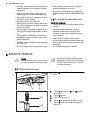
5.3 Filling the rinse aid dispenser
A
B
D
C
M
A
X
1
2
3
4
+
-
A
B
D
C
1.
Press the release button (D) to open
the lid (C).
2.
Fill the rinse aid dispenser (A), no
more than the mark 'max'.
3.
Remove the spilled rinse aid with an
absorbent cloth to prevent too much
foam.
4.
Close the lid. Make sure that the re-
lease button locks into position.
You can turn the selector of the
released quantity (B) between po-
sition 1 (lowest quantity) and posi-
tion 4 or 6 (highest quantity).
6. DAILY USE
1.
Open the water tap.
2.
Turn the knob until the programme
marker is aligned with the programme
you want to set. Set the correct pro-
gramme for the type of load and the
degree of soil.
• If the salt indicator is on, fill the salt
container.
• If the rinse aid indicator is on, fill the
rinse aid dispenser.
3.
Load the baskets.
4.
Add the detergent.
5. Start the programme.
ENGLISH 9

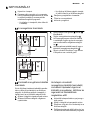
6.1 Using the detergent
A
B
D
30
20
C
M
A
X
1
2
3
4
+
-
B
2
0
0
3
A D
C
1.
Press the release button (B) to open
the lid (C).
2.
Put the detergent in the compartment
(A) .
3.
If the programme has a prewash
phase, put a small quantity of deter-
gent in the compartment (D).
4.
If you use detergent tablets, put the
tablet in the compartment (A).
5.
Close the lid. Make sure that the re-
lease button locks into position.
6.2 Using the combi detergent
tablets
When you use tablets, that contain salt
and rinse aid, do not fill the salt container
and the rinse aid dispenser. The rinse aid
indicator always comes on if the rinse aid
dispenser is empty.
1. Adjust the water softener to the lowest
level.
2.
Set the rinse aid dispenser to the low-
est position.
If you stop to use the combi
detergent tablets, before you
start to use separately
detergent, rinse aid and
dishwasher salt, do these steps:
1.
Press the on/off button to activate the
appliance.
2.
Set the water softener to the highest
level.
3.
Make sure that the salt container and
the rinse aid dispenser are full.
4. Start the shortest programme with a
rinsing phase, without detergent and
without dishes.
5. Adjust the water softener to the water
hardness in your area.
6.
Adjust the released quantity of rinse
aid.
6.3 Setting and starting a
programme
Starting a programme without
delay start
1. Open the water tap.
2.
Close the appliance door.
3. Turn the knob until the programme
marker is aligned with the symbol of
the programme you want to set.
• The on/off indicator comes on.
4.
Press Start to start the programme.
• The Start indicator comes on.
• The washing phase indicator comes
on.
10
www.electrolux.com

Starting a programme with delay
start
1. Set the programme
2. Press Delay to delay the start of the
programme of 3 hours.
• The Delay indicator comes on.
3.
Press Start to start the countdown.
• The Start indicator comes on.
Opening the door while the
appliance operates
If you open the door, the appliance stops.
When you close the door, the appliance
continues from the point of interruption.
Cancelling the delay start while
the countdown operates
1. Press and hold, at the same time,
Start and Delay until the Delay and
the Start indicators goes off.
2.
Press Start to start the programme.
Cancelling the programme
1. Press and hold, at the same time,
Start and Delay until the Start indica-
tor goes off.
Make sure that there is detergent
in the detergent dispenser before
you start a new programme.
At the end of the programme
When the programme is completed, the
end indicator comes on and the Start indi-
cator goes off. If you do not deactivate
the appliance within 3 minutes, only the
on/off indicator stays on. This helps to de-
crease energy consumption.
1. To deactivate the appliance, turn the
knob until the programme marker is
aligned with the on/off indicator.
2.
Close the water tap.
Important
• Let the dishes become cold before you
remove them from the appliance. Hot
dishes can be easily damaged.
• First remove the items from the lower
basket, then from the upper basket.
• There can be water on the sides and on
the door of the appliance. Stainless
steel becomes cool more quickly than
the dishes.
7. HINTS AND TIPS
7.1 The water softener
Hard water contains a high quantity of
minerals that can cause damage to the
appliance and bad washing results. The
water softener neutralises these minerals.
The dishwasher salt keeps the water soft-
ener clean and in good conditions. It is
important to set the right level of the water
softener. This makes sure that the water
softener uses the correct quantity of dish-
washer salt and water.
7.2 Using salt, rinse aid and
detergent
• Only use salt, rinse aid and detergent
for dishwasher. Other products can
cause damage to the appliance.
• The rinse aid helps, during the last rins-
ing phase, to dry the dishes without
streaks and stains.
• Combi detergent tablets contain deter-
gent, rinse aid and other added agents.
Be sure that these tablets are applica-
ble to the water hardness in your area.
Refer to the instructions on the packag-
ing of the products.
• Detergent tablets do not fully dissolve
with short programmes. To prevent de-
tergent residues on the tableware, we
recommend that you use the tablets
with long programmes.
Do not use more than the correct
quantity of detergent. Refer to the
instructions on the detergent
packaging.
ENGLISH 11

7.3 Loading the baskets
Refer to the supplied leaflet with
examples of the load of the bas-
kets.
• Only use the appliance to wash items
that are dishwasher-safe.
• Do not put in the appliance items made
of wood, horn, aluminium, pewter and
copper.
• Do not put in the appliance items that
can absorb water (sponges, household
cloths).
• Remove remaining food from the items.
• To remove easily remaining burned
food, soak pots and pans in water be-
fore you put them in the appliance.
• Put hollow items (cups, glasses and
pans) with the opening down.
• Make sure that cutlery and dishes do
not bond together. Mix spoons with
other cutlery.
• Make sure that glasses do not touch
other glasses.
• Put the small items in the cutlery bas-
ket.
• Put the light items in the upper basket.
Make sure that they do not move.
• Make sure that the spray arms can
move freely before you start a pro-
gramme.
7.4 Before starting a
programme
Make sure that:
• The filters are clean and correctly instal-
led.
• The spray arms are not clogged.
• The position of the items in the baskets
is correct.
• The programme is applicable for the
type of load and for the degree of soil.
• The correct quantity of detergent is
used.
• There is dishwasher salt and rinse aid
(unless you use combi detergent tab-
lets).
• The cap of the salt container is tight.
8. CARE AND CLEANING
WARNING!
Before maintenance, deactivate
the appliance and disconnect the
mains plug from the mains socket.
Dirty filters and clogged spray
arms decrease the washing re-
sults.
Make a check regularly and, if
necessary, clean them.
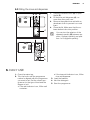
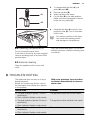
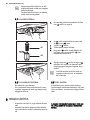
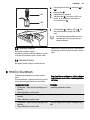
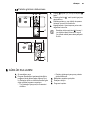
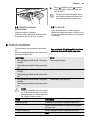
8.1 Cleaning the filters
C
B
A
1.
Turn the filter (A) counterclockwise
and remove it.
12
www.electrolux.com

A1
A2
2.
To disassemble the filter (A), pull
apart (A1) and (A2).
3.
Remove the filter (B).
4.
Wash the filters with water.
5.
Put the filter (B) to its initial position.
Make sure that it assembles correctly
under the two guides (C).
6.
Assemble the filter (A) and put it into
position in filter (B). Turn it clockwise
until it locks.
An incorrect position of the filters
can cause bad washing results
and damage to the appliance.
8.2 Cleaning the spray arms
Do not remove the spray arms.
If the holes in the spray arms are clogged,
remove remaining parts of soil with a thin
pointed object.
8.3 External cleaning
Clean the appliance with a moist soft
cloth.
Only use neutral detergents. Do not use
abrasive products, abrasive cleaning pads
or solvents.
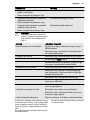
9. TROUBLESHOOTING
The appliance does not start or it stops
during operation.
Before you contact the Service, refer to
the information that follows for a solution
to the problem.
With some problems, the end indica-
tor flashes intermittently to show an
alarm code.
Alarm code Problem
• The end indicator flashes 1 time in-
termittently.
• Start indicator flashes continuously.
The appliance does not fill with water.
• The end indicator flashes 2 times in-
termittently.
• Start indicator flashes continuously.
The appliance does not drain the water.
• The end indicator flashes 3 times in-
termittently.
• Start indicator flashes continuously.
The anti-flood device is on.
ENGLISH 13

WARNING!
Deactivate the appliance before
you do the checks. Turn the knob
until the programme marker is
aligned with the on/off indicator.
Problem Possible solution
You cannot activate the appli-
ance.
Make sure that the mains plug is connected
to the mains socket.
Make sure that there is not a damaged fuse in
the fuse box.
The programme does not start. Make sure that the appliance door is closed.
Press Start.
If the delay start is set, cancel the setting or
wait for the end of the countdown.
The appliance does not fill with
water.
Make sure that the water tap is open.
Make sure that the pressure of the water sup-
ply is not too low. For this information, con-
tact your local water authority.
Make sure that the water tap is not clogged.
Make sure that the filter in the inlet hose is not
clogged.
Make sure that the inlet hose has no kinks or
bends.
The appliance does not drain the
water.
Make sure that the sink spigot is not clogged.
Make sure that the drain hose has no kinks or
bends.
The anti-flood device is on. Close the water tap and contact the Service.
After the checks are completed, turn the
programme knob until the programme
marker is aligned with programme that
was in operation when the problem oc-
curred. The programme continues from
the point of interruption.
If the problem occurs again, contact the
Service.
If other alarm codes show, contact the
Service.
9.1 If the washing and drying
results are not satisfactory
Whitish streaks or bluish layers on
glasses and dishes
• The released quantity of rinse aid is too
much. Adjust the rinse aid selector to a
lower position.
• The quantity of detergent is too much.
Stains and dry water drops on
glasses and dishes
• The released quantity of rinse aid is not
sufficient. Adjust the rinse aid selector
to a higher position.
• The quality of the detergent can be the
cause.
Dishes are wet
• The programme is without a drying
phase or with a low temperature drying
phase.
• The rinse aid dispenser is empty.
• The quality of the rinse aid can be the
cause.
Refer to ‘HINTS AND TIPS’ for
other possible causes.
14
www.electrolux.com

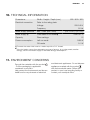
10. TECHNICAL INFORMATION
Dimensions Width / Height / Depth (mm) 600 / 850 / 625
Electrical connection Refer to the rating plate.
Voltage 220-240 V
Frequency 50 Hz
Water supply pressure Min. / max. (bar / MPa) (0.5 / 0.05 ) / (8 / 0.8 )
Water supply
1)
Cold water or hot water
2)
max. 60 °C
Capacity Place settings 12
Power consumption Left-on mode 0.99 W
Off-mode 0.1 W
1)
Connect the water inlet hose to a water tap with a 3/4'' thread.
2)
If the hot water comes from alternative sources of energy, (e.g. solar panels, aeolian
energy), use the hot water supply to decrease energy consumption.
11. ENVIRONMENT CONCERNS
Recycle the materials with the symbol
. Put the packaging in applicable
containers to recycle it.
Help protect the environment and human
health and to recycle waste of electrical
and electronic appliances. Do not dispose
appliances marked with the symbol
with the household waste. Return the
product to your local recycling facility or
contact your municipal office.
ENGLISH 15

TARTALOMJEGYZÉK
1. BIZTONSÁGI ELŐÍRÁSOK . . . . . . . . . . . . . . . . . . . . . . . . . . . . . . . . . . . . . . . . . . . . . . . . . . . . . . . . . . . . . 17
2. TERMÉKLEÍRÁS . . . . . . . . . . . . . . . . . . . . . . . . . . . . . . . . . . . . . . . . . . . . . . . . . . . . . . . . . . . . . . . . . . . . . 18
3. KEZELŐPANEL . . . . . . . . . . . . . . . . . . . . . . . . . . . . . . . . . . . . . . . . . . . . . . . . . . . . . . . . . . . . . . . . . . . . . . 19
4. PROGRAMOK . . . . . . . . . . . . . . . . . . . . . . . . . . . . . . . . . . . . . . . . . . . . . . . . . . . . . . . . . . . . . . . . . . . . . . . 19
5. AZ ELSŐ HASZNÁLAT ELŐTT . . . . . . . . . . . . . . . . . . . . . . . . . . . . . . . . . . . . . . . . . . . . . . . . . . . . . . . . . . 20
6. NAPI HASZNÁLAT . . . . . . . . . . . . . . . . . . . . . . . . . . . . . . . . . . . . . . . . . . . . . . . . . . . . . . . . . . . . . . . . . . . . 23
7. HASZNOS TANÁCSOK ÉS JAVASLATOK . . . . . . . . . . . . . . . . . . . . . . . . . . . . . . . . . . . . . . . . . . . . . . . . . 25
8. ÁPOLÁS ÉS TISZTÍTÁS . . . . . . . . . . . . . . . . . . . . . . . . . . . . . . . . . . . . . . . . . . . . . . . . . . . . . . . . . . . . . . . . 25
9. HIBAELHÁRÍTÁS . . . . . . . . . . . . . . . . . . . . . . . . . . . . . . . . . . . . . . . . . . . . . . . . . . . . . . . . . . . . . . . . . . . . . 26
10. MŰSZAKI INFORMÁCIÓK . . . . . . . . . . . . . . . . . . . . . . . . . . . . . . . . . . . . . . . . . . . . . . . . . . . . . . . . . . . . . . 28
11. KÖRNYEZETVÉDELMI TUDNIVALÓK . . . . . . . . . . . . . . . . . . . . . . . . . . . . . . . . . . . . . . . . . . . . . . . . . . . . 28
GONDOLUNK ÖNRE
Köszönjük, hogy Electrolux terméket vásárolt. Ön olyan készülék tulajdonosa lett, mely mögött több évtizedes
szakmai tapasztalat és innováció áll. Rendkívüli tudását és stílusos megjelenését az Ön igényei ihlették.
Valahányszor csak használja, biztos lehet abban, hogy a benne foglalt tudás a siker garanciája.
Köszöntjük az Electrolux világában.
Látogassa meg a weboldalunkat:
Kezelési tanácsok, kiadványok, hibaelhárító, szerviz információk:
www.electrolux.com
További előnyökért regisztrálja készülékét:
www.electrolux.com/productregistration
Kiegészítők, segédanyagok és eredeti alkatrészek vásárlása a készülékhez:
www.electrolux.com/shop
VÁSÁRLÓI TÁMOGATÁS ÉS SZERVIZ
Kizárólag eredeti alkatrészek használatát javasoljuk.
Ha készülékével a szervizhez fordul, legyenek kéznél az alábbi adatok.
Ezek az információk az adattáblán olvashatók. Típus, Termékszám, Sorozatszám.
Figyelmeztetés - Biztonsági információk
Általános információk és tanácsok
Környezetvédelmi információk
A változtatások jogát fenntartjuk.
16
www.electrolux.com

1.
BIZTONSÁGI ELŐÍRÁSOK
Az üzembe helyezés és használat előtt gondo‐
san olvassa el a mellékelt útmutatót. A nem
megfelelő üzembe helyezés vagy használat által
okozott károkért nem vállal felelősséget a gyártó.
További tájékozódás érdekében tartsa elérhető
helyen az útmutatót.
1.1 Gyermekek és fogyatékkal élő
személyek biztonsága
VIGYÁZAT
Fulladás, sérülés vagy tartós rokkant‐
ság kockázata.
• Ne engedje, hogy a készüléket csökkent fizi‐
kai, értelmi vagy mentális képességű, illetve
megfelelő tapasztalatok és ismeretek híján lé‐
vő személy használja, beleértve a gyermek‐
eket is. Ha ilyen személyek használják a ké‐
szüléket, a biztonságukért felelős személynek
kell őket felügyelnie, illetve a készülék hasz‐
nálatára vonatkozóan útmutatást kell biztosí‐
tani számukra.
• Ne hagyja, hogy gyermekek játsszanak a ké‐
szülékkel.
• Minden csomagolóanyagot tartson távol a
gyermekektől.
• Minden mosószert tartson távol a gyermekek‐
től.
• A gyermekeket és kedvenc háziállatokat tart‐
sa távol a készüléktől, amikor az ajtaja nyitva
van.
1.2 Üzembe helyezés
• Távolítsa el az összes csomagolóanyagot.
• Ne helyezzen üzembe, és ne is használjon
sérült készüléket.
• Ne helyezze üzembe a készüléket olyan he‐
lyen, ahol a hőmérséklet 0 °C alatt van.
• Tartsa be a készülékhez mellékelt üzembe
helyezési útmutatóban foglaltakat.
Elektromos csatlakoztatás
VIGYÁZAT
Tűz- és áramütésveszély.
• A készüléket kötelező földelni.
• Ellenőrizze, hogy az adattáblán szereplő
elektromos adatok megfelelnek-e a háztartási
hálózati áram paramétereinek. Amennyiben
nem, forduljon szakképzett villanyszerelőhöz.
• Mindig megfelelően felszerelt, áramütés ellen
védett aljzatot használjon.
• Ne használjon hálózati elosztókat és hosszab‐
bító kábeleket.
• Ügyeljen a hálózati csatlakozódugó és a háló‐
zati kábel épségére. Amennyiben a készülék
hálózati vezetékét ki kell cserélni, a cserét sa‐
ját szervizünknél végeztesse el.
• Csak az üzembe helyezés befejezése után
csatlakoztassa a hálózati csatlakozódugót a
hálózati csatlakozóaljzatba. Ügyeljen arra,
hogy a hálózati dugasz üzembe helyezés után
is könnyen elérhető legyen.
• A készülék csatlakozásának bontására, soha
ne a hálózati kábelnél fogva húzza ki a csatla‐
kozódugót. A kábelt mindig a csatlakozódugó‐
nál fogva húzza ki.
• Nedves kézzel ne érintse meg a hálózati ká‐
belt és a csatlakozódugót.
• A készülék megfelel az EGK irányelveinek.
Vízhálózatra csatlakoztatás
• Ügyeljen arra, hogy ne okozzon sérülést a víz‐
csöveknek.
• Mielőtt új vagy hosszabb idő óta nem használt
csövekhez csatlakoztatja a készüléket, addig
folyassa a vizet, amíg az teljesen ki nem tisz‐
tul.
• A készülék első használata előtt ellenőrizze,
hogy nincs-e szivárgás.
• A befolyócső biztonsági szeleppel, valamint
dupla bevonattal ellátott belső vezetékkel ren‐
delkezik.
VIGYÁZAT
Veszélyes feszültség.
• Ha a befolyócső megsérül, akkor azonnal húz‐
za ki a csatlakozódugót a fali csatlakozóaljzat‐
MAGYAR 17

ból. Forduljon a márkaszervizhez a befolyócső
cseréje érdekében.
1.3 Használat
• A készülék háztartási és hasonló célú haszná‐
latra készült, például:
– üzletek, irodák és egyéb munkahelyeken ki‐
alakított személyzeti konyhák
– Tanyaházak
– Hotelek, motelek és egyéb lakás céljára
szolgáló ingatlanok esetén az ügyfelek szá‐
mára
– Szállások reggelivel.
VIGYÁZAT
Sérülés-, égés-, áramütés- és tűzve‐
szély.
• Ne változtassa meg a készülék műszaki jel‐
lemzőit.
• Lefelé fordítva vagy vízszintes irányba tegye a
késeket és a hegyes evőeszközöket az
evőeszközkosárba.
• A beleütközés elkerülésének megelőzésére,
ne hagyja nyitva felügyelet nélkül a készülék
ajtaját.
• Ne üljön vagy álljon rá a nyitott ajtóra.
• A mosogatógépben használt mosogatószerek
veszélyesek. Tartsa be a mosogatószer cso‐
magolásán feltüntetett utasításokat.
• Ne igyon a készülékben lévő vízből, és ne
játsszon vele.
• Az edényeket a mosogatógépből csak a mo‐
sogatóprogram lejárta után vegye ki. Mosoga‐
tószer maradhat az edényeken.
• A készülékből forró gőz szabadulhat ki, ha az
ajtót mosogatóprogram futása közben kinyitja.
• Ne tegyen gyúlékony anyagot vagy gyúlékony
anyaggal szennyezett tárgyat a készülékbe,
annak közelébe, illetve annak tetejére.
• A készülék tisztításához ne használjon vízsu‐
garat vagy gőzt.
1.4 Ártalmatlanítás
VIGYÁZAT
Sérülés- vagy fulladásveszély.
• Bontsa a készülék hálózati csatlakozását.
• Vágja le a hálózati tápkábelt, és helyezze a
hulladékba.
• Szerelje le az ajtókilincset, hogy megakadá‐
lyozza gyermekek és kedvenc állatok készü‐
lékben rekedését.
2. TERMÉKLEÍRÁS
2
3
5
4
8
10
6
7
12
9
11
1
18
www.electrolux.com

1
Munkafelület
2
Felső szórókar
3
Alsó szórókar
4
Szűrők
5
Adattábla
6
Sótartály
7
Vízkeménység-tárcsa
8
Öblítőszer-adagoló
9
Mosogatószer-adagoló
10
Evőeszköztartó
11
Alsó kosár
12
Felső kosár
3. KEZELŐPANEL
1 2 3
6 5 4
1
Be-/kikapcsolt állapot visszajelző
2
Programjelölő
3
Visszajelzők
4
Delay gomb
5
Start gomb
6
Programválasztó gomb
Visszajelzők leírása
Mosogatási fázis visszajelző. Akkor világít, amikor a készülék mosogatási és
öblítési fázisban működik.
Szárítási fázis visszajelző. Világít, amikor a szárítási fázis működik.
Program vége visszajelző.
Só visszajelző. A program működése során ez a visszajelző sohasem világít.
Öblítőszer visszajelző. A program működése során ez a visszajelző sohasem
világít.
4. PROGRAMOK
Program
1)
Szennyezettség
mértéke
Töltet típusa
Program
szakaszok
Időtartam
(perc)
Energia‐
fogyasz‐
tás
(kWh)
Víz
(l)
2)
Normál szennye‐
zettség
Edények és
evőeszközök
Előmosás
Főmosogatás 50
°C-on
Öblítés
Szárítás
130 - 140 1.0 - 1.2 14 - 16
MAGYAR 19

Program
1)
Szennyezettség
mértéke
Töltet típusa
Program
szakaszok
Időtartam
(perc)
Energia‐
fogyasz‐
tás
(kWh)
Víz
(l)
Normál szennye‐
zettség
Edények és
evőeszközök
Főmosogatás 65
°C-on
Öblítés
Szárítás
100 - 110 1.4 - 1.6 19 - 21
Erős szennye‐
zettség
Edények,
evőeszközök,
lábasok és faze‐
kak
Előmosás
Főmosogatás 70
°C-on
Öblítés
Szárítás
120 - 130 1.8 - 2.0 22 - 24
3)
Friss szennye‐
zettség
Edények és
evőeszközök
Főmosogatás 60
°C-on
Öblítés
30 0.9 9
4)
Összes Előmosás 12 0.1 5
1)
A víz nyomása és hőmérséklete, a hálózati feszültség ingadozásai, a beállítások és az edények
mennyisége módosíthatja a program időtartamát és a fogyasztási értékeket.
2)
A programmal a leghatékonyabb víz- és áramfelhasználás mellett mosogathatja el a normál mértékben
szennyezett edényeket és evőeszközöket. (Ezt a programot használják tesztprogramként a bevizsgáló
intézetek.)
3)
Ezzel a programmal frissen szennyezett edényeket mosogathat el. Rövid idő alatt is kiváló eredményt
nyújt.
4)
Ezzel a programmal gyorsan leöblítheti az edényeket. Így megakadályozza, hogy az ételmaradék
rászáradjon az edényekre, és kellemetlen szagok képződjenek.
Ehhez a programhoz ne használjon mosogatószert.
Tájékoztatás a bevizsgáló intézetek számára
A bevizsgálás elvégzéséhez szükséges összes információ megszerzéséhez küldjön egy e-mailt a
következő címre:
Jegyezze fel az adattáblán található termékszámot (PNC).
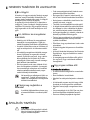
5. AZ ELSŐ HASZNÁLAT ELŐTT
1. Ellenőrizze, hogy a vízlágyító szintje megfe‐
lel-e a környékén használt víz keménységé‐
nek. Szükség esetén módosítsa a vízlágyító
beállítását. A használt víz keménységére vo‐
natkozó tájékoztatásért lépjen kapcsolatba a
helyi vízszolgáltatóval.
2. Töltse fel sótartályt.
3. Töltse fel az öblítőszer-adagolót.
4. Nyissa ki a vízcsapot.
5. A készülékben gyártási maradványok lehet‐
nek. Az eltávolításukhoz indítson el egy mo‐
sogatóprogramot. Ne használjon mosogató‐
szert, és ne töltse meg a kosarakat.
20
www.electrolux.com
Sayfa yükleniyor...
Sayfa yükleniyor...
Sayfa yükleniyor...
Sayfa yükleniyor...
Sayfa yükleniyor...
Sayfa yükleniyor...
Sayfa yükleniyor...
Sayfa yükleniyor...
Sayfa yükleniyor...
Sayfa yükleniyor...
Sayfa yükleniyor...
Sayfa yükleniyor...
Sayfa yükleniyor...
Sayfa yükleniyor...
Sayfa yükleniyor...
Sayfa yükleniyor...
Sayfa yükleniyor...
Sayfa yükleniyor...
Sayfa yükleniyor...
Sayfa yükleniyor...
Sayfa yükleniyor...
Sayfa yükleniyor...
Sayfa yükleniyor...
Sayfa yükleniyor...
Sayfa yükleniyor...
Sayfa yükleniyor...
Sayfa yükleniyor...
Sayfa yükleniyor...
Sayfa yükleniyor...
Sayfa yükleniyor...
Sayfa yükleniyor...
Sayfa yükleniyor...
Sayfa yükleniyor...
Sayfa yükleniyor...
Sayfa yükleniyor...
Sayfa yükleniyor...
-
 1
1
-
 2
2
-
 3
3
-
 4
4
-
 5
5
-
 6
6
-
 7
7
-
 8
8
-
 9
9
-
 10
10
-
 11
11
-
 12
12
-
 13
13
-
 14
14
-
 15
15
-
 16
16
-
 17
17
-
 18
18
-
 19
19
-
 20
20
-
 21
21
-
 22
22
-
 23
23
-
 24
24
-
 25
25
-
 26
26
-
 27
27
-
 28
28
-
 29
29
-
 30
30
-
 31
31
-
 32
32
-
 33
33
-
 34
34
-
 35
35
-
 36
36
-
 37
37
-
 38
38
-
 39
39
-
 40
40
-
 41
41
-
 42
42
-
 43
43
-
 44
44
-
 45
45
-
 46
46
-
 47
47
-
 48
48
-
 49
49
-
 50
50
-
 51
51
-
 52
52
-
 53
53
-
 54
54
-
 55
55
-
 56
56


Electrolux ESF6210LOX Kullanım kılavuzu
- Kategori
- Bulaşık makineleri
- Tip
- Kullanım kılavuzu
diğer dillerde
- English: Electrolux ESF6210LOX User manual