
SWA-8500S
USER MANUAL

ENG - 2 ENG - 3
Safety Information
Thank you for purchasing this product (SWA-8500S).
CAUTION
RISK OF ELECTRIC SHOCK.
DO NOT OPEN
This symbol indicates that
high voltage is present inside.
It is dangerous to make any
kind of contact with any
internal part of this product.
CAUTION: TO REDUCE THE RISK OF
ELECTRIC SHOCK, DO NOT REMOVE THE
COVER (OR BACK). THERE ARE NO USER
SERVICEABLE PARTS INSIDE. REFER ALL
SERVICING TO QUALIFIED PERSONNEL.
This symbol indicates
that important literature
concerning operation and
maintenance has been
included with this product.
Class II product : This symbol indicates that it does not require a safety connection to
electrical earth (ground).
AC voltage : This symbol indicates that the rated voltage marked with the symbol is AC
voltage.
DC voltage : This symbol indicates that the rated voltage marked with the symbol is DC
voltage.
Caution, Consult instructions for use : This symbol instructs the user to consult the user
manual for further safety related information.
• The slots and openings in the cabinet and
in the back or bottom are provided for
necessary ventilation. To ensure reliable
operation of this apparatus, and to protect it
from overheating, these slots and openings
must never be blocked or covered.
– Do not place this apparatus in a conned
space, such as a bookcase, or built-in
cabinet, unless proper ventilation is
provided.
– Do not place this apparatus near or over
a radiator or heat register, or where it is
exposed to direct sunlight.
– Do not place vessels (vases etc.)
containing water on this apparatus.
A water spill can cause a re or electric
shock.
• Do not expose this apparatus to rain
or place it near water (near a bathtub,
washbowl, kitchen sink, or laundry tub, in
a wet basement, or near a swimming pool,
etc.). If this apparatus accidentally gets wet,
unplug it and contact an authorized dealer
immediately.
• Do not overload wall outlets, extension cords
or adaptors beyond their capacity, since this
can result in re or electric shock.

ENG - 2 ENG - 3
Safety Information
Thank you for purchasing this product (SWA-8500S).
CAUTION
RISK OF ELECTRIC SHOCK.
DO NOT OPEN
This symbol indicates that
high voltage is present inside.
It is dangerous to make any
kind of contact with any
internal part of this product.
CAUTION: TO REDUCE THE RISK OF
ELECTRIC SHOCK, DO NOT REMOVE THE
COVER (OR BACK). THERE ARE NO USER
SERVICEABLE PARTS INSIDE. REFER ALL
SERVICING TO QUALIFIED PERSONNEL.
This symbol indicates
that important literature
concerning operation and
maintenance has been
included with this product.
Class II product : This symbol indicates that it does not require a safety connection to
electrical earth (ground).
AC voltage : This symbol indicates that the rated voltage marked with the symbol is AC
voltage.
DC voltage : This symbol indicates that the rated voltage marked with the symbol is DC
voltage.
Caution, Consult instructions for use : This symbol instructs the user to consult the user
manual for further safety related information.
• Route power-supply cords so that they are
not likely to be walked on or pinched by items
placed on or against them. Pay particular
attention to cords at the plug end, at wall
outlets, and the point where they exit from
the apparatus.
• To protect this apparatus from a lightning
storm, or when it is left unattended and
unused for long periods of time, unplug it from
the wall outlet and disconnect the antenna or
cable system. This will prevent damage to the
set due to lightning and power line surges.
• Before connecting the AC power cord to the
DC adaptor outlet, make sure the voltage
designation of the DC adaptor corresponds to
the local electrical supply.
• Never insert anything metallic into the open
parts of this apparatus. Doing so may create a
danger of electric shock.
• To avoid electric shock, never touch the inside
of this apparatus. Only a qualied technician
should open this apparatus.
• Make sure to plug the power cord in until it is
rmly seated. When unplugging the power
cord from a wall outlet, always pull on the
power cord’s plug. Never unplug by pulling on
the power cord. Do not touch the power cord
with wet hands.
• If this apparatus does not operate normally
- in particular, if there are any unusual
sounds or smells coming from it - unplug it
immediately and contact an authorized dealer
or service centre.
• Maintenance of Cabinet.
– Before connecting other components to
this product, be sure to turn them off.
• Be sure to pull the power plug out of the
outlet if the product is to remain unused or
if you are leaving the house for an extended
period of time (especially when children,
elderly, or disabled people will be left alone in
the house).
– Accumulated dust can cause an electric
shock, an electric leakage, or a re by
causing the power cord to generate sparks
and heat or the insulation to deteriorate.
• Contact an authorized service centre for
information if you intend to install your
product in a location with heavy dust, high or
low temperatures, high humidity, chemical
substances, or where it will operate 24 hours
a day such as in an airport, a train station, etc.
Failing to do so may cause serious damage to
your product.
• Use only a properly grounded plug and wall
outlet.
– An improper ground may cause electric
shock or equipment damage. (Class l
Equipment only.)
• To turn this apparatus off completely, you
must disconnect it from the wall outlet.
Consequently, the wall outlet and power plug
must be readily accessible at all times.
• Do not allow children to hang on the product.
• Store the accessories (battery, etc.) in a
location safely out of the reach of children.
– Do not place vessels (vases etc.)
containing water on this apparatus.
A water spill can cause a re or electric
shock.
• Do not expose this apparatus to rain
or place it near water (near a bathtub,
washbowl, kitchen sink, or laundry tub, in
a wet basement, or near a swimming pool,
etc.). If this apparatus accidentally gets wet,
unplug it and contact an authorized dealer
immediately.
• Do not overload wall outlets, extension cords
or adaptors beyond their capacity, since this
can result in re or electric shock.

ENG - 4 ENG - 5
• Do not install the product in an unstable
location such as a shaky self, a slanted oor,
or a location exposed to vibration.
• Do not drop or strike the product. If the
product is damaged, disconnect the power
cord and contact a service centre.
• To clean this apparatus, unplug the power
cord from the wall outlet, and then wipe
the product using a soft, dry cloth. Do not
use any chemicals such as wax, benzene,
alcohol, thinners, insecticide, air fresheners,
lubricants, or detergent. These chemicals can
damage the appearance of the product or
erase the printing on the product.
• Do not expose this apparatus to dripping
or splashing. Do not put objects lled with
liquids, such as vases, on the apparatus.
• Do not plug multiple electric devices into the
same wall socket. Overloading a socket can
cause it to overheat, resulting in a re.
WARNING :
• TO PREVENT THE SPREAD OF
FIRE, KEEP CANDLES AND
OTHER ITEMS WITH OPEN
FLAMES AWAY FROM THIS
PRODUCT AT ALL TIMES.
• To reduce the risk of re or electric shock, do
not expose this appliance to rain or moisture.
Precautions
1. Ensure that the AC or DC power supply
in your house complies with the power
requirements listed on the identication
sticker located on the back of your product.
Install your product horizontally, on a
suitable base (furniture), with enough space
around it for ventilation (7~10 cm).
Make sure the ventilation slots are not
covered. Do not place the unit on ampliers
or other equipment which may become hot.
This unit is designed for continuous use.
To fully turn off the unit, disconnect the AC
plug from the wall outlet.
2. Do not expose the unit to direct sunlight
or other heat sources. This could lead
to overheating and cause the unit to
malfunction.
3. Unplug the Power cord from the AC wall
socket if the unit malfunctions. Your product
is not intended for industrial use. It is for
personal use only. Condensation may occur
if your product has been stored in cold
temperatures. If transporting the unit during
the winter, wait approximately 2 hours until
the unit has reached room temperature
before using it.
4. If the electricity supplied to your home is
rated at 240V AC, use a suitable plug adapter
to connect this unit to your electrical outlets.
Important Safety Instructions
Read these operating instructions carefully
before using the unit. Follow all the safety
instructions listed below. Keep these operating
instructions handy for future reference.
1. Read these instructions.
2. Keep these instructions.
3. Heed all warnings.
4. Follow all instructions.
5. Do not use this apparatus near water.
6. Clean only with a dry cloth.
7. Do not block any ventilation openings. Install
in accordance with the manufacturer’s
instructions.
8. Do not install near any heat sources such
as radiators, heat registers, stoves, or other
apparatus (including AV receivers) that
produce heat.
9. Do not defeat the safety purpose of the
polarized or grounding-type plug.
A polarized plug has two blades with one
wider than the other. A grounding type
plug has two blades and a third grounding
prong. The wide blade or the third prong
are provided for your safety. If the provided
plug does not t into your outlet, consult an
electrician for replacement of the obsolete
outlet.

ENG - 4 ENG - 5
Precautions
1. Ensure that the AC or DC power supply
in your house complies with the power
requirements listed on the identication
sticker located on the back of your product.
Install your product horizontally, on a
suitable base (furniture), with enough space
around it for ventilation (7~10 cm).
Make sure the ventilation slots are not
covered. Do not place the unit on ampliers
or other equipment which may become hot.
This unit is designed for continuous use.
To fully turn off the unit, disconnect the AC
plug from the wall outlet.
2. Do not expose the unit to direct sunlight
or other heat sources. This could lead
to overheating and cause the unit to
malfunction.
3. Unplug the Power cord from the AC wall
socket if the unit malfunctions. Your product
is not intended for industrial use. It is for
personal use only. Condensation may occur
if your product has been stored in cold
temperatures. If transporting the unit during
the winter, wait approximately 2 hours until
the unit has reached room temperature
before using it.
4. If the electricity supplied to your home is
rated at 240V AC, use a suitable plug adapter
to connect this unit to your electrical outlets.
Important Safety Instructions
Read these operating instructions carefully
before using the unit. Follow all the safety
instructions listed below. Keep these operating
instructions handy for future reference.
1. Read these instructions.
2. Keep these instructions.
3. Heed all warnings.
4. Follow all instructions.
5. Do not use this apparatus near water.
6. Clean only with a dry cloth.
7. Do not block any ventilation openings. Install
in accordance with the manufacturer’s
instructions.
8. Do not install near any heat sources such
as radiators, heat registers, stoves, or other
apparatus (including AV receivers) that
produce heat.
9. Do not defeat the safety purpose of the
polarized or grounding-type plug.
A polarized plug has two blades with one
wider than the other. A grounding type
plug has two blades and a third grounding
prong. The wide blade or the third prong
are provided for your safety. If the provided
plug does not t into your outlet, consult an
electrician for replacement of the obsolete
outlet.
10. Protect the power cord from being walked
on or pinched particularly at plugs,
convenience receptacles, and the point
where it exits the apparatus.
11. Only use attachments/accessories specied
by the manufacturer.
12. Use only with the cart,
stand, tripod, bracket,
or table specied by the
manufacturer, or sold with
the apparatus. When a cart
is used, use caution when moving the cart/
apparatus combination to avoid injury from
tip-over.
13. Unplug this apparatus during lightning
storms or when you intend to leave it unused
for long periods of time.
14. Refer all servicing to qualied service
personnel. Servicing is required when the
apparatus has been damaged in any way,
such as when the power-supply cord or plug
is damaged, liquid has been spilled or objects
have fallen into the apparatus, the apparatus
has been exposed to rain or moisture, does
not operate normally, or has been dropped.

ENG - 6 ENG - 7
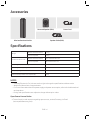
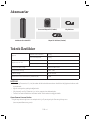
Accessories
STANDBY
LINK
Surround Speaker (2EA) Power Cord
Wireless Receiver Module Speaker Cable (2EA)
Specications
Weight
Wireless Receiver Module 0.7 kg
Surround Speaker 0.5 kg
Dimensions (W x H x D)
Wireless Receiver Module 50.0 X 201.3 X 132.0 mm
Surround Speaker 76.2 X 126.9 X 76.2 mm
Operating Temperature Range +5°C to +35°C
Operating Humidity Range 10% ~ 75%
Frequency range 20Hz~20KHz
Overall Standby Power Consumption (W) 1.0W
NOTES
– Samsung Electronics Co., Ltd reserves the right to change the specications without notice.
– Weight and dimensions are approximate.
– For more information about the power supply and power consumption, refer to the label attached
to the product.
– Design and specications are subject to change without prior notice.
Open Source Licence Notice
• To send inquiries and requests regarding open sources, contact Samsung via Email
(oss.request@samsung.com).
Important Note About Service
• An administration fee may be charged if either
(a) an engineer is called out at your request and there is no defect with the product (i.e. where the
user manual has not been read).
(b) you bring the unit to a repair centre and there is no defect with the product (i.e. where the user
manual has not been read).
• You will be informed of the administration fee amount before a technician visits.
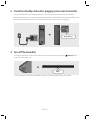
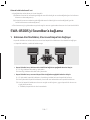
Connecting the SWA-8500S to a Soundbar
1. Connect the Wireless Receiver Module to 2 Surround Speakers
Use the speaker cables to connect the two surround sound speakers to the Wireless Receiver
Module.
• The speaker cables are colour coded.
SURROUND-LEFT
ID SET
L
R
SURROUND SPEAKERS OUT
SPEAKER IMPEDANCE : 3Ω
POWER
ID SET
L
R
SURROUND SPEAKERS OUT
SPEAKER IMPEDANCE : 3Ω
SURROUND-RIGHT
SURROUND-LEFT SURROUND-RIGHT
• When connecting the speaker cables to the Wireless Receiver Module, follow these steps:
1. Insert the grey plug into the grey jack on the Wireless Receiver.
2. Insert the blue plug into the blue jack on the Wireless Receiver.
• When connecting the speaker cables to the surround speakers, follow these steps:
1. Match the speaker cable connected to the grey jack to the speaker with the grey label.
2. Match the speaker cable connected to the blue jack to the speaker with the blue label.
3. Insert the red and black coloured ends of each speaker cable into the red and black jacks of
the appropriate speakers.
• The labels are on the backs of the speaker.

ENG - 6 ENG - 7
Accessories
STANDBY
LINK
Surround Speaker (2EA) Power Cord
Wireless Receiver Module Speaker Cable (2EA)
Specications
Weight
Wireless Receiver Module 0.7 kg
Surround Speaker 0.5 kg
Dimensions (W x H x D)
Wireless Receiver Module 50.0 X 201.3 X 132.0 mm
Surround Speaker 76.2 X 126.9 X 76.2 mm
Operating Temperature Range +5°C to +35°C
Operating Humidity Range 10% ~ 75%
Frequency range 20Hz~20KHz
Overall Standby Power Consumption (W) 1.0W
NOTES
– Samsung Electronics Co., Ltd reserves the right to change the specications without notice.
– Weight and dimensions are approximate.
– For more information about the power supply and power consumption, refer to the label attached
to the product.
– Design and specications are subject to change without prior notice.
Open Source Licence Notice
• To send inquiries and requests regarding open sources, contact Samsung via Email
(oss.request@samsung.com).
Important Note About Service
• An administration fee may be charged if either
(a) an engineer is called out at your request and there is no defect with the product (i.e. where the
user manual has not been read).
(b) you bring the unit to a repair centre and there is no defect with the product (i.e. where the user
manual has not been read).
• You will be informed of the administration fee amount before a technician visits.
Connecting the SWA-8500S to a Soundbar
1. Connect the Wireless Receiver Module to 2 Surround Speakers
Use the speaker cables to connect the two surround sound speakers to the Wireless Receiver
Module.
• The speaker cables are colour coded.
SURROUND-LEFT
ID SET
L
R
SURROUND SPEAKERS OUT
SPEAKER IMPEDANCE : 3Ω
POWER
ID SET
L
R
SURROUND SPEAKERS OUT
SPEAKER IMPEDANCE : 3Ω
SURROUND-RIGHT
SURROUND-LEFT SURROUND-RIGHT
• When connecting the speaker cables to the Wireless Receiver Module, follow these steps:
1. Insert the grey plug into the grey jack on the Wireless Receiver.
2. Insert the blue plug into the blue jack on the Wireless Receiver.
• When connecting the speaker cables to the surround speakers, follow these steps:
1. Match the speaker cable connected to the grey jack to the speaker with the grey label.
2. Match the speaker cable connected to the blue jack to the speaker with the blue label.
3. Insert the red and black coloured ends of each speaker cable into the red and black jacks of
the appropriate speakers.
• The labels are on the backs of the speaker.

ENG - 8 ENG - 9
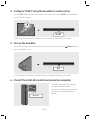
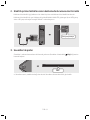
2. Check the standby status after plugging into an electrical outlet
Plug the Wireless Receiver Module power cord into an electrical outlet and into the Wireless
Receiver Module to turn on the Wireless Receiver Module. The LINK LED indicator (blue LED) on the
Wireless Receiver Module blinks. If the LED does not blink, refer to step 7 on page 10.
ID SET
L
R
SURROUND SPEAKERS OUT
SPEAKER IMPEDANCE : 3Ω
POWER
POWER
STANDBY
LINK
STANDBY
LINK
Blue blinking
3. Turn off the Soundbar
Turn off the Soundbar using the Soundbar’s remote control or by pressing the (Power) button
on the main Soundbar unit.
OFF
• The image of the Soundbar may differ from your Soundbar, depending on the model.
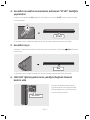
4. Congure “ID SET” using the Soundbar’s remote control
Press the VOL button on your remote control for 5~6 seconds until the “ID SET” message appears
on your Soundbar display.
VOL
SOUNDBAR
ID SET
5 Sec
• The image of the Soundbar may differ from your Soundbar, depending on the model.
5. Turn on the Soundbar
Turn on the Soundbar using the Soundbar’s remote control or by pressing the (Power) button on
the main Soundbar’s unit.
ON
• The image of the Soundbar may differ from your Soundbar, depending on the model.
6. Check if the LINK LED is solid blue (connection complete)
STANDBY
LINK
STANDBY
LINK
Blue is On
The LINK LED indicator stops blinking
and glows a solid blue when a
connection is established between the
Soundbar and the Wireless Receiver
Module.

ENG - 8 ENG - 9
2. Check the standby status after plugging into an electrical outlet
Plug the Wireless Receiver Module power cord into an electrical outlet and into the Wireless
Receiver Module to turn on the Wireless Receiver Module. The LINK LED indicator (blue LED) on the
Wireless Receiver Module blinks. If the LED does not blink, refer to step 7 on page 10.
ID SET
L
R
SURROUND SPEAKERS OUT
SPEAKER IMPEDANCE : 3Ω
POWER
POWER
STANDBY
LINK
STANDBY
LINK
Blue blinking
3. Turn off the Soundbar
Turn off the Soundbar using the Soundbar’s remote control or by pressing the (Power) button
on the main Soundbar unit.
OFF
• The image of the Soundbar may differ from your Soundbar, depending on the model.
4. Congure “ID SET” using the Soundbar’s remote control
Press the VOL button on your remote control for 5~6 seconds until the “ID SET” message appears
on your Soundbar display.
VOL
SOUNDBAR
ID SET
5 Sec
• The image of the Soundbar may differ from your Soundbar, depending on the model.
5. Turn on the Soundbar
Turn on the Soundbar using the Soundbar’s remote control or by pressing the (Power) button on
the main Soundbar’s unit.
ON
• The image of the Soundbar may differ from your Soundbar, depending on the model.
6. Check if the LINK LED is solid blue (connection complete)
STANDBY
LINK
STANDBY
LINK
Blue is On
The LINK LED indicator stops blinking
and glows a solid blue when a
connection is established between the
Soundbar and the Wireless Receiver
Module.

ENG - 10 ENG - 11
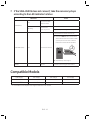
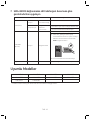
7. If the SWA-8500S does not connect, take the necessary steps
according to the LED Indicator’s status
LED status Action
LINK (Blue)
On
Connected with
the Soundbar
-
Blinking
Connection
standby status
Check if the Soundbar is turned on
Repeat steps 3 through 6.
STANDBY (Red) On Connection failure
Check if the Soundbar is turned on
1. Press the ID SET button on the back
of the Wireless Receiver Module with
a pen tip for 5~6 seconds until the
LINK LED indicator blinks (in Blue).
ID SET
L
R
SURROUND SPEAKERS OUT
SPEAKER IMPEDANCE : 3Ω
POWER
ID SET
5 Sec
2. Repeat steps 3 through 6.
Others - Errors Contact a Samsung Service Centre.
Compatible Models
HW-M360 HW-M369 HW-M450 HW-M460
HW-M4500 HW-M4501 HW-M4510 HW-M4511
HW-M550 HW-M560
• The model list is subject to change without further notice.
Wireless Models (including the frequency of 5.15GHz-5.35GHz)
• Hereby, Samsung Electronics, declares that this equipment is in compliance
with the essential requirements and other relevant provisions of Directive
1999/5/EC.
The original Declaration of Conformity may be found at http://www.samsung.com,
go to Support > Search Product Support and enter the model name.
This equipment may be operated in all EU countries.
This equipment may only be used indoors.
Wireless Models (excluding the frequency of 5.15GHz-5.35GHz)
• Hereby, Samsung Electronics, declares that this equipment is in compliance with the
essential requirements and other relevant provisions of Directive 1999/5/EC.
The original Declaration of Conformity may be found at http://www.samsung.com,
go to Support > Search Product Support and enter the model name.
This equipment may be operated in all EU countries.
Correct Disposal of This Product
(Waste Electrical & Electronic Equipment)
(Applicable in countries with separate collection systems)
This marking on the product, accessories or literature indicates that the product and its electronic
accessories (e.g. charger, headset, USB cable) should not be disposed of with other household waste
at the end of their working life. To prevent possible harm to the environment or human health from
uncontrolled waste disposal, please separate these items from other types of waste and recycle
them responsibly to promote the sustainable reuse of material resources.
Household users should contact either the retailer where they purchased this product, or their local
government ofce, for details of where and how they can take these items for environmentally safe
recycling.
Business users should contact their supplier and check the terms and conditions of the purchase
contract. This product and its electronic accessories should not be mixed with other commercial
wastes for disposal.
For information on Samsung’s environmental commitments and product specic regulatory
obligations e.g. REACH visit:
samsung.com/uk/aboutsamsung/samsungelectronics/corporatecitizenship/data_corner.html

ENG - 10 ENG - 11
7. If the SWA-8500S does not connect, take the necessary steps
according to the LED Indicator’s status
LED status Action
LINK (Blue)
On
Connected with
the Soundbar
-
Blinking
Connection
standby status
Check if the Soundbar is turned on
Repeat steps 3 through 6.
STANDBY (Red) On Connection failure
Check if the Soundbar is turned on
1. Press the ID SET button on the back
of the Wireless Receiver Module with
a pen tip for 5~6 seconds until the
LINK LED indicator blinks (in Blue).
ID SET
L
R
SURROUND SPEAKERS OUT
SPEAKER IMPEDANCE : 3Ω
POWER
ID SET
5 Sec
2. Repeat steps 3 through 6.
Others - Errors Contact a Samsung Service Centre.
Compatible Models
HW-M360 HW-M369 HW-M450 HW-M460
HW-M4500 HW-M4501 HW-M4510 HW-M4511
HW-M550 HW-M560
• The model list is subject to change without further notice.
Wireless Models (including the frequency of 5.15GHz-5.35GHz)
• Hereby, Samsung Electronics, declares that this equipment is in compliance
with the essential requirements and other relevant provisions of Directive
1999/5/EC.
The original Declaration of Conformity may be found at http://www.samsung.com,
go to Support > Search Product Support and enter the model name.
This equipment may be operated in all EU countries.
This equipment may only be used indoors.
Wireless Models (excluding the frequency of 5.15GHz-5.35GHz)
• Hereby, Samsung Electronics, declares that this equipment is in compliance with the
essential requirements and other relevant provisions of Directive 1999/5/EC.
The original Declaration of Conformity may be found at http://www.samsung.com,
go to Support > Search Product Support and enter the model name.
This equipment may be operated in all EU countries.
Correct Disposal of This Product
(Waste Electrical & Electronic Equipment)
(Applicable in countries with separate collection systems)
This marking on the product, accessories or literature indicates that the product and its electronic
accessories (e.g. charger, headset, USB cable) should not be disposed of with other household waste
at the end of their working life. To prevent possible harm to the environment or human health from
uncontrolled waste disposal, please separate these items from other types of waste and recycle
them responsibly to promote the sustainable reuse of material resources.
Household users should contact either the retailer where they purchased this product, or their local
government ofce, for details of where and how they can take these items for environmentally safe
recycling.
Business users should contact their supplier and check the terms and conditions of the purchase
contract. This product and its electronic accessories should not be mixed with other commercial
wastes for disposal.
For information on Samsung’s environmental commitments and product specic regulatory
obligations e.g. REACH visit:
samsung.com/uk/aboutsamsung/samsungelectronics/corporatecitizenship/data_corner.html

TUR - 2 TUR - 3
Güvenlik Bilgileri
Bu ürünü (SWA-8500S) aldığınız için teşekkürler.
DİKKAT
ELEKTRİK ÇARPMA RİSKİ
AÇMAYIN
Bu sembol, cihazın içinde
yüksek voltaj bulunduğunu
belirtir. Bu ürünün içindeki
herhangi bir parça ile temas
edilmesi tehlike teşkil eder.
DİKKAT: ELEKTRİK ÇARPMASI RİSKİNİ AZALTMAK
İÇİN, KAPAĞI (VEYA CİHAZIN ARKASINI) AÇMAYIN.
KULLANICI TARAFINDAN ONARILABİLECEK PARÇA
İÇERMEZ. TÜM SERVİS İŞLEMLERİ İÇİN YETKİLİ
SERVİS PERSONELİNE BAŞVURUN.
Bu sembol, kullanım
ve bakımla ilgili önemli
talimatların cihazla
birlikte verildiğini
belirtir.
Sınıf II ürün: Bu sembol, elektrik topraklamasına (toprak) bir güvenlik bağlantısı
gerekmediğini gösterir.
AC voltajı: Bu sembol, sembolle işaretlenen nominal voltajın AC voltajı olduğunu
gösterir.
DC voltajı: Bu sembol, sembolle işaretlenen nominal voltajın DC voltajı olduğunu
gösterir.
Dikkat, Kullanım talimatlarına bakın: Bu sembol, kullanıcıya güvenlikle ilgili daha fazla
bilgi için kullanıcı kılavuzuna başvurmasını söyler.
• Gerekli havalandırmanın sağlanması için,
cihaz kabininde ve arkasında veya alt
kısmında yuvalar ve açıklıklar bulunur. Bu
cihazın güvenilir şekilde çalışmasını sağlamak
ve aşırı ısınmaya karşı korunması için, bu
yuvaların ve açıklıkların asla engellenmemesi
veya kapatılmaması gerekmektedir.
– Bu cihazı düzgün havalandırma
sağlanmadığı sürece kitaplık veya
gömme dolap gibi kapalı bir alana
yerleştirmeyin.
– Bu cihazı bir radyatör veya ısı kaynağının
yakınına veya üzerine veya doğrudan
güneş ışığına maruz kalacağı bir yere
yerleştirmeyin.
– Cihazın üzerine (vazo vb.) su dolu kaplar
yerleştirmeyin. Su dökülmesi yangına
veya elektrik çarpmasına neden olabilir.
• Cihazı yağmura maruz bırakmayın veya suyla
temas edebileceği yerlere (küvet, lavabo,
mutfak evyesi veya çamaşır teknesi yakınına,
ıslak zeminlere veya bir havuzun yakınına vb.)
yerleştirmeyin. Cihazın yanlışlıkla ıslanması
durumunda şini çekin ve derhal bir yetkili
satıcı ile temas kurun.
• Yangın veya elektrik çarpmasına neden
olabileceği için, duvar prizlerini, uzatma
kablolarını veya adaptörleri kapasitelerini
aşacak şekilde aşırı yüklemeyin.

TUR - 2 TUR - 3
Güvenlik Bilgileri
Bu ürünü (SWA-8500S) aldığınız için teşekkürler.
DİKKAT
ELEKTRİK ÇARPMA RİSKİ
AÇMAYIN
Bu sembol, cihazın içinde
yüksek voltaj bulunduğunu
belirtir. Bu ürünün içindeki
herhangi bir parça ile temas
edilmesi tehlike teşkil eder.
DİKKAT: ELEKTRİK ÇARPMASI RİSKİNİ AZALTMAK
İÇİN, KAPAĞI (VEYA CİHAZIN ARKASINI) AÇMAYIN.
KULLANICI TARAFINDAN ONARILABİLECEK PARÇA
İÇERMEZ. TÜM SERVİS İŞLEMLERİ İÇİN YETKİLİ
SERVİS PERSONELİNE BAŞVURUN.
Bu sembol, kullanım
ve bakımla ilgili önemli
talimatların cihazla
birlikte verildiğini
belirtir.
Sınıf II ürün: Bu sembol, elektrik topraklamasına (toprak) bir güvenlik bağlantısı
gerekmediğini gösterir.
AC voltajı: Bu sembol, sembolle işaretlenen nominal voltajın AC voltajı olduğunu
gösterir.
DC voltajı: Bu sembol, sembolle işaretlenen nominal voltajın DC voltajı olduğunu
gösterir.
Dikkat, Kullanım talimatlarına bakın: Bu sembol, kullanıcıya güvenlikle ilgili daha fazla
bilgi için kullanıcı kılavuzuna başvurmasını söyler.
• Güç kablolarını, üstüne basılmayacakları
veya üzerine yerleştirilen nesneler nedeniyle
sıkıştırılmayacakları şekilde yönlendirin.
Özellikle şin ucunda, duvar prizlerinde ve
cihaz üzerindeki çıkış noktasındaki kablolara
özen gösterin.
• Cihazı yıldırım düşmesinden korumak için
veya uzun süre kullanılmayacağı zamanlarda,
şini prizden çekin ve anten veya kablolu
yayın bağlantısını kesin. Bu şekilde cihazı
yıldırım düşmesine ve güç hattındaki
dalgalanmalara bağlı hasarlardan korumuş
olursunuz.
• AC güç kablosunu DC adaptör prizine
bağlamadan önce, DC adaptörün voltaj
değerinin yerel elektrik şebekesi değerine
uygun olduğundan emin olun.
• Bu cihazın açık kısımlarına asla metal bir cisim
sokmayın. Aksi halde elektrik çarpması riski
ortaya çıkar.
• Elektrik çarpmasını önlemek için, cihazın
iç kısmına asla dokunmayın. Cihaz yalnızca
yetkili teknik servis personeli tarafından
açılmalıdır.
• Güç kablosunu prize takarken sıkıca yerine
oturana kadar bastırın. Güç kablosunu
duvar prizinden çıkarırken, daima kablonun
ş kısmından tutarak çekin. Asla güç
kablosundan çekerek çıkarmayın. Güç
kablosuna ıslak elle dokunmayın.
• Cihazın normal şekilde çalışmaması halinde,
özellikle de cihazdan garip sesler veya kokular
geliyorsa, derhal şini çekin ve bir yetkili
satıcıya veya servis merkezine başvurun.
• Kabinin Bakımı.
– Bu ürüne başka bileşenler bağlamadan
önce, diğer bileşenleri kapattığınızdan
emin olun.
• Cihaz uzun süre kullanılmayacaksa veya
uzun bir süreliğine evden ayrılıyorsanız
(özellikle çocuklar, yaşlılar veya engelli kişiler
evde yalnız bırakılacağı zaman) cihazın şini
prizden çekin.
– Cihazda biriken toz, güç kablosunun
kıvılcım çıkarmasına veya ısı yaymasına
ya da kablo yalıtımının bozulmasına yol
açarak, elektrik çarpmasına, elektrik
kaçağına veya yangına neden olabilir.
• Cihazınızı aşırı tozlu, yüksek veya düşük
sıcaklığa sahip, aşırı nemli, kimyasal
maddelerin bulunduğu veya havaalanı, tren
istasyonu gibi günde 24 saat çalışacağı bir
yere kurmak istiyorsanız, bilgi almak için
yetkili servis merkezine başvurun. Aksi halde
cihazınız ciddi şekilde hasar görebilir.
• Yalnızca düzgün şekilde topraklanmış bir ş
ve duvar prizi kullanın.
– Düzgün bir topraklama olmaması elektrik
çarpmasına veya ekipmanın hasar
görmesine neden olabilir. (Yalnız I. Sınıf
Ekipman.)
• Cihazı tamamen kapatmak için, şi prizden
çekmeniz gerekir. Bu nedenle, priz ve ş her
zaman kolaylıkla ulaşılabilen bir noktada
olmalıdır.
• Çocukların ürüne asılmasına izin vermeyin.
• Aksesuarları (pil, vb.) çocukların
ulaşamayacağı, güvenli bir yerde saklayın.
– Cihazın üzerine (vazo vb.) su dolu kaplar
yerleştirmeyin. Su dökülmesi yangına
veya elektrik çarpmasına neden olabilir.
• Cihazı yağmura maruz bırakmayın veya suyla
temas edebileceği yerlere (küvet, lavabo,
mutfak evyesi veya çamaşır teknesi yakınına,
ıslak zeminlere veya bir havuzun yakınına vb.)
yerleştirmeyin. Cihazın yanlışlıkla ıslanması
durumunda şini çekin ve derhal bir yetkili
satıcı ile temas kurun.
• Yangın veya elektrik çarpmasına neden
olabileceği için, duvar prizlerini, uzatma
kablolarını veya adaptörleri kapasitelerini
aşacak şekilde aşırı yüklemeyin.

TUR - 4 TUR - 5
• Cihazı sallanan bir raf, eğimli zemin veya
titreşime maruz kalan alanlar gibi dengesiz
yerlere kurmayın.
• Ürünü düşürmeyin veya çarpmayın.
Ürün hasar görürse, güç kablosunu prizden
çekin ve bir servis merkezine başvurun.
• Cihazı temizlemek için şini prizden çekin ve
ürünü yumuşak, kuru bir bez kullanarak silin.
Paran, benzin, alkol, tiner, böcek ilacı, oda
parfümü, yağ veya deterjan gibi kimyasal
maddeler kullanmayın. Bu kimyasallar
cihazın görünümüne zarar verebilir veya cihaz
üzerindeki yazıların silinmesine neden olabilir.
• Bu cihaza sıvı damlatılmamalı veya
dökülmemelidir. Vazo gibi sıvı dolu nesneler
cihazın üstüne konulmamalıdır.
• Aynı duvar prizine birden fazla elektrikli cihaz
takmayın. Prize aşırı yüklenilmesi prizin aşırı
ısınmasına ve yangına yol açabilir.
UYARI :
• YANGININ YAYILMASINI
ÖNLEMEK İÇİN, MUM VEYA
AÇIK ALEVLİ DİĞER NESNELERİ
DAİMA BU ÜRÜNDEN UZAK
TUTUN.
• Yangın veya elektrik çarpması riskini
azaltmak için, cihazı yağmurdan veya nemden
uzak tutun.
Önlemler
1. Evinizdeki AC veya DC güç kaynağının,
ürünün arkasında yer alan tanımlama
etiketiyle uyumlu olduğundan emin olun.
Ürünü, havalandırma için yeterli boşluk
7-10 cm olacak şekilde, uygun bir kaide
(mobilya) üzerine yatay biçimde yerleştirin.
Havalandırma deliklerinin kapatılmadığından
emin olun. Ürünü amplikatörlerin veya
ısınma yapabilecek diğer ekipmanların
üzerine koymayın. Bu ünite çalar sürekli
kullanım için tasarlanmıştır.
Üniteyi tamamen kapatmak için AC şini
duvardaki prizden çıkarın.
2. Üniteyi doğrudan güneş ışığı ya da diğer ısı
kaynaklarına maruz bırakmayın. Bu, cihazın
aşırı ısınmasına ve arızalanmasına yol
açabilir.
3. Üniteyi doğrudan güneş ışığı ya da diğer ısı
kaynaklarına maruz bırakmayın. Ünitenin
hatalı çalışması durumunda güç kablosunu
AC kaynağından çıkarın. Bu ürün, endüstriyel
kullanım için tasarlanmamıştır. Bu ürün
sadece kişisel kullanım içindir. Ürün veya
diskini, soğuk sıcaklıklarda depolanmışsa
yoğuşma meydana gelebilir. Kış şartlarında
ünitenin taşınması durumunda kullanmadan
önce ünite oda sıcaklığına gelene kadar
yaklaşık 2 saat bekleyin.
4. Evinize gelen elektrik gerilimi 240 VAC ise
bu üniteyi elektrik prizlerinize bağlamak için
uygun bir ş adaptörü kullanın.
Önemli Güvenlik Talimatları
Ürünü kullanmadan önce bu çalıştırma
talimatlarını dikkatlice okuyun. Aşağıda sıralanan
bütün güvenlik talimatlarını izleyin.
Bu çalıştırma talimatlarını gelecekte başvurmak
için yakında tutun.
1. Bu talimatları okuyun.
2. Bu talimatları izleyin.
3. Bütün uyarılara dikkat edin.
4. Bütün talimatları izleyin.
5. Bu cihazı su yakınında kullanmayın.
6. Sadece kuru bir bezle temizleyin.
7. Havalandırma deliklerini kapatmayın.
İmalatçının talimatlarına uygun olarak kurun.
8. Radyatörler, kalorifer ızgaraları, ocaklar veya
ısı üreten başka aygıtlar (AV alıcıları dahil)
gibi ısı kaynaklarının yakınına yerleştirmeyin.
9. Polarize veya topraklı şin güvenlik amacını
ortadan kaldırmayın. Polarize bir şin, biri
diğerinden daha geniş olan iki ucu vardır.
Topraklı bir şin iki ucu ve üçüncü bir
topraklama ucu vardır. Geniş uç veya üçüncü
uç güvenliğiniz için eklenmiştir. Ürünle
birlikte verilen ş prizinize uymuyorsa
kullanılmayan prizin değiştirilmesi için bir
elektrikçiye danışın.

TUR - 4 TUR - 5
Önlemler
1. Evinizdeki AC veya DC güç kaynağının,
ürünün arkasında yer alan tanımlama
etiketiyle uyumlu olduğundan emin olun.
Ürünü, havalandırma için yeterli boşluk
7-10 cm olacak şekilde, uygun bir kaide
(mobilya) üzerine yatay biçimde yerleştirin.
Havalandırma deliklerinin kapatılmadığından
emin olun. Ürünü amplikatörlerin veya
ısınma yapabilecek diğer ekipmanların
üzerine koymayın. Bu ünite çalar sürekli
kullanım için tasarlanmıştır.
Üniteyi tamamen kapatmak için AC şini
duvardaki prizden çıkarın.
2. Üniteyi doğrudan güneş ışığı ya da diğer ısı
kaynaklarına maruz bırakmayın. Bu, cihazın
aşırı ısınmasına ve arızalanmasına yol
açabilir.
3. Üniteyi doğrudan güneş ışığı ya da diğer ısı
kaynaklarına maruz bırakmayın. Ünitenin
hatalı çalışması durumunda güç kablosunu
AC kaynağından çıkarın. Bu ürün, endüstriyel
kullanım için tasarlanmamıştır. Bu ürün
sadece kişisel kullanım içindir. Ürün veya
diskini, soğuk sıcaklıklarda depolanmışsa
yoğuşma meydana gelebilir. Kış şartlarında
ünitenin taşınması durumunda kullanmadan
önce ünite oda sıcaklığına gelene kadar
yaklaşık 2 saat bekleyin.
4. Evinize gelen elektrik gerilimi 240 VAC ise
bu üniteyi elektrik prizlerinize bağlamak için
uygun bir ş adaptörü kullanın.
Önemli Güvenlik Talimatları
Ürünü kullanmadan önce bu çalıştırma
talimatlarını dikkatlice okuyun. Aşağıda sıralanan
bütün güvenlik talimatlarını izleyin.
Bu çalıştırma talimatlarını gelecekte başvurmak
için yakında tutun.
1. Bu talimatları okuyun.
2. Bu talimatları izleyin.
3. Bütün uyarılara dikkat edin.
4. Bütün talimatları izleyin.
5. Bu cihazı su yakınında kullanmayın.
6. Sadece kuru bir bezle temizleyin.
7. Havalandırma deliklerini kapatmayın.
İmalatçının talimatlarına uygun olarak kurun.
8. Radyatörler, kalorifer ızgaraları, ocaklar veya
ısı üreten başka aygıtlar (AV alıcıları dahil)
gibi ısı kaynaklarının yakınına yerleştirmeyin.
9. Polarize veya topraklı şin güvenlik amacını
ortadan kaldırmayın. Polarize bir şin, biri
diğerinden daha geniş olan iki ucu vardır.
Topraklı bir şin iki ucu ve üçüncü bir
topraklama ucu vardır. Geniş uç veya üçüncü
uç güvenliğiniz için eklenmiştir. Ürünle
birlikte verilen ş prizinize uymuyorsa
kullanılmayan prizin değiştirilmesi için bir
elektrikçiye danışın.
10. Güç kablosunun üzerine basılmasını veya
özellikle şlerde, ilave şlerde ve kablonun
cihazdan çıktığı noktada olmak üzere
ezilmesini önleyin.
11. Sadece imalatçının belirlediği ekleri/
aksesuarları kullanın.
12. Sadece imalatçının
belirlediği veya cihazla
birlikte sunulan araba, stant,
tripod, kelepçe veya masayla
kullanın.
Bir araba kullanıldığında devrilme kaynaklı
yaralanmaları önlemek için araba/aygıt
kombinasyonunu dikkatli hareket ettirin.
13. Yıldırımlı fırtınalar sırasında veya uzun
süreyle kullanılmayacaksa bu cihazı prizden
çekin.
14. Bütün servisleri kaliye servis personeline
yaptırın. Servis aygıt, güç tedarik kablosu
veya şinin zarar görmesi, üzerine sıvı
dökülmesi veya aygıta cisimlerin düşmesi,
aygıtın yağmura veya neme maruz kalması,
normal çalışmaması veya düşmesi gibi
herhangi bir biçimde zarar gördüğünde
gereklidir.

TUR - 6 TUR - 7
Aksesuarlar
STANDBY
LINK
Surround Hoparlör (2 adet) Güç Kablosu
Kablosuz Alıcı Modülü Hoparlör Kablosu (2 adet)
Teknik Özellikler
Ağırlık
Kablosuz Alıcı Modülü 0,7 kg
Surround Hoparlör 0,5 kg
Boyutlar (G x Y x D)
Kablosuz Alıcı Modülü 50,0 X 201,3 X 132,0 mm
Surround Hoparlör 76,2 X 126,9 X 76,2 mm
Çalışma Sıcaklık Aralığı +5°C ila +35°C arası
Çalışma Nem Aralığı 10% ~ 75%
Frekans aralığı 20 Hz~20 KHz
Bekleme Durumunda Genel Güç Tüketimi (W) 1,0W
NOTLAR
– Samsung Electronics Co., Ltd, önceden bildirimde bulunmaksızın özellikleri değiştirme hakkını saklı
tutmaktadır.
– Ağırlık ve boyutlar yaklaşık değerlerdir.
– Güç kaynağı ve Güç Tüketimi için, ürüne yapıştırılan etikete bakın.
– Tasarım ve teknik özellikler önceden haber verilemeksizin değiştirilebilir.
Open Source Licence Notice
• Açık kaynaklarla ilgili soru ve talepleriniz için E-posta yoluyla Samsung’a başvurun
(oss.request@samsung.com).
Hi
̇
zmet hakkinda önemli
̇
not
• Aşağıdaki durumlarda servis ücreti alınabilir
(a) talebiniz üzerine bir mühendis geldiğinde ama üründe hiçbir arıza olmadığında (yani bu kullanım
kılavuzunu okumadıysanız).
(b) üniteyi bir onarım merkezine getirdiğinizde ama üründe hiçbir arıza olmadığında (yani bu
kullanım kılavuzunu okumadıysanız).
• Evinize onarım için gelinmeden veya herhangi bir onarım yapılmadan önce servis ücreti size bildirilir.
SWA-8500S’yi Soundbar’a bağlama
1. Kablosuz Alıcı Modülünü, 2 Surround Hoparlöre bağlayın
Hoparlör kablolarını kullanarak iki surround ses hoparlörünü Kablosuz Alıcı Modülüne bağlayın.
• Hoparlör kabloları, renklerle kodlanmıştır.
SURROUND-LEFT
ID SET
L
R
SURROUND SPEAKERS OUT
SPEAKER IMPEDANCE : 3Ω
POWER
ID SET
L
R
SURROUND SPEAKERS OUT
SPEAKER IMPEDANCE : 3Ω
SURROUND-RIGHT
SURROUND-LEFT SURROUND-RIGHT
• Hoparlör kablolarını, Kablosuz Alıcı Modülüne bağlarken aşağıdaki adımları izleyin:
1. Gri şi, Kablosuz Alıcıdaki gri jaka takın.
2. Mavi şi, Kablosuz Alıcıdaki mavi jaka takın.
• Hoparlör kablolarını, surround hoparlörlere bağlarken aşağıdaki adımları izleyin:
1. Gri jaka takılı hoparlör kablosunu, üzerinde gri etiket bulunan hoparlörle kullanın.
2. Mavi jaka takılı hoparlör kablosunu, üzerinde mavi etiket bulunan hoparlörle kullanın.
3. Her bir hoparlör kablosunun kırmızı ve siyah renkli uçlarını, uygun hoparlörün kırmızı ve
siyah jaklarına takın.
• Etiketler, hoparlörlerin arka kısmındadır.

TUR - 8 TUR - 9
2. Elektrik prizine taktıktan sonra beklemede durumunu kontrol edin
Kablosuz Alıcı Modülü güç kablosunu bir elektrik prizine ve Kablosuz Alıcı Modülüne takarak
Kablosuz Alıcı Modülünü açın. Kablosuz Alıcı Modülündeki LINK LED’İ göstergesi (mavi LED) yanıp
söner. LED yanıp sönmüyorsa sayfa 10’deki 7. adıma başvurun.
ID SET
L
R
SURROUND SPEAKERS OUT
SPEAKER IMPEDANCE : 3Ω
POWER
POWER
STANDBY
LINK
STANDBY
LINK
Mavi yanıp sönüyor
3. Soundbar’ı kapatın
Soundbar’ı, uzaktan kumandasını kullanarak ya da ana Soundbar ünitesindeki (Güç) düğmesine
basarak kapatın.
OFF
• Soundbar resmi, modelinize bağlı olarak sizin Soundbar cihazınızdan farklı görünebilir.
4. Soundbar’ın uzaktan kumandasını kullanarak “ID SET” özelliğini
yapılandırın
Uzaktan kumandanızdaki VOL düğmesine Soundbar ekranınızda “ID SET” mesajı görünene kadar
5~6 saniye basın.
VOL
SOUNDBAR
ID SET
5 Sec
• Soundbar resmi, modelinize bağlı olarak sizin Soundbar cihazınızdan farklı görünebilir.
5. Soundbar’ı açın
Soundbar’ı, uzaktan kumandasını kullanarak ya da ana Soundbar ünitesindeki (Güç) düğmesine
basarak açın.
ON
• Soundbar resmi, modelinize bağlı olarak sizin Soundbar cihazınızdan farklı görünebilir.
6. LINK LED’İ göstergesinin mavi yandığını (bağlantı tamam)
kontrol edin
STANDBY
LINK
STANDBY
LINK
Mavi Yanıyor
Soundbar ile Kablosuz Alıcı Modülü
arasında bağlantı kurulduğunda LINK
LED’İ göstergesi yanıp sönmeyi bırakır
ve mavi olarak yanık kalır.

TUR - 10 TUR - 11
7. SWA-8500S bağlanmazsa LED Göstergesi durumuna göre
gerekli adımları uygulayın
LED durumu Eylem
LINK (Mavi)
Yanıyor Soundbar'a bağlı -
Yanıp sönüyor
Bağlantı
bekleme
durumunda
Soundbar'ın açık olup olmadığını kontrol edin
3 ila 6 arasındaki adımları tekrarlayın.
STANDBY
(Kırmızı)
Yanıyor Bağlantı hatası
Soundbar'ın açık olup olmadığını kontrol edin
1. LINK LED'İ göstergesi (Mavi) yanıp
sönene kadar bir kalem ucuyla 5~6 saniye
Kablosuz Alıcı Modülünün arkasındaki
ID SET düğmesine basın.
ID SET
L
R
SURROUND SPEAKERS OUT
SPEAKER IMPEDANCE : 3Ω
POWER
ID SET
5 Sec
2. 3 ila 6 arasındaki adımları tekrarlayın.
Diğer - Hatalar Bir Samsung Servis Merkezine başvurun.
Uyumlu Modeller
HW-M360 HW-M369 HW-M450 HW-M460
HW-M4500 HW-M4501 HW-M4510 HW-M4511
HW-M550 HW-M560
• Model listesi herhangi bir bildirimde bulunulmaksızın değiştirilebilir.
Kablosuz Modeller (5,15 GHz-5,35 GHz frekansı dahil)
• İşbu belge ile, Samsung Electronics bu ekipmanın 1999/5/EC Direktinin
esas gerekliliklerine ve diğer ilgili hükümlerine uygun olduğunu beyan eder.
Orijinal Uyumluluk Beyanı http://www.samsung.com adresinde bulunabilir,
Destek > Ürün Desteği Ara bölümüne gidin ve model adını girin.
Bu cihaz tüm AB ülkelerinde kullanılabilir.
Bu cihaz yalnızca iç mekanlarda kullanılabilir.
Kablosuz Modeller (5,15 GHz-5,35 GHz frekansı hariç)
• İşbu belge ile, Samsung Electronics bu ekipmanın 1999/5/EC Direktinin esas
gerekliliklerine ve diğer ilgili hükümlerine uygun olduğunu beyan eder.
Orijinal Uyumluluk Beyanı http://www.samsung.com adresinde bulunabilir,
Destek > Ürün Desteği Ara bölümüne gidin ve model adını girin.
Bu cihaz tüm AB ülkelerinde kullanılabilir.
Bu Ürünün Doğru Şekilde Atılması
(Atık Elektrikli ve Elektronik Cihazlar)
(Ayrı toplama sistemlerine sahip ülkeler içindir)
Ürünün, aksesuarların veya ilgili belgelerin üzerinde bulunan bu işaret, ürünün ve elektronik
aksesuarlarının (örn. şarj cihazı, kulaklık, USB kablo) kullanım ömrü sonunda diğer ev atıklarıyla
birlikte atılmaması gerektiğini belirtir. Atıkların kontrolsüz olarak imha edilmesinin çevre ve insan
sağlığı üzerindeki zararlı etkisini engellemek için lütfen bunu diğer atık türlerinden ayırın ve malzeme
kaynaklarının sürdürülebilir şekilde yeniden kullanılabilmesi için geri dönüştürülmesini sağlayın.
Ev kullanıcıları, bu ürünü çevresel açıdan güvenli bir geri dönüştürme işlemi için nereye ve nasıl
ulaştıracakları hakkında ayrıntılı bilgi için ürünü satın aldıkları bayi ile veya yerel resmi makamla
irtibat kurmalıdır.
İş kullanıcıları tedarikçileri ile irtibat kurup satın alma sözleşmesinin hüküm ve koşullarına bakmalıdır.
Bu ürün ve ürünün elektronik aksesuarları, imha için diğer ticari atıklarla karıştırılmamalıdır.
Samsung’un çevre taahhütleri ve REACH gibi ürüne özgü düzenleme zorunlulukları hakkında bilgi için
şu adresi ziyaret edin:
samsung.com/uk/aboutsamsung/samsungelectronics/corporatecitizenship/data_corner.html
Sayfa yükleniyor ...
Sayfa yükleniyor ...
-
 1
1
-
 2
2
-
 3
3
-
 4
4
-
 5
5
-
 6
6
-
 7
7
-
 8
8
-
 9
9
-
 10
10
-
 11
11
-
 12
12
-
 13
13
-
 14
14
-
 15
15
-
 16
16
-
 17
17
-
 18
18
-
 19
19
-
 20
20
-
 21
21
-
 22
22


Diğer dillerde
- English: Samsung SWA-8500S User manual
İlgili Makaleler
-
Samsung SWA-8500S Kullanım kılavuzu
-
Samsung HW-Q70R Kullanım kılavuzu
-
Samsung HW-T450 Kullanım kılavuzu
-
Samsung HW-N650 Hızlı başlangıç Kılavuzu
-
Samsung HW-R450 Hızlı başlangıç Kılavuzu
-
-
Samsung HW-T650 Kullanım kılavuzu
-
Samsung HW-N550 Kullanım kılavuzu
-
-
Samsung HW-N450 Hızlı başlangıç Kılavuzu