
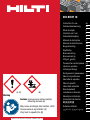
Hilti HIT-HY 10
Instruction for use en
Gebrauchsanweisung de
Mode d‘emploi fr
Istruzioni per l‘uso it
Gebruiksaanwijzing nl
Manual de instruções pt
Manual de instrucciones es
Brugsanvisning da
Käyttöohje fi
Bruksanvisning no
Bruksanvisning sv
Οδηγίες χρήσης el
Ръководство за обслужване
bg
Upute za uporabu hr
Instrukcja obslugi pl
Инструкция по применению
ru
Návod na používanie sk
Navodila za uporabo sl
Návod kpoužití cs
Használati útmutató hu
Kasutusjuhend et
Lietošanas instrukcija lv
Naudojimo instrukcija lt
Instrucţiuni de folosire ro
取扱説明書 ja
Kullanma talimatı tr
إرشادات الاستخدام ar
(A, B)
(B)
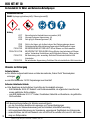
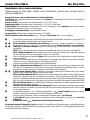
Warning
Contains: Hydroxypropyl methacrylate(A),
dibenzoyl peroxide (B)
May cause an allergic skin reaction. (A,B)
Causes serious eye irritation (A)
Very toxic to aquatic life. (B)
Printed: 21.05.2015 | Doc-Nr: PUB / 5168491 / 000 / 02

Hilti HIT-HY 10
2
1
2
3
10
11
2x
HIT-HY70-Ziegel
21.07.2006
2x
2
2x
4
6
31
7
8
9
5
12
15
14
16 17
t
gel
t
cure
13
2x 330ml
3x 500ml
HIT-SHIT-SCHIT-SC
T
max
1
2
3
10
11
2x
HIT-HY70-Ziegel
21.07.2006
2x
2
2x
4
6
31
7
8
9
5
12
15
14
16 17
t
gel
t
cure
13
2x 330ml
3x 500ml
HIT-SHIT-SCHIT-SC
T
max
1
2
3
10
11
2x
HIT-HY70-Ziegel
21.07.2006
2x
2
2x
4
6
31
7
8
9
5
12
15
14
16 17
t
gel
t
cure
13
2x 330ml
3x 500ml
HIT-SHIT-SCHIT-SC
T
max
1
2
3
10
11
2x
HIT-HY70-Ziegel
21.07.2006
2x
2
2x
4
6
31
7
8
9
5
12
15
14
16 17
t
gel
t
cure
13
2x 330ml
3x 500ml
HIT-SHIT-SCHIT-SC
T
max
1
2
3
10
11
2x
HIT-HY70-Ziegel
21.07.2006
2x
2
2x
4
6
31
7
8
9
5
12
15
14
16 17
t
gel
t
cure
13
2x 330ml
3x 500ml
HIT-SHIT-SCHIT-SC
T
max
1
2
3
10
11
2x
HIT-HY70-Ziegel
21.07.2006
2x
2
2x
4
6
31
7
8
9
5
12
15
14
16 17
t
gel
t
cure
13
2x 330ml
3x 500ml
HIT-SHIT-SCHIT-SC
T
max
1
2
3
10
11
2x
HIT-HY70-Ziegel
21.07.2006
2x
2
2x
4
6
31
7
8
9
5
12
15
14
16 17
t
gel
t
cure
13
2x 330ml
3x 500ml
HIT-SHIT-SCHIT-SC
T
max
1
2
3
10
11
2x
HIT-HY70-Ziegel
21.07.2006
2x
2
2x
4
6
31
7
8
9
5
12
15
14
16 17
t
gel
t
cure
13
2x 330ml
3x 500ml
HIT-SHIT-SCHIT-SC
T
max
1
2
3
10
11
2x
HIT-HY70-Ziegel
21.07.2006
2x
2
2x
4
6
31
7
8
9
5
12
15
14
16 17
t
gel
t
cure
13
2x 330ml
3x 500ml
HIT-SHIT-SCHIT-SC
T
max
1
2
3
10
11
2x
HIT-HY70-Ziegel
21.07.2006
2x
2
2x
4
6
31
7
8
9
5
12
15
14
16 17
t
gel
t
cure
13
2x 330ml
3x 500ml
HIT-SHIT-SCHIT-SC
T
max
1
2
3
10
11
2x
HIT-HY70-Ziegel
21.07.2006
2x
2
2x
4
6
31
7
8
9
5
12
15
14
16 17
t
gel
t
cure
13
2x 330ml
3x 500ml
HIT-SHIT-SCHIT-SC
T
max
7
4
2
1
1
2
3
10
11
2x
HIT-HY70-Ziegel
21.07.2006
2x
2
2x
4
6
31
7
8
9
5
12
15
14
16 17
t
gel
t
cure
13
2x 330ml
3x 500ml
HIT-SHIT-SCHIT-SC
T
max
1
2
3
10
11
2x
HIT-HY70-Ziegel
21.07.2006
2x
2
2x
4
6
31
7
8
9
5
12
15
14
16 17
t
gel
t
cure
13
2x 330ml
3x 500ml
HIT-SHIT-SCHIT-SC
T
max
1
2
3
10
11
2x
HIT-HY70-Ziegel
21.07.2006
2x
2
2x
4
6
31
7
8
9
5
12
15
14
16 17
t
gel
t
cure
13
2x 330ml
3x 500ml
HIT-SHIT-SCHIT-SC
T
max
1
2
3
10
11
2x
HIT-HY70-Ziegel
21.07.2006
2x
2
2x
4
6
31
7
8
9
5
12
15
14
16 17
t
gel
t
cure
13
2x 330ml
3x 500ml
HIT-SHIT-SCHIT-SC
T
max
1
2
3
10
11
2x
HIT-HY70-Ziegel
21.07.2006
2x
2
2x
4
6
31
7
8
9
5
12
15
14
16 17
t
gel
t
cure
13
2x 330ml
3x 500ml
HIT-SHIT-SCHIT-SC
T
max
1
2
3
10
11
2x
HIT-HY70-Ziegel
21.07.2006
2x
2
2x
4
6
31
7
8
9
5
12
15
14
16 17
t
gel
t
cure
13
2x 330ml
3x 500ml
HIT-SHIT-SCHIT-SC
T
max
1
2
3
10
11
2x
HIT-HY70-Ziegel
21.07.2006
2x
2
2x
4
6
31
7
8
9
5
12
15
14
16 17
t
gel
t
cure
13
2x 330ml
3x 500ml
HIT-SHIT-SCHIT-SC
T
max
1
2
3
10
11
2x
HIT-HY70-Ziegel
21.07.2006
2x
2
2x
4
6
31
7
8
9
5
12
15
14
16 17
t
gel
t
cure
13
2x 330ml
3x 500ml
HIT-SHIT-SCHIT-SC
T
max
Printed: 21.05.2015 | Doc-Nr: PUB / 5168491 / 000 / 02

3
HIT-HY70-Vollstein
21.07.2006
2x
2x
2x
2 3 4
1
2
1x
3
8
9
t
gel
t
cure
T
max
14
10
15
11
10
11
16
17
2x 330ml
3x 500ml
32
41
50
68
86
104
F
C
0
5
10
t
gel
10 min
10 min
7 min
15
32
41
50
F
C
0
5
10
t
cure
4 h
2.5 h
1.5 h
20
30
40
4 min
2 min
1 min
68
86
104
20
30
40
45 min
30 min
20 min
16
10
HIT-HY70-Vollstein
21.07.2006
2x
2x
2x
2 3 4
1
2
1x
3
8
9
t
gel
t
cure
T
max
14
10
15
11
10
11
16
17
2x 330ml
3x 500ml
32
41
50
68
86
104
F
C
0
5
10
t
gel
10 min
10 min
7 min
15
32
41
50
F
C
0
5
10
t
cure
4 h
2.5 h
1.5 h
20
30
40
4 min
2 min
1 min
68
86
104
20
30
40
45 min
30 min
20 min
16
10
HIT-HY70-Vollstein
21.07.2006
2x
2x
2x
2 3 4
1
2
1x
3
8
9
t
gel
t
cure
T
max
14
10
15
11
10
11
16
17
2x 330ml
3x 500ml
32
41
50
68
86
104
F
C
0
5
10
t
gel
10 min
10 min
7 min
15
32
41
50
F
C
0
5
10
t
cure
4 h
2.5 h
1.5 h
20
30
40
4 min
2 min
1 min
68
86
104
20
30
40
45 min
30 min
20 min
16
10
HIT-HY70-Vollstein
21.07.2006
2x
2x
2x
2 3 4
1
2
1x
3
8
9
t
gel
t
cure
T
max
14
10
15
11
10
11
16
17
2x 330ml
3x 500ml
32
41
50
68
86
104
F
C
0
5
10
t
gel
10 min
10 min
7 min
15
32
41
50
F
C
0
5
10
t
cure
4 h
2.5 h
1.5 h
20
30
40
4 min
2 min
1 min
68
86
104
20
30
40
45 min
30 min
20 min
16
10
HIT-HY70-Vollstein
21.07.2006
2x
2x
2x
2 3 4
1
2
1x
3
8
9
t
gel
t
cure
T
max
14
10
15
11
10
11
16
17
2x 330ml
3x 500ml
32
41
50
68
86
104
F
C
0
5
10
t
gel
10 min
10 min
7 min
15
32
41
50
F
C
0
5
10
t
cure
4 h
2.5 h
1.5 h
20
30
40
4 min
2 min
1 min
68
86
104
20
30
40
45 min
30 min
20 min
16
10
HIT-HY70-Vollstein
21.07.2006
2x
2x
2x
2 3 4
1
2
1x
3
8
9
t
gel
t
cure
T
max
14
10
15
11
10
11
16
17
2x 330ml
3x 500ml
32
41
50
68
86
104
F
C
0
5
10
t
gel
10 min
10 min
7 min
15
32
41
50
F
C
0
5
10
t
cure
4 h
2.5 h
1.5 h
20
30
40
4 min
2 min
1 min
68
86
104
20
30
40
45 min
30 min
20 min
16
10
HIT-HY70-Vollstein
21.07.2006
2x
2x
2x
2 3 4
1
2
1x
3
8
9
t
gel
t
cure
T
max
14
10
15
11
10
11
16
17
2x 330ml
3x 500ml
32
41
50
68
86
104
F
C
0
5
10
t
gel
10 min
10 min
7 min
15
32
41
50
F
C
0
5
10
t
cure
4 h
2.5 h
1.5 h
20
30
40
4 min
2 min
1 min
68
86
104
20
30
40
45 min
30 min
20 min
16
10
1
2
3
10
11
2x
HIT-HY70-Ziegel
21.07.2006
2x
2
2x
4
6
31
7
8
9
5
12
15
14
16 17
t
gel
t
cure
13
2x 330ml
3x 500ml
HIT-SHIT-SCHIT-SC
T
max
7
4
2
1
HIT-HY70-Vollstein
21.07.2006
2x
2x
2x
2 3 4
1
2
1x
3
8
9
t
gel
t
cure
T
max
14
10
15
11
10
11
16
17
2x 330ml
3x 500ml
32
41
50
68
86
104
F
C
0
5
10
t
gel
10 min
10 min
7 min
15
32
41
50
F
C
0
5
10
t
cure
4 h
2.5 h
1.5 h
20
30
40
4 min
2 min
1 min
68
86
104
20
30
40
45 min
30 min
20 min
16
10
HIT-HY70-Vollstein
21.07.2006
2x
2x
2x
2 3 4
1
2
1x
3
8
9
t
gel
t
cure
T
max
14
10
15
11
10
11
16
17
2x 330ml
3x 500ml
32
41
50
68
86
104
F
C
0
5
10
t
gel
10 min
10 min
7 min
15
32
41
50
F
C
0
5
10
t
cure
4 h
2.5 h
1.5 h
20
30
40
4 min
2 min
1 min
68
86
104
20
30
40
45 min
30 min
20 min
16
10
HIT-HY70-Vollstein
21.07.2006
2x
2x
2x
2 3 4
1
2
1x
3
8
9
t
gel
t
cure
T
max
14
10
15
11
10
11
16
17
2x 330ml
3x 500ml
32
41
50
68
86
104
F
C
0
5
10
t
gel
10 min
10 min
7 min
15
32
41
50
F
C
0
5
10
t
cure
4 h
2.5 h
1.5 h
20
30
40
4 min
2 min
1 min
68
86
104
20
30
40
45 min
30 min
20 min
16
10
HIT-HY70-Vollstein
21.07.2006
2x
2x
2x
2 3 4
1
2
1x
3
8
9
t
gel
t
cure
T
max
14
10
15
11
10
11
16
17
2x 330ml
3x 500ml
32
41
50
68
86
104
F
C
0
5
10
t
gel
10 min
10 min
7 min
15
32
41
50
F
C
0
5
10
t
cure
4 h
2.5 h
1.5 h
20
30
40
4 min
2 min
1 min
68
86
104
20
30
40
45 min
30 min
20 min
16
10
HIT-HY70-Vollstein
21.07.2006
2x
2x
2x
2 3 4
1
2
1x
3
8
9
t
gel
t
cure
T
max
14
10
15
11
10
11
16
17
2x 330ml
3x 500ml
32
41
50
68
86
104
F
C
0
5
10
t
gel
10 min
10 min
7 min
15
32
41
50
F
C
0
5
10
t
cure
4 h
2.5 h
1.5 h
20
30
40
4 min
2 min
1 min
68
86
104
20
30
40
45 min
30 min
20 min
16
10
HIT-HY70-Vollstein
21.07.2006
2x
2x
2x
2 3 4
1
2
1x
3
8
9
t
gel
t
cure
T
max
14
10
15
11
10
11
16
17
2x 330ml
3x 500ml
32
41
50
68
86
104
F
C
0
5
10
t
gel
10 min
10 min
8 min
15
32
41
50
F
C
0
5
10
t
cure
4 h
2.5 h
1.5 h
20
30
40
5 min
3 min
2 min
68
86
104
20
30
40
45 min
30 min
20 min
16
10
HAS / HIT-V
HIS
Rebar
Printed: 21.05.2015 | Doc-Nr: PUB / 5168491 / 000 / 02

Hilti HIT-HY 10
4
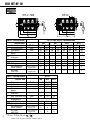
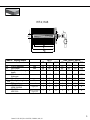
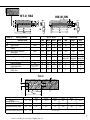
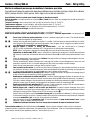
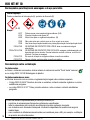
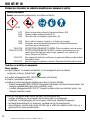
Table 1:
HIT-V, HAS, HAS-E, threaded rods
Anchor size
Setting details
M6 M8 M10 M12
Sieve sleeve
Drill bit diameter
1)
Hole depth
Min. base material
thickness
Max. Clearance hole
Max. tightening torque
Filling volume
Effective anchoring
depth
HIT-SC... 12x50
mm
mm
mm
mm
Nm
ml
mm
12
60
80
7
3
12
2
50
12
95
115
7
3
24
4
80
16
60
80
9
3
18
3
18
3
50
16
95
115
9
3
30
5
30
5
80
16
60
80
12
4
50
16
95
115
12
4
80
18
60
80
14
6
18
3
50
18
95
115
14
6
36
6
80
d
o
h
o
h
min
d
f
T
max
h
ef
12x85 16x50 16x85 16x50 16x85 18x50 18x85
Table 1: HIT-IC
Anchor size
Setting details
M8 M10M12
Sieve sleeve
Drill bit diameter
1)
Hole depth
Min. base material
thickness
Max. Clearance hole
Length bolt
engagement
Max. tightening torque
Filling volume
Effective anchoring
depth
HIT-SC...
mm
mm
mm
mm
mm
Nm
ml
mm
16
95
115
9
3
30
5
80
18
95
115
12
min. 10 – max. 75
6
36
6
80
22
95
115
14
6
45
8
80
d
o
h
o
h
min
d
f
h
s
T
max
h
ef
16x85 18x85 22x85
TE 2-S; TE 2-M; TE 6-S ( / )
1)
approx. number of
trigger pulls
36474749
approx. number of
trigger pulls
7911
approx. number of
trigger pulls
MD 2000/2500
HDM 330/500
ED 3500
HDE 500
approx. number of
trigger pulls
MD 2000/2500
HDM 330/500
ED 3500
HDE 500
HIT-HY_BA-Zeich
24.07.2006
T
max
T
max
T
max
T
max
T
max
T
max
HIT-V, HAS
HIT-IC
Printed: 21.05.2015 | Doc-Nr: PUB / 5168491 / 000 / 02

5
HIT-V HAS, HAS-E, HAS-R
M8
Drill bit diameter
Hole depth
Min. base material
thickness
Max. Clearance hole
Max. tightening torque
Filling volume
Effective anchoring
depth
ml
mm
4
1
d
o
h
o
h
min
d
f
T
max
h
ef
M10 M12M8M10 M12 M16
mm
mm
mm
mm
Nm
10
85
80
115
9
5
5
1
12
85
80
115
12
8
7
2
14
85
80
115
14
10
4
1
10
85
80
115
9
5
6
1
12
95
90
120
12
8
10
2
14
115
110
140
14
10
15
3
18
130
125
170
18
10
Anchor size
Setting details
Table 2:
approx. number of
trigger pulls
1221234
MD 2000/2500
HDM 330/500
ED 3500
HDE 500
approx. number of
trigger pulls
HIT-HY_BA-Zeich
24.07.2006
T
max
T
max
T
max
T
max
T
max
T
max
HIT-V, HAS
Printed: 21.05.2015 | Doc-Nr: PUB / 5168491 / 000 / 02

Hilti HIT-HY 10
6
Table 3: HIT-IC HIS-N/-RN
M8
Filling volume
mm
mm
mm
mm
mm
mm
Nm
6
1
Drill bit diameter
Hole depth
Min. base material
thickness
Max. Clearance hole
Length bolt engagement
Effective anchoring
depth
d
o
h
o
h
min
d
f
h
s
Max. tightening torqueT
max
h
ef
ml
14
85
80
115
9
5
6
1
18
85
80
115
14
10
6
1
16
85
80
115
12
min. 10 – max. 75 min. 8-
max.20
min. 10-
max.25
min. 12-
max.30
8
6
1
14
95
90
120
9
5
16
3
22
130
125
170
14
10
10
2
18
115
110
150
12
8
M10 M12 M8 M10 M12Anchor size
Setting details
approx. number of
trigger pulls
2222 43
MD 2000/2500
HDM 330/500
ED 3500
HDE 500
approx. number of
trigger pulls
HIT-HY_BA-Zeich
24.07.2006
T
max
T
max
T
max
T
max
T
max
T
max
T
max
HIT-IC
HIS-N/-RN
Printed: 21.05.2015 | Doc-Nr: PUB / 5168491 / 000 / 02

7
d
l
b
0
d
h
ef
=
h
0
h
min
US Inch reinforcement bar sizes
Setting Parameter
S
y
mbol Uni
t
# 3# 4
Bar Diameter
din. 3/81/2
Setting Detail
Drill bit diameter
d
0
in.
1/25/8
Embedment Range
h
ef,min
- h
ef,max
h
ef
in.3-4 1/24-6
Min. base material thickness*
h
min
in.
h
ef
+ 2 in.h
ef
+ 2 in.
Recommended Drilling tool
Hilti TE-
6-18M16-35
* The minimum base material thickness must be equal to or greater than 3-1/2 in. (89mm).
Setting Parameter
S
y
mbol Uni
t
Ø 8Ø 10 Ø 12
Rebar Diameter
d mm 9 11,5 13,5
Setting Detail
Drill bit diameter
d
0
mm
12 14 16
h
ef
Effective anchoring depth
mm 80 90 110
Min. base material thickness
h
min
mm
h
ef
+ 50 mm
The holes must be filled about 2/3 full.
Canadian reinforcement bar sizes
Setting Parameter
Symbol Unit
10 M
Bar Diameter
dmm11,3
Setting Detail
Drill bit diameter
d
0
in.
9/16
Embedment Range
h
ef,min
- h
ef,max
h
ef
mm 91 -136
Min. base material thickness*
h
min
mm
h
ef
+ 50 mm
Recommended Drilling tool
Hilti TE-
6-18M
* The minimum base material thickness must be equal to or greater than 3-1/2 in. (89mm).
The holes must be filled about 2/3 full.
Ø 14
16
18
125
Ø 16
18,5
20
145
Ø 13
15
18
120
Rebar
Table 4: HIT-V, HAS HIS-N/-RN
M8
Filling volume
mm
mm
mm
mm
mm
mm
Nm
4
1
Drill bit diameter
Hole depth
Min. base material
thickness
Max. Clearance hole
Length bolt engagement
Effective anchoring
depth
d
o
h
o
h
min
d
f
h
s
Max. Tightening torqueT
max
h
ef
ml
approx. number of
trigger pulls
10
85
80
115
9
10
10
2
14
115
110
140
14
40
6
1
12
95
90
120
12
min. 8-
max.20
min. 10-
max.25
min. 12-
max.30
20
6
1
14
95
90
120
9
10
16
3
22
130
125
170
14
40
10
2
18
115
110
140
12
20
M10M12 M8 M10M12Anchor size
Setting details
approx. number of
trigger pulls
32
15
3
18
130
125
170
18
80
M16
4
-
-
-
-
w
HIT-V, HAS
HIS-N/-RN
max
max
232
4
MD 2000/2500
HDM 330/500
ED 3500
HDE 500
Printed: 21.05.2015 | Doc-Nr: PUB / 5168491 / 000 / 02

Hilti HIT-HY 10
8
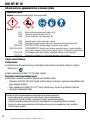
Adhesive mortar for anchor and rebar fastenings
Disposal considerations
Empty packs:
▶ Leave the mixer attached and dispose of via the local Green Dot recovery system
▶ or EAK waste material code: 150102 plastic packaging
Full or partially emptied packs:
▶ Must be disposed of as special waste in accordance with official regulations.
– EAK waste material code: 08 04 09* waste adhesives and sealants containing organic solvents or
other dangerous substances.
– or EAK waste material code: 20 01 27* paint, inks, adhesives and resins containing dangerous
substances.
Hilti accepts no liability for damage or failure caused by:
– Storage and transport not in accordance with the specified conditions.
– Failure to observe the instructions for use and setting data, incorrect use
– Inadequate design of the anchor points, inadequate load bearing capacity of the base material
– Other influences of which Hilti is not aware or on which Hilti has no influence, e.g. use with products
from a third party.
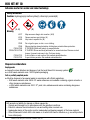
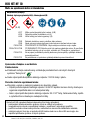
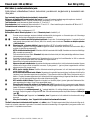
Safety instructions
Contains: Hydroxypropyl methacrylate(A), dibenzoyl peroxide(B)
(A, B)
(B)
Warning
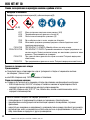
H317 May cause an allergic skin reaction. (A,B)
H319 Causes serious eye irritation (A)
H400 Very toxic to aquatic life. (B)
P262 Do not get in eyes, on skin, or on clothing.
P280 Wear protective gloves/protective clothing/eye protection/face protection.
P302+P352 IF ON SKIN: Wash with plenty of soap and water.
P305+P351+P338 IF IN EYES: Rinse cautiously with water for several minutes. Remove contact
lenses, if present and easy to do. Continue rinsing.
P333+P313 If skin irritation or rash occurs: Get medical advice/attention.
P337+P313 If eye irritation persists: Get medical advice/attention.
Printed: 21.05.2015 | Doc-Nr: PUB / 5168491 / 000 / 02

9
en
Net contents: 330 ml/500 ml Net weight: 540 g/820 g
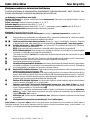
Adhesive mortar for anchor and rebar fastenings
Suitable for use in hollow and solid clay brick, sand-lime block, concrete, concrete block, cellular concrete
and natural stone
Read the instructions for use and safety instructions before using this product.
Expiry date: see imprint on manifold (month/year). Do not use expired mortar!
Transport and storage: cool, dry and dark, +5 °C to 25 °C.
Foil pack temperature: must be between +5 °C and 40 °C during application.
Base material temperature: must be between 0 °C and 40 °C during application - Exception in solid clay brick:
between +5 °C and 40 °C.
The foil pack opens automatically at start of dispensing.
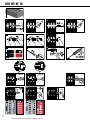
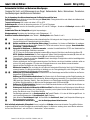
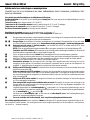
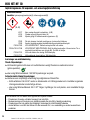
Installation instructions: Illustration of the sequence of operations: see pictograms 1-17
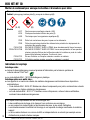
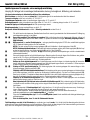
Detailed setting data: for hollow materials see table 1; for solid materials see tables 2 and 3
Drill the hole with a rotary hammer. Check to determine whether the material is solid or hollow (with cavities). Use of
a diamond coring tool to drill the hole is not permissible.
– Clean the drilled hole immediately before setting the anchor: 2 x blowing – 2 x cleaning with a wire brush – 2 x blowing.
Holes must be free of dust, water, ice, oil/grease and other contaminates. Inadequate hole cleaning = poor load-bearing
values
– Base materials with cavities ➔ Use a mesh sleeve – either HIT-SC composite mesh sleeve or HIT-S metal mesh sleeve.
Do not use damaged sleeves.
HIT-SC: First fit the centering cap, check that it engages (5) and then insert the mesh sleeve in the drilled hole (7).
HIT-SC sleeve combinations: Fit the centering cap on the outer mesh sleeve (5), connect the outer mesh sleeve to the
inner mesh sleeve (6), check that parts are well engaged and then insert the combined sleeves in the hole (7).
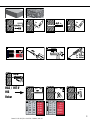
Place the foil pack in the foil pack holder. Caution! Never use damaged foil packs and/or damaged or very dirty foil
pack holders.
Screw the mixing nozzle tightly onto the foil pack. Do not modify the mixing nozzle in any way, unless specified by Hilti.
A new mixing nozzle must be used with each new foil pack.
Insert the foil pack holder, with the foil pack, in the dispenser.
Discard initial quantity of mortar: Do not use the initial quantity of mortar dispensed from the mixing nozzle for making
fastenings. The quantity of mortar to be discarded depends on the size of the foil pack. See pictogram 11. The initial
quantity of mortar must be discarded each time the mixing nozzle is changed.
– Filling the HIT-SC plastic mesh sleeve: Fill the mesh sleeve with mortar from the centering cap until mortar escapes at
the centering cap (filling control) (13).
Filling HIT-SC mesh sleeve combinations: Push the mixing nozzle through the centering cap and through the bottom of
the outer mesh sleeve (if necessary: use mixer extension). Fill the inner mesh sleeve (12). For the number of trigger
pulls required: see table 1. Then pull the mixing nozzle back to the
centering cap of the outer mesh sleeve and fill the outer mesh sleeve until mortar escapes from the centering cap
(filling control) (13).
Filling the HIT-S metal mesh sleeve: Insert the mixing nozzle to the bottom of the mesh sleeve and then retract the
mixing nozzle approx. 10 mm after each trigger pull of the dispenser.
Solid materials: Fill the drilled hole without trapping air! Insert the mixing nozzle to the base of the borehole (use an
extension for deep holes) and then retract the nozzle, step by step, after each trigger pull of the dispenser. Fill the hole
to approx. 2/3 with mortar.
Push the fastening element into the mortar-filled hole or mesh sleeve up to anchoring depth „h
ef
“ in accordance with
tables 1-3. Afterwards the annular gap must be completely filled with mortar.
Observe the working time „t
gel
“, which varies according to temperature of base material.
Once the working time „t
gel
“, has elapsed, do not move or apply a load to the fastening element until the curing time
„t
cure
“ has passed.
A load may be applied to the fastening element only after the curing time „t
cure
“ has elapsed.
Partly-used foil packs may be reused within 4 weeks. Leave the used mixing nozzle screwed on and store the partly-used foil
pack in accordance with storage instructions. Before reuse, screw on a new mixing nozzle and discard the initial quantity of
mortar dispensed, as described at paragraph 11.
Printed: 21.05.2015 | Doc-Nr: PUB / 5168491 / 000 / 02

Hilti HIT-HY 10
10
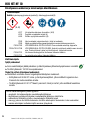
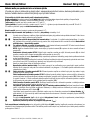
Verbundmörtel für Dübel- und Betoneisen-Befestigungen
Hinweise zur Entsorgung
Entleerte Gebinde:
▶ Den Mischer aufgeschraubt lassen und über das nationale „Grüner Punkt“ Sammelsystem
entsorgen.
▶ oder EAK-Abfallcode: 150102 Verpackungen aus Kunststoff
Volle oder teilentleerte Gebinde:
▶ Unter Beachtung der behördlichen Vorschriften als Sonderabfall entsorgen.
– EAK-Abfallcode: 08 04 09* Klebstoff- und Dichtmassenabfälle, die organische Lösemittel oder
andere gefährliche Stoffe enthalten.
– oder EAK-Abfallcode: 20 01 27* Farben, Druckfarben, Klebstoffe und Kunstharze, die gefährliche
Stoffe enthalten.
Hilti übernimmt keine Haftung für Schäden verursacht durch:
– von den Vorschriften abweichende Lagerungs- und Transportbedingungen
– Missachtung der Gebrauchsanweisung und der Setzdaten, fehlerhafte Anwendung
– nicht ausreichende Bemessung der Verankerung, ungenügende Tragfähigkeit des Untergrundes
– andere Einflüsse, die Hilti nicht bekannt oder von Hilti nicht zu vertreten sind, wie z.B. die Verwen-
dung von Drittprodukten.
Sicherheitsvorschriften:
Enthält: Hydroxypropylmethacrylat(A), Dibenzoylperoxid(B)
(A, B)
(B)
Achtung
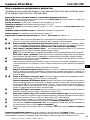
H317 Kann allergische Hautreaktionen verursachen.(A,B)
H319 Verursacht schwere Augenreizung. (A)
H400 Sehr giftig für Wasserorganismen. (B)
P262 Nicht in die Augen, auf die Haut oder auf die Kleidung gelangen lassen.
P280 Schutzhandschuhe/Schutzkleidung/Augenschutz/Gesichtsschutz tragen.
P302+P352 BEI BERÜHRUNG MIT DER HAUT: Mit viel Wasser und Seife waschen.
P305+P351+P338 BEI KONTAKT MIT DEN AUGEN: Einige Minuten lang behutsam mit Wasser
spülen. Vorhandene Kontaktlinsen nach Möglichkeit entfernen. Weiter spülen.
P333+P313 Bei Hautreizung oder -ausschlag: Ärztlichen Rat einholen/ärztliche Hilfe
hinzuziehen.
P337+P313 Bei anhaltender Augenreizung: Ärztlichen Rat einholen/ärztliche Hilfe hinzuziehen.
Printed: 21.05.2015 | Doc-Nr: PUB / 5168491 / 000 / 02

11
de
Inhalt: 330 ml/500 ml Gewicht: 540 g/820 g
Verbundmörtel für Dübel- und Betoneisen-Befestigungen
Geeignet für Hohl- und Vollmauerwerk aus Ziegel, Kalksandstein, Beton, Betonsteinen, Porenbeton,
haufwerksporigem Leichtbeton und Naturstein
Vor der Anwendung diese Gebrauchsanweisung und die Sicherheitsvorschriften lesen.
Haltbarkeitsdatum: siehe Aufdruck auf dem Verbindungsteil (Monat/Jahr). Foliengebinde dürfen nach Ablauf des Haltbarkeitsda-
tums nicht mehr verwendet werden!
Transport und Lagerung: kühl, trocken und dunkel; +5°C bis 25°C
Gebindetemperatur: muss bei der Anwendung zwischen +5°C und 40°C betragen
Untergrundtemperatur: muss bei der Anwendung zwischen 0°C und 40°C betragen - Ausnahme in Volltonziegel: zwischen +5°C
und 40°C
Automatisches Öffnen der Foliengebinde erfolgt bei Auspressbeginn
Montageanweisung: Darstellung der Arbeitsfolgen: siehe Piktogramme 1-17;
Detaillierte Setzdaten: Hohluntergründe: siehe Tabelle 1; Volluntergründe: siehe Tabellen 2 und 3
Bohrloch erstellen mit Bohrhammer; dabei feststellen/prüfen: Volluntergrund oder Untergrund mit Hohlräumen? Erstel-
lung des Bohrlochs mit Diamantbohrgerät ist nicht zulässig.
– Bohrloch unmittelbar vor dem Setzen des Dübels reinigen: 2 x ausblasen, 2 x bürsten mit Stahlbürste, 2x ausblasen.
Bohrlöcher müssen frei sein von Staub, Wasser, Eis, Öl/Fett oder anderen Verunrei-nigungen. Unzureichende Bohr-
lochreinigung = schlechte Haltewerte
– Untergrund mit Hohlräumen ➔ Siebhülse verwenden - entweder Kunststoffsiebhülse HIT-SC oder Metallsiebhülse
HIT-S. Keine beschädigten Siebhülsen verwenden.
HIT-SC: Zuerst die Zentrierkappe aufstecken/verrasten (5) und dann die Siebhülse in das Bohrloch einführen (7).
HIT-SC Siebhülsen-Kombinationen: Die Zentrierkappe auf äußere Siebhülse aufstecken/verrasten (5), diese mit der
inneren Siebhülse zusammenstecken/verrasten (6) und ins Bohrloch einführen (7).
Foliengebinde in Kassette einschieben. Vorsicht! Niemals beschädigte Foliengebinde und/oder beschädigte/stark
verschmutzte Kassetten verwenden.
Mischer vollständig auf das Foliengebinde aufschrauben. Den Mischer unter keinen Umständen verändern, außer es
wird von Hilti genau angegeben. Für jedes neue Foliengebinde muss ein neuer Mischer verwendet werden.
Kassette mit dem Foliengebinde in das Auspressgerät einlegen.
Mörtelvorlauf verwerfen: Der am Anfang aus dem Mischer austretende Mörtelvorlauf darf nicht für Befestigungen
verwendet werden. Die Mörtelvorlauf-Menge ist abhängig von der Foliengebindegröße, siehe Piktogramm 11. Nach
jedem Mischerwechsel den Mörtelvorlauf erneut verwerfen.
– Befüllung der HIT-SC Kunststoffsiebhülse: Die Siebhülse von der Zentrierkappe aus befüllen bis Mörtel an der Zentrier-
kappe austritt (Füllkontrolle) (13).
Befüllung von HIT-SC-Siebhülsen-Kombinationen: Den Mischer durch die Zentrierkappe und den Siebhülsenboden der
äußeren Siebhülse durchstecken (falls erforderlich: Mischerverlängerung verwenden). Die innere Siebhülse befüllen
(12). Anzahl der Hübe siehe Tabelle 1. Dann den Mischer bis zur Zentrierkappe der äußeren Siebhülse zurückziehen
und äußere Siebhülse befüllen, bis Mörtel an der Zentrierkappe austritt (Füllkontrolle) (13).
Befüllung der HIT-S Metallsiebhülse: Mischer bis zum Siebhülsenboden stecken und mit jedem Hub den Mischer um
ca. 10 mm schrittweise zurückziehen.
Volluntergrund: Das Bohrloch luftblasenfrei mit Mörtel verfüllen! Den Mischer bis zum Bohrlochgrund in das Bohrloch
stecken (bei tiefen Bohrlöchern eine Verlängerung verwenden) und mit jedem Hub den Mischer schrittweise zurück-
ziehen. Das Bohrloch zu ca. 2/3 mit Mörtel verfüllen.
Das Befestigungselement bis zur Verankerungstiefe „hef” gemäß Tabellen 1-3 in das mit Mörtel ausgefüllt sein. Je
nach Anwendungstemperatur die Verarbeitungszeit „tgel“ beachten.
Nach Ablauf der Verarbeitungszeit „tgel“ bis zum Ablauf der Aushärtezeit „tcure“ jede Manipulation/Belastung am
Befestigungselement unterlassen.
Erst nach Ablauf der Aushärtezeit „t
cure
“ darf das Befestigungselement belastet werden.
Nicht vollständig aufgebrauchte Foliengebinde können innerhalb von 4 Wochen weiterverwendet werden. Den gefüllten Mischer
aufgeschraubt lassen und das Foliengebinde vorschriftsmäßig lagern. Vor Weiterver- wendung einen neuen Mischer aufschrau-
ben und den Mörtelvorlauf – wie unter Punkt 11 beschrieben – erneut verwerfen.
Printed: 21.05.2015 | Doc-Nr: PUB / 5168491 / 000 / 02

Hilti HIT-HY 10
12
Mortier de scellement pour ancrage de chevilles et d‘armatures pour béton
Mesures de sécurité:
Contient: hydroxypropyl methacrylate(A), peroxyde de dibenzoyle(B)
(A, B)
(B)
Attention
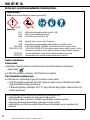
H317 Peut provoquer une allergie cutanée. (A,B)
H319 Provoque une sévère irritation des yeux.(A)
H400 Très toxique pour les organismes aquatiques.(B)
P262 Éviter tout contact avec les yeux, la peau ou les vêtements.
P280 Porter des gants de protection/des vêtements de protection/un équipement de
protection des yeux/du visage.
P302+P352 EN CAS DE CONTACT AVEC LA PEAU: laver abondamment à l'eau et au savon.
P305+P351+P338 EN CAS DE CONTACT AVEC LES YEUX: rincer avec précaution à l'eau pendant
plusieurs minutes. Enlever les lentilles de contact si la victime en porte et si elles
peuvent être facilement enlevées. Continuer à rincer.
P333+P313 En cas d'irritation ou d'éruption cutanée: consulter un médecin.
P337+P313 Si l'irritation oculaire persiste: consulter un médecin. Le produit
Indications de recyclage
Emballages vides:
▶ Laisser la buse mélangeuse vissée et procéder à l'élimination par le biais du système de
collecte national "Point Vert".
▶ ou code déchets EAK: 150102 Emballages en plastique
Emballages pleins ou à moitié vides:
▶ Les apporter à un centre de collecte des matières dangereuses conformément aux dispositions
administratives.
– Code déchets EAK: 08 04 09* Résidus de colles et composants pour joints, contenant des solvants
organiques ou d'autres substances dangereuses.
– ou code déchets EAK: 20 01 27* Peintures, encres d'impression, colles et résines articielles,
contenant des substances dangereuses.
Hilti rejette toute responsabilité en cas de dommages dus:
– à des conditions de stockage et de transport non conformes aux consignes
– au non-respect du mode d'emploi et des données de pose, à une erreur d'utilisation
– à un dimensionnement insuffisant de l'ancrage, à une capacité de charge insuffisante du matériau
support
– ou à tous autres facteurs non connus de Hilti ou indépendants de sa volonté, par exemple en cas
d'utilisation de produits d'autres marques.
Printed: 21.05.2015 | Doc-Nr: PUB / 5168491 / 000 / 02

13
Mortier de scellement pour ancrage de chevilles et d‘armatures pour béton
Approprié aux travaux de maçonnerie dans des matériaux creux et pleins en brique, brique silico-calcaire,
béton, pierres de béton, béton poreux, béton léger creux et pierres naturelles
Avant utilisation, bien lire le présent mode d‘emploi ainsi que les directives de sécurité.
Date de péremption: voir date imprimée sur le raccord (Mois / Année). Ne plus utiliser les recharges dont la date de péremption
est dépassée.
Transport et stockage: dans un endroit frais, sec et à l‘abri de la lumière; entre +5 °C et 25 °C
Température des recharges: lors de l‘utilisation, elle doit être comprise entre +5 °C et 40 °C
Température du matériau support: lors de l‘utilisation, elle doit être comprise entre 0 °C et 40 °C
Ouverture automatique des recharges: au début de l‘extrusion.
Instructions de montage: illustration de la séquence des étapes: voir pictogrammes 1 à 17 ;
Détails sur les opérations de pose: matériaux supports à cavités: voir tableau 1; matériaux supports pleins: voir tableaux 2 et 3.
Percer le trou à l‘aide d‘un marteau perforateur; à vérifier : matériau support plein ou creux ? Il est interdit de percer
le trou à l‘aide d‘un appareil de forage diamant.
– Nettoyer les trous juste avant de placer les chevilles: 2 x souffler, 2 x brosser avec une brosse métallique, 2 x souffler.
Les trous doivent être exempts de toute trace de poussière, d‘eau, de glace, d‘huile / de graisse ou d‘autres contami-
nants. Nettoyage de trous insuffisant = mauvaise fixation.
– Matériau support à cavités ➔ utiliser des douilles-tamis – soit des douilles-tamis en plastique
HIT-SC, soit des douilles-tamis métalliques HIT-S. Ne pas utiliser de douilles-tamis endommagées !
HIT-SC: placer / enclencher le capuchon de centrage (5), puis insérer la douille-tamis dans le trou (7).
Combinaisons de douilles-tamis HIT-SC: placer / enclencher le capuchon de centrage sur la douille-tamis extérieure
(5), introduire / enclencher cette dernière dans la douille-tamis intérieure (6) et insérer cette combinaison dans le trou
(7).
Insérer la recharge dans le porte-cartouches. Attention! Ne jamais utiliser de recharges endommagées ni de porte-
cartouches endommagés / très encrassés.
Dévisser complètement l‘embout mélangeur de la recharge. Ne modifier la buse mélangeuse en aucun cas, sauf
prescription contraire de Hilti. Un nouveau mélangeur doit être utilisé pour chaque nouvelle recharge.
Insérer le porte-cartouches avec la recharge dans le pistolet à injecter.
Jeter le premier mortier extrudé: le mortier extrudé sortant du mélangeur lors des premières pressions ne doit pas
être utilisé pour la fixation. La quantité de premier mortier extrudé dépend de la taille de la recharge, voir pictogramme
11. Après chaque remplacement de l‘embout mélangeur, jeter le premier mortier extrudé!
– Remplissage de douilles-tamis en plastique HIT-SC: remplir la douille-tamis à partir du capuchon de centrage jusqu‘à
ce que du mortier sorte du capuchon (contrôle de remplissage) (13).
Remplissage de combinaisons de douilles-tamis HIT-SC: introduire l‘embout mélangeur à travers le capuchon de cen-
trage et le fond de la douille extérieure. Remplir la douille-tamis intérieure (12). Nombre de pressions, voir tableau 1.
Puis retirer l‘embout mélangeur jusqu‘au capuchon de centrage de la douille-tamis extérieure et remplir la douille-tamis
extérieure jusqu‘à ce que du mortier sorte du capuchon de centrage (contrôle de remplissage) (13).
Remplissage de douilles-tamis métalliques HIT-S: introduire l‘embout mélangeur jusqu‘au fond de la douille-tamis et
retirer progressivement l‘embout mélangeur de 10 mm env. par pression.
Matériau support plein: remplir le trou de mortier sans bulles d‘air! Introduire l‘embout mélangeur dans le trou
jusqu‘à atteindre le fond (pour les trous de perçage profonds, utiliser une rallonge) et retirer progressivement l‘embout
mélangeur à chaque pression. Remplir environ 2/3 du trou avec le mortier.
Insérer l‘élément de fixation jusqu‘à la profondeur d‘ancrage „hef“ conformément aux tableaux 1 à 3 dans le trou resp.
la douille-tamis rempli(e) de mortier. L‘espace annulaire doit ensuite être complètement rempli de mortier. Respecter
le temps de manipulation „tgel“ en fonction de la température d‘utilisation.
Après écoulement du temps de manipulation „tgel“ et jusqu‘à écoulement du temps de durcissement „tcure“, ne pas
manipuler / mettre en charge l‘élément de fixation.
L‘élément de fixation peut seulement être mis en charge après écoulement du temps de durcissement „tcure“.
Toute cartouche entamée peut être réutilisée dans les 4 semaines. Laisser l‘embout mélangeur rempli vissé sur la cartouche
entamée et stocker la cartouche conformément à la réglementation. Avant réutilisation, visser un nouvel embout mélangeur et
jeter le mortier extrudé lors des premières pressions – comme décrit au point 11.
fr
Contenu : 330 ml/500 ml Poids: 540 g/820 g
Printed: 21.05.2015 | Doc-Nr: PUB / 5168491 / 000 / 02

Hilti HIT-HY 10
14
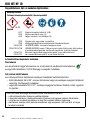
Resina ad iniezione per fissaggi con barre filettate e con barre ad aderenza migliorata
Norme di sicurezza:
Contiene: idrossipropilmetacrilato(A), perossido di dibenzoile(B)
(A, B)
(B)
Attenzione
H317 Può provocare una reazione allergica cutanea(A,B)
H319 Provoca grave irritazione oculare.(A)
H400 Molto tossico per gli organismi acquatici. (B)
P262 Evitare il contatto con gli occhi, la pelle o gli indumenti.
P280 Indossare guanti/indumenti protettivi/Proteggere gli occhi/il viso.
P302+P352 IN CASO DI CONTATTO CON LA PELLE: lavare abbondantemente con acqua e
sapone.
P305+P351+P338 IN CASO DI CONTATTO CON GLI OCCHI: sciacquare accuratamente per parecchi
minuti. Togliere le eventuali lenti a contatto se è agevole farlo. Continuare a
sciacquare.
P333+P313 In caso di irritazione o eruzione della pelle: consultare un medico.
P337+P313 Se l'irritazione degli occhi persiste, consultare un medico.
Avvertenze per lo smaltimento
Cartucce vuote:
▶ lasciare il miscelatore avvitato e procedere allo smaltimento mediante il sistema nazionale di
"PuntiVerdi".
▶ oppure codice riuto EAK: 150102 imballaggi in plastica
Cartucce piene o parzialmente vuote:
▶ smaltire come riuti speciali in base alle disposizioni delle autorità competenti.
– Codice riuto EAK: 08 04 09* adesivi e sigillanti di scarto, contenenti solventi organici o altre
sostanze pericolose.
– oppure codice riuto EAK: 20 01 27* vernici, inchiostri, adesivi e resine contenenti sostanze
pericolose.
Hilti non si assume alcuna responsabilità per eventuali danni causati da:
– condizioni di magazzinaggio e trasporto diverse da quanto riportato nelle specifiche
– mancata osservanza delle Istruzioni per l'uso e dei dati di messa in opera, utilizzo erroneo
– tasselli non adeguatamente dimensionati, capacità di carico della base insufficiente
– altri effetti, non noti oppure non accettabili per Hilti, come ad esempio l'utilizzo di prodotti di terzi.
Printed: 21.05.2015 | Doc-Nr: PUB / 5168491 / 000 / 02

15
Resina ad iniezione per fissaggi con barre filettate e con barre ad aderenza migliorata
Adatta per muratura di mattoni pieni o forati, arenaria calcarea, calcestruzzo, blocchi in calcestruzzo,
calcestruzzo poroso, calcestruzzo alleggerito e pietra naturale
Prima dell‘impiego, leggere le presenti istruzioni d‘uso e le norme di sicurezza.
Data di scadenza: vedere i dati riportati sull‘elemento di collegamento (mese/anno). Una volta trascorsa la data di scadenza, la
cartuccia non deve più essere utilizzata!
Trasporto e stoccaggio: conservare in un luogo fresco, asciutto e buio; tra +5 °C e 25 °C.
Temperatura della cartuccia: per l‘applicazione la temperatura deve essere tra +5 °C e 40 °C.
Temperatura del materiale di base: per l‘applicazione la temperatura deve essere tra 0 °C e 40 °C.
La cartuccia si apre automaticamente: quando inizia la pressione.
Istruzioni di montaggio: rappresentazione della sequenza delle operazioni: vedere i punti 1-17;
per dettagli relativi alla messa in opera: Materiale forato: vedere tabella 1; Materiale base pieno: vedere tabelle 2 e 3
Eseguire il foro con un perforatore; una volta eseguito il foro verificare se il materiale base è pieno o presenta cavità
al suo interno. Non è consentito eseguire il foro per mezzo di carotatrici.
– Pulire il foro immediatamente prima di applicare la barra: soffiare 2 volte, spazzolare 2 volte con soffiare 2 volte. I fori
devono essere liberi da polvere, acqua, ghiaccio, olio/grasso o altre impurità. Se la pulizia dei fori è insufficiente si
otterranno scarsi valori di ancoraggio.
– Materiale base forato ➔ utilizzare una bussola retinata – una bussola in plastica HIT-SC o una bussola in metallo
HIT-S. Non utilizzare bussole retinate danneggiate!
HIT-SC: dapprima incastrare il dispositivo di centraggio (5) e quindi inserire la bussola retinata nel foro (7).
Combinazioni di bussole retinate HIT-SC: incastrare il dispositivo di centraggio sulla bussola retinata esterna (5), quindi
accoppiare/incastrare questa con la bussola retinata interna (6) e inserire nel foro (7).
Spingere la cartuccia all‘interno del caricatore. Attenzione! Non utilizzare mai cartucce danneggiate e/o caricatori
danneggiati/molto sporchi.
Avvitare fino in fondo il miscelatore sulla cartuccia. Non modificare in alcun caso il miscelatore, a meno che la modifica
sia prescritta da Hilti. Per ogni cartuccia nuova deve essere utilizzato un miscelatore nuovo.
Inserire il caricatore con la cartuccia nel dispenser.
Scartare le prime pompate di resina: la prima di resina che esce dal miscelatore non deve mai essere utilizzata per
i fissaggi. La quantità di resina da scartare dipende dalle dimensioni della cartuccia, vedere tabella 11. Dopo ogni
sostituzione del miscelatore scartare sempre la prima quantità di resina!
– Riempimento della bussola retinata in plastica HIT-SC: riempire con la resina la bussola retinata finché la resina
fuoriesce dal dispositivo di centraggio (controllo del riempimento) (13).
Riempimento di combinazione di bussole retinate HIT-SC: Inserire il miscelatore attraverso il dispositivo di centraggio e
raggiungere il fondo della bussola retinata esterna. Riempire la bussola retinata interna (12). per il numero dei pom-
paggi vedere la tabella 1. Quindi estrarre il miscelatore fino al dispositivo di centraggio della bussola retinata esterna
e riempire la bussola, finché la resina fuoriesce dal dispositivo di centraggio (controllo del riempimento) (13).
Riempimento della bussola retinata in metallo HIT-S: Inserire il miscelatore fino al fondo della bus sola retinata ed
estrarre il miscelatore ad ogni pompaggio di circa 10 mm per volta.
Materiale base pieno: Riempire il foro con la resina evitando di lasciare bolle d‘aria! Inserire il miscelatore fino alla
base del foro (per i fori profondi utilizzare una prolunga) ed estrarre di pochi millimetri alla volta il miscelatore ad ogni
pompaggio. Riempire il foro di resina per circa 2/3 della profondità.
Inserire la barra nel foro riempito di resina o nella bussola retinata fino alla profondità di ancoraggio „hef“ secondo le
tabelle 1-3. Lo spazio spazio vuoto anulare deve essere completamente riempito con la resina.
Attenersi ai tempi di applicazione „tgel“ in funzione della temperatura di applicazione.
Una volta trascorso il tempo di applicazione „tgel“ e fino al termine del tempo di indurimento „tcure“, evitare qualunque
manipolazione/sollecitazione dell‘elemento di fissaggio.
Solamente quando è trascorso il tempo di indurimento „tcure“ è consentito applicare un carico sull‘elemento di fissag-
gio.
Le cartucce parzialmente utilizzate possono essere riutilizzate entro 4 settimane. Lasciare avvitato il miscela tore riempito con il
materiale e immagazzinare la cartuccia secondo le prescrizioni. Prima di riutilizzarlo, avvitare un nuovo miscelatore e scartare
nuovamente la prima resina prodotta, come descritto al punto 11.
it
Contenuto: 330 ml/500 ml Peso: 540 g/820 g
Printed: 21.05.2015 | Doc-Nr: PUB / 5168491 / 000 / 02

Hilti HIT-HY 10
16
Hybride mortel voor ankerstangen en wapeningsstaven
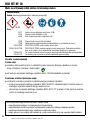
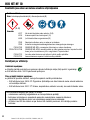
Veiligheidsvoorschriften:
Bevat: hydroxypropylmethacrylaat(A), dibenzoylperoxide(B)
(A, B)
(B)
Waarschuwing
H319 Veroorzaakt ernstige oogirritatie. (A,B)
H317 Kan een allergische huidreactie veroorzaken.(A)
H400 Zeer giftig voor in het water levende organismen. (B)
P262 Contact met de ogen, de huid of de kleding vermijden.
P280 Beschermende handschoenen/beschermende kleding/oogbescherming/gelaatsbe-
scherming dragen.
P302+P352 BIJ CONTACT MET DE HUID: met veel water en zeep wassen.
P305+P351+P338 BIJ CONTACT MET DE OGEN: voorzichtig afspoelen met water gedurende een
aantal minuten; contactlenzen verwijderen, indien mogelijk; blijven spoelen.
P333+P313 Bij huidirritatie of uitslag: een arts raadplegen.
P337+P313 Bij aanhoudende oogirritatie: een arts raadplegen.
Aanwijzingen voor afvalverwerking
Geledigde patronen:
▶ De mengtuit laten zitten en via het nationale inzamelsysteem afvoeren.
▶ of EAC-afvalcode: 150102 kunststof verpakkingen
Volle of halege verpakking:
▶ Met inachtneming van de ofciële voorschriften als speciaal afval afvoeren.
– EAC-afvalcode: 08 04 09* lijm- en kitafval, dat organische oplosmiddelen of andere gevaarlijke
stoffen bevat.
– of EAC-afvalcode: 20 01 27* lakken, drukinkten, lijmen en kunstharsen, die gevaarlijke stoffen
bevatten.
Hilti kan niet aansprakelijk worden gesteld voor schade veroorzaakt door:
– Opslag- en transportomstandigheden die afwijken van de voorschriften
– Het niet naleven van de handleiding en de indrijfgegevens, verkeerd gebruik
– Het niet toereikend bemeten van de verankering, ontoereikend draagvermogen van de ondergrond
– Andere invloeden die Hilti niet bekend zijn of waarvoor Hilti niet aansprakelijk is, zoals het gebruik
van producten van derden.
Printed: 21.05.2015 | Doc-Nr: PUB / 5168491 / 000 / 02

17
Hybride mortel voor ankerstangen en wapeningsstaven
Geschikt voor hol en vol metselwerk van steen, kalkzandsteen, beton, betonsteen, poriënbeton, licht-
beton en natuursteen
Voor gebruik deze gebruiksaanwijzing en de veiligheidsvoorschriften lezen.
Houdbaarheidsdatum: zie de opdruk op het verbindingsdeel (maand/jaar). De mortel mag na de houdbaarheidsdatum niet meer
worden gebruikt!
Transport en opslag: koel, droog en donker; +5 °C tot 25 °C.
Temperatuur van het te bevestigen materiaal: moet bij gebruik tussen de +5 °C en 40 °C bedragen.
Temperatuur van de ondergrond: moet bij het gebruik tussen de 0 °C en 40 °C bedragen.
De folie wordt automatisch geopend: bij het begin van het uitdrukken.
Aanwijzing voor de montage: weergave van het arbeidsproces: zie pictogram 1-17;
Gedetailleerde gegevens: Holle ondergronden: zie tabel 1; Volle ondergronden: zie tabel 2 en 3
Boorgat maken met boorhamer; hierbij vaststellen/controleren: volle ondergrond of ondergrond met holle ruimtes? Het
is niet toegestaan het boorgat te maken met een diamantboor.
– Boorgat reinigen: 2x doorblazen, 2x borstelen met staal borstel, 2x doorblazen. Boorgaten dienen vrij van stof, water,
ijs, olie/vet of andere ver ontreinigingen te zijn. Ontoereikende reiniging van het boorgat = slechte bevestigingswaarden.
– Ondergrond met holle ruimtes ➔ zeefhuls gebruiken – een kunststof huls HIT-SC of metalen zeefhuls HIT-S. Geen
beschadigde zeefhulzen gebruiken!
HIT-SC: Eerst de centreerkap aanbrengen/vastzetten (5) en vervolgens de zeefhuls in het boorgat inbrengen (7).
Combinaties van HIT-SC zeefhulzen: De centreerkap op de buitenste zeefhuls aanbrengen/vastzetten (5), deze met de
binnenste zeefhuls vergrendelen (6) en in het boorgat inbrengen (7).
Folie in de patroonhouder schuiven. Attentie! Nooit beschadigde en/of sterk vervuilde patronen gebruiken.
Mengtuit volledig op verbindingsdeel schroeven. De mengtuit onder geen enkele omstandigheid veranderen, behalve
als dit door Hilti wordt voorgeschreven. Voor elke nieuwe patroon dient een nieuwe mengtuit te worden gebruikt.
Foliepatroon met patroonhouder in HIT-P8000-D persluchtspuit plaatsen.
Voorloopmortel verwerpen: De voorloopmortel die in het begin uit de mengtuit naar buiten komt mag niet voor be-
vestigingen worden gebruikt. De hoeveelheid voorloopmortel is afhankelijk van de grootte van het foliepatroon, zie
pictogram 11. Na wisseling van de mengtuit de voorloopmortel altijd opnieuw verwerpen.
– Vulling van de HIT-SC kunststof zeefhuls: De zeefhuls vullen vanuit de centreerkap tot er bij de centreerkap mortel naar
buiten komt (vulcontrole) (13).
Vullen van combinaties van HIT-SC-zeefhulzen: De mengtuit door de centreerkap en de bodem van de buitenste zeefhuls
steken. De binnenste zeefhuls vullen (12). Zie voor het aantal slagen tabel 1. Vervolgens de mengtuit tot de centreer-
kap van de buitenste zeefhuls terugtrekken en de buitenste zeefhuls vullen tot er mortel bij de centreerkap naar buiten
komt (vulcontrole) (13).
Vulling van de HIT-S metalen zeefhuls: De mengtuit tot de bodem van de zeefhuls inbrengen en hem bij elke slag met
ca. 10 mm stapsgewijs terugtrekken.
Volle ondergrond: Het boorgat zonder luchtbellen vullen met mortel! De mengtuit tot de grond van het boorgat in het
boorgat steken (bij diepe boorgaten een verlenging gebruiken) en hem bij elke slag langzaam terugtrekken. Het
boorgat tot ca. 2/3 met mortel vullen.
Het bevestigingselement tot de verankeringsdiepte „h
ef
“ volgens tabel 1-3 in het met mortel gevulde boorgat, resp. de
zeefhuls inbrengen. Hierna dient de ringspleet volledig met mortel gevuld te zijn. Afhankelijk van de gebruikstempera-
tuur de verwerkingstijd „t
gel
“ in acht nemen.
Na afloop van de verwerkingstijd „tgel“ tot het einde van de uithardingstijd „tcure“ elke hande ling/belasting ten
aanzien van het bevestigingselement voorkomen.
Pas na het verstrijken van de uithardingstijd „tcure“ mag het bevestigingselement belast worden.
Niet volledig opgebruikte patronen kunnen nog binnen 4 weken worden gebruikt. De gevulde mengtuit opgeschroefd laten en de
koker volgens voorschrift opslaan. Voor verder gebruik een nieuwe mengtuit opschroeven en de voorloopmortel – zoals beschre-
ven bij punt 11 – opnieuw verwerpen.
nl
Inhoud: 330 ml/500 ml Gewicht: 540 g/820 g
Printed: 21.05.2015 | Doc-Nr: PUB / 5168491 / 000 / 02

Hilti HIT-HY 10
18
Bucha química para fixações de ancoragens e de aço para betão
Ficha de segurança:
Contém: metacrilato de hidroxipropilo(A), peróxido de dibenzoilo(B)
(A, B)
(B)
Atenção
H317 Pode provocar uma reacção alérgica cutânea. (A,B)
H319 Provoca irritação ocular grave.(A)
H400 Muito tóxico para os organismos aquáticos. (B)
P262 Não pode entrar em contacto com os olhos, a pele ou a roupa.
P280 Usar luvas de protecção/vestuário de protecção/protecção ocular/protecção facial.
P302+P352 SE ENTRAR EM CONTACTO COM A PELE: lavar com sabonete e água
abundantes.
P305+P351+P338 SE ENTRAR EM CONTACTO COM OS OLHOS: enxaguar cuidadosamente com
água durante vários minutos. Se usar lentes de contacto, retire-as, se tal lhe for
possível. Continuar a enxaguar.
P333+P313 Em caso de irritação ou erupção cutânea: consulte um médico.
P337+P313 Caso a irritação ocular persista: consulte um médico.
Recomendação sobre a eliminação
Cartuchos vazios:
▶ Deixar o misturador enroscado e eliminar através do sistema de recolha "Ponto Verde" nacional.
▶ ou código CER: 150102 Embalagens de plástico
Cartuchos semiusados ou novos:
▶ Eliminar de acordo com as normas e regulamentações legais sobre resíduos especiais.
– Código CER: 08 04 09* Resíduos de colas ou vedantes, contendo solventes orgânicos ou outras
substâncias perigosas.
– ou código CER: 20 01 27* Tintas, produtos adesivos, colas e resinas, contendo substâncias
perigosas.
A Hilti não assume responsabilidade por danos provocados por:
– condições de armazenagem/transporte contrárias às especificadas
– falha na observância das condições de utilização/colocação, aplicação incorrecta
– uso de buchas com dimensão inadequada, insuficiente capacidade de resistência à carga do
material base
– como resultado de influências desconhecidas ou inaceitáveis para a Hilti, por exemplo, a utilização
de produtos de outros fabricantes.
Printed: 21.05.2015 | Doc-Nr: PUB / 5168491 / 000 / 02

19
Bucha química para fixações de ancoragens e de aço para betão
Indicado para alvenaria oca e maciça de tijolo, betão, blocos de arenito calcário e de betão, betão celular,
betão leve e pedra natural
Antes da utilização, ler estas instruções de utilização e a ficha de segurança.
Prazo de validade: ver impressão na peça de junção (mês/ano). Não utilize cartuchos cujo prazo de validade se encontre ultra-
passado!
Transporte e armazenamento: em lugar fresco, seco e escuro; entre os +5 °C e os 25 °C.
Temperatura do cartucho: aquando da utilização, a temperatura deverá situar-se entre os +5 °C e os 40 °C.
Temperatura do material base: aquando da utilização, a temperatura deverá situar-se entre os 0 °C e os 40 °C – excepto em tijolo
maciço: entre os +5 °C e os 40 °C.
A abertura dos cartuchos ocorre automaticamente durante o espremer inicial.
Instruções de montagem: Representação das sequências de operações: ver figuras 1-17.
Pormenores de colocação: para materiais base ocos: consultar a tabela 1; para materiais base maciços: consultar tabelas 2 e 3
Efectuar o furo utilizando um martelo perfurador; ao fazê-lo averiguar/verificar: material base maciço ou com cavida-
des? A utilização de equipamento diamantado para efectuar o furo não é permitida.
– Limpe o furo imediatamente antes da colocação da ancoragem: soprar 2 vezes, escovar 2 vezes com escova de
arame, soprar 2 vezes. Os furos deverão estar isentos de pó, água, gelo, óleo/massa ou outras impurezas. Limpeza
insuficiente do furo = valores de retenção deficientes
– Material base com cavidades ➔ Utilizar uma camisa perfurada – ou camisa perfurada de plástico HIT-SC ou camisa
perfurada de metal HIT-S. Não utilizar camisas perfuradas danificadas!
HIT-SC: primeiro, encaixar a capa de centragem e bloqueá-la (5) e depois inserir a camisa perfurada no furo (7).
Combinações de camisas perfuradas HIT-SC: encaixar a capa de centragem na camisa perfurada exterior (5), unir esta
última com a camisa perfurada interior (6) e bloqueá-las e inserir as camisas combinadas no furo (7).
Colocar o cartucho no respectivo suporte. Cuidado! Nunca utilize cartuchos danificados e/ou suportes danificados ou
muito sujos.
Roscar completamente o misturador sobre o cartucho. Não modifique o misturador de forma alguma, excepto se for
indicado pela Hilti. Para cada cartucho novo tem de utilizar-se um misturador novo.
Inserir o suporte, com o cartucho, no dispensador.
Não utilizar a resina inicial dispensada: a resina inicial que escoa do misturador não deve ser utilizada para efectuar
fixações. A quantidade de resina inicial dispensada depende do tamanho do cartucho, ver figura 11. Não utilizar a
resina inicial dispensada cada vez que o misturador é substituído!
– Enchimento da camisa perfurada de plástico HIT-SC: encher a camisa perfurada a partir da capa de centragem até a
resina se escapar da capa de centragem (controlo de enchimento) (13).
Enchimento de combinações de camisas perfuradas HIT-SC: enfiar o misturador através da capa de centragem e através
do fundo da camisa perfurada exterior (se necessário: utilizar extensão do misturador). Encher a camisa perfurada
interior (12). Número de bombadas, consultar a tabela 1. Depois puxar o misturador para trás até à capa de centragem
da camisa perfurada exterior e encher a camisa perfurada exterior até a resina se escapar da capa de centragem
(controlo de enchimento) (13).
Enchimento da camisa perfurada de metal HIT-S: injectar a resina começando a partir do fundo da camisa perfurada,
enquanto retira lentamente o misturador, passo a passo, em cerca de 10 mm, depois de cada bombada.
Material base maciço: preencher o furo sem formar bolhas de ar! Inserir o misturador até ao fundo do buraco (utilizar
uma extensão no caso de furos fundos), enquanto retira o misturador, passo a passo, depois de cada bombada. O
furo deve ser preenchido até cerca de 2/3.
Introduzir no furo ou na camisa perfurada preenchida com resina, o elemento de fixação até à profundidadede anco-
ragem „h
ef
“ de acordo com as tabelas 1-3. Depois disso, o intervalo anular deverá estar completamente preenchido
pela resina. Observar o tempo de trabalho „t
gel
“, que dependerá da temperatura operacional.
Após passar o tempo de trabalho „t
gel
“ e até passar o tempo de cura total „t
cure
“, evitar toda e qualquer manipulação/
aplicação de carga sobre o elemento de fixação.
Só após passar o tempo de cura total „t
cure
“, o elemento de fixação pode ser sujeito às cargas especificadas.
As sobras de cartuchos parcialmente usados devem ser utilizadas num prazo de 4 semanas. Deixar o misturador cheio enroscado
e armazená-lo juntamente com o cartucho, de acordo com as condições de armazenagem preconizadas. Antes de continuar a
utilizar, aparafusar um novo misturador e não utilizar novamente a resina inicial – como descrito no ponto 11.
pt
Conteúdo líquido: 330 ml/500 ml Peso: 540 g/820 g
Printed: 21.05.2015 | Doc-Nr: PUB / 5168491 / 000 / 02

Hilti HIT-HY 10
20
Resina de inyección para la fijación de tamices y anclajes en hormigón
Indicaciones de seguridad:
Contiene: metacrilato de hidroxipropilo(A), peróxido de dibenzoilo(B)
(A, B)
(B)
Atención
H319 Provoca irritación ocular grave. (A,B)
H317 Puede provocar una reacción alérgica en la piel.(A)
H400 Muy tóxico para los organismos acuáticos. (B)
P262 Evitar el contacto con los ojos, la piel o la ropa.
P280 Llevar guantes/prendas/gafas/máscara de protección.
P302+P352 EN CASO DE CONTACTO CON LA PIEL: Lavar con agua y jabón abundantes.
P305+P351+P338 EN CASO DE CONTACTO CON LOS OJOS: Aclarar cuidadosamente con agua
durante varios minutos. Quitar las lentes de contacto, si lleva y resulta fácil. Seguir
aclarando.
P333+P313 En caso de irritación o erupción cutánea: Consultar aun médico.
P337+P313 Si persiste la irritación ocular: Consultar a un médico.
Indicaciones de reciclaje
Cartuchos vacíos:
▶ Deseche el mezclador enroscado a través del sistema de recogida nacional identicado como
PuntoVerde.
▶ O el código de residuo LER: 150102 embalajes de plástico
Cartuchos llenos o parcialmente vacíos:
▶ Deberán eliminarse como residuos especiales de acuerdo con las normativas ociales.
– Código de residuo LER: 08 04 09* Residuos de adhesivos y sellantes que contienen disolventes
orgánicos u otras sustancias peligrosas.
– O el código de residuo LER: 20 01 27* Pinturas, tintas, adhesivos y resinas que contienen sustan-
cias peligrosas.
Hilti no acepta responsabilidad alguna por daños causados por:
– condiciones de almacenamiento y transporte diferentes a las especificadas
– incumplimiento de las instrucciones de uso y los datos de fijación, o utilización incorrecta
– anclajes mal dimensionados, capacidad de carga insuficiente de la superficie
– otros factores desconocidos o no atribuibles a Hilti como, por ejemplo, el uso de productos de otros
fabricantes.
Printed: 21.05.2015 | Doc-Nr: PUB / 5168491 / 000 / 02
Sayfa yükleniyor ...
Sayfa yükleniyor ...
Sayfa yükleniyor ...
Sayfa yükleniyor ...
Sayfa yükleniyor ...
Sayfa yükleniyor ...
Sayfa yükleniyor ...
Sayfa yükleniyor ...
Sayfa yükleniyor ...
Sayfa yükleniyor ...
Sayfa yükleniyor ...
Sayfa yükleniyor ...
Sayfa yükleniyor ...
Sayfa yükleniyor ...
Sayfa yükleniyor ...
Sayfa yükleniyor ...
Sayfa yükleniyor ...
Sayfa yükleniyor ...
Sayfa yükleniyor ...
Sayfa yükleniyor ...
Sayfa yükleniyor ...
Sayfa yükleniyor ...
Sayfa yükleniyor ...
Sayfa yükleniyor ...
Sayfa yükleniyor ...
Sayfa yükleniyor ...
Sayfa yükleniyor ...
Sayfa yükleniyor ...
Sayfa yükleniyor ...
Sayfa yükleniyor ...
Sayfa yükleniyor ...
Sayfa yükleniyor ...
Sayfa yükleniyor ...
Sayfa yükleniyor ...
Sayfa yükleniyor ...
Sayfa yükleniyor ...
Sayfa yükleniyor ...
Sayfa yükleniyor ...
Sayfa yükleniyor ...
Sayfa yükleniyor ...
Sayfa yükleniyor ...
Sayfa yükleniyor ...
Sayfa yükleniyor ...
Sayfa yükleniyor ...
-
 1
1
-
 2
2
-
 3
3
-
 4
4
-
 5
5
-
 6
6
-
 7
7
-
 8
8
-
 9
9
-
 10
10
-
 11
11
-
 12
12
-
 13
13
-
 14
14
-
 15
15
-
 16
16
-
 17
17
-
 18
18
-
 19
19
-
 20
20
-
 21
21
-
 22
22
-
 23
23
-
 24
24
-
 25
25
-
 26
26
-
 27
27
-
 28
28
-
 29
29
-
 30
30
-
 31
31
-
 32
32
-
 33
33
-
 34
34
-
 35
35
-
 36
36
-
 37
37
-
 38
38
-
 39
39
-
 40
40
-
 41
41
-
 42
42
-
 43
43
-
 44
44
-
 45
45
-
 46
46
-
 47
47
-
 48
48
-
 49
49
-
 50
50
-
 51
51
-
 52
52
-
 53
53
-
 54
54
-
 55
55
-
 56
56
-
 57
57
-
 58
58
-
 59
59
-
 60
60
-
 61
61
-
 62
62
-
 63
63
-
 64
64


Diğer dillerde
- eesti: Hilti HY 10 Kasutusjuhend
- slovenčina: Hilti HY 10 Užívateľská príručka
- română: Hilti HY 10 Manualul utilizatorului
İlgili Makaleler
-
Hilti HIT-HY 10 Kullanım kılavuzu
-
Hilti HIT-MM PLUS Kullanım kılavuzu
-
-
Hilti HIT-HY 170 EE Kullanici rehberi
-
Hilti HIT-HY 170 Kullanma talimatları
-
-
-
-
Hilti HIT-RE 500 Kullanici rehberi
-