Yamaha DSP-A2 Kullanım kılavuzu
- Kategori
- AV alıcıları
- Tip
- Kullanım kılavuzu
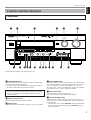
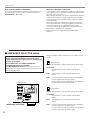
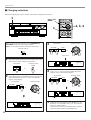
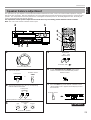
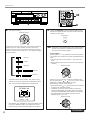
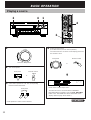
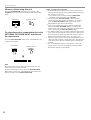
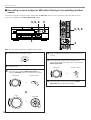
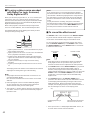
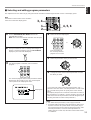
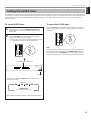
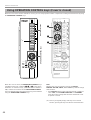
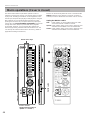
Aşağıda, DSP-A2 için kısa bilgiler bulacaksınız. Bu AV amplifikatör, ev sinema sisteminiz için gelişmiş dijital ses alanı işleme özellikleri sunmaktadır. Dolby Digital, Dolby Pro Logic Surround ve DTS kod çözücüleriyle birlikte YAMAHA'nın CINEMA DSP teknolojisinin keyfini çıkarabilir, böylece kendinizi ünlü bir konser salonundan rahat bir caz kulübüne kadar çeşitli dinleme ortamlarına taşıyabilirsiniz. Yedi dahili amplifikasyon kanalı, ileri düzeyde dijital ses alanı işleme için ek amplifikatörlere ihtiyaç duymayacağınız anlamına gelir. Kullanım kılavuzunu dikkatlice okuyarak sisteminizi kurun ve çok çeşitli yeteneklerini keşfedin.
Aşağıda, DSP-A2 için kısa bilgiler bulacaksınız. Bu AV amplifikatör, ev sinema sisteminiz için gelişmiş dijital ses alanı işleme özellikleri sunmaktadır. Dolby Digital, Dolby Pro Logic Surround ve DTS kod çözücüleriyle birlikte YAMAHA'nın CINEMA DSP teknolojisinin keyfini çıkarabilir, böylece kendinizi ünlü bir konser salonundan rahat bir caz kulübüne kadar çeşitli dinleme ortamlarına taşıyabilirsiniz. Yedi dahili amplifikasyon kanalı, ileri düzeyde dijital ses alanı işleme için ek amplifikatörlere ihtiyaç duymayacağınız anlamına gelir. Kullanım kılavuzunu dikkatlice okuyarak sisteminizi kurun ve çok çeşitli yeteneklerini keşfedin.


-
 1
1
-
 2
2
-
 3
3
-
 4
4
-
 5
5
-
 6
6
-
 7
7
-
 8
8
-
 9
9
-
 10
10
-
 11
11
-
 12
12
-
 13
13
-
 14
14
-
 15
15
-
 16
16
-
 17
17
-
 18
18
-
 19
19
-
 20
20
-
 21
21
-
 22
22
-
 23
23
-
 24
24
-
 25
25
-
 26
26
-
 27
27
-
 28
28
-
 29
29
-
 30
30
-
 31
31
-
 32
32
-
 33
33
-
 34
34
-
 35
35
-
 36
36
-
 37
37
-
 38
38
-
 39
39
-
 40
40
-
 41
41
-
 42
42
-
 43
43
-
 44
44
-
 45
45
-
 46
46
-
 47
47
-
 48
48
-
 49
49
-
 50
50
-
 51
51
-
 52
52
-
 53
53
-
 54
54
-
 55
55
-
 56
56
-
 57
57
-
 58
58
-
 59
59
-
 60
60
-
 61
61
-
 62
62
-
 63
63
-
 64
64
-
 65
65
-
 66
66
-
 67
67
-
 68
68
-
 69
69
-
 70
70
-
 71
71
-
 72
72
-
 73
73
-
 74
74
-
 75
75
-
 76
76
-
 77
77
-
 78
78


Yamaha DSP-A2 Kullanım kılavuzu
- Kategori
- AV alıcıları
- Tip
- Kullanım kılavuzu
Aşağıda, DSP-A2 için kısa bilgiler bulacaksınız. Bu AV amplifikatör, ev sinema sisteminiz için gelişmiş dijital ses alanı işleme özellikleri sunmaktadır. Dolby Digital, Dolby Pro Logic Surround ve DTS kod çözücüleriyle birlikte YAMAHA'nın CINEMA DSP teknolojisinin keyfini çıkarabilir, böylece kendinizi ünlü bir konser salonundan rahat bir caz kulübüne kadar çeşitli dinleme ortamlarına taşıyabilirsiniz. Yedi dahili amplifikasyon kanalı, ileri düzeyde dijital ses alanı işleme için ek amplifikatörlere ihtiyaç duymayacağınız anlamına gelir. Kullanım kılavuzunu dikkatlice okuyarak sisteminizi kurun ve çok çeşitli yeteneklerini keşfedin.
diğer dillerde
- español: Yamaha DSP-A2 Manual de usuario
- français: Yamaha DSP-A2 Manuel utilisateur
- italiano: Yamaha DSP-A2 Manuale utente
- svenska: Yamaha DSP-A2 Användarmanual
- čeština: Yamaha DSP-A2 Uživatelský manuál
- polski: Yamaha DSP-A2 Instrukcja obsługi
- Deutsch: Yamaha DSP-A2 Benutzerhandbuch
- português: Yamaha DSP-A2 Manual do usuário
- English: Yamaha DSP-A2 User manual
- dansk: Yamaha DSP-A2 Brugermanual
- русский: Yamaha DSP-A2 Руководство пользователя
- suomi: Yamaha DSP-A2 Ohjekirja
- Nederlands: Yamaha DSP-A2 Handleiding
- română: Yamaha DSP-A2 Manual de utilizare