
EN
RU
UK
PL
CS
SK
HU
BG
HR
RO
SL
BS
SR
ET
LT
LV
TR
Instructions for use - Инструкция по эксплуатации -
Інструкція з використання - Instrukcja użytkowania -
Pokyny k použití - Návod na použitie - Használati útmutató -
Инструкции за употреба - Upute za uporabu - Instrucţiuni
de utilizare - Navodila za uporabo - Uputstvo za upotrebu -
Uputstvo za upotrebu - Kasutusjuhend - Naudojimo instrukcija
- Lietošanas instrukcija - Kullanma talimatları

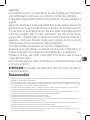
A
A1 A2 A4 A5 A6
D
E
B
C
F
A3
B

3
SAFETY INSTRUCTIONS
IMPORTANT SAFEGUARDS
Use, maintenance and product installation guidelines: for your own
safety, please read through all paragraphs of the instruction manual
including the associated pictograms.
This appliance is intended for indoor, domestic household use only. It is not
intended to be used in the following applications, and the guarantee will not
apply for:
- sta kitchen areas in shops, oces and other working
environments;
- farm houses;
- by clients in hotels, motels and other residential type environments;
- bed and breakfast type environments.
Before rst use remove all packaging materials, stickers and accessories from the
inside and the outside of the appliance.
This appliance is not intended for use by persons (including children) with reduced
physical, sensory or mental capabilities, or lack of experience and knowledge,
unless they have been given supervision or instruction concerning use of the
appliance by an adult responsible for their safety. Children should be supervised
to ensure that they do not play with the appliance, and do not use as a toy.
This appliance can be used by children aged from 8 years and above and persons
with reduced physical, sensory or mental capabilities or lack of experience and
knowledge if they have been given supervision or instruction concerning use
of the appliance in a safe way and understand the hazards involved. Cleaning
and user maintenance shall not be made by children unless they are older than
8 and supervised.
Keep the appliance and its cord out of reach of children less than 8 years.
Never leave the appliance unattended when in use.
Accessible surface temperatures can be high when the appliance
is operating. Never touch the hot surfaces of the appliance.
This appliance is not intended to be operated by means of an external timer or
separate remote-control system.
Fully unwind the power cord before plugging in the appliance.

4
If the power supply cord is damaged, it must be replaced by the manufacturer
or its after sales service in order to avoid any danger.
Do not use an extension lead. If you accept liability for doing so, only use an
extension lead which is in good condition, has a plug with an earth connection
and is suited to the power rating of the appliance. Take all necessary precautions
to prevent anyone tripping over an extension cord.
Always plug the appliance into an earthed socket.
Make sure that the electric power supply is compatible with the power rating
and voltage indicated on the bottom of the appliance.
Use a sponge, hot water and washing up liquid to clean the cooking plates.
Never immerse the appliance, its power cord or plug in water or any other liquid.
WARNING: Do not heat or pre-heat without the 2 cooking plates inside the grill.
Do
• Read the instructions carefully, common to dierent versions depending on the accessories supplied
with your appliance, and keep them within reach.
• If an accident occurs, rinse the burn immediately with cold water and call a doctor if necessary.
• Before rst use, wash the plates (see paragraph 5), pour a little cooking oil onto the plates and wipe with a soft cloth or
paper kitchen towel.
• Position the power cord carefully, whether an extension is used or not, so that guests can move freely around the table
without tripping over it.
• Cooking fumes may be dangerous for animals which have a particularly sensitive respiratory system, such as birds. We
advise bird owners to keep them away from the cooking area.
• Always keep the appliance out of the reach of children.
• Check that both faces of the plate are clean before use.
• To prevent damage to the plates, only use them on the appliance for which they were designed (e.g., do not place in
an oven, on the gas ring or electric hot-plate, etc.).
• Ensure that the plates are stable, well positioned and correctly clipped to the appliance. Only use the plates provided
with the appliance or bought from an Approved Service Centre.
• Always use a wooden or plastic spatula to avoid damaging the cooking plates.
• Only use parts or accessories provided with the appliance or bought from an Approved Service Centre. Do not use
them for other appliances or intention.
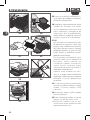
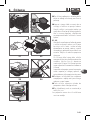
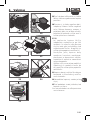
Do not
• Do not use the appliance outside.
• Never leave the appliance unattended when plugged in or in use.
• To prevent the appliance from overheating, do not place it in a corner or below a wall cupboard.
• Never place the appliance directly on a fragile surface (glass table, tablecloth, varnished furniture,
etc.) or on a soft surface such as a tea-towel.
• Never place the appliance under a cupboard attached to a wall or a shelf or next to inammable
materials such as blinds, curtains or wall hangings.
• Never place the appliance on or near hot or slippery surfaces; the power cord must never be close
to or in contact with hot parts of the appliance, close to a source of heat or resting on sharp edges.
• Do not place cooking utensils on the cooking surfaces of the appliance.

5
• Never cut food directly on the plates,
• Do not use metal scouring pads, abrasive wire wool or harsh scouring powder as this may damage
the nonstick coating.
• Do not move the appliance when in use.
• Do not carry the appliance by the handle or metallic wires.
• Never run the appliance empty.
• Do not use aluminium foil or other objects between the plate and the food being cooked.
• Do not remove the grease collection tray while cooking. If the grease collection tray becomes full
when cooking: let the appliance cool down before emptying.
• Do not place the hot plate on a fragile surface or under water.
• To preserve the non-stick properties of the coating, avoid excessive pre-heating with the appliance
empty.
• The plates should never be handled when hot.
• Do not cook food in aluminium foil.
• To avoid spoiling your appliance, do not use ambé recipes in connection with it at any time.
• Do not place a sheet of aluminum or any other object between the plates and the heating element.
• Never heat or cook whilst the grill is open.
• Never heat up the appliance without the cooking plates.
Tips/information
• Thank you for buying this appliance, which is intended for domestic use only.
• For your safety, this appliance complies with the applicable standards and regulations - Low voltage
directive - Electromagnetic compatibility - The environment - Materials in contact with food.
• On rst use, there may be a slight odour and a little smoke during the rst few minutes.
• Our company has an ongoing policy of research and development and may modify these products
without prior notice.
• Do not consume foodstu that comes into contact with the parts marked with logo .
• If the food is too thick, the safety system will stop the appliance from working.
Environment
Environment protection rst!
Your appliance contains valuable materials which can be recovered or recycled.
Leave it at a local civic waste collection point.

6
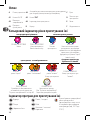
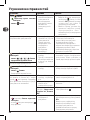
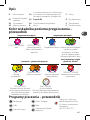
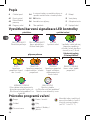
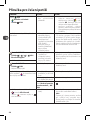
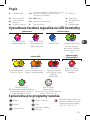
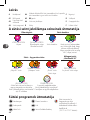
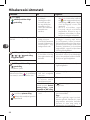
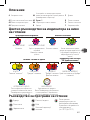
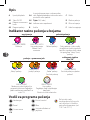
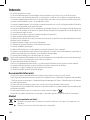
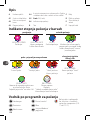
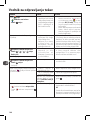
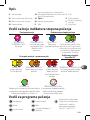
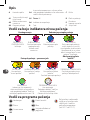
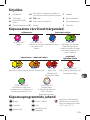
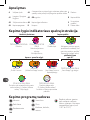
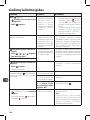
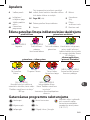
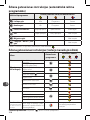
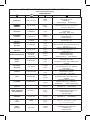
Colour guide of the cooking level indicator
preheating starting of cooking
PURPLE FLASHING
Wait.
SOLID PURPLE
End of preheating
You can put food.
BLUE
Starting of cooking.
GREEN
While cooking is in progress,
the appliance will beep to
signal the user that "rare"
(yellow) will soon be reached.
cooking - ready to eat
keep warm
“30’ approximately”
YELLOW
“Rare” cooking.
ORANGE
“Medium” cooking.
RED
“Well done”
cooking.
End of cooking
RED FLASHING
End of cooking for “Well
done”.
SOLID GREEN
Manual function is selected or
activated automatically, see the
"Troubleshooting Guide" on
page 14.
WHITE FLASHING
Malfunction of the product
Refer to “Trouble shooting guide”.
Contact customer services
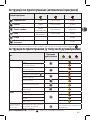
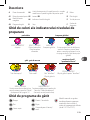
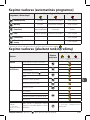
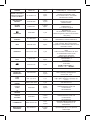
Guide of cooking programs
Burger Panini / Sandwich
Manual mode: a traditional
grill for manual operation,
including 4 dierent
temperature settings
(from 110°C to 275°C)
Poultry Fish
Red meat Pork/sausages/lamb
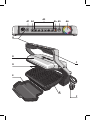
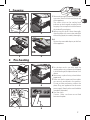
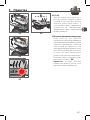
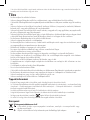
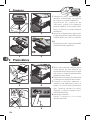
Description
A Control panel A4
4 temperature settings in manual mode;
see specic manual mode in the quick start
guide
C Handle
A1 On/o button A5 OK button D Cooking plates
A2 Frozen food mode A6 Cooking level indicator E Drip tray
A3 Cooking programs B Body F Power cord

7
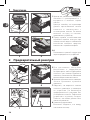
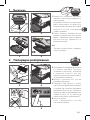
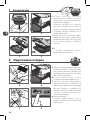
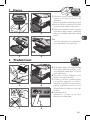
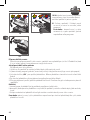
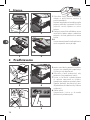
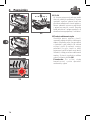
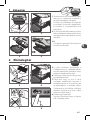
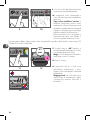
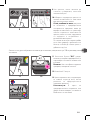
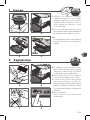
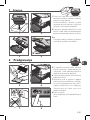
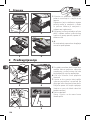
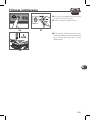
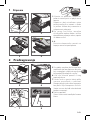
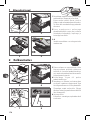
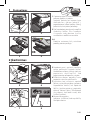
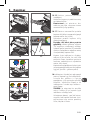
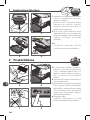
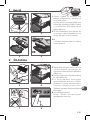
1
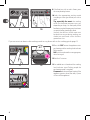
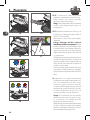
Preparing
1 Remove all packaging materials, stickers and
accessories from the inside and the outside
of the appliance.
The colour sticker on the cooking level
indicator can be changed, according to the
language. You can replace it with the one on
the inside of the packaging.
2 Before using for the rst time, thoroughly
clean the plates with warm water and a little
dishwashing liquid, rinse and dry thoroughly.
3-4
Position the removable drip tray at the front
of the appliance.
1 2
OK
3 4
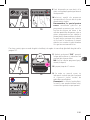
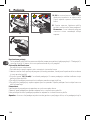
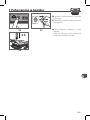
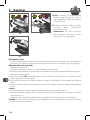
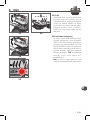
2 Pre-heating
5 For the best results you may wipe the
cooking plates using a paper towel dipped
in a little cooking oil, to improve the non-stick
release.
6 Remove any surplus oil using a clean kitchen
paper towel.
7 Make sure that the upper and lower plates
are correctly positioned in the product.
Do not activate pre-heating without the
plates. Plug your appliance into the mains
power supply. (Note that the cord should be
completely extended).
8 Press the switch.
Caution : Make sure there are no food
between the plates
5 6
7 8

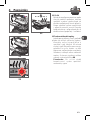
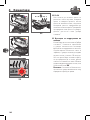
8
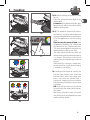
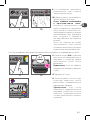
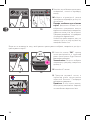
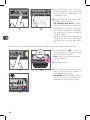
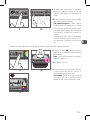
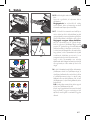
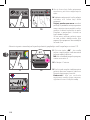
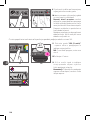
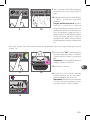
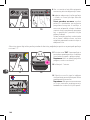
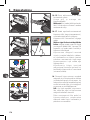
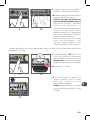
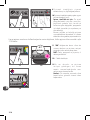
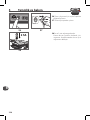
9 If the food you wish to cook is frozen, press
the corresponding button.
10 Select the appropriate cooking mode
according to what type of food you wish to
cook.
Tip, especially for meat: the cooking
results on the preset programs may vary
depending on origin, cut and quality of the
food being cooked, the programs have been
set and tested for good quality food.
Similarly, the thickness of the meat must
be taken into account during cooking; you
should not cook foods with a thickness
greater than 4 cm.
9 10
If you are uncertain about what cooking mode to use, please refer to the cooking guides page 15.
4-7
minutes
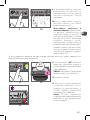
11 Press the “OK” button: the appliance starts
pre-heating and the cooking level indicator
ashes purple.
NB: If you have selected the wrong program,
return to stage 8.
12 Wait for 4-7 minutes.
13 An audible tone is heard and the cooking
level indicator stops ashing purple the
pre-heating mode is complete.
Comments: At the end of pre-heating, if the
appliance remains closed, the safety system
will turn o the appliance.
11 12
13

9
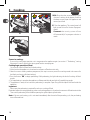
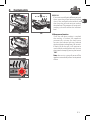
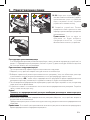
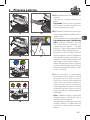
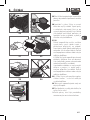
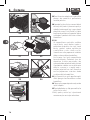
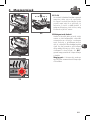
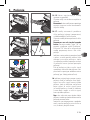
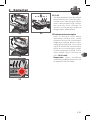
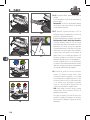
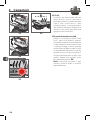
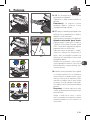
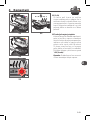
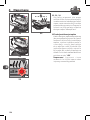
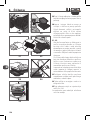
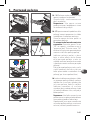
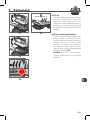
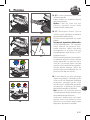
3 Cooking
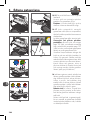
14-15 After pre-heating, the appliance is ready
for use.
Open the grill and place the food on the
cooking plate.
Comments: if the appliance remains open
for too long, the safety system will turn o the
appliance automatically.
16-17 The appliance automatically adjusts
the cooking cycle (time and temperature)
according to the food thickness and quantity.
Close the appliance to start the cooking
cycle.
Note for very thin pieces of food: close
the appliance, the button ”OK” will ash and
the indicator will stay “xed purple”, press
”OK” to ensure the appliance recognizes the
food and that the cooking cycle starts.
The cooking level indicator turns blue and
then becomes green to indicate the cooking
is in progress (for the best results do not
open or move your food during the cooking
process).
While cooking is in progress, a beep alerts
the user each time a certain level of cooking
is attained (e.g. rare/yellow).
18 According to the degree of cooking, the
indicator light changes color. When the
indicator light is yellow with a beep, your
food is rare, when the indicator light is
orange with a beep, your food is medium
and when the indicator light is red, your food
is well done.
N.B.: if you like your meat very rare, remove
the meat when the cooking level indicator
turns green.
Please note, especially on meat, it is normal
that cooking result vary depending on type,
quality and origin of food.
14 15
16 17
rare well-
done
medium
18

10
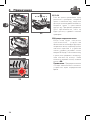
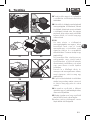
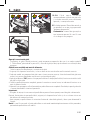
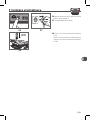
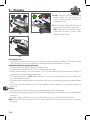
3 Cooking
19-20 When the color corresponding to your
choice of cooking level appears and that
the beep sounds, open the appliance and
remove your food.
21 Close the appliance. The control panel will
light up and set itself to ‘choice of program’
mode.
Comment: the security system will turn
o automatically if no program selection is
made.
19 20
21
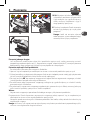
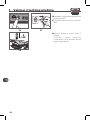
Successive cookings
If you wish to cook larger quantities, set in temperature the appliance again (see section 2. " Preheating ", starting
from point 9), even if cooking the same type of food or same program.
Cooking larger quantities of food:
Once your rst batch of food has nished cooking:
1. Make sure that the appliance is closed and no remnants of food remain inside.
2. Select the correct cooking mode or programme (this step is necessary even if the cooking mode is the same as for
the foods you have just nished cooking).
3. Press the button " OK " to begin preheating. While preheating, the light indicating the level of cooking will blink
purple.
4. Once preheating is complete, the appliance will beep and the indicator light will stop blinking purple.
5. The appliance is ready to be used once preheating is complete. Open the grill lid and place the food inside the
appliance.
Important:
- Please note that preheating is required for each new cooking of food.
Reminder: before activating preheating, make sure that the appliance is closed and no remnants of food remain inside.
- Then wait for preheating to nish before opening the grill and placing food inside.
Note : if the new pre-heating cycle is activated immediately after the end of the preceding cycle, the pre-heating
time will be reduced.

11
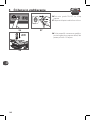
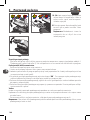
4 Comments
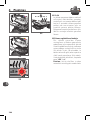
22-23-24
If you want to cook food to dierent personal
tastes, open the grill and remove the food
when it has reached the desired level and
then close the grill and continue cooking
the other food. The program will continue its
cooking cycle until it reaches the ‘well done’
level.
25 Keep warm function
Once the well done cooking is reached,
the cooking is nished, the appliance
automatically activates the keep warm
function, the indicator light turns red and
the device begins to beep every 20 seconds.
If food is left on the grill, it will continue to
cook while the cooking plates cool. You may
deactivate the beep by pressing the button
" OK ".
Note : the security system will power o the
appliance automatically after a certain period
of time
22 23
24
25

12
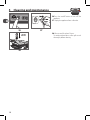
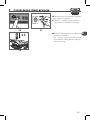
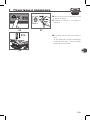
5 Cleaning and maintenance
26 Press the on/o button to turn o the
appliance.
27 Unplug the appliance from wall outlet.
28 Allow to cool for at least 2 hours.
To avoid accidental burns, allow grill to cool
thoroughly before cleaning.
26 27
2 H
28

13
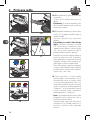
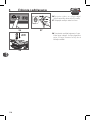
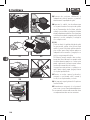
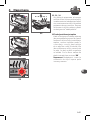
6 Cleaning
29 Before cleaning, unlock and remove the
plates to prevent damage to the cooking
surface.
30 The appliance and its cord cannot be
placed in the dishwasher. The heating
elements, visible and accessible parts, should
not be cleaned after removing the plates. If
they are very dirty, wait until the appliance
has completely cooled down and clean
them with a dry cloth.
31-32
If you do not wish to wash the cooking
plates in the dishwasher, use hot water and
a little washing up liquid to clean, then rinse
thoroughly to remove any residue. Wipe
them carefully with a paper towel.
Do not use metal scouring pads, steel wool
or abrasive cleaners to clean any part of the
grill, use only nylon or non-metallic cleaning
pads.
Drain the juice drip tray and wash it in mild
soapy water, then dry thoroughly with a
paper towel.
33 To clean the grill cover, wipe with a warm,
wet sponge and dry with a soft, dry cloth.
34 Do not immerse the body of grill in water or
any other liquid.
35 Always make sure grill is clean and dry
before storing.
Any repairs must be carried out by an approved
service representative.
29 30
31 32
33 34
35

14
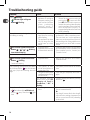
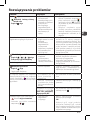
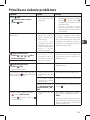
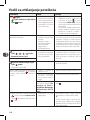
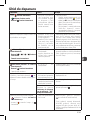
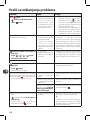
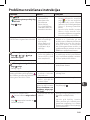
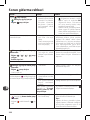
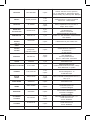
Troubleshooting guide
Problem
Cause Solution
Button blinking
+ Indicator light solid green
+ Button blinking
• Switching on the
appliance or starting an
automatic cooking cycle
with food and without
plates preheating
(manual mode is
automatically activated).
• 2 possible options:
– Choose the temperature setting by
pressing the button and then
press OK. Allow to cook, but you must
monitor the cooking (manual mode).
– stop the appliance, remove the food,
close the appliance properly, re-
program the appliance and wait until
end of preheating.
The appliance stops during the cycle of
pre-heating or cooking.
• The appliance has been
kept open for too long
while cooking.
• The appliance has been
idle too long after the
end of warm up or keep
warm.
• Disconnect the appliance from the outlet
and leave for 2-3 mins., restart the process.
The next time you use the appliance,
make sure you open and close it quick for
best cooking results. If the problem occurs
again contact your local Tefal customer
service.
The indicator light will blink white
+ Button / / / blinking
+ Intermittent beeping
• Appliance failure.
• Appliance stored or used
in a room that is too cold.
• Disconnect and reconnect your appliance
and immediately restart a preheat cycle.
If the problem persists, contact your
Customer Service.
The device does not beep.
The indicator light will blink white
+ Button blinking
+ Continuous beeping
• Appliance failure. • Unplug the appliance and contact
customer service.
After preheating, I placed the food inside and
closed the appliance, but the indicator
light stays purple and cooking does not
begin.
• The quantity of food
inside the appliance is
greater than 4 cm.
• The quantity of food should not exceed
4 cm.
• The grill was not opened
completely when placing
the food inside.
• Open the grill completely and close it
again.
The appliance does not
detect food inside The
quantity of food is
insucient, " OK " is
blinking.
• Conrm cooking activation by pressing
the button .
The appliance will activate in manual mode
+ The indicator light will blink red.
+ button temp control and light
xed
• Preheating time was cut
short.
• Monitor the cooking periodically
(for use in manual mode).
Or
• Stop the grill, remove food, close the grill,
select the new cooking programme you
wish to use and wait for the preheating
cycle to nish.

15
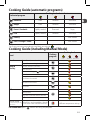
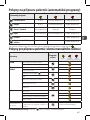
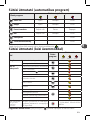
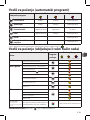
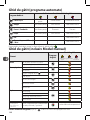
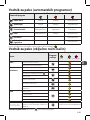
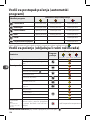
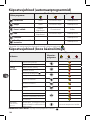
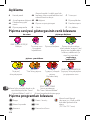
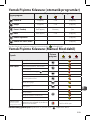
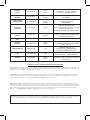
Cooking Guide (automatic programs)
Dedicated program
Cooking level color indicator
Red meat
Rare Medium Well-done
Burger
Rare Medium Well-done
Panini / Sandwich
Lightly cooked Browned Crispy
Fish
Lightly cooked Medium Well-done
Poultry
Well cooked
Pork / Sausages / Lamb
Well cooked
Tips: if you want your meat to be very rare (blue), you may use
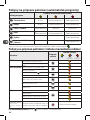
Cooking Guide (including Manual Mode)
Food
Cooking
program
Cooking level
rare medium well-done
Bread
Slices of bread, toasted sandwiches
Burger: (after pre-cooking the meat)
Meat &
Poultry
Pork llet (boneless), pork belly
Lamb (boneless)
Frozen chicken nuggets
Pork belly
Slice of ham to be cooked
Marinated chicken breast
Duck breast
Fish
Whole trout
Shelled prawns
King prawns (with and without shells on)
Tuna steak
Manual mode
See the quick start guide for
manual mode
Grilled fruits and vegetables (should
be cut to the same size and thickness)
4 dierent temperature settings
For frozen food, press before selecting your program.

16
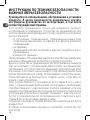
RU
ИНСТРУКЦИИ ПО ТЕХНИКЕ БЕЗОПАСНОСТИ
ВАЖНЫЕ МЕРЫ БЕЗОПАСНОСТИ
Руководство по использованию, обслуживанию и установке
продукта. В целях безопасности внимательно изучите
все разделы руководства по эксплуатации, в том числе
соответствующие пиктограммы.
Этот прибор предназначен только для домашнего бытового
использования в помещениях. Устройство не предназначено для
использования в нижеприведенных случаях, гарантия на которые не
распространяется:
– в кухонных помещениях, предназначенных для
персонала магазинов, в офисах и в других рабочих
помещениях;
– на фермах;
– клиентами отелей, мотелей и других подобных мест
проживания;
- в мини-гостиницах.
Перед первым использованием удалите все упаковочные материалы,
наклейки и принадлежности изнутри и снаружи устройства.
Данное устройство не предназначено для использования лицами (в
том числе детьми) с пониженными физическими, сенсорными или
умственными способностями или имеющими недостаточный опыт
или знания, если только они не находятся под присмотром или были
проинструктированы по поводу использования устройства лицом,
ответственным за их безопасность. Следите за тем, чтобы дети не
играли с этим устройством.
Этим устройством могут пользоваться дети старше 8 лет, а также
лица с ограниченными физическими, сенсорными и умственными
способностями или с недостаточным опытом и знаниями, если они
находятся под присмотром или получили инструкции по безопасной
эксплуатации устройства и понимают связанные с этим опасности.
Чистку и пользовательское обслуживание могут выполнять дети
старше 8 лет и при условии надзора за ними.
Устройство и его кабель питания должны быть недоступны для детей
младше 8 лет.
Во время использования никогда не оставляйте устройство без
присмотра.

17
RU
Во время использования доступные поверхности
устройства могут сильно нагреваться. Никогда не
прикасайтесь к горячим поверхностям устройства.
Это устройство не предназначено для использования с внешним
таймером или отдельной системой дистанционного управления.
Перед подключением устройства к электросети полностью
разматывайте кабель питания.
Если кабель питания поврежден, то во избежание опасности его
должен заменить изготовитель или его технический представитель.
Не используйте удлинители. Если вы согласны взять на себя
ответственность за использование удлинителей, то выбирайте
только те, которые находятся в хорошем состоянии, имеют вилку с
заземлением и соответствуют номинальной мощности устройства.
Примите все необходимые меры предосторожности, чтобы никто не
споткнулся об удлинитель.
Всегда подключайте устройство к розетке с заземлением.
Убедитесь, что источник электропитания соответствует номинальной
мощности и напряжению, указанным на нижней части устройства.
Для очистки пластин используйте губку, горячую воду и моющее
средство.
Никогда не погружайте устройство, кабель питания или вилку в воду
или любую другую жидкость.
ПРЕДУПРЕЖДЕНИЕ. Не используйте гриль без двух пластин,
установленных внутрь.
Всегда
• Внимательно прочитайте инструкции, общие для разных моделей в зависимости от принадлежностей,
поставляемых с устройством, и храните их в пределах досягаемости.
• При случайном получении ожога промойте его холодной водой и немедленно обратитесь к врачу при необходимости.
• Перед первым использованием вымойте пластины (см. раздел 5), налейте на них небольшое количество растительного
масла и протрите мягкой тканью или бумажным кухонным полотенцем.
• Разместите кабель питания аккуратно, с удлинителем или без, таким образом, чтобы люди могли свободно перемещаться
вокруг стола, не спотыкаясь о кабели.
• Дым может быть опасен для животных, которые обладают особо чувствительным обонянием, таких как птицы. Мы
рекомендуем владельцам птиц держать их подальше от зоны приготовления пищи.
• Всегда храните устройство в недоступном для детей месте.
• Перед использованием убедитесь, что пластины чистые с обеих сторон.
• Чтобы предотвратить повреждение пластин, используйте их только с тем устройством, для которого они предназначены
(например, не ставите их в печь, на газовые горелки, электрические варочные панели и т.д.).
• Убедитесь, что пластины устойчивы, надежно зафиксированы и правильно расположены на устройстве. Используйте только
пластины, поставляемые в комплекте с устройством или приобретенные в специализированном сервисном центре.
• Чтобы не повредить пластины устройства, всегда используйте деревянную или пластиковую лопатку.

18
RU
• Используйте только детали и аксессуары, поставляемые в комплекте с устройством или приобретенные в
специализированном сервисном центре. Не используйте их для других изделий или целей.
Никогда
• Не используйте устройство вне помещений.
• Никогда не оставляйте подключенное или работающее устройство без присмотра.
• Чтобы избежать перегрева, не ставьте устройство в угол или под шкаф у стены.
• Никогда не ставьте устройство непосредственно на хрупкие поверхности (стеклянный стол, скатерть, лакированную мебель
и др.) или на мягкие поверхности, например на кухонное полотенце.
• Никогда не ставьте устройство под настенный шкаф, полку или рядом с горючими материалами, такими как жалюзи, шторы
или гобелены.
• Никогда не ставьте устройство на горячие или скользкие поверхности либо поблизости от них. Кабель питания не должен
находиться вблизи или в контакте с горячими частями устройства, в непосредственной близости к источнику тепла или
острым краям.
• Не кладите кухонные приборы на варочные поверхности устройства.
• Никогда не режьте пищу непосредственно на пластинах.
• Не используйте металлические мочалки и агрессивные чистящие порошки, так как они могут повредить антипригарное
покрытие пластин.
• Не перемещайте устройство во время эксплуатации.
• Не поднимайте устройство за рукоятку или металлические провода.
• Не используйте устройство без пищи.
• Не кладите алюминиевую фольгу и другие предметы между пластиной и приготовляемой пищей.
• Не извлекайте поддон для жира во время использования устройства. Если поддон для жира заполнился в процессе
приготовления пищи, дайте устройству остыть и опустошите поддон.
• Не помещайте горячие пластины на хрупкие поверхности или под воду.
• Чтобы сохранить антипригарные свойства покрытия, избегайте чрезмерного предварительного разогрева пустого устройства.
• Никогда не переносите горячие пластины.
• Не готовьте при помощи устройства пищу, завернутую в алюминиевую фольгу.
• Чтобы не испортить устройство, никогда не используйте его для приготовления блюд способом «фламбе».
• Не помещайте листы алюминия и другие предметы между пластинами и нагревательным элементом.
• Никогда не готовьте на открытом гриле.
• Никогда не нагревайте устройство без пластин.
Советы и информация
• Благодарим за приобретение данного устройства, которое предназначено только для домашнего использования.
• В целях безопасности данный прибор соответствует применимым стандартам и нормативам — Директива по низковольтному
оборудованию — Директива об электромагнитной совместимости — Директива об охране окружающей среды — Директива
о материалах, непосредственно контактирующих с продуктами питания.
• Во время первых минут использования устройство может испускать легкий запах и дым.
• Наша компания проводит постоянные исследования и разработки и может вносить изменения в данное изделие без
предварительного уведомления.
• Не употребляйте в пищу продукты, которые были в непосредственном контакте с частями устройства, имеющими маркировку
.
• Если пища слишком толстая, предохранительная система автоматически отключит устройство.
Защита окружающей среды
Защита окружающей среды превыше всего!
Данное устройство содержит материалы, пригодные для переработки и вторичного использования.
Сдайте его в ближайший пункт сбора отходов.

19
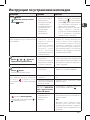
RU
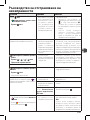
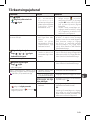
Цветовое руководство для индикатора
уровня приготовления
Предварительный разогрев Начало приготовления
МИГАЕТ ФИОЛЕТОВЫМ
Ожидание.
СВЕТИТСЯ ФИОЛЕТОВЫМ
Окончание
предварительного
разогрева
Можно класть пищу.
СИНИЙ
Начало приготовления.
ЗЕЛЕНЫЙ
В процессе приготовления устройство
издаст звуковой сигнал, чтобы сообщить
пользователю, что скоро будет достигнут
желтый уровень прожарки («с кровью»).
Приготовление — готово к употреблению в пищу
Сохранение тепла
(прибл. 30 минут)
ЖЕЛТЫЙ
Прожарка "с кровью".
ОРАНЖЕВЫЙ
Средняя прожарка.
КРАСНЫЙ
Полная прожарка.
Окончание
приготовления.
МИГАЕТ КРАСНЫМ
Окончание приготовления до уровня
«полная прожарка»
СВЕТИТСЯ ЗЕЛЕНЫМ
Выбрана или автоматически
активирована ручная функция, см. раздел
«Инструкции по устранению неполадок»
на стр. 27.
МИГАЕТ БЕЛЫМ
Неисправность устройства.
См. раздел «Инструкции по
устранению неполадок».
Обратитесь в сервисный центр.
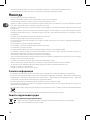
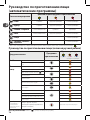
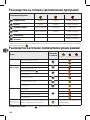
Руководство по программам приготовления
Бургер Панини / сэндвичи
Ручной режим: обычный режим
гриля для ручных операций,
включая 4 различных параметра
температуры (от 110°C до 275°C).
Птица Рыба
Стейк
Свинина / сосиски /
баранина
Описание
A Панель управления A4
4 настройки температуры в ручном режиме; см.
раздел о специальном ручном режиме в кратком
руководстве пользователя
C Ручка
A1
Кнопка включения/
выключения
A5 Кнопка «OK» D
Рабочие
пластины
A2
Режим замороженной
пищи
A6 Индикатор уровня приготовления E
Поддон для
жира
A3
Программы
приготовления
B Корпус F Кабель питания

20
RU
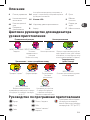
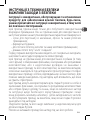
1
Подготовка
1 Удалите все упаковочные материалы,
наклейки и принадлежности с
внутренних и внешних сторон
пластин.
Цветную наклейку на индикаторе
уровня приготовления можно
заменить в соответствии с
используемым языком. Ее можно
заменить на одну из наклеек,
прилагаемых к устройству.
2 Перед первым использованием
тщательно помойте пластины при
помощи теплой воды и небольшого
количества моющего средства,
ополосните и тщательно вытрите.
3-4
Расположите съемный поддон для
жира в передней части устройства.
1 2
ОК
3 4
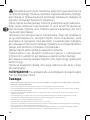
2 Предварительный разогрев
5 Для достижения наилучших
результатов и поддержания
антипригарных свойств протирайте
пластины при помощи бумажного
полотенца, смоченного в небольшом
количестве растительного масла.
6 Удалите все излишки масла с помощью
чистого бумажного кухонного
полотенца.
7 Убедитесь, что верхняя и нижняя
пластины правильно установлены
на устройство. Не выполняйте
предварительный разогрев без
установленных пластин. Подключите
устройство к источнику питания.
Помните, что кабель должен быть
полностью размотан.
8 Нажмите на выключатель.
Внимание! Убедитесь, что между
пластинами нет пищи.
5 6
7 8
Sayfa yükleniyor...
Sayfa yükleniyor...
Sayfa yükleniyor...
Sayfa yükleniyor...
Sayfa yükleniyor...
Sayfa yükleniyor...
Sayfa yükleniyor...
Sayfa yükleniyor...
Sayfa yükleniyor...
Sayfa yükleniyor...
Sayfa yükleniyor...
Sayfa yükleniyor...
Sayfa yükleniyor...
Sayfa yükleniyor...
Sayfa yükleniyor...
Sayfa yükleniyor...
Sayfa yükleniyor...
Sayfa yükleniyor...
Sayfa yükleniyor...
Sayfa yükleniyor...
Sayfa yükleniyor...
Sayfa yükleniyor...
Sayfa yükleniyor...
Sayfa yükleniyor...
Sayfa yükleniyor...
Sayfa yükleniyor...
Sayfa yükleniyor...
Sayfa yükleniyor...
Sayfa yükleniyor...
Sayfa yükleniyor...
Sayfa yükleniyor...
Sayfa yükleniyor...
Sayfa yükleniyor...
Sayfa yükleniyor...
Sayfa yükleniyor...
Sayfa yükleniyor...
Sayfa yükleniyor...
Sayfa yükleniyor...
Sayfa yükleniyor...
Sayfa yükleniyor...
Sayfa yükleniyor...
Sayfa yükleniyor...
Sayfa yükleniyor...
Sayfa yükleniyor...
Sayfa yükleniyor...
Sayfa yükleniyor...
Sayfa yükleniyor...
Sayfa yükleniyor...
Sayfa yükleniyor...
Sayfa yükleniyor...
Sayfa yükleniyor...
Sayfa yükleniyor...
Sayfa yükleniyor...
Sayfa yükleniyor...
Sayfa yükleniyor...
Sayfa yükleniyor...
Sayfa yükleniyor...
Sayfa yükleniyor...
Sayfa yükleniyor...
Sayfa yükleniyor...
Sayfa yükleniyor...
Sayfa yükleniyor...
Sayfa yükleniyor...
Sayfa yükleniyor...
Sayfa yükleniyor...
Sayfa yükleniyor...
Sayfa yükleniyor...
Sayfa yükleniyor...
Sayfa yükleniyor...
Sayfa yükleniyor...
Sayfa yükleniyor...
Sayfa yükleniyor...
Sayfa yükleniyor...
Sayfa yükleniyor...
Sayfa yükleniyor...
Sayfa yükleniyor...
Sayfa yükleniyor...
Sayfa yükleniyor...
Sayfa yükleniyor...
Sayfa yükleniyor...
Sayfa yükleniyor...
Sayfa yükleniyor...
Sayfa yükleniyor...
Sayfa yükleniyor...
Sayfa yükleniyor...
Sayfa yükleniyor...
Sayfa yükleniyor...
Sayfa yükleniyor...
Sayfa yükleniyor...
Sayfa yükleniyor...
Sayfa yükleniyor...
Sayfa yükleniyor...
Sayfa yükleniyor...
Sayfa yükleniyor...
Sayfa yükleniyor...
Sayfa yükleniyor...
Sayfa yükleniyor...
Sayfa yükleniyor...
Sayfa yükleniyor...
Sayfa yükleniyor...
Sayfa yükleniyor...
Sayfa yükleniyor...
Sayfa yükleniyor...
Sayfa yükleniyor...
Sayfa yükleniyor...
Sayfa yükleniyor...
Sayfa yükleniyor...
Sayfa yükleniyor...
Sayfa yükleniyor...
Sayfa yükleniyor...
Sayfa yükleniyor...
Sayfa yükleniyor...
Sayfa yükleniyor...
Sayfa yükleniyor...
Sayfa yükleniyor...
Sayfa yükleniyor...
Sayfa yükleniyor...
Sayfa yükleniyor...
Sayfa yükleniyor...
Sayfa yükleniyor...
Sayfa yükleniyor...
Sayfa yükleniyor...
Sayfa yükleniyor...
Sayfa yükleniyor...
Sayfa yükleniyor...
Sayfa yükleniyor...
Sayfa yükleniyor...
Sayfa yükleniyor...
Sayfa yükleniyor...
Sayfa yükleniyor...
Sayfa yükleniyor...
Sayfa yükleniyor...
Sayfa yükleniyor...
Sayfa yükleniyor...
Sayfa yükleniyor...
Sayfa yükleniyor...
Sayfa yükleniyor...
Sayfa yükleniyor...
Sayfa yükleniyor...
Sayfa yükleniyor...
Sayfa yükleniyor...
Sayfa yükleniyor...
Sayfa yükleniyor...
Sayfa yükleniyor...
Sayfa yükleniyor...
Sayfa yükleniyor...
Sayfa yükleniyor...
Sayfa yükleniyor...
Sayfa yükleniyor...
Sayfa yükleniyor...
Sayfa yükleniyor...
Sayfa yükleniyor...
Sayfa yükleniyor...
Sayfa yükleniyor...
Sayfa yükleniyor...
Sayfa yükleniyor...
Sayfa yükleniyor...
Sayfa yükleniyor...
Sayfa yükleniyor...
Sayfa yükleniyor...
Sayfa yükleniyor...
Sayfa yükleniyor...
Sayfa yükleniyor...
Sayfa yükleniyor...
Sayfa yükleniyor...
Sayfa yükleniyor...
Sayfa yükleniyor...
Sayfa yükleniyor...
Sayfa yükleniyor...
Sayfa yükleniyor...
Sayfa yükleniyor...
Sayfa yükleniyor...
Sayfa yükleniyor...
Sayfa yükleniyor...
Sayfa yükleniyor...
Sayfa yükleniyor...
Sayfa yükleniyor...
Sayfa yükleniyor...
Sayfa yükleniyor...
Sayfa yükleniyor...
Sayfa yükleniyor...
Sayfa yükleniyor...
Sayfa yükleniyor...
Sayfa yükleniyor...
Sayfa yükleniyor...
Sayfa yükleniyor...
Sayfa yükleniyor...
Sayfa yükleniyor...
Sayfa yükleniyor...
Sayfa yükleniyor...
Sayfa yükleniyor...
Sayfa yükleniyor...
Sayfa yükleniyor...
Sayfa yükleniyor...
Sayfa yükleniyor...
Sayfa yükleniyor...
Sayfa yükleniyor...
Sayfa yükleniyor...
Sayfa yükleniyor...
Sayfa yükleniyor...
Sayfa yükleniyor...
Sayfa yükleniyor...
Sayfa yükleniyor...
Sayfa yükleniyor...
Sayfa yükleniyor...
Sayfa yükleniyor...
Sayfa yükleniyor...
Sayfa yükleniyor...
-
 1
1
-
 2
2
-
 3
3
-
 4
4
-
 5
5
-
 6
6
-
 7
7
-
 8
8
-
 9
9
-
 10
10
-
 11
11
-
 12
12
-
 13
13
-
 14
14
-
 15
15
-
 16
16
-
 17
17
-
 18
18
-
 19
19
-
 20
20
-
 21
21
-
 22
22
-
 23
23
-
 24
24
-
 25
25
-
 26
26
-
 27
27
-
 28
28
-
 29
29
-
 30
30
-
 31
31
-
 32
32
-
 33
33
-
 34
34
-
 35
35
-
 36
36
-
 37
37
-
 38
38
-
 39
39
-
 40
40
-
 41
41
-
 42
42
-
 43
43
-
 44
44
-
 45
45
-
 46
46
-
 47
47
-
 48
48
-
 49
49
-
 50
50
-
 51
51
-
 52
52
-
 53
53
-
 54
54
-
 55
55
-
 56
56
-
 57
57
-
 58
58
-
 59
59
-
 60
60
-
 61
61
-
 62
62
-
 63
63
-
 64
64
-
 65
65
-
 66
66
-
 67
67
-
 68
68
-
 69
69
-
 70
70
-
 71
71
-
 72
72
-
 73
73
-
 74
74
-
 75
75
-
 76
76
-
 77
77
-
 78
78
-
 79
79
-
 80
80
-
 81
81
-
 82
82
-
 83
83
-
 84
84
-
 85
85
-
 86
86
-
 87
87
-
 88
88
-
 89
89
-
 90
90
-
 91
91
-
 92
92
-
 93
93
-
 94
94
-
 95
95
-
 96
96
-
 97
97
-
 98
98
-
 99
99
-
 100
100
-
 101
101
-
 102
102
-
 103
103
-
 104
104
-
 105
105
-
 106
106
-
 107
107
-
 108
108
-
 109
109
-
 110
110
-
 111
111
-
 112
112
-
 113
113
-
 114
114
-
 115
115
-
 116
116
-
 117
117
-
 118
118
-
 119
119
-
 120
120
-
 121
121
-
 122
122
-
 123
123
-
 124
124
-
 125
125
-
 126
126
-
 127
127
-
 128
128
-
 129
129
-
 130
130
-
 131
131
-
 132
132
-
 133
133
-
 134
134
-
 135
135
-
 136
136
-
 137
137
-
 138
138
-
 139
139
-
 140
140
-
 141
141
-
 142
142
-
 143
143
-
 144
144
-
 145
145
-
 146
146
-
 147
147
-
 148
148
-
 149
149
-
 150
150
-
 151
151
-
 152
152
-
 153
153
-
 154
154
-
 155
155
-
 156
156
-
 157
157
-
 158
158
-
 159
159
-
 160
160
-
 161
161
-
 162
162
-
 163
163
-
 164
164
-
 165
165
-
 166
166
-
 167
167
-
 168
168
-
 169
169
-
 170
170
-
 171
171
-
 172
172
-
 173
173
-
 174
174
-
 175
175
-
 176
176
-
 177
177
-
 178
178
-
 179
179
-
 180
180
-
 181
181
-
 182
182
-
 183
183
-
 184
184
-
 185
185
-
 186
186
-
 187
187
-
 188
188
-
 189
189
-
 190
190
-
 191
191
-
 192
192
-
 193
193
-
 194
194
-
 195
195
-
 196
196
-
 197
197
-
 198
198
-
 199
199
-
 200
200
-
 201
201
-
 202
202
-
 203
203
-
 204
204
-
 205
205
-
 206
206
-
 207
207
-
 208
208
-
 209
209
-
 210
210
-
 211
211
-
 212
212
-
 213
213
-
 214
214
-
 215
215
-
 216
216
-
 217
217
-
 218
218
-
 219
219
-
 220
220
-
 221
221
-
 222
222
-
 223
223
-
 224
224
-
 225
225
-
 226
226
-
 227
227
-
 228
228


Tefal GC716D12 Kullanım kılavuzu
- Tip
- Kullanım kılavuzu
diğer dillerde
- eesti: Tefal GC716D12 Kasutusjuhend
- slovenčina: Tefal GC716D12 Používateľská príručka
- română: Tefal GC716D12 Manual de utilizare
