Braun 190s-1, 190cb-1, 170s-1, Series 1 Kullanım kılavuzu
- Kategori
- Erkek traş makineleri
- Tip
- Kullanım kılavuzu

www.braun.com
Series1
Type 5729
Type 5727
Series 1
190s-1
190cb-1
190s-1
170s-1
96834040_190_170-s1_MN_S1.indd 196834040_190_170-s1_MN_S1.indd 1 09.04.14 09:1209.04.14 09:12
Stapled booklet, 105 x 148mm, 68 pages (incl. 8 pages cover), 2/2c = black+HKS43N
CSS APPROVED Effective Date 6May2014 GMT - Printed 29Sep2015 Page 1 of 67

Deutsch 6
English 10
Français 17
Español 22
Português 27
Italiano 32
Nederlands 36
Dansk 40
Norsk 44
Svenska 48
Suomi 52
Türkçe 56
∂ÏÏËÓÈο 60
Braun GmbH
Frankfurter Straße 145
61476 Kronberg/Germany
www.braun.com
www.service.braun.com
96834040/IV-14
DE/UK/FR/ES/PT/IT/NL/DK/NO/SE/
FI/TR/GR
Braun Infolines
DE / AT 00 800 27 28 64 63
00 800 BRAUNINFOLINE
CH 08 44 - 88 40 10
UK 0800 783 7010
IE 1 800 509 448
FR 0 800 944 802
BE 0 800 14 592
ES 901 11 61 84
PT 808 20 00 33
IT 800 440 017
NL 0 800-445 53 88
DK 70 15 00 13
NO 22 63 00 93
SE 020 - 21 33 21
FI 020 377 877
TR 0 800 261 63 65
GR 210-9478700
HK 2926 2300
(Jebsen Consumer Service
Centre)
96834040_190_170-s1_MN_S2.indd 196834040_190_170-s1_MN_S2.indd 1 09.04.14 09:0709.04.14 09:07
CSS APPROVED Effective Date 6May2014 GMT - Printed 29Sep2015 Page 2 of 67

4
90°
90°
5
4
Series 1
190s-
1
1
2
3
6
1
2
7
96834040_190_170-s1_MN_S4.indd 196834040_190_170-s1_MN_S4.indd 1 09.04.14 09:0609.04.14 09:06
CSS APPROVED Effective Date 6May2014 GMT - Printed 29Sep2015 Page 3 of 67

5
a
b
d
c
96834040_190_170-s1_MN_S5.indd 196834040_190_170-s1_MN_S5.indd 1 09.04.14 09:0509.04.14 09:05
CSS APPROVED Effective Date 6May2014 GMT - Printed 29Sep2015 Page 4 of 67

6
Unsere Produkte werden hergestellt, um höchste Ansprüche an Qualität,
Funktionalität und Design zu erfüllen. Wir wünschen Ihnen mit Ihrem Braun
Rasierer viel Freude.
Lesen Sie die Gebrauchsanweisung vollständig und bewahren Sie sie als
Referenz auf, da sie Sicherheitshinweise enthält.
Achtung
Der Scherkopf ist geeignet zur Reinigung unter
fließendem Wasser. Der Rasierer ist vom Anschluss-
kabel zu trennen, bevor der Scherkopf mit Wasser
gereinigt wird.
Ihr Rasierer ist mit einem Spezialkabel mit integriertem
Netzteil für Sicherheitskleinspannung ausgestattet. Es
dürfen weder Teile ausgetauscht noch Veränderungen
vorgenommen werden, da sonst Stromschlaggefahr
besteht. Verwenden Sie ausschließlich das mitgelieferte
Spezialkabel.
Verwenden Sie das Gerät nicht mit beschädigter Scherfolie
oder defektem Spezialkabel.
Dieses Gerät kann von Kindern ab 8 Jahren und von
Personen mit reduzierten physischen, sensorischen oder
mentalen Fähigkeiten oder Mangel an Erfahrung und/oder
Wissen benutzt werden, wenn sie beaufsichtigt oder bezüg-
lich des sicheren Gebrauchs des Gerätes unterwiesen
wurden und die daraus resultierenden Gefahren verstanden
haben. Kinder dürfen nicht mit dem Gerät spielen. Reini-
gung und Benutzer-Wartung dürfen nicht durch Kinder
durchgeführt werden, es sei denn, sie sind älter als 8 Jahre
und beaufsichtigt.
Deutsch
96834040_190_170-s1_MN_S6-68.indd 696834040_190_170-s1_MN_S6-68.indd 6 29.04.14 15:1729.04.14 15:17
CSS APPROVED Effective Date 6May2014 GMT - Printed 29Sep2015 Page 5 of 67

7
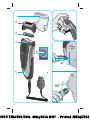
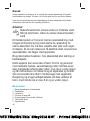
Beschreibung
1 Schutzkappe
2 Scherfolie
3 Klingenblock
4 Trimmer (Langhaarschneider)
5 Ladekontroll-Leuchte (nur Modell 190s/cb)
6 Ein-/Ausschalter
7 Spezialkabel
Aufladen des Rasierers (nur Modell 190s/cb)
Die empfohlene Umgebungstemperatur zum Laden ist 5 °C bis 35 °C. Bei extrem
niedrigen oder hohen Temperaturen kann es sein, dass der Akku nicht richtig
geladen werden kann. Die empfohlene Umgebungstemperatur zum Rasieren liegt
bei 15 °C bis 35 °C.
Setzen Sie den Rasierer nicht längere Zeit Temperaturen über 50° C aus.
• Den ausgeschalteten Rasierer mit dem Spezialkabel (7) ans Netz anschließen.
• Bei der Erstladung den Rasierer mindestens 4 Stunden ununterbrochen laden.
Die Ladekontroll-Leuchte (5) zeigt an, dass der Rasierer geladen wird. Sind die
Akkus voll geladen, blinkt die Ladekontroll-Leuchte nur noch gelegentlich beim
Nachladen.
• Voll geladen kann der Rasierer je nach Bartstärke ca. 30 Minuten kabellos
betrieben werden.
• Verwenden Sie den Rasierer kabellos, bis die Akkus leer sind. Danach wieder
voll aufladen. Nachfolgende Ladevorgänge dauern ca. 1 Stunde.
• Die maximale Akku-Kapazität wird erst nach mehreren Lade-/Entladevorgängen
erreicht.
• Wenn die Akkus leer sind, können Sie das Gerät auch direkt über das Spezial-
kabel vom Netz betreiben.
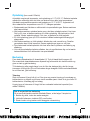
Rasieren
Zuerst Schutzkappe (1) abnehmen und den Rasierer mit dem Ein-/Ausschalter (6)
einschalten. Der bewegliche Scherfolienrahmen passt sich automatisch der
Gesichtsform an und sorgt für eine gründliche und sanfte Rasur.
Wenn Sie sich einige Tage nicht rasiert haben, können Sie den Trimmer (4)
verwenden, um längere Haare zunächst vorzukürzen und dann mit der Scherfolie
gründlich auszurasieren.
Trimmen
Durch Ausfahren können Sie den Trimmer zuschalten (a). Der Trimmer ist nicht nur
für das großflächige Trimmen konzipiert, sondern auch ideal für Formen und Teilen
von Koteletten, Oberlippen- und Teilbärten.
96834040_190_170-s1_MN_S6-68.indd 796834040_190_170-s1_MN_S6-68.indd 7 29.04.14 15:1729.04.14 15:17
CSS APPROVED Effective Date 6May2014 GMT - Printed 29Sep2015 Page 6 of 67

8
Häufiger Einsatz des Trimmers kann die Akku-Kapazität herabsetzen
(nur Modell 190s/cb).
Tipps für eine optimale Trockenrasur
Für optimale Rasier-Ergebnisse empfehlen wir drei einfache Schritte:
1. Rasieren Sie sich immer, bevor Sie Ihr Gesicht waschen.
2. Rasierer stets im rechten Winkel (90°) zur Haut halten.
3. Haut straffen und gegen die Bartwuchsrichtung rasieren.
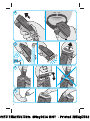
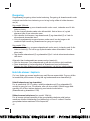
Reinigung
Durch regelmäßiges Reinigen verbessern Sie die Rasierleistung Ihres Rasierers.
So können Sie den Scherkopf nach jeder Rasur einfach und schnell unter fließen-
dem Wasser reinigen (b):
Nur Modell 190s/cb:
• Rasierer einschalten und den Scherkopf unter heißes, fließendes Wasser halten
bis alle Rückstände entfernt sind.
• Gelegentlich Flüssigseife (ohne Scheuermittel) benutzen. Schaum vollständig
abspülen und den Rasierer noch einige Sekunden laufen lassen.
• Dann den Rasierer ausschalten, die Scherfolie (2) und den Klingenblock (3)
abnehmen und trocknen lassen.
• Bei regelmäßiger Nassreinigung sollten Sie wöchentlich einen Tropfen Leicht-
maschinenöl auf der Scherfolie (2) und dem Langhaarschneider (4) verteilen (d).
Nur Modell 170s:
• Nach jeder Rasur den Scherkopf mit heißem, fließenden Wasser spülen bis alle
Rückstände entfernt sind (b). Gelegentlich Flüssigseife (ohne Scheuermittel)
benutzen. Schaum vollständig abspülen.
• Scherfolie (2) und Klingenblock (3) abnehmen und trocknen lassen.
Alternativ können Sie den Rasierer mit einer Bürste reinigen (c):
• Rasierer ausschalten. Die Scherfolie abnehmen und ausklopfen.
• Mit der Bürste den Klingenblock und die Innenseite des Scherkopfes reinigen.
Die Scherfolie darf nicht mit der Bürste gereinigt werden.
So halten Sie Ihren Rasierer in Bestform
Etwa alle vier Wochen den Klingenblock mit Braun Reinigungsmitteln reinigen.
Verteilen Sie etwas Leichtmaschinenöl auf der Scherfolie und dem Trimmer (d).
Scherteile-Wechsel
Um 100 % der Rasierleistung zu erhalten, wechseln Sie Scherfolie (2) und
Klingenblock (3) spätestens alle 18 Monate oder sobald sie Verschleißerschei-
96834040_190_170-s1_MN_S6-68.indd 896834040_190_170-s1_MN_S6-68.indd 8 29.04.14 15:1729.04.14 15:17
CSS APPROVED Effective Date 6May2014 GMT - Printed 29Sep2015 Page 7 of 67

9
nungen zeigen. Für eine gründlichere Rasur mit weniger Hautreizung sollten Sie
beide Teile gleichzeitig wechseln.
(Scherfolie und Klingenblock: 10B)
Akku-Pflege (nur Modell 190s/cb)
Um die maximale Kapazität der Akkus zu erhalten, sollte der Rasierer ca. alle
sechs Monate durch Gebrauch vollständig entladen werden. Danach den Rasierer
wieder voll aufladen.
Umweltschutz
Dieses Gerät enthält Akkus. Im Sinne des Umweltschutzes darf dieses
Gerät am Ende seiner Lebensdauer nicht mit dem Hausmüll entsorgt
werden. Die Entsorgung kann über den Braun Kundendienst oder lokal
verfügbare Rückgabe- und Sammelstellen erfolgen.
Änderungen vorbehalten.
Elektrische Angaben siehe Bedruckung auf dem Spezialkabel.
Garantie
Als Hersteller übernehmen wir für dieses Gerät – nach Wahl des Käufers
zusätzlich zu den gesetzlichen Gewährleistungsansprüchen gegen den Verkäufer
– eine Garantie von 2 Jahren ab Kaufdatum. Innerhalb dieser Garantiezeit
beseitigen wir nach unserer Wahl durch Reparatur oder Austausch des Gerätes
unentgeltlich alle Mängel, die auf Material- oder Herstellungsfehlern beruhen. Die
Garantie kann in allen Ländern in Anspruch genommen werden, in denen dieses
Braun Gerät von uns autorisiert verkauft wird.
Von der Garantie sind ausgenommen: Schäden durch unsachgemäßen Gebrauch
(Knickstellen an der Scherfolie, Bruch), normaler Verschleiß (z.B. Scherfolie
oder Klingenblock) sowie Mängel, die den Wert oder die Gebrauchstauglichkeit
des Gerätes nur unerheblich beeinflussen. Bei Eingriffen durch nicht von uns
autorisierte Braun Kundendienstpartner sowie bei Verwendung anderer als
Original Braun Ersatzteile erlischt die Garantie.
Im Garantiefall senden Sie das Gerät mit Kaufbeleg bitte an einen autorisierten
Braun Kundendienstpartner. Die Anschrift finden Sie unter www.service.braun.
com oder können Sie kostenlos unter 00800/27 28 64 63 erfragen.
96834040_190_170-s1_MN_S6-68.indd 996834040_190_170-s1_MN_S6-68.indd 9 29.04.14 15:1729.04.14 15:17
CSS APPROVED Effective Date 6May2014 GMT - Printed 29Sep2015 Page 8 of 67

10
Our products are designed to meet the highest standards of quality, functionality
and design. We hope you enjoy your new Braun Shaver.
Read these instructions completely, they contain safety information. Keep them
for future reference.
Warnings
The shaver head is suitable for cleaning under
running tap water. Detach the shaver from the power
supply before cleaning the shaver head in water.
Your shaver is provided with a special cord set, which has
an integrated Safety Extra Low Voltage power supply.
Do not exchange or tamper with any part of it, otherwise
there is risk of electric shock. Only use the special cord set
provided with your appliance.
Never use the appliance with a damaged foil or cord.
This appliance can be used by children aged from 8 years
and above and persons with reduced physical, sensory or
mental capabilities or lack of experience and knowledge if
they have been given supervision or instruction concerning
the safe use of the appliance and understand the hazards
involved. Children shall not play with the appliance.
Cleaning and user maintenance shall not be made by
children unless they are older than 8 years and supervised.
Description
1 Foil protection cap
2 Shaver foil
3 Cutter block
4 Long hair trimmer
5 Charging light (model 190s/cb only)
6 On/off switch
7 Special cord set
English
96834040_190_170-s1_MN_S6-68.indd 1096834040_190_170-s1_MN_S6-68.indd 10 29.04.14 15:1729.04.14 15:17
CSS APPROVED Effective Date 6May2014 GMT - Printed 29Sep2015 Page 9 of 67

11
Charging (model 190s/cb only)
Recommended ambient temperature for charging is 5 °C to 35 °C.
The battery may not charge properly or at all under extreme low or high
temperatures. Recommended ambient temperature for shaving is 15 °C
to 35 °C. Do not expose the shaver to temperatures higher than 50 °C for
extended periods of time.
• Using the special cord set, connect the shaver to an electrical outlet with the
motor switched off.
• When charging for the first time, leave the shaver to charge continuously for
4 hours. The charging light (5) shows that the shaver is being charged. When
the battery is fully charged, the charging light intermittently blinks on and off.
This indicates that the battery maintains its full capacity.
• A full charge provides up to 30 minutes of cordless shaving time depending on
your beard growth.
• Once the shaver is completely charged, discharge the shaver through normal
use. Then recharge to full capacity. Subsequent charges will take about 1 hour.
• Maximum battery capacity will only be reached after several charging /
discharging cycles.
• If the rechargeable batteries are discharged, you may also shave by connecting
the shaver to an electrical outlet via the special cord set.
Shaving
Remove the foil protection cap (1). Activate the on/off switch (6). The floating foil
frame automatically adapts to your skin surface for a close, smooth shave.
For pre-shaving after a few days of not having shaved, use the long hair trimmer
(4) to pre-cut long hairs. For a close, smooth shave, finish with the foil.
Trimming
Push out the long hair trimmer (a). It allows controlled trimming of moustache and
sideburns. It evenly cuts and trims larger areas: ideal for shaping sideburns,
moustaches and partial short beards.
Frequent use of the long hair trimmer may reduce the battery capacity (model
190s/cb only).
Tips for a perfect dry shave
For best shaving results, Braun recommends you to follow 3 simple steps:
1. Always shave before washing your face.
2. At all times, hold the shaver at right angles (90°) to your skin.
3. Stretch your skin and shave against the direction of your beard growth.
96834040_190_170-s1_MN_S6-68.indd 1196834040_190_170-s1_MN_S6-68.indd 11 29.04.14 15:1729.04.14 15:17
CSS APPROVED Effective Date 6May2014 GMT - Printed 29Sep2015 Page 10 of 67

12
Cleaning
Regular cleaning ensures better shaving performance. Rinsing the shaver head
under running water after each shave is an easy and fast way to keep it clean (b):
Model 190s/cb only:
• Switch the shaver on and rinse the shaver head under hot running water until all
residues have been removed.
• You may use liquid soap without abrasive substances. Rinse off all foam and let
the shaver run for a few more seconds.
• Next, switch off the shaver, remove the shaver foil (2) and cutter block (3).
Then leave the disassembled shaving parts to dry.
• If you regularly clean the shaver under water, then once a week apply a drop of
light machine oil onto the long hair trimmer and shaver foil (d).
Model 170s only:
• After each shave, rinse the shaver head under hot running water until all
residues have been removed (b). You may use liquid soap without abrasive
substances. Rinse off all foam.
• Next, remove the shaver foil (2) and cutter block (3). Then leave the
disassembled shaving parts to dry.
Alternatively, you may clean the shaver using a brush (c):
• Switch off the shaver. Remove the shaver foil and tap it out on a flat surface.
• Using the brush, clean the cutter block and the inner area of the shaver head.
However, do not clean the shaver foil with the brush as this will damage the foil.
Keeping your shaver in top shape
About every four weeks, clean the cutter block with Braun cleaning agents.
Put a drop of light machine oil onto the long hair trimmer and the shaver foil (d).
Replacing the shaver foil and cutter block
To maintain 100% shaving performance, replace the shaver foil (2) and cutter
block (3) at least every 18 months or when worn. Change both parts at the same
time for a closer shave with less skin irritation.
(Shaver foil and cutter block: 10B)
Preserving the batteries (model 190s/cb only)
In order to maintain the optimum capacity of the rechargeable batteries, the
shaver has to be fully discharged (by shaving) every 6 months approximately.
Then recharge the shaver to full capacity.
96834040_190_170-s1_MN_S6-68.indd 1296834040_190_170-s1_MN_S6-68.indd 12 29.04.14 15:1729.04.14 15:17
CSS APPROVED Effective Date 6May2014 GMT - Printed 29Sep2015 Page 11 of 67

13
Environmental notice
This appliance contains rechargeable batteries. In the interest of protecting
the environment, please do not dispose of the product in household waste
at the end of its useful life. Disposal can take place at a Braun Service
Centre or at appropriate collection points provided in your country.
Subject to change without notice.
For electric specifications, see printing on the special cord set.
Guarantee
We grant a 2 year guarantee on the product commencing on the date of
purchase. Within the guarantee period we will eliminate any defects in the
appliance resulting from faults in materials or workmanship, free of charge
either by repairing or replacing the complete appliance at our discretion.
This guarantee extends to every country where this appliance is supplied by
Braun or its appointed distributor.
This guarantee does not cover: damage due to improper use, normal wear and
tear (e.g. shaver foil or cutter block) as well as defects that have a negligible effect
on the value or operation of the appliance. The guarantee becomes void if repairs
are undertaken by unauthorised persons and if original Braun parts are not used.
To obtain service within the guarantee period, hand in or send the complete
appliance with your sales receipt to an authorised Braun Customer Service Centre
(address information available online at www.service.braun.com).
For UK only:
This guarantee in no way affects your rights under statutory law.
96834040_190_170-s1_MN_S6-68.indd 1396834040_190_170-s1_MN_S6-68.indd 13 29.04.14 15:1729.04.14 15:17
CSS APPROVED Effective Date 6May2014 GMT - Printed 29Sep2015 Page 12 of 67

14
For Australia & New Zealand only:
Warranty
In Australia, our goods come with guarantees that cannot be excluded under
the Australian Consumer Law. You are entitled to a replacement or refund for a
major failure and for compensation for any other reasonably foreseeable loss
or damage. You are also entitled to have the goods repaired or replaced if the
goods fail to be of acceptable quality and the failure does not amount to a
major failure.
The benefi ts given by this warranty are in addition to other rights and
remedies of the consumer law.
For Claims in Australia please contact:
Procter & Gamble Australia Pty Ltd
1 Innovation Road, Macquarie Park
NSW 2113
Telephone: +612 8864 5000
Facsimile: +612 8864 5574
Email: [email protected]
For claims in New Zealand please contact:
Procter & Gamble Distributing
New Zealand Limited
Unit 3, Building I, 5 Orbit Drive
Rosedale, North Shore City 0632
Auckland, New Zealand
Telephone: +649 477 6400
Facsimile: +649 477 6399
Email: [email protected]
Our Warranty
This appliance is also covered by a 24 Month Replacement Warranty commencing
on the date of purchase (Our Warranty).
Our Warranty applies in all States and Territories of Australia and in
New Zealand and is in addition to any mandatory statutory obligations
imposed on Procter & Gamble Australia Pty. Ltd., its distributors and its
manufacturer. Our Warranty does not purport to exclude, restrict or modify
any such mandatory statutory obligations.
Our Warranty only covers defects in the appliance resulting from faults in
workmanship or materials. Therefore, if your appliance becomes faulty as a result
of faults in workmanship or materials, it will be exchanged by your retailer, on
presentation of proof of purchase.
96834040_190_170-s1_MN_S6-68.indd 1496834040_190_170-s1_MN_S6-68.indd 14 29.04.14 15:1729.04.14 15:17
CSS APPROVED Effective Date 6May2014 GMT - Printed 29Sep2015 Page 13 of 67

15
Our Warranty only applies to domestic or household use of this appliance and the
warranty will only apply if the correct operating instructions included with this
product have been followed. For any appliance replaced under this warranty, Our
Warranty ends on the expiry of the warranty period that applied to the original
appliance.
Our Warranty does not cover:
A. Damage arising from improper use or operation on incorrect voltages.
B. Breakages to shaver foils, glass jars, etc.
C. Normal wear due to moving parts.
D. Repairs undertaken by unauthorised service personnel or use of non genuine parts.
E. Appliances that are outside the warranty period or are not faulty.
This appliance is not intended for use by young children or infi rm persons without
supervision. Young children should be supervised to ensure that they do not play
with the appliance.
If the appliance is powered by a cord extension set or electrical portable outlet
device these should be positioned so they are not subject to splashing or ingress
of moisture.
To the extent permitted by the laws of the Commonwealth of Australia and New
Zealand and applicable laws of a State or Territory of Australia, and without
affecting any mandatory statutory obligations imposed by law, Our Warranty is
given in exchange for any other rights you may have against Procter & Gamble
Australia Pty. Ltd. or its distributors or manufacturer, whether at law, in tort
(including negligence), in equity or under statute.
Please retain proof of purchase of this appliance. If you have any questions in
relation to Our Warranty, please call our Consumer Service line (see below for
numbers).
If you intend to make a claim please telephone our Customer Service line on the
numbers set out below to obtain information about your claim and any costs
associated with claiming under Our Warranty. You will bear the cost of returning
your product to us.
Repairs and service
If you are sending your appliance for repair under Our Warranty, please pack the
appliance adequately and send it to your nearest Service Agent, at your expense. For
service or replacement parts refer to the authorised Service Agents listed overleaf.
Local Service Agents may change from time to time – in that event please contact
the Consumer Service free call number below for updated local service agent details.
Australian Consumer Service (free call): 1 800 641 820
New Zealand Consumer Service (free call): 0 800 108 909
N2820
96834040_190_170-s1_MN_S6-68.indd 1596834040_190_170-s1_MN_S6-68.indd 15 29.04.14 15:1729.04.14 15:17
CSS APPROVED Effective Date 6May2014 GMT - Printed 29Sep2015 Page 14 of 67

16
Australian & New Zealand Service Agents
VICTORIA & TASMANIA
Statewide Services Pty Ltd
trading as J A Appliances
17-19 Hossack Avenue
Coburg North, VIC 3058
Tel. (03) 8371 9100
Fax. (03) 9355 8644
Email: jaappliances@
statewideservices.com.au
QUEENSLAND
Walters Import trading as
Brisbane Appliance Service Centre
449 Beaudesert Road
Moorooka
QLD 4105
Tel. (07) 3277 0360
Fax. (07) 3274 2909
Email: [email protected]
WESTERN AUSTRALIA
Mark 1 Appliances
Unit 1, 46 Abernethy Road
Belmont, WA 6104
Tel. (08) 9475 0911
Fax. (08) 9475 0922
Email: [email protected]
NEW SOUTH WALES & ACT
Faulder Appliance Services Pty Ltd
Shop 4, 9 Evans Road,
Rooty Hill, NSW 2766
Tel. (02) 9625 3064
Fax. (02) 9625 3037
Email: [email protected]
SOUTH AUSTRALIA & NT
Adelaide Service Centre
Shop B2,
Parkholme Shopping Centre
319 Oaklands Road, Parkholme
Adelaide, SA 5043
Tel. (08) 8357 5800
Fax. (08) 8357 5833
Email: [email protected]
NEW ZEALAND
Key Service Ltd
7D Echelon Place
East Tamaki
Manukau City
Auckland
New Zealand
(PO Box 38569, Howick, Auckland,
New Zealand)
Tel. (09) 916 0960
Fax. (09) 916 0970
Email: [email protected]
96834040_190_170-s1_MN_S6-68.indd 1696834040_190_170-s1_MN_S6-68.indd 16 29.04.14 15:1729.04.14 15:17
CSS APPROVED Effective Date 6May2014 GMT - Printed 29Sep2015 Page 15 of 67

17
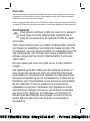
Nos produits sont conçus pour satisfaire les plus hautes exigences en matière
de qualité, fonctionnalité et design. Nous espérons que vous serez pleinement
satisfait de votre nouveau rasoir Braun.
Lisez l’intégralité des instructions d’utilisation, elles contiennent des informations
de sécurité. Conservez ce document pour le consulter également ultérieurement.
Avertissement
Vous pouvez nettoyer la tête du rasoir en le passant
sous l’eau courante. Débranchez l’appareil de la
prise de courant avant de nettoyer la tête du rasoir
sous l’eau.
Votre rasoir est livré avec un cordon d’alimentation spécial
qui intègre un adaptateur sécuritaire de basse tension. Par
conséquent, vous ne devez modifier ou manipuler aucun de
ses composants, afin d’éviter tout risque d’électrocution.
Utilisez uniquement le cordon d’alimentation fourni avec
votre rasoir.
Ne vous rasez pas avec une grille ou un cordon endom-
magés.
Cet appareil peut être utilisé par des enfants de 8 ans et
plus et par des personnes dont les capacités physiques,
sensorielles ou mentales sont réduites, ou des personnes
dénuées d’expérience ou de connaissance, si elles ont pu
bénéficier, par l’intermédiaire d’une personne responsable
de leur sécurité, d’une surveillance ou d’instructions
préalables concernant l’utilisation de l’appareil en toute
sécurité et les dangers encourus. Les enfants ne doivent
pas jouer avec l’appareil. Le nettoyage et l’entretien ne
doivent pas être faits par des enfants, à moins qu’ils ne
soient âgés de plus de 8 ans et qu’ils ne soient sous
surveillance.
Français
96834040_190_170-s1_MN_S6-68.indd 1796834040_190_170-s1_MN_S6-68.indd 17 29.04.14 15:1729.04.14 15:17
CSS APPROVED Effective Date 6May2014 GMT - Printed 29Sep2015 Page 16 of 67

18
Description
1 Capot de protection de la grille
2 Grille de rasage
3 Bloc-couteaux
4 Tondeuse rétractable
5 Témoin lumineux de charge (seulement sur le modèle 190s/cb)
6 Bouton marche/arrêt
7 Câble d’alimentation
Mise en charge du rasoir (seulement sur le modèle 190s/cb)
La température ambiante recommandée pour charger le rasoir est comprise entre
5 °C et 35 °C. La batterie peut ne pas se charger correctement ou pas du tout à
des températures extrêmement basses ou élevées. La température ambiante
recommandée pour se raser est comprise entre 15° C et 35 °C.
N’exposez pas
votre rasoir à des températures supérieures à 50 °C pendant une période prolongée.
• Utilisez le cordon d’alimentation, branchez le rasoir sur le secteur en veillant à
ce que l’appareil soit en position arrêt.
• Lors de la première mise en charge, laissez l’appareil branché pendant au
moins 4 heures. Le témoin de charge (5) vous indique que le rasoir est en cours
de charge. Lorsque la batterie est complètement pleine, le voyant s’éteint, puis
se rallume ponctuellement lors des auto-contrôles de charge.
• Une pleine charge procure jusqu’à 30 minutes de rasage sans fil en fonction du
type de barbe.
• Une fois que le rasoir est complètement chargé, déchargez-le en l’utilisant
normalement sans le cordon. Rechargez-le ensuite. Le temps de charge supplé-
mentaire prendra environ une heure.
• La capacité maximum de batterie sera atteinte seulement après plusieurs
cycles de charge et de décharge.
• Lorsque la batterie est déchargée, vous pouvez également vous raser avec le
rasoir branché sur le secteur grâce au cordon d’alimentation.
Rasage
Retirez le capot de protection de la grille (1). Appuyez sur le bouton marche/arrêt
pour mettre en marche le rasoir. La grille flottante s’adapte automatiquement à
votre surface de peau pour un rasage précis et doux.
Pour vous pré-raser lorsque vous ne vous êtes pas rasé depuis quelques temps,
utilisez la tondeuse rétractable (4) et ce afin de pré-couper les poils les plus longs.
Tondeuse
Poussez la tondeuse rétractable vers l’avant (a). Cela permet de mieux maîtriser la
tonte de votre barbe ou de vos pattes. L’appareil peut éventuellement couper ou
tondre des zones plus larges : idéal pour dessiner les contours de barbes, de
96834040_190_170-s1_MN_S6-68.indd 1896834040_190_170-s1_MN_S6-68.indd 18 29.04.14 15:1729.04.14 15:17
CSS APPROVED Effective Date 6May2014 GMT - Printed 29Sep2015 Page 17 of 67

19
moustaches ou les barbes de 3 jours.
Une utilisation fréquente de la tondeuse rétractable pourrait réduire la capacité de
la batterie (seulement sur le modèle 190s/cb).
Les astuces pour un rasage parfait
Pour obtenir le meilleur rasage possible, Braun vous recommande de suivre
3 conseils simples :
1. Rasez-vous toujours avant de vous laver le visage.
2. Pendant toute la durée du rasage, tenez le rasoir perpendiculairement (90°)
à la peau.
3. Tendez votre peau et rasez-vous dans le sens contraire à la pousse du poil.
Nettoyage
Un nettoyage régulier assure une meilleure performance de rasage. Le nettoyage
de la tête du rasoir sous l’eau courante après chaque rasage est un moyen
efficace et rapide pour le garder propre (b) :
Précision pour le modèle 190s/cb :
• Mettez en marche le rasoir (sans le cordon d’alimentation) et rincez la tête du
rasoir sous l’eau chaude jusqu’à enlever tous les résidus. Vous pouvez utiliser
un peu de savon liquide s’il ne contient aucune substance abrasive. Rincez bien
la mousse et laissez le rasoir en marche pendant quelques secondes.
• Ensuite, arrêtez le rasoir, puis enlevez la grille de rasage (2) et le bloc-couteaux
(3). Laissez sécher.
• Si vous nettoyez régulièrement votre rasoir sous l’eau, appliquez une fois par
semaine une goutte de l’huile fournie ou d’huile fluide de machine a coudre sur
la tondeuse et sur la grille de rasage (d).
Précision pour le modèle 170s :
• Après chaque rasage, rincez la tête du rasoir sous l’eau chaude jusqu’à enlever
tous les résidus (b). Vous pouvez utiliser un peu de savon liquide s’il ne contient
aucune substance abrasive. Rincez bien toute la mousse.
• Ensuite, enlevez la grille de rasage (2) et le bloc-couteaux (3) pour les laisser
sécher.
Vous pouvez également nettoyer le rasoir en utilisant une brossette (c) :
• Arrêtez le rasoir. Enlevez la grille de rasage et tapez la légèrement sur une
surface plane.
• A l’aide de la brossette, nettoyez le bloc-couteaux et la partie intérieure de la
tête du rasoir. Cependant, ne nettoyez pas la grille de rasage avec la brossette
car cela risquerait de l’abîmer.
96834040_190_170-s1_MN_S6-68.indd 1996834040_190_170-s1_MN_S6-68.indd 19 29.04.14 15:1729.04.14 15:17
CSS APPROVED Effective Date 6May2014 GMT - Printed 29Sep2015 Page 18 of 67

20
Entretien du rasoir
Environ toutes les 4 semaines, nettoyez le bloc-couteaux avec du liquide
nettoyant Braun.
Remplacement de la grille de rasage et du bloc-couteaux
Pour conserver 100% de la performance de votre rasoir, remplacez la grille de
rasage (2) et le bloc-couteaux (3) tous les 18 mois au maximum ou quand ils sont
usés. Changez les 2 pièces en même temps pour assurer un rasage plus précis
avec moins d’irritations.
(Références Grille et Bloc-couteaux : 10B)
Entretien de la batterie (seulement sur le modèle 190s/cb)
Afin de conserver la capacité maximum de la batterie, le rasoir doit être complète-
ment déchargé (en se rasant) environ tous les 6 mois. Puis rechargez le rasoir à sa
pleine capacité.
Respect de l’environnement
Ce produit contient des batteries rechargeables. Afin de protéger
l’environnement, ne jetez jamais l’appareil dans les ordures ménagères
à la fin de sa durée de vie. Remettez-le à votre centre service agréé Braun
ou déposez-le dans des sites de récupération appropriés conformément
aux réglementations locales ou nationales en vigueur.
Susceptible d’être modifié sans préavis.
Pour les spécifications électriques, se référer aux inscriptions sur le cable
d’alimentation.
Garantie
Nous accordons une garantie de 2 ans sur ce produit, à partir de la date d’achat.
Pendant la durée de la garantie, Braun prendra gratuitement à sa charge la
réparation des vices de fabrication ou de matière en se réservant le droit de
décider si certaines pièces doivent être réparées ou si l’appareil lui-même doit
être échangé.
Cette garantie s’étend à tous les pays où cet appareil est commercialisé par
Braun ou son distributeur exclusif.
96834040_190_170-s1_MN_S6-68.indd 2096834040_190_170-s1_MN_S6-68.indd 20 29.04.14 15:1729.04.14 15:17
CSS APPROVED Effective Date 6May2014 GMT - Printed 29Sep2015 Page 19 of 67

21
Cette garantie ne couvre pas : les dommages occasionnés par une utilisation
inadéquate, l’usure normale (par exemple, grille et bloc-couteaux) ainsi que les
défauts d’usures qui ont un effet négligeable sur la valeur ou l’utilisation de
l’appareil. Cette garantie devient caduque si des réparations ont été effectuées
par des personnes non agréées par Braun et si des pièces de rechange ne
provenant pas de Braun ont été utilisées.
Pour toute réclamation intervenant pendant la période de garantie, retournez ou
rapportez l’appareil ainsi que l’attestation de garantie à votre revendeur ou à un
Centre Service Agréé Braun.
Veuillez vous référer à www.service.braun.com ou appeler au 0 800 944 802
(service consommateurs - appel gratuit depuis un poste fixe) pour connaitre le
Centre Service Agrée Braun le plus proche de chez vous.
Clause spéciale pour la France
Outre la garantie contractuelle exposée ci-dessus, nos clients bénéficient de la
garantie légale des vices cachés prévue aux articles 1641 et suivants du Code
civil.
96834040_190_170-s1_MN_S6-68.indd 2196834040_190_170-s1_MN_S6-68.indd 21 29.04.14 15:1729.04.14 15:17
CSS APPROVED Effective Date 6May2014 GMT - Printed 29Sep2015 Page 20 of 67
Sayfa yükleniyor ...
Sayfa yükleniyor ...
Sayfa yükleniyor ...
Sayfa yükleniyor ...
Sayfa yükleniyor ...
Sayfa yükleniyor ...
Sayfa yükleniyor ...
Sayfa yükleniyor ...
Sayfa yükleniyor ...
Sayfa yükleniyor ...
Sayfa yükleniyor ...
Sayfa yükleniyor ...
Sayfa yükleniyor ...
Sayfa yükleniyor ...
Sayfa yükleniyor ...
Sayfa yükleniyor ...
Sayfa yükleniyor ...
Sayfa yükleniyor ...
Sayfa yükleniyor ...
Sayfa yükleniyor ...
Sayfa yükleniyor ...
Sayfa yükleniyor ...
Sayfa yükleniyor ...
Sayfa yükleniyor ...
Sayfa yükleniyor ...
Sayfa yükleniyor ...
Sayfa yükleniyor ...
Sayfa yükleniyor ...
Sayfa yükleniyor ...
Sayfa yükleniyor ...
Sayfa yükleniyor ...
Sayfa yükleniyor ...
Sayfa yükleniyor ...
Sayfa yükleniyor ...
Sayfa yükleniyor ...
Sayfa yükleniyor ...
Sayfa yükleniyor ...
Sayfa yükleniyor ...
Sayfa yükleniyor ...
Sayfa yükleniyor ...
Sayfa yükleniyor ...
Sayfa yükleniyor ...
Sayfa yükleniyor ...
-
 1
1
-
 2
2
-
 3
3
-
 4
4
-
 5
5
-
 6
6
-
 7
7
-
 8
8
-
 9
9
-
 10
10
-
 11
11
-
 12
12
-
 13
13
-
 14
14
-
 15
15
-
 16
16
-
 17
17
-
 18
18
-
 19
19
-
 20
20
-
 21
21
-
 22
22
-
 23
23
-
 24
24
-
 25
25
-
 26
26
-
 27
27
-
 28
28
-
 29
29
-
 30
30
-
 31
31
-
 32
32
-
 33
33
-
 34
34
-
 35
35
-
 36
36
-
 37
37
-
 38
38
-
 39
39
-
 40
40
-
 41
41
-
 42
42
-
 43
43
-
 44
44
-
 45
45
-
 46
46
-
 47
47
-
 48
48
-
 49
49
-
 50
50
-
 51
51
-
 52
52
-
 53
53
-
 54
54
-
 55
55
-
 56
56
-
 57
57
-
 58
58
-
 59
59
-
 60
60
-
 61
61
-
 62
62
-
 63
63


Braun 190s-1, 190cb-1, 170s-1, Series 1 Kullanım kılavuzu
- Kategori
- Erkek traş makineleri
- Tip
- Kullanım kılavuzu
Diğer dillerde
- español: Braun 190s-1, 190cb-1, 170s-1, Series 1 Manual de usuario
- français: Braun 190s-1, 190cb-1, 170s-1, Series 1 Manuel utilisateur
- italiano: Braun 190s-1, 190cb-1, 170s-1, Series 1 Manuale utente
- svenska: Braun 190s-1, 190cb-1, 170s-1, Series 1 Användarmanual
- Deutsch: Braun 190s-1, 190cb-1, 170s-1, Series 1 Benutzerhandbuch
- português: Braun 190s-1, 190cb-1, 170s-1, Series 1 Manual do usuário
- English: Braun 190s-1, 190cb-1, 170s-1, Series 1 User manual
- dansk: Braun 190s-1, 190cb-1, 170s-1, Series 1 Brugermanual
- suomi: Braun 190s-1, 190cb-1, 170s-1, Series 1 Ohjekirja
- Nederlands: Braun 190s-1, 190cb-1, 170s-1, Series 1 Handleiding
İlgili Makaleler
-
Braun WF2s WaterFlex El kitabı
-
Braun 720s-6, Series 7 Kullanım kılavuzu
-
Braun Series 1 130 Şartname
-
-
-
-
-
-
-