
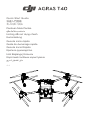
v1.4
Quick Start Guide
快速入門指南
퀵 스타트 가이드
Panduan Mula Pantas
Hướng dẫn sử dụng nhanh
Kurzanleitung
Guía de inicio rápido
Guide de démarrage rapide
Guia de Início Rápido
Краткое руководство
Hızlı Başlangıç Kılavuzu
Короткий посібник користувача

1
Contents
EN Quick Start Guide 9
CHT 快速入門指南18
KR 퀵 스타트 가이드 26
MS Panduan Mula Pantas 35
TH 44
DE Kurzanleitung 61
ES Guía de inicio rápido 70
FR Guide de démarrage rapide 79
PT-BR Guia de Início Rápido 88
RU Краткое руководство 97
TR Hızlı Başlangıç Kılavuzu 106
UK Короткий посібник користувача 115
VI Hướng dẫn sử dụng nhanh 52
AR 124

2
1
2
AB
B
A
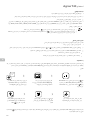
Academy
DJI SmartFarm
App
https://ag2-api.dji.com/app/download
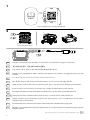
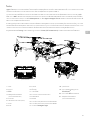
BAX601-30000mAh-52.22V
BAX702-30000mAh-52.22V
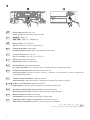
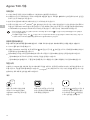
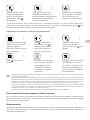
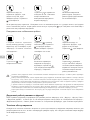
EN Charge to activate the internal battery of the remote controller before using for the rst time.
CHT
首次使用遙控器時,需先充電以啟動內建電池。
KR 처음 사용하기 전에 , 조종기의 내장 배터리를 충전해 활성화해야 합니다 .
MS Caskan untuk mengaktifkan bateri dalaman alat kawalan jauh sebelum menggunakannya buat kali
pertama.
TH
DE Laden Sie den internen Akku der Fernsteuerung auf, um ihn vor dem ersten Gebrauch zu aktivieren.
ES Antes de usar el control remoto por primera vez, cargue su batería interna para activarlo.
FR Rechargez la batterie interne de la radiocommande pour l’activer avant la première utilisation.
PT-BR Carregue para ativar a bateria interna antes de usar o controle remoto pela primeira vez.
RU Перед первым использованием встроенный аккумулятор пульта управления необходимо
зарядить для его активации.
TR İlk kullanımdan önce uzaktan kumandanın dahili bataryasını etkinleştirmek için şarj edin.
UK Зарядіть, щоб активувати внутрішній акумулятор пульта дистанційного керування перед першим
використанням.
VI Sạc để kích hoạt pin bên trong của bộ điều khiển từ xa trước khi sử dụng lần đầu tiên.
. AR

3
3
M4
M3
M1
M2
4
2
1
3
7
8
5
6
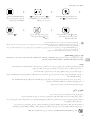
4Nano-SIM
Dongle related functions are not supported in some countries or regions. Comply with the local
laws and regulations.
部分國家 /地區不支援無線網路卡之相關功能,請遵守當地法律法規。
일부 국가 또는 지역에서는 동글 관련 기능을 지원하지 않습니다 . 현지 법규 및 규정을 준수하십시오 .
Fungsi berkaitan dongel tidak disokong di sesetengah negara atau wilayah. Patuhi undang-
undang dan peraturan tempatan.
Không hỗ trợ các chức năng liên quan của mô-đun rời tại một số quốc gia hoặc khu vực. Tuân
thủ các điều luật và quy định của địa phương.
Dongle-Funktionen werden in einigen Ländern/Regionen nicht unterstützt. Beachte stets die
örtlichen Gesetze und Vorschriften.
Las funciones asociadas al adaptador no están permitidas en algunos países o regiones. Cumpla
las leyes y normativas locales.
Les fonctions liées au Dongle ne sont pas prises en charge dans certains pays ou régions.
Respectez les lois et réglementations locales.
Funções relacionadas ao Dongle não são suportadas em determinados países e regiões.
Obedeça às regras e regulamentações locais.
Функции, связанные с портом сотовой связи, не поддерживаются в некоторых странах или
регионах. Соблюдайте местные законы и требования.
Donanım kilidi ile ilgili işlevler bazı ülkelerde veya bölgelerde desteklenmez. Yerel yasa ve
düzenlemelere uyun.
Функції, пов’язані із ключем, не підтримуються в деяких країнах або регіонах. Дотримуйтеся
місцевих законів і норм.
. .

4
5
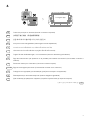
Check battery level: press once.
Power on/o: press and then press and hold.
EN
檢查電量:短按一次。
開機 /關機:短按一次,再長按 2 秒。
CHT
배터리 잔량 확인: 한 번 누릅니다.
전원 켜기/끄기: 한번 누르고 다시 길게 누릅니다.
KR
Periksa tahap bateri: tekan sekali.
Hidupkan/matikan kuasa: tekan, kemudian tekan dan tahan.
MS
:
/ :
TH
Einmal drücken: Akkustand überprüfen.
Ein- oder ausschalten: Kurz drücken, dann nochmals drücken und gedrückt halten.
DE
Comprobar nivel de batería: presione el botón una vez.
Encender/apagar: presione el botón una vez y suéltelo; a continuación, vuelva a presionarlo
y manténgalo presionado.
ES
Vériez le niveau de batterie : appuyez une fois.
Allumer/Éteindre : appuyez une fois, puis appuyez et maintenez le bouton enfoncé.
FR
PT-BR Vericar o nível da bateria: pressione uma vez.
Ligar/desligar: pressione, depois pressione e mantenha pressionado.
Проверка уровня заряда аккумулятора: нажмите один раз.
Включение/выключение: нажмите, затем нажмите и удерживайте.
RU
Batarya seviyesi kontrolü: bir kez basın.
Açma/kapama:açma kapama tuşuna basın ve basılı tutun.
TR
Перевірити рівень заряду акумулятора: натисніть один раз.
Увімк./вимкн. живлення: натисніть, і потім натисніть і утримуйте.
UK
Kiểm tra mức pin: nhấn một lần.
Bật/tắt nguồn: nhấn rồi nhấn và giữ.
VI
. :
. : / AR

5
6
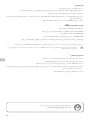
DJI Agras App
Follow the prompts to activate (internet connection required).
EN
按照指示進行啟動(需連接網際網路)。
CHT
알림 메시지에 따라 활성화합니다(인터넷 연결 필요).
KR
Ikut prom untuk mengaktifkan (sambungan internet diperlukan).MS
()
TH
Folgen Sie den Auorderungen, um zu aktivieren (Internet-Verbindung erforderlich).DE
Siga las indicaciones que aparecen en la pantalla para realizar la activación (se necesita conexión a
Internet).
ES
Suivez les invites pour l’activation (connexion Internet requise).FR
Siga as mensagens para ativar (é necessária conexão com a internet).PT-BR
Следуйте инструкциям для активации (требуется интернет-соединение).RU
Etkinleştirmek için komutları takip edin (internet bağlantısı gereklidir).TR
Для активації дотримуйтесь підказок (потрібне підключення до мережі Інтернет).UK
Làm theo các lời nhắc để kích hoạt (yêu cầu kết nối internet).VI
.( ) AR

6
7
OR
1 2 3
Mode 2 /美國手 / 모드 2 / Mod 2 / 2 / Chế độ 2 / Modus 2 / Modo 2 / Mode 2 / Modo 2 / Режим 2 / Mod
2 / Режим 2 / 2
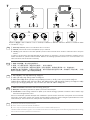
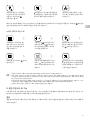
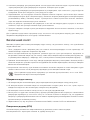
① Start/stop motors: perform combination stick command.
② Takeo: push the left control stick (Mode 2) up to take o.
③ Landing: push the left control stick (Mode 2) down until the aircraft lands. Hold for three seconds to stop the
motors.
In order for the aircraft to automatically take o and perform an operation, it is recommended to create a plan for
a eld and select an operation before takeo. Refer to the Starting Operations section for more information. For
other scenarios, take o and land manually.
EN
① 啟動 /停止馬達:執行綜合控制桿指令。
② 起飛:向上推動油門桿(美國手為左搖桿),使飛行器起飛。
③ 降落:向下拉動油門桿(美國手為左搖桿)至飛行器落地,在最低位置保持 3 秒,馬達將停止。
建議使用者進行地塊規劃,然後進行調用作業,使飛行器自動起飛並執行作業。詳情請見「開始作業」。其他
情況下可按照以上操作,進行手動起飛和降落。
CHT
① 모터 시동/중지: 스틱 조합 명령(CSC)을 수행합니다.
② 이륙: 왼쪽 조종 스틱을 위로 밀어(모드 2) 이륙합니다.
③ 착륙: 기체가 착륙할 때까지 왼쪽 조종 스틱을 아래로 밉니다(모드 2). 3초 동안 누르고 있으면 모터가 정지합니다.
기체가 자동으로 이륙하여 작업을 수행하기 위해서는 필드 계획을 수립하고 이륙 전에 작업을 선택하는 것이 좋습니다. 자세한
내용은 작업 시작 섹션을 참조하십시오. 다른 시나리오의 경우 수동으로 이륙하고 착륙합니다.
KR
① Motor mula/henti: laksanakan arahan batang gabungan.
② Berlepas: tolak batang kawalan kiri (Mod 2) ke atas untuk berlepas.
③ Pendaratan: tolak batang kawalan kiri (Mod 2) ke bawah sehingga pesawat mendarat. Tahan selama tiga
saat untuk menghentikan motor.
Untuk membolehkan pesawat berlepas dan melakukan operasi secara automatik, ia disyorkan untuk membuat
rancangan untuk suatu medan dan memilih operasi sebelum berlepas. Rujuk bahagian Operasi Bermula untuk
maklumat lanjut. Untuk senario lain, berlepas dan mendarat secara manual.
MS
① /:
② : ( 2)
③ : ( 2)
TH

7
①Ein-/Ausschalten der Motoren: Steuerknüppel-Kombinationsbefehl (Combination Stick Command, CSC).
②Zum Abheben: Linken Steuerknüppel (Modus 2) nach oben drücken.
③Zum Landen: Langsam den linken Steuerknüppel (Modus 2) nach unten drücken, bis das Fluggerät landet.
Halten Sie ihn drei Sekunden lang nach unten gedrückt, um die Motoren auszuschalten.
Um das Fluggerät automatisch abheben und eine Arbeit ausführen zu lassen, sollten Sie einen Plan für das
Feld erstellen und noch vor dem Start die Bedienung auswählen. Weitere Informationen finden Sie im Abschnitt
„Betriebsaufnahme“ (Starting Operations). Bei anderen Szenarien können Sie manuell starten und landen.
DE
① Arrancar/parar motores: ejecute el comando de combinación de palancas que se indica.
② Despegar: empuje la palanca de control izquierda hacia arriba (Modo 2).
③ Aterrizar: empuje la palanca de control izquierda hacia abajo (Modo 2) hasta que se complete la operación.
Manténgala así durante tres segundos para detener los motores.
Para que la aeronave automatice el despegue y la ejecución de una operación determinada, se recomienda que antes
se haga una planicación de un campo de cultivo y se le asigne dicha operación. Consulte la sección “Operaciones
de inicio” para obtener más información. Para otras situaciones, despegue y aterrice de forma manual.
ES
① Démarrer/couper les moteurs : exécutez une commande des joysticks (CSC).
② Décollage : poussez lentement le joystick gauche (Mode 2) vers le haut pour faire décoller l’appareil.
② Atterrissage : poussez lentement le joystick gauche (Mode 2) vers le bas jusqu’à ce que l’appareil atterrisse.
Maintenez pendant trois secondes pour couper les moteurs.
Pour que l’appareil décolle automatiquement et eectue une opération, il est recommandé de créer un plan pour un
champ et de sélectionner une opération avant le décollage. Reportez-vous à la section Lancement d’une opération
pour plus d’informations. Pour les autres scénarios, décollez et atterrissez manuellement.
FR
① Động cơ khởi động/dừng: thực hiện lệnh điều khiển kết hợp.
② Cất cánh: đẩy cần điều khiển bên trái (Chế độ 2) lên để cất cánh.
③ Hạ cánh: đẩy cần điều khiển bên trái (Chế độ 2) xuống cho đến khi máy bay hạ cánh. Giữ trong ba giây để
dừng động cơ.
Để máy bay có thể tự động cất cánh và thực hiện một hoạt động, nên lập sơ đồ thực địa và chọn một hoạt
động trước khi cất cánh. Xem phần Starting Operations (Bắt đầu Vận hành) để biết thêm thông tin. Đối với các
tình huống khác, hãy cất cánh và hạ cánh thủ công.
VI
① Liga/desliga os motores: executa o Comando combinado do joystick (CSC).
② Decolagem: empurre o pino de controle esquerdo (Modo 2) para cima para decolar.
③ Pouso: empurre lentamente o pino de controle esquerdo (Modo 2) para baixo até a aeronave aterrissar.
Segure por três segundos para interromper os motores.
Recomenda-se criar um plano para um campo e selecionar uma operação antes da decolagem para que a
aeronave decole automaticamente e execute uma operação. Para obter mais informações, consulte a seção
Operações iniciais. Em outros cenários, decole e pouse manualmente.
PT-BR
① Запуск/остановка моторов: выполните комбинацию джойстиками.
② Взлет: направьте левый джойстик (Pежим 2) вверх, чтобы совершить взлет.
③ Посадка: направляйте левый джойстик вниз (Pежим 2), пока дрон не приземлится. Удерживайте в
течение трех секунд для выключения моторов.
Чтобы дрон автоматически взлетел и выполнил какое-либо действие, рекомендуется создать план для
поля и выбрать действие перед взлетом. Дополнительная информация представлена в разделе «Начало
работы». В других ситуацией выполните взлет и посадку вручную.
RU

8
① Motorları başlat/durdur: kumanda çubuğu kombinasyonunu uygulayın.
② Kalkış: kalkış için sol kumanda çubuğunu (Mod 2) yukarı itin.
③ İniş: sol kumanda çubuğunu (Mod 2), hava aracı inene kadar aşağı itin. Motorları durdurmak için üç saniye
basılı tutun.
Hava aracı otomatik olarak kalkış ve çalışma yapmadan önce arazi planının oluşturulması ve kalkıştan önce bir
çalışma modu seçilmesi önerilir. Daha fazla bilgi için Çalışmayı Başlatma bölümüne bakın. Diğer senaryolarda
manuel olarak kalkış ve iniş yapın.
TR
① Запустити/зупинити двигуни: виконайте комбіновану команду ручками керування.
② Зліт: натисніть ліву ручку керування (Pежим 2) вгору, щоб злетіти.
③ Приземлення: натисніть ліву ручку керування (Pежим 2) вниз, доки літальний апарат не приземлиться.
Утримуйте протягом трьох секунд, щоб вимкнути двигуни.
Щоб літальний апарат автоматично злітав і виконував роботу, рекомендується створити план для поля й
вибрати роботу перед зльотом. Для отримання додаткової інформації див. розділ «Операції запуску». Для
інших сценаріїв злітайте та приземляйтеся вручну.
UK
. :/ ①
. (2 ) : ②
. . (2 ) : ③
. .
.
AR

EN
9
Using the Agras T40
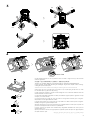
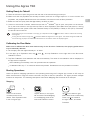
Getting Ready for Takeo
A. Place the aircraft on open, at ground with the rear of the aircraft facing toward you.
B. Make sure that the propellers are securely mounted, there are no foreign objects in or on the motors and
propellers, the propeller blades and arms are unfolded, and the arm locks are rmly fastened.
C. Make sure that the spray tank and ight battery are rmly in place.
D. Power on the remote controller, make sure that the DJITM AGRASTM app is open, and power on the aircraft.
Go to the home screen in the app and tap Start to enter Operation View. Make sure that there is a strong
GNSS signal and the system status bar indicates Ready to GO (GNSS) or Ready to GO (RTK). Otherwise,
the aircraft cannot take o.
RTK positioning is recommended. In the app, go to Operation View, tap , then RTK to select a method for receiving
RTK signals.
If using the DJI Cellular Dongle, tap and select Network Diagnostics in DJI Agras. The cellular dongle and SIM card
are functioning properly if the status of all the devices in the network chain are displayed green.
Calibrating the Flow Meter
Make sure to calibrate the ow meter before using for the rst time. Otherwise, the spraying performance
may be adversely aected.
A. Fill the spray tank with approximately 2 L of water.
B. In the app, go to Operation View, tap , then , and tap Calibration on the right side of the ow meter
calibration section.
C. Tap Start Calibration and calibration will start automatically. The result of the calibration will be displayed in
the app when completed.
After calibrating successfully, users can proceed with the operation.
If calibration fails, tap “?” to view and resolve the problem. Recalibrate once the problem is resolved.
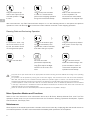
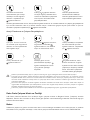
Starting Operations
Users can perform mapping operations in the operating area using the DJI Agras app, receive an HD map via
oine reconstruction using the remote controller, and plan a eld for operations. DJI Agras provides multiple
methods to add points. The following description uses Route Mapping and Crosshair as an example.
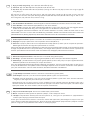
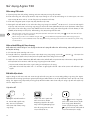
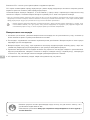
Mapping
Power on the remote
controller and then the
aircraft. Enter Operation View
in the DJI Agras app.
Tap the button on the upper
left and select Route Mapping
on the Mapping panel in the
task mode selection screen.
Tap on the bottom right,
select Area Route or Boundary
Route, tap in middle of
the right screen, and select
Crosshair.
DJI AGRAS
APP

EN
10
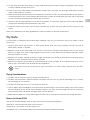
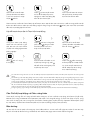
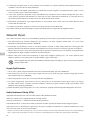
Planning Field and Performing Operation
Drag the map and tap
Add to add a point at the
crosshair position. Tap
to save.
Tap and move the slider
to take o. The aircraft will
perform the mapping operation
along the route automatically.
Wait for the reconstruction
to be completed. The
reconstruction result will be
displayed on the original map.
After reconstruction, tap Plan Field and follow steps 3 to 6 in the following section to add points and perform
operations. Users can also tap to cancel the current selection and start a new mapping operation.
In Operation View, tap
the mode button at the
top left and select Route
on the Agriculture panel.
Drag the map and tap Add to
add a point on the map. Tap
to save.
Tap to use the eld. Set task and route
parameters respectively,
drag to adjust the ight
direction of the route, and
save.
Tap , check the aircraft
status and task settings, and
move the slider to take o.
The aircraft will perform the
operation automatically.
Tap on the bottom right,
tap in the middle of the
right screen, select Crosshair,
and select the type of point.
Only take o in open areas and set an appropriate Connection Routing and RTH Altitude according to the operating
environment.
An operation can be paused by moving the control stick slightly. The aircraft will hover and record the breakpoint.
After that, the aircraft can be controlled manually. Select the operation again to continue. The aircraft will return to the
breakpoint automatically and resume the operation. Pay attention to aircraft safety when returning to a breakpoint.
In Route Operation mode, the aircraft is able to circumvent obstacles, which is disabled by default and can be enabled
in the app. If the function is enabled and the aircraft detects obstacles, the aircraft will slow down and circumvent the
obstacles and return to the original ight path.
Users can set the action the aircraft will perform after the operation is completed in the app.
More Operation Modes and Functions
Refer to the user manual for more information about the A-B Route, Manual, Manual Plus, and Fruit Tree
operation modes, and on how to use functions such as Connection Routing, Operation Resumption, System
Data Protection, and Empty Tank.
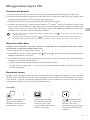
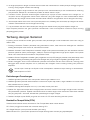
Maintenance
Clean all parts of the aircraft and remote controller at the end of each day of spraying after the aircraft returns to
a normal temperature. DO NOT clean the aircraft immediately after operations are completed.

EN
11
A. Fill the spray tank with clean water or soapy water and spray the water through the sprinklers until the tank
is empty. Repeat the step twice more.
B. Remove the spray tank strainer and sprinklers to clean them and clear any blockage. Afterwards, immerse
them in clean water for 12 hours.
C. Make sure that the aircraft structure is completely connected so that it can be washed directly with water. It
is recommended to use a spray washer lled with water to clean the aircraft body and wipe with a soft brush
or wet cloth before removing water residue with a dry cloth.
D. If there is dust or pesticide liquid on the motors, propellers, or heat sinks, wipe them with a wet cloth before
cleaning the remaining water residue with a dry cloth.
E. Wipe the surface and screen of the remote controller with a clean wet cloth that has been wrung out with
water.
Refer to the disclaimer and safety guidelines for more information on product maintenance.
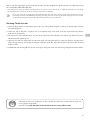
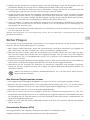
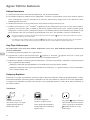
Fly Safe
It is important to understand some basic ight guidelines, both for your protection and for the safety of those
around you.
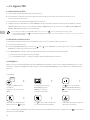
1. Flying in Open Areas: pay attention to utility poles, power lines, and other obstacles. DO NOT y near or
above water, people, or animals.
2. Maintain Control at All Times: keep your hands on the remote controller and maintain control of the aircraft
when it is in ight, even when using intelligent functions such as the Route and A-B Route operation modes
and Smart Return to Home.
3. Maintain Line of Sight: maintain visual line of sight (VLOS) with your aircraft at all times and avoid ying behind
buildings or other obstacles that may block your view.
4. Monitor Your Altitude: for the safety of manned aircraft and other air trac, y at an altitude lower than 100 m
(328 ft) and in accordance with all local laws and regulations.
Visit https://www.dji.com/flysafe for more information on critical safety features such as GEO
zones.
Flying Considerations
1. DO NOT use the aircraft to spray in winds exceeding 6 m/s.
2. DO NOT use the aircraft in adverse weather conditions such as snow, fog, winds exceeding 6 m/s, or heavy
rain exceeding 25 mm (0.98 in).
3. DO NOT y more than 4.5 km (14,763 ft) above sea level.
4. The DJI Agras app will intelligently recommend the payload weight of the tank according to the current status
and surroundings of the aircraft. When adding material to the tank, the max weight should not exceed the
recommended value. Otherwise, the ight safety may be aected.
5. Make sure that there is a strong GNSS signal and the D-RTK antennas are unobstructed during operation.
Return to Home (RTH)
The aircraft will automatically return to the Home Point in the following situations:
Smart RTH: user presses and holds the RTH button.
Failsafe RTH*: the remote controller signal is lost.
Low Battery RTH*: the aircraft battery level reaches the preset low battery threshold.

EN
12
It is important to understand the basic ight guidelines, both for your protection and for the
safety of those around you.
Make sure to read the disclaimer and safety guidelines.
The aircraft decelerates and then brakes and hovers if there is an obstacle within 20 m of the aircraft. The
aircraft exits RTH and waits for further commands.
* The action of the aircraft when the remote controller signal is lost or the aircraft battery level is low can be set in the app. Failsafe
RTH and Low Battery RTH will only be available if RTH is set.
Obstacle avoidance is disabled in Attitude mode (which the aircraft enters in situations such as when the GNSS signal
is weak) and is not available if the operating environment is not suitable for the radar modules or binocular vision
system. Extra caution is required in such situations.
Pesticide Usage
1. Avoid the use of water-insoluble pesticides as much as possible as they may reduce the service life of the
spraying system.
2. Pesticides are poisonous and pose serious risks to safety. Only use them in strict accordance with their
specications.
3. Use clean water to mix the pesticide and lter the mixed liquid before pouring into the spray tank to avoid
blocking the strainer.
4. Eective use of pesticides depends on pesticide density, spray rate, spray distance, aircraft speed, wind
speed, wind direction, temperature, and humidity. Consider all factors when using pesticides.
5. DO NOT compromise the safety of people, animals, or the environment during operation.

EN
13
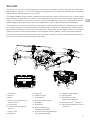
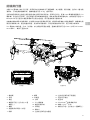
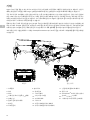
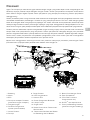
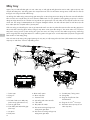
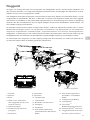
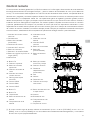
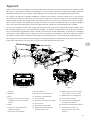
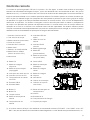
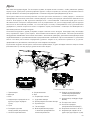
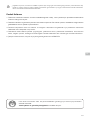
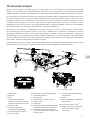
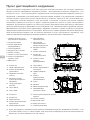
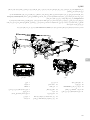
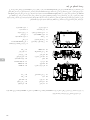
Aircraft
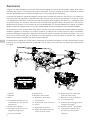
The Agras T40 has a truss-style design with arms that can be folded to reduce the body size, making the
aircraft easier to transport. The all-new integrated spraying system can quickly be swapped with a spreading
system with a spreading payload of up to 50 kg.
The spatial intelligent sensing system includes active phased array radars and binocular vision to ensure ight
safety. Boasting a 12MP UHD FPV camera with a tiltable gimbal, the aircraft can automatically collect HD eld
images for local oine reconstruction to assist in precise eld planning. Using the P4 Multispectral and DJI
Agras Intelligent Cloud, prescription maps can be generated in order to perform variable rate fertilization.
The coaxial twin rotor structure produces strong winds so that pesticides are able to penetrate thick canopies
for thorough spraying. The spraying system is equipped with the brand new magnetic drive impeller pumps,
dual atomized sprinklers, and anti-drip centrifugal valves. When used with the weight sensors, the spraying
system provides real-time liquid level detection and improves spraying eciency while saving liquid pesticide.
Core modules adopt potting technology and the aircraft has a protection rating of IPX6K (ISO 20653:2013) so
that the aircraft body can be washed directly with water.
1. Propellers
2. Motors
3. ESCs
4. Aircraft Front Indicators (on
two front arms)
5. Frame Arms
6. Folding Detection Sensors
(built-in)
7. Spray Lance
8. Sprinklers
9. Spray Tank
10. Delivery Pumps
11. FPV Camera
12. Binocular Vision System
13. Spotlights
14. Heat Sinks
15. Active Phased Array
Omnidirectional Radar
16. Active Phased Array Backward
and Downward Radar
17. Intelligent Flight Battery
18. Landing Gear
19. OCUSYNCTM Image
Transmission Antennas
20. Onboard D-RTKTM Antennas
21. Aircraft Rear Indicators (on two
rear arms)
FoldedRear View
16
4
2
3
56
79
1
18
15
21
14
13
10
19
11
12
17
8
20

EN
14
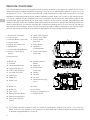
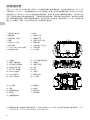
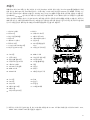
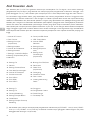
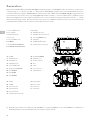
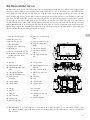
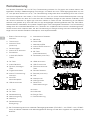
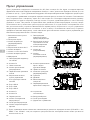
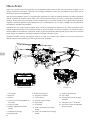
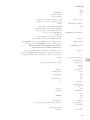
Remote Controller
The next generation DJI RC Plus (Agras) remote controller features DJI O3 Agras, the latest version of the
signature OcuSync image transmission technology, and has a max transmission distance of up to 7 km (at
an altitude of 2.5 m)[1]. The remote controller has a high-performance 8-core CPU and a built-in 7-in high
brightness touchscreen powered by the Android operating system. Users can connect to the internet via Wi-
Fi or the DJI Cellular Dongle. Operations are more convenient and accurate than ever before thanks to the
revamped DJI Agras app design and a wide range of buttons on the remote controller. With Mapping mode
added to the app, users can complete oine reconstructions and perform precise eld planning without the
need of extra devices. The remote controller has a maximum operating time of 3 hours and 18 min with the
high-capacity internal battery. Users can also purchase an external battery separately to be used to supply
power to the remote controller and fully meet the requirements for long and high-intensity operations.
[1] The remote controller is able to reach its maximum transmission distance (FCC/NCC: 7 km (4.35 mi);
SRRC: 5 km (3.11 mi); CE/MIC: 4 km (2.49 mi)) in an open area with no electromagnetic interference and at
an altitude of approximately 2.5 m (8.2 ft).
34
32
36
35
33
37
38 39
813
5 5
77
1
44
315
2
10 11
9
9
16
17
18
19 25
26
27
28
3
0
29
21
22 23 24
31 31
31
4
0
2
0
2
0
12
614
4
1
1. External RC Antennas
2. Touchscreen
3. Indicator Button (reserved)
4. Control Sticks
5. Internal Wi-Fi Antennas
6. Back Button
7. L1/L2/L3/R1/R2/R3 Buttons
8. Return to Home (RTH)
Button
9. Microphones
16. Button C3
17. Left Dial
18. Spray/Spread Button
19. Flight Mode Switch
20. Internal RC Antennas
21. microSD Card Slot
22. USB-A Port
23. HDMI Port
24. USB-C Port
25. FPV/Map Switch
Button
26. Right Dial
27. Scroll Wheel
(reserved)
28. Handle
29. Speaker
30. Air Vent
31. Reserved Mounting
Holes
10. Status LED Indicator
11. Battery Level LEDs
12. Internal GNSS
Antennas
13. Power Button
14. 5D Button
(customizable)
15. Flight Pause Button
(reserved)
32. Button C1
33. Button C2
34. Rear Cover
35. Battery Release Button
36. Battery Compartment
37. Rear Cover Release
Button
38. Alarm
39. Air Intake
40. Dongle Compartment
41. Strap Bracket

EN
15
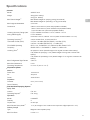
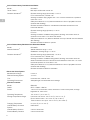
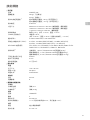
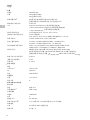
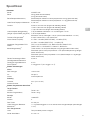
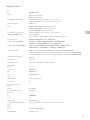
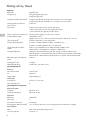
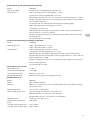
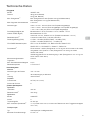
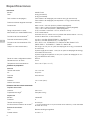
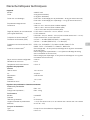
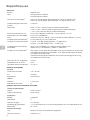
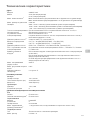
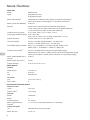
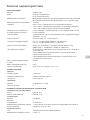
Specications
Aircraft
Model 3WWDZ-40A
Weight 38 kg (excl. battery)
50 kg (inc. battery)
Max Takeo Weight[1] Max takeo weight for spraying: 90 kg (at sea level)
Max takeo weight for spreading: 101 kg (at sea level)
Max Diagonal Wheelbase 2,184 mm
Dimensions 2,800×3,150×780 mm (arms and propellers unfolded)
1,590×1,930×780 mm (arms unfolded and propellers folded)
1,125×750×850 mm (arms and propellers folded)
Hovering Accuracy Range (with
strong GNSS signal)
D-RTK enabled: Horizontal: ±10 cm, Vertical: ±10 cm
D-RTK disabled:
Horizontal: ±60 cm, Vertical: ±30 cm (radar module enabled: ±10 cm)
Operating Frequency[2] 2.4000-2.4835 GHz, 5.725-5.850 GHz
Transmitter Power (EIRP) 2.4 GHz: <20 dBm (SRRC/CE/MIC), <33 dBm (FCC)
5.8 GHz: <33 dBm (SRRC/FCC), <14 dBm (CE)
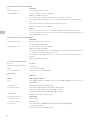
RTK/GNSS Operating
Frequency GPS L1/L2, GLONASS F1/F2, BeiDou B1/B2, Galileo E1/E5
GNSS: GPS L1, GLONASS F1, Galileo E1, BeiDou B1
Hovering Time[3] No payload: 18 min (takeo weight of 50 kg with a 30000 mAh battery)
Fully loaded for spraying: 7 min (takeo weight of 90 kg with a 30000 mAh
battery)
Fully loaded for spreading: 6 min (takeo weight of 101 kg with a 30000 mAh
battery)
Max Congurable Flight Radius 2,000 m
Max Wind Resistance 6 m/s
Operating Temperature 0° to 45° C (32° to 113° F)
Propulsion System
Motors
Stator Size 100×33 mm
KV 48 rpm/V
Power 4000 W/rotor
Propellers
Diameter 54 in (1371.6 mm)
Rotors Quantity 8
Dual Atomized Spraying System
Spray Tank
Volume Full: 40 L
Operating Payload[1] Full: 40 kg
Sprinklers
Model LX8060SZ
Quantity 2
Droplet Size 50-300 μm
Max Eective Spray Width[4] 11 m (at a height of 2.5 m above the crops with a ight speed of 7 m/s)
Delivery Pumps
Type Magnetic drive impeller pump
Max Flow Rate 6 L/min × 2

EN
16
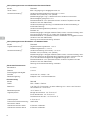
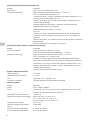
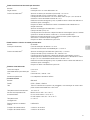
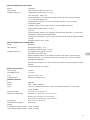
Active Phased Array Omnidirectional Radar
Model RD2484R
Terrain Follow Max slope in Mountain mode: 30°
Obstacle Avoidance[5] Obstacle sensing range (horizontal): 1.5-50 m
FOV: Horizontal 360°, Vertical ±45°
Working conditions: ying higher than 1.5 m over the obstacle at a speed no
more than 7 m/s
Safety limit distance: 2.5 m (distance between the front of propellers and the
obstacle after braking)
Obstacle avoidance direction: omnidirectional obstacle avoidance in the
horizontal direction.
Obstacle sensing range (upward): 1.5-30 m
FOV: 45°
Working conditions: available during takeo, landing, and ascent when an
obstacle is more than 1.5 m above the aircraft.
Safety limit distance: 3 m (distance between the top of aircraft and the obstacle
after braking)
Obstacle avoidance direction: upward
Active Phased Array Backward and Downward Radar
Model RD2484B
Altitude Detection[5] Altitude detection range: 1-45 m
Stabilization working range: 1.5-30 m
Obstacle Avoidance[5] Obstacle sensing range (backward): 1.5-30 m
FOV: Horizontal ±60°, Vertical ±25°
Working conditions: available during takeo, landing, and ascent when the
distance between the rear of aircraft and the obstacle is more than 1.5 m and
the aircraft speed is no more than 7 m/s.
Safety limit distance: 2.5 m (distance between the front of propellers and the
obstacle after braking)
Obstacle avoidance direction: backward
Binocular Vision System
Measurement Range 0.4-25 m
Eective Sensing Speed ≤10 m/s
FOV Horizontal: 90°, Vertical: 106°
Operating Environment Adequate light and discernible surroundings
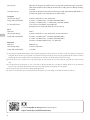
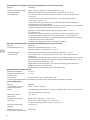
Remote Controller
Model RM700B
GNSS GPS + Galileo + BeiDou
Screen 7.02-in LCD touchscreen, with a resolution of 1920×1200 pixels, and high
brightness of 1200 cd/m2
Operating Temperature -20° to 50° C (-4° to 122° F)
Storage Temperature Range Less than one month: -30° to 45° C (-22° to 113° F)
One to three months: -30° to 35° C (-22° to 95° F)
Three months to one year: -30° to 30° C (-22° to 86° F)
Charging Temperature 5° to 40° C (41° to 104° F)
Internal Battery Chemical
System LiNiCoAIO2
Internal Battery Runtime 3 hours 18 minutes
External Battery Runtime 2 hours 42 minutes

EN
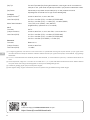
17
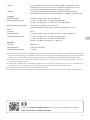
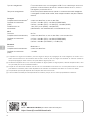
Charging Type It is recommended to use a locally certied USB-C charger at a maximum rated
power of 65 W and maximum voltage of 20 V such as the DJI 65W Portable
Charger.
Charging Time 2 hours for internal battery or internal and external battery (when remote
controller is powered o and using a standard DJI charger)
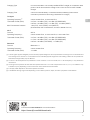
O3 Agras
Operating Frequency[2] 2.4000-2.4835 GHz, 5.725-5.850 GHz
Transmitter Power (EIRP) 2.4 GHz: <33 dBm (FCC), <20 dBm (CE/SRRC/MIC)
5.8 GHz: <33 dBm (FCC), <14 dBm (CE), <23 dBm (SRRC)
Max Transmission Distance 7 km (FCC), 5 km (SRRC), 4 km (MIC/CE)
(unobstructed, free of interference, and at an altitude of 2.5 m)
Wi-Fi
Protocol WiFi 6
Operating Frequency[2] 2.4000-2.4835 GHz, 5.150-5.250 GHz, 5.725-5.850 GHz
Transmitter Power (EIRP) 2.4 GHz: <26 dBm (FCC), <20 dBm (CE/SRRC/MIC)
5.1 GHz: <26 dBm (FCC), <23 dBm (CE/SRRC/MIC)
5.8 GHz: <26 dBm (FCC/SRRC), <14 dBm (CE)
Bluetooth
Protocol Bluetooth 5.1
Operating Frequency 2.4000-2.4835 GHz
Transmitter Power (EIRP) <10 dBm
[1] The DJI Agras app will intelligently recommend the payload weight limit for the spread tank according to the current status and
surroundings of the aircraft. Do not exceed the recommended payload weight limit when adding material to the spread tank.
Otherwise, the ight safety may be aected.
[2] 5.8 and 5.1 GHz frequencies are prohibited in some countries. In some countries, the 5.1 GHz frequency is only allowed for
use indoors.
[3] Hovering time acquired at sea level with wind speed lower than 3 m/s and a temperature of 25° C (77° F). For reference only.
The data may vary depending on the environment. Actual results shall be as tested.
[4] The spray width depends on the actual operation scenarios.
[5] The eective sensing range varies depending on the material, position, shape, and other properties of the obstacle.
Download the user manual for more information:
https://www.dji.com/t40/downloads

CHT
18
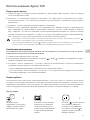
使用 T40
準備飛行
A. 將飛行器放置於戶外平整開闊地帶,使用者面朝機尾。
B. 確保螺旋槳安裝牢固,馬達和螺旋槳清潔無異物,槳葉和機臂完全展開,機臂卡扣已扣緊。
C. 確保作業箱和飛行器電池已安裝到位。
D. 開啟遙控器,確保大疆農業應用程式正常執行,然後開啟飛行器。在應用程式主介面,點選「開始」進入
作業介面,請確保飛行器 GNSS 訊號良好,且介面上方的飛行狀態提示欄顯示「起飛準備完畢(衛星定位)」
或「起飛準備完畢 (RTK)」,否則飛行器將無法起飛。
● 推薦使用 RTK 定位。進入應用程式作業介面 > > RTK,選擇 RTK 訊號來源。
● 若使用 Cellular 模組,進入應用程式主介面 > > 網路診斷,網路鏈路上所有裝置的狀態均顯示綠色,表示 Cellular
模組及 SIM 卡可正常使用。
校正流量計
首次使用飛行器進行噴灑作業時,務必校正流量計,否則可能會影響作業效果。
A. 在作業箱中加入約 2 L 的水。
B. 進入應用程式作業介面 > > ,點選校正流量計右側的「校正」按鍵。
C. 點選「開始校正」,系統將自動進行校正,等待 25 秒後,將顯示校正結果。
● 若顯示校正成功,則可進行正常的噴灑作業。
● 若顯示校正失敗,點選「?」查看失敗原因,排除故障後重新校正,等待校正成功。
開始作業
使用者可使用大疆農業應用程式對作業區域進行航測,透過遙控器離線建圖取得本機高解析地圖,然後規劃
地塊進行作業。規劃航測區域及地塊時,大疆農業應用程式提供多種打點方式,以下內容以大田航測及準星
打點為例說明。
航 測
開啟遙控器及飛行器,進入
大疆農業應用程式作業介面。
點選左上角按鍵,在作業方
式選擇介面的航測面板中選
擇「大田航測」。
點選右下角 ,選擇「面狀航
線」或「圈狀航線」,然後點
選右側中部 選擇準星打點。
DJI AGRAS
APP
拖曳地圖,點選「新增」,
在準星所在位置新增點位。
點選 儲存。
點選 ,滑動滑動條起飛。飛
行器將自動按照航線飛行完成
航測。
等待應用程式完成重建後,重
建成果高解析地圖將顯示在初
始地圖上。
重建完成後,可點選「地塊規劃」,按照下述地塊規劃及作業的步驟 3-6 打點及執行作業。亦可點選 取消
目前選擇,然後開始新的航測作業。

CHT
19
地塊規劃及作業
在作業介面,點選左上角
模式按鍵,在植保面板中
選擇「大田航線」。
拖曳地圖,點選「新增」在地
圖上添加點位。點選 儲存。
點選 調用地塊。 分別設定作業及航線參數,拖
曳 可調整航線角度,然後
儲存。
點選 ,檢查飛行器狀態及
作業設定,滑動滑動條以自動
起飛並執行作業。
點選右下角 ,然後點選右側中
部 選擇準星打點方式,選擇
點位類別。
● 確保起飛點附近開闊,並根據作業環境設定合適的啟航 /返航高度。
● 執行作業過程中,使用者可輕微撥動搖桿暫停作業。飛行器將原地懸停,並記錄中斷點。此時,使用者可自由操控飛行器。
之後,使用者可重新進行調用作業,則飛行器將自動飛回中斷點繼續執行作業。在飛回中斷點的過程中,務必注意飛行安全。
● 在大田航線作業模式下,飛行器具備繞障功能(預設為關閉,需在應用程式中開啟)。若開啟此功能,當檢測到作業路
線上的障礙物時,飛行器將規劃避障路線,然後自動減速並繞過障礙物,再回到航線上繼續作業。
● 使用者可在應用程式中設定作業完成後飛行器的動作。
更多作業模式及功能
A-B 點航線、手動、增強手動和果樹航線作業模式的操作以及智慧啟航、作業恢復、資料保護、無藥警告等
功能的使用方法,詳情請見《使用者手冊》。
維 護
每天作業結束後,待飛行器恢復至常溫後,再對整機和遙控器進行清潔。禁止在飛行器結束作業後立即進行清潔。
A. 使用清水或肥皂水注滿作業箱,並完全噴灑,以此反覆清洗三次。
B. 將作業箱濾網、噴頭拆出後再進行清潔,請確保無堵塞,然後在清水中浸泡 12 小時。
C. 確保機身結構完整,可直接水洗整機。建議使用噴霧水槍沖洗機身,然後用軟刷或濕布清潔機身,再用乾
布擦乾水漬。
D. 若馬達、槳葉、散熱片表面有沙塵、藥液附著,建議用濕布清潔表面,再用乾布擦乾水漬。
E. 使用乾淨的濕布(擰乾水分)擦拭遙控器表面及顯示螢幕。
更多產品保養內容詳見《免責聲明與安全指導方針》。
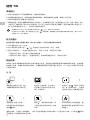
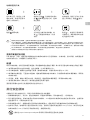
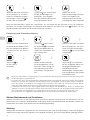
飛行安全須知
必要的飛行安全知識對於您、周圍人群與環境的安全非常重要。
1. 在開闊的場地飛行:飛行時,請注意電線桿、高壓線等障礙物,同時遠離水面、人群和動物。
2. 飛行過程全程操控:即使在使用大田航線作業模式、A-B 點航線作業模式和自動返航等功能時,也請保持
遙控器在手中,以隨時控制飛行器。
3. 在視線範圍內飛行。請隨時讓飛行器保持在視線範圍內,避免飛到可能阻擋視線的高大障礙物後面。
4. 控制飛行高度:為確保飛行器及民航的飛行安全,請將飛行器的高度控制在 100 公尺以內。如您所在區域
有禁航或低於 100 公尺的飛行高度限制規定,請遵照其規定。
請前往 https://www.dji.com/ysafe 取得飛行限制等更全面的安全知識。
Sayfa yükleniyor...
Sayfa yükleniyor...
Sayfa yükleniyor...
Sayfa yükleniyor...
Sayfa yükleniyor...
Sayfa yükleniyor...
Sayfa yükleniyor...
Sayfa yükleniyor...
Sayfa yükleniyor...
Sayfa yükleniyor...
Sayfa yükleniyor...
Sayfa yükleniyor...
Sayfa yükleniyor...
Sayfa yükleniyor...
Sayfa yükleniyor...
Sayfa yükleniyor...
Sayfa yükleniyor...
Sayfa yükleniyor...
Sayfa yükleniyor...
Sayfa yükleniyor...
Sayfa yükleniyor...
Sayfa yükleniyor...
Sayfa yükleniyor...
Sayfa yükleniyor...
Sayfa yükleniyor...
Sayfa yükleniyor...
Sayfa yükleniyor...
Sayfa yükleniyor...
Sayfa yükleniyor...
Sayfa yükleniyor...
Sayfa yükleniyor...
Sayfa yükleniyor...
Sayfa yükleniyor...
Sayfa yükleniyor...
Sayfa yükleniyor...
Sayfa yükleniyor...
Sayfa yükleniyor...
Sayfa yükleniyor...
Sayfa yükleniyor...
Sayfa yükleniyor...
Sayfa yükleniyor...
Sayfa yükleniyor...
Sayfa yükleniyor...
Sayfa yükleniyor...
Sayfa yükleniyor...
Sayfa yükleniyor...
Sayfa yükleniyor...
Sayfa yükleniyor...
Sayfa yükleniyor...
Sayfa yükleniyor...
Sayfa yükleniyor...
Sayfa yükleniyor...
Sayfa yükleniyor...
Sayfa yükleniyor...
Sayfa yükleniyor...
Sayfa yükleniyor...
Sayfa yükleniyor...
Sayfa yükleniyor...
Sayfa yükleniyor...
Sayfa yükleniyor...
Sayfa yükleniyor...
Sayfa yükleniyor...
Sayfa yükleniyor...
Sayfa yükleniyor...
Sayfa yükleniyor...
Sayfa yükleniyor...
Sayfa yükleniyor...
Sayfa yükleniyor...
Sayfa yükleniyor...
Sayfa yükleniyor...
Sayfa yükleniyor...
Sayfa yükleniyor...
Sayfa yükleniyor...
Sayfa yükleniyor...
Sayfa yükleniyor...
Sayfa yükleniyor...
Sayfa yükleniyor...
Sayfa yükleniyor...
Sayfa yükleniyor...
Sayfa yükleniyor...
Sayfa yükleniyor...
Sayfa yükleniyor...
Sayfa yükleniyor...
Sayfa yükleniyor...
Sayfa yükleniyor...
Sayfa yükleniyor...
Sayfa yükleniyor...
Sayfa yükleniyor...
Sayfa yükleniyor...
Sayfa yükleniyor...
Sayfa yükleniyor...
Sayfa yükleniyor...
Sayfa yükleniyor...
Sayfa yükleniyor...
Sayfa yükleniyor...
Sayfa yükleniyor...
Sayfa yükleniyor...
Sayfa yükleniyor...
Sayfa yükleniyor...
Sayfa yükleniyor...
Sayfa yükleniyor...
Sayfa yükleniyor...
Sayfa yükleniyor...
Sayfa yükleniyor...
Sayfa yükleniyor...
Sayfa yükleniyor...
Sayfa yükleniyor...
Sayfa yükleniyor...
Sayfa yükleniyor...
Sayfa yükleniyor...
Sayfa yükleniyor...
Sayfa yükleniyor...
Sayfa yükleniyor...
-
 1
1
-
 2
2
-
 3
3
-
 4
4
-
 5
5
-
 6
6
-
 7
7
-
 8
8
-
 9
9
-
 10
10
-
 11
11
-
 12
12
-
 13
13
-
 14
14
-
 15
15
-
 16
16
-
 17
17
-
 18
18
-
 19
19
-
 20
20
-
 21
21
-
 22
22
-
 23
23
-
 24
24
-
 25
25
-
 26
26
-
 27
27
-
 28
28
-
 29
29
-
 30
30
-
 31
31
-
 32
32
-
 33
33
-
 34
34
-
 35
35
-
 36
36
-
 37
37
-
 38
38
-
 39
39
-
 40
40
-
 41
41
-
 42
42
-
 43
43
-
 44
44
-
 45
45
-
 46
46
-
 47
47
-
 48
48
-
 49
49
-
 50
50
-
 51
51
-
 52
52
-
 53
53
-
 54
54
-
 55
55
-
 56
56
-
 57
57
-
 58
58
-
 59
59
-
 60
60
-
 61
61
-
 62
62
-
 63
63
-
 64
64
-
 65
65
-
 66
66
-
 67
67
-
 68
68
-
 69
69
-
 70
70
-
 71
71
-
 72
72
-
 73
73
-
 74
74
-
 75
75
-
 76
76
-
 77
77
-
 78
78
-
 79
79
-
 80
80
-
 81
81
-
 82
82
-
 83
83
-
 84
84
-
 85
85
-
 86
86
-
 87
87
-
 88
88
-
 89
89
-
 90
90
-
 91
91
-
 92
92
-
 93
93
-
 94
94
-
 95
95
-
 96
96
-
 97
97
-
 98
98
-
 99
99
-
 100
100
-
 101
101
-
 102
102
-
 103
103
-
 104
104
-
 105
105
-
 106
106
-
 107
107
-
 108
108
-
 109
109
-
 110
110
-
 111
111
-
 112
112
-
 113
113
-
 114
114
-
 115
115
-
 116
116
-
 117
117
-
 118
118
-
 119
119
-
 120
120
-
 121
121
-
 122
122
-
 123
123
-
 124
124
-
 125
125
-
 126
126
-
 127
127
-
 128
128
-
 129
129
-
 130
130
-
 131
131
-
 132
132
-
 133
133


