Yamaha Electone Stagea 01X El kitabı
- Kategori
- Ses mikserleri
- Tip
- El kitabı
Bu kılavuz için de uygundur

Owner’s Manual
ELS-01/01C/01X
EN
Excellence Winner of
STC's International Technical
Publications Competition, 2004

(1)B-9 1/2
2
ELS-01/01C/01X Owner’s Manual
PRECAUTIONS
PLEASE READ CAREFULLY BEFORE PROCEEDING
* Please keep this manual in a safe place for future reference.
WARNING
Always follow the basic precautions listed below to avoid the possibility of serious injury or even death from electrical
shock, short-circuiting, damages, fire or other hazards. These precautions include, but are not limited to, the following:
• Only use the voltage specified as correct for the instrument. The required
voltage is printed on the name plate of the instrument.
• Check the electric plug periodically and remove any dirt or dust which may have
accumulated on it.
• Do not place the power cord near heat sources such as heaters or radiators, and
do not excessively bend or otherwise damage the cord, place heavy objects on
it, or place it in a position where anyone could walk on, trip over, or roll anything
over it.
• Do not open the instrument or attempt to disassemble the internal parts or
modify them in any way. The instrument contains no user-serviceable parts. If it
should appear to be malfunctioning, discontinue use immediately and have it
inspected by qualified Yamaha service personnel.
• Do not expose the instrument to rain, use it near water or in damp or wet
conditions, or place containers on it containing liquids which might spill into
any openings.
• Never insert or remove an electric plug with wet hands.
• Do not put burning items, such as candles, on the unit.
A burning item may fall over and cause a fire.
• If the power cord or plug becomes frayed or damaged, or if there is a sudden
loss of sound during use of the instrument, or if any unusual smells or smoke
should appear to be caused by it, immediately turn off the power switch,
disconnect the electric plug from the outlet, and have the instrument inspected
by qualified Yamaha service personnel.
CAUTION
Always follow the basic precautions listed below to avoid the possibility of physical injury to you or others, or damage
to the instrument or other property. These precautions include, but are not limited to, the following:
• When removing the electric plug from the instrument or an outlet, always hold
the plug itself and not the cord. Pulling by the cord can damage it.
• Remove the electric plug from the outlet when the instrument is not to be used
for extended periods of time, or during electrical storms.
• Do not connect the instrument to an electrical outlet using a multiple-connector.
Doing so can result in lower sound quality, or possibly cause overheating in the
outlet.
• Do not expose the instrument to excessive dust or vibrations, or extreme cold or
heat (such as in direct sunlight, near a heater, or in a car during the day) to
prevent the possibility of panel disfiguration or damage to the internal
components.
• Do not use the instrument in the vicinity of a TV, radio, stereo equipment,
mobile phone, or other electric devices. Otherwise, the instrument, TV, or radio
may generate noise.
• Do not place the instrument in an unstable position where it might accidentally
fall over.
• Before moving the instrument, remove all connected cables.
• When setting up the instrument, make sure that the AC outlet you are using is
easily accessible. If some trouble or malfunction occurs, immediately turn off
the power switch and disconnect the plug from the outlet.
• Do not place the instrument against a wall (allow at least 3 cm/one-inch from
the wall), since this can cause inadequate air circulation, and possibly result in
the instrument overheating.
Power supply/Power cord
Do not open
Water warning
Fire warning
If you notice any abnormality
Power supply/Power cord Location

(1)B-9 2/2
3
ELS-01/01C/01X Owner’s Manual
• Before connecting the instrument to other electronic components, turn off the
power for all components. Before turning the power on or off for all
components, set all volume levels to minimum. Also, be sure to set the volumes
of all components at their minimum levels and gradually raise the volume
controls while playing the instrument to set the desired listening level.
• When cleaning the instrument, use a soft, dry cloth. Do not use paint thinners,
solvents, cleaning fluids, or chemical-impregnated wiping cloths.
•Take care that the key cover does not pinch your fingers, and do not insert a
finger or hand in any gaps on the key cover or instrument.
• Never insert or drop paper, metallic, or other objects into the gaps on the key
cover, panel or keyboard. If this happens, turn off the power immediately and
unplug the power cord from the AC outlet. Then have the instrument inspected
by qualified Yamaha service personnel.
• Do not place vinyl, plastic or rubber objects on the instrument, since this might
discolor the panel or keyboard.
• Do not rest your weight on, or place heavy objects on the instrument, and do not
use excessive force on the buttons, switches or connectors.
• Do not operate the instrument for a long period of time at a high or
uncomfortable volume level, since this can cause permanent hearing loss. If you
experience any hearing loss or ringing in the ears, consult a physician.
• Do not place the bench in an unstable position where it might accidentally fall
over.
• Do not play carelessly with or stand on the bench. Using it as a tool or step-
ladder or for any other purpose might result in accident or injury.
• Only one person should sit on the bench at a time, in order to prevent the
possibility of accident or injury.
• If the bench screws become loose due to extensive long-term use, tighten them
periodically using the included tool.
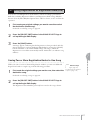
Saving and backing up your data
• Always save data to a SmartMedia card or other external media, in order to help
prevent the loss of important data due to a malfunction or user operating error.
Backing up the external media
•To protect against data loss through media damage, we recommend that you
save your important data onto two external media.
Yamaha cannot be held responsible for damage caused by improper use or
modifications to the instrument, or data that is lost or destroyed.
Always turn the power off when the instrument is not in use.
Connections
Maintenance
Handling caution
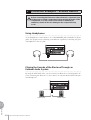
Using the bench
Saving data
The serial number of this product may be found on the bottom
of the unit. You should note this serial number in the space
provided below and retain this manual as a permanent record
of your purchase to aid identification in the event of theft.
Model No. ELS-01 / ELS-01C / ELS-01X
Serial No.
(bottom)

ELS-01/01C/01X Owner’s Manual
4
Accessories
•Bench
• Owner’s Manual
•Playing the ELS-01/01C/01X — Tutorial Guidebook
•SmartMedia card
Congratulations!
You are the proud owner of a fine electronic organ, the Electone STAGEA ELS-01/01C/01X.
The Yamaha Electone combines the most advanced tone generation technology with state-of-the-
art digital electronics and features to give you stunning sound quality with maximum musical
versatility.
In order to make the most of your Electone and its extensive performance potential, we urge you to
read the manual thoroughly while trying out the various features described.
Keep the manual in a safe place for later reference.

ELS-01/01C/01X Owner’s Manual
5
Main Features
Wide Variety of Registration Menus page 19
The Registration Menu buttons feature a total of 240 Registrations, allowing you to instantly set up the
Electone for playing your favorite type of music. The ELS-01C/01X contains even more — an additional 60
Registrations that utilize the expressive VA Voices and Organ Flute Voices. The Registrations in Registration
Menu are divided into five basic categories for ease of selection. Moreover, you can edit any of the
Registrations and customize them to fit your own performance needs.
Richly textured, four-layer AWM Voices and High Quality Digital
Effects
pages 22
and 50
The ELS-01 contains a huge amount of exceptionally high-quality Voices – 415 altogether – created with the
AWM (Advanced Wave Memory) tone generation system. The ELS-01C/01X adds to that 94 VA (Virtual
Acoustic) Voices and a virtually limitless variety of Organ Flute Voices. The authentic touch response
keyboard lets you play these Voices with all the expressiveness and control of an actual acoustic instrument.
What’s more, there are 183 different effect types in 15 categories that you can apply to each Voice section —
letting you enhance and even completely change the character of the Voices, without having to use the Voice
Edit features.
Dynamic, Contemporary Rhythms and Auto Accompaniment page 51
The exceptionally of wide selection of 274 rhythms lets you choose exactly the rhythm you need in your
performance. Each rhythm contains 15 variations (sections) – such as Main, Fill In, Intro, Ending, and Break
– that you can easily switch while you play, to make your performance even more dynamic and professional.
Each rhythm has its own matching accompaniment divided into five instrument parts, providing basic
backing as well as embellishments.
Large, 6.5-inch TFT-LCD with Intuitive Touch Panel Operation page 12
This large LCD display not only lets you clearly see a wide selection of settings and parameters at almost any
angle, it also serves as a touch control panel — letting you intuitively make selections and adjust settings
simply by touching the screen! Once you touch a setting, you can even adjust it in finer detail if necessary
with the Data Control dial.

ELS-01/01C/01X Owner’s Manual
6
This product utilizes NF, an embedded Internet browser from ACCESS Co., Ltd. NF is used with
the patented LZW, licensed from Unisys Co., Ltd. NF may not be separated from this product,
nor may it be sold, lent or transferred in any way. Also, NF may not be reverse-engineered,
reverse-compiled, reverse-assembled or copied.
This software includes a module developed by the Independent JPEG Group.
• The bitmap fonts used in this instrument have been provided by and are the property of Ricoh Co., Ltd.
• This product incorporates and bundles computer programs and contents in which Yamaha owns copyrights or
with respect to which it has license to use others’ copyrights. Such copyrighted materials include, without
limitation, all computer software, styles files, MIDI files, WAVE data and sound recordings. Any unauthorized
use of such programs and contents outside of personal use is not permitted under relevant laws. Any violation of
copyright has legal consequences. DON’T MAKE, DISTRIBUTE OR USE ILLEGAL COPIES.
• Copying of the commercially available music sequence data and/or digital audio files is strictly prohibited except
for your personal use.
•Electone and STAGEA are the trademarks of Yamaha Corporation.
• The company names and product names in this Owner’s Manual are the trademarks or registered trademarks of
their respective companies.
• The illustrations and LCD screens as shown in this owner’s manual are for instructional purposes only, and may
appear somewhat different from those on your instrument.
• The panel illustrations and LCD screens shown in this owner's manual are taken from the ELS-01C, Version
1.60.
• The pan flute and sitar, shown in the displays of the ELS-01/01C/01X, are on display at the Hamamatsu
Museum of Musical Instruments.
The ELS-01/01C/01X is compatible with the following formats.
“GM (General MIDI)” is one of the most common Voice allocation formats. “GM System
Level 2” is a standard specification that enhances the original “GM” and improves Song data
compatibility. It provides for increased polyphony, greater Voice selection, expanded Voice
parameters, and integrated effect processing.
XG is a major enhancement of the GM System Level 1 format, and was developed by Yamaha
specifically to provide more Voices and variations, as well as greater expressive control over
Voices and effects, and to ensure compatibility of data well into the future.
GS was developed by the Roland Corporation. In the same way as Yamaha XG, GS is a major
enhancement of the GM specifically to provide more Voices and Drum kits and their variations,
as well as greater expressive control over Voices and effects.
The Style File Format combines all of Yamaha’s auto accompaniment know-how into a single
unified format.
Products bearing the SONDIUS-XG logo are licensed under patents of Stanford University and
Yamaha as listed on the internet web site, <http://www.sondius-xg.com>.

1
Voices
2
Quick Introductory Guide
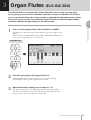
Organ Flutes
(ELS-01C/01X)
3
Voice Controls
and Effects
4
Rhythm/
Keyboard Percussion
5
Registration Memory
6
Music Data Recorder
(MDR)
7
Voice Edit
8
Rhythm Program
9
Footswitches, Knee Lever
and Expression Pedals
10
Transpose
and Pitch Controls
11
13
Internet Direct Connection
Connections
14
Appendix
12
Contents
Accessories ..............................................................4
Main Features ...........................................................5
Panel Layout . . . . . . . . . . . . . . . . . . . . . . .8
Front Panel ................................................................8
LCD Display/Display Select ....................................10
Overview .................................................................10
1 Quick Introductory Guide . . . . . . . . . .11
Getting Started........................................................11
Using the LCD Display............................................12
LCD Display Settings ..............................................15
Voice Display ..........................................................17
Registration Menu ...................................................19
Confirming the Version of Your Electone ................21
Factory Set (Initializing the Electone)......................21
2 Voices . . . . . . . . . . . . . . . . . . . . . . . . . .22
Voices for each keyboard .......................................22
Selecting Voices with the Voice buttons .................23
Selecting Voices from the User buttons..................28
Voice List.................................................................30
3 Organ Flutes (ELS-01C/01X). . . . . . . .35
4 Voice Controls and Effects. . . . . . . . .38
Selecting from the Voice Condition display ............39
Selecting from the panel .........................................43
Effect List ................................................................50
5 Rhythm/Keyboard Percussion . . . . . .51
Selecting rhythms with the Rhythm buttons............51
Selecting rhythms from the User buttons................58
Rhythm List .............................................................59
Accompaniment......................................................61
Automatic Accompaniment
– Auto Bass Chord (A.B.C.) ....................................62
Melody On Chord (M.O.C.).....................................64
Keyboard Percussion..............................................65
6 Registration Memory. . . . . . . . . . . . . .80
Storing Registrations...............................................80
Selecting Registrations ...........................................82
Saving the Registration data to SmartMedia card ..83
Initializing Registration Memory ..............................84
Registration Shift .....................................................84
Unifying a specific parameter.................................89
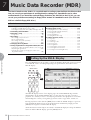
7 Music Data Recorder (MDR) . . . . . . . .92
Calling Up the M.D.R. Display ................................92
Formatting External Media ......................................95
Selecting a Song.....................................................96
Recording .............................................................101
Changing the Song Name ....................................104
Saving Registrations as Registration Data (File)...107
Recalling Recorded Registrations ........................111
Playing Back a Song.............................................112
Other Functions (Tools).........................................118
8 Voice Edit. . . . . . . . . . . . . . . . . . . . . . 127
Voice Structure......................................................127
Editing a Voice ......................................................128
Saving the edited Voice ........................................137
Quitting Voice Edit.................................................138
Recalling an Edited Voice .....................................138
9 Rhythm Program. . . . . . . . . . . . . . . . 139
Outline of the Rhythm Programming Operation ....139
Rhythm Pattern Program .......................................140
Rhythm Sequence Program ..................................170
Saving Rhythm Pattern and Rhythm Sequence Data
to external media...................................................179
10 Footswitches, Knee Lever
and Expression Pedals . . . . . . . . . . . . 180
Footswitches .........................................................180
Knee Lever ............................................................183
Expression Pedals.................................................185
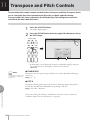
11 Transpose and Pitch Controls. . . . 188
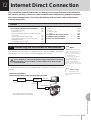
12 Internet Direct Connection. . . . . . . 189
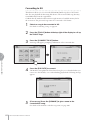
Connecting the Instrument to the Internet.............189
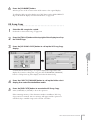
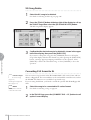
Accessing the Website from the Electone ............190
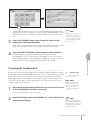
About the Internet Settings Display.......................198
Exiting from the Internet Display ...........................201
Initializing Internet Settings ...................................201
Glossary of Internet Terms ....................................202
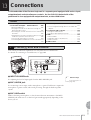
13 Connections. . . . . . . . . . . . . . . . . . . 203
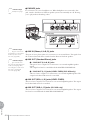
Accessory Jacks and Controls .............................203
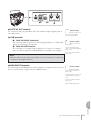
Connection Examples – External Devices ............206
Connection with Computer....................................212
MIDI.......................................................................213
MIDI Control ..........................................................217
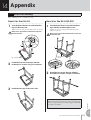
14 Appendix . . . . . . . . . . . . . . . . . . . . . 219
Bench Assembly ...................................................219
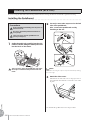
Installing the Pedalboard (ELS-01X) .....................220
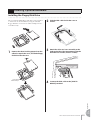
Installing Optional Hardware.................................221
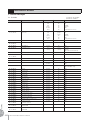
MIDI Data Format ..................................................222
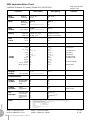
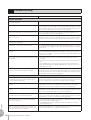
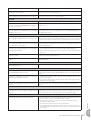
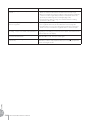
Troubleshooting ....................................................236
Specifications........................................................239
Index .....................................................................241

ELS-01/01C/01X Owner’s Manual
8
REVERB
SUSTAIN
UPPER KEYBOARD VOICE
1
MAX
BRILLIANCE
BRILLIANT
MELLOW
MIN
VOLUME
UPPER KEYBOARD VOICE 2
BRILLIANCE VOLUME
MAX
MIN
BRILLIANT
MELLOW
MAX
MIN
STRINGS BRASS TUTTI PAD SYNTH
WOOD-
WIND
PIANO ORGAN GUITAR CHOIR WORLD
PERCUS-
SION
1
2
STRINGS BRASS TUTTI PAD SYNTH
WOOD-
WIND
PIANO ORGAN GUITAR CHOIR WORLD
PERCUS-
SION
1
2
LOWER KEYBOARD VOICE 1
REGISTRATION MENU
KEYBOARD
PERCUSSION
BRILLIANCE
BRILLIANT
MELLOW
VOLUME
LOWER KEYBOARD VOICE 2
BRILLIANCE VOLUME
MAX
MIN
BRILLIANT
MELLOW
MAX
MIN
STRINGS BRASS TUTTI PAD SYNTH
WOOD-
WIND
UPPER
(KNEE)
MARCH
LATIN
WORLD
MUSIC
BALLAD ROCK
DANCE
WALT Z POPS R & B
SWING &
JAZZ
LOWER
(KNEE)
PEDAL
PIANO ORGAN GUITAR CHOIR WORLD
PERCUS-
SION
1
2
STRINGS BRASS TUTTI PAD SYNTH
WOOD-
WIND
PIANO ORGAN GUITAR CHOIR WORLD
PERCUS-
SION
1
2
12
2
1
1
1
23
123
123 ABCD
45
RHYTHM
VOLUME
SEQ.
2
SEQ.
3
SEQ.
4
SEQ.
MAX
MIN
TEMPO
INTRO
ENDING
MAIN / FILL IN
BAR / BEAT
RHYTHM
CONTROL
START
BREAK
SYNCHRO
START
TEMPO
13 14 15 16
1234
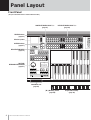
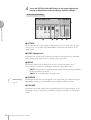
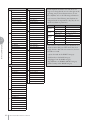
Panel Layout
Front Panel
(The panel illustration below is taken from the ELS-01C.)
LOWER KEYBOARD VOICE 1, 2
(page 23)
REVERB buttons
(page 43)
UPPER KEYBOARD VOICE 1, 2
(page 22)
Monitor speaker
SUSTAIN buttons
(page 47)
REGISTRATION MENU
(page 19)
RHYTHM/
KEYBOARD PERCUSSION
(page 51)
SmartMedia slot
(page 93)
[M.] (Memory) button
(page 80)
Registration memory
(page 80)

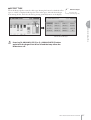
ELS-01/01C/01X Owner’s Manual
9
BRILLIANCE VOLUME
BRILLIANT
MELLOW
MAX
MIN
BRILLIANT
MELLOW
MAX
MIN
VIOLIN
SYNTH
FLUTE TO
LOWER
TRUMPET
1
LEAD VOICE 1
BRILLIANCE VOLUME
BRILLIANT
MELLOW
MAX
MIN
CONTRA
BASS
ELEC.
BASS
TIMPANI TO
LOWER
SYNTH
BASS
1
PEDAL VOICE 1
BRILLIANCE VOLUME
BRILLIANT
MELLOW
MAX
MIN
CONTRA
BASS
ELEC.
BASS
TIMPANI TO
LOWER
SYNTH
BASS
1
PEDAL VOICE 2
BRILLIANCE VOLUME
LEAD VOICE 2
VA VA
ACOUS-
TIC
VIRTUAL
VA VA
ELEC-
TRONIC
SOLO
(KNEE)
CUSTOM
1
MASTER VOLUME
DISPLAY SELECT
VOICE
DISPLAY
FOOT
SWITCH
RHYTHM
PROGRAM
UTILITY INTERNET
A.B.C.
M.O.C.
MDR
VOICE EDIT PATTERN SEQUENCE
U.ORGAN
FLUTES
L.ORGAN
FLUTES
ROTARY SP
SPEED
DATA CONTROL
POWER
5678 910 12
D.
11
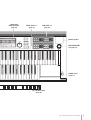
LCD display/
DISPLAY SELECT
(page 10)
PEDAL VOICE 1, 2
(page 23)
LEAD VOICE 1, 2
(page 22)
Monitor speaker
MASTER VOLUME
dial (page 11)
POWER switch
(page 11)
[D.] (Disable) button
(page 82)

ELS-01/01C/01X Owner’s Manual
10
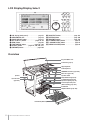
LCD Display/Display Select
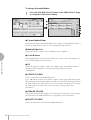
Overview
1 LCD display (touch-panel) . . . . . . . . . . . . page 12
2 DATA CONTROL dial . . . . . . . . . . . . . . . . page 14
3 [VOICE DISPLAY] button . . . . . . . . . . . . . page 17
4 [A.B.C./M.O.C.] button . . . . . . . . . . .pages 62, 64
5 [MDR] button. . . . . . . . . . . . . . . . . . . . . page 92
6 [FOOT SWITCH] button . . . . . . . . . .pages 85, 180
7 [UTILITY] button . . . . . . pages 15, 186, 188, 217
8 [INTERNET] button . . . . . . . . . . . . . . . . page 190
9 [VOICE EDIT] button. . . . . . . . . . . . . . . page 129
) [PATTERN] button . . . . . . . . . . . . . . . . page 140
! [SEQUENCE] button . . . . . . . . . . . . . . . page 170
@ [U. ORGAN FLUTES] button. . . . . . . . . . . page 35
# [L. ORGAN FLUTES] button . . . . . . . . . . . page 35
$ [ROTARY SP SPEED] button . . . . . . . . . . page 48
DISPLAY SELECT
VOICE
DISPLAY
FOOT
SWITCH
RHYTHM
PROGRAM
UTILITY INTERNET
A.B.C.
M.O.C.
MDR
VOICE EDIT PATTERN SEQUENCE
U.ORGAN
FLUTES
L.ORGAN
FLUTES
ROTARY SP
SPEED
DATA CONTROL
1
2
3 4 5
6 7 8
9 ) !
@ # $
Key cover/Music rest
Front Panel (page 8)
Upper keyboard
Lower keyboard
USB/MIDI connectors (page 205)
Knee lever (page 183)
Speaker switch
Left footswitch (page 180)
Expression pedal (page 12)
Second expression pedal
(ELS-01C/01X); (page 185)
Pedalboard
Speaker
I/O connectors
(page 203)
Right footswitch (page 84)
Output terminals (page 204)
Pedalboard (ELS-01X)

ELS-01/01C/01X Owner’s Manual
11
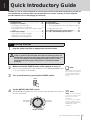
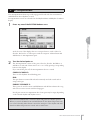
Quick Introductory Guide
Whether you are an advanced performer or have never touched an electronic keyboard in your life, we
recommend that you take the time to go through this basic section. It shows you in the simplest
possible manner how to start playing your Electone.
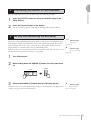
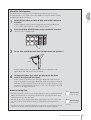
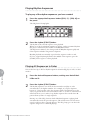
Plug the power cord into an appropriate electrical outlet.
Make sure that the POWER switch of the speaker is set to on.
If you are using the ELS-01C or ELS-01X, also set the REAR SPEAKER switch
to on (not available on the ELS-01).
Turn on the Electone by pressing the POWER switch.
Set the MASTER VOLUME control.
The MASTER VOLUME control is an overall control that affects the volume of
the entire instrument.
Contents
1 Getting Started . . . . . . . . . . . . . . . . . . . . . . . . . . .11
2 Using the LCD Display . . . . . . . . . . . . . . . . . . . . .12
• Changing the Display Page . . . . . . . . . . . . . . . . .12
• Pressing Buttons on the Display . . . . . . . . . . . . .13
• Adjusting Parameter Values by Using the Display
Sliders . . . . . . . . . . . . . . . . . . . . . . . . . . . . . . . . . .14
3 LCD Display Settings . . . . . . . . . . . . . . . . . . . . . .15
• Selecting the Display Language . . . . . . . . . . . . .15
• Muting the Touch Panel Sound. . . . . . . . . . . . . . .16
• Adjusting the Display Brightness . . . . . . . . . . . . .16
4Voice Display. . . . . . . . . . . . . . . . . . . . . . . . . . . . .17
5 Registration Menu. . . . . . . . . . . . . . . . . . . . . . . . .19
• Selecting Registrations from the Registration Menu
. . . . . . . . . . . . . . . . . . . . . . . . . . . . . . . . . . . . . . . 19
• Registration Menu List . . . . . . . . . . . . . . . . . . . . .20
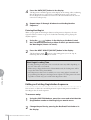
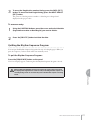
6 Confirming the Version of Your Electone . . . . . .21
7Factory Set (Initializing the Electone). . . . . . . . .21
1
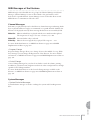
Getting Started
Only use the voltage specified as correct for the Electone. The required
voltage is printed on the name plate of the Electone. Yamaha products are
manufactured specifically for the supply voltage in the area where they are to
be sold. If you intend to use the instrument in another location, or if any
doubt exists about the supply voltage, please consult with a qualified
technician.
1
2
NOTE
When using the rear speaker,
place the Electone against a
wall, allowing about 20 cm
from the wall for optimum
sound.
3
POWER
4
NOTE
You do not need to switch the
power of the speaker on/off
whenever you use the
instrument.
If you want, you can always
keep it on and turn off the
power by pressing the main
POWER switch of the
instrument.
MASTER VOLUME
Decreasing
the volume
Increasing
the volume
1

ELS-01/01C/01X Owner’s Manual
12
1
Quick Introductory Guide
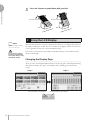
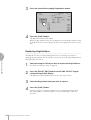
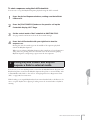
Press the Expression pedal down with your foot.
This instrument features a special touch panel that allows you to change the parameters
by simply touching the ‘virtual’ buttons or sliders on the display. (Please note that two
or more parameters cannot be operated simultaneously.)
You can also use the Data Control dial to make fine changes to the parameter value
shown in the display.
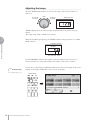
●●●●●●●●●●●●●●●●●●●●●●●●●●●●●●●●●●●●●●
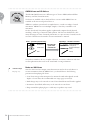
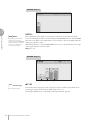
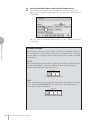
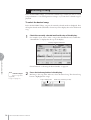
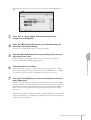
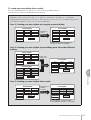
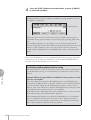
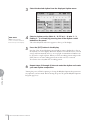
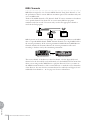
Changing the Display Page
There are some oval-shaped numbered buttons at the top right of the display. Pressing
these buttons changes the “page” of the display. The selected page’s button turns
orange.
2
Using the LCD Display
5
Maximum volume
Minimum volume
NOTE
When cleaning the display,
use a soft, dry cloth.
Do not use any sharp or
hard tools to operate the
touch panel. Doing so may
damage the display.
Page 1
Page 2
Press this button to select Page 1
Press this button to select Page 2

ELS-01/01C/01X Owner’s Manual
13
1
Quick Introductory Guide
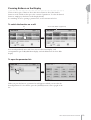
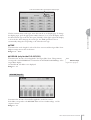
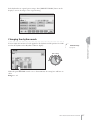
●●●●●●●●●●●●●●●●●●●●●●●●●●●●●●●●●●●●●●
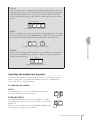
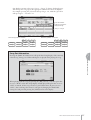
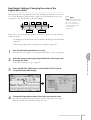
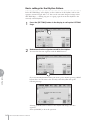
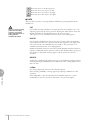
Pressing Buttons on the Display
There are three types of buttons: those that select a function, those that switch a
function on/off, and those that open a list or menu of parameters. To select the desired
function, simply press the button in the display directly.
For switching on/off or opening a parameter list, see the instructions below.
To switch the function on or off:
You can independently mute each Voice section in the Voice Display, each
accompaniment part in Rhythm Menu display, and each Element in the Voice Edit
display.
To open the parameter list:
When you press the button, a parameter list will appear in which you can select the
desired parameter. To close the list, press the [CLOSE] button at the top right of the
list.
On
Off, or mute (button is grayed out)

ELS-01/01C/01X Owner’s Manual
14
1
Quick Introductory Guide
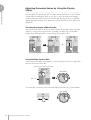
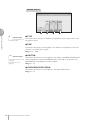
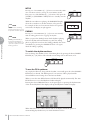
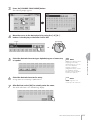
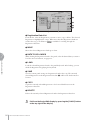
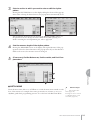
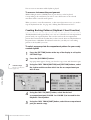
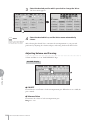
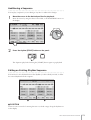
Adjusting Parameter Values by Using the Display
●●●●●●●●●●●●●●●●●●●●●●●●●●●●●●●●●●●●●●
Sliders
You can adjust some parameters such as Volume, Reverb, Pan and so on, by using the
‘virtual’ sliders in the display. There are two ways to move the slider in the display:
touching it directly, and using the Data Control dial. We suggest that you touch the
display slider when making coarse adjustments and use the Data Control dial for fine
adjustment.
Touching the display slider directly:
Press a point in the slider to which you want to adjust the parameter value. The slider
will move to the point you pressed. Also, by sliding your finger up or down while
holding down the display slider, you can change the parameter value.
Using the Data Control dial:
Touch on/above the slider in the display to enable the parameter and set a rough value,
then turn the Data Control dial.
To control Pan, you can move the horizontal slider in the same way as vertical sliders.
Slider will move to the point you touch
Slider will follow your finger
or
DATA CONTROL
Touch here to enable the parameter
Blue mark
DATA CONTROL

ELS-01/01C/01X Owner’s Manual
15
1
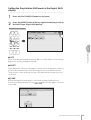
Quick Introductory Guide
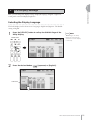
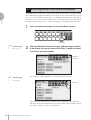
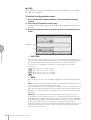
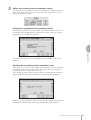
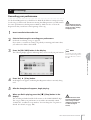
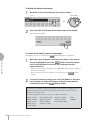
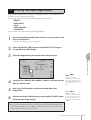
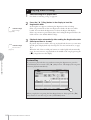
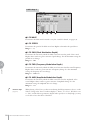
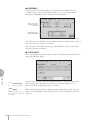
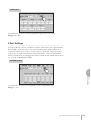
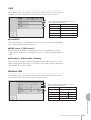
Here you can change the display settings: displayed language (English or Japanese),
touch panel sound, and display brightness.
●●●●●●●●●●●●●●●●●●●●●●●●●●●●●●●●●●●●●●
Selecting the Display Language
The LCD display can be shown in two languages, English and Japanese. The default
setting is English.
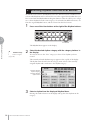
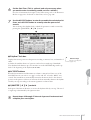
Press the [UTILITY] button to call up the GLOBAL Page of the
Utility Display.
Press the desired button, (Japanese) or [English].
3
LCD Display Settings
NOTE
The settings in the Utility
Display are automatically
saved when another display
is called up.
1
DISPLAY SELECT
VOICE
DISPLAY
FOOT
SWITCH
RHYTHM
PROGRAM
UTILITY INTERNET
A.B.C.
M.O.C.
MDR
VOICE EDIT PATTERN SEQUENCE
U.ORGAN
FLUTES
L.ORGAN
FLUTES
ROTARY SP
SPEED
2
LANGUAGE

ELS-01/01C/01X Owner’s Manual
16
1
Quick Introductory Guide
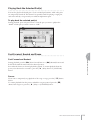
●●●●●●●●●●●●●●●●●●●●●●●●●●●●●●●●●●●●●●
Muting the Touch Panel Sound
The Electone is set by default with the touch panel sound turned on, giving you audio
feedback when you press a button or control. If you want to mute the touch panel
sound, follow the procedure below.
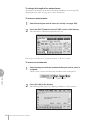
Press [UTILITY] button to call up GLOBAL Page of the Utility
Display.
Press the [OFF] button of the TOUCH PANEL SOUND to mute the
sound.
To turn the sound on again, select [ON] in Step #2.
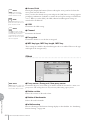
●●●●●●●●●●●●●●●●●●●●●●●●●●●●●●●●●●●●●●
Adjusting the Display Brightness
You can adjust the display brightness to a comfortable, easy-to-read level.
Press the [UTILITY] button to call up the GLOBAL Page of the
Utility Display.
Move the LCD BRIGHTNESS slider by touching it directly or
using the Data Control dial.
Higher settings make the display brighter and lower settings make it darker.
1
2
TOUCH PANEL SOUND
1
2
DATA CONTROL
LCD BRIGHTNESS

ELS-01/01C/01X Owner’s Manual
17
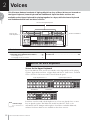
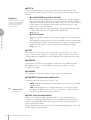
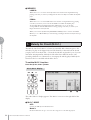
1
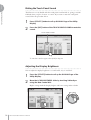
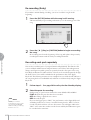
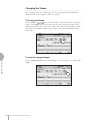
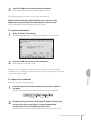
Quick Introductory Guide
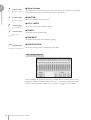
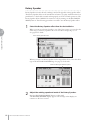
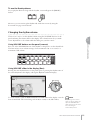
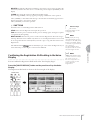
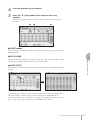
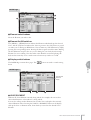
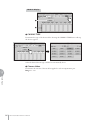
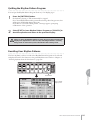
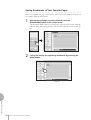
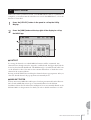
You can visually confirm the currently assigned Voices to each keyboard, currently
selected rhythm, Registration Shift, and so on, in the Voice Display.
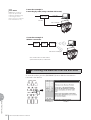
How to call up the Voice Display:
The Voice Display always appears when the Electone is turned on. To call up the Voice
Display from any other display, press the [VOICE DISPLAY] button.
The Voice Display consists of two different pages that can be switched by pressing the
[1] or [2] button at the top right of the display.
4
Voice Display
DISPLAY SELECT
VOICE
DISPLAY
FOOT
SWITCH
RHYTHM
PROGRAM
UTILITY INTERNET
A.B.C.
M.O.C.
MDR
VOICE EDIT PATTERN SEQUENCE
U.ORGAN
FLUTES
L.ORGAN
FLUTES
ROTARY SP
SPEED
3
1
2
564
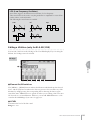
Switching the Display Pages
Voice Display [Page 1]

ELS-01/01C/01X Owner’s Manual
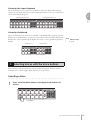
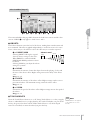
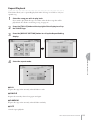
18
1
Quick Introductory Guide
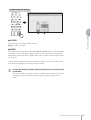
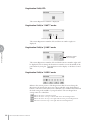
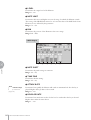
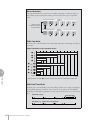
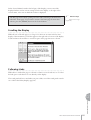
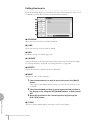
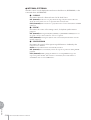
1 Voice Sections
Shows the Voices currently assigned to each Voice section. You can also mute specific
Voice section by pressing its button (the button is grayed-out).
2 RHYTHM
Shows the currently selected rhythm.
3 A.B.C. MODE
Shows the mode of the Auto Bass Chord.
4 TEMPO
Shows the current rhythm tempo.
5 BAR/BEAT
Shows the bar/beat when the rhythm is playing.
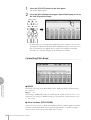
6 REGISTRATION
Shows the current position of the Registration Shift.
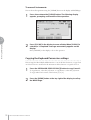
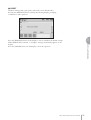
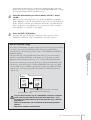
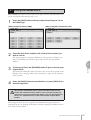
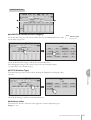
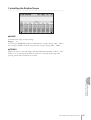
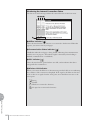
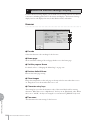
You can confirm the parameter values (for example, Reverb, Volume, Pan) for each
Registration Memory simultaneously. Moreover, you can unify a specific parameter
used in various Registration Memories at one time. See page 89 for the details.
Reference Page
Selecting a Voice (page 23)
Reference Page
Selecting a rhythm (page 51)
Reference Page
Auto Bass Chord (page 62)
Reference Page
Adjusting the tempo
(page 56)
Reference Page
Registration Shift (page 84)
Voice Display [Page 2]

ELS-01/01C/01X Owner’s Manual
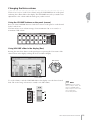
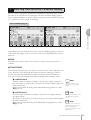
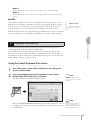
19
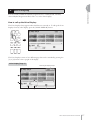
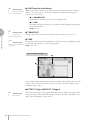
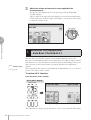
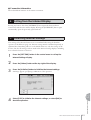
1
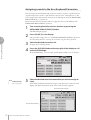
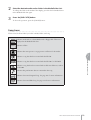
Quick Introductory Guide
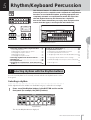
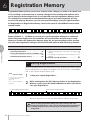
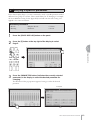
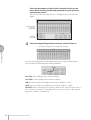
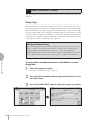
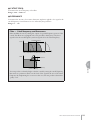
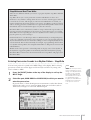
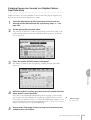
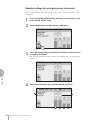
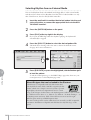
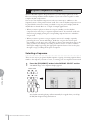
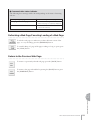
A “Registration” consists of panel settings including the selected Upper Keyboard
Voices, Lower Keyboard Voices, Pedal Voices, rhythm and so on. Each Registration
Menu button (1 – 5) includes 48 Registrations (or 60 Registrations on the ELS-01C/
01X), each specially suited for playing in a different music style.
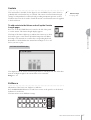
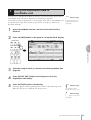
●●●●●●●●●●●●●●●●●●●●●●●●●●●●●●●●●●●●●●
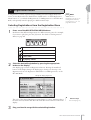
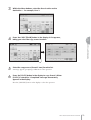
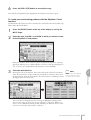
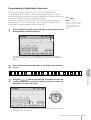
Selecting Registrations from the Registration Menu
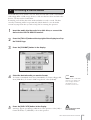
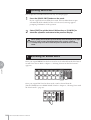
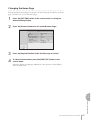
Press one of the REGISTRATION MENU buttons.
Each button has different Registrations for different music genres. For example,
if you want to play Jazz, press the [4] button. For details on the Registration
Menu, see page 20.
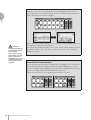
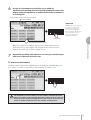
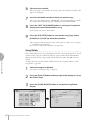
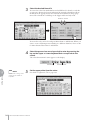
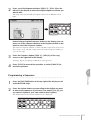
Select the desired Registration by pressing the appropriate
button on the display.
One display page contains 12 Registration buttons. Pressing the numbered
buttons in the display changes the display pages, letting you select up to 48
Registrations from one Registration Menu button (or 60 Registrations, on the
ELS-01C/01X).
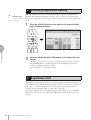
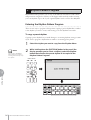
The color of the selected Registration name changes to orange, indicating that it
has been selected, and the Auto Bass Chord mode is shown at the bottom of the
display.
Play your favorite song with the selected Registration.
5
Registration Menu
NOTE
Additional basic
Registrations are preset on
the Registration Memory
locations from 1 to 16. See
page 80 for details.
Kids
Pops & Rock
Dance & Ballad
Jazz & Latin
Symphony & World
1
REGISTRATION MENU
12345
1
2
3
4
5
2
Change the display pages here.
Reference Page
Auto Bass Chord (page 62)
3

ELS-01/01C/01X Owner’s Manual
20
1
Quick Introductory Guide
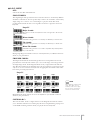
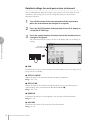
●●●●●●●●●●●●●●●●●●●●●●●●●●●●●●●●●●●●●●●●●●●●●●●●●●
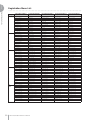
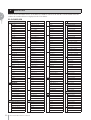
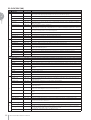
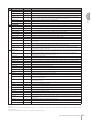
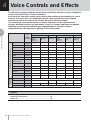
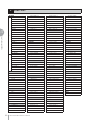
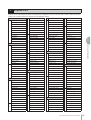
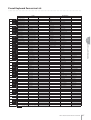
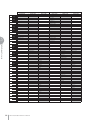
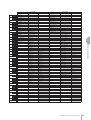
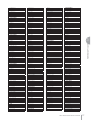
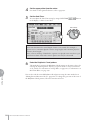
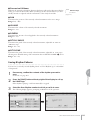
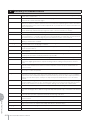
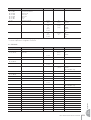
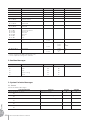
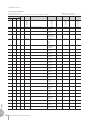
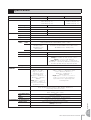
Registration Menu List
Page
REGISTRATION MENU 1
KIDS
REGISTRATION MENU 2
POPS & ROCK
REGISTRATION MENU 3
DANCE & BALLAD
REGISTRATION MENU 4
JAZZ & LATIN
REGISTRATION MENU 5
SYMPHONY & WORLD
1
Simple 8 Beat 1 Dynamic 8 Beat Organ Ballad Blow On Sax Fanfare
Simple 8 Beat 2 NY Ballad Dramatic Ballad Sax Ensemble String Orchestra
Light Step British Pop Love Ballad Moonlight Romantic Violin
Sunny Pop 8 Beat Modern Smooth Lead Big Band Baroque
Kids March 1 Rock Band Pop Ballad Clarinet Swing Flute&Harp
Kids March 2 Detroit Pop Guitar Ballad Jazz Combo Serenade
Kids March 3 Techno Pop Acoustic Ballad Medium Jazz Fast March
Synth. Rock Sheriff Reggae Healing Guitar Organ Session Wild West
Symphonic March 1 Rock&Roll Chillout Guitar Combo Vienna Waltz
Symphonic March 2 Power Rock Sweetheart 1 Tender Ballad Polka
Bluegrass 60’s Guitar Rock Sweetheart 2 Jazz Waltz Chanson Club
Sea Carnival Unplugged Slow & Easy Five-Four Theatre Organ
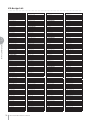
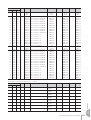
2
Basic Waltz Motor City Euro Trance Big Band Samba Flamenco
Brass Ensemble Lovely Shuffle 6/8 Trance Mambo Brass Pop Flamenco
Pure Waltz Gospel Shuffle Cool Hip Hop Mambo Tenor Mexican Dance
Rococo Ensemble Joyful Gospel Latin House Montuno Mariachi
Pop Cha Cha Frankly Soul Dance Beat Bossa Nova Celtic Dance
Comical Rumba Soul Euro Dance Pop Pop Bossa Folk Step
Comical Samba Gospel UK Pop Sweet Rumba Italiano
Toy Orchestra 6/8 Soul Jive Beguine Musette
Charleston Hit Pop Disco Queen Cha Cha Cha Country
Winter Swing New Country Disco Soul Mellow Groove Hawaiian
Snow Waltz 1 Eternal Pop Pop Disco Modern R&B Chinese Nocturne
Snow Waltz 2 Ground Beat Hot Disco Dixieland Jazz Japanese Sound
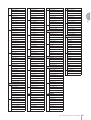
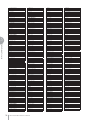
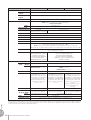
3
Alpine Polka *A Bounce Pop *A Ibiza *A Jungle Drum *A Orchestra March*A
Alpine Polka *B Bounce Pop *B Ibiza *B Jungle Drum *B Orchestra March*B
Alpine Polka *C Bounce Pop *C Ibiza *C Jungle Drum *C Orchestra March*C
Alpine Polka *D Bounce Pop *D Ibiza *D Jungle Drum *D Orchestra March*D
Dream Ballad *A Blues Jam *A Power House *A Jazz Club *A Pasodoble *A
Dream Ballad *B Blues Jam *B Power House *B Jazz Club *B Pasodoble *B
Dream Ballad *C Blues Jam *C Power House *C Jazz Club *C Pasodoble *C
Dream Ballad *D Blues Jam *D Power House *D Jazz Club *D Pasodoble *D
Pops Orchestra*A Evergreen Waltz*A Dance Latino *A Afro Session *A Tango *A
Pops Orchestra*B Evergreen Waltz*B Dance Latino *B Afro Session *B Tango *B
Pops Orchestra*C Evergreen Waltz*C Dance Latino *C Afro Session *C Tango *C
Pops Orchestra*D Evergreen Waltz*D Dance Latino *D Afro Session *D Tango *D
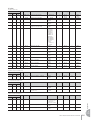
4
Kids On Stage *A 16 Beat Pop *A Twilight Disco*A ChaCha Grandee*A Show Time *A
Kids On Stage *B 16 Beat Pop *B Twilight Disco*B ChaCha Grandee*B Show Time *B
Kids On Stage *C 16 Beat Pop *C Twilight Disco*C ChaCha Grandee*C Show Time *C
Kids On Stage *D 16 Beat Pop *D Twilight Disco*D ChaCha Grandee*D Show Time *D
Galaxy March *A Top Gear Rock *A Love Song *A 3/4 Fast Jazz *A Majestic Sound*A
Galaxy March *B Top Gear Rock *B Love Song *B 3/4 Fast Jazz *B Majestic Sound*B
Galaxy March *C Top Gear Rock *C Love Song *C 3/4 Fast Jazz *C Majestic Sound*C
Galaxy March *D Top Gear Rock *D Love Song *D 3/4 Fast Jazz *D Majestic Sound*D
SE *A Southern Pop *A Movie Ballad *A Twilight Sax *A Orchestra Swing*A
SE *B Southern Pop *B Movie Ballad *B Twilight Sax *B Orchestra Swing*B
SE *C Southern Pop *C Movie Ballad *C Twilight Sax *C Orchestra Swing*C
SE *D Southern Pop *D Movie Ballad *D Twilight Sax *D Orchestra Swing*D
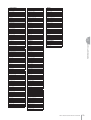
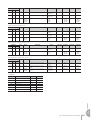
5
(ELS-01C/
01X)
Bright 16 Beat *A Funk *A Hip Hop Pop *A Organ Bossa *A Orchestra 3001*A
Bright 16 Beat *B Funk *B Hip Hop Pop *B Organ Bossa *B Orchestra 3001*B
Bright 16 Beat *C Funk *C Hip Hop Pop *C Organ Bossa *C Orchestra 3001*C
Bright 16 Beat *D Funk *D Hip Hop Pop *D Organ Bossa *D Orchestra 3001*D
Movie Panther *A West Coast Rock*A Fusion Shuffle*A Afro Cuban *A Wedding Song *A
Movie Panther *B West Coast Rock*B Fusion Shuffle*B Afro Cuban *B Wedding Song *B
Movie Panther *C West Coast Rock*C Fusion Shuffle*C Afro Cuban *C Wedding Song *C
Movie Panther *D West Coast Rock*D Fusion Shuffle*D Afro Cuban *D Wedding Song *D
Powerful Swing*A 6/8 Enka *A Whole Ballad *A Midnight Jazz *A Fantasy *A
Powerful Swing*B 6/8 Enka *B Whole Ballad *B Midnight Jazz *B Fantasy *B
Powerful Swing*C 6/8 Enka *C Whole Ballad *C Midnight Jazz *C Fantasy *C
Powerful Swing*D 6/8 Enka *D Whole Ballad *D Midnight Jazz *D Fantasy *D
Sayfa yükleniyor ...
Sayfa yükleniyor ...
Sayfa yükleniyor ...
Sayfa yükleniyor ...
Sayfa yükleniyor ...
Sayfa yükleniyor ...
Sayfa yükleniyor ...
Sayfa yükleniyor ...
Sayfa yükleniyor ...
Sayfa yükleniyor ...
Sayfa yükleniyor ...
Sayfa yükleniyor ...
Sayfa yükleniyor ...
Sayfa yükleniyor ...
Sayfa yükleniyor ...
Sayfa yükleniyor ...
Sayfa yükleniyor ...
Sayfa yükleniyor ...
Sayfa yükleniyor ...
Sayfa yükleniyor ...
Sayfa yükleniyor ...
Sayfa yükleniyor ...
Sayfa yükleniyor ...
Sayfa yükleniyor ...
Sayfa yükleniyor ...
Sayfa yükleniyor ...
Sayfa yükleniyor ...
Sayfa yükleniyor ...
Sayfa yükleniyor ...
Sayfa yükleniyor ...
Sayfa yükleniyor ...
Sayfa yükleniyor ...
Sayfa yükleniyor ...
Sayfa yükleniyor ...
Sayfa yükleniyor ...
Sayfa yükleniyor ...
Sayfa yükleniyor ...
Sayfa yükleniyor ...
Sayfa yükleniyor ...
Sayfa yükleniyor ...
Sayfa yükleniyor ...
Sayfa yükleniyor ...
Sayfa yükleniyor ...
Sayfa yükleniyor ...
Sayfa yükleniyor ...
Sayfa yükleniyor ...
Sayfa yükleniyor ...
Sayfa yükleniyor ...
Sayfa yükleniyor ...
Sayfa yükleniyor ...
Sayfa yükleniyor ...
Sayfa yükleniyor ...
Sayfa yükleniyor ...
Sayfa yükleniyor ...
Sayfa yükleniyor ...
Sayfa yükleniyor ...
Sayfa yükleniyor ...
Sayfa yükleniyor ...
Sayfa yükleniyor ...
Sayfa yükleniyor ...
Sayfa yükleniyor ...
Sayfa yükleniyor ...
Sayfa yükleniyor ...
Sayfa yükleniyor ...
Sayfa yükleniyor ...
Sayfa yükleniyor ...
Sayfa yükleniyor ...
Sayfa yükleniyor ...
Sayfa yükleniyor ...
Sayfa yükleniyor ...
Sayfa yükleniyor ...
Sayfa yükleniyor ...
Sayfa yükleniyor ...
Sayfa yükleniyor ...
Sayfa yükleniyor ...
Sayfa yükleniyor ...
Sayfa yükleniyor ...
Sayfa yükleniyor ...
Sayfa yükleniyor ...
Sayfa yükleniyor ...
Sayfa yükleniyor ...
Sayfa yükleniyor ...
Sayfa yükleniyor ...
Sayfa yükleniyor ...
Sayfa yükleniyor ...
Sayfa yükleniyor ...
Sayfa yükleniyor ...
Sayfa yükleniyor ...
Sayfa yükleniyor ...
Sayfa yükleniyor ...
Sayfa yükleniyor ...
Sayfa yükleniyor ...
Sayfa yükleniyor ...
Sayfa yükleniyor ...
Sayfa yükleniyor ...
Sayfa yükleniyor ...
Sayfa yükleniyor ...
Sayfa yükleniyor ...
Sayfa yükleniyor ...
Sayfa yükleniyor ...
Sayfa yükleniyor ...
Sayfa yükleniyor ...
Sayfa yükleniyor ...
Sayfa yükleniyor ...
Sayfa yükleniyor ...
Sayfa yükleniyor ...
Sayfa yükleniyor ...
Sayfa yükleniyor ...
Sayfa yükleniyor ...
Sayfa yükleniyor ...
Sayfa yükleniyor ...
Sayfa yükleniyor ...
Sayfa yükleniyor ...
Sayfa yükleniyor ...
Sayfa yükleniyor ...
Sayfa yükleniyor ...
Sayfa yükleniyor ...
Sayfa yükleniyor ...
Sayfa yükleniyor ...
Sayfa yükleniyor ...
Sayfa yükleniyor ...
Sayfa yükleniyor ...
Sayfa yükleniyor ...
Sayfa yükleniyor ...
Sayfa yükleniyor ...
Sayfa yükleniyor ...
Sayfa yükleniyor ...
Sayfa yükleniyor ...
Sayfa yükleniyor ...
Sayfa yükleniyor ...
Sayfa yükleniyor ...
Sayfa yükleniyor ...
Sayfa yükleniyor ...
Sayfa yükleniyor ...
Sayfa yükleniyor ...
Sayfa yükleniyor ...
Sayfa yükleniyor ...
Sayfa yükleniyor ...
Sayfa yükleniyor ...
Sayfa yükleniyor ...
Sayfa yükleniyor ...
Sayfa yükleniyor ...
Sayfa yükleniyor ...
Sayfa yükleniyor ...
Sayfa yükleniyor ...
Sayfa yükleniyor ...
Sayfa yükleniyor ...
Sayfa yükleniyor ...
Sayfa yükleniyor ...
Sayfa yükleniyor ...
Sayfa yükleniyor ...
Sayfa yükleniyor ...
Sayfa yükleniyor ...
Sayfa yükleniyor ...
Sayfa yükleniyor ...
Sayfa yükleniyor ...
Sayfa yükleniyor ...
Sayfa yükleniyor ...
Sayfa yükleniyor ...
Sayfa yükleniyor ...
Sayfa yükleniyor ...
Sayfa yükleniyor ...
Sayfa yükleniyor ...
Sayfa yükleniyor ...
Sayfa yükleniyor ...
Sayfa yükleniyor ...
Sayfa yükleniyor ...
Sayfa yükleniyor ...
Sayfa yükleniyor ...
Sayfa yükleniyor ...
Sayfa yükleniyor ...
Sayfa yükleniyor ...
Sayfa yükleniyor ...
Sayfa yükleniyor ...
Sayfa yükleniyor ...
Sayfa yükleniyor ...
Sayfa yükleniyor ...
Sayfa yükleniyor ...
Sayfa yükleniyor ...
Sayfa yükleniyor ...
Sayfa yükleniyor ...
Sayfa yükleniyor ...
Sayfa yükleniyor ...
Sayfa yükleniyor ...
Sayfa yükleniyor ...
Sayfa yükleniyor ...
Sayfa yükleniyor ...
Sayfa yükleniyor ...
Sayfa yükleniyor ...
Sayfa yükleniyor ...
Sayfa yükleniyor ...
Sayfa yükleniyor ...
Sayfa yükleniyor ...
Sayfa yükleniyor ...
Sayfa yükleniyor ...
Sayfa yükleniyor ...
Sayfa yükleniyor ...
Sayfa yükleniyor ...
Sayfa yükleniyor ...
Sayfa yükleniyor ...
Sayfa yükleniyor ...
Sayfa yükleniyor ...
Sayfa yükleniyor ...
Sayfa yükleniyor ...
Sayfa yükleniyor ...
Sayfa yükleniyor ...
Sayfa yükleniyor ...
Sayfa yükleniyor ...
Sayfa yükleniyor ...
Sayfa yükleniyor ...
Sayfa yükleniyor ...
Sayfa yükleniyor ...
Sayfa yükleniyor ...
Sayfa yükleniyor ...
Sayfa yükleniyor ...
Sayfa yükleniyor ...
Sayfa yükleniyor ...
Sayfa yükleniyor ...
Sayfa yükleniyor ...
Sayfa yükleniyor ...
Sayfa yükleniyor ...
Sayfa yükleniyor ...
Sayfa yükleniyor ...
Sayfa yükleniyor ...
Sayfa yükleniyor ...
Sayfa yükleniyor ...
Sayfa yükleniyor ...
Sayfa yükleniyor ...
-
 1
1
-
 2
2
-
 3
3
-
 4
4
-
 5
5
-
 6
6
-
 7
7
-
 8
8
-
 9
9
-
 10
10
-
 11
11
-
 12
12
-
 13
13
-
 14
14
-
 15
15
-
 16
16
-
 17
17
-
 18
18
-
 19
19
-
 20
20
-
 21
21
-
 22
22
-
 23
23
-
 24
24
-
 25
25
-
 26
26
-
 27
27
-
 28
28
-
 29
29
-
 30
30
-
 31
31
-
 32
32
-
 33
33
-
 34
34
-
 35
35
-
 36
36
-
 37
37
-
 38
38
-
 39
39
-
 40
40
-
 41
41
-
 42
42
-
 43
43
-
 44
44
-
 45
45
-
 46
46
-
 47
47
-
 48
48
-
 49
49
-
 50
50
-
 51
51
-
 52
52
-
 53
53
-
 54
54
-
 55
55
-
 56
56
-
 57
57
-
 58
58
-
 59
59
-
 60
60
-
 61
61
-
 62
62
-
 63
63
-
 64
64
-
 65
65
-
 66
66
-
 67
67
-
 68
68
-
 69
69
-
 70
70
-
 71
71
-
 72
72
-
 73
73
-
 74
74
-
 75
75
-
 76
76
-
 77
77
-
 78
78
-
 79
79
-
 80
80
-
 81
81
-
 82
82
-
 83
83
-
 84
84
-
 85
85
-
 86
86
-
 87
87
-
 88
88
-
 89
89
-
 90
90
-
 91
91
-
 92
92
-
 93
93
-
 94
94
-
 95
95
-
 96
96
-
 97
97
-
 98
98
-
 99
99
-
 100
100
-
 101
101
-
 102
102
-
 103
103
-
 104
104
-
 105
105
-
 106
106
-
 107
107
-
 108
108
-
 109
109
-
 110
110
-
 111
111
-
 112
112
-
 113
113
-
 114
114
-
 115
115
-
 116
116
-
 117
117
-
 118
118
-
 119
119
-
 120
120
-
 121
121
-
 122
122
-
 123
123
-
 124
124
-
 125
125
-
 126
126
-
 127
127
-
 128
128
-
 129
129
-
 130
130
-
 131
131
-
 132
132
-
 133
133
-
 134
134
-
 135
135
-
 136
136
-
 137
137
-
 138
138
-
 139
139
-
 140
140
-
 141
141
-
 142
142
-
 143
143
-
 144
144
-
 145
145
-
 146
146
-
 147
147
-
 148
148
-
 149
149
-
 150
150
-
 151
151
-
 152
152
-
 153
153
-
 154
154
-
 155
155
-
 156
156
-
 157
157
-
 158
158
-
 159
159
-
 160
160
-
 161
161
-
 162
162
-
 163
163
-
 164
164
-
 165
165
-
 166
166
-
 167
167
-
 168
168
-
 169
169
-
 170
170
-
 171
171
-
 172
172
-
 173
173
-
 174
174
-
 175
175
-
 176
176
-
 177
177
-
 178
178
-
 179
179
-
 180
180
-
 181
181
-
 182
182
-
 183
183
-
 184
184
-
 185
185
-
 186
186
-
 187
187
-
 188
188
-
 189
189
-
 190
190
-
 191
191
-
 192
192
-
 193
193
-
 194
194
-
 195
195
-
 196
196
-
 197
197
-
 198
198
-
 199
199
-
 200
200
-
 201
201
-
 202
202
-
 203
203
-
 204
204
-
 205
205
-
 206
206
-
 207
207
-
 208
208
-
 209
209
-
 210
210
-
 211
211
-
 212
212
-
 213
213
-
 214
214
-
 215
215
-
 216
216
-
 217
217
-
 218
218
-
 219
219
-
 220
220
-
 221
221
-
 222
222
-
 223
223
-
 224
224
-
 225
225
-
 226
226
-
 227
227
-
 228
228
-
 229
229
-
 230
230
-
 231
231
-
 232
232
-
 233
233
-
 234
234
-
 235
235
-
 236
236
-
 237
237
-
 238
238
-
 239
239
-
 240
240
-
 241
241
-
 242
242
-
 243
243
-
 244
244
-
 245
245
-
 246
246
-
 247
247
-
 248
248


Yamaha Electone Stagea 01X El kitabı
- Kategori
- Ses mikserleri
- Tip
- El kitabı
- Bu kılavuz için de uygundur
Diğer dillerde
- español: Yamaha Electone Stagea 01X El manual del propietario
- français: Yamaha Electone Stagea 01X Le manuel du propriétaire
- italiano: Yamaha Electone Stagea 01X Manuale del proprietario
- svenska: Yamaha Electone Stagea 01X Bruksanvisning
- čeština: Yamaha Electone Stagea 01X Návod k obsluze
- polski: Yamaha Electone Stagea 01X Instrukcja obsługi
- Deutsch: Yamaha Electone Stagea 01X Bedienungsanleitung
- português: Yamaha Electone Stagea 01X Manual do proprietário
- English: Yamaha Electone Stagea 01X Owner's manual
- dansk: Yamaha Electone Stagea 01X Brugervejledning
- русский: Yamaha Electone Stagea 01X Инструкция по применению
- Nederlands: Yamaha Electone Stagea 01X de handleiding
- română: Yamaha Electone Stagea 01X Manualul proprietarului