Samsung HW-J6001R Hızlı başlangıç Kılavuzu
- Tip
- Hızlı başlangıç Kılavuzu

HW-J6000R
HW-J6001R
For further information, refer to the Web Manual.
Web manual : www.Samsung.com
Support
Product name search HW-J6000R or HW-J6001R
User Manual

· 2 · English
SAFETY INFORMATION
SAFETY WARNINGS
TO REDUCE THE RISK OF ELECTRIC SHOCK, DO NOT REMOVE THE COVER (OR BACK).
NO USER-SERVICEABLE PARTS ARE INSIDE. REFER SERVICING TO QUALIFIED SERVICE PERSONNEL.
CAUTION
RISK OF ELECTRIC SHOCK
DO NOT OPEN
This symbol indicates that high voltage is
present inside. It is dangerous to make any
kind of contact with any internal part of this
product.
This symbol indicates that important literature
concerning operation and maintenance has
been included with this product.
Class II product : This symbol indicates that it does not require a safety connection to electrical
earth (ground).
AC voltage : This symbol indicates that the rated voltage marked with the symbol is AC
voltage.
DC voltage : This symbol indicates that the rated voltage marked with the symbol is DC
voltage.
Caution, Consult instructions for use : This symbol instructs the user to consult the user
manual for further safety related information.
WARNING : To reduce the risk of fire or electric shock, do not expose this appliance to rain or moisture.
CAUTION : TO PREVENT ELECTRIC SHOCK, MATCH WIDE BLADE OF PLUG TO WIDE SLOT, FULLY
INSERT.
• This apparatus shall always be connected to a AC outlet with a protective grounding connection.
• To disconnect the apparatus from the mains, the plug must be pulled out from the mains socket, therefore the
mains plug shall be readily operable.
CAUTION
• Do not expose this apparatus to dripping or splashing. Do not put objects filled with liquids, such as vases on
the apparatus.
• To turn this apparatus off completely, you must pull the power plug out of the wall socket. Consequently, the
power plug must be easily and readily accessible at all times.

· 3 · English
PRECAUTIONS
1. Ensure that the AC power supply in your house complies with the power requirements listed on the identification
sticker located on the back of your product. Install your product horizontally, on a suitable base (furniture), with
enough space around it for ventilation (7~10 cm). Make sure the ventilation slots are not covered. Do not place the
unit on amplifiers or other equipment which may become hot. This unit is designed for continuous use. To fully turn
off the unit, disconnect the AC plug from the wall outlet. Unplug the unit if you intend to leave it unused for a long
period of time.
2. During thunderstorms, disconnect the AC plug from the wall outlet. Voltage peaks due to lightning could damage
the unit.
3. Do not expose the unit to direct sunlight or other heat sources. This could lead to overheating and cause the unit
to malfunction.
4. Protect the product from moisture (i.e. vases), and excess heat (e.g. a fireplace) or equipment creating strong
magnetic or electric fields. Disconnect the power cable from the AC supply if the unit malfunctions. Your product is
not intended for industrial use. It is for personal use only. Condensation may occur if your product has been stored
in cold temperatures. If transporting the unit during the winter, wait approximately 2 hours until the unit has reached
room temperature before using.
5. The batteries used with this product contain chemicals that are harmful to the environment.
Do not dispose of batteries in the general household trash. Do not dispose of batteries in a fire. Do not short circuit,
disassemble, or overheat the batteries. There is a danger of explosion if the battery is incorrectly replaced.
Replace only with the same or equivalent type.
WARNING, DO NOT INGEST BATTERY, CHEMICAL BURN HAZARD,
The remote control supplied with this product contains a coin/button cell battery. If the coin/button cell battery is
swallowed, it can cause severe internal burns in just 2 hours and can lead to death. Keep new and used batteries
away from children. If the battery compartment does not close securely, stop using the product and keep it away from
children. If you think batteries might have been swallowed or placed inside any part of the body, seek immediate
medical attention.

· 4 · English
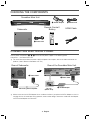
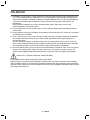
CHECKING THE COMPONENTS
Subwoofer
1 Power Cord
Soundbar Main Unit
2 AC/DC Adapter 3 Power Cord
Remote Control /
Battery
HDMI Cable
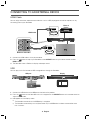
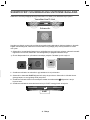
CONNECTING ELECTRICAL POWER
Use the power components (1, 2, 3) to connect the power supplies in the following order:
Subwoofer Soundbar Main Unit
c For more information about the power supply and power consumption, refer to the label attached to the
product. (Label : Bottom of Soundbar main unit)
DC 14V
AUX IN
OPTICAL IN
HDMI IN
HDMI OUT
(TV-ARC)
5V 0.5A
DC 14V
POWER
POWER
DC 14V
(Power Jack)
Connecting electrical power
1 Power Cord
2 AC/DC Adapter
3 Power Cord
Rear of Subwoofer
Rear of the Soundbar Main Unit
c Make sure to rest the AC/DC Adapter flat on a table or the floor. If you place the AC/DC Adapter so that it is
hanging with the AC cord input facing upwards, water or other foreign substances could enter the Adapter
and cause the Adapter to malfunction.

· 5 · English
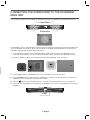
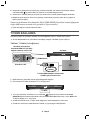
CONNECTING THE SUBWOOFER TO THE SOUNDBAR
MAIN UNIT
You can enjoy rich bass tones and better sound quality by linking the subwoofer to the Soundbar main unit.
Subwoofer
Soundbar Main Unit
Sou
So
Unit
Unit
The Soundbar main unit and subwoofer should link (connect wirelessly) automatically when the Soundbar main
unit and subwoofer are turned on. When auto-connection is complete, the blue indicator on the front of the
subwoofer stops blinking and glows blue continuously.
c If the indicator on the front of the subwoofer displays in red or flashes in blue, the subwoofer has not
automatically connected. If this occurs, follow the directions below to connect the subwoofer manually.
c Important: Before you begin, put the battery into the remote. See page 12 for instructions.
POWER
1. Plug the power cords of the Soundbar main unit and subwoofer into an AC wall outlet.
2. Press the ID SET button on the rear of the subwoofer for 5 seconds. The red indicator on the front of the
subwoofer turns off and the blue indicator flashes rapidly.
3. Press the
button on your remote control for 5 seconds while the Soundbar main unit is turned OFF.
4. The ID SET message appears on the display of the Soundbar main unit for a short period of time, and then
disappears.
ID SET

· 6 · English
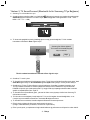
5. While the subwoofer's indicator is flashing blue, press the button on your remote control or on the top of
the Soundbar main unit to turn on the Soundbar main unit.
6. The connection is complete if the indicator on the front of the subwoofer stops flashing and glows
continuously.
c If the connection process fails, the blue indicator will flash continuously. Go to Step 2 and start again.
Expand to true wireless surround sound by connecting the Samsung Wireless Rear
Speaker Kit (SWA-8000S) to your Soundbar. (Sold separately)
c For further information, refer to the Web Manual.
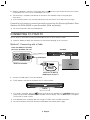
CONNECTING TO YOUR TV
You can enjoy TV sound after connecting the Soundbar to your TV with or without a cable.
c Important: Before you begin, put the battery into the remote. See page 12 for instructions.
Method 1. Connecting with a Cable
HDMI OUT
(TV-ARC)
Bottom of Soundbar
HDMI IN
(TV-ARC)
Soundbar
HDMI Cable
Check the HDMI OUT (TV-ARC)
port of the Soundbar main unit.
Check the (TV-ARC) at
HDMI IN port of your TV.
1. Connect the HDMI cable as in the picture above.
2. TV ARC appears on display of the product and TV sound is output.
TV ARC
c If TV sound is not output, press the button on the top of your Soundbar or the SOURCE button on the
remote control to select the D.IN mode on Soundbar main unit display. Then, the D.IN mode is changed to
TV ARC and TV sound is output.
c If the Soundbar main unit display does not change to TV ARC, check the cable connections.
c You can conveniently control the volume of the Soundbar and interlock power supply.

· 7 · English
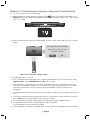
Method 2. TV SoundConnect (Linking to a Samsung TV with Bluetooth)
1. Turn on your Samsung TV and the Soundbar.
2. Select TV mode in your Soundbar display by pressing the
button on the top of the Soundbar or the
SOURCE button on your remote control. (Modes are displayed in the following order: D.IN → AUX → HDMI
→ BT → TV → USB.)
3. When the connection message shown below appears on the TV screen, select <Yes > with your TV remote
control.
Samsung Audio Device detected.
Do you want to hear TV sound
through this device?
Yes No
Select <Yes> with your TV remote control.
4. The Soundbar outputs TV sound.
c If the TV SoundConnect linking process fails, navigate to SoundConnect in the TV's Sound menu, select
Add New Device, and set Add New Device to ON. Then, try again.
c If your Soundbar is connected to your TV through TV SoundConnect, you can conveniently control the
volume with the Soundbar's remote or the TV's remote. You can also have the Soundbar turn on and off
automatically when you turn the TV on or off by setting the Bluetooth POWER On function to On.
See page 13.
c The TV SoundConnect (Soundshare) function is only available in some Samsung TV products released since
2012.
c If you want to disconnect the existing connection to your TV and establish a new connection to another TV,
press the & button on your remote control for more than 5 seconds.
c In the TV SoundConnect mode, the Soundbar cannot be paired to another Bluetooth device.
c Do not place electronic devices or metallic objects on top of the product.
e.g., Wired/wireless router, set-top box, or modem.
c Placing the product on the floor may degrade wireless network performance, depending on the floor material.

· 8 · English
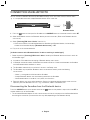
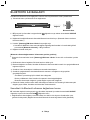
CONNECTION VIA BLUETOOTH
You can connect a Bluetooth device to the Soundbar and enjoy music with stereo sound, all without wires!
c It is not possible to connect multiple Bluetooth devices at the same time.
Connect
Bluetooth device
1. Press the
button on the top of the Soundbar or the SOURCE button on the remote control to select BT.
2. Select the Bluetooth menu on the Bluetooth device you want to connect. (Refer to the Bluetooth device's
user manual.)
3. Select "[Samsung] HW-Jxxxx J-Series" from the list.
• When the connection is established between the Soundbar and Bluetooth device, the front display
window of the Soundbar displays [Bluetooth device name] → BT.
4. Play music on the connected device.
[If failed to connect to the Bluetooth device / If device searching is needed again]
• Delete the previous "[Samsung] HW-Jxxxx J-Series" found by the Bluetooth device and have it search for
the Soundbar again.
c If asked for a PIN code when connecting a Bluetooth device, enter <0000>.
c In Bluetooth connection mode, the Bluetooth connection will be lost if the distance between the Soundbar
and the Bluetooth device exceeds 10 meters.
c The Soundbar automatically turns off after 5 minutes in the Ready state.
c The Soundbar may not perform Bluetooth search or connection correctly under the following
circumstances:
If there is a strong electrical field around the Soundbar.
If several Bluetooth devices are simultaneously paired with the Soundbar.
If the Bluetooth device is turned off, not in place, or malfunctions.
c Electronic devices may cause radio interference. Devices that generate electromagnetic waves must be
kept away from the Soundbar main unit - e.g., microwaves, wireless LAN devices, etc.
Disconnecting the Soundbar from the Bluetooth device
Press the SOURCE button on the remote control or the button on the product's
top
to switch from BT to
another mode or turn off the Soundbar.
• The connected Bluetooth device will wait a certain amount of time for a response from the Soundbar before
terminating the connection. (Disconnection time may differ, depending on the Bluetooth device)

· 9 · English
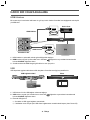
CONNECTING TO AN EXTERNAL DEVICE
HDMI Cable
You can enjoy sound from separate external devices such as a BD player/game console/set-top box, etc. by
connecting them to your Soundbar.
HDMI IN
HDMI OUT
(TV-ARC)
HDMI Cable
HDMI Cable
External
Device
Soundbar
HDMI OUT
HDMI IN
Bottom of Soundbar
1. Connect the HDMI cable as in the picture above.
2. Press the
button on top of your Soundbar or the SOURCE button on your remote control to select
HDMI mode.
3. The Soundbar shows HDMI on its display and output sound.
USB
You can play music files located on USB storage devices through the Soundbar.
DC 14V
AUX IN
OPTICAL IN
HDMI IN
HDMI OUT
(TV-ARC)
5V 0.5A
5V 0.5A
USB port Display
1. Connect the USB device to the USB port on the back of the product.
2. Press the
button on the Soundbar main unit’s top panel or the SOURCE button on the remote control to
select the USB mode.
3. USB appears on the display screen.
●
The Soundbar connection to the USB device is complete.
●
The Soundbar automatically turns off (Auto Power Off) if no USB device has been connected for more
than 5 minutes.

· 10 · English
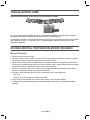
SOFTWARE UPDATE
Samsung may offer updates for the Soundbar's system firmware in the future.
DC 14V
AUX IN
OPTICAL IN
HDMI IN
HDMI OUT
(TV-ARC)
5V 0.5A
5V 0.5A
If an update is offered, you can update the firmware by connecting a USB device with the firmware update
stored on it to the USB port on your Soundbar.
For more information about how to download update files, go to the Samsung Electronics website at
(samsung.com/sec) search for the model name download the firmware from the customer support menu
option. The option name can vary.
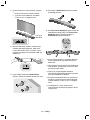
INSTALLING THE WALL MOUNT
I nstallation Precautions
• Install on a vertical wall only.
• Do not install the Soundbar system in a location with high temperature and/or humidity. Install the system on a
stable wall that can bear the weight of the Soundbar main unit.
• Check the strength of the wall. To install the Soundbar system on a wall that may not bear the Soundbar main
unit weight, reinforce the wall before installation. If this is not possible, install the system on another wall, one
stable enough to bear the weight of the Soundbar main unit.
• Purchase and use the fixing screws or anchors appropriate for the kind of wall you have (plaster board,
iron board, wood, etc.). If possible, fix the support screws into wall studs.
• Purchase wall mounting screws according to the type and thickness of the wall you will mount the Soundbar
on.
Diameter : M5
Length: 35 mm or longer recommended.
• Connect cables from the unit to external devices before you install it on the wall.
• Make sure the unit is turned off and unplugged before you install it. Otherwise, it may cause an electric shock.

· 11 · English
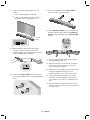
1. Place the installation guide against the wall
surface.
●
The installation guide must be level.
●
If the TV is mounted on the wall, install the
Soundbar at least 5 cm below the TV.
5 cm or
more
2. Mark the location where the screws will go
through on the wall, and then remove the
installation guide. Next, drill holes for the screws
using an appropriately sized drill bit.
Center Line
Center Line
3. Fasten the 2 Bracket-Wall pieces firmly to the
wall at the marked locations using the appropriate
screws.
4. Attach the Soundbar to the 2 Bracket-Wall
pieces as shown in the illustration.
5. Insert a Holder-Fix Mount into each hole on the
product’s bottom side. Tighten each Holder-Fix
Mount to fix the Soundbar to the 2 Bracket-Wall
pieces.
DC 14V
AUX IN
OPTICAL IN
HDMI IN
HDMI OUT
(TV-ARC)
5V 0.5A
c Do not hang onto the installed unit and avoid
striking or dropping the unit.
c Secure the unit firmly to the wall so that it does
not fall off. If the unit falls off, it may cause an
injury or damage the product.
c When the unit is installed on a wall, please make
sure that children do not pull any of the
connecting cables, as this may cause it to fall.
c For the optimal performance of a wall mount
installation, install the speaker system at least
5 cm below the TV, if the TV is mounted on the
wall.
c For your safety, if you do not mount the unit on
the wall, install it on a secure, flat surface where it
is unlikely to fall.

· 12 · English
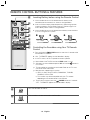
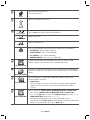
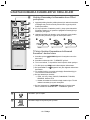
REMOTE CONTROL BUTTONS & FEATURES
Inserting Battery before using the Remote Control
1. Use a suitable coin to turn the remote control's battery cover
counterclockwise to remove it as shown in the figure below.
2. Insert a 3V lithium battery. Keep the positive (+) pole facing up when
inserting the battery. Put the battery cover on, and then align the '●'
marks side by side as shown in the figure below.
3. Use a suitable coin to turn the remote control battery cover clockwise
as far as it will go to fix it in place.
Controlling the Soundbar using Your TV Remote
Control
1. Press and hold the SOUND button for more than 5 seconds while
the Soundbar is turned on.
2. "ON - TV REMOTE" appears on the Soundbar's display.
3. In the TV's menu, set the TV speaker to external speaker.
c Not available if the TV ARC function or HDMI mode is in use.
c All buttons are not available except the VOL +/- and the
buttons in
this function.
c TV menus differ by manufacturer and model. Refer to the TV's user
manual for further information.
c Manufacturers supporting this function:
●
VIZIO, LG, Sony, Sharp, PHILIPS, PANASONIC, TOSHIBA,
GRUNDIG, Hisense, RCA
●
This function may not be compatible with your TV's remote
depending on the remote control's manufacturer.
c To turn off this function, press the
SOUND button for 5 seconds.
"OFF - TV REMOTE" appears on the Soundbar's display.
Power
Turns the Soundbar on and off.
SOURCE
Press to select a source connected to the Soundbar.

· 13 · English
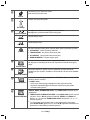
Mute
Sets the volume temporarily to 0.
Press again to cancel.
Volume
Adjusts the volume level of the unit.
Play / Pause
Press the
&
button to pause a music temporarily.
Press the
&
button again to play the selected music.
Skip Forward
Selects the next file.
Skip Back
Selects the previous file.
Repeat
Press to set the Repeat function during music playback from a USB device.
• OFF-REPEAT : Cancels Repeat Playback.
• TRACK-REPEAT : Plays a track repeatedly.
• ALL-REPEAT : Plays all tracks repeatedly.
• RANDOM-REPEAT : Plays tracks in random order.
Surround Sound
The Surround Sound function adds depth and a sense of space to sound.
When this button is pressed, ON or OFF is repeatedly alternated.
Bluetooth POWER
Press to turn the Bluetooth POWER On function on and off. When the Bluetooth
POWER On function is on, ON - BLUETOOTH POWER appears in the Soundbar’s
display.
SOUND EFFECT
You can select from 6 sound modes: STANDARD, MUSIC, CLEAR VOICE,
SPORTS, MOVIE, and NIGHT.
c NIGHT Mode
When changing a channel or music source, the volume difference between
different music input sources is automatically adjusted to be suitable for
listening.
SOUND CONTROL
You can select from TREBLE, BASS, SUBWOOFER LEVEL
or
AUDIO SYNC.
• Press to select TREBLE, BASS,
SUBWOOFER LEVEL or AUDIO SYNC.
Then, use the , buttons to adjust the
TREBLE
or
BASS
volume from -6 ~ +6,
SUBWOOFER LEVEL volume from -12, -6 ~ +6.
• If the video and audio between the TV and your Soundbar are not
synchronized, select AUDIO SYNC in Sound Settings, and then set audio delay
between 0~300 milliseconds by using the , buttons.

· 14 · English
TROUBLESHOOTING
Before seeking assistance, check the following.
The unit will not turn on.
Is the power cord plugged into the outlet?
Connect the power plug to the outlet.
A function does not work when the button is
pr
essed.
Is there static electricity in the air?
Disconnect the power plug and connect it again.
Sound is not produced.
Is the Mute function on?
Press the (Mute) button to cancel the function.
Is the volume set to minimum?
Adjust the V
olume.
The remote control does not work.
Is the battery drained?
Replace with new battery
.
Is the distance between the remote control and
Soundbar main unit too far?
Move the remote control closer to the Soundbar
main unit.
The TV SoundConnect (TV pairing) failed.
Does your TV support TV SoundConnect?
TV SoundConnect is supported by some
Samsung TVs r
eleased from 2012 on. Check
your TV to see if it supports TV SoundConnect.
Is your TV firmware the latest version?
Update your TV with the latest firmwar
e.
Does an error occur when connecting?
Contact the Samsung Call Centr
e.
Reset TV SoundConnect and connect again.
To reset the TV SoundConnect connection,
press and hold the
&
button for 5 seconds.
The red LED on the subwoofer blinks and the
subwoofer is not producing sound.
This issue can occur if the subwoofer is not
connected to the Soundbar main unit.
T
ry to connect your subwoofer again.
See page 5.
LICENCE
Manufactured under licence from Dolby
Laboratories. Dolby, Dolby Audio and the double-D
symbol are trademarks of Dolby Laboratories.
For DTS patents, see http://patents.dts.com.
Manufactured under licence from DTS Licencing
Limited. DTS, the Symbol, & DTS and the Symbol
together are registered trademarks, and DTS 2.0
Channel is a trademark of DTS, Inc. © DTS, Inc.
All Rights Reserved.
The terms HDMI and HDMI High-Definition
Multimedia Interface, and the HDMI Logo are
trademarks or registered trademarks of HDMI
Licencing LLC in the United States and other
countries.
T

· 15 · English
OPEN SOURCE LICENCE NOTICE
To send inquiries and requests regarding open sources, contact Samsung via Email (oss.r[email protected]).
IMPORTANT NOTE ABOUT SERVICE
• Figures and illustrations in this User Manual are provided for reference only and may differ from actual product
appearance.
• An administration fee may be charged if either
a. an engineer is called out at your request and there is no defect with the product (i.e. where the user manual
has not been read).
b. you bring the unit to a repair centre and there is no defect with the product (i.e. where the user manual has
not been read).
• You will be informed of the administration fee amount before a technician visits.
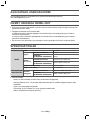
SPECIFICATIONS
GENERAL
USB
5V / 0.5A
Weight
Soundbar Main Unit
2.7 kg
Subwoofer
(PS-WJ6000R / PS-WJ6001R)
6.8 kg
Dimensions
(W x H x D)
Soundbar Main Unit
1078.0 x 47.5 x 129.0 mm
Subwoofer
(PS-WJ6000R / PS-WJ6001R)
452.0 x 335.0 x 154.0 mm
Operating Temperature Range
+5°C to +35°C
Operating Humidity Range
10 % to 75 %
AMPLIFIER
Rated Output
Power
Soundbar Main Unit
22W x 6, 4 ohm, THD≦10%
Subwoofer
(PS-WJ6000R / PS-WJ6001R)
168W, 3 ohm, THD≦10%
• Nominal specification
Design and specifications are subject to change without prior notice.
Samsung Electronics Co., Ltd reserves the right to change the specifications without notice.
Weight and dimensions are approximate.
For more information about the power supply and power consumption, refer to the label attached to the
product. (Label : Bottom of Soundbar main unit)

· 16 · English
Wireless Models (including the frequency of 5.15GHz-5.35GHz)
• Hereby, Samsung Electronics, declares that this equipment is in compliance with the
essential requirements and other relevant provisions of Directive 1999/5/EC.
The original Declaration of Conformity may be found at http://www.samsung.com,
go to Support > Search Product Support and enter the model name.
This equipment may be operated in all EU countries.
This equipment may only be used indoors.
Wireless Models (excluding the frequency of 5.15GHz-5.35GHz)
• Hereby, Samsung Electronics, declares that this equipment is in compliance with the essential
requirements and other relevant provisions of Directive 1999/5/EC.
The original Declaration of Conformity may be found at http://www.samsung.com,
go to Support > Search Product Support and enter the model name.
This equipment may be operated in all EU countries.
[Correct disposal of batteries in this product]
(Applicable in countries with separate collection systems)
This marking on the battery, manual or packaging indicates that the batteries in this product should not be disposed of with other
household waste at the end of their working life. Where marked, the chemical symbols Hg, Cd or Pb indicate that the battery
contains mercury, cadmium or lead above the reference levels in EC Directive 2006/66.
If batteries are not properly disposed of, these substances can cause harm to human health or the environment.
To protect natural resources and to promote material reuse, please separate batteries from other types of waste and recycle them
through your local, free battery return system.
Correct Disposal of This Product (Waste Electrical & Electronic Equipment)
(Applicable in countries with separate collection systems)
This marking on the product, accessories or literature indicates that the product and its electronic accessories (e.g. charger,
headset, USB cable) should not be disposed of with other household waste at the end of their working life. To prevent possible harm
to the environment or human health from uncontrolled waste disposal, please separate these items from other types of waste and
recycle them responsibly to promote the sustainable reuse of material resources.
Household users should contact either the retailer where they purchased this product, or their local government office, for details of where
and how they can take these items for environmentally safe recycling.
Business users should contact their supplier and check the terms and conditions of the purchase contract. This product and its electronic
accessories should not be mixed with other commercial wastes for disposal.

· 2 · Türkçe
GÜVENLIK BILGILERI
GÜVENLIK UYARILARI
ELEKTRİK ÇARPMA RİSKİNİ AZLATMAK İÇİN KAPAĞI (YA DA ARKA KISMI) SÖKMEYİN.
ÜRÜN İÇİNDE KULLANICI TARAFINDAN TAMİR EDİLEBİLECEK BİR PARÇA BULUNMAMAKTADIR.
SERVİS İŞLEMLERİNİ, YETKİN SERVİS PERSONELİNE BIRAKIN.
DİKKAT
ELEKTRİK ÇARPMA RİSKİ
AÇMAYIN
Bu sembol, cihazın içinde yüksek voltaj
bulunduğunu belirtir. Bu ürünün içindeki
herhangi bir parça ile temas edilmesi tehlike
teşkil eder.
Bu sembol, kullanım ve bakımla ilgili önemli
talimatların cihazla birlikte verildiğini belirtir.
Sınıf II ürün: Bu sembol, elektrik topraklamasına (toprak) bir güvenlik bağlantısı gerekmediğini
gösterir.
AC voltajı: Bu sembol, sembolle işaretlenen nominal voltajın AC voltajı olduğunu gösterir.
DC voltajı: Bu sembol, sembolle işaretlenen nominal voltajın DC voltajı olduğunu gösterir.
Dikkat, Kullanım talimatlarına bakın: Bu sembol, kullanıcıya güvenlikle ilgili daha fazla bilgi
için kullanıcı kılavuzuna başvurmasını söyler.
UYARI : Yangın ya da elektrik çarpması riskini azaltmak için cihazın, su veya neme maruz kalmasına izin
vermeyin.
DİKKAT : ELEKTRİK ÇARPMASINI ENGELLEMEK İÇİN FİŞİN GENİŞ UCUNU YUVAYLA EŞLEŞTİRİN VE
YERİNE TAM OTURTUN.
●
Bu cihaz, koruyucu topraklama bağlantısına sahip bir AC prizine takılmalıdır.
●
Cihazın şebeke bağlantısını kesmek için, fi şi şebeke soketinden çekilmelidir; dolayısıyla şebeke fi şi uygun
bir yerde olmalıdır.
DİKKAT
●
Bu cihaza sıvı damlatılmamalı veya dökülmemelidir. Vazo gibi sıvı dolu nesneler cihazın üstüne
konulmamalıdır.
●
Bu cihazı tamamen kapatmak için güç fi şini duvardaki prizden çıkarmanız gerekir. Dolayısıyla, güç fi şi her
zaman hızla ve kolayca erişilebilir bir noktada olmalıdır.

· 3 · Türkçe
ÖNLEMLER
1. Evinizdeki AC güç kaynağının, ürünün arkasında yer alan tanımlama etiketiyle uyumlu olduğundan emin
olun. Ürünü, havalandırma için yeterli boşluk 7-10 cm olacak şekilde, uygun bir kaide (mobilya) üzerine
yatay biçimde yerleştirin. Havalandırma deliklerinin kapatılmadığından emin olun. Ürünü amplifi katörlerin
veya ısınma yapabilecek diğer ekipmanların üzerine koymayın. Bu ünite çalar sürekli kullanım için
tasarlanmıştır.
Üniteyi tamamen kapatmak için AC fi şini duvardaki prizden çıkarın. Eğer üniteyi uzun bir süre
kullanmayacaksanız fi şini prizden çıkarın.
2. Fırtınalı havalarda AC ana fi şi, prizden çıkarın. Yıldırım nedeniyle oluşan gerilim tepe değerleri üniteye
zarar verebilir.
3. Üniteyi doğrudan güneş ışığı ya da diğer ısı kaynaklarına maruz bırakmayın. Bu, cihazın aşırı ısınmasına
ve arızalanmasına yol açabilir
.
4.
Ürünü, neme (örneğin, vazo) ve aşırı ısınmaya (örneğin, şömine) ya da güçlü manyetik ya da elektriksel
alan oluşturan ekipmanlara karşı koruyun. Ünitenin hatalı çalışması durumunda güç kablosunu AC
kaynağından çıkarın.
Bu ürün, endüstriyel kullanım için tasarlanmamıştır. Bu ürün sadece kişisel kullanım içindir. Ürün veya
diskini, soğuk sıcaklıklarda depolanmışsa yoğuşma meydana gelebilir
. Kış şartlar
ında ünitenin taşınması
durumunda kullanmadan önce ünite oda sıcaklığına gelene kadar yaklaşık 2 saat bekleyin.
5. Bu ürünle kullanılan piller, çevreye zarar veren kimyasal maddeler içermektedir. Pilleri, normal ev çöpüne
atmayın. Pilleri ateşe atmayın. Pillere kısa devre yaptırmayın, içini açmayın veya aşırı ısıtmayın. Pil
düzgün şekilde değiştirilmediği takdirde patlama riski. Yalnızca aynı tiple veya eşdeğer tiple değiştirin.
DİKKAT, PİLİ YUTMAYIN, KİMYASAL YANIK TEHLİKESİ,
Bu ürün [birlikte verilen uzaktan kumanda] bir düğme pil içermektedir.
Düğme pil yutulursa yalnızca 2 saat içinde şiddetli iç yanıklara neden olup ölüme yol açabilir. Yeni ve kullanılmış
pilleri çocuklardan uzak tutun. Pil bölmesi güvenli bir biçimde kapanmıyorsa ürünü kullanmayı bırakıp çocuklardan
uzak tutun. Pillerin yutulmuş veya vücudun herhangi bir bölümünün içine yerleştirilmiş olabileceğini düşünüyorsanız
derhal tıbbi yardıma başvurun.

· 4 · Türkçe
BİLEŞENLERİ DENETLEME
Subwoofer
Uzaktan
Kumanda/Pil
HDMI Kablosu
1 Güç Kablosu
Soundbar Ana Ünitesi
2 AC/DC Adaptörü 3 Güç Kablosu
ELEKTRİK BAĞLANTISINI YAPMA
Güç kaynaklarını aşağıdaki sırada bağlamak için güç bileşenlerini kullanın (1, 2, 3): Subwoofer
Soundbar Ana Ünitesi
c Güç kaynağı ve Güç
Tüketimi için, ürüne yapıştırılan etikete bakın.
(Etı
̇
ket : Soundbar Ana Ünitesinin Alt Kısmı)
DC 14V
AUX IN
OPTICAL IN
HDMI IN
HDMI OUT
(TV-ARC)
5V 0.5A
DC 14V
POWER
POWER
DC 14V
(Güç Jakı)
Elektrik bağlantısını yapma
1 Güç Kablosu
2 AC/DC Adaptörü
3 Güç Kablosu
Arka Subwoofer
Soundbar Ana Ünitesinin Arkası
c AC/DC Adaptörünü bir masa üstünde veya zeminde düz tuttuğunuzdan emin olun. AC/DC Adaptörünü AC
kablosu giriş yüzü yukarı bakacak şekilde yerleştirirseniz, su veya diğer yabancı maddeler Adaptöre
girebilir ve Adaptörün arızalanmasına neden olabilir.

· 5 · Türkçe
SUBWOOFER'I SOUNDBAR ANA ÜNİTESİNE BAĞLAMA
Subwoofer'ı ana üniteye bağlayarak zengin bas tonlarının ve daha iyi ses kalitesinin keyfi ni çıkarın.
Subwoofer
Soundbar Ana Ünitesi
So
un
Sou
r
nite
si
itesi
Soundbar ana ünitesi ve subwoofer açıldığında otomatik olarak bağlanmalıdır (kablosuz bağlayın). Otomatik
bağlantı tamamlandığında, subwoofer'ın ön tarafındaki mavi gösterge yanıp sönmeyi durdurur ve sürekli
mavi yanar.
c Subwoofer'ın ön tarafındaki gösterge kırmızı görüntülenirse veya mavi yanıp sönerse, subwoofer otomatik
bağlanmaz. Bu durumda, subwoofer'ı manüel bağlamak için aşağıdaki talimatları izleyin.
c Önemli: Başlamadan önce, pili uzaktan kumandaya yerleştirin. Talimatlar için bkz. sayfa 12.
POWER
1. Soundbar ana ünitesini ve subwoofer'ın güç kablolarını bir AC prizine takın.
2. Subwoofer'ın arkasındaki ID SET düğmesine 5 saniye boyunca basın. Subwoofer'ın önündeki kırmızı
gösterge kapanır ve mavi gösterge hızla yanıp söner.
3. Soundbar ana ünitesi KAPALI konumundayken uzaktan kumandanızdaki
düğmesine 5 saniye
boyunca basın.
4. Soundbar ana ünitesinin ekranında kısa bir süre için ID SET mesajı görünür ve kaybolur.
ID SET
Sayfa yükleniyor...
Sayfa yükleniyor...
Sayfa yükleniyor...
Sayfa yükleniyor...
Sayfa yükleniyor...
Sayfa yükleniyor...
Sayfa yükleniyor...
Sayfa yükleniyor...
Sayfa yükleniyor...
Sayfa yükleniyor...
Sayfa yükleniyor...
Sayfa yükleniyor...
-
 1
1
-
 2
2
-
 3
3
-
 4
4
-
 5
5
-
 6
6
-
 7
7
-
 8
8
-
 9
9
-
 10
10
-
 11
11
-
 12
12
-
 13
13
-
 14
14
-
 15
15
-
 16
16
-
 17
17
-
 18
18
-
 19
19
-
 20
20
-
 21
21
-
 22
22
-
 23
23
-
 24
24
-
 25
25
-
 26
26
-
 27
27
-
 28
28
-
 29
29
-
 30
30
-
 31
31
-
 32
32


Samsung HW-J6001R Hızlı başlangıç Kılavuzu
- Tip
- Hızlı başlangıç Kılavuzu
diğer dillerde
- English: Samsung HW-J6001R Quick start guide
İlgili makaleler
-
Samsung HW-K551 Hızlı başlangıç Kılavuzu
-
-
Samsung HW-J7501 Kullanım kılavuzu
-
Samsung HW-J7501R Kullanım kılavuzu
-
Samsung HW-H7501 Kullanım kılavuzu
-
Samsung HW-J450 Kullanım kılavuzu
-
Samsung HW-K430 Kullanım kılavuzu
-
Samsung HW-J6001R Kullanım kılavuzu
-
Samsung HW-K360 Kullanım kılavuzu
-
Samsung DA-F560 Kullanım kılavuzu