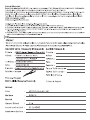
Siemens TT86105 Kullanım kılavuzu
- Kategori
- Tost makineleri
- Tip
- Kullanım kılavuzu

siemens-home.bsh-group.com/welcome
Register
your
product
online
TT 86...
de Gebrauchs anleitung
en Instruction manual
fr Mode d’emploi
it Istruzioni per l‘uso
nl Gebruiksaanwijzing
da Brugsanvisning
no Bruksanvisning
sv Bruksanvisning
Käyttöohje
es Instrucciones de uso
pt Instruções de serviço
el
tr
pl
hu Használati utasítás
bg
ru
ar

de Deutsch 2
en English 6
fr Français 10
it Italiano 15
nl Nederlands 20
da Dansk 25
no Norsk 29
sv Svenska 33
Suomi 37
es Español 41
pt Português 46
el
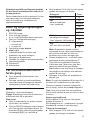
tr Türkçe 56
pl Polski 63
hu Magyar 68
bg
ru
ar 87

–+
defrost stop
–+
defrost stop
–+
e
g
k
b
c
h
9
8
10
|1I3| = 2
7
6
6
d
f
ij
11
defrost stop
–+
1 4
5
32
–+
|3I5| = 4
a

2
de
Sicherheitshinweise
Die Gebrauchsanleitung bitte sorgfältig durchlesen, danach
handeln und aufbewahren! Bei Weitergabe des Geräts diese
Anleitung beilegen. Dieses Gerät ist nur für den privaten
Haushalt und das häusliche Umfeld bestimmt.
WStromschlaggefahr!
Das Gerät nur in Innenräumen bei Raumtemperatur und bis zu
2000 m über Meereshöhe verwenden. Das Gerät darf nur über eine
vorschriftsmäßig installierte Steckdose mit Erdung an ein Stromnetz
mit Wechselstrom angeschlossen werden. Stellen Sie sicher,
dass das Schutzleitersystem der elektrischen Hausinstallation
vorschriftsmäßig installiert ist. Gerät nur gemäß Angaben auf
dem Typenschild anschließen und betreiben. Nur benutzen, wenn
Zuleitung und Gerät keine Be schädigungen aufweisen. Stecker
nach jedem Gebrauch oder im Fehlerfall ziehen. Reparaturen am
Gerät, wie z. B. eine be schädigte Zuleitung auswechseln, dürfen nur
durch unseren Kundendienst ausgeführt werden, um Gefährdungen
zu vermeiden.
Kinder unter 8 Jahren sind vom Gerät und der Anschlussleitung
fernzuhalten und dürfen das Gerät nicht bedienen. Dieses Gerät
kann von Kindern ab 8 Jahren und darüber und von Personen mit
reduzierten physischen, sensorischen oder mentalen Fähigkeiten
oder Mangel an Erfahrung und/oder Wissen benutzt werden,
wenn sie beaufsichtigt oder bezüglich des Gebrauchs des Gerätes
unterwiesen wurden und die daraus resultierenden Gefahren
verstanden haben. Kinder dürfen nicht mit dem Gerät spielen.
Reinigung und Benutzer-Wartung dürfen nicht durch Kinder
vorgenommen werden, es sei denn, sie sind 8 Jahre oder älter und
werden beaufsichtigt.

3
de
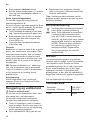
Verbrennungs- und Brandgefahr!
beschädigt werden.
Fehlanwendung des Gerätes kann zu Verletzungen führen. Gerät
niemals an Zeitschaltuhren oder fernbedienbare Steckdosen
anschließen und betreiben. Nicht mit Gegenständen im Röstschacht
hantieren. Brot kann brennen. Toaster nie in der Nähe oder
unterhalb von Gardinen oder anderen brennbaren Materialien
betreiben. Röstschacht niemals abdecken. Der Toaster kann
während des Toastens heiß werden, nur an den Bedienelementen
anfassen. Start-Schieber ausschließlich zum Toasten nach unten
drücken, niemals blockieren. Keine Nahrungsmittel benutzen,
die während des Toastens oder Aufbackens tropfen können,
Brandgefahr.
Vor dem Reinigen den Netzstecker ziehen und den Toaster
abkühlen lassen. Das Gerät oder Netzkabel niemals in Wasser
tauchen oder in den Geschirrspüler geben. Keinen Dampfreiniger
benutzen. Nicht mit Backofen-/Grillspray reinigen. Krümel
unter dem Brötchenaufsatz mit einem harten Pinsel entfernen.
Krümelschublade herausziehen und abwischen.
Toaster nur stehend betreiben. Den Toaster während des
Betriebs stets beaufsichtigen!
KNicht in der Nähe von Wasser benutzen, das in
Badewannen, Waschbecken oder anderen Gefäßen
enthalten ist.
WErstickungsgefahr!
Kinder nicht mit Verpackungsmaterial spielen lassen.

4
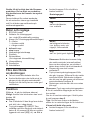
de
Herzlichen Glückwunsch zum Kauf
dieses Gerätes aus unserem Hause
Siemens. Sie haben ein hochwertiges
Produkt erworben, das Ihnen viel Freude
bereiten wird.
Diesen Toaster bitte ausschließlich zum
Toasten oder Aufwärmen von z. B. Toastbrot,
sowie zum Aufbacken von Brötchen auf dem
Brötchenaufsatz verwenden.
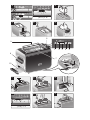
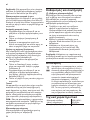
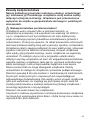
Teile und Bedienelemente
1 Taste O Ein/Aus
2 Röstgrad-Anzeige
z.B. Stufe |3| mittlere Bräunung
3 Taste (für 9 Röstgrad-Einstellungen)
T = Aufwärmen
– = kürzere Toastzeit
+ = längere Toastzeit
4 Auftautaste defrost
5 stop-Taste
6 Start-Schieber
7 Röstschacht
8 Schalter
(für integrierten Brötchenaufsatz)
9 Brötchenaufsatz
10 Krümelschublade
11 Kabelaufwicklung
Vor dem ersten Gebrauch
Vorhandene Aufkleber und Folien
entfernen.
Toaster ohne Brot bei geöffnetem
Fenster mit der höchsten Röstgrad-
Einstellung mindestens 3 mal aufheizen,
danach abkühlen lassen.
Bedienung
(Bilder a – k auf den Ausklappseiten)
Wichtig: Gerät nicht ohne
Krümelschublade 10 betreiben!
Toasten
Zuleitung auf die gewünschte Länge
abwickeln und anschließen.
Taste O Ein/Aus drücken, in der
Röstgrad-Anzeige 2 leuchtet der
eingestellte Röstgrad auf, z.B. Stufe |3|
oder |35| (=4). X Bild a
Gewünschten Röstgrad mit Hilfe der
Taste 3 einstellen.
Röstgrad Stufe
Aufwärmen T
Niedrig
X trockene Brotsorten,
z. B. Toastbrot
|1|
|13| (=2)
|3|
|35| (=4)
|5|
Mittel
X feuchtere Brotsorten,
z. B. Graubrot, Vollkornbrot
|57| (=6)
|7|
Hoch
X z. B. dickes Schwarzbrot
|79| (=8)
|9|
Info: Der eingestellte Röstgrad bleibt
gespeichert (Memory-Funktion),
wenn das Gerät ausgeschaltet oder
ausgesteckt wird sowie bei Stromausfall.
Toastgut in Röstschacht 7 einlegen.
Den Start-Schieber 6 bis zum Anschlag
nach unten drücken. Die Zahlen für
den eingestellten Röstgrad blinken
nun. Der Zeitablauf ist durch das
jeweilige Aufleuchten der Zahlen in der
Röstgradanzeige 2 erkennbar.
Der Toastvorgang ist beendet, wenn das
Toastgut nach oben gehoben wird.
Info: Zum leichteren Entnehmen des
Toastguts den Start-Schieber 6 nach oben
schieben.
Soll der Toastvorgang vorzeitig beendet
werden, die stop-Taste 5 drücken.
Tipp: Bei einer Scheibe den Röstgrad
kleiner stellen als bei zwei Scheiben.
Aufwärmen von kaltem Brot oder Toast
Röstgrad T (Aufwärmen) mit Hilfe der
Taste 3 einstellen.
Toastgut einlegen und Start-Schieber
6 bis zum Anschlag nach unten drücken.

5
de
Gefrorenes Brot oder Toast zubereiten
Gewünschten Röstgrad mit Hilfe der
Taste 3 einstellen.
Auftautaste 4 defrost drücken.
Gefrorenes Toastgut einlegen und
Start-Schieber 6 bis zum Anschlag nach
unten drücken.
Aufbacken
Keine Alufolie auf den Brötchenaufsatz 9
legen! Nur mit herausgefahrenem Brötchen-
aufsatz 9 aufbacken. Nicht gleichzeitig
toasten und aufbacken!
Schalter 8 bis zum Anschlag nach unten
schieben. Der Brötchenaufsatz 9 fährt
aus.
Gewünschten Röstgrad mit Hilfe der
Taste 2 auf maximal Stufe |13| (=2)
einstellen.
Start-Schieber 6 bis zum Anschlag nach
unten drücken.
Allgemein
Toastgut goldgelb anstatt dunkel oder
braun toasten, verbrannte Reste entfernen.
Stärkehaltige Lebensmittel, insbesondere
Getreide und Kartoffelprodukte, nicht zu
intensiv toasten (acrylamidarme Zubereitung).
Hinweis: Bei verklemmter Scheibe schaltet
der Toaster automatisch ab. Den Netz-
stecker ziehen und nach dem Abkühlen das
Brot vorsichtig entfernen.
Energiesparen
Den Toaster nach der Benutzung mit der
Taste O ausschalten um Strom zu sparen.
Reinigung und Pflege
W Stromschlaggefahr!
Das Gerät niemals in Wasser tauchen oder
in den Geschirrspüler geben!
Keinen Dampfreiniger benutzen.
Nicht mit Backofen-/Grillspray reinigen.
Netzstecker ziehen und Toaster
abkühlen lassen. Krümel unter dem
Brötchen-Aufsatz mit einem harten
Pinsel entfernen.
Krümelschublade 10 herausziehen und
abwischen.
Gehäuse nur feucht abwischen,
keine scharfen oder scheuernden
Reinigungsmittel verwenden.
Tipp: Die Edelstahloberfläche mit einem
handelsüblichen Edelstahlpflegemittel
reinigen.
Technische Daten
Elektrischer Anschluss
(Spannung – Frequenz)
220-240 V~
50-60 Hz
Leistung 860 W
Entsorgung
J Entsorgen Sie die Verpackung
um weltgerecht. Dieses Gerät ist
ent sprechend der europäischen
Richtlinie 2012/19/EU über Elektro-
und Elektronikaltgeräte (waste
electrical and electronic equip-
ment – WEEE) gekennzeichnet.
Die Richtlinie gibt den Rahmen für
eine EU-weit gültige Rücknahme
und Verwertung der Altgeräte vor.
Über aktuelle Entsorgungswege
bitte beim Fachhändler informieren.
Garantiebedingungen
Für dieses Gerät gelten die von unserer
jeweils zuständigen Landes vertretung
herausgegebenen Garantie bedingungen
des Landes, in dem das Gerät gekauft
wurde. Sie können die Garantiebedin-
gungen jederzeit über Ihren Fachhändler,
bei dem Sie das Gerät gekauft haben,
oder direkt bei unserer Landesvertretung
anfordern. Die Garantie bedingungen für
Sie auf den letzten vier Seiten dieses
Heftes. Darüber hinaus sind die Garantie-
bedingungen auch im Internet unter der
benannten Webadresse hinterlegt.
Für die Inanspruchnahme von Garantie-
leistungen ist in jedem Fall die Vorlage des
Kauf beleges erforderlich.
Änderungen vorbehalten.

6
en
Safety instructions
Please read and follow the operating instructions carefully and
keep them for later reference. Enclose these instructions when
you give this appliance to someone else.
This appliance is intended for domestic use only.
WDanger of electric shock!
Only use the appliance indoors at room temperature and up to
2000 m above sea level. The appliance may only be connected to a
power supply with alternating current via a correctly installed socket
with earthing. Ensure that the protective conductor system of the
domestic supply has been correctly installed.
Connect and operate the appliance only according to the type plate
signs of damage. Unplug after every use or if defective.
To avoid potential hazards, repairs such as replacing a damaged
cable must only be carried out by our customer service personnel.
Keep children under 8 years of age away from the appliance and
connecting cable and do not allow them to use the appliance.
This appliance may be used by children aged 8 years and older
and by persons with reduced physical, sensory or mental
capabilities or who lack experience and / or knowledge if they are
supervised or have been given instruction in the safe use of the
appliance and have understood the dangers involved. Children may
not play with the appliance.
Cleaning and user maintenance shall not be made by children
unless they are older than 8 years and supervised.

7
en
W
Do not place the appliance on or near hot surfaces, e.g. hobs. Avoid
spatters of grease as the plastic may be damaged.
A misuse of the appliance can potentially lead to injury.
The appliance is not intended to be operated by means of an
external timer or separate remote-control system.
Do not insert any objects into the toast slot.
Bread can burn. Never operate the toaster near or underneath
Do not touch parts other than the operating controls as the toaster
can become hot during toasting.
Press down the push-down lever only for toasting; never block it.
Do not use food that may drip as it is toasted or warmed, since this
Unplug the toaster and allow it to cool down before cleaning it.
Never immerse the appliance in water or place it in the dishwasher!
Do not steam-clean the appliance.
Do not use oven or grill spray for cleaning.
under the warming rack.
Remove the crumb tray and wipe it clean.
Only operate the toaster when it is upright. Never leave the
toaster unattended while it is in use!
KDo not use near water contained in bath tubs, sinks or
other containers.
W
Do not allow children to play with packaging material.

8
en
Congratulations on purchasing this
Siemens appliance. You have acquired a
high-quality product that will bring you
a lot of enjoyment.
Please use this toaster solely for toasting or
heating sliced bread or for reheating bread
rolls on the warming rack.
Parts and operating controls
1 O ON/OFF button
2 Toasting level indicator
e.g., level |3| Average browning
3 Button (for 9 toasting settings)
T = Warming
– = Shorter toasting time
+ = Longer toasting time
4 defrost button
5 stop button
6 Push-down/start lever
7 Toast slot
8 Switch (for integrated warming rack)
9 Warming rack
10 Crumb tray
11 Cable tidy
Before using
for the first time
Remove any stickers or film.
With the window open, operate the
toaster without bread in it at least three
times at the highest toasting level
setting and let it cool down.
Operation
(Figures a – k on the fold-out pages)
Important: Do not operate the toaster
without the crumb tray 10!
Toasting
Unwind the power cable to the required
length and plug it in.
Press the O ON/OFF button; the set
toasting level lights up on the toasting
level indicator 2, for example |3| or
an intermediate level like |35| (=4).
X Figure a.
Use button 3 to set the desired toasting
level.
Degree of toasting Level
Warming T
Low
X dry sorts of bread,
e.g. sliced white bread
|1|
|13| (=2)
|3|
|35| (=4)
|5|
Medium
X more moist sorts of
bread, e.g. mixed-grain
bread, wholemeal
|57| (=6)
|7|
High
X e.g. thick-sliced
black bread
|79| (=8)
|9|
Note: The toaster will remember the
selected toasting level (memory func-
tion), even if it is turned off, unplugged,
or in case of a power failure.
Place the food to be toasted in the toast
slot 7.
Press the push-down lever 6 down
until it engages. The numbers for the
selected toasting level flash. The toaster
indicates the elapsed time by illuminat-
ing the numbers in the toasting level
indicator 2.
Toasting ends when the food being
toasted is raised up.
Note: Push the push-down lever 6 up to
remove toasted items more easily.
To end the toasting process prematurely,
press the stop button 5.
Tip: If you toast only one slice, set the
toasting level lower than for two slices.
Warming cold bread or toast
Use button 3 to set the desired toasting
level T (warming).

9
en
Insert the food being toasted and press the
push-down lever 6 down until it engages.
Preparing frozen bread or toast
Use button 3 to set the desired toasting
level.
Press button 4 defrost.
Insert the frozen food to be toasted and
press the push-down lever 6 down until
it engages.
Using the warming rack
Never place aluminium foil on the warming
rack 9!
Only use the warming function when the
warming rack 9 is extended.
Never warm and toast at the same time!
Press switch 8 down until it engages.
The warming rack 9 extends.
Use button 2 to set the desired toasting
level, but no higher than level |13| (=2).
Press the push-down lever 6 down until
it engages.
General
Toast items only until they are golden brown
and not dark or brown. Remove any burnt
edges. Do not over-toast foods containing
starch, especially grain and potato products
(to reduce the production of acryl amides).
N.B.: If a slice gets stuck, the toaster turns
itself off automatically. Pull the power plug
and carefully remove the bread after the
toaster has cooled down.
Saving energy
Turn the toaster off after use by pressing
the O button in order to conserve energy.
Cleaning and maintenance
W Risk of electric shock!
Never immerse the device in water or place
it in the dishwasher!
Don’t steam-clean the appliance.
Do not use oven or grill spray for cleaning.
Pull the power plug and let the toaster
cool down. Use a firm brush to remove
crumbs that may have accumulated
under the warming rack.
Remove the crumb tray 10 and wipe it
clean.
Clean the toaster’s exterior with a damp
cloth; do not use strong or abrasive
cleaning agents.
Tip: Clean the stainless steel surface with
a commercial stainless steel care product.
Technical specifications
Electrical connection
(voltage – frequency)
220-240 V~
50-60 Hz
Output 860 W
Disposal
J Dispose of packaging in an environ-
mentally-friendly manner. This
appliance is labelled in accordance
with European Directive 2012/19/EU
concerning used electrical and
electronic appliances (waste electrical
and electronic equipment – WEEE).
The guideline determines the frame-
work for the return and recycling
of used appliances as applicable
throughout the EU. Please ask your
specialist retailer about current
disposal facilities.
Guarantee
The guarantee conditions for this appliance
country in which it is sold. Details regarding
these conditions can be obtained from
the dealer from whom the appliance was
purchased. The bill of sale or receipt must
be produced when making any claim under
the terms of this guarantee.
Changes reserved.

10
fr
Consignes de sécurité
Lire attentivement ce mode d’emploi, s’y conformer lors de
l’utilisation et le conserver ! Veuillez joindre ce mode d’emploi
si vous passez l’appareil à quelqu’un d’autre. Cet appareil est
destiné exclusivement à une utilisation domestique et non
professionnelle.
WRisque de chocs électriques !
N’utilisez l’appareil que dans des pièces intérieures à température
ambiante et jusqu’à 2 000 m au-dessus du niveau de la mer.
L’appareil doit être branché uniquement sur un réseau à courant
alternatif par l‘intermédiaire d‘une prise secteur installée de
manière conforme et disposant d‘une connexion à la terre. Assurez-
vous que le système à conducteur de protection de l’installation
électrique de votre maison soit conforme. Ne brancher et n’utiliser
l’appareil que conformément aux données indiquées sur la plaque
signalétique. Ne l’utiliser que lorsque le cordon et l’appareil ne
ou en cas de dysfonctionnement. Les réparations sur l’appareil
telles que le remplacement d’un cordon endommagé ne doivent être
Les enfants de moins de 8 ans doivent être tenus éloignés de
l’appareil et du cordon d’alimentation et ne doivent pas utiliser
l’appareil. Cet appareil peut être utilisé par des enfants à partir
de 8 ans et par des personnes ayant des facultés physiques,
sensorielles ou mentales réduites ou manquant d’expérience
et/ou de connaissances à condition d’être surveillés ou d’avoir été
informés quant à la bonne utilisation de l’appareil et d’avoir compris
les dangers qui en découlent.
Ne pas laisser les enfants jouer avec l’appareil.
Le nettoyage et l’entretien incombant à l’utilisateur ne doivent pas
surveillés.

11
fr
WRisque de brûlure et d’incendie !
Ne jamais poser l‘appareil sur des surfaces chaudes (tables
de cuisson par ex.) ou à proximité de celles-ci. Empêcher les
projections de graisse, le plastique risque d‘être endommagé.
L’utilisation inappropriée de la machine peut entraîner des
blessures. Ne jamais brancher l’appareil à des minuteries ou des
prises à télécommande ou le faire fonctionner à partir de celles-ci.
Ne pas introduire d’objet dans la fente du grille-pain. Le pain
peut prendre feu. Ne jamais placer le grille-pain à proximité ou
couvrir la fente du grille-pain.
En fonctionnement, le grille-pain peut devenir brûlant. Toucher
uniquement les éléments de commande.
N’abaisser le levier de commande que pour griller, ne jamais le
bloquer. Ne pas utiliser d’aliments qui peuvent goutter lorsqu’on les
le grille-pain.
Ne jamais plonger l’appareil dans l’eau, ne pas le passer en
lavevaisselle ! Ne pas utiliser de nettoyeur à vapeur.
Ne pas nettoyer avec des nettoyants pour four ou grill.
Utiliser un pinceau dur pour retirer les miettes sous le
ramasse-miettes.
Retirer le ramasse-miettes et l’essuyer.
Utiliser le grille-pain en position verticale. Toujours surveiller le
grille-pain lorsqu’il fonctionne !
KNe pas utiliser à proximité des baignoires, des lavabos
ou autres récipients contenant de l’eau.
W
Ne pas laisser les enfants jouer avec les emballages.

12
fr
Commande
(Figures a – k sur les pages dépliantes)
Important : Ne jamais faire fonctionner
l’appareil sans le ramasse-miettes 10 !
Griller
Déroulez la longueur de cordon élec-
trique nécessaire et branchez l’appareil.
Appuyez sur le bouton O Marche/Arrêt,
l’indicateur de niveau de brunissage
2 affiche le niveau réglé, par ex. |3|
ou le niveau intermédiaire |35| (=4).
X Figure a.
Réglez le niveau de brunissage
souhaité à l’aide du bouton 3.
Degré de brunissage Niveau
Réchauffer T
Bas
X Types de pain secs,
p. ex. pain de mie
|1|
|13| (=2)
|3|
|35| (=4)
|5|
Moyen
X Types de pain humides,
p. ex. pain bis, pain complet
|57| (=6)
|7|
Haut
X P. ex. pain bis épais
|79| (=8)
|9|
Informations : Le niveau de brunissage
réglé est mémorisé (fonction Memory)
lorsque vous arrêtez ou débranchez
l’appareil ainsi qu’en cas de panne de
courant.
Placez l’aliment que vous désirez griller
dans la fente 7.
Abaissez le levier de commande 6 à
fond. Les chiffres correspondant au
niveau de brunissage réglé clignotent.
L’écoulement du temps est visible grâce
à l’allumage des chiffres sur l’afficheur
du niveau de brunissage 2.
Félicitation pour avoir choisi cet appareil
Siemens. Vous avez fait l’acquisition
d’un produit de haute qualité, qui vous
apportera satisfaction.
Utiliser le grille-pain uniquement pour faire
griller ou pour réchauffer p. ex. du pain de
mie ainsi que pour réchauffer des petits
pains sur le porte-pains.
Eléments et commandes
1 Bouton O Marche/Arrêt
2 Indication du niveau de brunissage
par ex. niveau |3| moyennement grillé
3 Touche (pour le réglage de 9 degrés de
brunissage)
T = Réchauffer
– = Moins grillé
+ = Plus grillé
4 Bouton de décongélation defrost
5 Bouton stop
6 Levier de commande
7 Fente
8 Commande
(pour porte-pains intégré)
9 Porte-pains intégré
10 Ramasse-miettes
11 Enrouleur de câble
Avant la première utilisation
Retirez les autocollants et les films
d’emballage.
Devant une fenêtre ouverte, faites fonc-
tionner le grille-pain à vide en réglant le
niveau le plus élevé. Répétez l’opération
au moins 3 fois. Ensuite, laissez refroidir
l’appareil.

13
fr
Le brunissage est terminé lorsque le
pain grillé sort de l’appareil.
Information : Pour prendre facilement le
pain grillé, remonter le levier de commande
6 entièrement vers le haut.
Si vous souhaitez interrompre le brunis-
sage, appuyez sur le bouton stop 5.
Conseil pratique : Réglez le niveau de
brunissage à une valeur moins forte lorsque
vous grillez une tranche et non deux.
Réchauffer du pain ou un toast froid
Réglez le niveau de brunissage T
(Réchauffer) à l’aide du bouton 3.
Placez l’aliment à griller et abaissez le
levier de commande 6 à fond.
Pain ou pain de mie congelé
Réglez le niveau de grillage souhaité à
l’aide du bouton 3.
Appuyez sur le bouton de décongélation
4 defrost.
Placez l’aliment congelé à griller et
abaissez le levier de commande 6 à
fond.
Réchauffer
Ne jamais placez une petite feuille d’alumi-
nium sur le porte-pains intégré 9!
Pour réchauffer, il faut que le porte-pains 9
soit sortie de l’appareil.
Ne pas griller et réchauffer simultanément !
Abaissez la commande 8 jusqu’à
enclenchement. Le porte-pains 9 sort de
l’appareil.
Réglez le niveau de brunissage à l’aide
du bouton 2 au maximum sur le niveau
|13| (=2).
Abaissez le levier de commande 6 à
fond.
Généralités
Grillez votre pain de manière à ce qu’il
prenne une teinte dorée, veillez à ce qu’il
ne devienne jamais trop foncé. Retirez les
parties brûlées. Ne jamais griller trop inten-
sément les produits alimentaires contenant
de l’amidon, en particulier les produits à
base de céréales ou de pomme de terre
(préparation pauvre en acrylamide).
Remarque : Si le pain se coince dans la
fente, le grille-pain s’arrête automatique-
ment. Dans ce cas, débrancher l’appareil,
le laisser refroidir et extraire le pain avec
précaution.
Economiser l’énergie
Après utilisation, arrêter le grille pain à
l’aide du bouton O afin d’économiser
l’énergie.
Nettoyage et entretien
W Risque de choc électrique !
Ne jamais plonger l’appareil dans l’eau, ne
pas le passer en lave-vaisselle !
Ne pas utiliser de nettoyeur à vapeur.
Ne pas nettoyer avec des nettoyants pour
four ou grill.
Débrancher la fiche et laisser le
grille-pain refroidir. Utiliser un pinceau
dur pour retirer les miettes sous le
ramasse-miettes.
Retirer le ramasse-miettes 10 et
l ’essuyer.
Nettoyer le corps de l’appareil avec
un chiffon humide. Ne pas utiliser de
produit nettoyant trop puissant ou
abrasif.
Conseil pratique : Nettoyer la surface en
acier inoxydable avec un produit d’entretien
pour l’acier inoxydable courant.
Mise au rebut
J Eliminez l’emballage en respectant
l’environnement. Cet appareil est
marqué selon la directive européenne
2012/19/UE relative aux appareils
électriques et électroniques usagés
(waste electrical and electronic equip-
ment – WEEE). La directive définit
le cadre pour une reprise et une
récupération des appareils usagés
applicables dans les pays de la CE.
S’informer auprès du revendeur sur la
procédure actuelle de recyclage.

14
fr
Garantie
Les conditions de garantie applicables
sont celles publiées par notre distributeur
revendeur chez qui vous vous êtes procuré
l’appareil fournira les modalités de garantie
sur simple demande de votre part. En cas
de recours en garantie, veuillez toujours
vous munir de la preuve d’achat.
Caractéristiques techniques
Raccordement électrique
(tension – fréquence)
220-240 V~
50-60 Hz
Puissance 860 W

15
it
Avvertenze di sicurezza
Leggere, osservare e conservare le istruzioni con cura!
Se l’apparecchio viene ceduto, allegare anche le presenti
istruzioni. Questo apparecchio è pensato esclusivamente per
l’utilizzo in abitazioni private e in ambito domestico.
WRischio di scossa elettrica!
Usare l’apparecchio solo in ambienti interni a temperatura
ambientale e ad un’altitudine massima di 2000 m. L’apparecchio
può essere collegato a una rete a corrente alternata soltanto
con una presa con messa a terra installata a norma. Accertarsi
che il sistema del conduttore di protezione dell’impianto elettrico
domestico sia installato a norma.
Collegare e far funzionare l’apparecchio solo conformemente
alle indicazioni fornite sulla targhetta. Utilizzare solo se il cavo
e l’apparecchio non presentano danni. Estrarre la spina dopo
riparazioni sull’apparecchio, come ad es. la sostituzione di un cavo
danneggiato, sono consentite solo al nostro servizio clienti.
I bambini di età inferiore agli 8 anni devono essere tenuti lontani
dall’apparecchio e dal cavo di collegamento e non devono utilizzare
l’apparecchio.
Questo apparecchio può essere usato da bambini di almeno 8 anni
di età e da persone con ridotte facoltà psichiche, sensoriali o
sotto il controllo di persone adulte o siano stati istruiti sull’uso sicuro
dell’apparecchio e abbiano compreso i pericoli connessi all’uso dello
stesso. Tenere l’apparecchio lontano dalla portata dei bambini.
I lavori di pulizia o manutenzione non devono essere eseguiti da
parte di bambini che non abbiano compiuto almeno 8 anni di età e
solo sotto la sorveglianza di una persona adulta.

16
it
WPericolo di ustioni e di incendio!
molto calde, come per es. fornelli. Evitare gli spruzzi di grasso, la
plastica può danneggiarsi.
L’uso improprio dell’apparecchio può causare lesioni.
Non connettere mai l’apparecchio a temporizzatori o prese elettriche
telecomandate.
Non introdurre oggetti di vario tipo nello scomparto di tostatura.
Il pane può bruciarsi. Non utilizzare mai il tostapane sotto o in
scomparto di tostatura.
Durante la tostatura, l’apparecchio può diventare molto caldo.
Premere verso il basso l’interruttore di avvio solo per eseguire la
tostatura. Non bloccare mai l’apparecchio.
Non usare con alimenti che durante la tostatura o la doratura
possono gocciolare, pericolo di incendio.
tostapane. Non immergere mai l’apparecchio in acqua né lavarlo in
lavastoviglie!
Non pulire con il vapore.
Non pulire con spray per forni o griglie.
Asportare le briciole sotto il cassetto per le briciole con un pennello.
Estrarre il cassetto per le briciole e lavarlo.
Usare il tostapane solo in posizione verticale. Durante l’utilizzo,
controllare sempre il tostapane!
KNon utilizzare vicino all’acqua contenuta nella vasca
da bagno, nel lavandino o in altri contenitori.
W
Non lasciare che i bambini giochino con il materiale di imballaggio.

17
it
Utilizzo
(Figure a – k nelle pagine ripiegate)
Importante: Non usare l’apparecchio senza
il cassetto briciole 10!
Tostatura
Srotolare il cavo di alimentazione fino
alla lunghezza necessaria e collegarlo.
Premere il tasto O On/Off, nell’indica-
tore del grado di tostatura 2 si accende
il grado di tostatura impostato, ad
esempio |3| oppure il livello intermedio
|35| (=4). X Figura a.
Impostare il grado di tostatura deside-
rato con il tasto 3.
Grado di tostatura Livello
Riscaldamento T
Basso
X Tipi di pane non umidi,
ad es. pane in cassetta
|1|
|13| (=2)
|3|
|35| (=4)
|5|
Medio
X Tipi di pane più
umidi, ad es. pane bigio,
pane integrale
|57| (=6)
|7|
Alto
X Ad es. pane nero
spesso
|79| (=8)
|9|
Informazione: il grado di tostatura
impostato resta memorizzato (funzione
Memory) quando l’apparecchio viene
spento o separato dalla corrente
o anche dopo un‘interruzione
dell’alimentazione.
Inserire le fette da tostare nello scom-
parto di tostatura 7.
Congratulazioni per l’acquisto di
questo apparecchio del nostro marchio
Siemens. Avete acquistato un prodotto
estremamente valido e ne sarete molto
soddisfatti.
Utilizzare il tostapane esclusivamente per
tostare o riscaldare ad es. pane da toast,
oppure per dorare i panini sull’apposita
griglia.
Parti ed elementi di
comando
1 Tasto O On/Off
2 Indicatore del grado di tostatura
ad es. grado |3| doratura media
3 Tasto (per le 9 impostazioni del
grado di tostatura)
T = Riscaldamento
– = Tempo di tostatura più breve
+ = Tempo di tostatura più lungo
4 Tasto di decongelazione defrost
5 Tasto stop
6 Interruttore di avvio
7 Scomparto di tostatura
8 Interruttore
(per la griglia integrata per i panini)
9 Grigli per i panini
10 Cassetto briciole
11 Avvolgicavo
Al primo impiego
Togliere le etichette e le pellicole che
ricoprono l‘apparecchio.
Riscaldare per almeno 3 volte il
tostapane senza pane, tenendo la
finestra aperta, con il grado massimo
di doratura, quindi far raffreddare.

18
it
Premere verso il basso fino in
fondo l‘interruttore di avvio 6. Ora
lampeggiano i numeri che indicano
il grado di tostatura impostato. Lo
scorrere del tempo è rico noscibile grazie
al lampeggiare delle cifre nell’indicatore
del grado di tostatura 2.
La tostatura si può dire terminata
quando la fette tostate vengono solle-
vate verso l’alto.
Informazione: per un più facile prelievo
delle fette, spingere verso l’alto l’interruttore
di avvio 6.
Se la tostatura dovesse terminare in anti-
cipo, premere il tasto di arresto 5 stop.
Suggerimento: il grado di tostatura per una
fetta deve essere inferiore rispetto a quello
per due fette.
Riscaldare il pane freddo oppure un toast
Impostare il grado di tostatura T
( Riscaldare) con il tasto 3.
Appoggiare il pane da tostare e premere
verso il basso fino in fondo l‘interruttore
di avvio 6.
Preparazione di pane o toast congelati
Impostare il grado di tostatura deside-
rato con il tasto 3.
Premere il tasto di decongelazione 4
defrost.
Appoggiare il pane da tostare congelato
e premere verso il basso fino in fondo
l‘interruttore di avvio 6.
Cottura
Non rivestire la griglia per panini 9 con
pellicola di alluminio!
Cuocere solo con griglia per panini 9
estratta.
Non eseguire tostatura e cottura allo stesso
tempo!
Spingere l’interruttore 8 in basso fino in
fondo. La griglia per i panini 9 fuoriesce.
Impostare il grado di tostatura deside-
rato sul livello massimo |13| (=2) con
l’aiuto del tasto 2.
Premere verso il basso fino in fondo
l‘interruttore di avvio 6.
Informazioni generali
Tostare il pane o le fette fino al colore
dorato, piuttosto che scuro o marrone.
Asportare i resti bruciati. Non tostare ecces-
sivamente gli alimenti contenenti amido,
in particolare i cereali e i prodotti a base di
patate (preparazione a basso contenuto di
acrilamide).
Avviso: se una fetta si incastra, il tostapane
si spegne automaticamente. Estrarre la
spina di rete ed estrarre prudentemente
il pane dopo che l’apparecchio si è
raffreddato.
Risparmio energetico
Dopo l’uso spegnere il tostapane con il
tasto O per risparmiare corrente.
Pulizia e cura
W Pericolo di scossa elettrica!
Non immergere mai l’apparecchio in acqua
né lavarlo in lavastoviglie!
Non utilizzare pulitori a vapore.
Non pulire con spray per forni o griglie.
Estrarre la spina di rete e far raffreddare
il tostapane. Asportare le briciole sotto il
cassetto per le briciole con un pennello
duro.
Estrarre il cassetto per le briciole 10 e
lavarlo.
Pulire l’involucro solo con un panno
umido. Non utilizzare detergenti aggres-
sivi o abrasivi.
Suggerimento: pulire la superficia in
acciaio inossidabile con un detergente per
acciaio normalmente in commercio.
Sayfa yükleniyor...
Sayfa yükleniyor...
Sayfa yükleniyor...
Sayfa yükleniyor...
Sayfa yükleniyor...
Sayfa yükleniyor...
Sayfa yükleniyor...
Sayfa yükleniyor...
Sayfa yükleniyor...
Sayfa yükleniyor...
Sayfa yükleniyor...
Sayfa yükleniyor...
Sayfa yükleniyor...
Sayfa yükleniyor...
Sayfa yükleniyor...
Sayfa yükleniyor...
Sayfa yükleniyor...
Sayfa yükleniyor...
Sayfa yükleniyor...
Sayfa yükleniyor...
Sayfa yükleniyor...
Sayfa yükleniyor...
Sayfa yükleniyor...
Sayfa yükleniyor...
Sayfa yükleniyor...
Sayfa yükleniyor...
Sayfa yükleniyor...
Sayfa yükleniyor...
Sayfa yükleniyor...
Sayfa yükleniyor...
Sayfa yükleniyor...
Sayfa yükleniyor...
Sayfa yükleniyor...
Sayfa yükleniyor...
Sayfa yükleniyor...
Sayfa yükleniyor...
Sayfa yükleniyor...
Sayfa yükleniyor...
Sayfa yükleniyor...
Sayfa yükleniyor...
Sayfa yükleniyor...
Sayfa yükleniyor...
Sayfa yükleniyor...
Sayfa yükleniyor...
Sayfa yükleniyor...
Sayfa yükleniyor...
Sayfa yükleniyor...
Sayfa yükleniyor...
Sayfa yükleniyor...
Sayfa yükleniyor...
Sayfa yükleniyor...
Sayfa yükleniyor...
Sayfa yükleniyor...
Sayfa yükleniyor...
Sayfa yükleniyor...
Sayfa yükleniyor...
Sayfa yükleniyor...
Sayfa yükleniyor...
Sayfa yükleniyor...
Sayfa yükleniyor...
Sayfa yükleniyor...
Sayfa yükleniyor...
Sayfa yükleniyor...
Sayfa yükleniyor...
Sayfa yükleniyor...
Sayfa yükleniyor...
Sayfa yükleniyor...
Sayfa yükleniyor...
Sayfa yükleniyor...
Sayfa yükleniyor...
Sayfa yükleniyor...
Sayfa yükleniyor...
Sayfa yükleniyor...
Sayfa yükleniyor...
-
 1
1
-
 2
2
-
 3
3
-
 4
4
-
 5
5
-
 6
6
-
 7
7
-
 8
8
-
 9
9
-
 10
10
-
 11
11
-
 12
12
-
 13
13
-
 14
14
-
 15
15
-
 16
16
-
 17
17
-
 18
18
-
 19
19
-
 20
20
-
 21
21
-
 22
22
-
 23
23
-
 24
24
-
 25
25
-
 26
26
-
 27
27
-
 28
28
-
 29
29
-
 30
30
-
 31
31
-
 32
32
-
 33
33
-
 34
34
-
 35
35
-
 36
36
-
 37
37
-
 38
38
-
 39
39
-
 40
40
-
 41
41
-
 42
42
-
 43
43
-
 44
44
-
 45
45
-
 46
46
-
 47
47
-
 48
48
-
 49
49
-
 50
50
-
 51
51
-
 52
52
-
 53
53
-
 54
54
-
 55
55
-
 56
56
-
 57
57
-
 58
58
-
 59
59
-
 60
60
-
 61
61
-
 62
62
-
 63
63
-
 64
64
-
 65
65
-
 66
66
-
 67
67
-
 68
68
-
 69
69
-
 70
70
-
 71
71
-
 72
72
-
 73
73
-
 74
74
-
 75
75
-
 76
76
-
 77
77
-
 78
78
-
 79
79
-
 80
80
-
 81
81
-
 82
82
-
 83
83
-
 84
84
-
 85
85
-
 86
86
-
 87
87
-
 88
88
-
 89
89
-
 90
90
-
 91
91
-
 92
92
-
 93
93
-
 94
94


Siemens TT86105 Kullanım kılavuzu
- Kategori
- Tost makineleri
- Tip
- Kullanım kılavuzu
diğer dillerde
- dansk: Siemens TT86105 Brugermanual