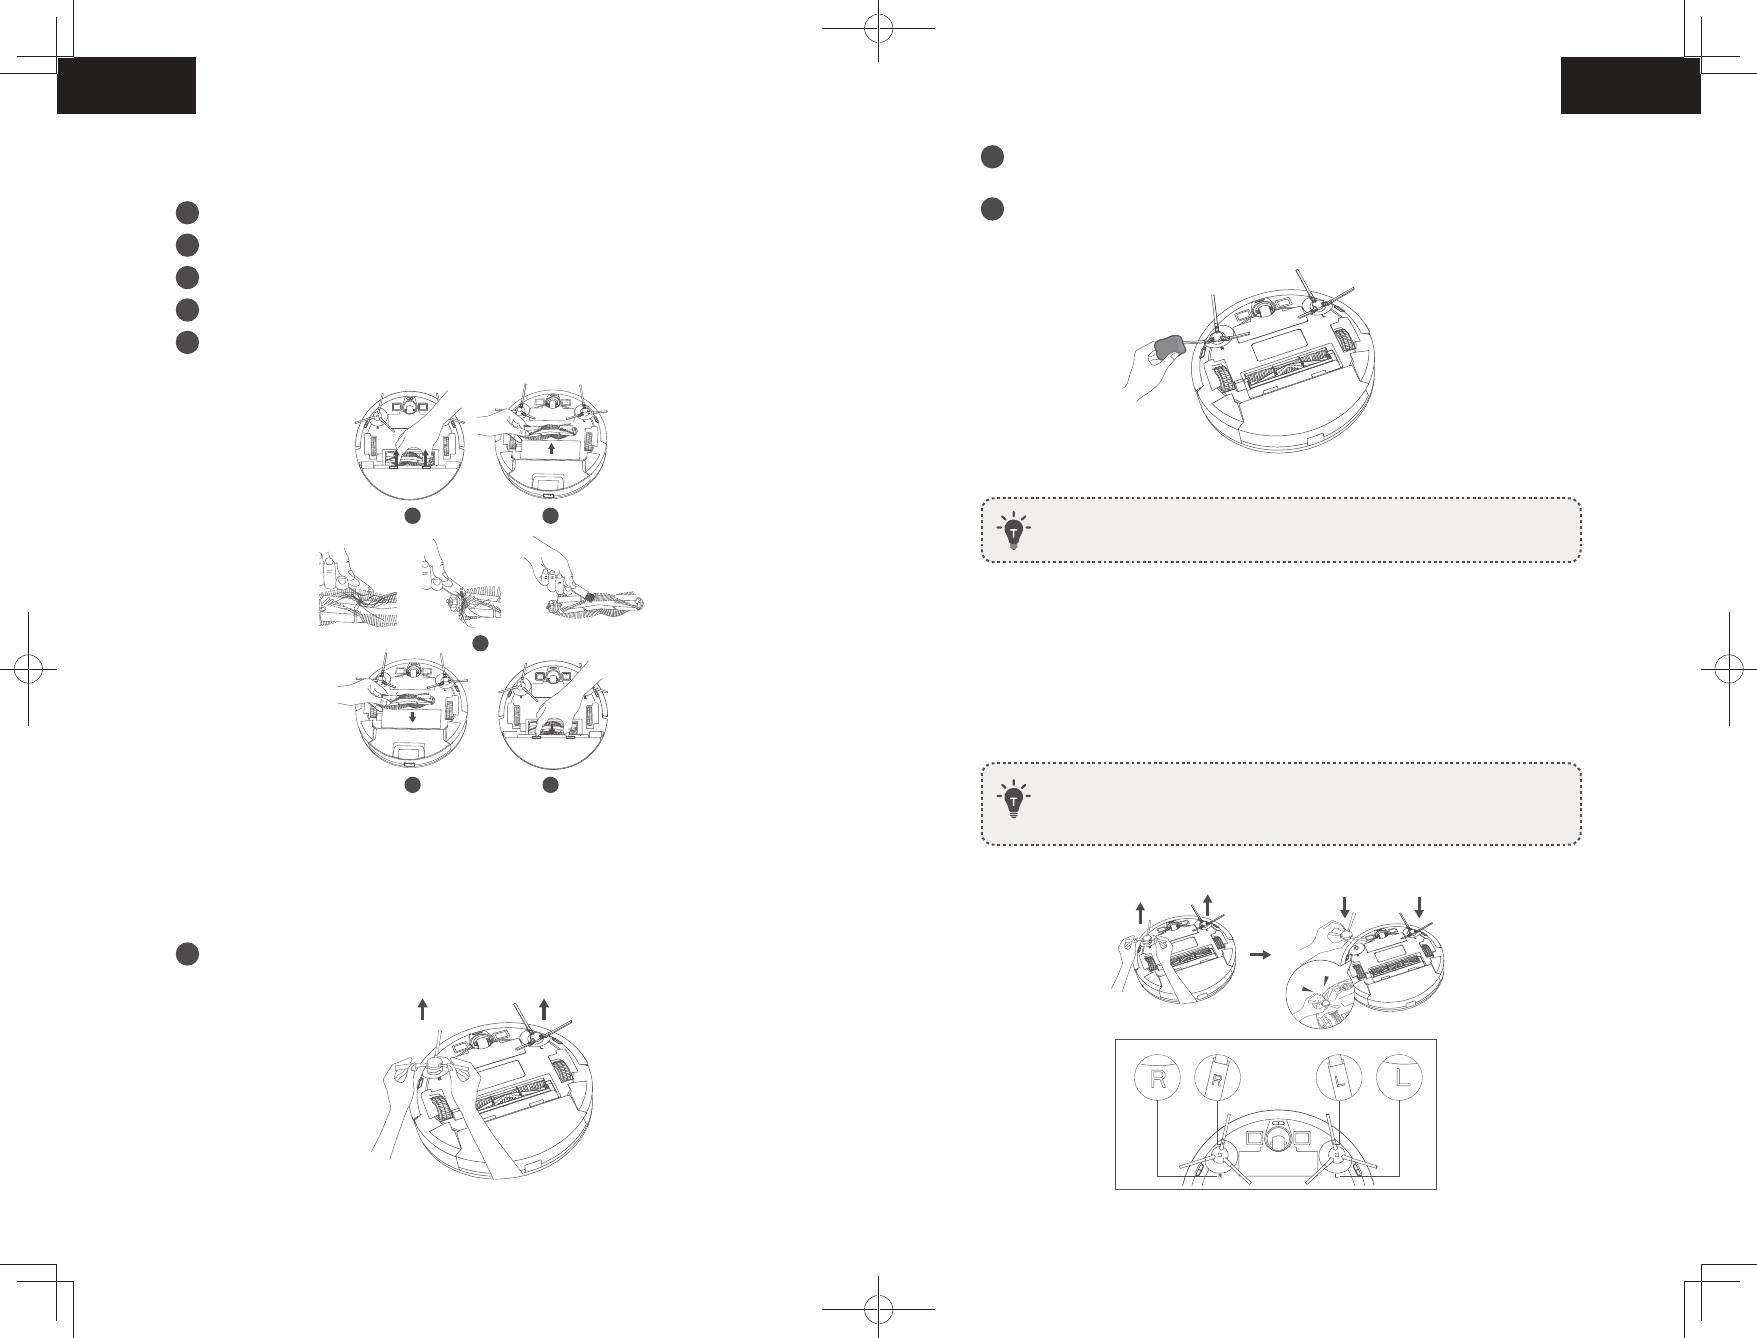
Eufy 931825 El kitabı

Tip
El kitabı
RoboVac L35 Hybrid
Owner’s Manual
T2194 51005003862 V01
EN 01
English
Thank you for purchasing RoboVac. Carefully read all the instructions below
before using this device, and keep this manual for future reference.
Table of Contents
02 Important Safety Instructions
09 About Your RoboVac
What's in the Box
RoboVac Anatomy
LED Indication
Map Navigation and Management
14 Using Your RoboVac
Important Tips Before Use
Preparation
Charge Your RoboVac
Use Your RoboVac with the eufy Clean App
Start / Stop Cleaning
Select a Cleaning Mode
Select a Suction Power Level
Use Mopping System
Use Your RoboVac with Amazon Alexa / the
Google Assistant
Enable / Disable the Child Safety Lock
25 Cleaning and Maintenance
Clean the Dust Box, Water Tank, and Filter
Clean the Rolling Brush
Clean the Side Brushes
Replace the Side Brushes
Clean the Sensors and Charging Pins
Clean the Swivel Wheel
Clean the Mopping Cloth
34 Troubleshooting
Voice Alert
38 Specifications
39 Customer Service
English 01
Français 41
Italiano 81
Español 119
Nederlands 159
Deutsch 197
Pусский 235
Türkçe 275
02 EN EN 03
English English
The used battery should be placed in a sealed plastic bag
and disposed of safely according to local environmental
regulations.
The external flexible cable or cord of the power supply
unit cannot be replaced; if the cord is damaged, the
power supply unit should be disposed of.
This device is for indoor use only.
This device is not a toy. Do not sit or stand on this device.
Small children and pets should be supervised when this
device is operating.
Store and operate this device in room temperature
environments only.
Do not use this device to pick up anything that is burning
or smoking.
Do not use this device to clean up spills of bleach, paint,
chemicals, or anything wet.
Before using this device, pick up objects like clothing and
loose paper. Lift up cords for blinds or curtains. Move
power cords and sharp, pointed, or fragile objects out
of the way. If this device passes over a power cord and
drags it, an object could be pulled off a table or shelf.
If the room to be cleaned has a balcony, a physical barrier
should be used to prevent access to the balcony and to
ensure safe operation.
Do not place anything on top of this device.
Be aware that this device moves around on its own.
Take care when walking in the area where this device is
operating to avoid stepping on it.
Do not operate this device in areas with exposed
electrical outlets on the floor.
Do not expose the electronics of this device, its battery,
or the integrated Charging Base. There are no user-
serviceable parts inside.
Do not use this device on an unfinished, unsealed, waxed
or rough floor. It may result in damage to the floor and
this device. Use only on hard floor surfaces or low-pile
Important Safety Instructions
To reduce the risk of injury or damage, keep these instructions
at hand when setting up, using, and maintaining this device.
WARNING SYMBOLS USED
This is the safety alert symbol. This symbol alerts you to
potential hazards that could result in property damage
and/or serious bodily harm or death.
This device can be used by children aged from 8
years and above and persons with reduced physical,
sensory or mental capabilities or lack of experience
and knowledge if they have been given supervision or
instruction concerning use of this device in a safe way
and understand the hazards involved.
Children should be supervised to ensure they do not play
with this device.
Cleaning and maintenance shall not be performed by
children without adult supervision.
This device is only to be used with the power supply unit
provided.
Before cleaning or maintaining this device, the plug must
be removed from the outlet.
The battery in this device should only be replaced by a
skilled professional.
Before removing the battery, disconnect the device from
its power supply.
To recharge the battery, only use the detachable adapter
(US/CA: NLD100240W1A4; UK: NLD100240W1E4; EU:
NLD100240W1U4; AU: NLD100240W1S4) provided
with this device.
The battery must be removed before this device is
disposed of. To remove the battery, first unscrew the
screws on the bottom, then remove the back cover.
Remove the battery by disconnecting the quick connector.
04 EN EN 05
English English
Notice
This symbol on the device or its packaging
indicates:
Do not dispose of electrical appliances as unsorted
municipal waste; use separate collection facilities.
Contact your local authority for information
regarding the collection systems available. If
electrical appliances are disposed of in landfills or
dumps, hazardous substances can leak into the
groundwater and get into the food chain, damaging
your health and well-being. When replacing old
appliances with new ones, the retailer is legally
obliged to take back your old appliance for disposal
at least free of charge.
FCC Statement
This device complies with Part 15 of the FCC Rules.
Operation is subject to the following two conditions:
(1) This device may not cause harmful interference, and
(2) this device must accept any interference received,
including interference that may cause undesired operation.
Warning: Changes or modifications not expressly
approved by the party responsible for compliance could
void the user's authority to operate the equipment.
Note: This equipment has been tested and found to
comply with the limits for a Class B digital device,
pursuant to Part 15 of the FCC Rules. These limits are
designed to provide reasonable protection against harmful
interference in a residential installation.
This equipment generates, uses, and can radiate radio
frequency energy and, if not installed and used in
accordance with the instructions, may cause harmful
carpets, and not on carpets with tasseled edges or loose
threads.
This device has been designed to be used on floors
without scratching them. We still recommend that you
test this device on a small area of the room to be cleaned
to ensure no scratches are made before cleaning the
whole room.
Only use attachments recommended or described in this
manual.
Do not handle the device or plug with wet hands.
Ensure that the dust box and/or filters are correctly in-
place before use.
Do not use a battery pack or device that is damaged or
modified. Damaged or modified batteries may exhibit
unpredictable behavior resulting in fire, explosion, or risk
of injury.
Do not expose the battery pack or device to fire or
excessive heat. Exposure to fire or temperatures above
130°C / 266°F may cause an explosion.
Do not modify or attempt to repair the device or the
battery pack, except as indicated in the instructions for
use and care.
Follow all charging instructions and do not charge the
battery pack or device outside of the temperature range
specified in the instructions. Charging improperly or at
temperatures outside of the specified range may damage
the battery and increase the risk of fire.
The laser distance sensor of this device meets the
standards for Class I Laser Products in IEC 60825-1:2014
and will not generate hazardous laser radiation.
06 EN EN 07
English English
Declaration of Conformity
This product complies with the radio interference
requirements of the European Community. Hereby, Anker
Innovations Limited declares that the radio equipment type
T2194 is in compliance with Directive 2014/53/EU. The
full text of the EU declaration of conformity is available
at the following website: https://support.eufylife.com/s/
articleRecommend?type=DownLoad.
Maximum output power: 18 dBm (For EU)
Frequency band: 2.4G band (2.4000GHz - 2.4835GHz)
GB Declaration of Conformity
Hereby, Anker Innovations Limited declares that
the product type T2194 is in compliance with Radio
Equipment Regulations 2017 and The Restriction of
the Use of Certain Hazardous Substances in Electrical
and Electronic Equipment Regulations 2012. The full
text of the GB declaration of conformity is available at
the following website: https://support.eufylife.com/s/
articleRecommend?type=DownLoad.
The following importer is the responsible party (contract for
EU and UK matters)
Anker Technology (UK) Ltd | GNR8, 49 Clarendon Road,
Watford, Hertfordshire, WD17 1HP, United Kingdom
Anker Innovations Deutschland GmbH | Georg-Muche-
Strasse 3, 80807 Munich, Germany
Anker Innovations Limited | Room 1318-19, Hollywood
Plaza, 610 Nathan Road, Mongkok, Kowloon, Hong Kong
Trademark Notice
Amazon, Echo, Alexa and all related logos are trademarks
of Amazon.com, Inc. or its affiliates.
Apple and the Apple logo are trademarks of Apple Inc.,
interference to radio communications. However, there is
no guarantee that interference will not occur in a particular
installation. If this equipment does cause harmful
interference to radio or television reception, which can
be determined by turning the equipment off and on, the
user is encouraged to try to correct the interference by
one or more of the following measures: (1) Reorient or
relocate the receiving antenna. (2) Increase the separation
between the equipment and receiver. (3) Connect the
equipment into an outlet on a circuit different from that to
which the receiver is connected. (4) Consult the dealer or
an experienced radio / TV technician for help.
The following importer is the responsible party (for FCC
matters only).
Company Name: POWER MOBILE LIFE, LLC
Address: 400 108th Ave NE Ste 400, Bellevue, WA
98004-5541
Telephone: +1 (800) 994 3056
RF Exposure Compliance Statement
This equipment complies with FCC/IC radiation exposure
limits set forth for an uncontrolled environment. This
equipment should be installed and operated with a
minimum distance of 20 cm between the radiator and
your body.
ISED Compliance Statement
This device contains licence-exempt transmitter(s)/
receiver(s) that comply with Innovation, Science and
Economic Development Canada’s licence-exempt RSS(s).
Operation is subject to the following two conditions:
1. This device may not cause interference.
2. This device must accept any interference, including interference
that may cause undesired operation of the device.
08 EN EN 09
English English
About Your RoboVac
What's in the Box
RoboVac
Side Brushes (×2)
Waterproof Pad Owner’s Manual
& Other Documents
Mopping Module Cleaning Tool
Charging Base Power Adapter
registered in the U.S. and other countries. App Store is
a service mark of Apple Inc., registered in the U.S. and
other countries.
Google Play and the Google Play logo are trademarks of
Google Inc.
Google Home is a trademark of Google Inc.
10 EN EN 11
English English
C. Bottom
Charging contact pins Charging contact pins
Left side brush
Drop sensor
Drop sensor
Right side brush
Drop sensor
Wheels
Rolling brush
Swivel wheel
D. Dust Box and Water Tank (2-in-1)
High-performance filter
Foam filter
Filter cover
Handle
Release button
Water tank
Water inlet cover
Water inlet
Battery cover
Brush guard
Dust box
RoboVac Anatomy
A. Top
Press to start or pause cleaning.
Press and hold for 3 seconds to turn on or o.
Press to return to the Charging Base or pause.
Press and hold for 3 seconds to enable / disable the
child safety lock.
Laser distance sensor (LDS)
Press and hold both buttons for 3 seconds to
reset Wi-Fi connection.
B. Side
Mopping module
Dust box and water
tank (2-in-1)
Dust box and water
tank release button Force shutdown button
Bumper
12 EN EN 13
English English
LED Indication
You can see the status of RoboVac from the LED indicators.
and Status
Pulsing blue Charging
Solid blue Standby / Cleaning / Fully charged
Solid red Low power and returning to Charging Base
O
RoboVac is off.
To conserve power, the light automatically turns off
when RoboVac is not docked to the Charging Base
and has been inactive for 10 minutes.
Flashing blue Waiting for Wi-Fi connection
Flashing red with voice alert
RoboVac has an error.
Refer to the “Troubleshooting > Voice Alert” section in
this manual for solutions.
Map Navigation and Management
Navigation
Once RoboVac starts to auto clean, it will move away from the Charging Base and
automatically scan your house to generate maps, intelligently determine its cleaning route,
and divide the space into rooms. The cleaning paths are planned along the walls, following
a Z-shaped cleaning method to complete the cleaning of each zone, one by one.
E. Mopping Module
18 EN EN 19
Use Your RoboVac with the eufy Clean App
To enjoy all available features, it is recommended to control your RoboVac via the eufy
Clean app.
Before you start, make sure that:
Your smartphone or tablet is running iOS 10.0 (or above) or Android 5.0 (or above).
The 2.4GHz band wireless signal is enabled on your wireless router.
RoboVac is attached to the Charging Base to ensure it has enough power during setup.
eufy Clean
eufy Clean
1
Download the eufy Clean app from the App Store (iOS devices) or Google Play
(Android devices).
2
Open the app and create a user account.
3
Tap the “+” icon to add “eufy Clean LR20” to your eufy Clean account.
4
Follow the instructions in the app to set up the Wi-Fi connection.
After connecting successfully, you can control RoboVac via the app.
With the app, you can select a cleaning mode, set the time, schedule a cleaning, adjust
suction power and water flow, view the system status, receive notifications and access
additional features.
Slowly flashing blue Waiting for connection
Rapidly flashing blue Connecting with your wireless router
Solid blue Connected with your wireless router
If RoboVac gets stuck in any space, tap Find My Robot in the app to find the
machine.
Schedule Cleaning
With the eufy Clean app, you can schedule RoboVac to start cleaning at a particular time.
You can set the time and customize the cleaning schedules from Sunday to
Saturday on the eufy Clean app. This function is only available on the app.
Start / Stop Cleaning
• You can also start or stop cleaning via the eufy Clean app.
1
Press and hold for 3 seconds to turn on.
3 sec
2
Press to start cleaning in Auto Cleaning mode.
To pause cleaning, press again.
To turn off, press and hold for 3 seconds.
Washable mopping cloth
Cloth attachment area
F. Suction Inlet
18 EN EN 19
Use Your RoboVac with the eufy Clean App
To enjoy all available features, it is recommended to control your RoboVac via the eufy
Clean app.
Before you start, make sure that:
Your smartphone or tablet is running iOS 10.0 (or above) or Android 5.0 (or above).
The 2.4GHz band wireless signal is enabled on your wireless router.
RoboVac is attached to the Charging Base to ensure it has enough power during setup.
eufy Clean
eufy Clean
1
Download the eufy Clean app from the App Store (iOS devices) or Google Play
(Android devices).
2
Open the app and create a user account.
3
Tap the “+” icon to add “eufy Clean LR20” to your eufy Clean account.
4
Follow the instructions in the app to set up the Wi-Fi connection.
After connecting successfully, you can control RoboVac via the app.
With the app, you can select a cleaning mode, set the time, schedule a cleaning, adjust
suction power and water flow, view the system status, receive notifications and access
additional features.
Slowly flashing blue Waiting for connection
Rapidly flashing blue Connecting with your wireless router
Solid blue Connected with your wireless router
If RoboVac gets stuck in any space, tap Find My Robot in the app to find the
machine.
Schedule Cleaning
With the eufy Clean app, you can schedule RoboVac to start cleaning at a particular time.
You can set the time and customize the cleaning schedules from Sunday to
Saturday on the eufy Clean app. This function is only available on the app.
Start / Stop Cleaning
You can also start or stop cleaning via the eufy Clean app.
1
Press and hold for 3 seconds to turn on.
3 sec
2
Press to start cleaning in Auto Cleaning mode.
To pause cleaning, press again.
To turn off, press and hold for 3 seconds.
Suction inlet Suction inlet
G. Charging Base
Wire slot exit
Power cord storage
compartment
Slot winding
Power socket
Status light
Charging contact
pins
14 EN EN 15
English English
Remove power cords and small objects from the floor that may entangle RoboVac.
Fold tasseled edges of rugs underneath to prevent tangling RoboVac. Avoid
cleaning dark-colored high-pile rugs or rugs thicker than 1.02 in / 26 mm as they
may cause RoboVac to malfunction.
It is strongly recommended to set a No-Go zone or a virtual boundary in the eufy
Clean app in front of fireplaces and certain areas (i.e. air vents) that may cause
damage to RoboVac if entered.
Keep RoboVac away from wet areas during cleaning.
RoboVac may climb on top of objects less than 0.79 in / 20 mm in height.
Remove these objects if possible.
Anti-drop sensors will prevent RoboVac from tumbling down stairs and steep
drops in most cases. Sensors are less effective if dirty or used on carpeted /
reflective / dark-colored floors. It is recommended to place physical barriers or set
a No-Go zone / a virtual boundary in the eufy Clean app to block off areas where
RoboVac may fall.
Preparation
1
Remove the foam blocks beside the bumper before use.
2
Before mopping, attach the Charging Base to the waterproof pad to keep the floor
dry. Make sure it is firmly installed. Skip this step if mopping is not needed.
Real-Time Mapping and Floor Plan
Real-time mapping helps RoboVac easily learn the environment of your home to generate
the most ecient cleaning path. A floor plan will be built after cleaning. The map will be
updated in real-time during each cleaning session to ensure normal navigation.
To create a complete floor plan:
1. Open your doors so that RoboVac can map each room.
2. Remove any objects that may be in the way or that might entangle RoboVac.
Repositioning and Remapping
If the position of RoboVac / Charging Base is adjusted or the surroundings are changed
significantly, RoboVac will try to reposition and remap to match the surroundings.
If the repositioning is successful, RoboVac will resume cleaning.
If the repositioning fails, RoboVac will remap to ensure normal navigation with a new
cleaning.
When using for the first time, make sure RoboVac starts cleaning from the
Charging Base.
During cleaning, do not move RoboVac frequently. If moved, place RoboVac
back to the original position.
Using Your RoboVac
Important Tips Before Use
A
D
B
E
C
F
16 EN EN 17
English English
Charge Your RoboVac
Make sure RoboVac is fully charged before use.
RoboVac will return to the Charging Base at the end of a cleaning cycle or
when its battery is running low.
Attach RoboVac to the Charging Base by aligning its charging pins.
To preserve the battery’s lifespan, recharge at least once every 6 months.
Use Your RoboVac with the eufy Clean App
To enjoy all available features, it is recommended to control your RoboVac via the eufy
Clean app.
Before you start, make sure that:
Your smartphone or tablet is running iOS 10.0 (or above) or Android 5.0 (or above).
The 2.4GHz band wireless signal is enabled on your wireless router.
RoboVac is attached to the Charging Base to ensure it has enough power during setup.
eufy Clean
eufy Clean
18 EN EN 19
Use Your RoboVac with the eufy Clean App
To enjoy all available features, it is recommended to control your RoboVac via the eufy
Clean app.
Before you start, make sure that:
Your smartphone or tablet is running iOS 10.0 (or above) or Android 5.0 (or above).
The 2.4GHz band wireless signal is enabled on your wireless router.
RoboVac is attached to the Charging Base to ensure it has enough power during setup.
eufy Clean
eufy Clean
1
Download the eufy Clean app from the App Store (iOS devices) or Google Play
(Android devices).
2
Open the app and create a user account.
3
Tap the “+” icon to add “eufy Clean LR20” to your eufy Clean account.
4
Follow the instructions in the app to set up the Wi-Fi connection.
After connecting successfully, you can control RoboVac via the app.
With the app, you can select a cleaning mode, set the time, schedule a cleaning, adjust
suction power and water flow, view the system status, receive notifications and access
additional features.
Slowly flashing blue Waiting for connection
Rapidly flashing blue Connecting with your wireless router
Solid blue Connected with your wireless router
If RoboVac gets stuck in any space, tap Find My Robot in the app to find the
machine.
Schedule Cleaning
With the eufy Clean app, you can schedule RoboVac to start cleaning at a particular time.
You can set the time and customize the cleaning schedules from Sunday to
Saturday on the eufy Clean app. This function is only available on the app.
Start / Stop Cleaning
You can also start or stop cleaning via the eufy Clean app.
1
Press and hold for 3 seconds to turn on.
3 sec
2
Press to start cleaning in Auto Cleaning mode.
To pause cleaning, press again.
To turn off, press and hold for 3 seconds.
3
Place the Charging Base on a level surface and against a wall.
4
Remove objects within 1.6 ft / 0.5 m of the left and right side and within
4.9 ft / 1.5 m of the front of the Charging Base. If you cannot remove the objects,
move RoboVac to a new place and check whether RoboVac can return to the
Charging Base normally; if not, contact eufy customer service for help.
5
Connect the adapter to the Charging Base and a wall outlet.
When the Charging Base connects to AC power, the LED on the Charging Base is
solid white.
Install the Charging Base in a location that RoboVac can easily access. It is
recommended to place the Charging Base against a wall, and on a hard-level
surface rather than on rugs or carpets.
Always keep the Charging Base plugged in, otherwise RoboVac will not
automatically return to it.
18 EN EN 19
English English
Start / Stop Cleaning
You can also start or stop cleaning via the eufy Clean app.
1
Press and hold for 3 seconds to turn on.
18 EN EN 19
Use Your RoboVac with the eufy Clean App
To enjoy all available features, it is recommended to control your RoboVac via the eufy
Clean app.
Before you start, make sure that:
Your smartphone or tablet is running iOS 10.0 (or above) or Android 5.0 (or above).
The 2.4GHz band wireless signal is enabled on your wireless router.
RoboVac is attached to the Charging Base to ensure it has enough power during setup.
eufy Clean
eufy Clean
1
Download the eufy Clean app from the App Store (iOS devices) or Google Play
(Android devices).
2
Open the app and create a user account.
3
Tap the “+” icon to add “eufy Clean LR20” to your eufy Clean account.
4
Follow the instructions in the app to set up the Wi-Fi connection.
After connecting successfully, you can control RoboVac via the app.
With the app, you can select a cleaning mode, set the time, schedule a cleaning, adjust
suction power and water flow, view the system status, receive notifications and access
additional features.
Slowly flashing blue Waiting for connection
Rapidly flashing blue Connecting with your wireless router
Solid blue Connected with your wireless router
If RoboVac gets stuck in any space, tap Find My Robot in the app to find the
machine.
Schedule Cleaning
With the eufy Clean app, you can schedule RoboVac to start cleaning at a particular time.
You can set the time and customize the cleaning schedules from Sunday to
Saturday on the eufy Clean app. This function is only available on the app.
Start / Stop Cleaning
You can also start or stop cleaning via the eufy Clean app.
1
Press and hold for 3 seconds to turn on.
3 sec
2
Press to start cleaning in Auto Cleaning mode.
To pause cleaning, press again.
To turn off, press and hold for 3 seconds.
2
Press to start cleaning in Auto Cleaning mode.
To pause cleaning, press again.
To turn off, press and hold for 3 seconds.
*If RoboVac is not responding when you press a button, press the Force Shutdown
button (located inside the main unit) to forcibly power off the device. Then press and
hold for 3 seconds to restart the device.
34 EN EN 35
Voice Prompt Cause and Solution
Error 17: Virtual
Boundary detected.
Move device to a
different area
If the machine is in a No-Go Zone and the user tries to start
cleaning, this error will be reported. Device needs to be
moved out of the No-Go Zone to start cleaning.
Error 18: Laser cover
may be stuck
This error is reported when the radar shield is stuck and
cannot operate normally. The reason why the radar shield is
stuck can be checked and moved to a new location.
Error 19: Laser sensor
may be stuck
This error is reported if the radar cannot be rotated.
Check whether there is foreign matter under the lightning
protection cover and remove it.
Error 20: Laser sensor
may be blocked
This error will be reported if there are obstacles around the
radar that obstruct the data collected by the radar. You can
check whether there is any abnormal blocking of radar light
above the fuselage and remove it.
Error 22: The device is
being picked up. Please
put the machine back
near the starting place.
This error will be reported when the machine is picked up
and the wheel is suspended when the cleaning action is
performed. You can put the machine back near where it
was picked up, and then perform the cleaning (if it is not in
the area where it was picked up, the relocation will fail).
Error S1: Battery error
Open the battery compartment and check whether the
battery is connected and restart the device.
Battery temperature may be too high or low. Wait until
the battery falls to normal temperatures before use (0 °C
- 40 °C / 32 °F - 104 °F).
If the issue persists, contact customer support for help.
Error S2: Wheel
module error
Check whether the wheels are stuck or dust is trapped
inside before restarting the device.
If the issue persists, contact customer support for help.
Error S3: Side brush
error
Check whether the side brush is stuck in an unknown
object before restarting the device.
If the issue persists, contact customer support for help.
Error S4: Suction fan
error
Check whether the fan blades are stuck in an unknown
object before restarting the device.
Clean the dust bin and filter before restarting the device.
If the issue persists, contact customer support for help.
Voice Prompt Cause and Solution
Error S5: Rolling Brush
Error. Refer to Owner's
Manual or app for
help.
Remove and clean the roller brush, roller brush
connection, roller brush cover and suction inlet before
restarting the device.
If the issue persists, contact customer support for help.
Error S7: Laser Sensor
Error. Refer to Owner's
Manual or App for
help
This error is reported if the radar cannot collect data. You
can use the hand to toggle the radar to observe whether
it can rotate normally and whether the rotation resistance
is very large; restart the sweeper to observe whether it
can operate normally. If an error is still reported after the
above two solutions are implemented, you can contact
the after-sales service department for processing.
Specifications
Input 24 V 1 A
Battery Voltage 14.4 V
Power Consumption 50 W
Battery Type
Li-ion 3200 mAh (Typical)
Dust Box Capacity 600 ml
Charging Time 180 - 240 mins
Input 24 V 1 A
Output 24 V 1 A
18 EN EN 19
Use Your RoboVac with the eufy Clean App
To enjoy all available features, it is recommended to control your RoboVac via the eufy
Clean app.
Before you start, make sure that:
Your smartphone or tablet is running iOS 10.0 (or above) or Android 5.0 (or above).
The 2.4GHz band wireless signal is enabled on your wireless router.
RoboVac is attached to the Charging Base to ensure it has enough power during setup.
eufy Clean
eufy Clean
1
Download the eufy Clean app from the App Store (iOS devices) or Google Play
(Android devices).
2
Open the app and create a user account.
3
Tap the “+” icon to add “eufy Clean LR20” to your eufy Clean account.
4
Follow the instructions in the app to set up the Wi-Fi connection.
After connecting successfully, you can control RoboVac via the app.
With the app, you can select a cleaning mode, set the time, schedule a cleaning, adjust
suction power and water flow, view the system status, receive notifications and access
additional features.
Slowly flashing blue Waiting for connection
Rapidly flashing blue Connecting with your wireless router
Solid blue Connected with your wireless router
If RoboVac gets stuck in any space, tap Find My Robot in the app to find the
machine.
Schedule Cleaning
With the eufy Clean app, you can schedule RoboVac to start cleaning at a particular time.
You can set the time and customize the cleaning schedules from Sunday to
Saturday on the eufy Clean app. This function is only available on the app.
Start / Stop Cleaning
You can also start or stop cleaning via the eufy Clean app.
1
Press and hold for 3 seconds to turn on.
3 sec
2
Press to start cleaning in Auto Cleaning mode.
To pause cleaning, press again.
To turn off, press and hold for 3 seconds.
1
Press and hold the two buttons ( and ) simultaneously for 10 seconds to
start Wi-Fi connection.
2
Download the eufy Clean app from the App Store (iOS devices) or Google Play
(Android devices).
3
Open the app and create a user account.
4
Tap the “+” icon to add “RoboVac L35 Hybrid” to your eufy Clean account.
5
Follow the instructions in the app to set up the Wi-Fi connection.
After connecting successfully, you can control RoboVac via the app.
With the app, you can select a cleaning mode, set the time, schedule a cleaning, adjust
suction power and water flow, view the system status, receive notifications and access
additional features.
Slowly flashing blue Waiting for connection
Rapidly flashing blue Connecting with your wireless router
Solid blue Connected with your wireless router
If RoboVac gets stuck in any space, tap Find My Robot in the app to find the
machine.
Schedule Cleaning
With the eufy Clean app, you can schedule RoboVac to start cleaning at a particular time.
You can set the time and customize the cleaning schedules from Sunday to
Saturday on the eufy Clean app. This function is only available on the app.
20 EN EN 21
English English
Room Cleaning Mode (Only Available via the eufy Clean App)
In this mode, your house is automatically divided into several rooms for cleaning in the
eufy Clean app. You can also customize your room settings in the app. RoboVac will
clean the selected rooms only and return to the Charging Base after cleaning.
Start Room cleaning only after RoboVac has created the map.
It is recommended that RoboVac moves from the Charging Base to start
Room cleaning.
Zone Cleaning Mode (Only Available via the eufy Clean App)
In this mode, you can set up a cleaning zone in the eufy Clean app. RoboVac will clean
the selected zone only.
Select a Suction Power Level
In the eufy Clean app, select a suction power level according to your needs:
Quiet
Standard (Default)
Turbo
Max
When RoboVac starts cleaning the next time, it will clean according to the
suction power level you previously selected.
Select BoostIQ™ feature
In the eufy Clean app, select the BoostIQ™ feature according to your needs. RoboVac
will automatically increase the suction power if it detects that stronger power is
needed to ensure the best clean. BoostIQ™ is ideal for cleaning thicker carpets and
hard-to-sweep messes, which will reduce the total cleaning time, but increase the
noise level. If the vacuuming noise caused by BoostIQ™ disturbs you, you can disable
this feature.
Select a Cleaning Mode
Auto Cleaning Mode
Press to start cleaning in Auto Cleaning mode. You can also select this mode in the
eufy Clean app.
34 EN EN 35
Voice Prompt Cause and Solution
Error 17: Virtual
Boundary detected.
Move device to a
different area
If the machine is in a No-Go Zone and the user tries to start
cleaning, this error will be reported. Device needs to be
moved out of the No-Go Zone to start cleaning.
Error 18: Laser cover
may be stuck
This error is reported when the radar shield is stuck and
cannot operate normally. The reason why the radar shield is
stuck can be checked and moved to a new location.
Error 19: Laser sensor
may be stuck
This error is reported if the radar cannot be rotated.
Check whether there is foreign matter under the lightning
protection cover and remove it.
Error 20: Laser sensor
may be blocked
This error will be reported if there are obstacles around the
radar that obstruct the data collected by the radar. You can
check whether there is any abnormal blocking of radar light
above the fuselage and remove it.
Error 22: The device is
being picked up. Please
put the machine back
near the starting place.
This error will be reported when the machine is picked up
and the wheel is suspended when the cleaning action is
performed. You can put the machine back near where it
was picked up, and then perform the cleaning (if it is not in
the area where it was picked up, the relocation will fail).
Error S1: Battery error
Open the battery compartment and check whether the
battery is connected and restart the device.
Battery temperature may be too high or low. Wait until
the battery falls to normal temperatures before use (0 °C
- 40 °C / 32 °F - 104 °F).
If the issue persists, contact customer support for help.
Error S2: Wheel
module error
Check whether the wheels are stuck or dust is trapped
inside before restarting the device.
If the issue persists, contact customer support for help.
Error S3: Side brush
error
Check whether the side brush is stuck in an unknown
object before restarting the device.
If the issue persists, contact customer support for help.
Error S4: Suction fan
error
Check whether the fan blades are stuck in an unknown
object before restarting the device.
Clean the dust bin and filter before restarting the device.
If the issue persists, contact customer support for help.
Voice Prompt Cause and Solution
Error S5: Rolling Brush
Error. Refer to Owner's
Manual or app for
help.
Remove and clean the roller brush, roller brush
connection, roller brush cover and suction inlet before
restarting the device.
If the issue persists, contact customer support for help.
Error S7: Laser Sensor
Error. Refer to Owner's
Manual or App for
help
This error is reported if the radar cannot collect data. You
can use the hand to toggle the radar to observe whether
it can rotate normally and whether the rotation resistance
is very large; restart the sweeper to observe whether it
can operate normally. If an error is still reported after the
above two solutions are implemented, you can contact
the after-sales service department for processing.
Specifications
Input 24 V 1 A
Battery Voltage 14.4 V
Power Consumption 50 W
Battery Type
Li-ion 3200 mAh (Typical)
Dust Box Capacity 600 ml
Charging Time 180 - 240 mins
Input 24 V 1 A
Output 24 V 1 A
During cleaning, RoboVac will return to the Charging Base automatically
if the battery level becomes low. To resume cleaning from where it left off,
enable this feature in the eufy Clean app.
By default, RoboVac starts in Auto Cleaning mode when it is turned on.
Spot Cleaning Mode (Only Available via the eufy Clean App)
In this mode, RoboVac intensively cleans a specific area with a size of 4.9 ft x 4.9 ft /
1.5 m x 1.5 m, useful if there is a concentrated area of dust or debris. When the
cleaning of a certain zone is finished, it automatically returns to the Charging Base.
4.9 ft / 1.5 m
4.9 ft / 1.5 m
22 EN EN 23
English English
3
Remove the water tank. Open the water inlet cover to fill the water, then close the
cover.
34 EN EN 35
Voice Prompt Cause and Solution
Error 17: Virtual
Boundary detected.
Move device to a
different area
If the machine is in a No-Go Zone and the user tries to start
cleaning, this error will be reported. Device needs to be
moved out of the No-Go Zone to start cleaning.
Error 18: Laser cover
may be stuck
This error is reported when the radar shield is stuck and
cannot operate normally. The reason why the radar shield is
stuck can be checked and moved to a new location.
Error 19: Laser sensor
may be stuck
This error is reported if the radar cannot be rotated.
Check whether there is foreign matter under the lightning
protection cover and remove it.
Error 20: Laser sensor
may be blocked
This error will be reported if there are obstacles around the
radar that obstruct the data collected by the radar. You can
check whether there is any abnormal blocking of radar light
above the fuselage and remove it.
Error 22: The device is
being picked up. Please
put the machine back
near the starting place.
This error will be reported when the machine is picked up
and the wheel is suspended when the cleaning action is
performed. You can put the machine back near where it
was picked up, and then perform the cleaning (if it is not in
the area where it was picked up, the relocation will fail).
Error S1: Battery error
Open the battery compartment and check whether the
battery is connected and restart the device.
Battery temperature may be too high or low. Wait until
the battery falls to normal temperatures before use (0 °C
- 40 °C / 32 °F - 104 °F).
If the issue persists, contact customer support for help.
Error S2: Wheel
module error
Check whether the wheels are stuck or dust is trapped
inside before restarting the device.
If the issue persists, contact customer support for help.
Error S3: Side brush
error
Check whether the side brush is stuck in an unknown
object before restarting the device.
If the issue persists, contact customer support for help.
Error S4: Suction fan
error
Check whether the fan blades are stuck in an unknown
object before restarting the device.
Clean the dust bin and filter before restarting the device.
If the issue persists, contact customer support for help.
Voice Prompt Cause and Solution
Error S5: Rolling Brush
Error. Refer to Owner's
Manual or app for
help.
Remove and clean the roller brush, roller brush
connection, roller brush cover and suction inlet before
restarting the device.
If the issue persists, contact customer support for help.
Error S7: Laser Sensor
Error. Refer to Owner's
Manual or App for
help
This error is reported if the radar cannot collect data. You
can use the hand to toggle the radar to observe whether
it can rotate normally and whether the rotation resistance
is very large; restart the sweeper to observe whether it
can operate normally. If an error is still reported after the
above two solutions are implemented, you can contact
the after-sales service department for processing.
Specifications
Input 24 V 1 A
Battery Voltage 14.4 V
Power Consumption 50 W
Battery Type
Li-ion 3200 mAh (Typical)
Dust Box Capacity 600 ml
Charging Time 180 - 240 mins
Input 24 V 1 A
Output 24 V 1 A
Do not use any cleaning solution, as your floor may become slippery and
therefore affect the cleaning effect.
4
Install the mopping module and water tank back into the bottom of RoboVac until
a click is heard.
34 EN EN 35
Voice Prompt Cause and Solution
Error 17: Virtual
Boundary detected.
Move device to a
different area
If the machine is in a No-Go Zone and the user tries to start
cleaning, this error will be reported. Device needs to be
moved out of the No-Go Zone to start cleaning.
Error 18: Laser cover
may be stuck
This error is reported when the radar shield is stuck and
cannot operate normally. The reason why the radar shield is
stuck can be checked and moved to a new location.
Error 19: Laser sensor
may be stuck
This error is reported if the radar cannot be rotated.
Check whether there is foreign matter under the lightning
protection cover and remove it.
Error 20: Laser sensor
may be blocked
This error will be reported if there are obstacles around the
radar that obstruct the data collected by the radar. You can
check whether there is any abnormal blocking of radar light
above the fuselage and remove it.
Error 22: The device is
being picked up. Please
put the machine back
near the starting place.
This error will be reported when the machine is picked up
and the wheel is suspended when the cleaning action is
performed. You can put the machine back near where it
was picked up, and then perform the cleaning (if it is not in
the area where it was picked up, the relocation will fail).
Error S1: Battery error
Open the battery compartment and check whether the
battery is connected and restart the device.
Battery temperature may be too high or low. Wait until
the battery falls to normal temperatures before use (0 °C
- 40 °C / 32 °F - 104 °F).
If the issue persists, contact customer support for help.
Error S2: Wheel
module error
Check whether the wheels are stuck or dust is trapped
inside before restarting the device.
If the issue persists, contact customer support for help.
Error S3: Side brush
error
Check whether the side brush is stuck in an unknown
object before restarting the device.
If the issue persists, contact customer support for help.
Error S4: Suction fan
error
Check whether the fan blades are stuck in an unknown
object before restarting the device.
Clean the dust bin and filter before restarting the device.
If the issue persists, contact customer support for help.
Voice Prompt Cause and Solution
Error S5: Rolling Brush
Error. Refer to Owner's
Manual or app for
help.
Remove and clean the roller brush, roller brush
connection, roller brush cover and suction inlet before
restarting the device.
If the issue persists, contact customer support for help.
Error S7: Laser Sensor
Error. Refer to Owner's
Manual or App for
help
This error is reported if the radar cannot collect data. You
can use the hand to toggle the radar to observe whether
it can rotate normally and whether the rotation resistance
is very large; restart the sweeper to observe whether it
can operate normally. If an error is still reported after the
above two solutions are implemented, you can contact
the after-sales service department for processing.
Specifications
Input 24 V 1 A
Battery Voltage 14.4 V
Power Consumption 50 W
Battery Type
Li-ion 3200 mAh (Typical)
Dust Box Capacity 600 ml
Charging Time 180 - 240 mins
Input 24 V 1 A
Output 24 V 1 A
The mopping mode is only intended for a clean floor without stubborn
stains. To achieve a better mopping effect, it is recommended to clean the
floor with RoboVac three times before mopping.
5
Start cleaning. RoboVac will automatically vacuum and mop.
Use Mopping System
The mopping mode is only intended for a clean floor without stubborn stains
or liquids. To avoid staining floors, do not use the mopping function when
dust is mixed with liquids such as coffee or ink.
Mopping System cleans best on smooth hard surfaces and may not perform
so well on uneven tiles, heavily waxed floors or rough surfaces like slate or
brick, which may snag the mopping module.
The mopping mode is not recommended when no one is at home.
Do not use the mopping mode on a carpeted floor. It is recommended to set
a “No-Mop” zone in the eufy Clean app to avoid cleaning the carpeted area.
1
Before mopping, install the waterproof pad under the Charging Base to protect
the floor.
2
Wet the mopping cloth and wring it until it does not drip, then attach the cloth to
the mopping module.
24 EN EN 25
English English
To control RoboVac with Amazon Alexa or the Google
Assistant
1. Open the eufy Clean app and find “Smart Integrations” in the top left.
2. Follow the on-screen instructions to complete the setup.
Currently, this feature only supports English, German, French, and
Spanish. For more supported languages, check https://www.eufylife.com/
support/.
Enable / Disable the Child Safety Lock
Press and hold the button for 3 seconds to turn on the child safety lock. Once
the child safety lock is enabled, RoboVac will not respond if any button is pressed to
protect children from accidentally getting hurt.
To disable the child safety lock, press and hold the button for 3 seconds again.
This function is also available in the eufy Clean app.
Cleaning and Maintenance
Before cleaning and maintaining, turn o the device and unplug the adapter.
For optimal performance, follow the instructions below to clean and maintain RoboVac
regularly. The cleaning / replacement frequency will depend on your RoboVac usage
habits.
Recommended Cleaning / Replacement Frequency
RoboVac Part Cleaning Frequency
Replacement Frequency
Dust box and water tank After each use -
Filter
Once a week
(Twice a week if you have a
pet)
Every 6 months or after
every 50 rounds of cleaning
Side brushes Once a month Every 3-6 months (or when
visibly worn)
Brush guard Once a month Every 3-6 months (or when
visibly worn)
6
When RoboVac finishes cleaning and returns to the Charging Base, remove the
mopping module.
34 EN EN 35
Voice Prompt Cause and Solution
Error 17: Virtual
Boundary detected.
Move device to a
different area
If the machine is in a No-Go Zone and the user tries to start
cleaning, this error will be reported. Device needs to be
moved out of the No-Go Zone to start cleaning.
Error 18: Laser cover
may be stuck
This error is reported when the radar shield is stuck and
cannot operate normally. The reason why the radar shield is
stuck can be checked and moved to a new location.
Error 19: Laser sensor
may be stuck
This error is reported if the radar cannot be rotated.
Check whether there is foreign matter under the lightning
protection cover and remove it.
Error 20: Laser sensor
may be blocked
This error will be reported if there are obstacles around the
radar that obstruct the data collected by the radar. You can
check whether there is any abnormal blocking of radar light
above the fuselage and remove it.
Error 22: The device is
being picked up. Please
put the machine back
near the starting place.
This error will be reported when the machine is picked up
and the wheel is suspended when the cleaning action is
performed. You can put the machine back near where it
was picked up, and then perform the cleaning (if it is not in
the area where it was picked up, the relocation will fail).
Error S1: Battery error
Open the battery compartment and check whether the
battery is connected and restart the device.
Battery temperature may be too high or low. Wait until
the battery falls to normal temperatures before use (0 °C
- 40 °C / 32 °F - 104 °F).
If the issue persists, contact customer support for help.
Error S2: Wheel
module error
Check whether the wheels are stuck or dust is trapped
inside before restarting the device.
If the issue persists, contact customer support for help.
Error S3: Side brush
error
Check whether the side brush is stuck in an unknown
object before restarting the device.
If the issue persists, contact customer support for help.
Error S4: Suction fan
error
Check whether the fan blades are stuck in an unknown
object before restarting the device.
Clean the dust bin and filter before restarting the device.
If the issue persists, contact customer support for help.
Voice Prompt Cause and Solution
Error S5: Rolling Brush
Error. Refer to Owner's
Manual or app for
help.
Remove and clean the roller brush, roller brush
connection, roller brush cover and suction inlet before
restarting the device.
If the issue persists, contact customer support for help.
Error S7: Laser Sensor
Error. Refer to Owner's
Manual or App for
help
This error is reported if the radar cannot collect data. You
can use the hand to toggle the radar to observe whether
it can rotate normally and whether the rotation resistance
is very large; restart the sweeper to observe whether it
can operate normally. If an error is still reported after the
above two solutions are implemented, you can contact
the after-sales service department for processing.
Specifications
Input 24 V 1 A
Battery Voltage 14.4 V
Power Consumption 50 W
Battery Type
Li-ion 3200 mAh (Typical)
Dust Box Capacity 600 ml
Charging Time 180 - 240 mins
Input 24 V 1 A
Output 24 V 1 A
7
Press the release button to remove the dust box and the water tank.
34 EN EN 35
Voice Prompt Cause and Solution
Error 17: Virtual
Boundary detected.
Move device to a
different area
If the machine is in a No-Go Zone and the user tries to start
cleaning, this error will be reported. Device needs to be
moved out of the No-Go Zone to start cleaning.
Error 18: Laser cover
may be stuck
This error is reported when the radar shield is stuck and
cannot operate normally. The reason why the radar shield is
stuck can be checked and moved to a new location.
Error 19: Laser sensor
may be stuck
This error is reported if the radar cannot be rotated.
Check whether there is foreign matter under the lightning
protection cover and remove it.
Error 20: Laser sensor
may be blocked
This error will be reported if there are obstacles around the
radar that obstruct the data collected by the radar. You can
check whether there is any abnormal blocking of radar light
above the fuselage and remove it.
Error 22: The device is
being picked up. Please
put the machine back
near the starting place.
This error will be reported when the machine is picked up
and the wheel is suspended when the cleaning action is
performed. You can put the machine back near where it
was picked up, and then perform the cleaning (if it is not in
the area where it was picked up, the relocation will fail).
Error S1: Battery error
Open the battery compartment and check whether the
battery is connected and restart the device.
Battery temperature may be too high or low. Wait until
the battery falls to normal temperatures before use (0 °C
- 40 °C / 32 °F - 104 °F).
If the issue persists, contact customer support for help.
Error S2: Wheel
module error
Check whether the wheels are stuck or dust is trapped
inside before restarting the device.
If the issue persists, contact customer support for help.
Error S3: Side brush
error
Check whether the side brush is stuck in an unknown
object before restarting the device.
If the issue persists, contact customer support for help.
Error S4: Suction fan
error
Check whether the fan blades are stuck in an unknown
object before restarting the device.
Clean the dust bin and filter before restarting the device.
If the issue persists, contact customer support for help.
Voice Prompt Cause and Solution
Error S5: Rolling Brush
Error. Refer to Owner's
Manual or app for
help.
Remove and clean the roller brush, roller brush
connection, roller brush cover and suction inlet before
restarting the device.
If the issue persists, contact customer support for help.
Error S7: Laser Sensor
Error. Refer to Owner's
Manual or App for
help
This error is reported if the radar cannot collect data. You
can use the hand to toggle the radar to observe whether
it can rotate normally and whether the rotation resistance
is very large; restart the sweeper to observe whether it
can operate normally. If an error is still reported after the
above two solutions are implemented, you can contact
the after-sales service department for processing.
Specifications
Input 24 V 1 A
Battery Voltage 14.4 V
Power Consumption 50 W
Battery Type
Li-ion 3200 mAh (Typical)
Dust Box Capacity 600 ml
Charging Time 180 - 240 mins
Input 24 V 1 A
Output 24 V 1 A
8
Clean the dust box and water tank, empty any remaining water, and clean the
mopping cloth to prevent mildew or unpleasant smells. For how to clean and
maintain the components, refer to the “Cleaning and Maintenance” section in this
manual.
Use Your RoboVac with Amazon Alexa / the Google
Assistant
Amazon Alexa or the Google Assistant is a smart voice control device that enables
you to control RoboVac with your voice.
Before you start, make sure that:
RoboVac is attached to the Charging Base to ensure there is enough power.
RoboVac is connected with the eufy Clean app.
You have an Amazon Alexa-enabled device (i.e. Amazon Echo, Echo Dot and
Amazon Tap, Echo Show, Echo Spot) or a device enabled with the Google Assistant
(i.e. Google Home, Google Home Mini). These devices are sold separately.
The Amazon Alexa app or Google Home app is already installed on your smart
device, and you have created an account.
26 EN EN 27
English English
3
Open and empty the dust box.
4
Remove the foam filter and high-performance filter.
5
Clean the dust box and filters with the cleaning brush.
Rolling brush Once a month Every 6-8 months
Sensors Once a month -
Charging pins Once a month -
Swivel wheel Once a month -
Mopping cloth After each use -
Clean the Dust Box, Water Tank, and Filter
1
Press the release button to remove the dust box and water tank.
2
Separate the dust box from the water tank.
34 EN EN 35
Voice Prompt Cause and Solution
Error 17: Virtual
Boundary detected.
Move device to a
different area
If the machine is in a No-Go Zone and the user tries to start
cleaning, this error will be reported. Device needs to be
moved out of the No-Go Zone to start cleaning.
Error 18: Laser cover
may be stuck
This error is reported when the radar shield is stuck and
cannot operate normally. The reason why the radar shield is
stuck can be checked and moved to a new location.
Error 19: Laser sensor
may be stuck
This error is reported if the radar cannot be rotated.
Check whether there is foreign matter under the lightning
protection cover and remove it.
Error 20: Laser sensor
may be blocked
This error will be reported if there are obstacles around the
radar that obstruct the data collected by the radar. You can
check whether there is any abnormal blocking of radar light
above the fuselage and remove it.
Error 22: The device is
being picked up. Please
put the machine back
near the starting place.
This error will be reported when the machine is picked up
and the wheel is suspended when the cleaning action is
performed. You can put the machine back near where it
was picked up, and then perform the cleaning (if it is not in
the area where it was picked up, the relocation will fail).
Error S1: Battery error
Open the battery compartment and check whether the
battery is connected and restart the device.
Battery temperature may be too high or low. Wait until
the battery falls to normal temperatures before use (0 °C
- 40 °C / 32 °F - 104 °F).
If the issue persists, contact customer support for help.
Error S2: Wheel
module error
Check whether the wheels are stuck or dust is trapped
inside before restarting the device.
If the issue persists, contact customer support for help.
Error S3: Side brush
error
Check whether the side brush is stuck in an unknown
object before restarting the device.
If the issue persists, contact customer support for help.
Error S4: Suction fan
error
Check whether the fan blades are stuck in an unknown
object before restarting the device.
Clean the dust bin and filter before restarting the device.
If the issue persists, contact customer support for help.
Voice Prompt Cause and Solution
Error S5: Rolling Brush
Error. Refer to Owner's
Manual or app for
help.
Remove and clean the roller brush, roller brush
connection, roller brush cover and suction inlet before
restarting the device.
If the issue persists, contact customer support for help.
Error S7: Laser Sensor
Error. Refer to Owner's
Manual or App for
help
This error is reported if the radar cannot collect data. You
can use the hand to toggle the radar to observe whether
it can rotate normally and whether the rotation resistance
is very large; restart the sweeper to observe whether it
can operate normally. If an error is still reported after the
above two solutions are implemented, you can contact
the after-sales service department for processing.
Specifications
Input 24 V 1 A
Battery Voltage 14.4 V
Power Consumption 50 W
Battery Type
Li-ion 3200 mAh (Typical)
Dust Box Capacity 600 ml
Charging Time 180 - 240 mins
Input 24 V 1 A
Output 24 V 1 A
18 EN EN 19
Use Your RoboVac with the eufy Clean App
To enjoy all available features, it is recommended to control your RoboVac via the eufy
Clean app.
Before you start, make sure that:
Your smartphone or tablet is running iOS 10.0 (or above) or Android 5.0 (or above).
The 2.4GHz band wireless signal is enabled on your wireless router.
RoboVac is attached to the Charging Base to ensure it has enough power during setup.
eufy Clean
eufy Clean
1
Download the eufy Clean app from the App Store (iOS devices) or Google Play
(Android devices).
2
Open the app and create a user account.
3
Tap the “+” icon to add “eufy Clean LR20” to your eufy Clean account.
4
Follow the instructions in the app to set up the Wi-Fi connection.
After connecting successfully, you can control RoboVac via the app.
With the app, you can select a cleaning mode, set the time, schedule a cleaning, adjust
suction power and water flow, view the system status, receive notifications and access
additional features.
Slowly flashing blue Waiting for connection
Rapidly flashing blue Connecting with your wireless router
Solid blue Connected with your wireless router
If RoboVac gets stuck in any space, tap Find My Robot in the app to find the
machine.
Schedule Cleaning
With the eufy Clean app, you can schedule RoboVac to start cleaning at a particular time.
You can set the time and customize the cleaning schedules from Sunday to
Saturday on the eufy Clean app. This function is only available on the app.
Start / Stop Cleaning
You can also start or stop cleaning via the eufy Clean app.
1
Press and hold for 3 seconds to turn on.
3 sec
2
Press to start cleaning in Auto Cleaning mode.
To pause cleaning, press again.
To turn off, press and hold for 3 seconds.
28 EN EN 29
English English
9
Place the filters back into the dust box.
34 EN EN 35
Voice Prompt Cause and Solution
Error 17: Virtual
Boundary detected.
Move device to a
different area
If the machine is in a No-Go Zone and the user tries to start
cleaning, this error will be reported. Device needs to be
moved out of the No-Go Zone to start cleaning.
Error 18: Laser cover
may be stuck
This error is reported when the radar shield is stuck and
cannot operate normally. The reason why the radar shield is
stuck can be checked and moved to a new location.
Error 19: Laser sensor
may be stuck
This error is reported if the radar cannot be rotated.
Check whether there is foreign matter under the lightning
protection cover and remove it.
Error 20: Laser sensor
may be blocked
This error will be reported if there are obstacles around the
radar that obstruct the data collected by the radar. You can
check whether there is any abnormal blocking of radar light
above the fuselage and remove it.
Error 22: The device is
being picked up. Please
put the machine back
near the starting place.
This error will be reported when the machine is picked up
and the wheel is suspended when the cleaning action is
performed. You can put the machine back near where it
was picked up, and then perform the cleaning (if it is not in
the area where it was picked up, the relocation will fail).
Error S1: Battery error
Open the battery compartment and check whether the
battery is connected and restart the device.
Battery temperature may be too high or low. Wait until
the battery falls to normal temperatures before use (0 °C
- 40 °C / 32 °F - 104 °F).
If the issue persists, contact customer support for help.
Error S2: Wheel
module error
Check whether the wheels are stuck or dust is trapped
inside before restarting the device.
If the issue persists, contact customer support for help.
Error S3: Side brush
error
Check whether the side brush is stuck in an unknown
object before restarting the device.
If the issue persists, contact customer support for help.
Error S4: Suction fan
error
Check whether the fan blades are stuck in an unknown
object before restarting the device.
Clean the dust bin and filter before restarting the device.
If the issue persists, contact customer support for help.
Voice Prompt Cause and Solution
Error S5: Rolling Brush
Error. Refer to Owner's
Manual or app for
help.
Remove and clean the roller brush, roller brush
connection, roller brush cover and suction inlet before
restarting the device.
If the issue persists, contact customer support for help.
Error S7: Laser Sensor
Error. Refer to Owner's
Manual or App for
help
This error is reported if the radar cannot collect data. You
can use the hand to toggle the radar to observe whether
it can rotate normally and whether the rotation resistance
is very large; restart the sweeper to observe whether it
can operate normally. If an error is still reported after the
above two solutions are implemented, you can contact
the after-sales service department for processing.
Specifications
Input 24 V 1 A
Battery Voltage 14.4 V
Power Consumption 50 W
Battery Type
Li-ion 3200 mAh (Typical)
Dust Box Capacity 600 ml
Charging Time 180 - 240 mins
Input 24 V 1 A
Output 24 V 1 A
10
Push the dust box and water tank back into the main unit.
34 EN EN 35
Voice Prompt Cause and Solution
Error 17: Virtual
Boundary detected.
Move device to a
different area
If the machine is in a No-Go Zone and the user tries to start
cleaning, this error will be reported. Device needs to be
moved out of the No-Go Zone to start cleaning.
Error 18: Laser cover
may be stuck
This error is reported when the radar shield is stuck and
cannot operate normally. The reason why the radar shield is
stuck can be checked and moved to a new location.
Error 19: Laser sensor
may be stuck
This error is reported if the radar cannot be rotated.
Check whether there is foreign matter under the lightning
protection cover and remove it.
Error 20: Laser sensor
may be blocked
This error will be reported if there are obstacles around the
radar that obstruct the data collected by the radar. You can
check whether there is any abnormal blocking of radar light
above the fuselage and remove it.
Error 22: The device is
being picked up. Please
put the machine back
near the starting place.
This error will be reported when the machine is picked up
and the wheel is suspended when the cleaning action is
performed. You can put the machine back near where it
was picked up, and then perform the cleaning (if it is not in
the area where it was picked up, the relocation will fail).
Error S1: Battery error
Open the battery compartment and check whether the
battery is connected and restart the device.
Battery temperature may be too high or low. Wait until
the battery falls to normal temperatures before use (0 °C
- 40 °C / 32 °F - 104 °F).
If the issue persists, contact customer support for help.
Error S2: Wheel
module error
Check whether the wheels are stuck or dust is trapped
inside before restarting the device.
If the issue persists, contact customer support for help.
Error S3: Side brush
error
Check whether the side brush is stuck in an unknown
object before restarting the device.
If the issue persists, contact customer support for help.
Error S4: Suction fan
error
Check whether the fan blades are stuck in an unknown
object before restarting the device.
Clean the dust bin and filter before restarting the device.
If the issue persists, contact customer support for help.
Voice Prompt Cause and Solution
Error S5: Rolling Brush
Error. Refer to Owner's
Manual or app for
help.
Remove and clean the roller brush, roller brush
connection, roller brush cover and suction inlet before
restarting the device.
If the issue persists, contact customer support for help.
Error S7: Laser Sensor
Error. Refer to Owner's
Manual or App for
help
This error is reported if the radar cannot collect data. You
can use the hand to toggle the radar to observe whether
it can rotate normally and whether the rotation resistance
is very large; restart the sweeper to observe whether it
can operate normally. If an error is still reported after the
above two solutions are implemented, you can contact
the after-sales service department for processing.
Specifications
Input 24 V 1 A
Battery Voltage 14.4 V
Power Consumption 50 W
Battery Type
Li-ion 3200 mAh (Typical)
Dust Box Capacity 600 ml
Charging Time 180 - 240 mins
Input 24 V 1 A
Output 24 V 1 A
6
Empty the remaining water in the water tank.
7
Rinse the dust box, water tank, and filters thoroughly with water.
1min
Do not use hot water or any detergent to clean the filters.
8
Air-dry the dust box, water tank and filters completely before next use. You may
use another filter if the original one is not dry.
24h
34 EN EN 35
Voice Prompt Cause and Solution
Error 17: Virtual
Boundary detected.
Move device to a
different area
If the machine is in a No-Go Zone and the user tries to start
cleaning, this error will be reported. Device needs to be
moved out of the No-Go Zone to start cleaning.
Error 18: Laser cover
may be stuck
This error is reported when the radar shield is stuck and
cannot operate normally. The reason why the radar shield is
stuck can be checked and moved to a new location.
Error 19: Laser sensor
may be stuck
This error is reported if the radar cannot be rotated.
Check whether there is foreign matter under the lightning
protection cover and remove it.
Error 20: Laser sensor
may be blocked
This error will be reported if there are obstacles around the
radar that obstruct the data collected by the radar. You can
check whether there is any abnormal blocking of radar light
above the fuselage and remove it.
Error 22: The device is
being picked up. Please
put the machine back
near the starting place.
This error will be reported when the machine is picked up
and the wheel is suspended when the cleaning action is
performed. You can put the machine back near where it
was picked up, and then perform the cleaning (if it is not in
the area where it was picked up, the relocation will fail).
Error S1: Battery error
Open the battery compartment and check whether the
battery is connected and restart the device.
Battery temperature may be too high or low. Wait until
the battery falls to normal temperatures before use (0 °C
- 40 °C / 32 °F - 104 °F).
If the issue persists, contact customer support for help.
Error S2: Wheel
module error
Check whether the wheels are stuck or dust is trapped
inside before restarting the device.
If the issue persists, contact customer support for help.
Error S3: Side brush
error
Check whether the side brush is stuck in an unknown
object before restarting the device.
If the issue persists, contact customer support for help.
Error S4: Suction fan
error
Check whether the fan blades are stuck in an unknown
object before restarting the device.
Clean the dust bin and filter before restarting the device.
If the issue persists, contact customer support for help.
Voice Prompt Cause and Solution
Error S5: Rolling Brush
Error. Refer to Owner's
Manual or app for
help.
Remove and clean the roller brush, roller brush
connection, roller brush cover and suction inlet before
restarting the device.
If the issue persists, contact customer support for help.
Error S7: Laser Sensor
Error. Refer to Owner's
Manual or App for
help
This error is reported if the radar cannot collect data. You
can use the hand to toggle the radar to observe whether
it can rotate normally and whether the rotation resistance
is very large; restart the sweeper to observe whether it
can operate normally. If an error is still reported after the
above two solutions are implemented, you can contact
the after-sales service department for processing.
Specifications
Input 24 V 1 A
Battery Voltage 14.4 V
Power Consumption 50 W
Battery Type
Li-ion 3200 mAh (Typical)
Dust Box Capacity 600 ml
Charging Time 180 - 240 mins
Input 24 V 1 A
Output 24 V 1 A
Do not use the filters if they are not completely dry, otherwise it may affect
the cleaning performance.
30 EN EN 31
English English
2
Carefully unwind and pull o any hair or string that is wrapped between the main
unit and the side brushes.
3
Use a cloth dampened with warm water to remove dust from the brushes or to
gently reshape them.
34 EN EN 35
Voice Prompt Cause and Solution
Error 17: Virtual
Boundary detected.
Move device to a
different area
If the machine is in a No-Go Zone and the user tries to start
cleaning, this error will be reported. Device needs to be
moved out of the No-Go Zone to start cleaning.
Error 18: Laser cover
may be stuck
This error is reported when the radar shield is stuck and
cannot operate normally. The reason why the radar shield is
stuck can be checked and moved to a new location.
Error 19: Laser sensor
may be stuck
This error is reported if the radar cannot be rotated.
Check whether there is foreign matter under the lightning
protection cover and remove it.
Error 20: Laser sensor
may be blocked
This error will be reported if there are obstacles around the
radar that obstruct the data collected by the radar. You can
check whether there is any abnormal blocking of radar light
above the fuselage and remove it.
Error 22: The device is
being picked up. Please
put the machine back
near the starting place.
This error will be reported when the machine is picked up
and the wheel is suspended when the cleaning action is
performed. You can put the machine back near where it
was picked up, and then perform the cleaning (if it is not in
the area where it was picked up, the relocation will fail).
Error S1: Battery error
Open the battery compartment and check whether the
battery is connected and restart the device.
Battery temperature may be too high or low. Wait until
the battery falls to normal temperatures before use (0 °C
- 40 °C / 32 °F - 104 °F).
If the issue persists, contact customer support for help.
Error S2: Wheel
module error
Check whether the wheels are stuck or dust is trapped
inside before restarting the device.
If the issue persists, contact customer support for help.
Error S3: Side brush
error
Check whether the side brush is stuck in an unknown
object before restarting the device.
If the issue persists, contact customer support for help.
Error S4: Suction fan
error
Check whether the fan blades are stuck in an unknown
object before restarting the device.
Clean the dust bin and filter before restarting the device.
If the issue persists, contact customer support for help.
Voice Prompt Cause and Solution
Error S5: Rolling Brush
Error. Refer to Owner's
Manual or app for
help.
Remove and clean the roller brush, roller brush
connection, roller brush cover and suction inlet before
restarting the device.
If the issue persists, contact customer support for help.
Error S7: Laser Sensor
Error. Refer to Owner's
Manual or App for
help
This error is reported if the radar cannot collect data. You
can use the hand to toggle the radar to observe whether
it can rotate normally and whether the rotation resistance
is very large; restart the sweeper to observe whether it
can operate normally. If an error is still reported after the
above two solutions are implemented, you can contact
the after-sales service department for processing.
Specifications
Input 24 V 1 A
Battery Voltage 14.4 V
Power Consumption 50 W
Battery Type
Li-ion 3200 mAh (Typical)
Dust Box Capacity 600 ml
Charging Time 180 - 240 mins
Input 24 V 1 A
Output 24 V 1 A
Only use the side brushes when they are completely dry.
Replace the Side Brushes
The side brushes may become damaged after being used for a period of time. Follow
the instructions below to replace them.
Pull off the old side brushes and snap the new ones into place until you hear a click.
Make sure the left side brush marked with an L (Left) and the right side
brush marked with an R (right) are installed correctly, as illustrated.
Otherwise, the side brushes may be damaged.
34 EN EN 35
Voice Prompt Cause and Solution
Error 17: Virtual
Boundary detected.
Move device to a
different area
If the machine is in a No-Go Zone and the user tries to start
cleaning, this error will be reported. Device needs to be
moved out of the No-Go Zone to start cleaning.
Error 18: Laser cover
may be stuck
This error is reported when the radar shield is stuck and
cannot operate normally. The reason why the radar shield is
stuck can be checked and moved to a new location.
Error 19: Laser sensor
may be stuck
This error is reported if the radar cannot be rotated.
Check whether there is foreign matter under the lightning
protection cover and remove it.
Error 20: Laser sensor
may be blocked
This error will be reported if there are obstacles around the
radar that obstruct the data collected by the radar. You can
check whether there is any abnormal blocking of radar light
above the fuselage and remove it.
Error 22: The device is
being picked up. Please
put the machine back
near the starting place.
This error will be reported when the machine is picked up
and the wheel is suspended when the cleaning action is
performed. You can put the machine back near where it
was picked up, and then perform the cleaning (if it is not in
the area where it was picked up, the relocation will fail).
Error S1: Battery error
Open the battery compartment and check whether the
battery is connected and restart the device.
Battery temperature may be too high or low. Wait until
the battery falls to normal temperatures before use (0 °C
- 40 °C / 32 °F - 104 °F).
If the issue persists, contact customer support for help.
Error S2: Wheel
module error
Check whether the wheels are stuck or dust is trapped
inside before restarting the device.
If the issue persists, contact customer support for help.
Error S3: Side brush
error
Check whether the side brush is stuck in an unknown
object before restarting the device.
If the issue persists, contact customer support for help.
Error S4: Suction fan
error
Check whether the fan blades are stuck in an unknown
object before restarting the device.
Clean the dust bin and filter before restarting the device.
If the issue persists, contact customer support for help.
Voice Prompt Cause and Solution
Error S5: Rolling Brush
Error. Refer to Owner's
Manual or app for
help.
Remove and clean the roller brush, roller brush
connection, roller brush cover and suction inlet before
restarting the device.
If the issue persists, contact customer support for help.
Error S7: Laser Sensor
Error. Refer to Owner's
Manual or App for
help
This error is reported if the radar cannot collect data. You
can use the hand to toggle the radar to observe whether
it can rotate normally and whether the rotation resistance
is very large; restart the sweeper to observe whether it
can operate normally. If an error is still reported after the
above two solutions are implemented, you can contact
the after-sales service department for processing.
Specifications
Input 24 V 1 A
Battery Voltage 14.4 V
Power Consumption 50 W
Battery Type
Li-ion 3200 mAh (Typical)
Dust Box Capacity 600 ml
Charging Time 180 - 240 mins
Input 24 V 1 A
Output 24 V 1 A
Clean the Rolling Brush
1
Pull on the release tabs to unlock the brush guard as shown.
2
Lift the rolling brush to remove.
3
Clean the rolling brush with the cleaning tool.
4
Reinstall the rolling brush by inserting the fixed protruding end first.
5
Press down to snap the brush guard into place.
1 2
3
54
34 EN EN 35
Voice Prompt Cause and Solution
Error 17: Virtual
Boundary detected.
Move device to a
different area
If the machine is in a No-Go Zone and the user tries to start
cleaning, this error will be reported. Device needs to be
moved out of the No-Go Zone to start cleaning.
Error 18: Laser cover
may be stuck
This error is reported when the radar shield is stuck and
cannot operate normally. The reason why the radar shield is
stuck can be checked and moved to a new location.
Error 19: Laser sensor
may be stuck
This error is reported if the radar cannot be rotated.
Check whether there is foreign matter under the lightning
protection cover and remove it.
Error 20: Laser sensor
may be blocked
This error will be reported if there are obstacles around the
radar that obstruct the data collected by the radar. You can
check whether there is any abnormal blocking of radar light
above the fuselage and remove it.
Error 22: The device is
being picked up. Please
put the machine back
near the starting place.
This error will be reported when the machine is picked up
and the wheel is suspended when the cleaning action is
performed. You can put the machine back near where it
was picked up, and then perform the cleaning (if it is not in
the area where it was picked up, the relocation will fail).
Error S1: Battery error
Open the battery compartment and check whether the
battery is connected and restart the device.
Battery temperature may be too high or low. Wait until
the battery falls to normal temperatures before use (0 °C
- 40 °C / 32 °F - 104 °F).
If the issue persists, contact customer support for help.
Error S2: Wheel
module error
Check whether the wheels are stuck or dust is trapped
inside before restarting the device.
If the issue persists, contact customer support for help.
Error S3: Side brush
error
Check whether the side brush is stuck in an unknown
object before restarting the device.
If the issue persists, contact customer support for help.
Error S4: Suction fan
error
Check whether the fan blades are stuck in an unknown
object before restarting the device.
Clean the dust bin and filter before restarting the device.
If the issue persists, contact customer support for help.
Voice Prompt Cause and Solution
Error S5: Rolling Brush
Error. Refer to Owner's
Manual or app for
help.
Remove and clean the roller brush, roller brush
connection, roller brush cover and suction inlet before
restarting the device.
If the issue persists, contact customer support for help.
Error S7: Laser Sensor
Error. Refer to Owner's
Manual or App for
help
This error is reported if the radar cannot collect data. You
can use the hand to toggle the radar to observe whether
it can rotate normally and whether the rotation resistance
is very large; restart the sweeper to observe whether it
can operate normally. If an error is still reported after the
above two solutions are implemented, you can contact
the after-sales service department for processing.
Specifications
Input 24 V 1 A
Battery Voltage 14.4 V
Power Consumption 50 W
Battery Type
Li-ion 3200 mAh (Typical)
Dust Box Capacity 600 ml
Charging Time 180 - 240 mins
Input 24 V 1 A
Output 24 V 1 A
Clean the Side Brushes
Foreign substances, such as hair, can easily get tangled in the side brushes, and dirt
may adhere to them. Be sure to clean them regularly.
1
Remove the side brushes.
34 EN EN 35
Voice Prompt Cause and Solution
Error 17: Virtual
Boundary detected.
Move device to a
different area
If the machine is in a No-Go Zone and the user tries to start
cleaning, this error will be reported. Device needs to be
moved out of the No-Go Zone to start cleaning.
Error 18: Laser cover
may be stuck
This error is reported when the radar shield is stuck and
cannot operate normally. The reason why the radar shield is
stuck can be checked and moved to a new location.
Error 19: Laser sensor
may be stuck
This error is reported if the radar cannot be rotated.
Check whether there is foreign matter under the lightning
protection cover and remove it.
Error 20: Laser sensor
may be blocked
This error will be reported if there are obstacles around the
radar that obstruct the data collected by the radar. You can
check whether there is any abnormal blocking of radar light
above the fuselage and remove it.
Error 22: The device is
being picked up. Please
put the machine back
near the starting place.
This error will be reported when the machine is picked up
and the wheel is suspended when the cleaning action is
performed. You can put the machine back near where it
was picked up, and then perform the cleaning (if it is not in
the area where it was picked up, the relocation will fail).
Error S1: Battery error
Open the battery compartment and check whether the
battery is connected and restart the device.
Battery temperature may be too high or low. Wait until
the battery falls to normal temperatures before use (0 °C
- 40 °C / 32 °F - 104 °F).
If the issue persists, contact customer support for help.
Error S2: Wheel
module error
Check whether the wheels are stuck or dust is trapped
inside before restarting the device.
If the issue persists, contact customer support for help.
Error S3: Side brush
error
Check whether the side brush is stuck in an unknown
object before restarting the device.
If the issue persists, contact customer support for help.
Error S4: Suction fan
error
Check whether the fan blades are stuck in an unknown
object before restarting the device.
Clean the dust bin and filter before restarting the device.
If the issue persists, contact customer support for help.
Voice Prompt Cause and Solution
Error S5: Rolling Brush
Error. Refer to Owner's
Manual or app for
help.
Remove and clean the roller brush, roller brush
connection, roller brush cover and suction inlet before
restarting the device.
If the issue persists, contact customer support for help.
Error S7: Laser Sensor
Error. Refer to Owner's
Manual or App for
help
This error is reported if the radar cannot collect data. You
can use the hand to toggle the radar to observe whether
it can rotate normally and whether the rotation resistance
is very large; restart the sweeper to observe whether it
can operate normally. If an error is still reported after the
above two solutions are implemented, you can contact
the after-sales service department for processing.
Specifications
Input 24 V 1 A
Battery Voltage 14.4 V
Power Consumption 50 W
Battery Type
Li-ion 3200 mAh (Typical)
Dust Box Capacity 600 ml
Charging Time 180 - 240 mins
Input 24 V 1 A
Output 24 V 1 A
20 EN EN 21
Restart RoboVac
If RoboVac is not responding when you press a button, press the Force Shutdown
button (located inside the main unit) to forcibly power off the device. Then press and
hold for 3 seconds to restart the device.
Switch to Power Saving Mode
Make sure RoboVac is turned on and attached to the Charging Base.
1
Press and hold the two buttons ( and ) simultaneously for 20 seconds.
RoboVac switches to power saving mode automatically and the LED light turns
o.
2
To exit the power saving mode, press any button.
Select a Cleaning Mode
Auto Cleaning Mode
Press to start cleaning in Auto Cleaning mode. You can also select this mode in the
eufy Clean app.
During cleaning, RoboVac will return to the Charging Base automatically
if the battery level becomes low. To resume cleaning from where it left off,
enable this feature in the eufy Clean app.
By default, RoboVac starts in Auto Cleaning mode when it is turned on.
Spot Cleaning Mode (Only Available via the eufy Clean App)
In this mode, RoboVac intensively cleans a specific area with a size of 4.9 ft x 4.9 ft /
1.5 m x 1.5 m, useful if there is a concentrated area of dust or debris. When the
cleaning of a certain zone is finished, it automatically returns to the Charging Base.
4.9 ft / 1.5 m
4.9 ft / 1.5 m
Room Cleaning Mode (Only Available via the eufy Clean App)
In this mode, your house is automatically divided into several rooms for cleaning in the
eufy Clean app. You can also customize your room settings in the app. RoboVac will
clean the selected rooms only and return to the Charging Base after cleaning.
32 EN EN 33
English English
2
Pull out the swivel wheel with a tool (such as a screwdriver).
3
Clean any hair or debris wrapped around the wheel or entangled inside the wheel
cavity.
4
Reinstall the wheel and push in until it clicks into place.
Do not clean the swivel wheel with water.
Clean the Mopping Cloth
It is recommended to clean the washable mopping cloth after each use.
34 EN EN 35
Voice Prompt Cause and Solution
Error 17: Virtual
Boundary detected.
Move device to a
different area
If the machine is in a No-Go Zone and the user tries to start
cleaning, this error will be reported. Device needs to be
moved out of the No-Go Zone to start cleaning.
Error 18: Laser cover
may be stuck
This error is reported when the radar shield is stuck and
cannot operate normally. The reason why the radar shield is
stuck can be checked and moved to a new location.
Error 19: Laser sensor
may be stuck
This error is reported if the radar cannot be rotated.
Check whether there is foreign matter under the lightning
protection cover and remove it.
Error 20: Laser sensor
may be blocked
This error will be reported if there are obstacles around the
radar that obstruct the data collected by the radar. You can
check whether there is any abnormal blocking of radar light
above the fuselage and remove it.
Error 22: The device is
being picked up. Please
put the machine back
near the starting place.
This error will be reported when the machine is picked up
and the wheel is suspended when the cleaning action is
performed. You can put the machine back near where it
was picked up, and then perform the cleaning (if it is not in
the area where it was picked up, the relocation will fail).
Error S1: Battery error
Open the battery compartment and check whether the
battery is connected and restart the device.
Battery temperature may be too high or low. Wait until
the battery falls to normal temperatures before use (0 °C
- 40 °C / 32 °F - 104 °F).
If the issue persists, contact customer support for help.
Error S2: Wheel
module error
Check whether the wheels are stuck or dust is trapped
inside before restarting the device.
If the issue persists, contact customer support for help.
Error S3: Side brush
error
Check whether the side brush is stuck in an unknown
object before restarting the device.
If the issue persists, contact customer support for help.
Error S4: Suction fan
error
Check whether the fan blades are stuck in an unknown
object before restarting the device.
Clean the dust bin and filter before restarting the device.
If the issue persists, contact customer support for help.
Voice Prompt Cause and Solution
Error S5: Rolling Brush
Error. Refer to Owner's
Manual or app for
help.
Remove and clean the roller brush, roller brush
connection, roller brush cover and suction inlet before
restarting the device.
If the issue persists, contact customer support for help.
Error S7: Laser Sensor
Error. Refer to Owner's
Manual or App for
help
This error is reported if the radar cannot collect data. You
can use the hand to toggle the radar to observe whether
it can rotate normally and whether the rotation resistance
is very large; restart the sweeper to observe whether it
can operate normally. If an error is still reported after the
above two solutions are implemented, you can contact
the after-sales service department for processing.
Specifications
Input 24 V 1 A
Battery Voltage 14.4 V
Power Consumption 50 W
Battery Type
Li-ion 3200 mAh (Typical)
Dust Box Capacity 600 ml
Charging Time 180 - 240 mins
Input 24 V 1 A
Output 24 V 1 A
20 EN EN 21
Restart RoboVac
If RoboVac is not responding when you press a button, press the Force Shutdown
button (located inside the main unit) to forcibly power off the device. Then press and
hold for 3 seconds to restart the device.
Switch to Power Saving Mode
Make sure RoboVac is turned on and attached to the Charging Base.
1
Press and hold the two buttons ( and ) simultaneously for 20 seconds.
RoboVac switches to power saving mode automatically and the LED light turns
o.
2
To exit the power saving mode, press any button.
Select a Cleaning Mode
Auto Cleaning Mode
Press to start cleaning in Auto Cleaning mode. You can also select this mode in the
eufy Clean app.
During cleaning, RoboVac will return to the Charging Base automatically
if the battery level becomes low. To resume cleaning from where it left off,
enable this feature in the eufy Clean app.
By default, RoboVac starts in Auto Cleaning mode when it is turned on.
Spot Cleaning Mode (Only Available via the eufy Clean App)
In this mode, RoboVac intensively cleans a specific area with a size of 4.9 ft x 4.9 ft /
1.5 m x 1.5 m, useful if there is a concentrated area of dust or debris. When the
cleaning of a certain zone is finished, it automatically returns to the Charging Base.
4.9 ft / 1.5 m
4.9 ft / 1.5 m
Room Cleaning Mode (Only Available via the eufy Clean App)
In this mode, your house is automatically divided into several rooms for cleaning in the
eufy Clean app. You can also customize your room settings in the app. RoboVac will
clean the selected rooms only and return to the Charging Base after cleaning.
24h
1
Remove the mopping cloth from the mopping module.
2
Rinse the mopping cloth thoroughly with water.
3
Air-dry the mopping cloth completely to prevent mildew or unpleasant smells.
Clean the Sensors and Charging Pins
To maintain the best performance, clean the sensors and charging pins regularly.
Dust off the sensors and charging contact pins using a cloth or cleaning brush.
Clean the Swivel Wheel
Hair or dust particles can easily get entangled in the swivel wheel. Be sure to clean the
swivel wheel periodically and as needed.
Wheel
Axle
1
Remove the battery cover.
34 EN EN 35
English English
Problems Solutions
RoboVac cannot return to
the Charging Base.
Remove objects within 1.6 ft / 0.5 m to the left and
right side and within 4.9 ft / 1.5 m of the front of the
Charging Base.
Check if RoboVac is stuck on any objects.
Clean the charging contact pins.
RoboVac’s movements or
travel path are abnormal.
Clean the sensors carefully with a dry cloth.
Restart RoboVac by turning it on.
Water does not come out
during mopping.
Make sure there is enough water in the water tank.
Make sure the water tank and mopping cloth have
been installed properly.
Too much water comes out
during mopping.
Make sure the water tank and mopping cloth have
been installed properly.
Check if the water tank is damaged.
RoboVac's cleaning time
becomes shorter
Make sure RoboVac is fully charged (indicated by a
solid blue LED light) before cleaning.
Check if RoboVac has alerted you with any voice
prompts or LED indicators. Refer to the “Voice Alert”
section in this manual.
If your cleaning time is much less than the time
mentioned above, contact eufy customer service for
help.
RoboVac cannot connect to
a Wi-Fi network.
Make sure you entered the Wi-Fi password correctly.
Make sure your RoboVac, router, and mobile phone
are close enough to ensure a strong signal strength.
Make sure your Wi-Fi router supports a 2.4GHz and
802.11b/g/n band; a 5GHz band is not supported.
You cannot control
RoboVac with Amazon
Alexa.
Check if there are any Internet connection problems.
Check whether you have installed the Amazon
Alexa app onto your smart device and enabled “eufy
Clean - RoboVac” Skill in the Amazon Alexa app. For
details, refer to the “Smart Integrations” page in the
eufy Clean App.
Make sure you have an eufy Clean account and have
connected to RoboVac.
Make sure you are using correct Alexa voice-
commands.
Troubleshooting
The solutions below are for general questions. If your problem persists, visit www.
eufylife.com, go to the eufy Clean app, or contact [email protected] for help.
Problems Solutions
RoboVac cannot be
activated.
Make sure the battery is fully charged.
If you still have trouble, press the Force Shutdown
button inside the main unit to forcibly power off the
device, then power it on.
RoboVac stops working
suddenly.
Check if RoboVac is trapped or stuck on an obstacle.
Check if the battery level is too low.
If you still have trouble, turn RoboVac off, and then
turn it back on.
Check if RoboVac has alerted you with any voice
prompts or LED indicators. Refer to the “Voice Alert”
section in this manual.
You cannot schedule
cleanings.
Make sure RoboVac is turned on.
Make sure the scheduled time has been set
correctly. Check if the time zone in the eufy Clean
app is consistent with that on your mobile device.
Check if RoboVac’s power is too low to start
cleaning.
Cleaning schedules are erased when RoboVac is
powered off. If RoboVac is powered on without
Internet access, cleaning schedules will not
synchronize and must be reset via the app.
Suction power is weak.
Check if any obstructions are blocking the suction
inlet.
Empty the dust box.
Check if the filter is wet due to water or other liquid
on the floor. Air-dry the filter completely before use.
RoboVac cannot be
charged.
Check if the indicator on the Charging Base lights up.
If not, reconnect the adapter with the Charging Base
and try a new power outlet. If the problem persists,
contact the eufy service center to repair or replace
the Charging Base.
Dust off the charging contact pins with a dry cloth.
Check if you can hear a beep when RoboVac is
docked onto the Charging Base. If not, contact the
eufy service center to repair or replace the Charging
Base.
36 EN EN 37
English English
Voice Prompt Cause and Solution
Error 6: Device trapped
Device may be suspended in the air. Move it to a new
position close to the original position and try again. If the
device is still unable to start, clean the drop sensors and try
again.
Error 8: Low battery.
Shutting down.
Low battery. System will shut down. Charge the device and
try again.
Error S1: Battery error
Open the battery compartment and check whether the
battery is connected and restart the device.
Battery temperature may be too high or low. Wait until
the battery falls to normal temperatures before use (0 °C
- 40 °C / 32 °F - 104 °F).
If the issue persists, contact customer support for help.
Error S2: Wheel
module error
Check whether the wheels are stuck or dust is trapped
inside before restarting the device.
If the issue persists, contact customer support for help.
Error S3: Side brush
error
Check whether the side brush is stuck in an unknown
object before restarting the device.
If the issue persists, contact customer support for help.
Error S4: Suction fan
error
Check whether the fan blades are stuck in an unknown
object before restarting the device.
Clean the dust bin and filter before restarting the device.
If the issue persists, contact customer support for help.
Error S5: Rolling Brush
Error. Refer to Owner's
Manual or app for
help.
Remove and clean the roller brush, roller brush
connection, roller brush cover and suction inlet before
restarting the device.
If the issue persists, contact customer support for help.
Problems Solutions
You cannot control
RoboVac with the Google
Assistant.
Check if there are any Internet connection problems.
Check if you have installed the Google Home app
onto your smart device and initiated the “eufy Clean”
action in the Google Home app. For details, refer to
the “Smart Integrations” page in the eufy Clean App.
Check if you are using the proper commands when
talking to the Google Assistant. When making your
request, first say the wake phrase “Ok Google”.
Repeat your question. Speak clearly to the Google
Assistant.
Voice Alert
When RoboVac encounters a problem, the red indicator on RoboVac will flash and you
will hear the relevant voice prompts.
The voice prompts below are only for reference and may be changed slightly after
voice pack updates. Please follow the voice prompts you have heard to find the cause
and solution below.
Voice Prompt Cause and Solution
Error 1: Front bumper
stuck
Front bumper is stuck. Tap it repeatedly to remove any
dust, or move the device to a new position and try again.
Error 2: Wheel stuck
Wheel may be stuck or trapped. Clear any obstacles in the
surrounding area and check the wheel for any trapped dust.
Move the device to a new position and try again.
Error 3: Side brush
stuck Side brush may be stuck. Clean it and try again.
Error 4: Rolling brush
stuck. Remove and
clean the rolling brush.
Remove the rolling brush, roller joint, roller brush cover, and
suction inlet to clean it. Once cleaned, place the items back
into the device and try again.
Error 5: Device stuck
or trapped
Device is trapped. Clear any obstacles in the surrounding
area and try again.
  • Page 1 1
  • Page 2 2
  • Page 3 3
  • Page 4 4
  • Page 5 5
  • Page 6 6
  • Page 7 7
  • Page 8 8
  • Page 9 9
  • Page 10 10
  • Page 11 11
  • Page 12 12
  • Page 13 13
  • Page 14 14
  • Page 15 15
  • Page 16 16
  • Page 17 17
  • Page 18 18
  • Page 19 19
  • Page 20 20
  • Page 21 21
  • Page 22 22
  • Page 23 23
  • Page 24 24
  • Page 25 25
  • Page 26 26
  • Page 27 27
  • Page 28 28
  • Page 29 29
  • Page 30 30
  • Page 31 31
  • Page 32 32
  • Page 33 33
  • Page 34 34
  • Page 35 35
  • Page 36 36
  • Page 37 37
  • Page 38 38
  • Page 39 39
  • Page 40 40
  • Page 41 41
  • Page 42 42
  • Page 43 43
  • Page 44 44
  • Page 45 45
  • Page 46 46
  • Page 47 47
  • Page 48 48
  • Page 49 49
  • Page 50 50
  • Page 51 51
  • Page 52 52
  • Page 53 53
  • Page 54 54
  • Page 55 55
  • Page 56 56
  • Page 57 57
  • Page 58 58
  • Page 59 59
  • Page 60 60
  • Page 61 61
  • Page 62 62
  • Page 63 63
  • Page 64 64
  • Page 65 65
  • Page 66 66
  • Page 67 67
  • Page 68 68
  • Page 69 69
  • Page 70 70
  • Page 71 71
  • Page 72 72
  • Page 73 73
  • Page 74 74
  • Page 75 75
  • Page 76 76
  • Page 77 77
  • Page 78 78
  • Page 79 79
  • Page 80 80
  • Page 81 81
  • Page 82 82
  • Page 83 83
  • Page 84 84
  • Page 85 85
  • Page 86 86
  • Page 87 87
  • Page 88 88
  • Page 89 89
  • Page 90 90
  • Page 91 91
  • Page 92 92
  • Page 93 93
  • Page 94 94
  • Page 95 95
  • Page 96 96
  • Page 97 97
  • Page 98 98
  • Page 99 99
  • Page 100 100
  • Page 101 101
  • Page 102 102
  • Page 103 103
  • Page 104 104
  • Page 105 105
  • Page 106 106
  • Page 107 107
  • Page 108 108
  • Page 109 109
  • Page 110 110
  • Page 111 111
  • Page 112 112
  • Page 113 113
  • Page 114 114
  • Page 115 115
  • Page 116 116
  • Page 117 117
  • Page 118 118
  • Page 119 119
  • Page 120 120
  • Page 121 121
  • Page 122 122
  • Page 123 123
  • Page 124 124
  • Page 125 125
  • Page 126 126
  • Page 127 127
  • Page 128 128
  • Page 129 129
  • Page 130 130
  • Page 131 131
  • Page 132 132
  • Page 133 133
  • Page 134 134
  • Page 135 135
  • Page 136 136
  • Page 137 137
  • Page 138 138
  • Page 139 139
  • Page 140 140
  • Page 141 141
  • Page 142 142
  • Page 143 143
  • Page 144 144
  • Page 145 145
  • Page 146 146
  • Page 147 147
  • Page 148 148
  • Page 149 149
  • Page 150 150
  • Page 151 151
  • Page 152 152
  • Page 153 153
  • Page 154 154
  • Page 155 155
  • Page 156 156
  • Page 157 157
  • Page 158 158

Eufy 931825 El kitabı

Tip
El kitabı