Monster Abra A7 V13.1 Kullanım kılavuzu
- Kategori
- Defterler
- Tip
- Kullanım kılavuzu
Bu kılavuz için de uygundur

01
EN
A5 V17.3
USER MANUAL
KULLANIM KILAVUZU
BENUTZERHANDBUCH

02
EN
A5 V17.3
USER
MANUAL
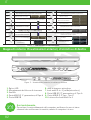
TABLE OF CONTENT
About this Concise User Guide ..............................................02
Servicing .....................................................................................03
System Startup .........................................................................04
Intel® Optane™ Setup .............................................................05
RAID Setup..................................................................................07
RAID Setup Procedure .............................................................08
System Map: Front View With LCD Panel Open..................09
LED Indicators ...........................................................................09
Keyboard & Function Keys ......................................................10
System Map: Front, Left & Right Views ...............................11
System Map: Bottom & Rear Views ......................................12
Specifications ...........................................................................13

03
EN
About this Concise User Guide
This quick guide is a brief introduction to getting your system started. This is a supplement,
and not a substitute for the expanded English language User’s Manual in Adobe Acrobat
format on the Device Drivers & Utilities + User’s Manual disc supplied with your computer.
This disc also contains the drivers and utilities necessary for the proper operation of the
computer (Note: The company reserves the right to revise this publication or to change its
contents without notice).Some or all of the computer’s features may already have been
setup. If they aren’t, or you are planning to re-configure(or re-install) portions of the system,
refer to the expanded User’s Manual. The Device Drivers & Utilities + User’s Manual disc does
not contain an operating system.
Regulatory and Safety Information
Please pay careful attention to the full regulatory notices and safety information contained
in the expanded User’s Manual on the Device Drivers & Utilities + User’s Manual disc.
© April 2020
Trademarks
Intel is a trademark/registered trademark of Intel Corporation.
Windows is a registered trademark of Microsoft Corporation.
FCC Statement
This device complies with Part 15 of the FCC Rules. Operation is subject to
the following two conditions:
1. This device may not cause harmful interference.
2. This device must accept any interference received, including interference
that may cause undesired operation.
Instructions for Care and Operation
The computer is quite rugged, but it can be damaged. To prevent this, follow these
suggestions:
• Don’t drop it, or expose it to shock. If the computer falls, the case and the components
could be damaged.
• Keep it dry, and don’t overheat it. Keep the computer and power supply away from any
kind of heating element. This is an electrical appliance. If water or any other liquid gets into
it, the computer could be badly damaged.
• Avoid interference. Keep the computer away from high capacity transformers, electric
motors, and other strong magnetic fields. These can hinder proper performance and
damage your data.
• Follow the proper working procedures for the computer. Shut the computer down
properly and don’t forget to save your work. Remember to periodically save your data as
data may be lost.

04
EN
Servicing
Do not attempt to service the computer yourself. Doing so may violate your warranty and
expose you and the computer to electric shock. Refer all servicing to authorized service
personnel. Unplug the computer from the power supply. Then refer servicing to qualified
service personnel under any of the following conditions:
• When the power cord or AC/DC adapter is damaged or frayed.
• If the computer has been exposed to any liquids.
• If the computer does not work normally when you follow the operating instructions.
• If the computer has been dropped or damaged (do not touch the poisonous liquid if the
LCD panel breaks).
• If there is an unusual odor, heat or smoke coming from your computer.
Safety Information
• Only use an AC/DC adapter approved for use with this computer.
• Use only the power cord and batteries indicated in this manual. Do not dispose of batteries
in a fire. They may explode. Check with local codes for possible special disposal instructions.
• Do not continue to use a battery that has been dropped, or that appears damaged (e.g.
bent or twisted) in any way. Even if the computer continues to work with a damaged battery
in place, it may cause circuit damage, which may possibly result in fire.
• Make sure that your computer is completely powered off before putting it into a travel bag
(or any such container).
• Before cleaning the computer, make sure it is disconnected from any external power
supplies, peripherals and cables.
• Use a soft clean cloth to clean the computer, but do not apply cleaner directly to the
computer. Do not use volatile (petroleum distillates) or abrasive cleaners on any part of the
computer.
• Do not try to repair a battery pack. Refer any battery pack repair or replacement to your
service representative or qualified service personnel.
• Note that in computer’s featuring a raised LCD electro-plated logo, the logo is covered by
a protective adhesive. Due to general wear and tear, this adhesive may deteriorate over time
and the exposed logo may develop sharp edges. Be careful when handling the computer in
this case, and avoid touching the raised LCD electro-plated logo. Avoid placing any other
items in the carrying bag which may rub against the top of the computer during transport.
If any such wear and tear develops contact your service center.
Polymer/Lithium-Ion Battery Precautions
Note the following information which is specific to Polymer/Lithium-Ion batteries only, and
where applicable, this overrides the general battery precaution information.
• Polymer/Lithium-Ion batteries may experience a slight expansion or swelling, however this
is part of the battery’s safety mechanism and is not a cause for concern.
• Use proper handling procedures when using Polymer/Lithium-Ion batteries. Do not use
Polymer/Lithium-Ion batteries in high ambient temperature environments, and do not store
unused batteries for extended periods.
• If you are working in areas of low temperature use the AC/DC adapter to power the
computer.

05
EN
Battery Disposal & Caution
The product that you have purchased contains a rechargeable battery. The
battery is recyclable. At the end of its useful life, under various state and
local laws, it may be illegal to dispose of this battery into the municipal waste
stream. Check with your local solid waste officials for details in your area for
recycling options or proper disposal.
Danger of explosion if battery is incorrectly replaced. Replace only with the
same or equivalent type recommended by the manufacturer. Discard used
battery according to the manufacturer’s instructions.
System Startup
1. Remove all packing materials.
2. Place the computer on a stable surface.
3. Insert the battery and make sure it is locked in position.
4. Securely attach any peripherals you want to use with the computer (e.g.
keyboard and mouse) to their ports.
5. When first setting up the computer use the following procedure (as to
safeguard the computer during shipping, the battery will be locked to not power
the system until first connected to the AC/DC adapter and initially set up as
below):
• Attach the AC/DC adapter cord to the DC-In jack on the rear of the computer,
then plug the AC power cord into an outlet, and connect the AC power cord to the
AC/DC adapter. The battery will now be unlocked.
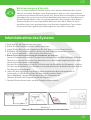
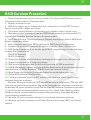
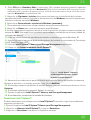
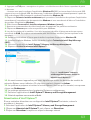
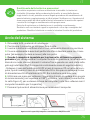
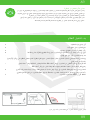
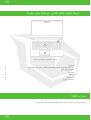
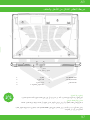
6. Use one hand to raise the lid/LCD to a comfortable viewing angle (do not e
xceed 130 degrees); use the other hand (as illustrated in Figure 1) to support
the base of the computer (Note: Never lift the computer by the lid/LCD).
7. Press the power button to turn the computer “on”.
Figure 1
Opening the Lid/LCD/Computer with AC/DC Adapter Plugged-In
130°

06
EN
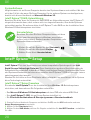
Shut Down
Note that you should always shut your
computer down by choosing the Shut
down command in Windows (see below).
This will help prevent hard disk or
system problems.
1. Click the Start Menu icon .
2. Click the Power item .
3. Choose Shut down from the menu.
Intel® Optane™ Setup
Intel® Optane™ is a combination of a compatible memory device and Intel Rapid Storage
Technology software. This combination is designed to speed up your system performance
by caching boot data, executables, frequently accessed data and system page files to a non
volatile, low latency Intel® Optane™ SSD.
Contact your distributor or supplier to see if your system supports this technology.
Intel® Optane™ Setup Procedure
You need to setup Intel® Optane™ before installing your Windows 10 operating system,
and you will need to prepare the following in order to do so.
• The Microsoft Windows 10 OS on a DVD or USB flash drive.
• An Intel® Optane™ SSD installed in your system.
• The Device Drivers & Utilities + User’s Manual disc.
1. Start-up your notebook computer and press F2 to enter the BIOS and go to the
Setup Utility.
2. Select the Advanced menu
3. Select VMD Mode, press Enter and select Intel RST Premium... and select <OK>.
System Software
Your computer may already come with system software pre-installed. Where this is not the
case, or where you are reconfiguring your computer for a different system, you will
find this manual refers to Microsoft Windows 10.
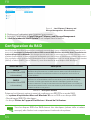
Intel® Optane™/RAID Support
Note that your system can be set up as a RAID OR to support Intel® Optane™, but it cannot
be set to support both systems. You need to setup Intel® Optane™ or RAID before installing
your Windows 10 operating system.

07
EN
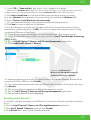
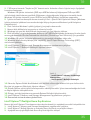
4. Press F10 to “Save and Exit” and select <Yes>, however note below.
• Make sure the Windows 10 OS (DVD) is in the attached DVD drive or on a USB flash drive and as the
computer starts up it will automatically boot from the Windows 10 OS DVD or USB flash drive
5. Click Next > Install Now to continue installing the operating system as normal
(see your Windows documentation if you need help on installing the Windows OS)
6. Select Custom: Install Windows only (advanced).
7. It is recommended that you select and then delete existing partitions.
8. Click New to create a partition for Windows.
9. It is very important to make sure that when you create the partition, leave at least a
minimum of unallocated space of 5MB. This space is required for any drive that is being
accelerated (System or Data Drive)
10. Follow the on-screen instructions to install the Windows 10 operating system.
11. Install the Windows drivers. Make sure you install the Intel® Rapid Storage Technology
(IRST) driver.
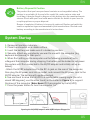
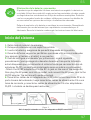
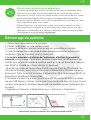
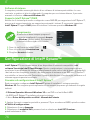
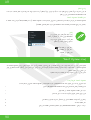
12. Run the Intel® Optane™ Memory and Storage Management application.
13. Click Enable Intel® Optane™ Memory.
14. A warning will pop up to notify you that all data on the Optane Memory Module will be
erased, and if this is OK then click Enable.
15. The system will prepare and enable the Optane drive, and when finished you can then
click Restart.
16. The system will then optimize the Optane Memory upon restart.
17. Run the Intel® Optane™ Memory and Storage Management application.
18. The system status will then be displayed.
Figure 2 - Intel® Optane™
Memory and Storage Management -
Enable Intel® Optane™ Memory
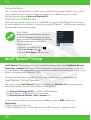
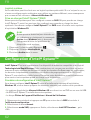
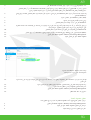
Disabling Intel® Optane™
If you wish to disable an existing Intel® Optane™ setup then follow the procedure below to
do so.
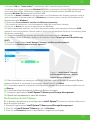
1. Run the Intel® Optane™ Memory and Storage Management application.
2. Click Intel® Optane™ Memory and then click Disable.
3. Click Disable when you see the following message.

08
EN
4. Restart the computer to complete the process.
5. Run the Intel® Optane™ Memory and Storage Management application
6. The Intel® Optane™ Memory Status is indicated in the Window.
Your solid state drives (SSDs) can be set up in RAID mode (for increased performance or
protection). Note that setting up your solid state drives in RAID mode needs to be done prior
to installing the Windows OS. Do not change the mode unless you intend to reinstall your
operating system, and make sure you back up all necessary files and data before doing so.To
configure your RAID (Redundant Array of Independent Disks) system in Striping (RAID 0) or
Mirroring (RAID 1) mode (see Table 1) you will require two identical solid state drives.
Prepare the following before setting up your PCIe SSDs in RAID mode:
• The Microsoft Windows 10 OS on a DVD or USB flash drive.
• An attached external DVD drive.
• Two identical PCIe solid state drives.
• The Device Drivers & Utilities + User’s Manual disc.
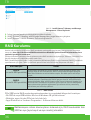
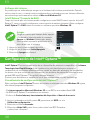
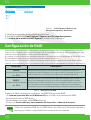
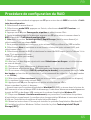
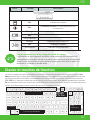
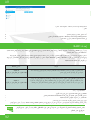
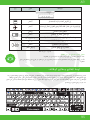
Table 1 - RAID Description
RAID Setup
All SSDs in a RAID should be identical (the same size and brand) in
order to prevent unexpected system behavior.
NOTE
RAID Level
RAID 0
(at lease two SSDs
needed)
RAID 1
(at lease two SSDs
needed)
Identical drives reading and writing data in parallel to increase
performance. RAID 0 implements a striped disk array and the data
is broken into blocks and each block is written to a separate drive.
Identical drives in a mirrored configuration used to protect data. Should
a drive that is part of a mirrored array fail, the mirrored drive (which
contains identical data) will handle all the data. When a new replacement
drive is installed, data to the new drive is rebuilt from the mirrored drive
to restore fault tolerance.
Description
Figure 3 - Intel® Optane™ Memory and
Storage Management - Disable

09
EN
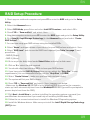
1. Start-up your notebook computer and press F2 to enter the BIOS and go to the Setup
Utility.
2. Select the Advanced menu.
3. Select SATA Mode, press Enter and select Intel RST Premium... and select <OK>.
4. Press F10 to “Save and Exit” and select <Yes>.
5. After the computer restarts press F2 to enter the BIOS again and go to the Setup Utility.
6. Go to Intel(R) Rapid Storage Technology (in the Advanced menu) and select “Create
RAID Volume”.
7. You can now setup your RAID volume using the installed SSDs.
8. Select “Name” and type a name of your choice for your RAID volume and select <Yes>.
9. Select “RAID Level” and choose the RAID Level required (see Table 1 on page 7) and
press Enter.
• RAID 0 (Stripe)
• RAID 1 (Mirror)
10. Go to any of the disks listed under Select Disks: and select a disk name.
11. Click on X to select the disk required.
12. You should select two identical SSDs to form your RAID volume.
13. If you have selected RAID 0 (Stripe) then you can adjust the “Strip Size” to your
requirements (It is recommended that you set the “Strip Size” to 128KB).
14. Select “Create Volume” (make sure you have selected your disks).
15. The system will list your RAID volume.
16. Press F10 to “Save and Exit” and select <Yes>, however note below.
• Make sure the Windows 10 OS DVD is in the attached DVD drive and as the computer
starts up it will automatically boot from the Windows 10 OS DVD (you will be prompted to
press a key to boot from the DVD).
17. Click Next > Install Now to continue installing the operating system as normal (see
your Windows documentation if you need help on installing the Windows OS).
18. Follow the on-screen instructions to install the Windows 10 operating system.
19. Install the Windows drivers. Make sure you install the Intel® Rapid Storage Technology
(IRST) driver.
RAID Setup Procedure

10
EN
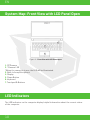
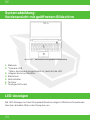
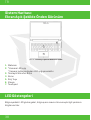
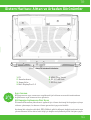
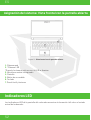
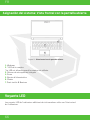
System Map: Front View with LCD Panel Open
LED Indicators
Figure 3 - Front View with LCD Panel Open
1. PC Camera
2. *Camera LED
*When the camera is in use, the LED will be illuminated.
3. Built-In Array Microphone
4. Display
5. Power Button
6. Keyboard
7. Touchpad & Buttons
The LED indicators on the computer display helpful information about the current status
of the computer.
1
23
3
7
6
5

11
EN
Icon Color Description
esu ni si ksiD draH ehTneerG
Green Airplane Mode is ON (the WLAN and Bluetooth Mod-
ules are OFF)
gnigrahC si yrettaB ehTegnarO
degrahC ylluF si yrettaB ehTneerG
he Battery Has Reached Critically Low Power Status
he AC/DC Adapter is Plugged In
nO si retupmoC ehTneerG
Blinking Green The Computer is in Sleep Mode
Table 2 - LED Indicators
Wireless Device Operation Aboard Aircraft
The use of any portable electronic transmission devices aboard aircraft is
usually prohibited.
Make sure the wireless modules are OFF if you are using the computer
aboard aircraft by putting the system in to Airplane Mode.
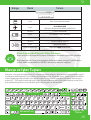
Keyboard & Function Keys
The keyboard includes a numeric keypad for easy numeric data input. Pressing Num Lk turns
on/off the numeric keypad. It also features function keys to allow you to change operational
features instantly. The function keys (F1 - F12 etc.) will act as hot keys when pressed
while the Fn key is held down. In addition to the basic function key combinations, some
visual indicators are available when the Control Center driver is installed.
Numeric
Keypad
Fn Key
Windows Logo Key
Scr Lk &
Num Lk
Function Keys
Blinking Orange
Orange T
T

12
EN
Overheating
To prevent your computer from overheating make sure nothing blocks any
vent while the computer is in use.
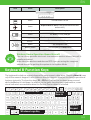
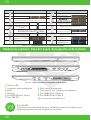
System Map: Front, Left & Right Views
Keys Function/Visual Indicators Keys Function/Visual Indicators
Fn + Play/Pause (in Audio/Video Programs) Fn + Sleep Toggle
Fn +
Fn + (Press a key to or use touchpad to turn on) Fn + Scroll Lock Toggle
Fn + Mute Toggle
Touchpad Toogle
Caps Lock Toggle
Fn + Volume Decrease/
Increase Fn + Control Center Toggle
Fn + Fn + Fan Automatic Control/
Full Power
Fn + Display Brightness
Decrease/Increase
*Note: It is recommended that you use Maximum fan speed when
playing games.
Fn + Camera Power
Toggle Fn + Disable/Enable
Flexikey®
Fn + Airplane Mode Toggle Fn + Power Modes Toggle
Number Lock Toggle
Figure 4 - Front, Left & Right Views (Model A)
1. LED Indicators
2. Security Lock Slot
3. Vent
4. USB 3.2 Gen 1 Type-A Port
5. USB 2.0 Port
6. Microphone-In Jack
7. 2-In-1 Audio Jack (Headphone and Microphone)
8. USB 3.2 Gen 2 Type-A Port
9. USB 3.2 Gen 2 Type-C Port
10. Multi-in-1 Card Reader
tt
tt
1
3
4
8
5
3
9
67
10
t
1
23
4
8
5
3
9
67
10

13
EN
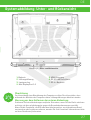
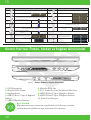
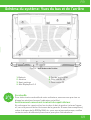
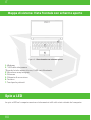
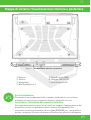
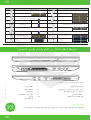
System Map: Bottom & Rear Views
Overheating
To prevent your computer from overheating make sure nothing blocks any
vent while the computer is in use.
Bottom Cover Removal Warning
Do not remove any cover(s) and/or screw(s) for the purposes of device
upgrade as this may violate the terms of your warranty.
If you need to replace/remove the hard disk/RAM etc., for any reason, please
contact your distributor/supplier for further information.
1
2
2
2 2
2
3 3
Figure 5 - Bottom & Rear Views
1. Battery
2. Vent
3. Speakers
4. Mini DisplayPort 1.4
5. HDMI-Out Port
6. RJ-45 LAN Jack
7. DC-In Jack
2
4
5
6
7

14
EN
14
EN
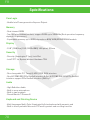
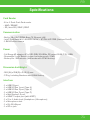
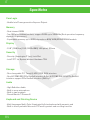
Specifications
Core Logic
• Mobile Intel® new generation Express Chipset
Display
• 15,6” (39,62cm) FHD (1920x1080) 16:9 panel, 3,2mm
Security
• Security (Kensington® Type) Lock Slot
• Intel® PTT for System Without Hardware TPM
Storage
• One changeable 2,5” 7mm(H) HDD / SSD, SATA interface
• One M.2 2280 SSD PCIe Gen4x4 interface & One M.2 2280 SSD SATA/PCIe Gen3x4
interface support PCIe Gen3x4 interface (RAID 0/1)
Audio
• High Definition Audio
• Built in array microphone
• Built in two speakers
• Sound Blaster™ Cinema 6
Keyboard and Pointing Device
• Multi languages Multi-Color illuminated full size keyboard with numeric pad
• Built in touch pad with Microsoft PTP multi-gesture and scrolling function
Memory
• Dual channel DDR4
• Two 260 pins SODIMM sockets, support DDR4 up to 3200MHz (Real operation frequency
depends on processor)
• Expandable memory up to 64GB, depends on 8GB/16GB/32GB SODIMM module

15
EN
15
EN
Specifications
Card Reader
• 6-in-1 Push-Push Card reader
- MMC / RSMMC
- SD / mini SD / SDHC / SDXC
Communication
• Built in 10/100/1000Mb Base-TX Ethernet LAN
• Intel® Dual Band Wi-Fi 6 AX201 2x2 AX + BT CNVi M.2 2230 (Harrison Peak 2)
• 1.0M HD video camera
Power
• Full Range AC adapter, AC in 100~240V, 50~60Hz, DC output 19,5V, 7,7A, 150W
• Removable 4 cells Smart Lithium-Ion battery pack, 41WH
• Battery life: 400 minutes (UMA mode with 41 WH battery)
Dimension And Weight
• 361 (W) x 258 (D) x 24,9 (H) mm
• 2,2 kg, Including Barebone and 41WH Battery
Interface
• 1 x USB 2.0 port
• 1 x USB 3.2 Gen 1 port (Type A)
• 1 x USB 3.2 Gen 2 port (Type A)
• 1 x USB 3.2 Gen 2 port (Type C)
• 1 x Mini Display 1.4 port
• 1 x HDMI™ output port (with HDCP)
• 1 x 2-in-1 Audio Jack (Headphone / Microphone)
• 1 x Microphone Jack
• 1 x RJ-45 LAN port
• 1 x DC-in jack

16
DE EN
BENUTZERHANDBUCH
A5 V17.3
INHALTSVERZEICHNIS
Über diese Kurzanleitung ........................................................02
Instandhaltung ..........................................................................03
Inbetriebnahme des Systems ................................................04
Intel® Optane™-Setup ............................................................05
RAID-Setup.................................................................................07
RAID-Setup-Prozedur .............................................................08
Systemabbildung:
Vorderansicht mit geöffnetem LCD-Display ......................09
LED-Anzeigen ............................................................................09
Tastatur & Funktionstasten ...................................................10
Systemabbildung: Ansichten vorne, links und rechts ......11
Systemabbildung: Unter- und Rückansicht .......................12
Spezifikationen .........................................................................13

17
DE
Über diese Kurzanleitung
Diese Kurzanleitung ist eine kleine Einführung in die Inbetriebnahme Ihres Systems. Es handelt sich
hierbei um eine Ergänzung und nicht um einen Ersatz für das erweiterte englischsprachige Benutzer-
handbuch im Adobe-Acrobat-Format auf der mit Ihrem Computer gelieferten CD mit Gerätetreibern &
Dienstprogrammen + Benutzerhandbuch. Diese CD enthält auch die Treiber und Dienstprogramme, die
für den ordnungsgemäßen Betrieb des Computers erforderlich sind (Hinweis: Das Unternehmen behält
sich das Recht vor, diese Veröffentlichung ohne vorherige Ankündigung zu überarbeiten oder ihren Inhalt
zu ändern).
Einige oder alle Funktionen des Computers sind möglicherweise bereits eingerichtet. Falls dies nicht der
Fall ist oder Sie planen, Teile des Systems neu zu konfigurieren (oder neu zu installieren), lesen Sie das
erweiterte Benutzerhandbuch. Die CD mit den Gerätetreibern & Dienstprogrammen + Benutzerhandbuch
enthält kein Betriebssystem.
Informationen zu gesetzlichen Vorschriften und Sicherheit
Bitte beachten Sie unbedingt die vollständigen gesetzlichen Hinweise und Sicherheitsinformationen
im erweiterten Benutzerhandbuch auf der CD mit den Gerätetreibern & Dienstprogrammen +
Benutzerhandbuch.
© April 2020
Warenzeichen
Intel ist eine Marke/eingetragenes Warenzeichen der Intel Corporation.
Windows ist ein eingetragenes Warenzeichen der Microsoft Corporation.
FCC-Erklärung
Dieses Gerät entspricht Teil 15 der FCC-Bestimmungen. Der Betrieb unterliegt den
folgenden beiden Bedingungen:
1. Dieses Gerät darf keine schädlichen Interferenzen verursachen und
2. Dieses Gerät ist für alle empfangenen Interferenzen ausgelegt, einschließlich
solcher, die einen unerwünschten Betrieb verursachen können
Hinweise zu Pflege und Betrieb
Der Computer ist äußerst robust, kann aber dennoch beschädigt werden. Um dies zu vermeiden,
befolgen Sie diese Empfehlungen:
• Lassen Sie das Gerät nicht fallen, und setzen Sie es keinen Stößen aus. Wenn der Computer zu
Boden fällt, können das Gehäuse und die Komponenten beschädigt werden.
• Halten Sie das Gerät trocken, und überhitzen Sie es nicht. . Halten Sie den Computer und das
Netzteil von jeder Art von Heizelement fern. Dies ist ein elektrisches Gerät. Wenn Wasser oder eine
andere Flüssigkeit eindringt, kann der Computer schwer beschädigt werden.
• Vermeiden Sie Interferenzen. Halten Sie den Computer von Hochleistungstransformatoren, Elek-
tromotoren und anderen starken Magnetfeldern fern. Diese können die ordnungsgemäße Funktion
beeinträchtigen und Ihre Daten beschädigen.
• Befolgen Sie die für den Computer vorgeschriebenen Arbeitsschritte. Fahren Sie den Computer
ordnungsgemäß herunter und vergessen Sie nicht, Ihre Arbeit zu speichern. Denken Sie daran, Ihre
Daten in regelmäßigen Abständen zu sichern, da sonst Daten verloren gehen können.

18
DE
Instandhaltung
Versuchen Sie nicht, den Computer selbst zu reparieren. Dadurch wird Ihre Garantie möglicherweise
hinfällig und Sie und der Computer werden einem elektrischen Schlag ausgesetzt. Überlassen Sie alle
Instandhaltungsarbeiten dem zuständigen Servicepersonal. Trennen Sie den Computer von der Strom-
versorgung. Überlassen Sie die Instandhaltung dann bei Auftreten einer der folgenden Störungen dem
qualifiziertem Servicepersonal:
• Wenn das Netzkabel oder das Netzteil beschädigt oder zerschlissen ist.
• Wenn der Computer mit Flüssigkeiten in Berührung gekommen ist.
• Wenn der Computer trotz Befolgung der Bedienungsanleitung nicht normal funktioniert.
• Wenn der Computer heruntergefallen ist oder beschädigt wurde (berühren Sie nicht die austretende
giftige Flüssigkeit, wenn die Abdeckung bricht).
• Wenn ungewöhnlicher Geruch, Wärme oder Rauch von Ihrem Computer ausgeht.
Sicherheitsinformationen
• Verwenden Sie nur ein für diesen Computer zugelassenes Netzteil.
• Verwenden Sie nur die in diesem Handbuch angegebenen Netzkabel und Batterien. Werfen Sie
Batterien nicht ins Feuer. Sie können explodieren. Erkundigen Sie sich bei den örtlichen Behörden nach
möglichen speziellen Entsorgungsvorschriften.
• Fahren Sie nicht mit der Verwendung eines Akkus fort, der heruntergefallen ist oder der in irgendeiner
Weise beschädigt erscheint (z. B. verbogen oder verdreht). Auch wenn der Computer mit einem
beschädigten Akku weiter funktioniert, kann es zu einer Beschädigung des Stromkreises kommen, die
möglicherweise zu einem Brand führt.
• Vergewissern Sie sich, dass Ihr Computer vollständig ausgeschaltet ist, bevor Sie ihn in eine Reise-
tasche (oder einen ähnlichen Transportbehälter) packen.
• Vergewissern Sie sich vor der Reinigung des Computers, dass er von allen externen Netzteilen,
Peripheriegeräten und Kabeln getrennt ist.
• Verwenden Sie ein weiches, sauberes Tuch, um den Computer zu reinigen, aber tragen Sie den Rein-
iger nicht direkt auf den Computer auf. Verwenden Sie keine flüchtigen (Petroleum-Destillate) oder
scheuernden Reinigungsmittel für irgendein Teil des Computers.
• Versuchen Sie nicht, einen Akkupack zu reparieren. Überlassen Sie die Reparatur oder den Austausch
des Akkupacks Ihrem Kundendienstvertreter oder qualifiziertem Servicepersonal.
• Beachten Sie, dass bei Computern mit einem erhöhten galvanischen Logo das Logo durch einen
Schutzkleber abgedeckt ist. Durch allgemeine Abnutzung kann sich dieser Kleber mit der Zeit ver-
schlechtern und das freigelegte Logo möglicherweise scharfe Kanten entwickeln. Seien Sie vorsichtig,
wenn Sie den Computer in diesem Fall anfassen, und vermeiden Sie es, das erhöhte galvanisierte
Logo zu berühren. Vermeiden Sie es, andere Gegenstände in die Tragetasche zu legen, die während
des Transports gegen die Oberseite des Computers reiben könnten. Wenden Sie sich bei derartigen
Verschleißerscheinungen an Ihren Kundendienst.
Vorsichtsmaßnahmen für Polymer-/Lithium-Ionen-Akkus
Beachten Sie die folgenden Informationen, die sich nur auf Polymer-/Lithium-Ionen-Akkus beziehen
und die gegebenenfalls die allgemeinen Vorsichtsmaßnahmen für Akkus ersetzen.
• Polymer-/Lithium-Ionen-Akkus unterliegen möglicherweise einer leichten Ausdehnung oder Schwel-
lung, dies ist jedoch Teil des Sicherheitsmechanismus des Akkus und stellt keinen Grund zur Sorge dar.
• Gehen Sie bei der Verwendung von Polymer/Lithium-Ionen-Akkus sachgemäß vor. Verwenden Sie
Polymer/Lithium-Ionen-Akkus nicht bei hohen Umgebungstemperaturen und lagern Sie unbenutzte
Akkus nicht über einen längeren Zeitraum.
• Wenn Sie in Umgebungen mit niedrigen Temperaturen arbeiten, verwenden Sie bitte das Netzteil zur
Stromversorgung des Computers

19
DE
Batterieentsorgung & Vorsicht
Das von Ihnen erworbene Produkt enthält einen wiederaufladbaren Akku. Dieser
Akku ist recycelbar. Am Ende seiner Nutzungsdauer kann es nach verschiedenen
staatlichen und lokalen Gesetzen illegal sein, diesen Akku im Hausmüll zu entsorgen.
Erkundigen Sie sich bei Ihrem örtlichen Abfallwirtschaftsamt nach Einzelheiten zu
Recyclingmöglichkeiten oder zur ordnungsgemäßen Entsorgung in Ihrer Region.
Explosionsgefahr bei unsachgemäßem Austausch des Akkus. Akku nur durch
denselben oder einen gleichwertigen, vom Hersteller empfohlenen Typ ersetzen.
Verbrauchten Akku gemäß den Anweisungen des Herstellers entsorgen.
Inbetriebnahme des Systems
1. Entfernen Sie alle Verpackungsmaterialien.
2. Stellen Sie den Computer auf eine stabile Unterlage.
3. Legen Sie den Akku ein und vergewissern Sie sich, dass er richtig eingerastet ist.
4. Schließen Sie alle Peripheriegeräte, die Sie mit dem Computer verwenden möchten
(z. B. Tastatur und Maus), sicher an ihre Anschlüsse an.
5. Gehen Sie bei der Ersteinrichtung des Computers wie folgt vor
(um den Computer während des Transports zu schützen, wird der Akku verriegelt, damit das
System erst dann mit Strom versorgt wird, wenn es an das Netzteil angeschlossen und wie
unten beschrieben eingerichtet wurde):
• Stecken Sie die das Netzteil in die DC-ln-Buchse auf der Rückseite des Computers , stecken
Sie dann das Netzkabel in eine Steckdose und verbinden Sie das Netzkabel mit dem Netzteil.
Der Akku wird nun entriegelt.
6. Heben Sie den Deckel mit einer Hand in einen angenehmen Betrachtungswinkel an
(nicht mehr als 130 Grad); stützen Sie dann mit der anderen Hand
(wie in Abbildung 1 dargestellt) die Unterseite des Computers ab
(Hinweis: Niemals den Computer am Deckel anheben).
7. Drücken Sie den Netzschalter, um den Computer einzuschalten.
Abbildung 1
Öffnen des Deckels/Computers mit eingesteckten Netzteilen
130°

20
DE
Herunterfahren
Beachten Sie, dass Sie Ihren Computer immer mit dem
Befehl zum Herunterfahren in Windows ausschalten
sollten (siehe unten). Dadurch werden Festplatten- oder
Systemprobleme vermieden.
1. Klicken Sie auf das Symbol für das Startmenü.
2. Klicken Sie auf den Menüpunkt Ein/Aus.
3. Wählen Sie im Menü Herunterfahren.
Intel® Optane™ Setup
Intel® Optane™ ist eine Kombination aus einem kompatiblen Speichergerät und Intel
Rapid Storage-Technologie-Software. Diese Kombination wurde zur Beschleunigung der
Systemleistung entwickelt, indem Boot-Daten, ausführbare Dateien, häufig genutzte Daten
und Systemseitendateien auf einer nicht volatilen Intel® Optane™ SSD mit geringer Latenz
zwischengespeichert werden.
Wenden Sie sich bitte an Ihren Distributor oder Lieferanten, um zu erfahren, ob Ihr System
diese Technologie unterstützt.
Intel® Optane™ Setup Procedure
Sie müssen Intel® Optane™ vor der Installation Ihres Windows 10-Betriebssystems
einrichten, und dazu müssen Sie Folgendes vorbereiten.
• Das Microsoft Windows 10-Betriebssystem auf einer DVD oder einem USB-Stick
• Eine Intel® Optane™-SSD, die auf Ihrem System installiert ist.
• Die CD mit den Gerätetreibern & Dienstprogrammen + Benutzerhandbuch.
1. Starten Sie Ihren Notebook-Computer und drücken Sie F2, um das BIOS aufzurufen und zum
Setup-Dienstprogramm zu wechseln.
2. Wählen Sie das Erweiterte Menü.
3. Wählen Sie den VMD-Modus, drücken Sie Eingabe und wählen Sie Intel RST Premium... und wählen
Sie <OK>.
SystemSoftware
Möglicherweise ist auf Ihrem Computer bereits eine Systemsoftware vorinstalliert. Wo dies
nicht der Fall ist oder wenn Sie Ihren Computer für ein anderes System neu konfigurieren,
bezieht sich dieses Handbuch auf Microsoft Windows 10.
Intel® Optane™/RAID-Unterstützung
Beachten Sie bitte, dass Ihr System als RAID ODER zur Unterstützung von Intel® Optane™
eingerichtet werden kann, aber es kann nicht so eingestellt werden, dass beide Systeme
unterstützt werden. Sie müssen daher Intel® Optane™ oder RAID vor der Installation Ihres
Windows 10-Betriebssystems einrichten
Sayfa yükleniyor ...
Sayfa yükleniyor ...
Sayfa yükleniyor ...
Sayfa yükleniyor ...
Sayfa yükleniyor ...
Sayfa yükleniyor ...
Sayfa yükleniyor ...
Sayfa yükleniyor ...
Sayfa yükleniyor ...
Sayfa yükleniyor ...
Sayfa yükleniyor ...
Sayfa yükleniyor ...
Sayfa yükleniyor ...
Sayfa yükleniyor ...
Sayfa yükleniyor ...
Sayfa yükleniyor ...
Sayfa yükleniyor ...
Sayfa yükleniyor ...
Sayfa yükleniyor ...
Sayfa yükleniyor ...
Sayfa yükleniyor ...
Sayfa yükleniyor ...
Sayfa yükleniyor ...
Sayfa yükleniyor ...
Sayfa yükleniyor ...
Sayfa yükleniyor ...
Sayfa yükleniyor ...
Sayfa yükleniyor ...
Sayfa yükleniyor ...
Sayfa yükleniyor ...
Sayfa yükleniyor ...
Sayfa yükleniyor ...
Sayfa yükleniyor ...
Sayfa yükleniyor ...
Sayfa yükleniyor ...
Sayfa yükleniyor ...
Sayfa yükleniyor ...
Sayfa yükleniyor ...
Sayfa yükleniyor ...
Sayfa yükleniyor ...
Sayfa yükleniyor ...
Sayfa yükleniyor ...
Sayfa yükleniyor ...
Sayfa yükleniyor ...
Sayfa yükleniyor ...
Sayfa yükleniyor ...
Sayfa yükleniyor ...
Sayfa yükleniyor ...
Sayfa yükleniyor ...
Sayfa yükleniyor ...
Sayfa yükleniyor ...
Sayfa yükleniyor ...
Sayfa yükleniyor ...
Sayfa yükleniyor ...
Sayfa yükleniyor ...
Sayfa yükleniyor ...
Sayfa yükleniyor ...
Sayfa yükleniyor ...
Sayfa yükleniyor ...
Sayfa yükleniyor ...
Sayfa yükleniyor ...
Sayfa yükleniyor ...
Sayfa yükleniyor ...
Sayfa yükleniyor ...
Sayfa yükleniyor ...
Sayfa yükleniyor ...
Sayfa yükleniyor ...
Sayfa yükleniyor ...
Sayfa yükleniyor ...
Sayfa yükleniyor ...
Sayfa yükleniyor ...
Sayfa yükleniyor ...
Sayfa yükleniyor ...
Sayfa yükleniyor ...
Sayfa yükleniyor ...
Sayfa yükleniyor ...
Sayfa yükleniyor ...
Sayfa yükleniyor ...
Sayfa yükleniyor ...
Sayfa yükleniyor ...
-
 1
1
-
 2
2
-
 3
3
-
 4
4
-
 5
5
-
 6
6
-
 7
7
-
 8
8
-
 9
9
-
 10
10
-
 11
11
-
 12
12
-
 13
13
-
 14
14
-
 15
15
-
 16
16
-
 17
17
-
 18
18
-
 19
19
-
 20
20
-
 21
21
-
 22
22
-
 23
23
-
 24
24
-
 25
25
-
 26
26
-
 27
27
-
 28
28
-
 29
29
-
 30
30
-
 31
31
-
 32
32
-
 33
33
-
 34
34
-
 35
35
-
 36
36
-
 37
37
-
 38
38
-
 39
39
-
 40
40
-
 41
41
-
 42
42
-
 43
43
-
 44
44
-
 45
45
-
 46
46
-
 47
47
-
 48
48
-
 49
49
-
 50
50
-
 51
51
-
 52
52
-
 53
53
-
 54
54
-
 55
55
-
 56
56
-
 57
57
-
 58
58
-
 59
59
-
 60
60
-
 61
61
-
 62
62
-
 63
63
-
 64
64
-
 65
65
-
 66
66
-
 67
67
-
 68
68
-
 69
69
-
 70
70
-
 71
71
-
 72
72
-
 73
73
-
 74
74
-
 75
75
-
 76
76
-
 77
77
-
 78
78
-
 79
79
-
 80
80
-
 81
81
-
 82
82
-
 83
83
-
 84
84
-
 85
85
-
 86
86
-
 87
87
-
 88
88
-
 89
89
-
 90
90
-
 91
91
-
 92
92
-
 93
93
-
 94
94
-
 95
95
-
 96
96
-
 97
97
-
 98
98
-
 99
99
-
 100
100


Monster Abra A7 V13.1 Kullanım kılavuzu
- Kategori
- Defterler
- Tip
- Kullanım kılavuzu
- Bu kılavuz için de uygundur
Diğer dillerde
- español: Monster Abra A7 V13.1 Manual de usuario
- français: Monster Abra A7 V13.1 Manuel utilisateur
- italiano: Monster Abra A7 V13.1 Manuale utente
- Deutsch: Monster Abra A7 V13.1 Benutzerhandbuch