Yamaha PortaTone PSR-220 El kitabı
- Kategori
- Dijital piyanolar
- Tip
- El kitabı

OWNER'S MANUAL
BEDIENUNGSANLEITUNG
MODE D'EMPLOI
MANUAL DE INSTRUCCIONES
DEUTSCHFRANÇAISESPAÑOL
ENGLISH

SPECIAL MESSAGE SECTION
This product utilizes batteries or an external power supply (adapter). DO NOT
connect this product to any power supply or adapter other than one described
in the manual, on the name plate, or specifically recommended by Yamaha.
This product should be used only with the components supplied or; a cart, rack,
or stand that is recommended by Yamaha. If a cart, etc., is used, please
observe all safety markings and instructions that accompany the accessory
product.
SPECIFICATIONS SUBJECT TO CHANGE:
The information contained in this manual is believed to be correct at the time of
printing. However, Yamaha reserves the right to change or modify any of the
specifications without notice or obligation to update existing units.
This product, either alone or in combination with an amplifier and headphones
or speaker/s, may be capable of producing sound levels that could cause
permanent hearing loss. DO NOT operate for long periods of time at a high
volume level or at a level that is uncomfortable. If you experience any hearing
loss or ringing in the ears, you should consult an audiologist.
IMPORTANT: The louder the sound, the shorter the time period before
damage occurs.
NOTICE:
Service charges incurred due to a lack of knowledge relating to how a function
or effect works (when the unit is operating as designed) are not covered by the
manufacturer’s warranty, and are therefore the owners responsibility. Please
study this manual carefully and consult your dealer before requesting service.
ENVIRONMENTAL ISSUES:
Yamaha strives to produce products that are both user safe and
environmentally friendly. We sincerely believe that our products and the
production methods used to produce them, meet these goals. In keeping with
both the letter and the spirit of the law, we want you to be aware of the
following:
Battery Notice:
This product MAY contain a small non-rechargeable battery which (if
applicable) is soldered in place. The average life span of this type of battery is
approximately five years. When replacement becomes necessary, contact a
qualified service representative to perform the replacement.
This product may also use “household” type batteries. Some of these may be
rechargeable. Make sure that the battery being charged is a rechargeable type
and that the charger is intended for the battery being charged.
When installing batteries, do not mix batteries with new, or with batteries of a
different type. Batteries MUST be installed correctly. Mismatches or incorrect
installation may result in overheating and battery case rupture.
Warning:
Do not attempt to disassemble, or incinerate any battery. Keep all batteries
away from children. Dispose of used batteries promptly and as regulated by the
laws in your area. Note: Check with any retailer of household type batteries in
your area for battery disposal information.
Disposal Notice:
Should this product become damaged beyond repair, or for
some reason its useful life is considered to be at an end, please observe all
local, state, and federal regulations that relate to the disposal of products that
contain lead, batteries, plastics, etc. If your dealer is unable to assist you,
please contact Yamaha directly.
NAME PLATE LOCATION:
The name plate is located on the bottom of the product. The model number,
serial number, power requirements, etc., are located on this plate. You should
record the model number, serial number, and the date of purchase in the
spaces provided below and retain this manual as a permanent record of your
purchase.
Model
Serial No.
Purchase Date
PLEASE KEEP THIS MANUAL
FCC INFORMATION (U.S.A.)
IMPORTANT NOTICE: DO NOT MODIFY THIS UNIT!
This product, when installed as indicated in the instructions contained in this
manual, meets FCC requirements. Modifications n ot expressly approved by
Yamaha may void your authority, granted by the FCC, to use the product.
IMPORTANT:
When connecting this product to accessories and/or another product use only
high quality shielded cables. Cable/s supplied with this product MUST be
used. Follow all installation instructions. Failure to follow instructions could
void your FCC authorization to use this product in the USA.
NOTE:
This product has been tested and found to comply with the requirements listed
in FCC Regulations, Part 15 for Class “B” digital devices. Compliance with
these requirements provides a reasonable level of assurance that your use of
this product in a residential environment will not result in harmful interference
with other electronic devices. This equipment generates/uses radio
frequencies and, if not installed and used according to the instructions found in
the users manual, may cause interference harmful to the operation of other
electronic devices. Compliance with FCC regulations does not guarantee that
interference will not occur in all installations. If this product is found to be the
source of interference, which can be determined by turning the unit “OFF” and
“ON”, please try to eliminate the problem by using one of the following
measures:
• Relocate either this product or the device that is being affected by the
interference.
• Utilize power outlets that are on different branch(circuit breaker or fuse)
circuits or install AC line filter/s.
• In the case of radio or TV interference, relocate/reorient the antenna. If
the antenna lead-in is 300 ohm ribbon lead, change the lead-in to co-
axial type cable.
If these corrective measures do not produce satisfactory results, please contact
the local retailer authorized to distribute this type of product. If you can not
locate the appropriate retailer, please contact Yamaha Corporation of America,
Electronic Service Division, 6600 Orangethorpe Ave, Buena Park, CA90620
• This applies only to products distributed by Yamaha Corporation of America.

Congratulations on your purchase of the Yamaha PortaTone!
You now own a portable keyboard that combines advanced functions, great sound and exceptional ease-of-
use in a highly compact package. Its outstanding features also make it a remarkably expressive and
versatile instrument.
Read this Owner’s Manual carefully while playing your new PortaTone in order to take full advantage of its
various features.
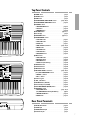
CONTENTS
Main Features 1
Precautions — Taking Care of Your PortaTone
2
Setting Up 3
Power Requirements ..........................................3
PHONES/AUX OUT Jack ....................................4
SUSTAIN Jack......................................................4
Music Stand ........................................................4
Getting Started — Playing the Demo Songs
5
Panel Controls and Terminals 6
Basic Display Operations 8
Playing Voices — The Voice Mode 10
Selecting and Playing a Voice — Main Voice Mode....
10
Main Voice Sub Menu..............................................11
Percussion Kit Voice Chart ........................................12
Playing Two Voices — Dual Voice Mode ........12
Dual Voice Sub Menu ..............................................13
Playing Two Voices — Split Voice Mode ........14
Split Voice Sub Menu ..............................................15
Other Voice Controls 16
Chorus ..............................................................16
Harmony/Echo ................................................16
Harmony/Echo Sub Menu ........................................17
Reverb ..............................................................18
Touch Response ..............................................18
Overall Controls ..............................................19
Reverb/Others Sub Menu ........................................19
Playing Auto Accompaniment — The Style Mode
20
Selecting a Style and Playing an Auto Accompaniment
........
20
About the METRONOME Icon ..................................21
Sync-Stop Function ..................................................24
Changing the Fingering Mode ........................24
Fingered ................................................................25
Full ........................................................................26
Single Finger ..........................................................26
Changing the Accompaniment Split Point ......26
One Touch Setting ............................................27
Playing Songs — Tne Song Mode 28
Selecting and Playing a Song ........................28
Using the Repeat Play Function ......................29
Using the Guide Function (PSR-230 only) ......30
Using the Minus One Function ........................31
Selecting individual channels for Minus One ..............31
Song Sub Menu ......................................................32
Song Volume ..........................................................32
One Touch Setting in the Song Mode ........................33
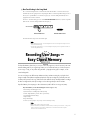
Recording User Songs — Easy Chord Memory
33
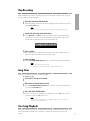
Real-time Recording ........................................34
Step Recording..................................................35
Song Clear ........................................................35
User Song Playback ........................................35
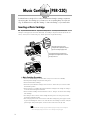
Music Cartridge (PSR-230) 36
Inserting a Music Cartridge..............................36
Music Cartridge Precautions......................................36
Selecting Styles on a Music Cartridge ............37
Selecting Songs on a Music Cartridge ............37
MIDI Functions 38
MIDI Basics ........................................................38
MIDI Sub Menu ......................................................40
Appendix 41
Data Backup and Initialization........................41
Initialize Operation..................................................41
Voice List ..........................................................42
Voice Polyphony......................................................42
Panel Voice List ......................................................42
GM Voice List..........................................................43
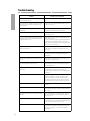
Troubleshooting ................................................44
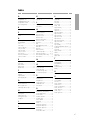
Index ................................................................45
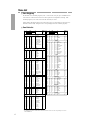
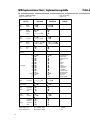
MIDI Implementation Chart ............................46
Specifications ....................................................48

1
Main Features
The PortaTone is a sophisticated yet easy-to-use keyboard with the following features and
functions:
Exceptionally realistic, high-quality Voices (100 Panel, 129 GM Voices (128 Voices +
1 Percussion Kit)), created with AWM (Advanced Wave Memory) technology, which utilizes
digital recordings of actual instruments.
A convenient Voice Set function that automatically calls up the most suitable Voice-related
settings whenever you select a Panel Voice.
100 auto accompaniment Styles, each with different Intro, Main A and B, four Fill-ins,
and Ending sections. Each of the 100 Styles also features a special Jam Track section,
providing stylistically appropriate chord progressions and section changes for playing along
with.
Large custom LCD gives you easy, at-a-glance confirmation of all important settings.
One Touch Setting buttons, for automatically calling up an appropriate Voice (along with
matching effect and other settings) for playing with the Style you select. Each of the 100
Styles features four different One Touch Settings.
Touch Response function for natural, expressive control over the Voices.
Rich, luscious-sounding effects — including Reverb, Chorus, Harmony and Echo — for
enhancing the Voices.
Easy Chord Memory for recording your own chord progressions — letting you create
automatic backing for your original songs.
Guide lamps (on PSR-230), and the Minus One and Repeat Play functions provide
convenient, powerful tools for learning new songs and improving your keyboard technique.
Music Cartridge slot (on PSR-230) lets you plug in optional Yamaha Music Cartridges for
adding new accompaniment Styles and Songs.
Comprehensive MIDI control, including 16-part multi-timbral capacity and full General
MIDI compatibility.
Built-in high-quality stereo amplifier/speaker system.

2
Precautions —
Taking Care of Your PortaTone
Your new PortaTone is a fine musical instrument — and should be treated as such. Handle it with care and
common sense, and it will give you years of enjoyment.
Location ------------------------------------------------------------------
• Avoid exposure to direct sunlight or other sources of heat. Never leave it inside a car where it can get
very hot. Also avoid highly humid or dusty places.
Interference From Electromagnetic Fields------------------------
• Do not use your PortaTone close to television sets, radios or similar equipment since this may cause
interference noise in the other appliance.
Handling ----------------------------------------------------------------
• Protect your PortaTone from strong impact. Be careful not to drop it or place heavy objects on it.
Avoid applying excessive force to the controls and keys.
• Always unplug cables by gripping the plug firmly, and not by pulling on the cable.
Turn Power Off When Making Connections --------------------
• To avoid damage to the PortaTone or other equipment, turn off the power of all related equipment —
including the PortaTone — before connecting or disconnecting any cables.
When Not Using the PortaTone ------------------------------------
• After use, always turn off the POWER switch. When not using your PortaTone for long periods, be sure
to remove the batteries to avoid damage through battery leakage. When using the PortaTone with an AC
adaptor, unplug the adaptor from the electrical outlet, if the instrument is not to be used for a long period
of time, or during electrical storms.
Cleaning------------------------------------------------------------------
• Clean the exterior with a soft, dry cloth. To remove stubborn stains, use a slightly moistened cloth.
• Never use alcohol, thinner, or other chemical solvents, since they will damage the finish. Also, do not
leave vinyl chloride material on the PortaTone for a long time, since it may adhere to the exterior.
Service and Modification --------------------------------------------
• Your PortaTone contains no user-serviceable parts. Opening it or tampering with it in any way may
result in damage and even electrical shock. Refer all servicing to qualified Yamaha personnel.
• Yamaha is not responsible for damage caused by improper usage.
NOTE

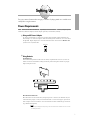
Setting Up
This section contains information about setting up your PortaTone for playing. Make sure to read this section
carefully before using the instrument.
Power Requirements
Your PortaTone can run either on batteries (sold separately) or on normal household current by using the optional
Yamaha PA-3/3B Power Adaptor (or another adaptor specifically recommended by Yamaha).
Using an AC Power Adaptor
To connect your PortaTone to a wall socket, you will need the optionally available Yamaha PA-3/3B
Power Adaptor. Use of other AC adaptors could result in damage to the instrument, so be sure to ask for
the right kind. Plug the adaptor into a convenient wall outlet and its connector into the DC IN 10-12V
jack on the back of your PortaTone.
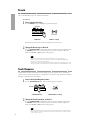
Using Batteries
Inserting Batteries
Turn the instrument upside-down and remove the battery compartment lid. Insert six 1.5-volt size “D”
batteries as shown in the illustration, making sure that the positive and negative terminals are properly
aligned, and replace the lid.
When the Batteries Run Down
When the batteries run low and the battery voltage drops below a certain level, the PortaTone may not
sound or function properly, or it may reset to the default status. As soon as this happens, replace them
with a complete set of six new batteries. Never mix old and new batteries or different types of batteries
(e.g., alkaline and manganese).
• To prevent possible damage from battery leakage, remove the batteries from the instrument if it is not to be used for
an extended period of time.
NOTE
DC IN 10-12V
3

4
PHONES/AUX OUT Jack
Using Headphones
For private practicing and playing without disturbing others, connect a set of stereo headphones to the
rear panel PHONES/AUX OUT jack. Sound from the built-in speaker system is automatically cut off when
you insert a headphone plug into this jack.
Connecting a Keyboard Amplifier or Stereo System
Though the PortaTone is equipped with a built-in speaker system, you can also play it through an
external amplifier/speaker system. First, make sure the PortaTone and any external devices are turned off,
then connect one end of a stereo audio cable to the LINE IN or AUX IN jack(s) of the other device and
the other end to the rear panel PHONES/AUX OUT jack on the PortaTone.
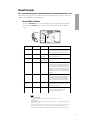
SUSTAIN Jack
An optional Yamaha FC4 or FC5 footswitch can be connected to the rear panel SUSTAIN jack for sustain
control. The footswitch functions like the damper switch on a piano: press and hold to sustain the sound,
and release for normal decay.
For normal operation, turn the power off before connecting the footswitch, then turn the PortaTone on
without pressing the footswitch. Also, do not disconnect the switch while the power is on.
• Make sure to turn the power off before connecting or disconnecting the footswitch.
Music Stand
Insert the bottom edge of the included music stand into the slot located at the top rear of the PortaTone control panel.
(PSR-230)
NOTE
SUSTAIN
PHONES /
AUX OUT

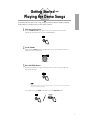
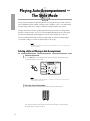
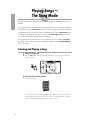
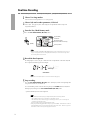
Getting Started —
Playing the Demo Songs
The PortaTone has sixteen various Demo Songs, specially recorded to showcase the dynamic sounds and
rhythms and give you an idea of what you can do with the instrument.
1
First, turn on the power.
Press the POWER ON/OFF button. Whenever the power is turned on, the Voice mode is
automatically called up and set to play Voice 01 (GRAND PIANO).
2
Set the Volume.
Initially, turn the VOLUME control about a third of the way up. You can adjust the control for
optimum level once you start playing.
3
Press the DEMO button.
The Demo Songs will play in sequence from Song number 01. You can also play along on the
keyboard with the Songs.
• When Demo Songs that use the internal accompaniment Styles are played back, chord names are indicated in the
display as the chords of the Song change.
To stop playback, press the DEMO button again or press the START/STOP button.
START/STOP
START/STOP
DEMO
NOTE
DEMO
VOLUME
MAXMIN
POWER
5

Panel Controls and Terminals
6
12
PSR-230
A B
CHORUSDUALFINGERINGSPLITTOUCH
HARMONYGUIDE
TEMPOLARGE/SMALL
MINUS ONEREPEAT
SYNC
STOP
REVERB
VOLUME
minMaj7sus4
dim
EASY CHORD MEMSONGVOICESTYLE
CART
6 5aug
A
B JAM
CART
43
GrandPno
321 4
PSR-230
VOICE EFFECT
DUAL/
CHORUS
HARMONY/
ECHO
REVERB
SONG
CLEAR
REC/
END
EASY
CHORD
MEMORY
NO YES
CARTRIGE
1
4
7
2
5
8
0
3
6
9
VOICE
STYLE
SONG
MAIN MENU
SYNC-START
START/STOP
INTRO MAIN/AUTO FILL ENDING
JAM TRACK
SYNC-
STOP
LARGE/
SMALL
MEASURE
BEAT
MINUS ONE
GUIDE
ONE TOUCH SETTING
EASY CHORD MEMORY
START/STOP
REPEAT PLAY
POWER VOLUME
DEMO
MAX
TEMPO
TEMPO
RESET
SUB MENU
SPLIT FINGERING
MIN
ACCOMPANIMENT
SONG
KEYBOARD
VOLUME
VOLUME
TOUCH
RESPONSE
NAME / SUB MENU MAIN MENU
MAIN VOICE
DUAL VOICE
SPLIT VOICE
STYLE
SONG
HARMONY/ECHO
MIDI
REVERB/OTHERS
MODE
ONE TOUCH SETTING
STYLE SECTION
KEYBOARD
SONG
EFFECT
INTRO MAIN A MAIN B ENDING JAM TRACK
STYLE
EASY CHORD
MEMORY
RESET
PIANO ORGAN
REED
01 GRAND PIANO
02 HONKY-TONK
03 FUNKY E PNO
04 DX E PIANO
05 MIDI GRAND
06 HYPER E PNO
07 BELL E PNO
09 HARPSI CPL
10 CLAVI
11 CELESTA
12 VIBRAPHONE
13 MARIMBA
14 XYLOPHONE
15 TUBE BELLS
08 HARPSICHORD
22 FULL ORGAN
23 ROCK ORG 1
24 ROCK ORG 2
40 DIST GUITAR
25 16+2 ORGAN
26 16+4 ORGAN
19 JAZZ ORG 1
20 JAZZ ORG 2
21 JAZZ ORG 3
37 CLEAN GTR
38 MUTE GUITAR
39 OVRDRV GTR
41 ACC BASS
42 FINGER BASS
43 FRETLESS
47 CHAMBER STR
48 SYNTH STRS
44 SLAP BASS
45 SYNTH BASS
46 STRINGS
49 SLOW STRS16 TIMPANI
17 STEEL DRUMS
18 MUSIC BOX
32 CLASSIC GTR
27 CHURCH ORG
28 REED ORGAN
29 MUSETTE
30 TRAD ACCORD
33 FOLK GUITAR
34 12ST GUITAR
35 JAZZ GUITAR
36 OCTAVE GTR
MALLETS
31 BANDONEON
GUITAR
BASS
ENSEMBLE
52 PIZZ STR
53 CHOIR
54 CHOIR AAHS
55 CHOIR OOHS
56 SYNTH CHOIR
57 ORCH HIT
58 VIOLIN
73 SOPRANO SAX
74 ALTO SAX
75 TENOR SAX
76 BARI SAX
77 SAX+CLARNET
80 ENG HORN
81 BASSOON
82 CLARINET
83 HARMONICA
84 PICCOLO
78 SAX+TRB
79 OBOE
59 CELLO
60 CONTRABASS
63 MUTE TRP
62 TRUMPET
64 TROMBONE
65 TRB SECTION
66 FRENCH HORN
61 HARP
BRASS
69 BRASS+SAX
70 BRASS+TRB
67 TUBA
68 BRASS SECT
71 BRASS+TRP
72 SYNTH BRASS
PIPE
SYNTH LEAD
85 FLUTE
86 PAN FLUTE
87 RECORDER
88 OCARINA
91 VOICE LEAD
92 CRYSTAL
93 BRIGHTNESS
94 ANALOG LEAD
89 SQUARE LEAD
90 SAWTOOTH LD
SYNTH PAD
96 BELL PAD
97 XENON PAD
98 ANGELS
99 DARK MOON
00 DRUM KIT
95 FANTASIA
DRUM KIT
50 TREMOLO STR
51 VIOLIN+STRS
STRINGS
POP
DANCE CONTEMP JAZZ
C & W
MARCH STYLE
BALLROOM STD
01 8BEAT POP
02 8 UPBT POP
03 LIGHT POP
04 FOLKROCK
05 DETROIT POP
06 UP POP SHFL
07 POP RHUMBA
09 8BEAT LIGHT
10 SLOW BALLAD
11 EPIC BALLAD
12 16BEAT BLD 1
13 PNO BALLAD
14 6
/
8 BALLAD 1
15 6
/
8 BALLAD 2
08 SHOWTUNE
22 ACID JAZZ
23 70S DISCO
24 DISCO PARTY
36 COOL JAZZ
37 JAZZ BALLAD
38 JAZZ WALTZ
25 DISCO TROP
26 POLKA POP
17 LITE RK BLD
18 LATIN ROCK
19 6
/
8HVY ROCK
20 6
/
8 GOSPEL
21 SLOW ROCK
33 B B BALLAD 49 REGGAE 16
34 SWING
35 CHARLESTON
39 FAST BOSSA
40 SLOW BOSSA
41 SAMBA 1
42 JAZZ SAMBA
43 MAMBO
47 BOLERO LNTO
48 REGGAE 12
44 BEGUINE
45 MERENGUE
46 SON
16 ROCK BALLAD 32 BIG BAND
POP BALLAD
ROCK
27 ROCK&ROLL 1
28 ROCK&ROLL 2
29 BOOGIE
30 TWIST
ROCK & ROLL
31 DIXIELAND
TRAD JAZZ
LATIN
50 BLUEGRASS
51 C ROCK 1
52 C ROCK 2
53 COWBOY BOOG
54 C BALLAD
55 C SHUFFLE
56 TWO STEP
57 C WALTZ 1
58 C WALTZ 2
69 TANGO ARGN
70 FOXTROT
71 JIVE
72 QUICKSTEP
73 SLOWFOX
BALLROOM LTN
76 CHA CHA
77 RHUMBA
78 SAMBA 2
79 CONGA
80 PASODOBLE
74 SLOW WALTZ
75 VIEN WALTZ
59 POLKA 1
60 POLKA 2
61 ESPAGNOLE
62 TARANTELLA
63 TRAD WALTZ 1
64 TRAD WALTZ 2
WORLD MUSIC
65 MARCH 1
66 MARCH 2
67 6
/
8 MARCH 1
68 6
/
8 MARCH 2
81 POP ROCK
82 POP SHUFFLE
83 ROCK POP
84 ROCK SHUFFL
85 16BEAT POP
86 16BEAT BLD 2
87 TECHNO
88 DANCE POP
89 POP RAP
90 EUROBEAT
91 DISCO POP
92 DISCO SOUL
93 R&B
94 SOUL
95 FUNK
96 6
/
8 BLUES
97 FUSION
98 POP BOSSA
99 SALSA
00 POP RAGGAE
!" #
$
%
&
'
(
)
*
+
3
5
NAME / SUB MENU MAIN MENU
PSR-220
A B
CHORUSDUALFINGERINGSPLITTOUCH
HARMONYGUIDE
TEMPOLARGE/SMALL
MINUS ONEREPEAT
SYNC
STOP
REVERB
VOLUME
minMaj7sus4
dim
EASY CHORD MEMSONGVOICESTYLE
CART
6 5aug
GrandPno
321 4
A
B
JAM
POWER VOLUME
DEMO
SUB MENU
MIN MAX
ACCOMPANIMENT
SONG
KEYBOARD
ONE TOUCH SETTING
EASY CHORD MEMORY
VOLUME
RESET
TEMPO
VOLUME
TEMPO
RESET
SYNC-START
START/STOP
INTRO MAIN/AUTO FILL ENDING
JAM TRACK
START/STOP
SPLIT FINGERING
TOUCH
RESPONSE
MEASURE
REPEAT PLAY
MINUS ONE
MAIN VOICE
DUAL VOICE
SPLIT VOICE
STYLE
SONG
HARMONY/ECHO
MIDI
REVERB/OTHERS
MODE
ONE TOUCH SETTING
STYLE SECTION
KEYBOARD
SONG
EFFECT
INTRO MAIN A MAIN B ENDING JAM TRACK
STYLE
EASY CHORD
MEMORY
BEAT
SYNC-
STOP
LARGE/
SMALL
VOICE
MAIN MENU
STYLE
SONG
1
4
7
2
5
8
0
3
6
9
NO YES
EASY CHORD MEMORY
General MIDI compatible
Reverb and chorus effects
Touch responsive keys
REC/
END
SONG
CLEAR
PSR-220
VOICE EFFECT
DUAL/
CHORUS
HARMONY/
ECHO
REVERB
1234
PIANO ORGAN
REED
01 GRAND PIANO
02 HONKY-TONK
03 FUNKY E PNO
04 DX E PIANO
05 MIDI GRAND
06 HYPER E PNO
07 BELL E PNO
09 HARPSI CPL
10 CLAVI
11 CELESTA
12 VIBRAPHONE
13 MARIMBA
14 XYLOPHONE
15 TUBE BELLS
08 HARPSICHORD
22 FULL ORGAN
23 ROCK ORG 1
24 ROCK ORG 2
40 DIST GUITAR
25 16+2 ORGAN
26 16+4 ORGAN
19 JAZZ ORG 1
20 JAZZ ORG 2
21 JAZZ ORG 3
37 CLEAN GTR
38 MUTE GUITAR
39 OVRDRV GTR
41 ACC BASS
42 FINGER BASS
43 FRETLESS
47 CHAMBER STR
48 SYNTH STRS
44 SLAP BASS
45 SYNTH BASS
46 STRINGS
49 SLOW STRS16 TIMPANI
17 STEEL DRUMS
18 MUSIC BOX
32 CLASSIC GTR
27 CHURCH ORG
28 REED ORGAN
29 MUSETTE
30 TRAD ACCORD
33 FOLK GUITAR
34 12ST GUITAR
35 JAZZ GUITAR
36 OCTAVE GTR
MALLETS
31 BANDONEON
GUITAR
BASS
ENSEMBLE
52 PIZZ STR
53 CHOIR
54 CHOIR AAHS
55 CHOIR OOHS
56 SYNTH CHOIR
57 ORCH HIT
58 VIOLIN
73 SOPRANO SAX
74 ALTO SAX
75 TENOR SAX
76 BARI SAX
77 SAX+CLARNET
80 ENG HORN
81 BASSOON
82 CLARINET
83 HARMONICA
84 PICCOLO
78 SAX+TRB
79 OBOE
59 CELLO
60 CONTRABASS
63 MUTE TRP
62 TRUMPET
64 TROMBONE
65 TRB SECTION
66 FRENCH HORN
61 HARP
BRASS
69 BRASS+SAX
70 BRASS+TRB
67 TUBA
68 BRASS SECT
71 BRASS+TRP
72 SYNTH BRASS
PIPE
SYNTH LEAD
85 FLUTE
86 PAN FLUTE
87 RECORDER
88 OCARINA
91 VOICE LEAD
92 CRYSTAL
93 BRIGHTNESS
94 ANALOG LEAD
89 SQUARE LEAD
90 SAWTOOTH LD
SYNTH PAD
96 BELL PAD
97 XENON PAD
98 ANGELS
99 DARK MOON
00 DRUM KIT
95 FANTASIA
DRUM KIT
50 TREMOLO STR
51 VIOLIN+STRS
STRINGS
POP
DANCE CONTEMP JAZZ
C & W
MARCH STYLE
BALLROOM STD
01 8BEAT POP
02 8 UPBT POP
03 LIGHT POP
04 FOLKROCK
05 DETROIT POP
06 UP POP SHFL
07 POP RHUMBA
09 8BEAT LIGHT
10 SLOW BALLAD
11 EPIC BALLAD
12 16BEAT BLD 1
13 PNO BALLAD
14 6
/
8 BALLAD 1
15 6
/
8 BALLAD 2
08 SHOWTUNE
22 ACID JAZZ
23 70S DISCO
24 DISCO PARTY
36 COOL JAZZ
37 JAZZ BALLAD
38 JAZZ WALTZ
25 DISCO TROP
26 POLKA POP
17 LITE RK BLD
18 LATIN ROCK
19 6
/
8HVY ROCK
20 6
/
8 GOSPEL
21 SLOW ROCK
33 B B BALLAD 49 REGGAE 16
34 SWING
35 CHARLESTON
39 FAST BOSSA
40 SLOW BOSSA
41 SAMBA 1
42 JAZZ SAMBA
43 MAMBO
47 BOLERO LNTO
48 REGGAE 12
44 BEGUINE
45 MERENGUE
46 SON
16 ROCK BALLAD 32 BIG BAND
POP BALLAD
ROCK
27 ROCK&ROLL 1
28 ROCK&ROLL 2
29 BOOGIE
30 TWIST
ROCK & ROLL
31 DIXIELAND
TRAD JAZZ
LATIN
50 BLUEGRASS
51 C ROCK 1
52 C ROCK 2
53 COWBOY BOOG
54 C BALLAD
55 C SHUFFLE
56 TWO STEP
57 C WALTZ 1
58 C WALTZ 2
69 TANGO ARGN
70 FOXTROT
71 JIVE
72 QUICKSTEP
73 SLOWFOX
BALLROOM LTN
76 CHA CHA
77 RHUMBA
78 SAMBA 2
79 CONGA
80 PASODOBLE
74 SLOW WALTZ
75 VIEN WALTZ
59 POLKA 1
60 POLKA 2
61 ESPAGNOLE
62 TARANTELLA
63 TRAD WALTZ 1
64 TRAD WALTZ 2
WORLD MUSIC
65 MARCH 1
66 MARCH 2
67 6
/
8 MARCH 1
68 6
/
8 MARCH 2
81 POP ROCK
82 POP SHUFFLE
83 ROCK POP
84 ROCK SHUFFL
85 16BEAT POP
86 16BEAT BLD 2
87 TECHNO
88 DANCE POP
89 POP RAP
90 EUROBEAT
91 DISCO POP
92 DISCO SOUL
93 R&B
94 SOUL
95 FUNK
96 6
/
8 BLUES
97 FUSION
98 POP BOSSA
99 SALSA
00 POP RAGGAE
!" #
%
&
'
(
)
*
+
5
MIDI DC IN 10-12
SUSTAIN
PHONES/
AUX OUT
OUT IN
+ -
9678

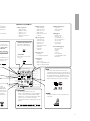
Top Panel Controls
! POWER switch ..........................................................................page 5
" VOLUME control ........................................................................page 5
# DEMO button ............................................................................page 5
$ ACCOMPANIMENT/SONG VOLUME controls ................pages 23, 32
% ACCOMPANIMENT/SONG TEMPO controls ........................ page 22
& KEYBOARD controls
• TOUCH RESPONSE button ..................................................page 18
• SPLIT button ........................................................................ page 14
• FINGERING button ..............................................................page 24
' SUB MENU buttons .......................................................... pages 8, 11
( Panel Display .......................................................................... page 8
) MAIN MENU buttons ...................................................... pages 8, 11
* ACCOMPANIMENT controls
• SYNC-START button ............................................................page 21
• START/STOP button ............................................................ page 21
• INTRO button ...................................................................... page 21
• MAIN/AUTO FILL A, B buttons .................................. pages 21, 22
• ENDING button .................................................................. page 24
• JAM TRACK button ............................................................ page 23
• SYNC-STOP button ............................................................ page 24
• LARGE/SMALL button ........................................................ page 23
+ SONG controls
• START/STOP button ............................................................ page 29
• REPEAT PLAY button .......................................................... page 29
• MINUS ONE button ............................................................ page 31
• GUIDE button (PSR-230 only) ............................................ page 30
, VOICE Mode button ................................................................page 10
- STYLE Mode button ................................................................ page 20
. SONG Mode button .............................................................. page 28
/ ONE TOUCH SETTING 1 - 4 buttons ............................ pages 27, 33
(also:) EASY CHORD MEMORY controls ................................ page 35
• MEASURE +/- buttons ........................................................ page 35
• BEAT +/- buttons ................................................................ page 35
0 Numeric keypad .................................................................... page 10
1 -/NO, +/YES buttons ............................................................ page 11
2 CARTRIDGE button (PSR-230) ................................................ page 37
3 Music Cartridge slot (PSR-230) ............................................ page 36
4 EASY CHORD MEMORY (REC/END) button .......................... page 34
5 VOICE EFFECT controls
• DUAL/CHORUS button .............................................. pages 12, 16
(also:) SONG CLEAR button for Easy Chord Memory .................. page 35
• HARMONY/ECHO button .................................................. page 16
• REVERB button .................................................................... page 18
Rear Panel Terminals
6 MIDI IN/OUT terminals .......................................................... page 38
7 SUSTAIN jack .......................................................................... page 4
8 PHONES/AUX OUT jack .......................................................... page 4
9 DC IN 10-12V jack ................................................................ page 3
7
CART
PSR-230
VOICE EFFECT
DUAL/
CHORUS
HARMONY/
ECHO
REVERB
SONG
CLEAR
REC/
END
EASY
CHORD
MEMORY
NO YES
CARTRIGE
1
4
7
2
5
8
0
3
6
9
ORGAN
REED
22 FULL ORGAN
23 ROCK ORG 1
24 ROCK ORG 2
40 DIST GUITAR
25 16+2 ORGAN
26 16+4 ORGAN
19 JAZZ ORG 1
20 JAZZ ORG 2
21 JAZZ ORG 3
37 CLEAN GTR
38 MUTE GUITAR
39 OVRDRV GTR
41 ACC BASS
42 FINGER BASS
43 FRETLESS
47 CHAMBER STR
48 SYNTH STRS
44 SLAP BASS
45 SYNTH BASS
46 STRINGS
49 SLOW STRS
32 CLASSIC GTR
27 CHURCH ORG
28 REED ORGAN
29 MUSETTE
30 TRAD ACCORD
33 FOLK GUITAR
34 12ST GUITAR
35 JAZZ GUITAR
36 OCTAVE GTR
31 BANDONEON
GUITAR
BASS
ENSEMBLE
52 PIZZ STR
53 CHOIR
54 CHOIR AAHS
55 CHOIR OOHS
56 SYNTH CHOIR
57 ORCH HIT
58 VIOLIN
73 SOPRANO SAX
74 ALTO SAX
75 TENOR SAX
76 BARI SAX
77 SAX+CLARNET
80 ENG HORN
81 BASSOON
82 CLARINET
83 HARMONICA
84 PICCOLO
78 SAX+TRB
79 OBOE
59 CELLO
60 CONTRABASS
63 MUTE TRP
62 TRUMPET
64 TROMBONE
65 TRB SECTION
66 FRENCH HORN
61 HARP
BRASS
69 BRASS+SAX
70 BRASS+TRB
67 TUBA
68 BRASS SECT
71 BRASS+TRP
72 SYNTH BRASS
PIPE
SYNTH LEAD
85 FLUTE
86 PAN FLUTE
87 RECORDER
88 OCARINA
91 VOICE LEAD
92 CRYSTAL
93 BRIGHTNESS
94 ANALOG LEAD
89 SQUARE LEAD
90 SAWTOOTH LD
SYNTH PAD
96 BELL PAD
97 XENON PAD
98 ANGELS
99 DARK MOON
00 DRUM KIT
95 FANTASIA
DRUM KIT
50 TREMOLO STR
51 VIOLIN+STRS
STRINGS
3
5
1
4
7
2
5
8
0
3
6
9
NO YES
EASY CHORD MEMORY
General MIDI compatible
Reverb and chorus effects
Touch responsive keys
REC/
END
SONG
CLEAR
PSR-220
VOICE EFFECT
DUAL/
CHORUS
HARMONY/
ECHO
REVERB
ORGAN
REED
22 FULL ORGAN
23 ROCK ORG 1
24 ROCK ORG 2
40 DIST GUITAR
25 16+2 ORGAN
26 16+4 ORGAN
19 JAZZ ORG 1
20 JAZZ ORG 2
21 JAZZ ORG 3
37 CLEAN GTR
38 MUTE GUITAR
39 OVRDRV GTR
41 ACC BASS
42 FINGER BASS
43 FRETLESS
47 CHAMBER STR
48 SYNTH STRS
44 SLAP BASS
45 SYNTH BASS
46 STRINGS
49 SLOW STRS
32 CLASSIC GTR
27 CHURCH ORG
28 REED ORGAN
29 MUSETTE
30 TRAD ACCORD
33 FOLK GUITAR
34 12ST GUITAR
35 JAZZ GUITAR
36 OCTAVE GTR
31 BANDONEON
GUITAR
BASS
ENSEMBLE
52 PIZZ STR
53 CHOIR
54 CHOIR AAHS
55 CHOIR OOHS
56 SYNTH CHOIR
57 ORCH HIT
58 VIOLIN
73 SOPRANO SAX
74 ALTO SAX
75 TENOR SAX
76 BARI SAX
77 SAX+CLARNET
80 ENG HORN
81 BASSOON
82 CLARINET
83 HARMONICA
84 PICCOLO
78 SAX+TRB
79 OBOE
59 CELLO
60 CONTRABASS
63 MUTE TRP
62 TRUMPET
64 TROMBONE
65 TRB SECTION
66 FRENCH HORN
61 HARP
BRASS
69 BRASS+SAX
70 BRASS+TRB
67 TUBA
68 BRASS SECT
71 BRASS+TRP
72 SYNTH BRASS
PIPE
SYNTH LEAD
85 FLUTE
86 PAN FLUTE
87 RECORDER
88 OCARINA
91 VOICE LEAD
92 CRYSTAL
93 BRIGHTNESS
94 ANALOG LEAD
89 SQUARE LEAD
90 SAWTOOTH LD
SYNTH PAD
96 BELL PAD
97 XENON PAD
98 ANGELS
99 DARK MOON
00 DRUM KIT
95 FANTASIA
DRUM KIT
50 TREMOLO STR
51 VIOLIN+STRS
STRINGS
5
IDI DC IN 10-12
SUSTAIN
PHONES/
AUX OUT
IN
+ -
9678

8
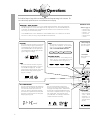
Basic Display Operations
The PortaTone features a large multi-function display that shows all important settings for the instrument. The
section below briefly explains the various icons and indications in the display.
A B
FINGERINGSPLITTOUCH
GUIDE
TEMPOLARGE/SMALL
MINUS ONEREPEAT
SYNC
STOP
minMaj7s
dim
SONGVOICESTYLE
6
NAME / SUB
MODE
ONE TOUCH SETTING
STYLE SECTION
KEYBOARD
SONG
EFFECT
STYLE
EASY CHORD
MEMORY
CART
Gra
A
B
21
EASY CHORD MEMSONGVOICESTYLE
MODE
This section indicates which mode is selected — Voice,
Style, Song, or Easy Chord Memory. To select the desired
mode, press the corresponding button: VOICE, STYLE,
SONG, or EASY CHORD MEMORY (REC/END).
ONE TOUCH SETTING
This indicates which of the One Touch Settings have been
called up. To select a One Touch Setting, press one of the
ONE TOUCH SETTING buttons. (See pages 27, 33.)
STYLE SECTION
This indicates playba
rhythm/accompanim
“sections” — Intro, M
and Jam Track — eac
as it plays. These can
appropriate button du
page 22.)
KEYBOARD
This section contains indications for the keyboard-related
functions: Touch Response (page 18), Split mode (page
14), and Fingering (page 24). Pressing the appropriate
button in the KEYBOARD section of the panel turns the
corresponding function on/off. (The display indication
appears or disappears accordingly.)
SPLIT FINGERINGTOUCH
SONG
This section contains indications for the Song-related
functions: Repeat Play (page 29), Minus One (page 31),
and Guide (PSR-230 only) (page 30). Pressing the
appropriate button on the panel turns the corresponding
function on/off. (The display indication appears or
disappears accordingly.)
MINUS ONE
A B
REPEAT GUIDE
•General MIDI
When a GM Voice is se
icon appears.
CART
•CART (Cartridge) (P
When a Music Cartridg
Style is selected, this ic
EASY CHORD MEMORY
This section contains indications for the Easy Chord Memory
function (page 33). These include the current measure and
beat, as well as the chord name entered at the current
position. The chord name is also displayed when playing
chords in the Auto Accompaniment section of the keyboard
(page 22). The current measure and beat are also displayed
during Song playback (page 28).
minMaj7sus4
dim
6 5aug
STYLE
This section contains indications for the Style-related
functions: Sync Stop (page 24), Large/Small (page 23), and
Tempo (page 22). Pressing the SYNC-STOP button turns that
function on/off. Pressing the LARGE/SMALL button switches
between the two accompaniment ensemble “sizes”: Large and
Small. Using the TEMPO controls changes the playback
speed and the TEMPO value in the display. The metronome
icon flashes in time with the current tempo.
TEMPO
SYNC
STOP
LARGE/SMALL
Main Menus and S
• Main Voice (page 11)
— Main Voice Name
— Main Voice Volum
— Main Voice Octave
— Main Voice Pan
— Main Voice Reverb
— GM Voice
MAIN MENU • NAME/SUB MENU
The Main Menu and the Sub Menus give you access to the detailed settings for the PortaTone. These include settings for the
Main, Dual and Split Voices, as well as various settings for the Styles, Songs and effects. They also include MIDI settings and
overall controls. The display indicates the selected Main Menu item, and shows the name and number of the selected Voice,
Style, or Song, or the selected Sub Menu parameter.
Use the MAIN MENU buttons to select a Main Menu item, and the SUB MENU buttons to select a Sub Menu item. The first Sub
Menu item can be directly selected by pressing both SUB MENU buttons simultaneously.
A
321 4

9
A B
CHORUSDUALFINGERINGSPLITTOUCH
HARMONYGUIDE
TEMPOLARGE/SMALL
MINUS ONEREPEAT
SYNC
STOP
REVERB
VOLUME
minMaj7sus4
dim
EASY CHORD MEMSONGVOICESTYLE
6 5aug
NAME / SUB MENU MAIN MENU
MAIN VOICE
DUAL VOICE
SPLIT VOICE
STYLE
SONG
HARMONY/ECHO
MIDI
REVERB/OTHERS
MODE
ONE TOUCH SETTING
STYLE SECTION
KEYBOARD
SONG
EFFECT
STYLE
EASY CHORD
MEMORY
CART
GrandPno
JAM
A
B JAM
321 4
EASY CHORD MEM
s selected — Voice,
To select the desired
on: VOICE, STYLE,
Y (REC/END).
uch Settings have been
etting, press one of the
ee pages 27, 33.)
STYLE SECTION
This indicates playback of the Styles, or the
rhythm/accompaniment patterns. Each Style has different
“sections” — Intro, Main A and B, four Fill-ins, Ending,
and Jam Track — each of which is indicated in the display
as it plays. These can be played by pressing the
appropriate button during accompaniment playback. (See
page 22.)
VOLUME
This graphic indication shows the Accompaniment and
Song volume.
VOLUME
EFFECT
This section contains indications for the Voice effect-
related functions: Dual mode (page 12), Chorus (page 16),
Harmony/Echo (page 16), and Reverb (page 18). Pressing
the appropriate button in the VOICE EFFECT section of
the panel turns the corresponding function on/off. (The
display indication appears or disappears accordingly.)
REVERB
CHORUS
HARMONY
DUAL
•General MIDI
When a GM Voice is selected, this
icon appears.
CART
•CART (Cartridge) (PSR-230 only)
When a Music Cartridge Song or
Style is selected, this icon appears.
e-related
(page 23), and
button turns that
L button switches
“sizes”: Large and
he playback
The metronome
Main Menus and Sub Menus
• Main Voice (page 11)
— Main Voice Name
— Main Voice Volume
— Main Voice Octave
— Main Voice Pan
— Main Voice Reverb Level
— GM Voice
• Dual Voice (page 13)
— Dual Voice Name
— Dual Voice Volume
— Dual Voice Octave
— Dual Voice Pan
— Dual Voice Reverb Level
— GM Voice
• Split Voice (page 15)
— Split Voice Name
— Split Voice Volume
— Split Voice Octave
— Split Voice Pan
— Split Voice Reverb Level
— Split Point 1
— Split Point 2
— GM Voice
• Style (page 20, 26)
— Style Name
— Accompaniment Split Point
• Song (page 32)
— Song Name
— Minus One Part
— Minus One Right Hand Channel
— Minus One Left Hand Channel
• Harmony/Echo (page 17)
— Type Name
— Harmony Volume
— Echo Speed
• MIDI (page 40)
— Remote Channel
— Keyboard Out
— Accompaniment Out
— Receive Channel Select
— Receive Switch
— Local Control
— External Clock
• Reverb/Others (page 19)
— Reverb Type Name
— Transpose
— Tuning
— Voice Set
— Touch Sensitivity
— Guide Lamp (PSR-230 only)
— Metronome
settings for the
DI settings and
selected Voice,
em. The first Sub
A
B JAM
4

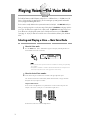
Playing Voices —The Voice Mode
The PortaTone features a wealth of dynamic, realistic Voices — 100 Panel Voices, or 129 GM Voices (128
Voices + 1 Percussion Kit). (See pages 42, 43.) The Voice mode gives you many powerful and versatile
tools for playing and enhancing these Voices.
The Voice mode is actually divided into three separate modes: Main, Dual and Split. In the Main Voice mode (see
below), you can play a single Voice over the entire range of the keyboard. The Dual Voice mode (page 12) allows
you to “layer” two different Voices together for rich, complex sounds. The Split Voice mode (page 14) lets you set
up two different Voices for playing from separate sections of the keyboard. Moreover, a special Voice Effect
section (page 16 - 18) lets you enhance the sound of the Voice or Voices with Chorus, Harmony, Echo, and Reverb
effects.
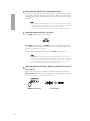
Selecting and Playing a Voice — Main Voice Mode
1
Select the Voice mode.
Press the VOICE button. (The VOICE indications appear in the display, indicating that the Voice
mode and Main Voice menu are selected.)
• You can quickly select the first parameter in the Main Voice menu (Main Voice Volume) by pressing and holding
the VOICE button.
• Selecting MAIN VOICE (or DUAL VOICE, SPLIT VOICE) with the Main Menu buttons does not change the selected
mode; the Style or Song mode is still active, but the appropriate Voice menu is called up.
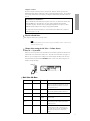
2
Select the desired Voice number.
Use the numeric keypad. Available Voices are listed on the upper right of the panel.
You can either enter the Voice number directly with the number buttons, or step up and down
through the Voices by using the +/- buttons.
Using the number buttons
Be sure to enter a two-digit number, as is printed next to each Voice name on the panel. For
example, to select Voice 09, first press “0” on the numeric keypad, then “9.”
For GM Voices, make sure to enter three-digit numbers.
1
4
7
2
5
8
0
3
6
9
NO YES
1
4
7
2
5
8
0
3
6
9
NO YES
NOTE
VOICE
NAME / SUB MENU MAIN MENU
MAIN VOICE
DUAL VOICE
SPLIT VOICE
STYLE
MODE
ONE TOUCH SETTING
KEYBOARD
EFFECT
CHORUSDUALFINGERINGSPLITTOUCH
EASY CHORD MEMSONGVOICESTYLE
CART
3214
GrandPno
10

11
Using the +/- buttons
Press the + button to select the next Voice, and press the - button to select the previous Voice.
Holding down either button continuously scrolls up or down through the numbers. The +/- buttons
have a “wrap around” feature. For example, pressing the + button from the last number returns to
Voice 01.
About Panel Voices and GM Voices
Keep in mind that the PortaTone has two separate sets of Voices: 100 Panel Voices and 129 GM
(General MIDI) Voices. The GM Voices can also be used for optimum playback of GM-
compatible song data. This means that any GM song data (played from a sequencer or other
MIDI device) will sound just as the composer or programmer intended.
To change between Panel and GM Voices, use the Sub Menu in the Main, Dual, or Split Voice
modes (see pages 11, 13, 15).
3
Play the selected Voice.
To change to another Voice, repeat step 2 above.
• You can also play rhythm Styles in the Voice mode by simply pressing the START/STOP button. The Style last selected
from the Style mode will be played.
4
Change other settings for the Voice — Volume, Octave,
Pan, etc. — if you wish.
Whenever you select a Panel Voice for the Main Voice, the Sub Menu parameters for that Voice are
automatically set to values that best suit the Voice. This is the Voice Set function. (See page 19.)
However, you can change the Voice settings if you wish by using the Sub Menu. First, select the
desired Sub Menu parameter with the SUB MENU buttons. Then, use the numeric keypad or +/-
buttons to change the setting.
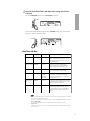
Main Voice Sub Menu
Display Name
—
M.Volume
M.Octave
M.Pan
M.RevLvl
GMvoice
Parameter Name
Main Voice Name
Main Voice Volume
Main Voice Octave
Main Voice Pan
Main Voice Reverb
Level
GM Voice
Range
01 - 00/001 - 129
000 - 127
-2 - +2 octaves
-7 (full left) - +7
(full right)
000 - 127
on, off
Description
This determines the Main Voice. Panel Voices are
from 01 - 00, and GM Voices are from 001 - 129. (To
change between Panel and GM Voices, use the GM
Voice parameter below.)
This determines the volume of the Main Voice, letting
you create the optimum blend with the Dual Voice.
This determines the octave range for the Main Voice.
This determines the pan position of the Main Voice in
the stereo image.
This determines how much of the Main Voice’s signal
is sent to the Reverb effect. Higher values result in a
louder Reverb effect.
This determines whether the Main Voice is selected
from the Panel Voices (off), or from the GM Voices
(on). When GM Voice is on, the General MIDI icon
will appear at the left of the Voice number in the
display.
SUB MENU
NAME / SUB MENU MAIN MENU
MAIN VOICE
DUAL VOICE
SPLIT VOICE
STYLE
SONG
HARMONY/ECHO
MODE
ONE TOUCH SETTING
KEYBOARD
SONG
EFFECT
STYLE
A B
CHORUSDUALFINGERINGSPLITTOUCH
HARMONYGUIDEMINUS ONEREPEAT
REVERB
EASY CHORD MEMSONGVOICESTYLE
CART
3214
M.Volume
NOTE

12
• The Main Voice Volume parameter can be directly selected by pressing and holding down the VOICE button.
• The Main Voice Name parameter can be directly selected by pressing both MAIN MENU buttons simultaneously.
• Reset to default settings
To reset the selected Main Voice parameter to its default settings, simultaneously press the +/- buttons.
• Negative values
To directly enter negative values (for Octave and Pan parameters), press the desired number button while holding
down the - button.
Percussion Kit Voice Chart
The PortaTone also has a special Percussion Kit Voice (Panel Voice #00, or GM Voice #129) that lets you
play various drum and percussion sounds from the keyboard. Symbols for the sounds are also printed
above the keyboard, conveniently indicating which sounds are played from which keys.
• The corresponding MIDI note numbers for the notes are actually one octave lower. For example, the MIDI note
number for note
36 (C1) is note
24 (C0).
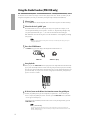
Playing Two Voices — Dual Voice Mode
The Dual Voice mode lets you create richly textured sounds by “layering” two different Voices together — one
Voice being the Main Voice selected in the normal way (page 10), and the other a Dual Voice selected as described
below.
1
Turn on the Dual Voice mode.
Press the DUAL/CHORUS button (in the VOICE EFFECT section) once, or repeatedly until the Dual
Voice icon appears in the display.
When you play the keyboard, both the currently selected Main and Dual Voices will be heard.
DUAL/CHORUS button DUAL icon in display
SONG
CLEAR
VOICE EFFECT
DUAL/
CHORUS
HARMONY/
ECHO
REVERB
DUAL
NOTE
Brush Tap
Brush Slap
Castanet
Sticks
Open Rim Shot
Closed Rim Shot
Hand Clap
Hi-Hat Closed
Hi-Hat Pedal
Hi-Hat Open
Crash Cymbal 1
Ride Cymbal 1
Tambourine
Cowbell
Vibraslap
Bongo L
Conga H Open
Timbale L
Agogo L
Maracas
Guiro Short
Claves
Cuica Mute
Triangle Mute
Shaker
C
lick
B
ru
sh
S
w
irl
B
ru
sh
S
w
irl W
/A
ttack
S
n
are R
o
ll
S
n
are 1
B
ass D
rum
1
B
ass D
ru
m
2
B
ass D
ru
m
3
S
n
are 2
S
n
are 3
F
lo
o
r To
m
L
F
loo
r T
o
m
H
L
o
w
To
m
M
id T
om
L
M
id T
om
H
H
ig
h
T
o
m
C
h
inese C
ym
b
al
R
id
e C
ym
b
al C
u
p
S
p
lash
C
ym
bal
C
rash
C
ym
b
al 2
R
id
e C
ym
b
al 2
B
o
ng
o H
C
o
ng
a H
M
u
te
C
on
ga L
T
im
b
ale H
A
g
o
g
o
H
C
ab
asa
S
am
b
a W
h
istle H
S
am
ba W
h
istle L
G
u
iro L
on
g
W
o
o
d B
lo
ck H
W
o
o
d
B
lo
ck L
C
u
ica O
p
en
T
rian
gle O
p
en
Jin
gle B
ell
B
ell T
ree
NOTE

13
2
Select the desired Dual Voice and make other settings for the Voice,
if desired.
First, use the MAIN MENU buttons to select DUAL VOICE in the display.
Next, select the desired Sub Menu parameter with the SUB MENU buttons. Then, use the numeric
keypad or +/- buttons to change the setting.
Dual Voice Sub Menu
• If the Voice Set function (page 19) is on, the Dual Voice parameters will change automatically whenever a different
Panel Voice is selected in the Main Voice menu.
• The Dual Voice Name parameter can be directly selected by pressing and holding down the DUAL/CHORUS button.
• Reset to default settings
To reset the selected Dual Voice parameter to its default settings, simultaneously press the +/- buttons.
• Negative values
To directly enter negative values (for Octave and Pan parameters), press the desired number button while holding
down the - button.
NOTE
Display Name
—
D.Volume
D.Octave
D.Pan
D.RevLvl
GMvoice
Parameter Name
Dual Voice Name
Dual Voice Volume
Dual Voice Octave
Dual Voice Pan
Dual Voice Reverb
Level
GM Voice
Range
01 - 00/001 - 129
000 - 127
-2 - +2 octaves
-7 (full left) - +7
(full right), --
(opposite of
Main Voice)
000 - 127
on, off
Description
This determines the Dual Voice. Panel Voices are
from 01 - 00, and GM Voices are from 001 - 129. (To
change between Panel and GM Voices, use the GM
Voice parameter below.)
This determines the volume of the Dual Voice
(relative to the Main Voice’s volume), letting you
create the optimum blend with the Main Voice.
This determines the octave range for the Dual Voice
(relative to the Main Voice’s octave setting).
This determines the pan position of the Dual Voice in
the stereo image. To set Dual Voice Pan to the
opposite of that of the Main Voice (“--”), press the +
or - button (past +7 or -7).
This determines how much of the Dual Voice’s signal
is sent to the Reverb effect. Higher values result in a
louder Reverb effect for the Dual Voice.
This determines whether the Dual Voice is selected
from the Panel Voices (off), or from the GM Voices
(on). When GM Voice is on, the General MIDI icon
will appear at the left of the Voice number in the
display.
NAME / SUB MENU MAIN MENU
MAIN VOICE
DUAL VOICE
SPLIT VOICE
STYLE
SONG
HARMONY/ECHO
MIDI
MODE
ONE TOUCH SETTING
KEYBOARD
SONG
EFFECT
STYLE
A B
CHORUSDUALFINGERINGSPLITTOUCH
HARMONYGUIDE
TEMPOLARGE/SMALL
MINUS ONEREPEAT
SYNC
STOP
REVERB
EASY CHORD MEMSONGVOICESTYLE
CART
3214
D.Volume
SUB MENU
NAME / SUB MENU MAIN MENU
MAIN VOICE
DUAL VOICE
SPLIT VOICE
STYLE
SONG
HARMONY/ECHO
MODE
ONE TOUCH SETTING
KEYBOARD
SONG
EFFECT
A B
CHORUSDUALFINGERINGSPLITTOUCH
HARMONYGUIDEMINUS ONEREPEAT
REVERB
EASY CHORD MEMSONGVOICESTYLE
CART
3214
ViolinSt
MAIN MENU

14
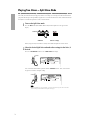
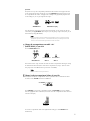
Playing Two Voices — Split Voice Mode
In the Split Voice mode, you can assign two different Voices to opposite sections of the keyboard, and play one
Voice with your left hand while your right plays another. For example, you could play bass with the left hand and
play piano with the right. The right-hand (or upper) Voice is selected in the Main Voice mode, and the left-hand (or
lower) Voice is selected in the Split Voice mode, as described below.
1
Turn on the Split Voice mode.
Press the SPLIT button (in the KEYBOARD section) so that the Split Voice icon appears in the
display.
When you play the keyboard, both the currently selected Main and Split Voices will be heard.
2
Select the desired Split Voice and make other settings for the Voice, if
desired.
First, use the MAIN MENU buttons to select SPLIT VOICE in the display.
Next, select the desired Sub Menu parameter with the SUB MENU buttons. Then, use the numeric
keypad or +/- buttons to change the setting.
• Dual Voice and Split Voice can be used together. You can have the Split Voice play in the lower section of the
keyboard and play the Main and Dual Voices together in the upper.
NOTE
NAME / SUB MENU MAIN MENU
MAIN VOICE
DUAL VOICE
SPLIT VOICE
STYLE
SONG
HARMONY/ECHO
MODE
ONE TOUCH SETTING
KEYBOARD
SONG
EFFECT
STYLE
CHORUSDUALFINGERINGSPLITTOUCH
HARMONYGUIDE
TEMPOLARGE/SMALL
MINUS ONEREPEAT
SYNC
STOP
REVERB
EASY CHORD MEMSONGVOICESTYLE
CART
3214
S.Volume
A B
SUB MENU
NAME / SUB MENU MAIN MENU
MAIN VOICE
DUAL VOICE
SPLIT VOICE
STYLE
SONG
HARMONY/ECHO
MODE
ONE TOUCH SETTING
KEYBOARD
SONG
EFFECT
STYLE
CHORUSDUALFINGERINGSPLITTOUCH
HARMONYGUIDEMINUS ONEREPEAT
REVERB
EASY CHORD MEMSONGVOICESTYLE
CART
3214
FngrBass
A B
MAIN MENU
SPLIT icon in display
KEYBOARD
SPLIT FINGERING
TOUCH
RESPONSE
SPLIT
SPLIT button

15
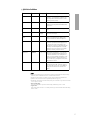
Split Voice Sub Menu
• If the Voice Set function (page 19) is on, the Split Voice parameters (excepting Split Points 1 and 2) will change
automatically whenever a different Panel Voice is selected in the Main Voice menu.
• The Split Voice Name parameter can be directly selected by pressing and holding down the SPLIT button.
• Split Point 2 cannot be set lower than the Accompaniment Split Point. (See page 26.)
• The Split Point 1 and 2 settings are retained in memory when power is turned off, as long as batteries are installed
or an AC adaptor is connected.
• Reset to default settings
To reset the selected Split Voice parameter to its default settings, simultaneously press the +/- buttons.
• Negative values
To directly enter negative values (for Octave and Pan parameters), press the desired number button while holding
down the - button.
NOTE
Display Name
—
S.Volume
S.Octave
S.Pan
S.RevLvl
SpltPnt1
SpltPnt2
GMvoice
Parameter Name
Split Voice Name
Split Voice Volume
Split Voice Octave
Split Voice Pan
Split Voice Reverb
Level
Split Point 1
Split Point 2
GM Voice
Range
01 - 00/001 - 129
000 - 127
-2 - +2 octaves
-7 (full left) - +7
(full right)
000 - 127
36 - 96 (C1 - C6)
37 - 96 (C
#
1 - C6)
on, off
Description
This determines the Split (lower) Voice. Panel Voices
are from 01 - 00, and GM Voices are from 001 - 129.
(To change between Panel and GM Voices, use the
GM Voice parameter below.)
This determines the volume of the Split (lower) Voice,
letting you create the optimum blend with the Main
(upper) Voice.
This determines the octave range for the Split (lower)
Voice.
This determines the pan position of the Split (lower)
Voice in the stereo image.
This determines how much of the Split (lower) Voice’s
signal is sent to the Reverb effect. Higher values
result in a louder Reverb effect for the Split Voice.
This determines the Split Point — i.e., the key that
separates the Split (lower) and Main (upper) Voices
— when the Voice mode or Song mode is active.
(The Split Voice sounds up to and including the Split
Point key.) The default for Split Point 1 is 59 (B2).
Split Point 1 can also be set directly by pressing the
desired key while this parameter is selected.
This determines the Split Point — i.e., the key that
separates the Split (lower) and Main (upper) Voices
— when the Style mode is active. (The Split Voice
sounds up to and including the Split Point key.) The
default for Split Point 2 is 71 (B3). Split Point 2 can
also be set directly by pressing the desired key while
this parameter is selected.
This determines whether the Split Voice is selected
from the Panel Voices (off), or from the GM Voices
(on). When GM Voice is on, the General MIDI icon
will appear at the left of the Voice number in the
display.

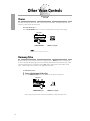
Other Voice Controls
Chorus
The Chorus effect lets you enhance the sound of a Voice with chorus modulation. This slightly detunes the Voice
with itself, creating a thicker and warmer sound.
Turn on the Chorus effect.
Press the DUAL/CHORUS button once or twice, or until the CHORUS icon appears in the display.
• The Chorus effect can be applied to the Main Voice.
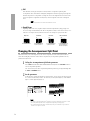
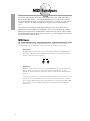
Harmony/Echo
Harmony and Echo are two separate effects that can be applied to a Voice. Harmony is used in conjunction with
the auto accompaniment features (page 20), and creates automatic harmonies (for notes played in the upper section
of the keyboard) to match the accompaniment chords. Echo produces delayed repeats of the sound for special
effects. Various settings for the two effects can be changed in the Sub Menus.
To use Harmony or Echo:
1
Turn on the Harmony/Echo effect.
Press the HARMONY/ECHO button. (The HARMONY icon appears in the display.)
When you play the keyboard, the currently selected Harmony or Echo effect will be heard.
HARMONY/ECHO button HARMONY icon in display
SONG
CLEAR
VOICE EFFECT
DUAL/
CHORUS
HARMONY/
ECHO
REVERB
HARMONY
NOTE
DUAL/CHORUS button CHORUS icon in display
SONG
CLEAR
VOICE EFFECT
DUAL/
CHORUS
HARMONY/
ECHO
REVERB
CHORUS
16

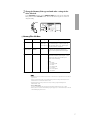
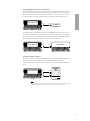
2
Change the Harmony/Echo type and make other settings for the
effect, if desired.
Use the MAIN MENU buttons to select the HARMONY/ECHO menu, and select the desired Sub
Menu parameter with the SUB MENU buttons. Then, use the numeric keypad or +/- buttons to
change the setting.
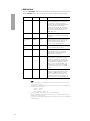
Harmony/Echo Sub Menu
• The Harmony effect is not available in the Voice mode, nor when the Auto Accompaniment Chord Cancel function
(page 25) is on.
• If the Voice Set function (page 19) is on, the Harmony/Echo parameters will change automatically whenever a
different Panel Voice is selected in the Main Voice menu.
• The Harmony/Echo Type Name parameter can be directly selected by pressing and holding down the
HARMONY/ECHO button.
• Reset to default settings
To reset the selected Harmony/Echo parameter to its default settings, simultaneously press the +/- buttons.
• Harmony/Echo is not available when the Full Fingering mode (page 26) is on, and will automatically be turned off
when the Full Fingering mode is selected.
NOTE
Display Name
—
HarmVol
EchoSpd
Parameter Name
Type Name
Harmony Volume
Echo Speed
Range
1 - 8 (1-5:
Harmony types;
6-8: Echo types)
000 - 127
1 - 7
Description
This determines the type of effect for Harmony or
Echo. The Harmony types are (1) Duet, (2) Trio, (3)
Block, (4) Country, and (5) Octave. The Echo types
are (6) Trill, (7) Tremolo, and (8) Echo.
This determines the volume of the Harmony effect,
letting you create the optimum blend with the original
note.
This determines the “speed” of the Echo effect, or the
amount of time between the delayed repeats — which
is based on note values. The actual Echo speed
depends on the selected tempo.
Settings:
1 — 04: 1/4 note
2 — 06: 1/4 note triplets
3 — 08: 1/8 note
4 — 12: 1/8 note triplets
5 — 16: 1/16 note
6 — 24: 1/16 note triplets
7 — 32: 1/32 note
NAME / SUB MENU MAIN MENU
MAIN VOICE
DUAL VOICE
SPLIT VOICE
STYLE
SONG
HARMONY/ECHO
MIDI
MODE
ONE TOUCH SETTING
KEYBOARD
SONG
EFFECT
STYLE
EASY CHORD
MEMORY
FINGERINGSPLITTOUCH
HARMONYGUIDE
TEMPOLARGE/SMALL
MINUS ONEREPEAT
SYNC
STOP
REVERB
7
dim
EASY CHORD MEMSONGVOICESTYLE
CART
6 5aug
3214
Duet
CHORUSDUAL
A B
MAIN MENU
17
Sayfa yükleniyor...
Sayfa yükleniyor...
Sayfa yükleniyor...
Sayfa yükleniyor...
Sayfa yükleniyor...
Sayfa yükleniyor...
Sayfa yükleniyor...
Sayfa yükleniyor...
Sayfa yükleniyor...
Sayfa yükleniyor...
Sayfa yükleniyor...
Sayfa yükleniyor...
Sayfa yükleniyor...
Sayfa yükleniyor...
Sayfa yükleniyor...
Sayfa yükleniyor...
Sayfa yükleniyor...
Sayfa yükleniyor...
Sayfa yükleniyor...
Sayfa yükleniyor...
Sayfa yükleniyor...
Sayfa yükleniyor...
Sayfa yükleniyor...
Sayfa yükleniyor...
Sayfa yükleniyor...
Sayfa yükleniyor...
Sayfa yükleniyor...
Sayfa yükleniyor...
Sayfa yükleniyor...
Sayfa yükleniyor...
Sayfa yükleniyor...
Sayfa yükleniyor...
-
 1
1
-
 2
2
-
 3
3
-
 4
4
-
 5
5
-
 6
6
-
 7
7
-
 8
8
-
 9
9
-
 10
10
-
 11
11
-
 12
12
-
 13
13
-
 14
14
-
 15
15
-
 16
16
-
 17
17
-
 18
18
-
 19
19
-
 20
20
-
 21
21
-
 22
22
-
 23
23
-
 24
24
-
 25
25
-
 26
26
-
 27
27
-
 28
28
-
 29
29
-
 30
30
-
 31
31
-
 32
32
-
 33
33
-
 34
34
-
 35
35
-
 36
36
-
 37
37
-
 38
38
-
 39
39
-
 40
40
-
 41
41
-
 42
42
-
 43
43
-
 44
44
-
 45
45
-
 46
46
-
 47
47
-
 48
48
-
 49
49
-
 50
50
-
 51
51
-
 52
52


Yamaha PortaTone PSR-220 El kitabı
- Kategori
- Dijital piyanolar
- Tip
- El kitabı
diğer dillerde
- español: Yamaha PortaTone PSR-220 El manual del propietario
- français: Yamaha PortaTone PSR-220 Le manuel du propriétaire
- italiano: Yamaha PortaTone PSR-220 Manuale del proprietario
- svenska: Yamaha PortaTone PSR-220 Bruksanvisning
- čeština: Yamaha PortaTone PSR-220 Návod k obsluze
- polski: Yamaha PortaTone PSR-220 Instrukcja obsługi
- Deutsch: Yamaha PortaTone PSR-220 Bedienungsanleitung
- português: Yamaha PortaTone PSR-220 Manual do proprietário
- English: Yamaha PortaTone PSR-220 Owner's manual
- dansk: Yamaha PortaTone PSR-220 Brugervejledning
- русский: Yamaha PortaTone PSR-220 Инструкция по применению
- suomi: Yamaha PortaTone PSR-220 Omistajan opas
- Nederlands: Yamaha PortaTone PSR-220 de handleiding
- română: Yamaha PortaTone PSR-220 Manualul proprietarului