
QUICK START GUIDE
Indoor Cam S350
Anker Innovations Limited. All rights reserved. eufy Security and eufy Security
Logo are trademarks of Anker Innovations Limited, registered in the United
States and other countries. All other trademarks are the property of their
respective owners.
51005003967 V01
Model:T8416

English 01
Deutsch 16
Español 31
Français 46
Italiano 61
Nederlands 76
Português 91
Pусский 106
Türkçe 121
日本語 136
148
161
CUSTOMER SERVICE 176

EN 0201 EN
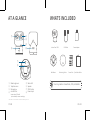
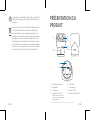
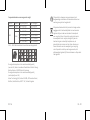
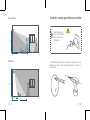
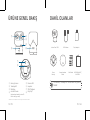
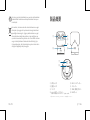
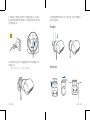
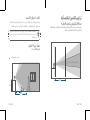
AT A GLANCE
①
④
⑤⑥
SYNC
⑦
⑧
③
②
①Wide-Angle Lens ⑤Status LED
②Telephoto Lens ⑥Speaker
③Microphone ⑦SYNC Button
④microSD Slot
Insert a microSD card*
(not included) to store recordings
⑧Power Input
*Use at least a Class 10 microSD card with a maximum of 128 GB.
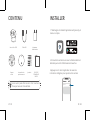
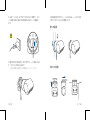
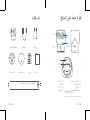
WHAT’S INCLUDED
You may need a screwdriver, drill, and ladder.
Quick Start Guide
Screw PackPositioning StickerWall Mount
Indoor Cam S350 USB Cable Power Adapter

EN 0403 EN
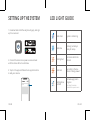
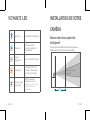
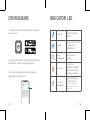
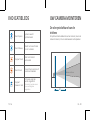
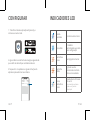
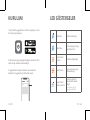
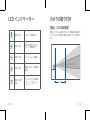
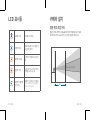
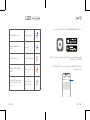
LED LIGHT GUIDE
Solid Violet System is initializing
Solid Blue Working normally or
ready for setup
Blinking Red Not connected to the
internet
Solid Red Recording or the live
stream is being viewed
Flashing Blue
and Red
Firmware upgrade in
progress
Note: Keep the camera
connected to a power source
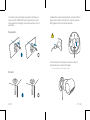
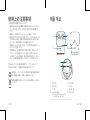
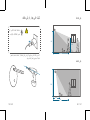
SETTING UP THE SYSTEM
1. Download and install the eufy Security app, and sign
up for an account.
2. Connect the camera to a power source and wait
until the status LED turns solid blue.
3. Tap + in the app and follow the in-app instructions
to add your camera.
My Devices

EN 0605 EN
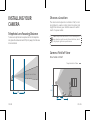
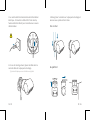
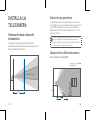
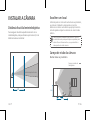
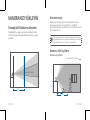
INSTALLING YOUR
CAMERA
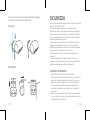
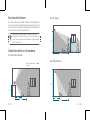
Telephoto Lens Focusing Distance
To ensure an optimal zoom experience from the telephoto
lens, place the camera at least 8 ft (2.5 m) away from the area
to be monitored.
8ft
Telephoto Lens in Focus
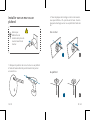
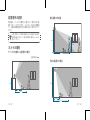
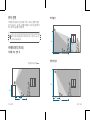
Choose a Location
The camera can be placed on a table or shelf, or can
be installed on a wall or ceiling. Select a location and
height that achieves your desired view and is within
reach of a power outlet.
Note: Keep the camera at least 0.7ft/0.2m away from
any objects or walls to avoid infrared reflection, which
may impact night vision performance.
Camera Field of View
On a Table or Shelf
2 ft 3.3 ft
2.6 ft
Telephoto Field of View

EN 0807 EN
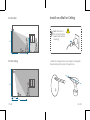
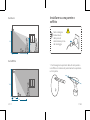
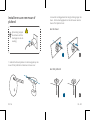
On the Wall
On the Ceiling
8 ft
9 ft
5.6 ft
2.6 ft
10 ft
6 ft
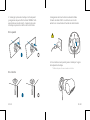
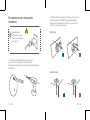
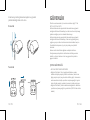
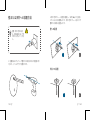
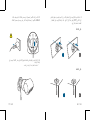
Install on a Wall or Ceiling
Note: Disconnect
the camera from the
power outlet before
mounting.
1. Mark the screw positions on the wall or ceiling with
the positioning sticker and drill a pilot hole.

EN 1009 EN
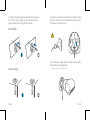
2. Hold the mounting plate on the wall and make sure
the "UP" arrow is pointing up. Secure the mounting
plate to the wall or ceiling with the screws.
On the Wall
On the Ceiling
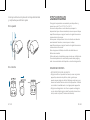
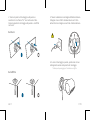
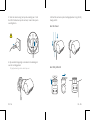
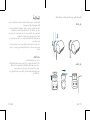
3. Keep the camera disconnected from power. Connect
the USB-C Cable to the camera with the other end not
connected to a power source.
4. If mounting on a wall, place the cable into the cable
channel of the mounting plate.
* Skip this step for ceiling installation.
SYNC

EN 1211 EN
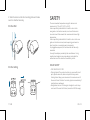
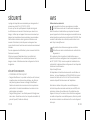
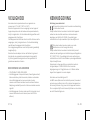
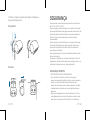
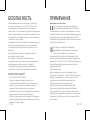
SAFETY
The recommended temperature range for devices and
accessories is 0°C to 40°C (32°F to 104°F) .
Unless specifically indicated that it is safe to do so in the
user guide or instruction manual, do not use this device in
an environment that exceeds the recommended low or high
temperature.
Unless specifically indicated that it is safe to do so in the user
guide or instruction manual, avoid exposing your device to
direct sunshine or excessively wet environments.
For pluggable equipment, the socket-outlet shall be easily
accessible.
Use only the adapter provided by the manufacturer. Using
unauthorized adapters may cause danger and violate the
authorized use of the device or the warranty article.
CHILD SAFETY
• THIS DEVICE IS NOT A TOY.
• Choking Hazard: The product contains (or comes with) small
parts, plastic elements, cables and parts that may cause
choking hazard. Keep your camera and its accessories out of
the reach of small children. Consult a physician immediately if
small parts are swallowed.
• Strangulation Hazard: Children get strangled in cords. Keep
cords out of the reach of children (more than 3ft/0.9m away).
5. Slide the camera onto the mounting plate and make
sure it is attached securely.
On the Wall
On the Ceiling
SYNC

EN 1413 EN
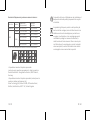
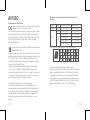
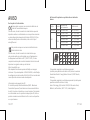
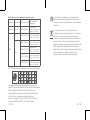
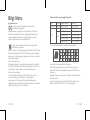
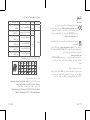
Frequency bands and power are as below:
Function Bands Operation Frequency Max.Power
Bluetooth 2.4GHz 2402-2480 MHz EIRP 9.24 dBm
Wi-Fi
2.4GHz 2412-2472MHz EIRP 19.97 dBm
5GHz
5150-5250MHz EIRP 18.45 dBm
5250-5350MHz EIRP 19.01 dBm
5470-5725MHz EIRP 16.74 dBm
5725-5850MHz EIRP 13.96 dBm
5150~5350 MHz can be used indoor only.
The following importer is the responsible party
(contract for EU matters):Anker Innovations Deutschland GmbH
I Georg-Muche-Strasse 3, 80807 Munich, Germany
The following importer is the responsible party (contract for UK
matters):
Anker Technology (UK) Limited I GNR8, 49 Clarendon Road,
Watford, Hertfordshire, WD17 1HP, United Kingdom
NOTICE
Declaration of Conformity
This product complies with the radio interference
requirements of the European Community.
Hereby, Anker Innovations Limited declares that this device is in
compliance with the essential requirements and other relevant
provisions of Directive 2014/53/EU. For the declaration of
conformity, visit the Web site: https://uk.eufylife.com/.
This product complies with the radio interference
requirements of the United Kingdom.
Hereby, Anker Innovations Limited declares that this
product is in compliance with Radio Equipment Regulations
2017(SI2017/1206). The full text of the UK declaration of
conformity is available at the following internet address:
https://uk.eufylife.com.
This adapter is for indoor use only. The adapter type is TEKA-
UCA20EU, rated output voltage/current is 5Vdc/2A. The plug
considered as disconnect device of adapter.
RF exposure information:
The Maximum Permissible Exposure (MPE) level has been
calculated based on a distance of d=20 cm between the device
and the human body. To maintain compliance with RF exposure
requirement, use product that maintain a 20cm distance
between the device and human body.

DE 1615 EN
This product is designed and manufactured with high
quality materials and components, which can be recycled
and reused.
This symbol means the product must not be discarded
as household waste, and should be delivered to an
appropriate collection facility for recycling. Proper
disposal and recycling helps protect natural resources,
human health and the environment. For more
information on disposal and recycling of this product,
contact your local municipality, disposal service, or the
shop where you bought this product.
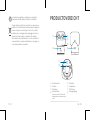
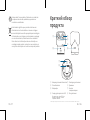
PRODUKTÜBERSICHT
①
④
⑤⑥
SYNC
⑦
⑧
③
②
①Weitwinkelobjektiv ⑤Status-LED
②Teleobjektiv ⑥Lautsprecher
③Mikrofon ⑦SYNC-Taste
④microSD-Steckplatz
microSD-Karte einlegen* (nicht
im Lieferumfang enthalten), um
Aufnahmen zu speichern
⑧Stromeingang
*Verwenden Sie mindestens eine microSD-Karte der Klasse10 mit einer maximalen Speicherkapazität von
128GB.

DE 1817 DE
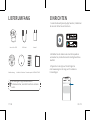
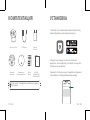
LIEFERUMFANG
Sie benötigen möglicherweise einen
Schraubenzieher, eine Bohrmaschine und eine
Leiter.
KURZANLEITUNG
SchraubenpaketAufkleber SchabloneWandhalterung
Indoor Cam S350 USB-Kabel Netzteil
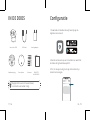
EINRICHTEN
1. Laden Sie die eufy Security-App herunter, installieren
Sie sie und richten Sie ein Konto ein.
2.Schließen Sie die Kamera an eine Stromquelle an
und warten Sie, bis die Status-LED durchgehend blau
leuchtet.
3.Tippen Sie in der App auf + und folgen Sie
den Anweisungen in der App, um Ihre Kamera
hinzuzufügen.
My Devices

DE 2019 DE
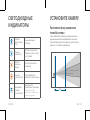
LED-ANZEIGEN
Leuchtet
violett System wird initialisiert
Leuchtet blau
Normaler Betrieb
oder bereit für die
Einrichtung
Blinkt rot Nicht mit dem Internet
verbunden
Leuchtet rot
Aufnahme oder
jemand sieht sich den
Livestream an
Blinkt blau
und rot
Firmware-
Aktualisierung wird
durchgeführt
Hinweis: Behalten Sie den
Anschluss der Kamera an eine
Stromquelle bei
INSTALLIEREN IHRER
KAMERA
Brennweite des Teleobjektivs
Um ein optimales Zoom-Erlebnis mit dem Teleobjektiv zu
gewährleisten, sollten Sie die Kamera in einem Abstand von
mindestens 2,5m von dem zu überwachenden Bereich
aufstellen.
8ft
Teleobjektiv im Fokus

DE 2221 DE
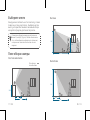
Wählen Sie einen Standort
Die Kamera kann auf einem Tisch oder in einem Regal
aufgestellt oder an der Wand oder Decke angebracht
werden. Wählen Sie den Ort und die Höhe so, dass Sie
die gewünschte Ansicht haben und sich die Kamera in
der Nähe einer Steckdose befindet.
Hinweis: Halten Sie die Kamera mindestens 0,7 Fuß
/ 0,2 m von Objekten oder Wänden entfernt, um
Infrarotreflexionen zu vermeiden, die sich auf die
Nachtsichtleistung auswirken können.
Sichtfeld der Kamera
Auf einem Tisch oder Regal
2 ft 3.3 ft
2.6 ft
Sichtfeld des
Teleobjektivs
An der Wand
An der Decke
8 ft
9 ft
5.6 ft
2.6 ft
10 ft
6 ft

DE 2423 DE
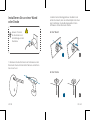
Installieren Sie an einer Wand
oder Decke
Hinweis: Trennen
Sie die Kamera vor
der Montage von der
Steckdose.
1. Markieren Sie die Positionen der Schrauben an der
Wand oder Decke mit der Bohrschablone und bohren
Sie ein Loch vor.
2. Halten Sie die Montageplatte an die Wand und
achten Sie darauf, dass der Aufwärtspfeil nach oben
zeigt. Befestigen Sie die Montageplatte mit den
Schrauben an der Wand oder Decke.
An der Wand
An der Decke

DE 2625 DE
3. Achten Sie darauf, dass die Kamera von der
Stromversorgung getrennt ist. Verbinden Sie das USB-
C-Kabel mit der Kamera, wobei das andere Ende nicht
mit einer Stromquelle verbunden sein darf.
4. Bei Wandmontage legen Sie das Kabel in den
Kabelkanal der Montageplatte.
*Überspringen Sie diesen Schritt bei der Deckenmontage.
SYNC
5.Schieben Sie die Kamera auf die Montageplatte und
vergewissern Sie sich, dass sie sicher befestigt ist.
An der Wand
An der Decke
SYNC

DE 2827 DE
SICHERHEIT
Der empfohlene Temperaturbereich für Geräte und Zubehör
beträgt 0 °C bis 40 °C (32 °F bis 104 °F).
Verwenden Sie das Gerät nicht in einer Umgebung, wo der
empfohlene Temperaturbereich über- oder unterschritten wird,
es sei denn, es wird in der Bedienungsanleitung ausdrücklich
darauf hingewiesen, dass dies unbedenklich ist.
Sofern in der Bedienungsanleitung nicht ausdrücklich darauf
hingewiesen wird, dass dies unbedenklich ist, sollten Sie Ihr
Gerät nicht direkter Sonneneinstrahlung oder übermäßig
feuchten Umgebungen aussetzen.
Bei Geräten mit einem Stecker muss die Steckdose leicht
zugänglich sein.
Verwenden Sie nur den Adapter, der vom Hersteller
bereitgestellt wird. Die Verwendung von nicht autorisierten
Adaptern kann Gefahren verursachen und gegen die
autorisierte Verwendung des Geräts oder des Garantieartikels
verstoßen.
KINDERSICHERHEIT
• DIES IST KEIN SPIELZEUG.
• Erstickungsgefahr: Das Produkt enthält (oder wird mit diesen
geliefert) kleine Teile, Kunststoffelemente, Kabel und Teile,
die eine Erstickungsgefahr verursachen können. Halten Sie
Ihre Kamera und ihr Zubehör außerhalb der Reichweite von
kleinen Kindern. Konsultieren Sie sofort einen Arzt, wenn
kleine Teile verschluckt werden.
• Strangulationsgefahr: Kinder können sich mit den Kabeln
strangulieren. Halten Sie Kabel außerhalb der Reichweite von
Kindern (mehr als 3 ft/0,9 m entfernt).
HINWEIS
Konformitätserklärung
Dieses Produkt erfüllt die Anforderungen der
Europäischen Gemeinschaft an Funkstörungen.
Anker Innovations Limited erklärt hiermit, dass dieses Gerät
die grundlegenden Anforderungen und anderen relevanten
Bestimmungen der Richtlinie 2014/53/EG erfüllt. Die
Konformitätserklärung finden Sie auf der Website: https://
uk.eufylife.com/.
Dieses Produkt erfüllt die britische Konformitätserklärung
und die Anforderungen für Funkstörungen.
Anker Innovations Limited erklärt hiermit, dass dieses Produkt
die Funkanlagenrichtlinie 2017 (SI2017/1206) erfüllt. Der
vollständige Text der UK-Konformitätserklärung ist online unter
der folgenden Adresse verfügbar:
https://uk.eufylife.com.
Der Adapter darf ausschließlich in Innenbereichen
verwendet werden. Der Adaptertyp ist TEKA-UCA20EU,
Nennausgangsspannung/-strom betragen 5VDC/2A.
Zum Trennen des Adapters von der Stromversorgung den
Netzstecker ziehen.
Informationen zur HF-Exposition:
Die maximal zulässige Exposition (MPE) wurde basierend
auf einem Abstand von d = 20cm zwischen dem Gerät und
dem menschlichen Körper berechnet. Um die Anforderungen
in Bezug auf die HF-Belastung zu erfüllen, muss zwischen
dem Gerät und dem menschlichen Körper ein Abstand von
mindestens 20cm bestehen.

DE 3029 DE
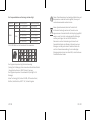
Die Frequenzbänder und Leistung sind wie folgt:
Funktion Bänder Betriebsfrequenz Maximale Leistung
Bluetooth 2,4 GHz 2.402 - 2.480 MHz EIRP 9,24dBm
WLAN
2,4 GHz 2412–2472MHz EIRP 19,97dBm
5GHz
5150–5250MHz EIRP 18,45dBm
5250–5350MHz EIRP 19,01dBm
5470–5725MHz EIRP 16,74dBm
5725–5850MHz EIRP 13,96dBm
5150~5350MHz nur im Innenbereich zu verwenden.
Der folgende Importeur trägt die Verantwortung
(Vertrag für EU-Belange): Anker Innovations Deutschland GmbH
I Georg-Muche-Strasse 3, 80807 Munich, Germany
Der folgende Importeur ist verantwortlich (Vertrag für UK-
Belange):
Anker Technology (UK) Limited I GNR8, 49 Clarendon Road,
Watford, Hertfordshire, WD17 1HP, United Kingdom
Dieses Produkt wurde aus hochwertigen Materialien und
Komponenten entwickelt und hergestellt, die recycelt
und wiederverwendet werden können.
Dieses Symbol bedeutet, dass das Produkt nicht
als Hausmüll entsorgt werden darf, sondern einer
angemessenen Sammelstelle für das Recycling zugeführt
werden muss. Durch das ordnungsgemäße Entsorgen
und Recyceln tragen Sie zum Schutz natürlicher
Ressourcen und zur Vermeidung von Umwelt- und
Gesundheitsschäden bei. Weitere Informationen zum
Entsorgen und Recyceln dieses Produkts erhalten Sie
von Ihrer Gemeindeverwaltung, Ihrem zuständigen
Entsorgungsdienst oder dem Geschäft, in dem Sie dieses
Produkt erworben haben.

ES 3231 ES
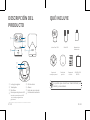
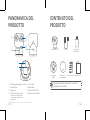
DESCRIPCIÓN DEL
PRODUCTO
①
④
⑤⑥
SYNC
⑦
⑧
③
②
①Lente gran angular ⑤LED de estado
②Teleobjetivo ⑥Altavoz
③Micrófono ⑦Botón de sincronización
④
Ranura para tarjeta microSD
Introduzca una tarjeta microSD*
(no incluida) para guardar las
grabaciones
⑧Entrada de alimentación
*Utilice al menos una tarjeta microSD Clase 10 de 128 GB como máximo.
QUÉ INCLUYE
Es posible que necesite un destornillador, un
taladro y una escalera.
GUÍA DE INICIO
RÁPIDO
Paquete de
tornillos
Plantilla de
posición
Soporte de
montaje en pared
Indoor Cam S350 Cable USB Adaptador de
alimentación

ES 3433 ES
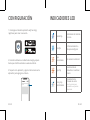
CONFIGURACIÓN
1. Descargue e instale la aplicación eufy Security y
regístrese para crear una cuenta.
2.Conecte la cámara a una fuente de energía y espere
hasta que el LED de estado se vuelva azul sólido.
3.Toque + en la aplicación y siga las instrucciones en la
aplicación para agregar su cámara.
My Devices
INDICADORES LED
Violeta fijo Inicialización del sistema
en curso
Azul fijo En funcionamiento o
listo para configurar
Rojo
intermitente Sin conexión a Internet
Rojo fijo
Se está viendo la
grabación o la señal en
directo
Azul y rojo
intermitentes
Actualización de
firmware en curso
Nota: Tenga la cámara
conectada a una fuente de
alimentación

ES 3635 ES
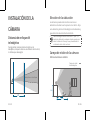
INSTALACIÓN DE LA
CÁMARA
Distancia de enfoque del
teleobjetivo
Para garantizar un alcance del zoom óptimo en el
teleobjetivo, coloque la cámara a una distancia mínima de 2,5
m del área que desee vigilar.
8ft
Teleobjetivo en el enfoque
Elección de la ubicación
La cámara se puede colocar sobre una mesa o
estantería o montarse en la pared o en el techo. Elija
una ubicación y altura donde tenga la vista deseada y
que esté cerca de una toma de corriente.
Nota: Mantenga la cámara al menos a 0,7 pies / 0,2
metros de distancia de cualquier objeto o pared para
evitar la reflexión infrarroja, lo que puede afectar el
rendimiento de la visión nocturna.
Campo de visión de la cámara
Sobre una mesa o estante
2 ft 3.3 ft
2.6 ft
Campo de visión
del teleobjetivo
Sayfa yükleniyor...
Sayfa yükleniyor...
Sayfa yükleniyor...
Sayfa yükleniyor...
Sayfa yükleniyor...
Sayfa yükleniyor...
Sayfa yükleniyor...
Sayfa yükleniyor...
Sayfa yükleniyor...
Sayfa yükleniyor...
Sayfa yükleniyor...
Sayfa yükleniyor...
Sayfa yükleniyor...
Sayfa yükleniyor...
Sayfa yükleniyor...
Sayfa yükleniyor...
Sayfa yükleniyor...
Sayfa yükleniyor...
Sayfa yükleniyor...
Sayfa yükleniyor...
Sayfa yükleniyor...
Sayfa yükleniyor...
Sayfa yükleniyor...
Sayfa yükleniyor...
Sayfa yükleniyor...
Sayfa yükleniyor...
Sayfa yükleniyor...
Sayfa yükleniyor...
Sayfa yükleniyor...
Sayfa yükleniyor...
Sayfa yükleniyor...
Sayfa yükleniyor...
Sayfa yükleniyor...
Sayfa yükleniyor...
Sayfa yükleniyor...
Sayfa yükleniyor...
Sayfa yükleniyor...
Sayfa yükleniyor...
Sayfa yükleniyor...
Sayfa yükleniyor...
Sayfa yükleniyor...
Sayfa yükleniyor...
Sayfa yükleniyor...
Sayfa yükleniyor...
Sayfa yükleniyor...
Sayfa yükleniyor...
Sayfa yükleniyor...
Sayfa yükleniyor...
Sayfa yükleniyor...
Sayfa yükleniyor...
Sayfa yükleniyor...
Sayfa yükleniyor...
Sayfa yükleniyor...
Sayfa yükleniyor...
Sayfa yükleniyor...
Sayfa yükleniyor...
Sayfa yükleniyor...
Sayfa yükleniyor...
Sayfa yükleniyor...
Sayfa yükleniyor...
Sayfa yükleniyor...
Sayfa yükleniyor...
Sayfa yükleniyor...
Sayfa yükleniyor...
Sayfa yükleniyor...
Sayfa yükleniyor...
Sayfa yükleniyor...
Sayfa yükleniyor...
Sayfa yükleniyor...
Sayfa yükleniyor...
Sayfa yükleniyor...
-
 1
1
-
 2
2
-
 3
3
-
 4
4
-
 5
5
-
 6
6
-
 7
7
-
 8
8
-
 9
9
-
 10
10
-
 11
11
-
 12
12
-
 13
13
-
 14
14
-
 15
15
-
 16
16
-
 17
17
-
 18
18
-
 19
19
-
 20
20
-
 21
21
-
 22
22
-
 23
23
-
 24
24
-
 25
25
-
 26
26
-
 27
27
-
 28
28
-
 29
29
-
 30
30
-
 31
31
-
 32
32
-
 33
33
-
 34
34
-
 35
35
-
 36
36
-
 37
37
-
 38
38
-
 39
39
-
 40
40
-
 41
41
-
 42
42
-
 43
43
-
 44
44
-
 45
45
-
 46
46
-
 47
47
-
 48
48
-
 49
49
-
 50
50
-
 51
51
-
 52
52
-
 53
53
-
 54
54
-
 55
55
-
 56
56
-
 57
57
-
 58
58
-
 59
59
-
 60
60
-
 61
61
-
 62
62
-
 63
63
-
 64
64
-
 65
65
-
 66
66
-
 67
67
-
 68
68
-
 69
69
-
 70
70
-
 71
71
-
 72
72
-
 73
73
-
 74
74
-
 75
75
-
 76
76
-
 77
77
-
 78
78
-
 79
79
-
 80
80
-
 81
81
-
 82
82
-
 83
83
-
 84
84
-
 85
85
-
 86
86
-
 87
87
-
 88
88
-
 89
89
-
 90
90
-
 91
91


diğer dillerde
- español: Eufy S350 Guía del usuario
- français: Eufy S350 Mode d'emploi
- italiano: Eufy S350 Guida utente
- Deutsch: Eufy S350 Benutzerhandbuch
- português: Eufy S350 Guia de usuario