Indesit IWSD 61252 C ECO EU Kullanici rehberi
- Kategori
- Çamaşır makineleri
- Tip
- Kullanici rehberi

GB
1
Contents
Installation, 2-3
Unpacking and levelling
Connecting the electricity and water supplies
The first wash cycle
Technical data
Care and maintenance, 4
Cutting off the water or electricity supply
Cleaning the washing machine
Cleaning the detergent dispenser drawer
Caring for the door and drum of your appliance
Cleaning the pump
Checking the water inlet hose
Precautions and tips, 5
General safety
Disposal
Description of the washing machine
and starting a wash cycle, 6-7
Control panel
Indicator lights
Starting a wash cycle
Wash cycles, 8
Table of wash cycles
Personalisation, 9
Setting the temperature
Setting the spin speed
Functions
Detergents and laundry, 10
Detergent dispenser drawer
Preparing the laundry
Garments requiring special care
Load balancing system
Troubleshooting, 11
Service, 12
Instructions for use
WASHING MACHINE
IWSD 61252
English, 1
GB
TR
PL
HU
Magyar,13
Română,25
RO
Türkçe,49
Polski,37

2
GB
! This instruction manual should be kept in a safe
place for future reference. If the washing machi-
ne is sold, transferred or moved, make sure that
the instruction manual remains with the machine
so that the new owner is able to familiarise him-
self/herself with its operation and features.
! Read these instructions carefully: they con-
tain vital information relating to the safe instal-
lation and operation of the appliance.
Unpacking and levelling
Unpacking
1. Remove the washing machine from its
packaging.
2. Make sure that the washing machine has
not been damaged during the transportation
process. If it has been damaged, contact the
retailer and do not proceed any further with
the installation process.
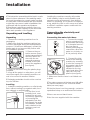
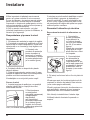
3. Remove the pro-
tective screws (used
during transportation)
and the rubber wa-
sher with the cor-
responding spacer,
located on the rear
part of the appliance
(see figure).
4. Close off the holes using the plastic plugs
provided.
5. Keep all the parts in a safe place: you will
need them again if the washing machine ne-
eds to be moved to another location.
! Packaging materials should not be used as
toys for children.
Levelling
1. Install the washing machine on a flat sturdy
floor, without resting it up against walls, furni-
ture cabinets or anything else.
2. If the floor is not
perfectly level, com-
pensate for any une-
venness by tightening
or loosening the
adjustable front feet
(see figure); the angle
of inclination, measu-
red in relation to the
worktop, must not
exceed 2°.
Levelling the machine correctly will provide
it with stability, help to avoid vibrations and
excessive noise and prevent it from shifting
while it is operating. If it is placed on carpet or
a rug, adjust the feet in such a way as to allow
a sufficient ventilation space underneath the
washing machine.
Connecting the electricity and
water supplies
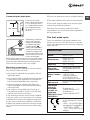
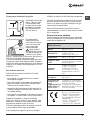
Connecting the water inlet hose
1. Connect the supply
pipe by screwing it to
a cold water tab using
a ¾ threaded connec-
tion (see figure).
Before performing the
connection, allow the
water to run freely un-
til it is perfectly clear.
2. Connect the inlet
hose to the washing
machine by screwing
it onto the correspon-
ding water inlet of the
appliance, which is
situated on the top
right-hand side of the
rear part of the ap-
pliance (see figure).
3. Make sure that the hose is not folded over
or bent.
! The water pressure at the tap must fall within
the values indicated in the Technical details
table (see next page).
! If the inlet hose is not long enough, contact a
specialised shop or an authorised technician.
! Never use second-hand hoses.
! Use the ones supplied with the machine.
Installation

GB
3
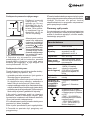
Connecting the drain hose
Connect the drain
hose, without bending
it, to a drainage duct
or a wall drain located
at a height between
65 and 100 cm from
the floor;
Alternatively, place the
drain hose over the
edge of a washbasin
or bathtub, by faste-
ning the guide
(which can be purcha-
sed at the technical as-
sistance centre) to the
tap (see figure).The free
end of the hose should
not be underwater.
! We advise against the use of hose extensions;
if it is absolutely necessary, the extension must
have the same diameter as the original hose
and must not exceed 150 cm in length.
Electrical connections
Before plugging the appliance into the electri-
city socket, make sure that:
•thesocketisearthedandcomplieswithall
applicable laws;
•thesocketisabletowithstandthemaximum
power load of the appliance as indicated in
the Technical data table (see opposite);
•thepowersupplyvoltagefallswithinthe
values indicated in the Technical data table
(see opposite);
•thesocketiscompatiblewiththeplugof
the washing machine. If this is not the case,
replace the socket or the plug.
! The washing machine must not be installed
outdoors, even in covered areas. It is extreme-
ly dangerous to leave the appliance exposed
to rain, storms and other weather conditions.
! When the washing machine has been instal-
led, the electricity socket must be within easy
reach.
65 - 100 cm
! Do not use extension cords or multiple sockets.
! The cable should not be bent or compressed.
! The power supply cable must only be repla-
ced by authorised technicians.
Warning! The company shall not be held
responsible in the event that these regulations
are not respected.
The first wash cycle
Once the appliance has been installed, and
before you use it for the first time, run a wash
cycle with detergent and no laundry, using the
wash cycle 2.
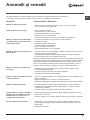
Technical data
Model
IWSD 61252
Dimensions
width 59,5 cm
height 85 cm
depth 42,4 cm
Capacity
from 1 to 6 kg
Electrical
connections
please refer to the techni-
cal data plate fixed to the
machine
Water connec-
tion
maximum pressure
1 MPa (10 bar)
minimum pressure
0.05 MPa (0.5 bar)
drum capacity 40 litres
Spin speed
up to 1200 rotations per
minute
Test wash
cycles in
accordan-
ce with re-
gulations
1061/2010 and
1015/2010
Programme 2:
Cotton standard 60°C;
Programme 3:
Cotton standard 40°C.
This appliance conforms
to the following EC Direc-
tives:
- EMC - 2014/30/EU (Elec-
tromagnetic Compatibility)
- 2012/19/EU - WEEE
- LVD - 2014/35/EU (Low
Voltage)

4
GB
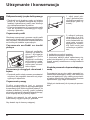
Care and maintenance
Cutting off the water and electri-
city supplies
•Turnoffthewatertapaftereverywashcycle.
This will limit wear on the hydraulic system
inside the washing machine and help to pre-
vent leaks.
•Unplugthewashingmachinewhencleaning
it and during all maintenance work.
Cleaning the washing machine
The outer parts and rubber components of the
appliance can be cleaned using a soft cloth
soaked in lukewarm soapy water. Do not use
solvents or abrasives.
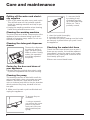
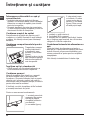
Cleaning the detergent dispenser
drawer
Remove the dispenser
by raising it and pul-
ling it out (see figure).
Wash it under running
water; this operation
should be repeated
frequently.
Caring for the door and drum of
your appliance
•Alwaysleavetheportholedoorajarinorder
to prevent unpleasant odours from forming.
Cleaning the pump
The washing machine is fitted with a self-cle-
aning pump which does not require any main-
tenance. Sometimes, small items (such as
coins or buttons) may fall into the pre-chamber
which protects the pump, situated in its bot-
tom part.
! Make sure the wash cycle has finished and
unplug the appliance.
To access the pre-
chamber:
1. using a screwdri-
ver, remove the cover
panel on the lower
front part of the wa-
shing machine (see
figure);
2. unscrew the lid
by rotating it anti-
clockwise (see figu-
re): a little water may
trickle out. This is
perfectly normal;
3. clean the inside thoroughly;
4. screw the lid back on;
5. reposition the panel, making sure the hooks
are securely in place before you push it onto
the appliance.
Checking the water inlet hose
Check the inlet hose at least once a year. If
there are any cracks, it should be replaced
immediately: during the wash cycles, water
pressure is very strong and a cracked hose
could easily split open.
! Never use second-hand hoses.

GB
5
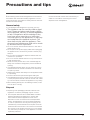
Precautions and tips
! This washing machine was designed and constructed in
accordance with international safety regulations. The fol-
lowing information is provided for safety reasons and must
therefore be read carefully.
General safety
• Thisappliancewasdesignedfordomesticuseonly.
• This appliance can be used by children aged
from 8 years and above and persons with re-
duced physical, sensory or mental capabilities
or lack of experience and knowledge if they
have been given supervision or instruction
concerning use of the appliance in a safe way
and understand the hazards involved. Chil-
dren shall not play with the appliance. Clea-
ning and user maintenance shall not be made
by children without supervision.
• Donottouchthemachinewhenbarefootorwithwetor
damp hands or feet.
• Donotpullonthepowersupplycablewhenunplugging
the appliance from the electricity socket. Hold the plug
and pull.
• Donotopenthedetergentdispenserdrawerwhilethe
machine is in operation.
• Donottouchthedrainedwaterasitmayreachextreme-
ly high temperatures.
• Neverforcetheportholedoor.Thiscoulddamagethe
safety lock mechanism designed to prevent accidental
opening.
• Iftheappliancebreaksdown,donotunderanycircum-
stances access the internal mechanisms in an attempt
to repair it yourself.
• Alwayskeepchildrenwellawayfromtheappliancewhile
it is operating.
• Thedoorcanbecomequitehotduringthewashcycle.
• Iftheappliancehastobemoved,workinagroupoftwo
or three people and handle it with the utmost care. Never
try to do this alone, because the appliance is very heavy.
• Beforeloadinglaundryintothewashingmachine,make
sure the drum is empty.
Disposal
• Disposingofthepackagingmaterials:observelocal
regulations so that the packaging may be re-used.
• TheEuropeanDirective2012/19/EUWEEEonWaste
Electrical and Electronic Equipment, requires that
old household electrical appliances must not be
disposed of in the normal unsorted municipal waste
stream. Old appliances must be collected separately
in order to optimise the recovery and recycling of the
materials they contain and reduce the impact on human
health and the environment. The crossed out “wheeled
bin” symbol on the product reminds you of your obliga-
tion, that when you dispose of the appliance it must be
separately collected.
Consumers should contact their local authority or
retailer for information concerning the correct
disposal of their old appliance.

6
GB
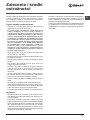
Detergent dispenser drawer: used to dispense deter-
gents and washing additives (see “Detergents and laundry”).
ON/OFF button: switches the washing machine on and
off.
WASH CYCLE knob: programmes the wash cycles. Du-
ring the wash cycle, the knob does not move.
FUNCTION buttons with indicator light: used to select the
available functions. The indicator light corresponding to the
selected function will remain lit.
TEMPERATURE knob: sets the temperature or the cold
wash cycle (see “Personalisation”).
SPIN SPEED knob: sets the spin speed or exclude the
spin cycle completely (see “Personalisation”).
DISPLAY: used to view the duration of the various cycles
available and the remaining time of a cycle in progress;
if the DELAY TIMER option has been selected, the
countdown to the start of the selected cycle will appear.
DELAY TMER button : press to set a delayed start
time for the selected wash cycle. The delay time will be
shown on the display.
WASH CYCLE PROGRESS
indicator light
s: used to
monitor the progress of the wash cycle. The illuminated
indicator light shows which phase is in progress.
DOOR LOCKED indicator light: indicates whether the
door may be opened or not (see next page).
START/PAUSE button with indicator light: starts or tem-
porarily interrupts the wash cycles.
N.B. To pause the wash cycle in progress, press this
button; the corresponding indicator light will flash orange,
while the indicator light for the current wash cycle phase
will remain lit in a fixed manner. If the DOOR LOCKED
indicator light is switched off, the door may be opened
(wait approximately 3 minutes).
To start the wash cycle from the point at which it was inter-
rupted, press this button again.
Standby mode
This washing machine, in compliance with new energy sa-
ving regulations, is fitted with an automatic standby system
which is enabled after about 30 minutes if no activity is
detected. Press the ON-OFF button briefly and wait for the
machine to start up again.
Consumption in off-mode: 0,5 W
Consumption in Left-on: 8 W
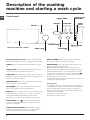
Description of the washing
machine and starting a wash cycle
WASH CYCLE
PROGRESS
DOOR LOCKED
indicator light
START/
PAUSE
button with
indicator light
Control panel
Detergent dispenser drawer
ON/OFF
button
WASH CYCLE
knob
TEMPERATURE
knob
FUNCTION
buttons with
indicator lights
SPIN SPEED
knob
DISPLAY
DELAY TIMER
button

GB
7
Indicator lights
The indicator lights provide important information.
This is what they can tell you:
Wash cycle phase indicator lights
Once the desired wash cycle has been selected and has
begun, the indicator lights switch on one by one to indicate
which phase of the cycle is currently in progress.
Function buttons and corresponding indicator lights
When a function is selected, the corresponding indicator
light will illuminate.
If the selected function is not compatible with the program-
med wash cycle, the corresponding indicator light will flash
and the function will not be activated.
If the selected function is not compatible with another
function which has been selected previously, the indicator
light corresponding to the first function selected will
flash and only the second function will be activated; the
indicator light corresponding to the enabled option will
remain lit.
Door locked indicator light
When the indicator light is on, the porthole door is locked
to prevent it from being opened; make sure the indicator
light is off before opening the door (wait approximately 3
minutes). To open the door during a running wash cycle,
press the START/PAUSE button; the door may be opened
once the DOOR LOCKED indicator light turns off.
Starting a wash cycle
1. Switch the washing machine on by pressing the ON/OFF button. All indicator lights will switch on for a few seconds, then
they will switch off and the START/PAUSE indicator light will pulse.
2. Load the laundry and close the door.
3. Set the WASH CYCLE knob to the desired programme.
4. Set the washing temperature (see “Personalisation”).
5. Set the spin speed (see “Personalisation”).
6. Measure out the detergent and washing additives (see “Detergents and laundry”).
7. Select the desired functions.
8. Start the wash cycle by pressing the START/PAUSE button and the corresponding indicator light will remain lit in a fixed
manner, in green.
To cancel the set wash cycle, pause the machine by pressing the START/PAUSE button and select a new cycle.
9. At the end of the wash cycle the indicator light will switch on. The door can be opened once the DOOR LOCK indi-
cator light turns off (wait approximately 3 minutes). Take out your laundry and leave the appliance door ajar to make sure the
drum dries completely. Switch the washing machine off by pressing the ON/OFF button.
Wash
Rinse
Spin
Drain
End of wash cycle

8
GB
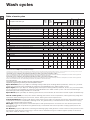
Wash cycles
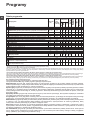
Table of wash cycles
Sport Intensive (
wash cycle
12) is for washing heavily soiled sports clothing fabrics (tracksuits, shorts, etc.); for best
results, we recommend not exceeding the maximum load indicated in the “Table of wash cycles”.
Sport Light (
wash cycle
13) is for washing lightly soiled sports clothing fabrics (tracksuits, shorts, etc.); for best results,
we recommend not exceeding the maximum load indicated in the “Table of wash cycles”. We recommend using a
liquid detergent and dosage suitable for a half-load.
Sport Shoes (
wash cycle
14) is for washing sports shoes; for best results, do not wash more than 2 pairs simultaneously.
The 20° wash cycles (20° Zone) offer effective washing performance at low temperatures, reducing electricity usage and
expenditure while benefitting the environment.The 20° wash cycles meet all requirements:
Cotton Standard 20° (programme 6) ideal for lightly soiled cotton loads. The effective performance levels achieved at cold
temperatures, which are comparable to washing at 40°, are guaranteed by a mechanical action which operates at varying
speed, with repeated and frequent peaks.
Mix Light (programme 7) ideal for mixed loads (cotton and synthetics) with a normal soil level. The effective performance
levels achieved at cold temperatures are guaranteed by a mechanical action which operates at varying speed, across set
average intervals.
20’ Refresh (programme 8) ideal for refreshing and washing lightly soiled garments in a few minutes. It lasts just 20 minutes
and therefore saves both time and energy. It can be used to wash different types of fabrics together (except for wool and
silk), with a maximum load of 1.5 kg.
The length of cycle shown on the display or in this booklet is an estimation only and is calculated assuming standard working conditions. The actual duration can vary according to factors such as
water temperature and pressure, the amount of detergent used, the amount and type of load inserted, load balancing and any wash options selected.
1) Test wash cycle in compliance with regulation 1061/2010: set wash cycle 2 with a temperature of 60°C.
This cycle is designed for cotton loads with a normal soil level and is the most efficient in terms of both electricity and water consumption; it should be used for garments
which can be washed at 60°C. The actual washing temperature may differ from the indicated value.
2) Test wash cycle in compliance with regulation 1061/2010: set wash cycle 3 with a temperature of 40°C.
This cycle is designed for cotton loads with a normal soil level and is the most efficient in terms of both electricity and water consumption; it should be used for garments
which can be washed at 40°C. The actual washing temperature may differ from the indicated value.
For all Test Institutes:
2) Long wash cycle for cottons: set wash cycle 3 with a temperature of 40°C.
3) Synthetic program along: set wash cycle 4 with a temperature of 40°C.
Wash cycles
Description of the wash cycle
Max.
temp.
(°C)
Max.
speed
(rpm)
Detergents
Max.
load (kg)
Residual
dampness %
Energy
consum-
ption kWh
Total water lt
Cycle
duration
Pre-
wash
Wash
Fabric
softener
Daily
1
Cotton with prewash: extremely soiled whites.
90°
1200
6
- - - **
2
Cotton Standard 60° (1): heavily soiled whites and resistant colours.
60°
(Max. 90°)
1200
-
6
53 0,89 50 210’
3
Cotton Standard 40° (2): lightly soiled whites and delicate colours.
40°
1200
-
6
53 0,97 63 240’
4
Synthetics: heavily soiled resistant colours.
60°
1000
-
3
- - - **
4
Synthetics (3): lightly soiled resistant colours.
40°
1000
-
3
44 0,47 46 95’
5
Mix Colored: lightly soiled whites and delicate colours.
40°
1200
-
6
- - - **
20° Zone
6
Cotton Standard 20°: lightly soiled whites and delicate colours.
20°
1200
-
6
- - - **
7 Mix Light
20°
1000
-
6
- - - **
8 20’ Refresh
20°
800
-
1,5
- - - **
Special
9
Silk/Curtains: for garments in silk and viscose, lingerie.
30°
0
-
1
- - - **
10
Wool: for wool, cashmere, etc.
40°
800
-
1
- - - **
11 Jeans
40°
800
-
2,5
- - - **
Sport
12 Sport Intensive
30° 600 -
2,5
- - - **
13 Sport Light
30° 600 -
2,5
- - - **
14 Sport Shoes
30° 600 -
Max. 2
Pairs
- - - **
Partial wash cycles
Rinse
-
1200
- -
6
- - - **
Spin + Drain
-
1200
- - - 6
- - - **
Drain only *
- - - - 6
- - - **
* If you select programme and exclude the spin cycle, the machine will drain only.
** The duration of the wash cycle can be checked on the display.

GB
9
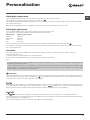
Personalisation
Setting the temperature
Turn the TEMPERATURE knob to set the wash temperature (see Table of wash cycles).
The temperature may be lowered, or even set to a cold wash .
The washing machine will automatically prevent you from selecting a temperature which is higher than the maximum value
set for each wash cycle.
! Exception: if the 2 programme is selected, the temperature can be increased up to a value of 90°C.
Setting the spin speed
Turn the SPIN SPEED knob to set the spin speed for the selected wash cycle.
The maximum spin speeds available for each wash cycle are as follows:
Wash cycles Maximum spin speed
Cottons 1200 rpm
Synthetics 1000 rpm
Wool 800 rpm
Silk drain only
The spin speed may be lowered, or the spin cycle can be excluded altogether by selecting the symbol .
The washing machine will automatically prevent you from selecting a spin speed which is higher than the maximum speed
set for each wash cycle.
Functions
The various wash functions available with this washing machine will help to achieve the desired results, every time.
To activate the functions:
1. Press the button corresponding to the desired function;
2. the function is enabled when the corresponding indicator light is illuminated.
Note:
- If the selected function is not compatible with the programmed wash cycle, the corresponding indicator light will flash and
the function will not be activated.
- If the selected function is not compatible with another function which has been selected previously, the indicator light
corresponding to the first function selected will flash and only the second function will be activated; the indicator light
corresponding to the enabled option will remain lit.
Delay timer
To set a delayed start for the selected programme, press the corresponding button repeatedly until the required delay period
has been reached. When this option is enabled, the symbol lights up on the display. To remove the delayed start option
press the button until the text “OFF” appears on the display.
Selecting this option enables you to suitably adjust drum rotation, temperature and water to a reduced load of lightly soiled
cotton and synthetic fabrics (refer to the “
“Table of wash cycles”
). “ ” enables you to wash in less time thereby saving
water and electricity. We suggest using a liquid detergent suitably measured out to the load quantity.
The function saves energy by not heating the water used to wash your laundry - an advantage both to the
environment and to your energy bill. Instead, intensified wash action and water optimisation ensure great wash results in the
same average time of a standard cycle.
For the best washing results we recommend the usage of a liquid detergent.

10
GB
Detergents and laundry
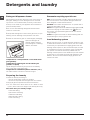
Detergent dispenser drawer
Good washing results also depend on the correct dose of
detergent: adding too much detergent will not necessa-
rily result in a more efficient wash, and may in fact cause
build up on the inside of your appliance and contribute to
environmental pollution.
! Do not use hand washing detergents because these
create too much foam.
! Use powder detergent for white cotton garments, for pre-
washing, and for washing at temperatures over 60°C.
! Follow the instructions given on the detergent packaging.
Open the detergent di-
spenser drawer and pour
in the detergent or washing
additive, as follows.
compartment 1: Compartment 1: Pre-wash deter-
gent (powder)
compartment 2: Detergent for the wash cycle
(powder or liquid)
Liquid detergent should only be poured in immediately
prior to the start of the wash cycle.
compartment 3: Additives (fabric softeners, etc.)
The fabric softener should not overflow the grid.
Preparing the laundry
•Dividethelaundryaccordingto:
- the type of fabric/the symbol on the label
- the colours: separate coloured garments from whites.
•Emptyallgarmentpocketsandcheckthebuttons.
• Do not exceed the values listed in the “Table of wash
cycles”, which refer to the weight of the laundry when dry.
How much does your laundry weigh?
1 sheet 400-500 g
1 pillow case 150-200 g
1 tablecloth 400-500 g
1 bathrobe 900-1200 g
1 towel 150-250 g
Garments requiring special care
Silk: use special wash cycle 9 to wash all silk garments.
We recommend the use of special detergent which has
been designed to wash delicate clothes.
Curtains: fold curtains and place them in a pillow case or
mesh bag. Use wash cycle 9.
Wool: all wool garments can be washed using programme 10,
even those carrying the “hand-wash only” label. For
best results, use special detergents and do not exceed
1 kg of laundry.
Jeans: Turn garments inside-out before washing and use
a liquid detergent. Use programme 11.
Load balancing system
Before every spin cycle, to avoid excessive vibrations and
to distribute the load in a uniform manner, the drum rotates
continuously at a speed which is slightly greater than the
washing rotation speed. If, after several attempts, the load
is not balanced correctly, the machine spins at a reduced
spin speed. If the load is excessively unbalanced, the
washing machine performs the distribution process instead
of spinning. To encourage improved load distribution and
balance, we recommend small and large garments are
mixed in the load.
1
2
3

GB
11
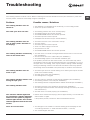
Troubleshooting
Your washing machine could fail to work. Before contacting the Technical Assistance Centre (see “Assistance”), make sure
that the problem cannot be solved easily using the following list.
Problem:
The washing machine does not
switch on.
The wash cycle does not start.
The washing machine does not
take in water (“H2O” will flash on
the display).
The washing machine continuously
takes in and drains water.
The washing machine does not
drain or spin.
The washing machine vibrates a lot
during the spin cycle.
The washing machine leaks.
The “function” indicator lights and
the “start/pause” indicator light flash,
while one of the “phase in progress”
indicator lights and the “door locked”
indicator light will remain lit in a fixed
manner.
There is too much foam.
Possible causes / Solutions:
• Theapplianceisnotpluggedintothesocketfully,orisnotmakingcontact.
• Thereisnopowerinthehouse.
• Thewashingmachinedoorisnotclosedproperly.
• TheON/OFFbuttonhasnotbeenpressed.
• TheSTART/PAUSEbuttonhasnotbeenpressed.
• Thewatertaphasnotbeenopened.
• Adelayedstarthasbeenset(see “Personalisation”).
• Thewaterinlethoseisnotconnectedtothetap.
• Thehoseisbent.
• Thewatertaphasnotbeenopened.
• Thereisnowatersupplyinthehouse.
• Thepressureistoolow.
• TheSTART/PAUSEbuttonhasnotbeenpressed.
• Thedrainhoseisnotfittedataheightbetween65and100cmfromthefloor
(see “Installation”).
• Thefreeendofthehoseisunderwater(see “Installation”).
• Thewalldrainagesystemisnotfittedwithabreatherpipe.
If the problem persists even after these checks, turn off the water tap, switch
the appliance off and contact the Assistance Service. If the dwelling is on one of
the upper floors of a building, there may be problems relating to water drainage,
causing the washing machine to fill with water and drain continuously. Special
anti-draining valves are available in shops and help to avoid this inconvenience.
• Thewashcycledoesnotincludedraining:somewashcyclesrequirethedrain
phase to be started manually.
• Thedrainhoseisbent(see “Installation”).
• Thedrainageductisclogged.
• Thedrumwasnotunlockedcorrectlyduringinstallation(see “Installation”).
• Thewashingmachineisnotlevel(see “Installation”).
• Thewashingmachineistrappedbetweencabinetsandwalls(see “Installation”).
• Thewaterinlethoseisnotscrewedonproperly(see “Installation”).
• Thedetergentdispenserdrawerisblocked(forcleaninginstructions,see “Care
and maintenance”).
• Thedrainhoseisnotfixedproperly(see “Installation”).
• Switchoffthemachineandunplugit,waitforapproximately1minuteandthen
switch it back on again.
If the problem persists, contact the Technical Assistance Service.
• Thedetergentisnotsuitableformachinewashing(itshoulddisplaythetext
“for washing machines” or “hand and machine wash”, or the like).
• Toomuchdetergentwasused.

12
GB
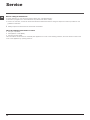
Service
Before calling for Assistance:
• Check whether you can solve the problem alone (see “Troubleshooting”);
• Restarttheprogrammetocheckwhethertheproblemhasbeensolved;
• Ifthisisnotthecase,contactanauthorisedTechnicalAssistanceCentreusingthetelephonenumberprovidedonthe
guarantee certificate.
! Always request the assistance of authorised technicians.
Have the following information to hand:
• thetypeofproblem;
• theappliancemodel(Mod.);
• theserialnumber(S/N).
This information can be found on the data plate applied to the rear of the washing machine, and can also be found on the
front of the appliance by opening the door.

HU
13
Magyar
Összefoglalás
Üzembe helyezés, 14-15
Kicsomagolás és vízszintbe állítás
Víz- és elektromos csatlakozás
Első mosási ciklus
Műszaki adatok
Karbantartás és ápolás, 16
A víz elzárása és az elektromos áram kikapcsolása
A mosógép tisztítása
A mosószer-adagoló ók tisztítása
Az ajtó és a forgódob ápolása
A szivattyú tisztítása
A vízbevezető cső ellenőrzése
Óvintézkedések és tanácsok, 17
Általános biztonság
Hulladékelhelyezés
A mosógép leírása és program
elindítása, 18-19
Kezelőpanel
Jelzőlámpák
Program elindítása
Programok, 20
Programtáblázat
Egyéni beállítások, 21
A hőmérséklet beállítása
A centrifugálás beállítása
Funkciók
Mosószerek és mosandók, 22
Mosószer-adagoló ók
A mosandó ruhák előkészítése
Különleges bánásmódot igénylő ruhadarabok
A bepakolt ruhák kiegyensúlyozására szolgáló rendszer
Rendellenességek és elhárításuk, 23
Szerviz, 24
HU
IWSD 61252
Használati utasítás
MOSÓGÉP

14
HU
Üzembe helyezés
! Fontos, hogy megőrizze ezt a kézikönyvet,
hogy mindig kéznél legyen. Ha a mosógépet
eladná, átadná vagy másnál helyezné el,
gondoskodjon arról, hogy e kézikönyv a
mosógéppel együtt maradjon, hogy az új
tulajdonos is megismerhesse a készülék fun-
kcióit és az ezekre vonatkozó gyelmezteté-
seket.
! Figyelmesen olvassa el az utasításokat:
fontos információkat tartalmaznak az üzem-
be helyezésről, a használatról és a biztonsá-
gról.
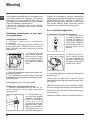
Kicsomagolás és vízszintbe állítás
Kicsomagolás
1. Csomagolja ki a mosógépet.
2. Ellenőrizze, hogy a mosógép nem sérült-e
meg a szállítás során. Ha a gépen sérülést
talál, ne csatlakoztassa, és forduljon a vis-
zonteladóhoz.
3. Csavarozza ki a
gép hátsó részén
található, a szál-
lításhoz szükséges
védőcsavart, és
távolítsa el a gumi-
bakot (lásd ábra).
4. Zárja le a furatokat a mellékelt műanyag
dugókkal.
5. Minden darabot őrizzen meg: ha a mo-
sógépet szállítani kell, előtte ezeket vissza
kell szerelni.
! A csomagolóanyag nem gyermekjáték!
Vízszintbe állítás
1. A mosógépet sík és kemény padlóra ál-
lítsa, úgy, hogy ne érjen falhoz, bútorhoz
vagy máshoz.
2. Ha a padló nem
tökéletesen vízszin-
tes, azt az első lábak
be-, illetve kicsa-
varásával kompen-
zálhatja (lásd ábra).
A gép felső burkola-
tán mért dőlés nem
haladhatja meg a
2°-ot.
A pontos vízszintezés biztosítja a gép sta-
bilitását, így az a működés során nem fog
rezegni, zajt okozni, illetve elmozdulni.
Szőnyegpadló vagy szőnyeg esetén a lá-
bakat úgy állítsa be, hogy a mosógép alatt
elegendő hely maradjon a szellőzésre.
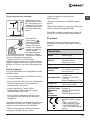
Víz- és elektromos csatlakozás
Vízbevezető cső csatlakoztatása
1. A vízbevezető cső
csatlakoztatásához csa-
varozza fel a csövet egy
3/4”-os külső menettel
rendelkező hidegvíz
csapra (lásd ábra).
A csatlakoztatás előtt
eressze meg a csapot
addig, amíg a víz te-
ljesen átlátszóvá nem
válik.
2. A vízbevezető cső
csatlakoztatásához
csavarozza a csövet
a mosógép hátol-
dalán jobbra fent
található vízbemeneti
csonkra (lásd ábra)!
3. Ügyeljen arra, hogy a csövön ne legyen
törés vagy szűkület!
! A csap víznyomásának a műszaki adatok
táblázatában szereplő határértékek között
kell lennie (lásd a szemben lévő oldalt).
! Amennyiben a vízbevezető cső nem elég
hosszú, forduljon szaküzlethez vagy enge-
déllyel rendelkező szakemberhez.
! Soha ne használjon korábban már használt
csöveket.
! Használja a készülékhez mellékelteket.

HU
15
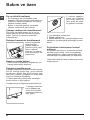
A leeresztőcső csatlakoztatása
Csatlakoztassa a
leeresztőcsövet a
lefolyóhoz vagy a pa-
dlótól 65 és 100 cm
közötti magasságban
lévő fali szifonhoz
anélkül, hogy meg-
törné;
Vagy helyezze a
kifolyócsövet a mosdó
vagy kád szélére, és
erősítse az vezetőt
(melyet a műszaki
ügyfélszolgálaton lehet
megvásárolni) a csa-
phoz (lásd az ábrát). A
leeresztőcső szabad
végének nem szabad
vízbe merülnie.
! Toldások használata nem javasolt. Amen-
nyiben feltétlenül szükséges, a toldás
átmérője egyezzen meg az eredeti csőével
és semmiképpen se legyen 150 cm-nél hos-
szabb.
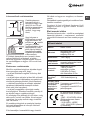
Elektromos csatlakoztatás
Mielőtt a csatlakozódugót az aljzatba dugná,
bizonyosodjon meg arról, hogy:
• az aljzat földelése megfelel a törvény által
előírtnak;
• az aljzat képes elviselni a készülék műszaki
adatait tartalmazó táblázatban megadott ma-
ximális teljesítményfelvételt (lásd szemben);
• a hálózat feszültsége a műszaki adatokat
tartalmazó táblázatban szereplő értékek
közé esik (lásd szemben);
• az aljzat kompatibilis a mosógép csatla-
kozódugójával. Ellenkező esetben cserélje ki
az aljzatot vagy a csatlakozódugót!
! A mosógép nem állítható fel nyílt téren, még
akkor sem, ha tető van fölötte, mivel nagyon
veszélyes, ha a gép esőnek vagy zivatarok-
nak van kitéve.
! A csatlakozódugónak a mosógép üzembe
helyezett állapotában is könnyen elérhető
helyen kell lennie.
! Ne használjon hosszabbítót vagy elosztót.
65 - 100 cm
! A kábel ne legyen se megtörve, se összen-
yomva.
! A tápkábelt csak engedéllyel rendelkező sza-
kember cserélheti.
Figyelem! A fenti előírások gyelmen kívül
hagyása esetén a gyártó elhárít minden
felelősséget.
Első mosási ciklus
Üzembe helyezés után – mielőtt a mosógépet
használni kezdené – mosószerrel, mosandó
ruha nélkül futtassa le az 2-es mosási progra-
mot.
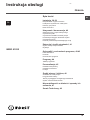
Mûszaki adatok
Modell
IWSD 61252
Méretek
szélesség 59,5 cm
magasság 85 cm
mélység 42,4 cm
Ruhatöltet:
1-tõl 6 kg-ig
Elektromos
csatlakozás
lásd a készüléken található,
muszaki jellemzoket tartal
mazó adattáblát!
Vízcsatla-
kozások
maximális nyomás
1 MPa (10 bar)
minimális nyomás
0,05 MPa (0,5 bar)
dob ûrtartalma 40 lite
Centrifuga
fordulat-
szám
1200 fordulat/perc-ig
Az 1061/2010
és 1015/2010
rendeletek
szerinti viz-
sgálati pro-
gramok.
2. program: normál 60°C-os
pamutprogram.
3. program: normál 40°C-os
pamutprogram.
Ez a berendezés megfelel a
következõ Uniós Elõírások
nak:
- EMC - 2014/30/EU elõírás
(Elektromágneses össze
férhetõség)
- 2012/19/EU - WEEE
- LVD - 2014/35/EU (Alacso
ny feszültség

16
HU
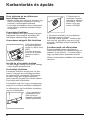
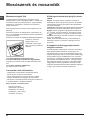
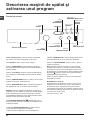
Karbantartás és ápolás
A víz elzárása és az elektromos
áram kikapcsolása
• Minden mosás után zárja el a vízcsapot. Így
kíméli a mosógép vízrendszerét és meg-
szünteti a vízszivárgás kockázatát.
• A mosógép tisztításakor, illetve karbantartá-
sakor húzza ki a hálózati csatlakozódugót
az aljzatból.
A mosógép tisztítása
A külső részeket és a gumirészeket langyos,
szappanos vizes ronggyal tisztíthatja. Ne
használjon oldószert vagy súrolószert!
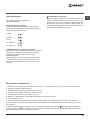
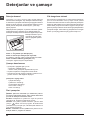
A mosószer-adagoló ók tisztítása
A ók felemelésével
és kifelé húzásával
vegye ki a ókot (lásd
ábra).
Folyó víz alatt mos-
sa ki! Ezt a tisztítást
gyakran el kell vé-
gezni.
Az ajtó és a forgódob ápolása
• Az ajtót hagyja mindig résre nyitva, nehogy
rossz szagok keletkezzenek.
A szivattyú tisztítása
A mosógép öntisztító szivattyúval van fels-
zerelve, melynek nincs szüksége tisztítási
és karbantartási műveletekre. Előfordulhat
azonban, hogy apró tárgyak (aprópénz,
gomb) esnek a szivattyú alsó részén találha-
tó szivattyúvédő előkamrába.
! Győződjön meg róla, hogy a mosóprogram
véget ért, és húzza ki a hálózati csatlakozót.
Az előkamrához való hozzáférés érdekében
tegye a következőket:
1. Egy csavarhúzó
segítségével távo-
lítsa el a burko-
lópanelt a készülék
elejéről (lásd ábra);
2. Órairánnyal el-
lentétesen forgatva
csavarja le a fedelet
(lásd ábra). Termé-
szetes, hogy egy
kevés víz kifolyik;
3. Gondosan tisztítsa ki az üreg belsejét;
4. Csavarja vissza a fedelet;
5. Szerelje vissza a panelt – mielőtt a gép
felé nyomná, győződjön meg arról, hogy
a horgok a hozzájuk tartozó furatokba ille-
szkednek.
A vízbevezető cső ellenőrzése
Évente legalább egyszer ellenőrizze a
vízbevezető csövet. Ha repedezett vagy ha-
sadozott, ki kell cserélni – a mosás során a
nagy nyomás hirtelen szakadást okozhat.
! Soha ne használjon korábban már használt
csöveket.

HU
17
Óvintézkedések és
tanácsok
! A mosógép a nemzetközi biztonsági szabványoknak
megfelelően lett tervezve és gyártva. Ezeket a gyel-
meztetéseket biztonsági okokból írjuk le, kérjük, olvassa
el őket gyelmesen!
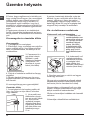
Általános biztonság
• Ez a készüléket háztartási használatra lett tervezve.
• Ezt a készüléket a 8 éves kort betöltött gyer-
mekek, valamint a testileg, érzékszervileg
vagy szellemileg korlátozott, nem hozzáértő,
illetve a terméket nem ismerő személyek
csak megfelelő felügyelet mellett, vagy a
készülék biztonságos használatával kapc-
solatos alapvető utasítások és a kapcsolódó
veszélyek ismeretében használhatják. A
gyerekek nem játszhatnak a készülékkel.
A karbantartási és tisztítási munkálatokat
felügyelet nélkül hagyott gyerekek nem
végezhetik.
• Ne érjen a géphez mezítláb, illetve vizes vagy nedves
kézzel vagy lábbal!
• A csatlakozódugót az aljzatból ne a kábelnél, hanem a
csatlakozónál fogva húzza ki!
• Működés közben ne nyissa ki a mosószer-adagoló
ókot.
• Ne nyúljon a leeresztett vízbe, mert forró lehet!
• Semmiképpen ne feszegesse az ajtót: megsérülhet a
véletlen nyitást megakadályozó biztonsági retesz.
• Hiba esetén semmiképpen se nyúljon a gép belső rés-
zeihez, és ne próbálja megjavítani!
• Mindig ügyeljen arra, hogy gyermekek ne mehessenek
a működő gép közelébe.
• A mosás során az ajtó meleg lehet.
• Amennyiben a gépet át kell helyezni, az áthelyezést
két vagy három személy végezze, maximális odagye-
léssel. Soha ne próbálja egyedül elmozdítani, mert a
készülék nagyon nehéz.
• A mosandó berakása előtt ellenőrizze, hogy a forgódob
üres-e.
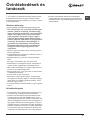
Hulladékelhelyezés
• A csomagolóanyag megsemmisítése: tartsa be a helyi
előírásokat, így a csomagolás újrahasznosítható.
• Az elektromos készülékek megsemmisítéséről szóló
európai direktíva 2012/19/EU WEEE előírja, hogy a
régi háztartási gépeket nem szabad a normál nem sze-
lektív hulladékgyűjtési folyamat során összegyűjteni. A
régi gépeket szelektíven kell összegyűjteni, hogy opti-
malizálni lehessen a bennük lévő anyagok újrahaszno-
sítását és csökkenteni lehessen az emberi egészségre
és környezetre gyakorolt hatásukat. Az áthúzott “sze-
meteskuka” jele emlékezteti Önt arra, hogy kötelessé-
ge ezeket a termékeket szelektíven összegyűjteni.
A fogyasztóknak a helyi hatóságot vagy kereskedőt
kell felkeresniük a régi háztartási gépek helyes elhel-
yezését illetően.

18
HU
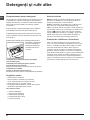
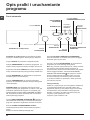
Mosószer-adagoló ók: a mosószerek és adalékan-
yagok betöltésére szolgál (lásd „Mosószerek és mosan-
dók”).
ON/OFFgomb: a mosógép be-, illetve kikapcsolására
szolgál.
PROGRAMOK tekerőgomb: a programok beállítására
szolgál. A program lefutása alatt a tárcsa nem mozdul.
FUNKCIÓ jelzőlámpás gombok: a lehetséges funkciók
kiválasztására szolgál. A kiválasztott funkció jelzőlámpája
égve marad.
CENTRIFUGÁLÁS tekerőgomb: a centrifugálás bekapc-
solására, illetve kikapcsolására szolgál (lásd „Egyéni
beállítások”).
HŐMÉRSÉKLET tekerőgomb: a hőmérséklet, illetve a
hideg vizes mosás beállítására szolgál (lásd „Egyéni
beállítások”).
KIJELZŐ: a rendelkezésre álló programok hosszának,
illetve elindított ciklus esetén a program végéig hátralévő
maradékidőnek a megjelenítésére szolgál. KÉSLELTE-
TETT INDÍTÁS beállítása esetén a kiválasztott program
elindulásáig hátralévő időt jeleníti meg.
KÉSLELTETETT INDÍTÁS gomb: a kiválasztott pro-
gram késleltetett elindításához nyomja meg ezt a gom-
bot. A késleltetés értéke megjelenik a kijelzőn.
CIKLUS ELŐREHALADÁSÁT jelző lámpák: a mosási
program előrehaladásának követésére szolgál.
Az égő lámpa az éppen folyamatban lévő fázist jelzi.
AJTÓZÁR lámpa: az ajtó kinyithatóságának jelzésére
szolgál (lásd a szemben lévő oldalt).
START/PAUSE jelzőlámpás gomb: a programok elin-
dítására, illetve pillanatnyi megszakítására szolgál.
Megjegyzés: A folyamatban lévő mosás szünetel-
tetéséhez nyomja meg ezt a gombot – a vonatkozó
jelzőlámpa narancssárga fénnyel fog villogni, míg a
folyamatban lévő fázist jelző lámpa folyamatos fénnyel
világítani fog. Ha az AJTÓZÁR lámpa nem világít,
kinyithatja az ajtót (várjon kb. 3 percet).
A mosásnak a megszakítás időpontjától való folyta-
tásához nyomja meg ismét ezt a gombot.
Készenléti üzemmód
Ez a mosógép - az energiatakarékosságra vonatkozó
legújabb eloírásoknak megfeleloen - automatikus ki-
kapcsolási (készenléti) rendszerrel van ellátva, mely a
használat megadott 30 percnyi szüneteltetése esetén
bekapcsol. Nyomja meg röviden a ON/OFF gombot, és
várjon, amíg a készülék újrabekapcsol.
Fogyasztás off üzemmódban: 0,5 W
Fogyasztás bekapcsolva hagyott üzemmódban: 8 W
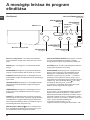
A mosógép leírása és program
elindítása
CIKLUS ELŐREHALADÁSÁT
jelző lámpák
AJTÓZÁR
lámpa
START/PAUSE
jelzőlámpás
gomb
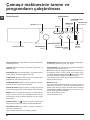
Kezelőpanel
Mosószer-adagoló ók
PROGRAMOK
tekerőgomb
ON/OFFgomb
HŐMÉRSÉKLET
tekerőgomb
CENTRIFUGÁLÁS
tekerőgomb
FUNKCIÓ
jelzőlámpás
gombok
KIJELZŐ
KÉSLELTETETT
INDÍTÁS
gomb

HU
19
Jelzőlámpák
A jelzőlámpák fontos információkat közvetítenek.
Ezek a következők:
Folyamatban lévő fázis jelzőlámpái
A kívánt mosási ciklus kiválasztása és elindítása után a
jelzőlámpák a program előrehaladásának megfelelően,
egymás után kigyulladnak.
Funkciógombok és az azokhoz tartozó lámpák
A Kívánt funkció kiválasztásakor a megfelelő jelzőlámpa
kigyullad.
Ha a kiválasztott funkció a beállított programmal nem fér
össze, a megfelelő jelzőlámpa villogni kezd, és a funkció
nem lesz bekapcsolva.
Ha a kiválasztott funkció egy korábban beállított pro-
grammal nem kompatibilis, az elsőként kiválasztott
funkció lámpája villogni kezd, és csak a második funkció
lesz bekapcsolva, a bekapcsolt funkció lámpája folyama-
tosan világít.
Ajtózár lámpa
A világító jelzőlámpa azt jelzi, hogy a véletlen nyitás me-
gakadályozása érdekében az ajtó be van zárva. Az ajtó
kinyitásához meg kell várni, hogy a jelzőlámpa kialudjon
(várjon kb. 3 percet). Az ajtó menet közbeni kinyitásához
nyomja meg az START/PAUSE gombot; ha az AJTÓZÁR
lámpa kialudt, kinyithatja az ajtót.
Program elindítása
1. A ON/OFFgomb megnyomásával kapcsolja be a mosógépet. Néhány másodpercre az összes jelzőlámpa bekapcsol,
majd kialszik, és az START/PAUSE lámpa villogni kezd.
2. Helyezze be a mosandó ruhákat, és csukja be az ajtót.
3. A PROGRAMOK tekerőgombbal állítsa be a kívánt programot.
4. Állítsa be a mosási hőmérsékletet (lásd „Egyéni beállítások”).
5. Állítsa be a centrifugálás sebességét (lásd „Egyéni beállítások”).
6. Töltse be a mosószert és adalékanyagokat (lásd „Mosószerek és mosandók”).
7. Válassza ki a kívánt funkciókat.
8. Az START/PAUSE gomb megnyomásával indítsa el a programot, mire a megfelelő jelzőlámpa zöld fénnyel világítani
kezd. A beállított mosási ciklus törléséhez az START/PAUSE gomb megnyomásával szüneteltesse le a készüléket, és
válasszon egy úgy mosási ciklust.
9. A program végeztével kigyullad a jelzőlámpa. Amikor az AJTÓZÁR lámpa kialszik, az ajtót ki lehet nyitni (várjon
kb. 3 percet). Vegye ki a mosandó ruhákat, és hagyja az ajtót félig nyitva, hogy a forgódob kiszáradjon.
A ON/OFFgomb megnyomásával kapcsolja ki a mosógépet.
Mosás
Öblítés
Centrifugálás
Ürítés
Mosás vége

20
HU
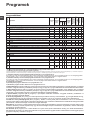
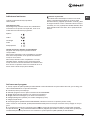
Programok
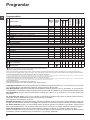
Programtáblázat
A Sport Intensive programot (12-es program) az nagyon koszos sportruházatok (melegítők, rövid nadrágok stb.) mosására
tervezték. A legjobb eredmény érdekében javasoljuk, hogy ne lépje túl a „programtáblázat”-ban feltüntetett maximális töltetet.
A Sport Light programot (13-es program) az enyhén koszos sportruházatok (melegítők, rövid nadrágok stb.) mosására
tervezték. A legjobb eredmény érdekében javasoljuk, hogy ne lépje túl a „programtáblázat”-ban feltüntetett maximális töltetet.
Javasoljuk, hogy használjon folyékony mosószert féladagnak megfelelő adagban.
A Sport Shoes programot (
14
-as program) a sportcipők mosására tervezték. A legjobb eredmény érdekében ne
mosson egyszerre 2 párnál többet.
A 20°C-os programok (20° Zone) jó mosási teljesítményt kínálnak alacsony hőmérsékleten, így energiát takaríthat meg,
ami megtakarítást jelent az Ön számára és kíméli a környezetet. A 20°C-os programok minden igényt kielégítenek:
normál 20 °C-os pamutprogram (6-es program)– Ideális a szennyezett pamut töltetekhez. A 40 C-os mosáséhoz
mérhető, akár hideg mosás mellett is elérhető jó teljesítményt egy rendszeres időközönként ismétlődő sebességcsúcsokkal
jellemezhető, változó sebességű mechanikus mozgás biztosítja.
Mix Light (7-es program)– Ideális a közepesen szennyezett vegyes töltetekhez (pamut és műszálas). Az akár hideg mosás
mellett is elérhető jó mosási teljesítményt egy adott hosszúságú közepes szünetekkel megszakított, változó sebességű
mechanikus mozgás biztosítja.
20’ Refresh (8-es program)– Ez a ciklus ideális az enyhén szennyezett ruhadarabok néhány perc alatti felfrissítéséhez.
Mindössze 20 percig tart, így időt és energiát takarít meg. Különböző anyagból készült ruhadarabokat moshat együtt (kivéve
gyapjút és selymet), maximum 1,5 kg-ot.
* Az program kiválasztásakor és a centrifuga kizárásakor a gép csak az ürítést végzi el.
** A mosási programok mosási ideje leolvasható a kijelzõrõl.
A kijelzőn megjelenő vagy a kézikönyben feltüntetett ciklusidők szokásos körülmények alapján becsült értékek. A tényleges időt számos tényező befolyásolhatja – pl. a bemeneti víznyomás, a
környezeti hőmérséklet, a mosószer mennyisége, a ruhatöltet mennyisége és típusa, a ruhatöltet kiegyensúlyozása, a kiválasztott további opciók.
1) 1061/2010 szabvány szerinti vezérlőprogramok: állítsa be a 2-os programot 60 °C.
Ez a ciklus egy adag, nem különösebben koszos pamut ruhadarabok mosására alkalmas, és ez a leghatékonyabb a víz- és energiafogyasztás
szempontjából is. 60°C -on mosható termékekhez. A mosás tényleges hőmérséklete eltérhet a megjelölt értéktől.
2) 1061/2010 szabvány szerinti vezérlőprogramok: állítsa be a 3-os programot 40 °C.
Ez a ciklus egy adag, nem különösebben koszos pamut ruhadarabok mosására alkalmas, és ez a leghatékonyabb a víz- és energiafogyasztás
szempontjából is. 40°C -on mosható termékekhez. A mosás tényleges hőmérséklete eltérhet a megjelölt értéktől.
A viszgálószervek számára:
2) Hosszú pamut program: állítsa be a 3-es programot 40 °C-ra.
3) Szintetikus program mentén: állítsa be a 4-es programot 40 °C-ra.
Programok
Programleírás
Max. hom.
(°C)
Max.
sebesség
(ford./
perc)
Mosószerek
Max.
ruhamen-
nyiség
(kg)
Maradék nedves-
ségtartalom %
Energiafogyasztás
kWh
Összes víz lt
Programido
Elomo-
sás
Mosás
Öblíto
Hétköznapi programok (Daily)
1
PAMUT ELOMOSÁS: Erosen szennyezett fehér ruhák
90°
1200
6
- - - **
2
Normál 60 °C-os pamutprogram (1): Erosen szennyezett fehér és magasabb homér-
sékleten mosható színes ruhák
60°
(Max. 90°)
1200
-
6
53 0,89 50 210’
3
Normál 40 °C-os pamutprogram (2): Enyhén szennyezett fehér és kényes színes ruhák
40°
1200
-
6
53 0,97 63 240’
4
SZINTETIKUS: Erosen szennyezett, magasabb homérsékleten mosható színes ruhák
60°
1000
-
3
- - - **
4
SZINTETIKUS (3): Enyhén szennyezett, magasabb homérsékleten mosható színes ruhák
40°
1000
-
3
44 0,47 46 95’
5
SZÍNES PAMUT: Enyhén szennyezett fehér és kényes színes ruhák
40°
1200
-
6
- - - **
20° Zone
6
Normál 20 °C-os pamutprogram: Enyhén szennyezett fehér és kényes színes ruhák
20°
1200
-
6
- - - **
7
Mix Light
20°
1000
-
6
- - - **
8
20’ Refresh
20°
800
-
1,5
- - - **
Speciális programok (Special)
9
SELYEM/FÜGGÖNY: Selyem ruhanemukhöz, viszkózus anyagokhoz, fehérnemukhöz.
30°
0
-
1
- - - **
10
Gyapjú: yapj, kasmír stb ruhanemuk mosásához
40°
800
-
1
- - - **
11
Jeans
40°
800
-
2,5
- - - **
Sport
12
Sport Intensive
30° 600 -
2,5
- - - **
13
Sport Light
30° 600 -
2,5
- - - **
14
Sport Shoes
30° 600 -
Max.
2 par
- - - **
Részleges programok
L
-
1200
- -
6
- - - **
CEUL + VA
-
1200
- - - 6
- - - **
CA VA
- - - - 6
- - - **
Sayfa yükleniyor...
Sayfa yükleniyor...
Sayfa yükleniyor...
Sayfa yükleniyor...
Sayfa yükleniyor...
Sayfa yükleniyor...
Sayfa yükleniyor...
Sayfa yükleniyor...
Sayfa yükleniyor...
Sayfa yükleniyor...
Sayfa yükleniyor...
Sayfa yükleniyor...
Sayfa yükleniyor...
Sayfa yükleniyor...
Sayfa yükleniyor...
Sayfa yükleniyor...
Sayfa yükleniyor...
Sayfa yükleniyor...
Sayfa yükleniyor...
Sayfa yükleniyor...
Sayfa yükleniyor...
Sayfa yükleniyor...
Sayfa yükleniyor...
Sayfa yükleniyor...
Sayfa yükleniyor...
Sayfa yükleniyor...
Sayfa yükleniyor...
Sayfa yükleniyor...
Sayfa yükleniyor...
Sayfa yükleniyor...
Sayfa yükleniyor...
Sayfa yükleniyor...
Sayfa yükleniyor...
Sayfa yükleniyor...
Sayfa yükleniyor...
Sayfa yükleniyor...
Sayfa yükleniyor...
Sayfa yükleniyor...
Sayfa yükleniyor...
Sayfa yükleniyor...
-
 1
1
-
 2
2
-
 3
3
-
 4
4
-
 5
5
-
 6
6
-
 7
7
-
 8
8
-
 9
9
-
 10
10
-
 11
11
-
 12
12
-
 13
13
-
 14
14
-
 15
15
-
 16
16
-
 17
17
-
 18
18
-
 19
19
-
 20
20
-
 21
21
-
 22
22
-
 23
23
-
 24
24
-
 25
25
-
 26
26
-
 27
27
-
 28
28
-
 29
29
-
 30
30
-
 31
31
-
 32
32
-
 33
33
-
 34
34
-
 35
35
-
 36
36
-
 37
37
-
 38
38
-
 39
39
-
 40
40
-
 41
41
-
 42
42
-
 43
43
-
 44
44
-
 45
45
-
 46
46
-
 47
47
-
 48
48
-
 49
49
-
 50
50
-
 51
51
-
 52
52
-
 53
53
-
 54
54
-
 55
55
-
 56
56
-
 57
57
-
 58
58
-
 59
59
-
 60
60


Indesit IWSD 61252 C ECO EU Kullanici rehberi
- Kategori
- Çamaşır makineleri
- Tip
- Kullanici rehberi