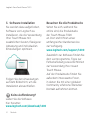
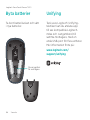
Logitech T400 El kitabı
- Kategori
- Fareler
- Tip
- El kitabı
Bu kılavuz aynı zamanda aşağıdakiler için de uygundur:

Zone Touch Mouse T400
Setup Guide
Sayfa yükleniyor...

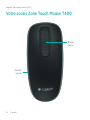
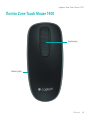
Logitech Zone Touch Mouse T400
3
English. . . . . . . . . . . . . . . . . . . . . . . . . . . . . . . . . . . . . . . . . . 4
Deutsch . . . . . . . . . . . . . . . . . . . . . . . . . . . . . . . . . . . . . . . . . 11
Français . . . . . . . . . . . . . . . . . . . . . . . . . . . . . . . . . . . . . . . . . 18
Italiano. . . . . . . . . . . . . . . . . . . . . . . . . . . . . . . . . . . . . . . . . 25
Español . . . . . . . . . . . . . . . . . . . . . . . . . . . . . . . . . . . . . . . . 32
Português . . . . . . . . . . . . . . . . . . . . . . . . . . . . . . . . . . . . . . . 39
Nederlands . . . . . . . . . . . . . . . . . . . . . . . . . . . . . . . . . . . . . . 46
Svenska . . . . . . . . . . . . . . . . . . . . . . . . . . . . . . . . . . . . . . . . 53
Dansk . . . . . . . . . . . . . . . . . . . . . . . . . . . . . . . . . . . . . . . . . 60
Norsk . . . . . . . . . . . . . . . . . . . . . . . . . . . . . . . . . . . . . . . . . 67
Suomi . . . . . . . . . . . . . . . . . . . . . . . . . . . . . . . . . . . . . . . . . 74
Ελληνικά . . . . . . . . . . . . . . . . . . . . . . . . . . . . . . . . . . . . . . . . . . 81
Türkçe . . . . . . . . . . . . . . . . . . . . . . . . . . . . . . . . . . . . . . . . . 88
95 . . . . . . . . . . . . . . . . . . . . . . . . . . . . . . . . . . . . . . . . . .
www.logitech.com/support . . . . . . . . . . . . . . . . . . . . . . . . . . . . 103

Logitech Zone Touch Mouse T400
4English
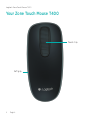
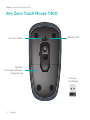
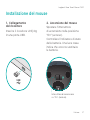
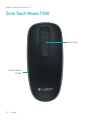
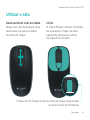
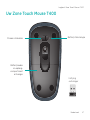
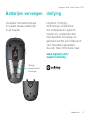
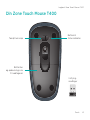
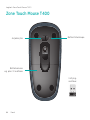
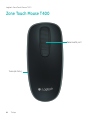
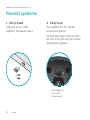
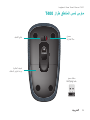
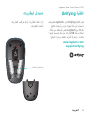
Touch strip
Soft grip
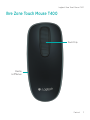
Your Zone Touch Mouse T400
Sayfa yükleniyor...

Logitech Zone Touch Mouse T400
6English
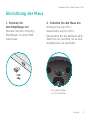
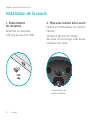
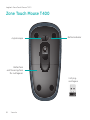
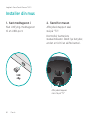
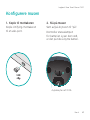
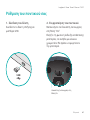
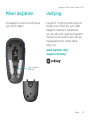
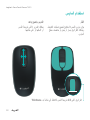
Set up your mouse
1. Plug in the receiver
Plug the Unifying receiver
into a USB port.
2. Power on the mouse
Move the power switch to
the On position.
Check the battery status light.
Red means its time to change
the battery.
Power switch in
the On position
USB

Logitech Zone Touch Mouse T400
English7
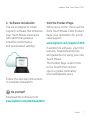
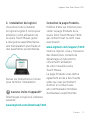
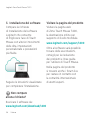
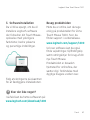
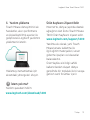
Visit the Product Page
While you’re online, check out the
Zone Touch Mouse T400 Product
Page, your destination for world-
class support.
www.logitech.com/support/t400
In addition to software, you’ll find
tutorials, troubleshooting tips,
and guidelines for using your new
Touch Mouse.
The Product Page is also home
to live forums that connect
you to a global community
of knowledgeable users.
No prompt?
Download the software from:
www.logitech.com/download/t400
3. Software installation
You are prompted to install
Logitech software that enhances
your Touch Mouse experience
with additional gestures,
smoother performance,
and personalized settings.
Follow the onscreen instructions
to complete installation.
Sayfa yükleniyor...
Sayfa yükleniyor...

Logitech Zone Touch Mouse T400
10English
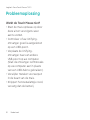
Troubleshooting
Touch Mouse not working?
•Restartthemousebyturningit
o and then back on.
•CheckifyourUnifyingreceiver
is properly connected to
a USB Port.
•MovetheUnifyingreceiver
to another USB port on
your computer. (Try connecting
directly to your computer
instead of using a USB hub.)
•Removeanymetallicobjects
near the mouse.
•Ifthestatuslightblinksred,
replace the battery.
Sayfa yükleniyor...
Sayfa yükleniyor...
Sayfa yükleniyor...

Logitech Zone Touch Mouse T400
14Deutsch
Besuchen Sie die Produktseite
Sehen Sie sich, während Sie
online sind, die Produktseite
der Touch Mouse T620
an. Dort steht Ihnen unser
umfangreicher Kundenservice
zur Verfügung.
www.logitech.com/support/t400
Zusätzlich zur Software finden Sie
dort Lernprogramme, Tipps zur
Fehlerbehebung sowie Richtlinien
zur Verwendung Ihrer neuen
Touch Mouse.
Auf der Produktseite finden Sie
außerdem interessante Foren,
in denen Sie mit einer globalen
Community erfahrener Benutzer
Kontakt aufnehmen können.
Keine Auorderung?
Laden Sie die Software
hier herunter:
www.logitech.com/download/t400
3. Software-Installation
Sie werden dazu aufgefordert,
Software von Logitech zu
installieren, die die Verwendung
Ihrer Touch Mouse mit
zusätzlichen Gesten, flüssigerer
Abtastung und individuellen
Einstellungen optimiert.
Folgen Sie den Anweisungen
auf dem Bildschirm, um die
Installation abzuschließen.

Logitech Zone Touch Mouse T400
Deutsch15
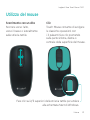
Scrollen mit einem Finger
Streichen Sie auf dem Touch
Strip nach oben oder unten bzw.
nach rechts oder links.
Klicken
Die Touch Mouse verfügt über
alle drei Tastenfunktionen.
Drücken Sie auf den linken,
rechten oder mittleren Bereich
der Mausoberfläche.
Verwendung der Maus
Drücken Sie auf den oberen Bereich des Touch Strips,
um den Windows-Startbildschirm aufzurufen.
Sayfa yükleniyor...
Sayfa yükleniyor...
Sayfa yükleniyor...

Logitech Zone Touch Mouse T400
Français19
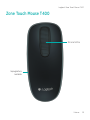
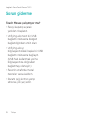
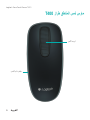
Récepteur
Unifying
Témoin
de charge des piles
Compartiment
des piles
et de stockage
du récepteur
Commutateur
d'alimentation
Votre souris Zone Touch Mouse T400
Sayfa yükleniyor...
Sayfa yükleniyor...

Logitech Zone Touch Mouse T400
22Français
Défilement à un doigt
Faites glisser votre doigt
vers le haut, vers le bas ou sur
les côtés de la bande tactile.
Clic
La souris Touch Mouse permet
l'utilisation des trois boutons
traditionnels. Cliquez sur la gauche,
la droite ou le milieu de la surface
de la souris.
Utilisation de la souris
Cliquez aux deux tiers de la partie supérieure de la bande
tactile pour accéder à l'écran Démarrer de Windows.

Logitech Zone Touch Mouse T400
Français23
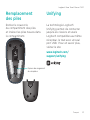
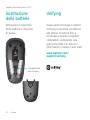
Remplacement
des piles
Retirez le couvercle
du compartiment des piles
et insérez les piles neuves dans
le compartiment.
Unifying
La technologie Logitech
®
Unifying permet de connecter
jusqu'àsixclaviersetsouris
Logitech compatibles au même
récepteur, le tout avec un seul
port USB. Pour en savoir plus,
visitez le site:
www.logitech.com/
support/unifying
Espace de rangement
du récepteur

Logitech Zone Touch Mouse T400
24Français
Dépannage
La souris Touch Mouse
ne fonctionne pas?
•Redémarrezlasourisen
la mettant hors tension puis
sous tension.
•Vériezquelerécepteur
Unifying est connecté
correctement à un port USB.
•Déplacezlerécepteur
Unifying sur un autre port USB
de l'ordinateur (branchez-le
directement sur l'ordinateur
et non sur un hub USB).
•Eloigneztoutobjetmétallique
de la souris.
•Siletémoind'étatclignote
en rouge, vous devez changer
les piles.
Sayfa yükleniyor...

Logitech Zone Touch Mouse T400
26Italiano
Ricevitore
Unifying
Indicatore di stato
delle batterie
Vano batterie
e alloggiamento
ricevitore
Interruttore
di accensione
Zone Touch Mouse T400
Sayfa yükleniyor...

Logitech Zone Touch Mouse T400
28Italiano
Visitare la pagina del prodotto
Visitare la pagina web
di Zone Touch Mouse T400,
la destinazione online per
supporto di livello mondiale.
www.logitech.com/support/t400
Oltre al software sarà possibile
trovare delle esercitazioni,
consigli per la risoluzione
dei problemi e linee guida
per l’utilizzo di Touch Mouse.
Nella pagina del prodotto
si trovano anche i forum live
per restare in contatto con
la comunità internazionale
di utenti esperti.
Non compare
alcuna richiesta?
Scaricare il software da:
www.logitech.com/download/t400
3. Installazione del software
Compare la richiesta
di installazione del software
Logitech che consente
di migliorare l’uso di Touch
Mouse con ulteriori movimenti
delle dita, impostazioni
personalizzate e prestazioni
più fluide.
Seguire le istruzioni visualizzate
per completare l'installazione.

Logitech Zone Touch Mouse T400
Italiano29
Scorrimento con un dito
Scorrere verso l’alto,
verso il basso o lateralmente
sulla striscia tattile.
Clic
Touch Mouse consente di svolgere
le classiche operazioni con
i 3 pulsanti: fare clic premendo
sulla parte sinistra, destra o
centrale della superficie del mouse.
Utilizzo del mouse
Fare clic sui 2/3 superiori della striscia tattile per andare
alla schermata Start di Windows.

Logitech Zone Touch Mouse T400
30Italiano
Sostituzione
delle batterie
Rimuovere il coperchio
delle batterie e inserirne
di nuove.
Unifying
Grazie alla tecnologia Logitech
®
Unifying è possibile connettere
allo stesso ricevitore fino a
sei mouse e tastiere Logitech
compatibili, utilizzando una
sola porta USB. Per ulteriori
informazioni, visitare il sito web:
www.logitech.com/
support/unifying
Alloggiamento
del ricevitore
Sayfa yükleniyor...
Sayfa yükleniyor...

Logitech Zone Touch Mouse T400
Español33
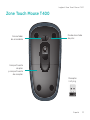
Receptor
Unifying
Diodo de estado
de pilas
Compartimento
de pilas
y compartimento
de receptor
Conmutador
de encendido
Zone Touch Mouse T400

Logitech Zone Touch Mouse T400
34Español
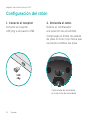
Configuración del ratón
1. Conecte el receptor
Conecte el receptor
Unifying a un puerto USB.
2. Encienda el ratón.
Deslice el conmutador
a la posición de encendido.
Compruebe el diodo de estado
depilas.Elcolorrojoindicaque
es preciso cambiar las pilas.
Conmutador de encendido
en la posición de encendido.
USB

Logitech Zone Touch Mouse T400
Español35
Visita a la página del producto
Mientras esté en línea, visite la
páginadelproductoZoneTouch
MouseT400,dondeencontrará
asistencia de primera clase.
www.logitech.com/support/t400
Ademásdesoftware,encontrará
tutoriales,consejossobre
resolución de problemas
y recomendaciones sobre el uso
de Touch Mouse.
Lapáginadelproductotambién
incluye interesantes foros donde
podráestablecercontacto
con una comunidad global
de usuarios expertos.
¿No aparece ningún
mensaje?
Descargue el software de:
www.logitech.com/download/t400
3. Instalación de software
Selepediráqueinstalesoftware
deLogitechquemejorala
experiencia con Touch Mouse ya
que añade gestos adicionales,
unrendimientomásuniforme
y configuración personalizada.
Siga las instrucciones que
aparezcan en pantalla para
completar la instalación.
Sayfa yükleniyor...

Logitech Zone Touch Mouse T400
Español37
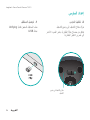
Sustituya las pilas
Quite la tapa de las pilas
y coloque pilas nuevas
en el compartimento.
Unifying
La tecnología Logitech
®
Unifying
conecta hasta seis ratones
y teclados Logitech al mismo
receptor, con lo que se usa
un solo puerto USB para
variosdispositivos.Paramás
información, visite:
www.logitech.com/
support/unifying
Compartimento
de receptor
Sayfa yükleniyor...
Sayfa yükleniyor...
Sayfa yükleniyor...
Sayfa yükleniyor...
Sayfa yükleniyor...
Sayfa yükleniyor...
Sayfa yükleniyor...
Sayfa yükleniyor...
Sayfa yükleniyor...
Sayfa yükleniyor...
Sayfa yükleniyor...
Sayfa yükleniyor...
Sayfa yükleniyor...
Sayfa yükleniyor...
Sayfa yükleniyor...
Sayfa yükleniyor...
Sayfa yükleniyor...
Sayfa yükleniyor...
Sayfa yükleniyor...
Sayfa yükleniyor...
Sayfa yükleniyor...
Sayfa yükleniyor...
Sayfa yükleniyor...
Sayfa yükleniyor...
Sayfa yükleniyor...
Sayfa yükleniyor...
Sayfa yükleniyor...
Sayfa yükleniyor...
Sayfa yükleniyor...
Sayfa yükleniyor...
Sayfa yükleniyor...
Sayfa yükleniyor...
Sayfa yükleniyor...
Sayfa yükleniyor...
Sayfa yükleniyor...
Sayfa yükleniyor...
Sayfa yükleniyor...
Sayfa yükleniyor...
Sayfa yükleniyor...
Sayfa yükleniyor...
Sayfa yükleniyor...
Sayfa yükleniyor...
Sayfa yükleniyor...
Sayfa yükleniyor...
Sayfa yükleniyor...
Sayfa yükleniyor...
Sayfa yükleniyor...
Sayfa yükleniyor...
Sayfa yükleniyor...
Sayfa yükleniyor...
Sayfa yükleniyor...
Sayfa yükleniyor...
Sayfa yükleniyor...
Sayfa yükleniyor...
Sayfa yükleniyor...
Sayfa yükleniyor...
Sayfa yükleniyor...
Sayfa yükleniyor...
Sayfa yükleniyor...
Sayfa yükleniyor...
Sayfa yükleniyor...
Sayfa yükleniyor...
Sayfa yükleniyor...
Sayfa yükleniyor...
Sayfa yükleniyor...
Sayfa yükleniyor...
Sayfa yükleniyor...
-
 1
1
-
 2
2
-
 3
3
-
 4
4
-
 5
5
-
 6
6
-
 7
7
-
 8
8
-
 9
9
-
 10
10
-
 11
11
-
 12
12
-
 13
13
-
 14
14
-
 15
15
-
 16
16
-
 17
17
-
 18
18
-
 19
19
-
 20
20
-
 21
21
-
 22
22
-
 23
23
-
 24
24
-
 25
25
-
 26
26
-
 27
27
-
 28
28
-
 29
29
-
 30
30
-
 31
31
-
 32
32
-
 33
33
-
 34
34
-
 35
35
-
 36
36
-
 37
37
-
 38
38
-
 39
39
-
 40
40
-
 41
41
-
 42
42
-
 43
43
-
 44
44
-
 45
45
-
 46
46
-
 47
47
-
 48
48
-
 49
49
-
 50
50
-
 51
51
-
 52
52
-
 53
53
-
 54
54
-
 55
55
-
 56
56
-
 57
57
-
 58
58
-
 59
59
-
 60
60
-
 61
61
-
 62
62
-
 63
63
-
 64
64
-
 65
65
-
 66
66
-
 67
67
-
 68
68
-
 69
69
-
 70
70
-
 71
71
-
 72
72
-
 73
73
-
 74
74
-
 75
75
-
 76
76
-
 77
77
-
 78
78
-
 79
79
-
 80
80
-
 81
81
-
 82
82
-
 83
83
-
 84
84
-
 85
85
-
 86
86
-
 87
87
-
 88
88
-
 89
89
-
 90
90
-
 91
91
-
 92
92
-
 93
93
-
 94
94
-
 95
95
-
 96
96
-
 97
97
-
 98
98
-
 99
99
-
 100
100
-
 101
101
-
 102
102
-
 103
103
-
 104
104


Logitech T400 El kitabı
- Kategori
- Fareler
- Tip
- El kitabı
- Bu kılavuz aynı zamanda aşağıdakiler için de uygundur:
diğer dillerde
- español: Logitech T400 El manual del propietario
- français: Logitech T400 Le manuel du propriétaire
- italiano: Logitech T400 Manuale del proprietario
- svenska: Logitech T400 Bruksanvisning
- Deutsch: Logitech T400 Bedienungsanleitung
- português: Logitech T400 Manual do proprietário
- English: Logitech T400 Owner's manual
- dansk: Logitech T400 Brugervejledning
- suomi: Logitech T400 Omistajan opas
- Nederlands: Logitech T400 de handleiding
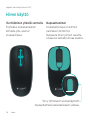
İlgili makaleler
-
Logitech 920-007119 Kullanım kılavuzu
-
-
Logitech M115 Kullanım kılavuzu
-
Logitech Wireless Touchpad El kitabı
-
Logitech 910-002696 Kullanım kılavuzu
-
-
Logitech M325 Kullanım kılavuzu
-
Logitech 910-001822 Kullanım kılavuzu
-
-
Logitech T630 El kitabı