
取扱説明書
このたびはヤマハサイレントブラス用パーソナルスタジオ ST9 をお買い求めいただ
き、まことにありがとうございます。本機の機能を十分に活用するために、この取扱説明書
をよくお読みになってからご使用ください。なお、ご一読いただいたあとも、不明な点が生
じた場合に備えて、保証書と共に大切に保管していただきますようお願いいたします。
火災・感電・人身傷害の危険を防止するには
~以下の指示を必ず守ってください~
安全へのこころがけ
この「安全へのこころがけ」は製品を安全に正しくお使いいただき、
お客様や他の人々への危害や財産への損害を未然に防止するため
に、いろいろな絵表示を使って説明しています。
絵表示の意味をよく理解してから、本文をお読みください。
絵表示に
ついて
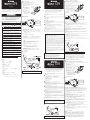
■ 各部の名称と機能
e
注意(危険・警告を含む)を促す内容があることを告げるものです。
禁止の行為を告げるものです。
行為の強制を示します。
例: → 分解禁止
この機器の内部を開けたり、内部の部品を分解したり改造したりしない。
感電や火
災、または故障などの原因になります。異常を感じた場合など、機器の点検修理は必ずお
買い上げの楽器店または下記のヤマハ電気音響製品サービス拠点にご依頼ください。
浴室や雨天時の屋外など湿気の多いところで使用しない。また、本体の上に花瓶や薬品など液体
の入ったものを置かない。
感電や火災、または故障の原因になります。
使用中に音が出なくなったり異常なにおいや煙が出た場合は、すぐに本体から電池を抜く。
感電や火災、または故障のおそれがあります。至急、お買い上げの楽器店または巻末のヤマハ電気
音響製品サービス拠点に点検をご依頼ください。
警告
この表示内容を無視した取り扱いをすると、死亡や重症を負う可能性が想
定さ
れます。
注意
この表示内容を無視した取り扱いをすると、障害を負う可能性または物的損
害が発生する可能性が想定されます。
他の機器と接続する場合は、すべての機器の電源を切った上で行う。また、電源を入れたり切った
りする前に、必ず機器のボリュームを最小(0)にする。
感電または機器の損傷のおそれがあります。
乾電池は+/-の極性表示どおりに正しく入れる。
液漏れや火災、または故障のおそれがあります。
長時間使用しない場合は、乾電池を本体から抜いておく。
乾電池が消耗し、液漏れが発生し、本体を破損する原因になります。
乾電池は早めに取り換える。
電池が少なくなると、音が歪んだり、エコーがかからなくなる原因になります。
直射日
光のあたる場所(日中の車内など)やストーブの近くなど極端に温度が高くなるところ、逆に
温度が極端に低いところ、またほこりや振動の多いところで使用しない。
本体パネルが変形したり内部の部品が故障したりする原因になります。
テレビやラジオ、スピーカーなど他の電気製品の近くで使用しない。
デジタ
ル回路を使用しているため、テレビやラジオなどに雑音が生じる場合があります。
不安定な場所に置かない。
機器が落下して故障したり、お客様がけがをしたりする原因になります。
本体を手入れするときは、ペンジンやシンナー、洗剤、科学ぞうきんなどは絶対に使用しない。また、
本体上にビニール製品やプラスチック製品などを置かない。
本体が変色/変質する原因になります。お手入れは、柔らかい布で乾拭きしてください。
本体の
上に乗ったり重いものをのせたりしない。また、ボタンやスイッチ、入出力端子などに無理な
力を加
えない。
本体が破損する原因になります。
大きな音量で長時間イヤホン(ヘッドフォン)を使用しない。
聴覚障害の原因になります。
■ 電池のセット/交換
本機は電源として6F22(S-006P)/6LR61乾電池を使用します。
電源を切った状態で電池交換を行ってください。
※ 電池の交換は、必ず電源スイッチをOFFにしてから行ってください。
q
本体を裏返し、電池カバーを外し
ます。
w 市販の6 F 2 2 ( S - 0 0 6 P ) /
6 L R 6
1 乾電池を入 れます。
+/-の向きを間違えないように
入れてください。
e 電池カバーを閉めます。
※ 電池が少なくなると、音が歪ん
だりエコーがかかりづらくな
り
ます。そのようなときは、電
池
を交換してください。
r
q 電源スイッチ(OFF/ON/ECHO)/インジケーター
本機の電源スイッチです。“ON”にすると電源が入り、インジケーターが点灯します。
“ECHO” にすると、ピックアップミュート/ピックアップマイクからの入力音にエ
コーがかかります。
※ 電源スイッチの操作は、必ずステレオイヤホンやヘッドフォンを耳から外
した状態で行ってください。
w ボリュームつまみ
OUTPUT/PHONES端子に出力される音量を調節します。
e OUTPUT/PHONES端子
ステレオイヤホンまたはヘッドフォンを接続します。外部出力端子も兼ねてい
ま
すので、市販のオーディオケーブルで接続すれば、外部アンプ
を鳴らしたり、
テープレコーダーに録音したりすることができます。
(ステレオ・ミニフォン
ジャック)
r AUX IN端子
この端子と、
CDプレーヤーなどの外部機器の出力端子を市販のオーディオケーブ
ルで接続すると、外部機器の音をバックに演奏することができます。
(ステレオ・ミニフォンジャック)
※ 外部機器の音量は、外部機器のボリュームで調整してください。
t INPUT端子
ヤマハピックアップミュート/ピックアップマイクを接続します。
※ INPUT 端子は電源供給も兼ねていますので、ヤマハピックアップミュート/
ピックアップマイク以外の機器は接続しないでください。
y 入力切替スイッチ(INPUT Lo/Hi)
接続する機器の出力(Lo=小出力用、Hi=大出力用)に応じて切り替えます。
※ 初めは「Lo」ポジションで演奏をし、音が歪むようでしたら「Hi」ポジション
に切り替えてください。
■ 仕様
周波数特性
INPUT : 120Hz~20kHz
AUX IN : 160Hz~20kHz
定格入出力レベル (0dBm=0.775 Vrms)
INPUT : -30dBm
AUX I
N : -20dBm
OUTPUT/PHONES : -10dBm
接続端子(すべてミニフォンジャック)
INPUT、 AUX IN、 OUTPUT/PHONES
コントロール
Volume、 Input Lo/Hi、電源 OFF/ON/ECHO
電源
6F22(S-006P)/6LR61 (9V箱形)、 マンガン電池で約12時間の連続使用可能
寸法
75(W)×70(D)×25(H)mm
重量
55g(乾電池除く)
セット内容
単体販売品:
パーソナルスタジオST9、 9V乾電池、ストラップ、取扱説明書(本書)
セット販売品:
パーソナルスタジオST9、 ピックアップミュート、接続ケーブル、9V乾電池、ストラップ、
ステレオイヤホン、取扱説明書(本書)
※ 仕様および外観は、改良のため予告なく変更することがあります。
q
例: プラグを抜く
不適切な使用や改造により故障した場合の保証はいたしかねます。
■ 使い方と接続
ステレオイヤホン
またはヘッドフォン
= 音の流れ
電源が入っている状態でコードが抜けると、機器が損傷するおそれがあります。
耳に伝わる衝撃も大きいので注意してください。
w
y
6F22(S-006P)/
6LR61乾電池
電池カバー
裏面
ストラップ(付属)
Thank you for purchasing the Yamaha Silent Brass Personal
Studio
ST9. In order to obtain the maximum performance and
enjoyment from your ST9, we urge you to read this Owner’s
Manual thoroughly before using. Please keep this Owner’s
Manual in a safe place for later reference.
Your ST9 will give you years of reliable service if you follow the simple
rules given below:
Location
Do not expose it to the following conditions to avoid deformation, discoloration, or more serious
damage
.
• Direct sunlight (e.g. near a window).
• High temperatures (e.g. near a heat source, outside, or in a car during the daytime).
• Excessive humidity.
• Excessive dust.
• Strong vibration.
Power Supply
• Turn the power switch OFF when not in use.
Turn Power OFF When Making Connections
• To avoid damage to the Personal Studio and other devices to which it is connected (a sound
system, for example), turn the power switches of all related devices OFF prior to connectin
g
or disconnecting audio cables
.
Handling and Transport
• Never apply excessive force to the controls, connectors or other parts.
• Always unplug cables by gripping the plug firmly, not by pulling on the cable.
• Disconnect all cables before moving the unit.
• Physical shocks caused by dropping, bumping, or placing heavy objects on the unit can
result in scratches and more serious damage
.
Cleaning
• Clean the cabinet and panel with a dry soft cloth.
• A slightly damp cloth may be used to remove stubborn grime and dirt.
• Never use cleaners such as alcohol or thinner.
• Avoid placing vinyl objects on top of the unit (vinyl can stick to and discolor the surface).
Electrical Interference
• This unit contains digital circuitry and may cause interference if placed too close to radio or
television receivers. If this occurs, move it further away from the affected equipment
.
YAMAHA is not responsible for damage caused by improper handling or operation
.
CANADA
THIS DIGITAL APPARATUS DOES NOT EXCEED THE “CLASS B” LIMITS FOR RADIO
NOISE
EMISSIONS FROM DIGITAL APPARATUS SET OUT IN THE RADIO INTERFER-
ENCE
REGULATION OF THE CANADIAN DEPARTMENT OF COMMUNICATIONS.
LE PRESENT APPAREIL NUMERIQUE N’EMET PAS DE BRUITS RADIOELECTRIQUES
DEPASSANT
LES LIMITES APPLICABLES AUX APPAREILS NUMERIQUES DE LA “CLASSE
B”
PRESCRITES DANS LE REGLEMENT SUR LE BROUILLAGE RADIOELECTRIQUE
EDICTE
PAR LE MINISTERE DES COMMUNICATIONS DU CANADA.
• This applies only to products distributed by Yamaha Canada Music Ltd.
• Ceci ne s’applique qu’aux produits distribués par Yamaha Canada Musique Ltée.
FCC INFORMATION (U.S.A.)
1. IMPORTANT NOTICE: DO NOT MODIFY THIS UNIT!
This product, when installed as indicated in the instructions contained in this manual,
meets
FCC requirements. Modifications not expressly approved by Yamaha may void
your
authority, granted by the FCC, to use the product.
2. IMPORTANT: When connecting this product to accessories and/or another product
use
only high-quality shielded cables. Cable/s supplied with this product MUST be used.
Follow
all installation instructions. Failure to follow instructions could void your FCC
authorization
to use this product in the USA.
3. NOTE: This product has been tested and found to comply with the requirements listed in
FCC Regulations, Part 15 for Class “B” digital devices. Compliance with these require-
ments
provides a reasonable level of assurance that your use of this product in a
residential
environment will not result in harmful interference with other electronic de-
vices.
This equipment generates/uses radio frequencies and, if not installed and used
according to the instructions found in the user’s manual, may cause interference harmfu
l
to
the operation of other electronic devices. Compliance with FCC regulations does not
guarantee
that interference will not occur in all installations. If this product is found to be
the
source of interference, which can be determined by turning the unit “OFF” and “ON”,
please
try to eliminate the problem by using one of the following measures:
Relocate
either this product or the device that is being affected by the interference.
Utilize
power outlets that are on different branch (circuit breaker or fuse) circuits or install
AC
line filter/s.
In
the case of radio or TV interference, relocate/reorient the antenna. If the antenna lead-
in
is 300 ohm ribbon lead, change the lead-in to co-axial type cable.
If
these corrective measures do not produce satisfactory results, please contact the local
retailer
authorized to distribute this type of product. If you cannot locate the appropriate
retailer,
please contact Yamaha Corporation of America, Electronic Service Division,
6600
Orangethorpe Ave, Buena Park, CA 90620
The
above statements apply ONLY to those products distributed by Yamaha Corporation
of
America or its subsidiaries.
Nomenclature
Installing / Replacing the Battery
A single 6F22/6LR61 9-Volt battery is used to power the ST9.
Before replacing the battery, switch the power OFF.
* Make sure that the power switch is set to OFF when replacing the battery.
q Turn over the device and remove the
battery compartment cover.
w
Insert an 6F22/6LR61 9-Volt battery.
Take
careful no te of t he pola rit y
markings
making sure the battery is not
inserted with its +/- poles reversed.
e
Replace the battery compartment cover.
* When battery power becomes low, the
sound
will become distorted or the
reverb
will not function properly.
When
these symptoms appear, replace
the
battery with a new one as soon as
possible.
q Power Switch (OFF/ON/ECHO) / Indicator
This is the device’s power switch. When set to the “ON” position, the power is switched
ON
and the indicator will light. When set to the “ECHO” position, the reverb circuit is
activated and applied to the signal received from the pickup mute/pickup mic.
* Before switching on or off the power, make sure you remove the Stereo earphones or
headphones from your ears.
w Volume Knob
Controls the volume of the signal delivered via the OUTPUT/PHONES jack.
e OUTPUT / PHONES Jack
Connect
a pair of Stereo earphones or headphones to this jack. It can also be used as
an
external output jack allowing the ST9 to be connected with a commercially
available audio cable (stereo mini phone jack) to an external amplifier/sound system
for sound reproduction, or to a tape deck, etc. for recording.
r AUX IN Jack
Use
a commercially available audio cable (stereo mini phone jack) to connect the
output
jack of an external device, such as a CD player, etc., to this jack to play along
with the external audio source.
* U se the volume control on the external device to control the volume of the external device.
t INPUT Jack
Connect a Yamaha Pickup Mute/Pickup Mic to this jack.
* The INPUT jack also supplies power to the pickup mute/pickup mic. Never use any
device other than a Yamaha Pickup Mute or Pickup Mic.
y INPUT Select Switch (Lo/Hi)
Select the switch position depending upon the requirements of the connected device.
* At first, set the switch to the “Lo” position and play. If the sound is distorted, please select the
“Hi” position.
Setup and Use
6F22/6LR61
9-Volt Battery
Battery Compartment
Cover
Back Side
Disconnecting the cable while the power is ON may result in damage to the unit.
The sudden noise may also result in hearing impairments.
Specifications
Frequency Characteristics: INPUT : 120 Hz to 20 kHz, AUX IN : 160 Hz to 20 kHz Input/Output
Levels (0dBm=0.775 Vrms): INPUT : -30dBm, AUX IN : -20dBm, OUTPUT/PHONES : -10dBm Jacks
and
Terminals:
INPUT, AUX IN, OUTPUT/PHONES (all mini jack type) Control : Volume, Input Lo/
Hi,
Power OFF/ON/ECHO
Power Supply: 6F22/6LR61 9-Volt battery (Operation with Manganese bat-
teries
last about 12 hours.) Dimensions (WxDxH): 75 x 70 x 25 mm (2-15/16” x 2-3/4” x 1”) Weight:
55g (1.9oz) without batteries Set Contents Main Unit Only: Personal Studio ST9, 9V battery, strap,
Ow
ner’s Manual (this booklet) Purchased as a Set: Personal Studio ST9, Pickup Mute, connection cable,
9V battery, strap, Stereo Earphones, Owner’s Manual (this booklet
)
Stereo Earphones or Headphones
PICKUP MUTE / PICKUP MI
C
OUTPUT/PHONES
CD/MD etc..
.
INPU
T
AUX
IN
ST9
= Signal path
e
r
t
q
w
y
Strap (Accessory)
Vielen Dank für den Kauf des Yamaha Silent Brass Personal
Studio
ST9. Damit Sie das Potential Ihres ST9-Systems voll
nutzen
können, raten wir Ihnen, die Bedienungsanleitung vor
Gebrauch
aufmerksam durchzulesen. Bewahren Sie die An-
leitung zusammen mit der Garantie sorgfältig auf.
ST9
Personal Studio
Sie werden viele Jahre Spaß mit Ihrem ST9 haben, wenn Sie die fol-
genden, einfachen, Regeln beachten:
Einsatzort
Um Verformung, Verfärbung oder ernsthaftere Schäden zu vermeiden, schützen
Sie die Systemkomponenten bitte vor folgenden Einflüssen
:
•Direktem Sonnenlicht (z.B. in der Nähe eines Fensters).
•Hohen Temperaturen (z.B. in der Nähe einer Heizung, im Freien oder tagsüber
in einem Auto)
.
•Übermäßiger Feuchtigkeit.
•Übermäßiger Staubeinwirkung.
•Starken Erschütterungen.
Stromversorgung
•Schalten Sie das Personal Studio nach Gebrauch stets aus.
Schalten Sie das System vor dem Herstellen von Geräte-
verbindungen aus
•Zur Vorbeugung gegen eine mögliche Beschädigung des Personal Studios
sowie anderer Geräte (Verstärkeranlage usw.) schalten Sie vor dem Anschlie
-
ßen bzw. Abtrennen von Kabeln alle Geräte AUS
.
Handhabung und Transport
•Wenden Sie beim Betätigen der Bedienelemente sowie beim Anschließen und
Abtrennen von Steckern nicht zu viel Kraft auf
.
•
Ziehen Sie zum Trennen von Verbindungen stets am Stecker und nicht am Kabel.
•Entfernen Sie alle Verbindungskabel, bevor Sie das System transportieren.
•Fall, Stoß und Ablegen schwerer Gegenstände auf dem Personal Studio kön-
nen Kratzer und andere Schäden zur Folge haben
.
Reinigung
•Reinigen Sie Gehäuse und Frontplatte mit einem weichen und trockenen Tuch.
•In hartnäckigen Fällen kann das Tuch leicht angefeuchtet werden.
•Verwenden Sie keine Reinigungsmittel wie Alkohol oder Verdünner.
•Legen Sie auch keine Gegenstände aus Weichplastik (Vinyl usw.) auf das
Personal Studio, da diese verkleben und das Gehäuse verfärben können
.
Elektrische Störungen
•Da das Personal Studio digitale Schaltungen enthält, könnte bei zu dichter
Plazierung an einem Fernseh- oder Rundfunkgerät der Empfang beeinträchtig
t
werden. Halten Sie in einem solchen Fall bitte einfach etwas Entfernung zu de
n
betroffenen Geräten ein
.
YAMAHA kann nicht für Schäden haftbar gemacht werden, die auf falsche Bedie-
nung oder unsachgemäßen Gebrauch zurückführbar sind
.
Technische Daten
Frequenzgang: INPUT: 120 Hz bis 20 kHz; AUX IN: 160 Hz bis 20 kHz Ein-/Aus-
gangspegel
(0 dBm = 0,775 V): INPUT: -30 dBm; AUX IN: -20 dBm; OUTPUT/
PHONES: -10 dBm
Buchsen: INPUT, AUX IN, OUTPUT/PHONES (alles Miniklinken)
Regler und Schalter: Lautstärke, INPUT (Lo/Hi), Ein/Aus (OFF/ON/ECHO)
Stromversorgung: 9-Volt-Batterie Typ 6F22/6LR61 (ca. 12 h Dauerbetrieb mit
Manganbatterien
)Abmessungen (B x H x T): 75 x 70 x 25 mm Gewicht: 55 g ohne
Batteri
eLieferumfang Haupteinheit allein: Personal Studio ST9, 9-V-Batterie,
Trageschlaufe,
Bedienungsanleitung (dieses Heft) Bei Kauf als Komplettsatz: Personal
Studio
ST9, Tonabnehmer-Dämpfer (Pickup Mute), Verbindungskabel, 9-V-Batterie,
Trageschlaufe, Stereoohrhörer, Bedienungsanleitung (dieses Heft)
Teilebezeichnungen
Einsetzen / Auswechseln der Batterie
Das ST9 wird von einer 9-Volt-Batterie des Typs 6F22/6LR61 gespeist.
Schalten Sie das Gerät AUS, bevor Sie die Batterie auswechseln.
* Achten Sie beim Auswechseln der Batterie darauf, daß der Ein/Aus-Schalter auf OFF steht.
q Drehen Sie das Gerät herum,
u n d e n t f e r n e n S i e d e n
Batteriefachdeckel.
w Legen Sie die 9-V-Batterie
(6F22/6LR61) ein. Achten Sie
beim Einlegen darauf, daß die
B a t t e r i e p o l e ( + / - ) d e n
Markierungen im Batteriefach
gemäß korrekt ausgerichtet sind.
e Bringen Sie den
Batteriefachdeckel wieder an.
* W enn die Batterie schwächer wird,
treten
Klangverzerrungen auf und der
Echoeffekt
(Reverb) arbeitet nicht
meh
r ordnungsgemäß. Sobald sich
diese
Symptome bemerkbar machen,
sollten Sie die Batterie so schnell wie
möglich durch eine neue ersetzen.
q Ein/Aus-Schalter (OFF/ON/ECHO) mit Anzeigelampe
Mit diesem Schalter wird das Gerät ein- und ausgeschaltet. Wenn Sie den
Schalter auf “ON” stellen, ist das Gerät eingeschaltet, wobei die
Anzeigelampe zur Bestätigung leuchtet. In der Position “ECHO” ist
zusätzlich die Reverb-Schaltung aktiviert und legt einen Echoeffekt auf
das vom Tonabnehmer-Dämpfer/Pickup Mic aufgenommene Signal.
* Nehmen Sie die Ohrhörer bzw. Kopfhörer vor dem Ein- oder Ausschalten des Geräts ab.
w Lautstärkeregler
Zum Einstellen der Lautstärke des an der OUTPUT/PHONES-Buchse
ausgegebenen Signals.
e Ausgangsbuchse (OUTPUT/PHONES)
Hier können Sie Stereoohrhörer oder Kopfhörer anschließen. Die Buchse
kann auch verwendet werden, um das ST9 über ein handelsübliches
Audiokabel (Stereo-Miniklinke) an ein Verstärker-/Beschallungssystem
oder für Aufnahmezwecke an ein Bandgerät anzuschließen.
r Zusätzliche Eingangsbuchse (AUX IN)
Diese Buchse kann über ein handelsübliches Audiokabel (Stereo-
Miniklinke) mit dem Ausgang eines CD-Players oder einer anderen
Tonquelle verbunden werden, um zu Musik vom externen Gerät
dazuzuspielen.
*
Die Lautstärke des externen Geräts wird mit dessen Lautstärkeregler eingestellt.
t Eingangsbuchse (INPUT)
Schließen Sie hier den Tonabnehmer-Dämpfer bzw. das Pickup Mic an.
*
Die INPUT-Buchse vorsorgt den Tonabnehmer-Dämpfer bzw. das
Pickup Mic
gleichzeitig mit Strom. Schließen Sie daher hier keine anderen Geräte an als die
vorgeschriebenen Tonabnehmer-Dämpfer bzw.
Pickup Mic
von Yamaha.
y Eingangswahlschalter (INPUT Lo/Hi)
Dieser Schalter wird auf die Position gestellt, die besser zum
angeschlossenen Gerät paßt.
* Stellen Sie den Schalter zunächst auf “Lo”, um dann probeweise zu spielen. Sollte der
Klang verzerrt sein, wählen Sie Position “Hi”.
Systemaufbau und Gebrauch
9-Volt-Batterie
(6F22/6LR61)
Batteriefachdeckel
Rückseite
Das Gerät kann beschädigt werden, wenn es beim Abtrennen des Kabels
eingeschaltet ist. Die dabei erzeugten Knackgeräusche können
außerdem Gehörschäden zur Folge haben.
e
t
q
y
Trageschlaufe (Zubehör)
Stereoohrhörer oder Kopfhörer
=
Tonabnehmer-Dämpfer
/Pickup Mic
OUTPUT/PHONE
S
Signalwe
g
INPU
T
AUX
IN
Entsorgung leerer Batterien (nur innerhalb Deutschlands)
Leisten Sie einen Beitrag zum Umweltschutz. Verbrauchte Batterien oder
Akkumulatoren dürfen nicht in den Hausmüll. Sie können bei einer Sammelstell
e
für Altbatterien bzw. Sondermüll abgegeben werden. Informieren Sie sich be
i
Ihrer Kommune
.
CD/MD usw.
ST9
Personal Studio
Owner’s Manual
ST9
Personal Studio
Bedienungsanleitung
ST9
t
w
ストラップの使用方法に
ついて
付属のストラップは、ズ
ボンのベルトや、ベルト
ループなどに掛けて使用
することができます。
Using the strap
You
can use the supplied
strap
to hang the ST9
from
your belt or belt
loop.
G e b r a u c h d e r
Trageschlaufe
Mi t
der beigel e g t e n
Trageschlaufe können Sie
das
ST9 an den Gürtel
oder
eine Gürtelschlaufe
hängen.
r
-
 1
1
