

Chinese traditional 03
INDEX
INSTALLING A 2.5” SATA SSD ON A DESKTOP PC
INSTALLING A 2.5” SATA SSD ON A LAPTOP PC
Chinese simple 07
English 11
German 15
Japanese 19
Korean 23
Portuguese 27
Russian 31
Romanian 35
Spanish 39
Turkish 43
Chinese traditional 47
Chinese simple 51
English 55
German 59
Japanese 63
Korean 67
Portuguese 71
Russian 75
Romanian 79
Spanish 83
Turkish 87

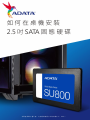
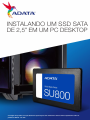
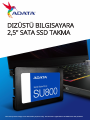
如何在桌機安裝
2.5 吋SATA 固 態 硬 碟
封面產品圖片僅示意,此說明書適用於所有威剛2.5”S S D 。

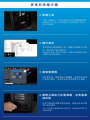
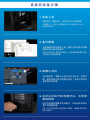
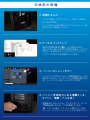
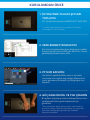
更換前準備步驟
1. 準備工具
主機、螺絲起子、新的ADATA 2.5吋SATA固態硬碟。
*請準備一支一般大小的螺絲起子(牙頭直徑歐3.5mm),
用來拆卸機殼。
2. 備份資料
在更換新的固態硬碟之前,建議先將電腦中的資
料,備份到外接式硬碟中。
*建議另外準備一顆外接式硬碟,讓更換固態硬碟的過程
不會遺失任何重要資料。
3. 請確實關機
完成備份後,請確實將主機關機,避免更換過程
中資料的遺失,或是對系統及各零組件的損害。
4. 關閉主機後方的電源鍵,並將電源
線拔除
此動作是避免微量的電流通過,會造成系統及零
件合資料損害。
*每一台主機的電源鍵位置不盡相同,請參照該主機的使
用者說明書。

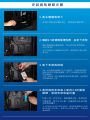
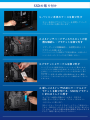
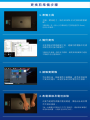
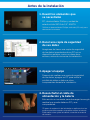
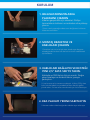
安裝固態硬碟步驟
1. 將主機機殼卸下
使用正常直徑的螺絲起子,將背板的螺絲取下。
2. 確認2.5吋硬碟插槽位置,並拆下支架
請仔細檢查主機板側面,可以找到未使用到的
2.5吋支架。
*若不知道自己的電腦該如何操作,請查閱該主機的使用
者手冊。
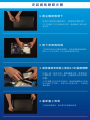
3. 取下支架與排線
*每一台主機固定硬碟的方式不盡相同,可能會有抽屜式
或是支架式來放置固態硬碟,取下方式就會有拉出托架
或支撐框架。
**卸下支架時,請仔細查看頂部或側面的螺釘,這些螺釘
可能會固定在上面。
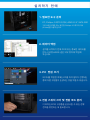
4. 將排線與支架裝上新的2.5吋固態
硬碟,放回支架或是托盤
排線上有一排金手指,固態硬碟也是,將相同的
位置對準,表示方向正確,並重新將支架或托盤
放回到插槽中。
*2.5吋排線上的接口有防呆設計,請依固態硬碟金手指與
接口對應之方向插入,如有干涉切勿強行插入,以免造成
產品損壞。

5. 重新裝上機殼
*勿過度拴緊螺絲,造成螺牙或是背蓋毀損。
6. 將電源線重新裝上,並開啟電源
鍵即完成安裝
客戶服務和技術支持
聯絡我們: https://www.adata.com/tw/support/

如何在台式电脑安装
2.5英寸SATA固态硬盘
封 面 产 品 图 片 仅 示 意 , 此 说 明 书 适 用 于 所 有 威 刚 2 . 5 ” S S D 。

更換前準備步驟
1. 準備工具
電腦主机、螺絲起子、新的ADATA固態硬盤。
*請准備一支一般大小的螺絲起子(牙頭直徑3.5mm),
用來拆卸外殼。
2. 備份數據
在更換新的固態硬盤之前,建議先將電腦中的數
據備份到外接式硬盤中。
*建議另外准備一顆外接式硬盤,讓更換固態硬盤的過程
不會遺失任何重要數据。
3. 請確認關機
完成備份后,請確認已將主機完全關閉,而非休
眠。避免更換過程中數據的遺失,或是對系統及
各零組件的損害。
4. 關閉主机后方的電源開關,并將電
源線拔除
此動作是避免微量的電流通過,仍會造成系統及
零件和數據損害。
*每一台主机的電源開關位置不盡相同,請參照該主机的
用戶說明書。

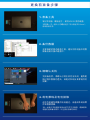
安裝固態硬盤步驟
1. 將電腦側板卸下
使用正常直徑的螺絲起子,將側板上的螺絲
取下。
2. 確認2.5吋硬盤的插槽位置,并拆下
支架
請仔細檢查主板側面,可以找到未使用到的2.5吋
支架。
*若不知道自己的電腦該如何操作,請查閱該電腦的用戶
手冊。
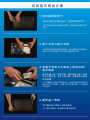
3. 取下支架与扁平電纜
*每一台電腦固定硬盤的方式不盡相同,可能会有抽屜式
或是支架式來放置固態硬盤,取下方式就會有拉出托架或
支撐框架。
**卸下支架時,請仔細查看頂部或側面的螺釘,這些螺釘
可能會固定在上面。
4. 將扁平電纜与支架裝上新的2.5吋
固態硬盤
扁平電纜上有一排金手指,固態硬盤也是,將相
同的位置對准,表示方向正确,并重新將支架或
托盤放回到插槽中。
*2.5吋扁平電纜上的接口有防呆設計,請依固態硬盤金手
指与接口對應之方向插入,如有干涉切勿強行插入,以免
造成產品損坏。

5. 重新裝上机箱側板
*勿過度擰緊螺絲,造成螺牙或是背蓋毀損。
6. 將電源線重新裝上,並開啟電源
鍵即完成安裝
客戶服務和技術支持
聯絡我們: https://www.adata.com/cn/support/

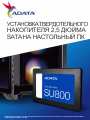
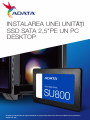
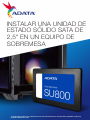
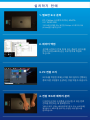
INSTALLING
A 2.5" SATA SSD
ON A DESKTOP PC
The cover product image is for illustration purposes only. This manual is applicable to all ADATA 2.5” SSD products.

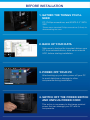
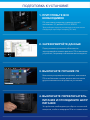
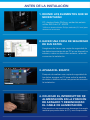
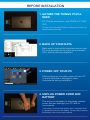
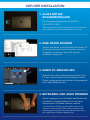
BEFORE INSTALLATION
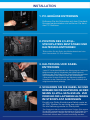
1. GATHER THE THINGS YOU'LL
NEED
PC, Phillips screwdriver,and ADATA 2.5" SATA
SSD
*Please use a standard Phillips screwdriver (3.5mm) for
disassembling the case.
2. BACK UP YOUR DATA
Make sureto backup the important data on your
PC to an external device, such as an external
HDD, before starting installation.
3. POWER OFF YOUR PC
After backing up your data, power off your PC
to avoid data loss or damage to other
components during installation.
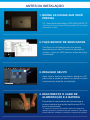
4. SWITCH OFF THE POWER SWITCH
AND UNPLUG POWER CORD
This action is necessary to discharge residual
power that can damage your PC and its
components.

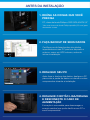
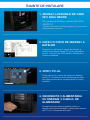
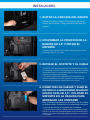
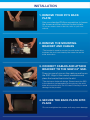
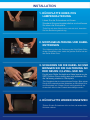
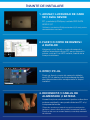
INSTALLATION
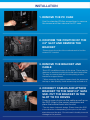
1. REMOVE THE PC CASE
Use the standard Philips screwdriver to remove
the screws and then remove the PC case
2. CONFIRM THE POSITION OF THE
2.5" SLOT AND REMOVE THE
BRACKET
*Please check the side of the motherboard to find the
unused 2.5" bracket
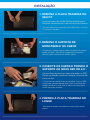
3. REMOVE THE BRACKET AND
CABLE
*Each PC has different ways to fix drives. There may be
drawers or brackets to place the solid state hard drives.
The way to remove them will involve pulling out the
bracket or support frame.
**When removing the stand, please check the screws on
the top or side carefully, these screws may be fixed on it.
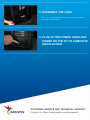
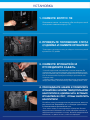
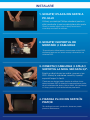
4. CONNECT CABLES AND ATTACH
BRACKET TO THE NEW 2.5" SATA
SSD. PUT THE BRACKET IN THE
SLOT TO FIX DRIVES
There is a row of pins on the cable as well as on
the SSD. Align to the correct orientation and
place the bracket back into the slot.
*The slot has a foolproof design. Please insert the SSD
in the direction corresponding to the pins on the solid
state drive and the slot.. Do not insert it forcibly to avoid
damage to the product.

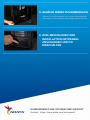
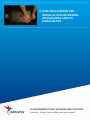
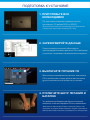
5. RESEMBLE THE CASE
*Do not overtighten the screws as it may damage the
screws ad back plate
6. PLUG IN THE POWER CORD AND
POWER ON THE PC TO COMPLETE
INSTALLATION
CUSTOMER SERVICE AND TECHNICAL SUPPORT
Contact Us: https://www.adata.com/en/support/

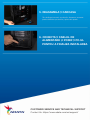
EINE2,5-ZOLL-SATA-SSDA
EINEM DESKTOP-PC
INSTALLIEREN
Das abgebildete Produktbild dient nur zur Veranschaulichung. Diese Anleitung gilt für alle ADATA 2.5” SSD-Produkte.

VOR DER INSTALLATION
1. ALLES NÖTIGE
ZUSAMMENTRAGEN
PC,KreuzschraubendreherundADATAs
2,5-Zoll-SATA-SSD
*Bitte verwenden Sie zum Demontieren des Gehäuses
einen Standard-Kreuzschraubendreher (3,5 mm).
2. IHRE DATEN SICHERN
Denken Sie daran, wichtige Daten auf Ihrem PC
auf einem externen Gerät, wie einer externen
Festplatte, zu sichern, bevor Sie mit der
Installation beginnen.
3. IHREN PC ABSCHALTEN
Schalten Sie nach Sicherung Ihrer Daten Ihren
PC aus, damit während der Installation keine
Daten verlorengehen und andere Komponenten
nicht beschädigt werden.
4. NETZSCHALTER AUSSCHALTEN
UND NETZKABEL TRENNEN
DieserVorgangistzumEntladendesReststroms
erforderlich,da andernfallsIhrPCundseine
KomponentenSchadennehmenkönnten.

INSTALLATION
1. PC-GEHÄUSE ENTFERNEN
Entfernen Sie die Schrauben mit dem Standard-
Kreuzschraubendreher und entfernen Sie dann
das PC-Gehäuse
2. POSITION DES 2,5-ZOLL-
STECKPLATZES BESTÄTIGEN UND
HALTERUNG ENTFERNEN
*Bitte prüfen Sie die Seite des Motherboards auf eine
nicht verwendete 2,5-Zoll-Halterung
3. HALTERUNG UND KABEL
ENTFERNEN
*JederPChatandereMethodenzurAnbringungderLaufwerke.
MöglicherweisegibtesSchubladenoderHalterungenzur
PlatzierungderSolid-State-Drives.DerenEntfernungbeinhaltet
dasHerausziehenderHalterungoderdesStützrahmens.
**BitteprüfenSiebeimEntfernendesStänderssorgfältigdie
SchraubenanderOberseiteoderSeite.DieseSchraubensind
möglicherweisedaranbefestigt.
4. SCHLIEßEN SIE DIE KABEL AN UND
BRINGENSIEDIEHALTERUNGAN DER
NEUEN2,5-ZOLL-SATA-SSDAN. ZUR
FIXIERUNGDERLAUFWERKEHALTERUNG
IM STECKPLATZ ANBRINGEN
Es gibt eine Reihe Kontakte am Kabel sowie an
derSSD.RichtenSie esrichtigausundplatzieren
Sie die Halterung wieder im Steckplatz.
*Der Steckplatz hat ein narrensicheres Design. Bitte setzen
Siedie SSD entsprechenddenKontaktenanSolid-State-Drive
und Steckplatz ein. Setzen Sie sie nicht gewaltvoll ein.
Andernfalls könnte das Produkt beschädigt werden.

5. GEHÄUSEWIEDERZUSAMMENBAUEN
*Ziehen Sie die Schrauben nicht zu fest, da andernfalls
Schrauben und Rückplatte beschädigt werden könnten
6. ZUM ABSCHLIEßEN DER
INSTALLATION NETZKABEL
ANSCHLIEßEN UND PC
EINSCHALTEN
KUNDENDIENST UND TECHNISCHER SUPPORT
Kontakt : https://www.adata.com/de/support/

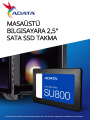
2.5インチSATA SSDのデスク
トップパソコンへの取り付け
方法
カバーの商品画像はイメージです。このマニュアルはA D A T A の す べ て の 2 . 5 ” S S D 製品に適用されます。

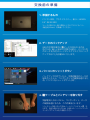
交 換 前 の 準 備
1. 準備するもの
パソコン本体、プラスドライバー、新しい ADATA
2.5" SATA SSD
*ケースの取り外し用に標準サイズのプラスドライバー(軸
径約3.5mm)を準備してください。
2.データのバックアップ
SSDの交換作業中に重要なデータが失われるの
を防ぐため、新しいSSDに交換する前に、パソコン
内のデータを外付けハードディスクドライブにバ
ックアップすることをお勧めいたします。
3. パソコンのシャットダウン
バックアップが完了したら、交換作業中のデータの
紛失やシステム、コンポーネントの破損を避けるた
め、ノートパソコンをシャットダウンします。
4. パソコン本体後方にある電源ボタンを
オフにし、電源ケーブルを抜く
残留電流によるシステム、コンポーネント、データ
の破損を避けるため、この作業を行います。
*電源 ボタンの位置はパソコンによって異なります。お使い
のノートパソコンのユーザーマニュアルをご参照ください。
Sayfa yükleniyor...
Sayfa yükleniyor...
Sayfa yükleniyor...
Sayfa yükleniyor...
Sayfa yükleniyor...
Sayfa yükleniyor...
Sayfa yükleniyor...
Sayfa yükleniyor...
Sayfa yükleniyor...
Sayfa yükleniyor...
Sayfa yükleniyor...
Sayfa yükleniyor...
Sayfa yükleniyor...
Sayfa yükleniyor...
Sayfa yükleniyor...
Sayfa yükleniyor...
Sayfa yükleniyor...
Sayfa yükleniyor...
Sayfa yükleniyor...
Sayfa yükleniyor...
Sayfa yükleniyor...
Sayfa yükleniyor...
Sayfa yükleniyor...
Sayfa yükleniyor...
Sayfa yükleniyor...
Sayfa yükleniyor...
Sayfa yükleniyor...
Sayfa yükleniyor...
Sayfa yükleniyor...
Sayfa yükleniyor...
Sayfa yükleniyor...
Sayfa yükleniyor...
Sayfa yükleniyor...
Sayfa yükleniyor...
Sayfa yükleniyor...
Sayfa yükleniyor...
Sayfa yükleniyor...
Sayfa yükleniyor...
Sayfa yükleniyor...
Sayfa yükleniyor...
Sayfa yükleniyor...
Sayfa yükleniyor...
Sayfa yükleniyor...
Sayfa yükleniyor...
Sayfa yükleniyor...
Sayfa yükleniyor...
Sayfa yükleniyor...
Sayfa yükleniyor...
Sayfa yükleniyor...
Sayfa yükleniyor...
Sayfa yükleniyor...
Sayfa yükleniyor...
Sayfa yükleniyor...
Sayfa yükleniyor...
Sayfa yükleniyor...
Sayfa yükleniyor...
Sayfa yükleniyor...
Sayfa yükleniyor...
Sayfa yükleniyor...
Sayfa yükleniyor...
Sayfa yükleniyor...
Sayfa yükleniyor...
Sayfa yükleniyor...
Sayfa yükleniyor...
Sayfa yükleniyor...
Sayfa yükleniyor...
Sayfa yükleniyor...
Sayfa yükleniyor...
Sayfa yükleniyor...
Sayfa yükleniyor...
-
 1
1
-
 2
2
-
 3
3
-
 4
4
-
 5
5
-
 6
6
-
 7
7
-
 8
8
-
 9
9
-
 10
10
-
 11
11
-
 12
12
-
 13
13
-
 14
14
-
 15
15
-
 16
16
-
 17
17
-
 18
18
-
 19
19
-
 20
20
-
 21
21
-
 22
22
-
 23
23
-
 24
24
-
 25
25
-
 26
26
-
 27
27
-
 28
28
-
 29
29
-
 30
30
-
 31
31
-
 32
32
-
 33
33
-
 34
34
-
 35
35
-
 36
36
-
 37
37
-
 38
38
-
 39
39
-
 40
40
-
 41
41
-
 42
42
-
 43
43
-
 44
44
-
 45
45
-
 46
46
-
 47
47
-
 48
48
-
 49
49
-
 50
50
-
 51
51
-
 52
52
-
 53
53
-
 54
54
-
 55
55
-
 56
56
-
 57
57
-
 58
58
-
 59
59
-
 60
60
-
 61
61
-
 62
62
-
 63
63
-
 64
64
-
 65
65
-
 66
66
-
 67
67
-
 68
68
-
 69
69
-
 70
70
-
 71
71
-
 72
72
-
 73
73
-
 74
74
-
 75
75
-
 76
76
-
 77
77
-
 78
78
-
 79
79
-
 80
80
-
 81
81
-
 82
82
-
 83
83
-
 84
84
-
 85
85
-
 86
86
-
 87
87
-
 88
88
-
 89
89
-
 90
90


