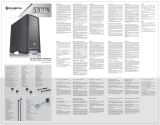
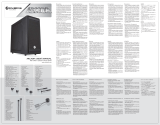
RAIJINTEK Rhea Kullanım kılavuzu
- Kategori
- Bilgisayar soğutma bileşenleri
- Tip
- Kullanım kılavuzu

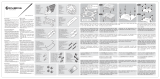
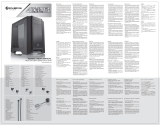
▪ Heat-sink X 1
▪ Heat-Sink X 1
▪ Radiateur X 1
▪ Disipador de calo X 1
▪ Dissipatore X 1
▪ X 1
▪
ሤጡώវ
X 1
▪ Радиатор X 1
▪ Radyatör X 1
▪ Dissipador de calor X 1
▪ Fan X 1
▪ Lüfter X 1
▪ Ventilateur X 1
▪ Ventilador X 1
▪ Ventola X 1
▪ X 1
▪
ࢲै
X 1
▪ Вентилятор X 1
▪ Fan X 1
▪ Ventoinha X 1
▪ X 2
▪ X 2
▪ Clip pour Ventilateur X 2
▪ X 2
▪ Staffe per le ventole X 2
▪ X 2
▪
ቢљ
X 2
▪ Крепления для вентилятора X 2
▪ 佲 佲 X 2
▪ Clipe Ventoinha X 2
▪ X 1
▪ X 1
▪ Pâte thermique X 1
▪ X 1
▪ Pasta Termoconduttiva X 1
▪ X 1
▪
ጱሤჼ
X 1
▪
Термо-паста
X 1
▪ X 1
▪ Pasta térmica X 1
www.raijintek.com
Creating Passion
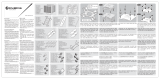
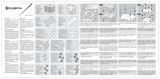
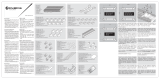
Press the Push-pin diagonally in two steps. Press the two units of Push-pin simultaneously
each time until the heat-sink can be securely clamped on the MB. To dismantle, turn
each Push-pin in a clockwise direction to return to the original position. (Orientation
is not provided for installing the heat-sink, which can be mounted on each side.)
Drücken Sie die Push-Pins diagonal in zwei Schritten nach unten. Drücken Sie die beiden
Units/Teile der Steckverbindungen gleichzeitig und vorsichtig nach unten,
bis der
Kühlkörper sicher auf dem MB und der CPU einrastet. Um den Kühler zu de
montieren
drehen Sie jeden Druckstift im Uhrzeigersinn in die Ausgangsposition zurück und
ziehen die Stifte langsam nach oben. (Installationsrichtung ist nicht für den Einbau
des Kühlkörpers vorgegeben, dieser kann auf jeder Seiten montiert werden).
Appuyer sur le "Push-Pin" diagonalement en deux étapes. Appuyer sur les deux unités
"Push-pin" simultanément jusqu'à ce que le dissipateur soit fixé à la carte mère. Pour
le démontage, tourner les "Push-pin" dans le sens horaire afin de revenir à la position
de base. (Pour l'installation du dissipateur, son orientation est libre).
Presione los anclajes de manera diagonal en dos paso. Primero presione de dos en
dos los anclajes de manera simultánea, hasta que el disipador quede bien fijado en la
placa base. Para su desmontaje, gire cada anclaje hacia la derecha, así volverá a su
posición original. (La orientación se proporciona al instalar el disipador, que puede
ser montado de cada lado).
Schiacciare il perno a pressione diagonalmente in due step. Schiacciare entrambi i
perni simultaneamente fino a che il dissipatore sarà ancorato alla motherboard. Per
rimuoverlo ruotare i perni a pressione in senso orario per riportarli alla posizione
iniziale. (Non è necessario orientare il dissipatore, che può essere montato in
qualsiasi direzione).
Нажать на крепления-штифты, расположенные по диагонали, в два этапа. Нажимать на два
крепления-штифта одновременно, каждый раз, пока пластина радиатора-теплообменника
не будет надежно прижата к материнской плате. Для снятия необходимо каждое крепление-
штифт повернуть по часовой стрелке, до возврата в исходное положение. (Ориентация
радиатора не важна, он может быть развернут в любую сторону)
Zıt köşelerdeki sabitleyici klipsleri iki adımda bastırın. Soğutucu radyatör güvenli biçimde
anakart üstüne sabitlenene kadar kenar pinleri aynı anda ikişer ikişer bastırın. Geri
çıkarmak için klipslerin üst ucunu saat yönünde orijinal konuma çevirin. (Radyatörün
yerleştirilmesi aşamasında hizalamaya yer verilmemiştir çünkü her yönde takılabilir.)
љͽ၆֎͞ё̶Ѩ˭ᑅĂՏѨТॡ˭ᑅ၆֎љሤጡቁ၁љЪٺ፟ڕ
˯ćٵעͽึॡ੫͞ШᖼՏ࣎љаזࣧώ۞ؠҜĄ
(
щ྅ѩሤጡ͞ШّĂЇң
͞ШӮΞщ྅
)
1.
Keep and store the product away from the reach of
children.
2.Check the component list and condition of the
product before installation. If there is any problem,
contact the shop where you purchased to get a
replacement or refund.
3.RAIJINTEK Co., Ltd. is not responsible for any
damages due to external causes, including but not
limited to, improper use, problems with electrical
power, accident, neglect, alteration, repair, improper
installation, and improper testing.
4.
CPU and motherboard are subject to damage if the
product in incorrectly installed.
1.
Conservez et stockez le produit hors de portée des
enfants.
2.
Vérifiez la liste des composants et l'état du produit
avant installation. En cas de problème, contactez
le magasin où vous l'avez acheté pour obtenir un
remplacement ou un remboursement.
3.
RAIJINTEK Co., Ltd. n'est pas responsable des dégâts
dus à des causes externes, y compris mais non limité
à, une mauvaise utilisation, des problèmes d'alimen-
tation électrique, un accident, une négligence,
une modification, une réparation, une installation
incorrecte ou un mauvais test.
4.Le CPU et le carte mère sont sujets à dégâts si le
produit est mal installé.
1.
2.
3.
4.
1.
ኛயݡٸཉ̈́ᐼхٺޅආΞᛈቑಛγĄ
2.
щ྅݈ኛᑭߤІϫᐂ̈́யݡېڶĄтѣЇңયᗟĂ
ኛᓑඛଋٙᔉ෴۞થظͽ೩ֻೱఱٕߏੜఱڇચĄ
3.RAIJINTEK
̳Φ̙ЇңЯγొЯ৵ౄј̝ຫεĄ
Β߁ҭ̙ࢨטٺĂ̙ዋ༊ֹ̝ϡă˧યᗟăຍγְ
Іăழنă࣒Լă࣒நă̙ዋ༊̝щ྅̙ዋ༊̝ീྏĄ
4.
̚δநጡ፟ڕд̙ϒቁгщ྅யݡ˭ٽצຫचĄ
1.Ürünü çocukların ulaşabileceği yerlerden uzakta
saklayın.
2.
Montajdan önce parça listesini ve ürünün durumunu
kontrol edin. Herhangi bir sorun varsa, yenisi almak
veya para iadesi için ürünü satın aldığınız mağaza
ile temas kurun.C
3.
RAIJINTEK Co., Ltd. hatalı kullanım, elektrik şebekesi
ile yaşanan sorunlar, kaza, ihmal, tadilat, onarım,
hatalı kurulum ve uygun olmayan test dahil ancak
bunlarla sınırlı olmamak kaydıyla hiçbir hasardan
sorumlu değildir.
4.Ürün hatalı şekilde kurulduysa işlemci ve ana kart
hasar görebilir.
1.Kindersicher aufbewahren.
2.
Prüfen Sie vor der Installation die Komponentenliste
und den Zustand des Produktes. Sollte es dabei ein
Problem gegen, wenden Sie sich an Ihren Händler
zwecks Austauschs bzw. Rückerstattung.
3.
RAIJINTEK Co., Ltd. haftet nicht für Beschädigungen
durch äußere Einflüsse, einschließlich aber nicht
beschränkt auf unsachgemäßen Gebrauch, Strom-
versorgungsprobleme, Unfall, Nachlässigkeit, Modifi-
kationen, Reparaturen, unsachgemäße Installation
und unsachgemäße Überprüfung.
4.Bei unsachgemäßer Installation können CPU und
Motherboard beschädigt werden.
1.
Mantenga el producto almacenado fuera del alcance
de los niños.
2.
Revise la lista de componentes y la condición de los
productos antes de la instalación. Si hay algún
problema contacte la tienda donde fue comprado
para que le reemplacen el producto o le devuelvan
su dinero.
3.RAIJINTEK Co., Ltd. no es responsable por daños
debido a causas externas, como, uso indebido,
problemas con la corriente eléctrica, accidentes,
negligencias, alteración, reparación, instalación
indebida y testeo indebido.
4.El procesador y placa madre pueden sufrir daño
si el producto es indebidamente instalado.
1.
Tenere il prodotto fuori dalla portata dei bambini.
2.Controllare la completezza della dotazione e le
condizioni del prodotto prima dell' installazione. Se
dovessero esserci parti mancanti o danni contattare
immediatamente il rivenditore per la sostituzione
o il rimborso.
3.
RAIJINTEK Co. Ltd.non è responsabile di danni di-
pendenti da cause esterne, inclusi uso improprio,
problemi con la corrente elettrica, cadute accidentali,
negligenza, alterazione, tentativi di riparazione o
errata installazione/testing.
4.
Le CPU e le schede madri possono essere soggette
a danneggiamento in caso di errata installazione.
1.
Храните изделие в недоступном для детей месте.
2.
Перед установкой проверьте список компонентов
и состояние изделия. При наличии проблем,
обратитесь в магазин, где вы приобрели изделие,
для замены или получения возмещения.
3.
Компания RAIJINTEK Co., Ltd. не несет ответственности
за ущерб или убытки, вызванные внешними причи-
нами, включая аварии, проблемы с электричеством,
небрежное или неправильное использование,
модификации изделия, самостоятельный ремонт,
неправильная установка или неправильное
тестирование изделия.
4.
Неправильная установка изделия может привести
к повреждению ЦПУ и материнской платы.
Precautions
Vorsichtsmaßnahmen
Précautions
Precauciones
Precauzioni
ֹϡॡڦຍ
Меры предосторожности
Önlemler
1.Manter e armazenar o produto longe do alcance
de crianças.
2.Verifique a lista de componentes e o estado do
produto antes da instalação. Se houver qualquer
problema, entre em contato com a loja onde o adquiriu
para obter uma substituição ou reembolso.
3.
RAIJINTEK Co., Ltd. não é responsável por qualquer
dano devido a causas externas, incluindo, mas não
limitado a, utilização indevida, problemas com
energia elétrica, acidente, negligência, alteração,
reparação, instalação inadequada e testagem
inadequada.
4.
CPU e placa-mãe estão sujeitas a danos se o produto
for instalado incorretamente.
Precauções
Please clean the surface of CPU before
applying the thermal grease, then apply
thermal grease evenly on CPU.
Reinigen Sie die Oberfläche der CPU
bevor Sie die Wärmeleitpaste auftragen.
Tragen Sie dann diese gleichmäßig auf
die CPU auf.
Nettoyez la surface du processeur, puis
étalez la pâte thermique de manière
homogène
Por favor, limpie la superficie de la CPU
antes de aplicar la pasta térmica, a
continuación, aplique la pasta térmica de
manera uniforme en la CPU.
Quindi , pulire con cura la superfice della
CPU, prima di applicare la pasta termica
per un ottimale scambio termico.
Пожалуйста, очистите поверхности процессора
перед нанесением термопасты, а затем
нанесите термопасту равномерно на
процессор.
Termal macun uygulamadan önce işlemci
yüzeyini temizleyin. Ardından eşit biçimde
işlemci yüzeyine termal macun sürün.
٠ጱሤჼ݈ኛАሒ
CPU
ܑࢬĂפጱ
ሤჼޢĂ֭ጱሤჼӮ̹٠д
CPU
˯Ą
Before installing the Heat-sink on the
CPU, please tear the protective film off.
Ziehen Sie den Schutzfilm vorsichtig
vom Heatsink ab, bevor Sie diesen auf
die CPU aufsetzen.
Avant d’installer le radiateur sur le
processeur, pensez à enlever le film de
protection.
Antes de instalar el disipador de calor
sobre la CPU, por favor rasgar la película
protectora.
Prima di applicare il dissipatore, sarà
necessario rimuovere il film protettivo
dall’ area che andrà a contatto con la
CPUA
Перед установкой радиатора на процессор,
снимите, пожалуйста, защитную пленку.
Radyatörü işlemci üzerine yerleştirmeden
önce alt yüzdeki koruyucu naylon kapla-
mayı çıkarın.
ሤጡغొ᜕ܲ෭৽ᇧᗓĂ᜕ܲ෭ᇧ
ᗓޢ̖Ξሤጡٸཉٺ
CPU
˯Ą
Utilize fan clips to buckle fan securely
onto heat-sink
Drücken Sie vorsichtig die Lüfterhal-
terungen nach unten um den Lüfter and
den Heat-Sink zu befestigen.
utiliser les support ventilateur pour fixer
correctement le ventilateur au dissipateur
Empuje con firmeza los clips del ventilador
hasta que llegue al cierre de seguridad
en el disipador.
Utilizzare le clip per assicurare la ventola
al dissipatore.
Используйте клипсы чтобы надежно
закрепить вентилятор к радиатору.
Pressione o Push-pin diagonalmente em duas etapas. Pressione 2 Push-pin de cada
vez, ao mesmo tempo, até que o dissipador de calor pode ser firmemente fixado na
placa-mãe. Para remover, gire cada Push-pin no sentido horário para voltar para a
posição original. (Uma orientação não é fornecida para a instalação do dissipador
de calor, que pode ser montado em ambas as orientações).
Por favor, limpe a superfície da CPU antes
de aplicar a pasta térmica, em seguida,
aplicar pasta térmica uniformemente sobre
CPU.
Antes de instalar o dissipador de calor
sobre a CPU, por favor, remova a película
protetora.
Utilize os clips para segurar a ventoinha
firmemente no dissipador de calor.
Klipsleri uygun biçimde yerine oturtarak
fanı radyatör üstünde sabitleyin.
ͽࢲैቢљؠࢲैᄃሤጡĄ
-
 1
1

RAIJINTEK Rhea Kullanım kılavuzu
- Kategori
- Bilgisayar soğutma bileşenleri
- Tip
- Kullanım kılavuzu
diğer dillerde
- español: RAIJINTEK Rhea Manual de usuario
- français: RAIJINTEK Rhea Manuel utilisateur
- italiano: RAIJINTEK Rhea Manuale utente
- 日本語: RAIJINTEK Rhea ユーザーマニュアル
- Deutsch: RAIJINTEK Rhea Benutzerhandbuch
- português: RAIJINTEK Rhea Manual do usuário
- English: RAIJINTEK Rhea User manual
- русский: RAIJINTEK Rhea Руководство пользователя
İlgili makaleler
-
 RAIJINTEK PallaS Kullanım kılavuzu
-
 RAIJINTEK Tisis Kullanım kılavuzu
-
 RAIJINTEK EREBOSS CORE EDITION Kullanım kılavuzu
-
 RAIJINTEK Zelos Kullanım kılavuzu
-
 RAIJINTEK Metis Kullanım kılavuzu
-
 RAIJINTEK Agos Kullanım kılavuzu
-
 RAIJINTEK Arcadia Kullanım kılavuzu
-
 RAIJINTEK Aeneas Kullanım kılavuzu
-
 RAIJINTEK Morpheus Core Edition Kullanım kılavuzu


