Palson 30718 El kitabı
- Kategori
- Saç düzleştiriciler
- Tip
- El kitabı
Bu kılavuz aynı zamanda aşağıdakiler için de uygundur:

Plancha de pelo
Hair straightener
Fer à lisser
Placas para alisar cabelos
Glätteisen
Piastra per i capelli
Steiltang
Sídero isiýmatov malliýn
Щипцы-выпрямители
Hajsimító
Saç düzeltici makina
Chic
Cód. 30718
MODO DE EMPLEO
OPERATING INSTRUCTIONS
MODE D’EMPLOI
MODO DE EMPRÊGO
GEBRAUCHSANLEITUNG
ISTRUZIONI
GEBRUIKSAANWIJZING
TROPOS CRHSHS
HASZNÁLATI UTASÍTÁS
KULLANMA WEKLI
�
GB
E
F
P
D
I
NL
GR
RU
AR
HU
TR
�
�

2
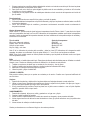
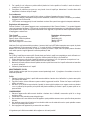
1. Finger rest
2. On/Off button
3. Operating light
4. Non-tangling swivelling power cord
5. Temperature LEDs
6. Temperature control buttons
7. “Crystal system” ceramic plates
8. Ventilation holes
1. Appui pour les doigts
2. Bouton On/Off (marche/arrêt)
3. Témoin lumineux de fonctionnement
4. Câble rotatif anti-emmêlement
5. Témoins lumineux LED indicateurs
de température
6. Boutons de contrôle de la
température
7. Plaques céramiques «crystal
system»
8. Orifices de ventilation
1. Apoio do dedo
2. Botão On/Off (ligar/desligar)
3. Luz indicadora de ligado
4. Cabo de alimentação com
dispositivo de rotação que evita que
se enrole
5. Luzes LED indicadoras da
temperatura
6. Botões de controlo da temperatura
7. Placas cerâmicas “crystal system”
8. Orifícios de ventilação
1. Fingerstütze
2. Ein-/Ausschalter (On/Off)
3. Kontrollleuchte
4. Drehkabel
5. LED-Temperaturanzeige
6. Temperaturreglerknöpfe
7. Keramikplatten „Crystal system“
8. Lüftungsöffnungen
1. Appoggio del dito
2.
Bottone On/Off (acceso / spento)
3. Spia luminosa che indica la
accensione
4. Cavo girevole anti-groviglio
5. LED luminosi che indicano la
temperatura
6. Bottoni per il controllo della
temperatura
7. Placche ceramiche “crystal system”
8. Fori di ventilazione
1. Vingersteun
2. On/Off-schakelaar (aan/uit)
3. Controlelampje “aan”
4. Snoer met draaimechanisme
5.
LED temperatuurcontrolelampjes
6. Knoppen voor het afstellen van de
temperatuur
7. Keramische “crystal system” platen
8. Ventilatieopeningen
1. Stñrigma tou daktúlou
2. Epilogéav thv qermokrasíav
3. ON/OFF (Qésh se leitourgía/
apenergopoíhsh)
4. Peristrofikó kalýdio enántia sto
mpérdema
5. Endeiktiká fýta LED éndeixhv thv
qermokrasíav
6. Koumpiá elégcou thv qermokrasíav
7. Keramikév plákev “crystal system”
8. Anoígmata exaerismoú
1. Опора для пальца
2. Кнопка Вкл./Выкл. (ON/OFF)
3. Сигнальная лампочка включения
4. Незапутывающийся вращающийся
шнур
5. Индикаторные светодиоды
температуры
6. Кнопки регулировки температуры
7. Керамические элементы “crystal
system”
8. Вентиляционные отверстия
1. Ujjtámasztó
2. ON/OFF (bekapcsolás/kikapcsolás)
gomb
3. Működésjelző lámpa
4. Összetekeredést gátló kábelcsuklós
vezeték
5. Hőmérséklet-kijelző LED lámpák
6. Hőmérséklet-ellenőrző gombok
7. „Crystal system” kerámia lapok
8. Szellőző nyílások
1. Parmakla desteklenecek nokta.
2. On/Off düxmesi (Çalñwma / Durma)
3. Iwñklñ çalñwñyor göstergesi
4. Kablo dolawmasñna karwñ çevrimli
kablo
5. Isñ derecesini gösteren LED ñwñklar
6. Isñ derecesini kontrol etmeye
yarayan düxmeler
7. “Crystal system“ seramik çubuklar
8. Havalandñrma delikleri

3
ESPAÑOL . . . . . . . . . . . . . . 4
ENGLISH . . . . . . . . . . . . . . . 6
FRANÇAIS . . . . . . . . . . . . . 8
PORTUGUÊS . . . . . . . . . . . 10
DEUTSCH . . . . . . . . . . . . . . 12
ITALIANO . . . . . . . . . . . . . . 14
NEDERLANDS . . . . . . . . . . 16
ELLHNIKA . . . . . . . . . . . . . 18
. . . . . . . . . . . . 20
. . . . . . . . . . . . . . . . . . . 23
MAGYAR . . . . . . . . . . . . . . . 24
TÜRKÇE . . . . . . . . . . . . . . . 26
GB
E
F
P
D
I
NL
GR
RU
AR
HU
TR
1. Apoyo del dedo
2. Botón On/Off (marcha/paro)
3. Luz indicadora de encendida
4. Cable giratorio anti-enredo
5. Luces LED indicadoras de temperatura
6. Botones de control de temperatura
7. Placas cerámicas “crystal system”
8. Orificios de ventilación
1 2 3
4
5
6
7
8

4
E
5
Nuestros productos están desarrollados para alcanzar los más altos estándares de calidad, funcionalidad y diseño.
Esperamos que disfrute de su nueva plancha de pelo CHIC de PALSON.
Por favor, leer atentamente las instrucciones antes de proceder al uso de este aparato.
Para disminuir los riesgos de accidente tome las siguientes precauciones:
PRECAUCIONES
1. "Desenchufar" siempre el aparato inmediatamente después de su utilización.
2. No utilizarlo mientras se está tomando un baño.
3. No colocar o guardar el aparato en un lugar donde pueda caer o pueda ser empujado hacia la bañera o el
fregadero.
4. No colocarlo ni dejarlo caer en el agua u otro líquido.
5. Si el aparato cae en el agua, "desenchufarlo" inmediatamente. No meter la mano en el agua.
6. Mantener el aparato apartado del agua.
7. Un aparato no debe dejarse nunca sin vigilancia mientras está enchufado.
8. Es necesaria una estricta supervisión cuando este aparato es utilizado por o cerca de los niños o por personas con
determinadas discapacidades.
9. Utilizar este aparato solamente para el uso para el que ha sido diseñado, tal como se indica en este manual. No
utilizar accesorios no recomendados por el fabricante.
10. Nunca hacer funcionar este aparato si tiene el cable o el enchufe dañado, si no está funcionando correctamente,
si ha caído o si está de algún modo dañado o ha caído en el agua. Llevar el aparato al servicio técnico oficial más
cercano para su examen o reparación.
11. Nunca obstruir las aberturas del aparato ni colocarlo sobre una superficie blanda, tal como una cama o lecho,
en la que las aberturas podrían quedar obstruidas. Mantener las aberturas de aire libres de hilachas, cabellos y
similares.
12. Mantener el cable apartado del calor o de superficies calientes. No enrollar el cable alrededor del aparato.
13. Nunca utilizarlo si se está soñoliento o medio dormido.
14. Nunca dejar caer ni introducir ningún objeto en las aberturas o el tubo.
15. No utilizarlo al aire libre o en lugares en los que se estén utilizando productos de aerosol (spray) o en los que se
administre oxígeno.
16. Esta unidad se calienta durante su utilización. No dejar que los ojos o la piel desnuda toquen las superficies
calientes.
17. No colocar la unidad caliente directamente sobre ninguna superficie mientras todavía esté caliente o enchufado.
18. No utilizar un cable de prolongación con este aparato.
19. Si el cable de corriente está dañado deberá ser sustituido por el fabricante, su servicio técnico autorizado o por un
técnico cualificado, con tal de evitar un peligro.
20. Este producto no está permitido para uso infantil u otras personas sin asistencia o supervisión si su estado físico,
sensorial o mental le limita de usarlo con seguridad. Los niños deberían ser supervisados para asegurar que no
juegan con dicho producto.
PELIGRO– Al igual que en la mayoría de aparatos eléctricos, los componentes eléctricos están activos incluso cuando
el interruptor está desconectado.
CONSEJOS DE SEGURIDAD PARA EL CABLE
1. Nunca tirar del cable o del aparato.
2. Para introducir el enchufe, sujetarlo firmemente y guiarlo hacia dentro de la toma de corriente.
3. Para desconectar el aparato, sujetar el enchufe y sacarlo de la toma de corriente.
4. Antes de cada utilización, inspeccionar el cable respecto a cortes y/o marcas de abrasión. Si se encuentra alguna,
esto indica que el aparato debe ser atendido y el cable sustituido.
5. Nunca enrollar el cable tensado alrededor del aparato, ya que ello podría producir tensiones excesivas en el cable
en la zona de entrada al aparato y causar roces y roturas.
NO HACER FUNCIONAR EL APARATO SI EL CABLE MUESTRA CUALQUIER DAÑO, SI EL FUNCIONAMIENTO
INDICA ALGÚN DEFECTO, SI EL APARATO FUNCIONA INTERMITENTEMENTE O SI DEJA DE FUNCIONAR POR
COMPLETO.
COMO UTILIZARLO
Este aparato es para uso doméstico y puede ser conectado a cualquier toma de corriente eléctrica AC (corriente
alterna).
Puesta en marcha
Importante: Durante los primeros minutos de uso inicial, se puede notar humo y un ligero olor. Esto es normal y no ha
de causar preocupación.

4
E
5
1. Siempre mantener las superficies calientes alejadas del contacto con todas las zonas de la piel. No tocar las placas
de alisado/prensado con las puntas de los dedos.
2. Para el pelo más corto, colocar un peine delgado de plástico entre el cuero cabelludo y el metal con el fin de evitar
el contacto con el cuero cabelludo.
3. Comprobar con una pequeña sección de cabello para determinar el valor correcto de la temperatura en función del
tipo de cabello.
Precalentamiento
1. Apoyar la plancha sobre una superficie lisa y plana, y enchufar el aparato.
2. Conectarla, establecer la temperatura en la posición deseada, y dejar que las placas se calienten; tardan unos 60-90
segundos en calentarse.
3. La luz LED indicadora deja de centellear y permanece continuamente encendida cuando es alcanzada la
temperatura deseada.
Ajustes de temperatura
Pulsar el botón "+" para aumentar el ajuste hacia una temperatura más alta. Pulsar el botón "-" para disminuir el ajuste
hacia una temperatura más baja. Las luces LED indicadoras de la temperatura centellean para indicar la temperatura
escogida. Cuando es alcanzada la temperatura deseada, las luces indicadoras de la temperatura dejan de centellear y
se iluminan con continuidad.
Tipo de cabello Ajuste de la temperatura
Muy grueso, altamente resistente (Alta) 200º
Espeso, denso, duro de enderezar (Media/Alta) 180º
Normal, en buen estado (Media) 160º/140º
Muy fino, frágil y color claro (Baja) 120º
Nota: Si la luz indicadora de potencia está encendida, y todas las luces LED indicadoras de la temperatura están
apagadas, las placas no se calentarán. Se ha de pulsar el botón "+/-" con el fin de que las placas se calienten.
Aviso: Tener mucho cuidado cuando se utilice la plancha de alisado ya que las placas se calientan mucho con el ajuste
en la temperatura más alta.
Estilo
Para la estilización, el cabello debe estar limpio. Estas placas de alisado están diseñadas para ser utilizadas con cabello
húmedo o seco. Pueden ser utilizados productos de estilización o de alisado con esta plancha.
1. Trabajar con secciones de cabello que no excedan de 6cm de ancho y 1cm de grueso.
2. Colocar el cabello entre las placas calientes y deslizar la plancha firmemente hacia abajo.
3. Mantenerlo en esta posición durante algunos segundos.
4. Liberar la presión y dejar el cabello libre.
CUIDADO Y LIMPIEZA
Este producto contiene piezas que no pueden ser revisadas por el usuario. Consultar con el personal cualificado del
servicio técnico.
Limpieza
1. Desenchufar las plancha y dejarla enfriar. Las placas deben ser limpiadas solamente cuando están frías.
2. Utilizar un trapo suave, ligeramente humedecido para limpiar la superficie de la plancha. No dejar que el agua o
cualquier otro líquido penetre por ningún orificio de la plancha.
3. Si hay acumulaciones de productos, limpie las placas con un jabón suave no abrasivo o use un líquido limpiador
específico, para ello utilice un trapo suave.
ALMACENAMIENTO
1. Desenchufar el aparato, dejar que se enfríe y guardarlo en un lugar seco y limpio.
2. Guardar el cable enrollado sin apretarlo.
3. Nunca enrollar el cable alrededor de la unidad; esto causaría un desgaste y rotura prematura del cable.
4. No dar ninguna tensión en el cable en la zona de entrada con el asa, ya que ello causaría un roce y la posible rotura
del cable.
5. Nunca sostener la unidad por el cable de potencia.
Gracias por demostrarnos su confianza al elegir uno de nuestros productos.

6
7
GB
Our products are developed to meet the highest quality, performance and design standards. We hope you enjoy your new
PALSON CHIC hair straightener.
Please read the instructions carefully before using the appliance.
To reduce any risk of accident, take the following precautions:
PRECAUTIONS
1. Always unplug the appliance immediately after use.
2. Never use the appliance while you are in the bath.
3. Do not place or store the appliance anywhere where it could fall or be pushed towards the bath or sink.
4. Do not immerse or drop into the water or any other liquid.
5. If the appliance falls into the water, unplug it immediately. Do not place your hand in the water.
6. Keep the appliance away from water.
7. An appliance should never be left unattended while it is plugged into the mains.
8. The appliance must be watched closely when it is being used by or near children or by people with certain
disabilities.
9. Use this appliance only for its intended purpose, as indicated in this manual. Do not use any accessory that is not
recommended by the manufacturer.
10. Never use this appliance if the power cord or plug is damaged, if it is malfunctioning, if it has been dropped or has
fallen into water. Take the appliance to your nearest service centre for inspection or repair.
11. Never block the appliance’s ventilation holes or place on a soft surface, such as a bed, where the openings could be
blocked. Keep the ventilation holes free of fluff, hair and similar items.
12. Keep the power cord away from sources of heat or hot surfaces. Do not coil the power cord around the appliance.
13. Do not use the appliance if you are drowsy.
14. Do not drop the appliance or insert any object in the openings or tube.
15. Do not use outdoors or in places were aerosol products (sprays) are being used or oxygen is administered.
16. This appliance becomes hot during use. Do not allow the hot surfaces to touch the eyes or bare skin.
17. Do not place the hot appliance directly on any surface while it is still hot or plugged into the mains.
18. Do not use an extension cable with this appliance.
19. If the power cord is damaged, it must be replaced by the manufacturer, its authorised technical service or a qualified
technician in order to prevent hazards.
20. This product must not be used by children or by other people without assistance or supervision if their physical,
sensory or mental condition limits safe use of the appliance. Children must be watched to make sure that they do not
play with the appliance.
DANGER – Like most electrical appliances, the electrical components are live even when the power switch is turned off.
SAFETY PRECAUTIONS FOR THE POWER CORD
1. Never pull on the power cord or appliance.
2. To plug in, hold the plug firmly and push it into the socket.
3. To unplug, hold the plug and pull out from the socket.
4. Each time before use, inspect the power cord for nicks and/or scuff marks. If you see any, the appliance should be
inspected and the power cord replaced.
5. Never coil the power cord tightly around the appliance. This could lead to excessive strain on the power cord where
it enters the appliance and cause rubbing and breakages.
DO NOT USE THE APPLIANCE IF THE POWER CORD SHOWS ANY SIGN OF DAMAGE OR THE APPLIANCE
MALFUNCTIONS, OPERATES IRREGULARLY OR DOES NOT OPERATE AT ALL.
DIRECTIONS FOR USE
This appliance is for domestic use and can be connected to any AC mains socket.
Using for the first time
Important: During the first minutes of using for the first time, you may note fumes and a slight smell. This is normal and
need not cause concern.
1. Always keep hot surfaces away from the skin. Do not touch the straightening plates with your fingertips.
2. If you have shorter hair, place a thin plastic comb between your scalp and the plates in order to prevent contact with
the scalp.
3. Check with a small section of hair that the temperature setting is right for your hair.

6
7
Preheating
1. Rest the plate on a flat, smooth surface and plug the appliance into the mains.
2. Turn on, set to the required temperature and allow the plates to heat; they take about 60-90 seconds to heat.
3. The LED stops blinking and stays lit continuously when the set temperature has been reached.
Temperature settings
Press the “+” button to increase the temperature setting. Press the “-” button to lower the temperature setting. The
temperature LEDs blink to indicate the temperature chosen. When the required temperature setting is reached, the
temperature LEDs stop blinking and remain lit continuously.
Hair type Temperature setting
Very thick and wiry (High) 200º C
Thick, bushy, hard to straighten (Medium/High) 180ºC
Normal, in good condition (Medium) 160ºC/140ºC
Very fine, fragile, light-coloured (Low) 120º C
Note: If the operating LED is lit but all the temperature LEDs are off, the plates will not heat. You must press the “+/-”
button to heat the plates.
Warning: Be very careful when using the straightening plates as they become very hot at the highest temperature
setting.
Styling
To style, the hair must be clean. The straightening plates are designed for use with wet or dry hair. You can use styling or
straightening products with these plates.
1. Work with sections of hair that do not exceed 6 cm wide and 1 cm thick.
2. Place the hair between the hot plates and press the plates firmly together.
3. Hold this position for a few seconds and pull slightly on the hair to keep it taut.
4. Release the pressure and allow the hair to come free of the plates.
CARE AND CLEANING
This product contains parts that cannot be repaired by the user. Take to qualified service technicians.
Cleaning
1. Unplug the appliance and allow the straightening plates to cool. The plates should only be cleaned when fully
cooled.
2. Use a soft, slightly damp cloth to clean the handle. Do not allow water or any other liquid to enter the handle.
3. If material should build up on the plates, clean with a mild, gentle soap or a special cleaning fluid and wipe with a soft
cloth.
STORAGE
1. Unplug the appliance, allow to cool and store in a clean, dry place.
2. Coil the power cord loosely.
3. Never coil the power cord around the appliance; this will cause wear and premature cord breakage.
4. Never strain the power cord in the area where it enters the handle. This will cause rubbing and breakages.
5. Never hold the appliance by the power cord.
Thank you for choosing one of our products.

8
9
F
Nos produits sont développés pour répondre aux standards de qualité, de fonctionnalité et de design les plus élevés.
Nous espérons que vous profiterez de votre nouveau fer à lisser CHIC de PALSON.
Veuillez lire attentivement la notice avant d’utiliser cet appareil.
Afin de réduire les risques d’accident, prenez les précautions suivantes:
PRECAUTIONS
1. «Débranchez» toujours l’appareil immédiatement après l’avoir utilisé.
2. Ne l’utilisez pas pendant que vous êtes en train de prendre un bain.
3. Ne placez pas l’appareil ou ne le rangez pas dans un endroit où il pourrait tomber ou être poussé dans une baignoire
ou dans un lavabo.
4. Ne le mettez pas et ne le laissez pas tomber dans l’eau ou dans tout autre liquide.
5. Si l’appareil tombe dans l’eau, «débranchez-le» immédiatement. Ne mettez pas les mains dans l’eau.
6. Gardez l’appareil éloigné de l’eau.
7. Ne laissez jamais l’appareil sans surveillance alors qu’il est branché.
8. Une surveillance stricte est indispensable lorsque cet appareil est utilisé par ou à proximité d’enfants ou de personnes
présentant certains handicaps.
9. Ne destinez cet appareil qu’à l’usage pour lequel il a été conçu, comme indiqué dans cette notice. N’utilisez pas des
accessoires non recommandés par le fabricant.
10. Ne faites jamais fonctionner cet appareil si le câble ou la fiche sont endommagés, s’il ne fonctionne pas correctement,
s’il est tombé, s’il a souffert un dommage quelconque ou est tombé dans l’eau. Remettez l’appareil au service
technique le plus proche pour examen ou réparation.
11.
N’obstruez jamais les ouvertures de l’appareil, ne le déposez pas sur une surface molle, comme un lit, qui pourrait
boucher les ouvertures. Gardez les ouvertures d’air libres de fils, de cheveux et autres éléments.
12. Gardez le câble éloigné de la chaleur ou de surfaces chaudes. N’enroulez pas le câble autour de l’appareil.
13. N’utilisez jamais l’appareil si vous êtes somnolent ou à moitié endormi.
14. N’introduisez et ne laissez jamais tomber des objets dans les ouvertures ou dans le cylindre.
15. N’utilisez pas l’appareil à l’air libre ou dans des endroits où des produits en aérosol (spray) sont utilisés ou dans
lesquels de l’oxygène est administré.
16. Cette unité s’échauffe en cours d’utilisation. Ne laissez pas les yeux ou la peau nue entrer en contact avec les
surfaces chaudes.
17. Ne placez pas l’appareil directement sur une surface alors qu’il est encore chaud ou branché.
18. N’utilisez pas une allonge avec cet appareil.
19. Si le câble d’alimentation est endommagé, il devra être remplacé par le fabricant, par son service technique agréé
ou par un technicien qualifié afin d’éviter tout danger.
20. Ce produit ne peut pas être utilisé par des enfants ou d’autres personnes sans aide ou sans surveillance si leur état
physique, sensoriel ou mental ne leur permet de l’utiliser en toute sécurité. Les enfants devraient être surveillés pour
s’assurer qu’ils ne jouent pas avec ce produit.
DANGER– Tout comme dans la plupart des appareils électriques, les composants électriques restent actifs même lorsque
l’interrupteur est éteint.
CONSEILS DE SECURITE POUR LE CABLE
1. Ne tirez jamais sur le câble ou l’appareil.
2. Pour introduire la fiche dans la prise de courant, saisissez-la fermement et guidez-la dans la prise.
3. Pour débrancher l’appareil, saisissez la fiche et retirez-la de la prise de courant.
4. Avant chaque utilisation, inspectez le câble pour vous assurer qu’il ne présente pas des coupures et/ou des signes
d’abrasion. Si ce n’est pas le cas, une intervention est indispensable et le câble doit être remplacé.
5. N’enroulez jamais le câble tendu autour de l’appareil, car cela pourrait produire des tensions excessives sur le câble
dans la zone d’entrée dans l’appareil et provoquer des frottements et des ruptures.
NE FAITES PAS FONCTIONNER L’APPAREIL SI LE CABLE EST ENDOMMAGE, SI LE FONCTIONNEMENT DE
L’APPAREIL INDIQUE UN DEFAUT QUELCONQUE, SI L’APPAREIL FONCTIONNE DE MANIERE INTERMITTENTE
OU S’IL S’ARRETE COMPLETEMENT DE FONCTIONNER.
COMMENT L’UTILISER
Cet appareil est destiné à un usage domestique et il peut être branché à n’importe quelle prise de courant électrique AC
(courant alternatif).
Mise en marche
Important: Durant les premières minutes de la première utilisation, l’appareil peut dégager de la fumée et une légère
odeur. Ceci est normal et ne doit pas vous préoccuper.

8
9
I
1. Evitez que les surfaces chaudes n’entrent en contact avec toute zone de la peau. Ne touchez pas les plaques de
lissage avec le bout des doigts.
2. Pour les cheveux plus courts, placez une peigne fin en plastique entre le cuir chevelu et le métal afin d’éviter un
contact direct avec le cuir chevelu.
3. Faites un essai sur une petite mèche de cheveux pour déterminer la valeur correcte de la température en fonction
du type de cheveux.
Préchauffage
1. Déposez le fer sur une surface lisse et plane et branchez l’appareil.
2. Allumez l’appareil, amenez la température sur la position voulue et laissez chauffer les plaques ; les plaques
tarderont environ 60-90 secondes à chauffer.
3.
Le témoin lumineux LED arrêtera de clignoter et restera allumé de manière continue lorsque la température voulue
sera atteinte
.
Réglage de la température
Appuyez sur le bouton «+» pour augmenter le réglage jusqu’à une température plus élevée. Appuyez sur le bouton
«-» pour diminuer le réglage vers une température plus basse. Les témoins lumineux LED indicateurs de température
clignotent pour indiquer la température choisie. Lorsque la température voulue est atteinte, les témoins lumineux
indicateurs de température arrêtent de clignoter et restent allumés de manière continue.
Types de cheveux Réglage de la température
Très épais, très résistants (Elevée) 200º
Epais, denses, difficiles à lisser (Moyenne/Elevée) 180º
Normaux, en bon état (Moyenne) 160º/140º
Très fins, fragiles et de couleur claire (Basse) 120º
Note: Si le témoin lumineux d’alimentation est allumé et que tous les témoins lumineux LED indicateurs de température
sont éteints, les plaques ne chaufferont pas. Vous devrez appuyer sur le bouton «+/-» pour que les plaques chauffent.
Attention: Faites très attention lorsque vous utilisez les plaques de lissage, car elles chauffent énormément si elles sont
réglées sur la température la plus élevée.
Lissage
Pour lisser les cheveux, ceux-ci doivent être propres. Ces plaques de lissage sont conçues pour être utilisées sur des
cheveux humides ou secs. Des produits coiffants ou lissants peuvent être utilisés avec ces plaques.
1. Travaillez des sections de cheveux ne dépassant pas 6 cm de largeur et 1 cm d’épaisseur.
2. Placez les cheveux entre les plaques chaudes et serrez fermement.
3.
Conservez-les dans cette position pendant quelques secondes et tirez sur les cheveux en maintenant une légère tension.
4. Libérez la pression exercée sur la poignée et laissez les cheveux s’échapper.
ENTRETIEN ET NETTOYAGE
Ce produit contient des pièces qui ne peuvent pas être révisées par l’utilisateur. Consultez le personnel qualifié du service technique.
Nettoyage
1. Débranchez le fer à lisser et laissez-le refroidir. Les plaques ne doivent être nettoyées que lorsqu’elles sont froides.
2. Utilisez un linge doux, légèrement humide pour nettoyer la poignée. Ne laissez pas entrer de l’eau ou tout autre
liquide dans la poignée.
3. En cas d’accumulation de produits, nettoyez les plaques avec un savon doux non abrasif ou utilisez un liquide
nettoyant pour fers à lisser et nettoyez-les à l’aide d’un linge doux.
RANGEMENT
1. Débranchez l’appareil, laissez-le refroidir et rangez-le dans un endroit sec et propre.
2. Gardez le câble enroulé sans le serrer.
3. N’enroulez jamais le câble autour de l’appareil, car cela provoquerait son usure ou sa rupture prématurée.
4. N’effectuez aucune tension sur le câble dans la zone d’entrée avec la poignée, car cela provoquerait un frottement
et la rupture éventuelle du câble.
5. Ne tenez jamais l’appareil par le câble d’alimentation.
Merci de nous démontrer votre confiance en choisissant l’un de nos appareils.

10
11
P
Os nossos produtos são concebidos para atingir os mais altos níveis de qualidade, funcionalidade e design. Esperamos
que aproveite as suas novas placas para alisar os cabelos CHIC da PALSON.
Leia atentamente as
instruções
antes de utilizar este aparelho.
Para minimizar os riscos de acidentes, observe as precauções descritas a seguir.
PRECAUÇÕES
1. Desligar sempre o aparelho da tomada eléctrica imediatamente após a sua utilização.
2. Não utilizar o aparelho durante o banho.
3. Não pôr ou guardar o aparelho em lugares onde possa cair ou ser empurrado para a banheira ou a pia.
4. Não pôr nem deixar o aparelho cair na água ou qualquer outro líquido.
5. Se o aparelho cair na água, desligá-lo imediatamente da tomada. Não meter a mão na água.
6. Manter o aparelho afastado da água.
7. O aparelho nunca deve ser deixado sem observação quando estiver ligado.
8. É necessário haver uma estrita supervisão quando este aparelho for utilizado por ou perto de crianças ou por
pessoas com determinadas deficiências.
9. Utilizar o aparelho apenas para a finalidade para a qual foi concebido, conforme indica este manual. Não utilizar
acessórios
não recomendados pelo fabricante.
10. Nunca pôr o aparelho a funcionar se: o cabo de alimentação ou a ficha estiverem danificados; não estiver a funcionar
correctamente; tiver caído; apresentar algum tipo de dano; ou tiver caído à água. Levar o aparelho ao serviço de
assistência técnica mais próximo para exame ou reparação.
11.
Nunca obstruir as suas aberturas nem pôr o aparelho sobre superfícies brandas (como uma cama), onde as
aberturas possam ficar obstruídas. Manter as aberturas de circulação de ar livres de fiapos, cabelos e coisas
similares.
12. Manter o cabo de alimentação afastado de fontes de calor ou de superfícies quentes. Não enrolar o cabo de
alimentação à volta do aparelho.
13. Nunca utilizar o aparelho se estiver sonolento ou meio adormecido.
14. Nunca deixar cair nem introduzir objectos nas aberturas ou no tubo.
15. Não utilizar o aparelho ao ar livre nem em lugares onde estejam sendo usados produtos em aerossol (spray) ou
esteja sendo administrado oxigénio.
16. Este aparelho aquece-se durante a utilização. Não permitir que as superfícies quentes toquem os olhos ou a pele
directamente.
17. Não pôr o aparelho directamente sobre qualquer superfície enquanto ainda estiver quente ou ligado à tomada.
18. Não utilizar cabos de extensão para ligar o aparelho.
19. Se o cabo de alimentação estiver danificado, a fim de evitar perigos, deverá ser substituído apenas pelo fabricante,
pelo serviço técnico autorizado ou por um técnico qualificado.
20. Sem assistência ou supervisão, não é permitido o uso deste aparelho por crianças ou por pessoas cujo estado físico,
sensorial ou mental represente uma limitação para uma utilização segura. As crianças deverão ser supervisionadas
para evitar que brinquem com o aparelho.
PERIGO – Da mesma forma que ocorre com a maioria de aparelhos eléctricos, os componentes eléctricos estão activos
inclusivamente quando o interruptor está desligado.
CONSELHOS DE SEGURANÇA SOBRE O CABO DE ALIMENTAÇÃO
1. Nunca puxar o cabo nem o aparelho.
2. Para introduzir a ficha na tomada, pegar firmemente nela e guiá-la para dentro.
3. Para desligar o aparelho da tomada, puxar firmemente pela ficha.
4. Antes de cada utilização, inspeccionar o cabo de alimentação para verificar se não apresenta cortes e/ou marcas de
abrasão. Se observar alguma dessas coisas, o cabo de alimentação do aparelho deverá ser substituído.
5. Nunca enrolar o cabo de alimentação esticado à volta do aparelho. Isso poderia causar tensões excessivas no cabo,
na zona de entrada ao aparelho, e causar raspaduras ou rupturas.
NÃO PÔR O APARELHO A FUNCIONAR SE O CABO DE ALIMENTAÇÃO APRESENTAR QUALQUER DANO,
SE O FUNCIONAMENTO DO APARELHO INDICAR ALGUM DEFEITO, SE O APARELHO FUNCIONAR
INTERMITENTEMENTE OU SE DEIXAR DE FUNCIONAR POR COMPLETO.
MODO DE USAR
Este aparelho está destinado ao uso doméstico e pode ser ligado a qualquer tomada de corrente eléctrica alternada (CA).
Pôr a funcionar
Importante - Durante os primeiros minutos da primeira vez que o aparelho for utilizado é possível notar um pouco de
fumo e um ligeiro odor. Isto é normal e não deve ser causa de preocupação.

10
11
GR
1. Impedir o contacto das superfícies quentes com qualquer zona da pele. Não tocar as placas de alisar/prensar com
as pontas dos dedos.
2. Com cabelos mais curtos, pôr um pente fino de plástico entre o couro cabeludo e o metal, a fim de evitar o contacto
com o couro cabeludo.
3.
Testar numa pequena porção de cabelo para determinar o valor correcto da temperatura em função do tipo de cabelo.
Pré-aquecimento
1. Apoiar o aparelho sobre uma superfície lisa e plana e ligar à tomada eléctrica.
2. Ligar, estabelecer a temperatura desejada e esperar o aquecimento das placas, o que demora entre 60 e 90
segundos.
3. A luz LED indicadora pára de piscar, permanecendo acesa de forma contínua, quando a temperatura pretendida é
atingida.
Ajuste da temperatura
Premir o botão “+” para aumentar a temperatura. Premir o botão “-” para reduzir a temperatura. As luzes LED indicadoras
da temperatura piscam para indicar a temperatura escolhida. Quando a temperatura pretendida é atingida, as luzes
indicadoras da temperatura param de piscar, permanecendo acesas de forma contínua.
Tipo de cabelo
Ajuste da temperatura
Muito grosso, muito resistente (Alta) 200º C
Espesso, denso, difícil de alisar (Média/Alta) 180º C
Normal, em bom estado (Média) 160º C/140º C
Muito fino, frágil e de cor clara (Baixa) 120º C
Nota: Se a luz indicadora de potência estiver acesa e todas as luzes LED indicadoras de temperatura estiverem
apagadas, as placas não se aquecerão. Será preciso premir o botão “+/-” para que se aqueçam as placas.
Aviso - Ter muito cuidado ao utilizar as placas para alisar cabelos, uma vez que se aquecem muito quando estão
ajustadas para a temperatura mais alta.
Estilo
Para a estilização, os cabelos devem estar limpos. Estas placas de alisamento estão concebidas para serem utilizadas
com os cabelos húmidos ou secos. As placas permitem o uso de produtos de estilização ou de alisamento.
1. Trabalhar com secções de cabelo com uma largura e espessura máximas de 6 cm e 1 cm, respectivamente.
2. Situar os cabelos entre as placas quentes e apertar firmemente para baixo.
3. Mantê-los nesta posição durante alguns segundos. Puxar os cabelos para baixo, mantendo um pouco de tensão.
4. Deixar de pressionar, permitindo que os cabelos se soltem.
CUIDADO E
LIMPEZA
Este aparelho contém peças que não podem ser revisadas pelo utilizador. Consultar o pessoal qualificado do serviço de
assistência técnica.
Limpeza
1. Desligar o aparelho da tomada e deixar que arrefeça. As placas devem ser limpas apenas quando estiverem frias.
2. Utilizar um pano macio e ligeiramente humedecido para limpar as partes externas. Não permitir que entre água ou
qualquer outro líquido no aparelho.
3. Se houver produtos acumulados, limpar as placas com um sabão suave não abrasivo ou usar um líquido limpador
de placas de alisamento e limpar com um pano macio.
ARMAZENAMENTO
1. Desligar o aparelho da tomada, deixar arrefecer e guardá-lo num lugar seco e limpo.
2. Guardar o cabo enrolado sem apertar.
3. Nunca enrolar o cabo de alimentação à volta da unidade; isso causaria desgaste e ruptura prematura do cabo de
alimentação.
4. Não deixar o cabo de alimentação tenso na zona de entrada ao aparelho, uma vez que isso causaria atrito e a
possível ruptura do cabo de alimentação.
5. Nunca levantar o aparelho pelo cabo de alimentação.
Obrigado pela confiança demonstrada ao escolher um dos nossos produtos.

12
13
D
Unsere Produkte sind auf höchste Ansprüche hinsichtlich Qualität, Funktionsfähigkeit und Design ausgelegt. Wir hoffen,
dass Sie mit Ihrem neuen Glätteisen CHIC von PALSON zufrieden sein werden.
Lesen Sie bitte die Gebrauchsanweisung vor der Benutzung dieses Gerätes aufmerksam durch.
Beachten Sie die folgenden Vorsichtsmaßnahmen zur Vermeidung von Unfällen:
VORSICHTSMAßNAHMEN
1. Ziehen Sie den Stecker sofort nach Gebrauch ab.
2. Benutzen Sie das Gerät nicht während Sie baden.
3. Legen Sie das Gerät nirgends ab, wo es in die Badewanne oder ins Spülbecken fallen oder gestoßen werden
kann.
4. Lassen Sie es nicht in Wasser oder andere Flüssigkeiten fallen.
5. Wenn der Apparat ins Wasser fällt, ziehen Sie sofort den Stecker ab. Aber stecken Sie nicht die Hand ins Wasser.
6. Halten Sie das Gerät vom Wasser fern.
7. Der Apparat darf nicht unbeaufsichtigt bleiben, solange er eingeschaltet ist.
8. Bei der Benutzung elektrischer Geräte von oder in der Nähe von Kindern oder Behinderten ist größte Aufmerksamkeit
geboten.
9. Verwenden Sie das Gerät nur für den Zweck, für den es vorgesehen ist, so wie es in der Bedienungsanleitung steht.
Verwenden Sie keine Zubehörteile, die nicht vom Hersteller empfohlen wurden.
10. Benutzen Sie das Gerät nicht mit beschädigtem Kabel oder Buchse, oder wenn es nicht richtig funktioniert,
heruntergefallen ist, beschädigt oder ins Wasser gefallen ist. Bringen Sie den Apparat zum nächst gelegenen
Kundendienst zur Untersuchung oder Reparatur.
11. Verstopfen Sie nicht die Öffnungen und legen das Gerät nicht auf eine weiche Oberfläche, wie ein Bett, wo die
Öffnungen verstopfen könnten. Halten Sie die Öffnungen frei von Fusseln, Haaren o.ä.
12. Halten Sie das Kabel fern von Hitze oder heißen Oberflächen. Wickeln Sie das Kabel nicht um das Gerät.
13. Gebrauchen Sie das Gerät nicht, wenn Sie schläfrig oder halb eingeschlafen sind.
14. Stecken Sie keine Fremdkörper in die Öffnungen.
15. Benutzen Sie den Apparat nicht im Freien oder in der Nähe von Sprühdosen (Sprays) oder Sauerstoffspendern.
16.
Dieses Produkt wird beim Gebrauch sehr heiß. Berühren Sie daher keine heißen Flächen mit den Augen oder der Haut.
17. Legen Sie es nicht direkt auf eine Fläche, solange es heiß oder eingeschaltet ist.
18. Verwenden Sie bei diesem Apparat kein Verlängerungskabel.
19. Ein beschädigtes Stromkabel ist vom Hersteller oder seinem autorisierten Kundendienst zu ersetzen oder durch
einen ausgebildeten Techniker, um Gefahren zu verhindern.
20. Dieses Produkt darf nicht von Kindern benutzt werden oder von sonstigen Personen, bei denen aufgrund der
körperlichen, sensorischen oder geistigen Verfassung ein sicherer Gebrauch ohne Hilfe oder Beaufsichtigung
einschränkt ist. Kinder sind zu beaufsichtigen, um sicherzustellen, dass sie das Produkt nicht zum Spielen
benutzen.
GEFAHR – Wie bei den meisten elektrischen Apparaten sind die elektrischen Komponenten auch noch aktiv, wenn das
Gerät ausgeschaltet ist.
SICHERHEITSEMPFEHLUNGEN FÜR DAS KABEL
1. Ziehen Sie nie am Kabel oder am Apparat.
2. Halten Sie den Stecker fest und führen ihn in die Steckdose ein.
3. Zum Ausschalten ziehen Sie den Stecker aus der Steckdose.
4. Prüfen Sie das Kabel vor jedem Gebrauch auf Schnitte oder Scheuerstellen. Wenn Sie eine beschädigte Stelle
finden, muss das Kabel ausgewechselt werden.
5. Rollen Sie das Kabel nicht fest um den Apparat auf. Das könnte zu übermäßigen Spannungen am Kabeleintritt in den
Apparat führen und Reibungen oder Kabelbruch verursachen.
BENUTZEN SIE DEN APPARAT NICHT, WENN DAS KABEL EINEN SCHADEN AUFWEIST, WENN IRGENDEIN
DEFEKT VORLIEGT, WENN DER APPARAT NUR MIT UNTERBRECHUNGEN ARBEITET ODER GAR NICHT MEHR
FUNKTIONIERT.
GEBRAUCH
Dieses Gerät ist für den häuslichen Gebrauch vorgesehen und kann an jede Wechselstrom-Steckdose angeschlossen
werden.
Benutzung
Wichtiger Hinweis: In den ersten Minuten beim Benutzen des Gerätes kann Rauch oder ein leichter Geruch festgestellt
werden. Das ist völlig normal und sollte Sie nicht beunruhigen.

12
13
AR
1. Halten Sie die heißen Oberflächen stets fern von Ihrer Haut. Berühren Sie die Glättplatten nicht mit den
Fingerspitzen.
2. Legen Sie bei kürzeren Haaren einen dünnen Kunststoffkamm zwischen Kopfhaut und Metall, damit die Kopfhaut
nicht von dem Gerät berührt wird.
3. Prüfen Sie mit einer Haarsträhne, welche Temperatur bei welchem Haartyp zu verwenden ist.
Vorheizen
1. Legen Sie das Glätteisen auf eine glatte, ebene Fläche und stecken den Stecker in die Steckdose.
2. Schalten Sie den Apparat ein und bestimmen die gewünschte Temperatur. Die Platten benötigen ca. 60-90
Sekunden, um heiß zu werden.
3. Die LED-Anzeige hört auf zu blinken und bleibt eingeschaltet, wenn die gewünschte Temperatur erreicht ist.
Temperatureinstellung
Drücken Sie den Einstellknopf „+”, um die Temperatur zu erhöhen. Drücken Sie den Einstellknopf „-“, um die Temperatur
zu verringern. Die LED-Anzeigen blinken, um die gewählte Temperatur anzuzeigen. Wenn die gewünschte Temperatur
erreicht ist, hört das Blinken auf, und die LED-Anzeigen bleiben eingeschaltet.
Haartyp Temperatureinstellung
Sehr dick und widerstandsfähig (Hoch) 200º
Voll, dicht, schwer zu glätten (Mittel/Hoch) 180º
Normal, gesund (Mittel) 160º/140º
Sehr fein, brüchig und hell (Niedrig) 120º
Hinweis: Ist die Kontrollleuchte eingeschaltet, aber alle LED-Anzeigeleuchten ausgeschaltet, heizen die Platten nicht auf.
Drücken Sie den Knopf „+/-“ , damit die Platten aufheizen.
Hinweis: Seien Sie sehr vorsichtig beim Benutzen der Platten, da diese bei der höchsten Temperatureinstellung sehr
heiß werden.
Styling
Für das Styling sollen die Haare sauber sein. Diese Platten sind für den Gebrauch bei feuchtem oder trockenem Haar
vorgesehen. Mit den Metallplatten können auch Stylingprodukte verwendet werden.
1. Nehmen Sie sich immer Haarpartien vor, die nicht breiter als 6 cm und nicht dicker als 1 cm sind.
2. Legen Sie die Haare zwischen die heißen Platten und drücken fest nach unten.
3. Halten Sie den Apparat einige Sekunden in dieser Stellung und ziehen Sie ein bisschen am Haar.
4. Lösen Sie die Spannung und lassen das Haar los.
PFLEGE UND REINIGUNG
Dieses Produkt enthält Teile, die nicht vom Benutzer überprüft werden können. Lassen Sie sich ggf. vom Kundendienst
beraten.
Reinigung
1. Nehmen Sie den Stecker ab und lassen die Platten abkühlen. Die Platten können erst gereinigt werden, wenn sie
abgekühlt sind.
2. Verwenden Sie einen weichen, leicht befeuchteten Lappen, um den Griff zu reinigen. Lassen Sie kein Wasser oder
sonstige Flüssigkeiten in den Griff eindringen.
3. Bilden sich Ablagerungen auf den Platten, reinigen Sie diese mit einem milden, nicht scheuernden Reinigungsmittel,
oder verwenden Sie ein spezielles Reinigungsmittel für Glätteisen und einen weichen Lappen.
AUFBEWAHRUNG
1.
Ziehen Sie den Stecker ab, lassen Sie das Gerät abkühlen und bewahren Sie es an einem trockenen, sauberen Ort auf.
2. Bewahren Sie das Kabel leicht aufgerollt auf, sodass es nicht gedrückt wird.
3. Rollen Sie das Kabel nicht um das Gerät auf; es könnte zu frühzeitigem Verschleiß oder Kabelbruch kommen.
4. Ziehen Sie nicht zu stark am Kabeleintritt in den Apparat; das könnte Reibungen oder Kabelbruch verursachen.
5. Halten Sie das Gerät nicht am Kabel fest.
Vielen Dank, dass Sie eines unserer Produkte ausgewählt haben.

14
15
I
I nostri prodotti sono stati sviluppati per raggiungere i più elevati standard qualitativi, di funzionalità e design. Ci auguriamo
che possiate usufruire pienamente della vostra nuova piastra per capelli CHIC di PALSON.
Vi preghiamo di leggere attentamente le istruzioni prima di incominciare ad utilizzare questo apparecchio.
Per diminuire i rischi di incidenti, si devono prendere le seguenti precauzioni:
PRECAUZIONI
1. Staccare sempre immediatamente l’apparato dalla presa di corrente quando si è terminato di utilizzarlo.
2. Non utilizzarlo mentre si sta facendo il bagno.
3. Non collocare o conservare l’apparato in un luogo da cui possa cadere o da cui possa venire spinto verso la vasca
da bagno o il lavandino.
4. Non immergerlo né lasciarlo cadere in acqua o in nessun altro liquido.
5. Se l’apparato cadesse in acqua si deve staccare immediatamente la spina dalla corrente. Non immergere la mano
nell’acqua.
6. Mantenere l’apparato lontano dall’acqua.
7. Questo tipo di apparato non deve mai essere lasciato senza controllo quando è collegato alla corrente.
8. Quando questo apparecchio viene utilizzato da bambini o vicino a loro, o da persone con determinate limitazioni, è
consigliabile uno stretto controllo.
9. Questo apparecchio va utilizzato solamente per l’ uso per cui è stato progettato, cosí come si indica in questo
manuale. Non utilizzare accessori che non siano stati raccomandati dal fabbricante.
10. Non mettere mai in funzione questo apparecchio se il cavo elettrico o la presa di corrente sono danneggiati, se non
funziona in modo corretto, se è caduto o risulta danneggiato in qualsiasi modo, o se è caduto in acqua. Portare
l’apparecchio al servizio di assistenza piú vicino affinché possa venire controllato o riparato.
11. Non ostruire mai le aperture dell’apparecchio, e non collocarlo su superfici morbide, come un letto o un materasso,
su cui le aperture potrebbero rimanere ostruite. Mantenere le aperture dell’aria libere da fili, capelli, ecc.
12. Mantenere il cavo elettrico lontano dal calore o da superfici calde. Non arrotolare il cavo intorno all’apparecchio.
13. Evitare di utilizzarlo in caso di sonnolenza o se si è mezzo addormentati.
14. Non lasciare mai cadere né introdurre nessun oggetto nei fori o nel tubo.
15.
Non utilizzarlo all’aperto o in luoghi in cui si stiano utilizzando prodotti ad aerosol (spray) o in cui si sta somministrando ossigeno.
16. Questo apparecchio si surriscalda durante il suo uso. Non lasciare che gli occhi o la pelle nuda vengano in contatto
con le superfici calde.
17. Quando l’apparecchio è acceso o ancora caldo, evitare di collocarlo direttamente su qualunque superficie.
18. Con questo apparecchio non si deve utilizzare prolunga.
19. Se il cavo elettrico è danneggiato dovrà essere sostituito dal fabbricante, dal servizio tecnico autorizzato o da un
tecnico qualificato, in maniera tale da evitare eventuali pericoli.
20. Non si consente l’uso di questo prodotto a bambini o ad altre persone senza assistenza o controllo qualora il loro stato
fisico, sensoriale o mentale non ne consentano l’uso sicuro. I bambini dovrebbero essere controllati per assicurarsi
che non giochino con detto prodotto.
PERICOLO – Come succede per la maggior parte degli apparati elettrici, i componenti elettrici sono attivi anche quando
l’interruttore è spento.
CONSIGLI DI SICUREZZA PER IL CAVO ELETTRICO
1. Non tirare mai il cavo elettrico.
2. Per collegare la spina, afferrarla saldamente e guidarla verso l’interno della presa di corrente.
3. Per scollegare l’apparecchio si deve afferrare la spina ed estrarla dalla presa di corrente.
4. Prima di utilizzarlo, controllare sempre che il cavo elettrico non presenti tagli e/o segni di abrasione. In caso positivo
si deve intervenire sull’apparecchio e sostituire il cavo elettrico.
5. Non si deve mai arrotolare strettamente il cavo intorno all’apparato, in quanto questo potrebbe produrre una
eccessiva tensione del cavo nella zona di entrata dell’apparato e potrebbe causare frizioni e rotture.
NON METTERE IN FUNZIONE L’APPARATO SE IL CAVO PRESENTA DANNI DI QUALSIASI TIPO O SE IL
FUNZIONAMENTO DELL’ APPARATO INDICA QUALCHE DIFETTO, O SE L’APPARATO FUNZIONA IN MODO
INTERMITTENTE O SE SMETTE DI FUNZIONARE DEL TUTTO.
COME UTILIZZARLO
Il presente apparecchio è destinato a uso domestico e puó essere collegato a qualsiasi presa di corrente elettrica AC
(corrente alterna).
Messa in funzione
Importante: Durante i primi minuti di utilizzo, si potrebbe notare del fumo e un leggero odore. Si tratta di una situazione
normale e non deve causare preoccupazione.
1. Mantenere sempre le superfici calde lontane da punti di contatto con la pelle. Non toccare le piastre con la punta
delle dita.

14
15
TR
2. Per i capelli piú corti, collocare un pettine sottile di plastica tra il cuoio capelluto e il metallo, in modo da evitarne il
contatto con il cuoio capelluto.
3. Consigliamo di realizzare una prova con una piccola ciocca di capelli per determinare il corretto valore della
temperatura in funzione del tipo di capelli.
Pre-riscaldamento
1. Appoggiare la piastra su una superficie liscia e piana, e collegare l’apparato alla presa di corrente.
2. Accenderlo, stabilire la temperatura nella posizione desiderata, e lasciare che le piastre si riscaldino; per scaldarsi,
impiegano circa 60-90 secondi.
3.
Il LED luminoso non lampeggerà piú in modo intermittente ma rimarrà fisso quando viene raggiunta la temperatura desiderata.
Regolazione della temperatura
Premere il bottone “+” per portare l’apparato verso una temperatura piú alta. Premere il bottone “-” per portare l’apparato
verso una temperatura piú bassa. I LED luminosi che indicano la temperatura lampeggiano con intermittenza per indicare
la temperatura scelta. Quando la temperatura desiderata viene raggiunta, le spie luminose della temperatura smettono
di lampeggiare e restano fisse.
Tipo di capelli Regolazione della temperatura
Molto grosso, molto resistente (Alta) 200º
Spesso, denso, difficile da pettinare (Media/Alta) 180º
Normale, in buono stato (Media) 160º/140º
Molto sottile, fragile e di colore chiaro (Bassa) 120º
Nota bene: Se la spia luminosa della accensione è accesa e tutte le spie LED della temperatura sono spente, le piastre
non si scalderanno. Si deve premere il bottone “+/-” in modo da iniziare il riscaldamento delle piastre.
Avviso: Fare molta attenzione quando si utilizzano le piastre per lisciare i capelli, dato che queste possono diventare
molto calde quando si regola l’apparecchio sulla temperatura piú alta.
Stiling
Per lo stiling i capelli devono essere puliti. Queste piastre per lisciare i capelli sono progettate per venire utilizzate con i
capelli umidi o asciutti. Con queste piastre si possono utilizzare prodotti di stiling o per renderli lisci.
1. Si deve lavorare con una ciocca di capelli di larghezza non superiore a 6 cm. e di spessore non superiore a 1 cm.
2. Collocare i capelli tra le piastre calde e premere con forza verso il basso.
3. Mantenerlo in questa posizione durante qualche secondo e quindi tirare verso fuori i capelli continuando ad esercitare
un poco di pressione.
4. Liberare la presa liberando cosí i capelli.
MANUTENZIONE E PULIZIA
Questo prodotto contiene parti che non possono essere riparate dagli utenti. Vi preghiamo di consultare un tecnico di
assistenza qualificato.
Pulizia
1. Staccare le piastre per lisciare i capelli dalla corrente elettrica e lasciare che si raffreddino. Le piastre vanno pulite
solo quando sono fredde.
2. Per pulire il manico si deve utilizzare un panno morbido, leggermente inumidito. Evitare che l’acqua o altri liquidi si
infiltrino nel manico.
3. Nel caso in cui si verifichino accumulazioni di prodotti, si devono pulire le piastre con un sapone neutro non abrasivo
o con un pulitore liquido specifico per la pulizia delle piastre metalliche per lisciare i capelli; si passa quindi con un
panno morbido.
CONSERVAZIONE
1.
Staccare l’apparecchio dalla corrente elettrica e lasciare che si raffreddi; conservarlo quindi in un luogo
asciutto e pulito.
2. Conservare il cavo arrotolato senza stringerlo troppo.
3. Non arrotolare mai il cavo elettrico intorno all’apparato: questo potrebbe causarne usura e quindi la rottura prematura
del cavo.
4. Non applicare nessun tipo di tensione al cavo elettrico nella zona di entrata del manico: questo potrebbe causare
frizioni e la possibile rottura del cavo.
5. Non impugnare mail l’apparecchio per mezzo del cavo elettrico.
Vi ringraziamo per la fiducia accordataci nello scegliere uno dei nostri prodotti.

16
17
Onze producten zijn ontworpen om aan de hoogste vereisten met betrekking tot kwaliteit, functionaliteit en design te
voldoen. Wij hopen dat u veel plezier beleeft aan uw nieuwe steiltang CHIC van PALSON.
Lees deze aanwijzingen aandachtig door alvorens het apparaat te gebruiken.
Om de kans op ongelukken te voorkomen dienen de volgende voorzorgsmaatregelen te worden opgevolgd:
VOORZORGSMAATREGELEN
1. Trek na het gebruik van het apparaat meteen de stekker uit het stopcontact.
2. Gebruik het niet in bad.
3.
Plaats of bewaar het apparaat niet op plaatsen waar het kan vallen of tegen de badkuip of wastafel aan
worden geduwd.
4. Plaats het niet in water of andere vloeistoffen en laat het daar niet in vallen.
5. V
alt het apparaat toch in het water, trek dan onmiddellijk de stekker uit het stopcontact. Steek uw handen niet in
het water.
6. Zorg ervoor dat het apparaat uit de buurt van water blijft.
7. Loop nooit bij het apparaat weg als het in werking is.
8.
Strikt toezicht is noodzakelijk als het apparaat door of in de buurt van kinderen of onbekwame personen gebruikt wordt.
9. Gebruik dit apparaat alleen voor het doeleinde waarvoor het ontworpen is, en op de hier beschreven manier. Maak
geen gebruik van accessoires die niet door de fabrikant worden aanbevolen.
10. Zet dit apparaat niet aan als het snoer of de stekker beschadigd zijn, als het niet goed werkt, gevallen is of op de
een of andere manier beschadigd is. Breng het apparaat voor controle of reparatie naar de dichtstbijzijnde bevoegde
technische dienst.
11. Blokkeer de openingen van het apparaat nooit en plaats het apparaat niet op zachte oppervlaktes zoals een bed,
waar de openingen geblokkeerd kunnen raken. Houd de luchtopeningen vrij van pluisjes, haar en dergelijke.
12. Houd het apparaat uit de buurt van warmte of warme oppervlaktes. Rol het snoer niet rond het apparaat op.
13. Gebruik het apparaat niet als u slaperig of suf bent.
14. Steek geen voorwerpen en laat geen voorwerpen vallen in de openingen of in de buis.
15.
Gebruik het apparaat niet in de open lucht of op plaatsen waar spuitbussen worden gebruikt of waar zuurstof
wordt verstrekt.
16. Deze eenheid wordt tijdens het gebruik warm. Zorg ervoor dat de warme oppervlaktes niet in contact komen met de
ogen of met de blote huid.
17. Plaats de eenheid niet direct op een oppervlak als hij nog warm is of als de stekker in het stopcontact zit.
18. Met dit apparaat mag geen verlengsnoer gebruikt worden.
19. Indien het elektriciteitssnoer is beschadigd dient het, om gevaar te voorkomen, te worden vervangen door de
fabrikant, een erkende technische dienst of een bevoegde technicus.
20. Dit product is niet geschikt om zonder toezicht te worden gebruikt door kinderen of andere personen die vanwege
hun lichamelijke, zintuiglijke of geestelijke gesteldheid niet in staat zijn om het op veilige wijze te gebruiken. Er moet
altijd goed op kinderen worden gelet om te voorkomen dat zij met het product gaan spelen.
GEVAAR– Zoals bij de meeste elektrische apparaten blijven de elektrische onderdelen nog actief nadat het apparaat is
uitgeschakeld.
VEILIGHEIDSINSTRUCTIES VOOR HET SNOER
1. Trek nooit aan het snoer of aan het apparaat.
2. Om het apparaat aan te sluiten: houd de stekker goed vast en steek hem in het stopcontact.
3. Om het apparaat uit te schakelen: houd de stekker vast en trek hem uit het stopcontact.
4. Controleer het snoer voor ieder gebruik op scheuren en slijtageplekken. Zijn die er, dan moet het apparaat worden
nagekeken voor reparatie en het snoer worden vervangen.
5. Rol het snoer niet strak rond het apparaat, aangezien er dan bij de ingang van het apparaat te veel spanning op het
snoer ontstaat, waardoor het kan schuren en breken.
ZET HET APPARAAT NIET AAN ALS HET SNOER BESCHADIGD IS OF ALS HET APPARAAT NIET GOED,
ONREGELMATIG OF HELEMAAL NIET MEER WERKT.
GEBRUIK
Dit apparaat is bedoeld voor huishoudelijk gebruik en kan worden aangesloten op ieder willekeurig stopcontact met AC
(wisselstroom).
Ingebruikstelling
Belangrijk: Bij het eerste gebruik kunnen er gedurende de eerste minuten wat rook en een geur ontstaan. Dit is een
normaal, niet zorgwekkend verschijnsel.
NL

16
17
1. Zorg ervoor dat de warme oppervlaktes niet in contact komen met de huid. Raak de platen voor het steil maken/
samenknijpen niet met de vingertoppen aan.
2. Heeft u kort haar, houd dan een dunne, plastic kam tussen de hoofdhuid en het metaal, om aanraking met de
hoofdhuid te voorkomen.
3. Controleer met een haarlok of de temperatuur juist is afgesteld, overeenkomstig met het haartype.
Voorverwarmen
1. Laat de steiltang op een vlak en egaal oppervlak rusten en steek de stekker in het stopcontact.
2. Zet het apparaat aan, stel de gewenste temperatuur en stand in en laat de platen warm worden; dat duurt ongeveer
60-90 seconden.
3. Zodra de gewenste temperatuur is bereikt, houdt het controlelampje (LED) op met knipperen en gaat het doorlopend
branden.
Temperatuuafstelling
Druk op de knop “+” om een hogere temperatuur in te stellen en druk op de knop “-” om een lagere temperatuur in
te stellen. De LED’s voor de temperatuur gaan knipperen om aan te geven welke temperatuur is ingesteld. Zodra de
gewenste temperatuur is bereikt houden de LED’s op met knipperen en gaan doorlopend branden.
Haartype Temperatuurafstelling
Zeer dik, zeer weerbarstig (Hoog) 200º
Dik, vol, moeilijk glad te maken (Gemiddeld/Hoog) 180º
Normaal, in goede conditie (Gemiddeld) 160º/140º
Zeer fijn, breekbaar en licht van kleur (Laag) 120º
N.B.: Als het controlelampje voor het vermogen brandt en alle LED’s voor temperatuur uit zijn, worden de platen niet warm.
Pas als op de knop “+/-” wordt gedrukt, worden de metalen platen verwarmd.
Waarschuwing: Wees voorzichtig bij het gebruik van de platen, aangezien zij zeer heet worden als de hoogste
temperatuur is ingesteld.
Stylen
Om het haar steil en glad te maken, moet het schoon zijn. Deze platen zijn ontworpen voor gebruik met vochtig of droog
haar. Ze kunnen gebruikt worden in combinatie met producten voor het glad en steil maken van het haar.
1. Gebruik de steiltang voor haarlokken van maximaal 6 cm breed en 1 cm dik.
2. Doe een haarlok tussen de warme platen en knijp de platen stevig aan.
3. Houd enkele seconden vast in deze stand en trek de steiltang, met het haar ertussen, naar beneden.
4. Verminder de druk en laat het haar onsnappen.
ONDERHOUD EN SCHOONMAKEN
Dit product bevat onderdelen die niet door de gebruiker mogen worden gecontroleerd. Neem contact op met het personeel
van een bevoegde technische dienst.
Schoonmaken
1. Schakel de steiltang uit en laat hem afkoelen. De platen mogen pas worden schoongemaakt als ze koud zijn.
2. Gebruik een zachte, enigszins vochtige doek om het handvat schoon te maken. Zorg ervoor dat er geen water of
andere vloeistoffen in het handvat kunnen binnendringen.
3. Voor het schoonmaken van opgehoopt vuil kunnen de platen met zachte, niet schurende zeep of met een speciaal
schoonmaakmiddel voor platen van steiltangen worden afgenomen.
OPBERGING
1. Haal de stekker van het apparaat uit het stopcontact, laat het apparaat afkoelen en berg het op op een droge en
schone plaats.
2. Rol het snoer losjes op.
3. Rol het snoer nooit rond de eenheid; hierdoor kan het snoer voortijdig slijten of scheuren.
4. Zorg ervoor dat er geen spanning is op de plaats waar het snoer het handvat binnengaat, om schuren en mogelijke
schade van het snoer tegen te gaan.
5. Houd de eenheid nooit aan het snoer vast.
Wij danken u voor uw vertrouwen in ons en voor het kiezen van een van onze producten.

18
19
Ta diká mav proiónta eínai kataskeuasména gia na antapokrínontai sta pléon uyhlá stántar tóso se poióthta óso kai se
leitourgikóthta kai scediasmó. Elpízoume na apolaúsete to kainoúrio sav sídero isiýmatov twn malliýn CHIC thv PALSON.
Parakaloúme diabáste prosektiká tiv parecómenev odhgíev crñshv prin procwrñsete sthn crhsimopoíhsh autñv thv
suskeuñv.
Gia na meiwqoún sto elácisto oi piqanoí kíndunoi atucñmatov qa prépei na lábete ta akólouqa métra asfaleíav:
PROFULAXEIS
1. “Na aposundéete”pánta thn suskeuñ apo thn príza metá apo káqe crhsimopoíhsñ thv.
2. Mhn thn crhsimopoieíte óso eísaste mésa sthn mpaniéra.
3. H suskeuñ den qa prépei na topoqeteítai ñ na to fulássetai se éna mérov pou qa mporoúse na pései ñ na sprwcqeí
mésa sthn mpaniéra ñ ston nerocúth.
4. Mhn thn topoqetñsete allá oúte na thn afñsete na pései mésa sto neró ñ opoioudñpote állo eídouv ugró.
5. Eán h suskeuñ pései mésa sto neró, “ aposundéontáv thn “améswv. Mhn bálete to céri sav mésa sto neró.
6. Diathreíste thn suskeuñ makriá apo to neró.
7. Mía suskeuñ den qa prépei poté na afñnetai cwrív epíbleyh óso eínai sundedeménh sto reúma.
8. Eínai aparaíthth mía sunecñv epitñrhsh ótan h hlektrkñ suskeuñ crhsimopoieítai apo mikrá paidiá ñ apo átoma me eidikév
anágkev.
9. Na crhsimopoieíte autñn thn suskeuñ apokleistiká kai móno gia thn crñsh pou écei scediasteí akribýv ópwv perigráfetai
se autó to egceirídio odhgiýn. Na mhn crhsimopoioúntai exartñmata pou den sunistoúntai apo thn kataskeuastñ.
10. Poté mhn procwrñsete sthn crhsimopoíhsh autñv tñv suskeuñv me to kalýdio trofodosíav ñ to búsma fqarméno, ñ ótan
h suskeuñ den leitourgeí kanoniká ñ écei uposteí kápoia blábh. Na páte thn suskeuñ sto plhsiéstero sthn periocñ sav
tecnikó grafeío exuphréthshv giá thn exétasñ thv kai an creiázetai episkeuñ thv.
11. Poté mh frakárete ta anoígmata thv suskeuñv oúte na thn topoqeteíte epánw se mía malakiá epifáneia ópwv gia
parádeigma, éna krebáti epánw sto opoío ta anoígmata qa mporoúsan na frakároun. Frontíste ta anoígmata tou aéra na
eínai eleúqera apo xhlwménev klwstév, trícev kai álla parómoia uliká.
12. Frontíste to kalýdio trofodosíav na brísketai makriá apo thn qérmansh kai tiv qermév epifáneiev. Mhn tulígete me to
kalýdio trofodosíav gúrw gúrw apo thn suskeuñ.
13. Poté mhn thn crhsimopoiñsete an eíste nustagménov ñ misokoimisménov.
14. Poté mhn epitréyete na pései allá oúte kai na eiságete kápoio antikeímeno sta anoígmata ñ ston swlñna.
15. Mhn thn crhsimopoieíte se upaíqriouv cýrouv ñ se mérh sta opoía gínetai crñsh proióntwn me yekastñra (spréi) ñ se
autá pou corhgeítai oxugóno.
16. Autñ h suskeuñ zestaínetai kata thn diárkeia thv crhsimopoíhsñv thv. Mhn afñnete tóso ta mátia óso kai to gumnó dérma
na aggízoun tiv qermév epifáneiev.
17.
Mhn topoqeteíte thn zestñ suskeuñ apeuqeíav epánw se kápoia epifáneia ený akóma eínai zestñ ñ sundedeménh sthn príza.
18. Mhn crhsimopoiñsete éna kalýdio proéktashv me autñn thn suskeuñ.
19. Eán to kalýdio trofodosíav écei fqareí qa prépei na antikatastaqeí apo ton kataskeuastñ, apo to tecnikó grafeío
exuphréthshv, ñ apo énan epíshma anagnwrisméno tecnikó me apýtero skopó na apofeucqeí o paramikróv kíndunov
atucñmatov
20. Autó to proión den epitrépetai giá paidikñ crñsh ñ apó álla átoma, cwrív parakoloúqhsh kai epíbleyh, ótan h fusikñ,
aisqhthriakñ ñ yucikñ touv katástash ta empodízei na to crhsimopoioún me asfáleia.Ta paidiá qa prépei na epithroúntai
étsi ýste na eíste sígouroi pwv den paízoun me to proanaferqén proión.
KINDUNOS– Opwv sumbaíneii me thn pleioyhfía twn oikiakýn hlektrikýn suskeuýn, ta hlektriká sustatiká paraménoun
energá akóma kai ótan o diakóipthv eínai aposundedeménov.
SUMBOULES ASFALEIAS GIA TO KALWDIO TROFODOSIAS
1. Poténa mhn trabáte apo to kalýdio ñ thn suskeuñ.
2. Gia na eiságete to búsma, to kratáte sfigktá kai to odhgeíte prov ta mésa sthn príza parocñv reúmatov .
3. Gia na aposundésete thn suskeuñ, kratáte to búsma kai to bgázete éxw apo thn príza parocñv.
4. Prin apo káqe crhsimopoíhsh, na epiqewreíte to kalýdio trofodosíav scetiká me ta koyímata kai ta shmádia sfíxhv. Eán
breíte kápoio,shmaínei pwv h suskeuñ qa prépei na paéi gia suntñrhsh kai to kalýdio na antikatastaqeí.
5. Poté mhn tulígete to tentwméno kalýdio gúrw gúrw apo thn suskeuñ, epeidñ káti tétoio qa mporoúse na prokalései
uperboliká tentýmata sto kalýdio sthn periocñ eisódou sthn suskeuñ kai na prokalései tribév kai spasímata.
MH QETETE SE LEITOURGIA THN SUSKEUH AN TO KALWDIO ECEI UPOSTEI KAPOIA FQORA H EAN H LEITOURGIA
THS SUSKEUHS UPODEIKNUEI KAPOIA BLABH, H H SUSKEUH LEITOURGEI DIAKEKOMMENA H PAUEI NA LEITOURGEI
ENTELWS
PWS NA THN CRHSIMOPOIHSETE
Autñ h suskeuñ eínai katállhlh gia oikiakñ crñsh kai mporeí na sundeqeí se opoiadñpote príza parocñv hlektrikoú reúmatov
AC (enallasómeno reúma).
Qésh se leitourgía
Shmantikó: Otan thn crhsimopoieíte gia prýth forá, ta prýta leptá, íswv na noiýsete kapnó kai mía elafriá osmñ.
Autó eínai kanonikó kai den prépei na sav prokalései kammía anhsucía.
GR

18
19
1. Frontíste pánta oi qermév epifáneiev na diathroúntai makriá apo thn epafñ me opoiadñpote periocñ tou dérmatov. Mhn
aggízete tiv plákev thv ísiwshv/píeshv me ta ákra twn daktúlwn
2. Gia to kontó mallí, na topoqetñsete miá leptñ plastikñ cténa anámesa sto tricwtó dérma tou kefalioú kai to métallo me
apýtero skopó na apofeúgetai h epafñ me to tricwtó dérma tou kefalioú.
3. Kánte mía dokimñ se éna mikró kommáti twn malliýn tou kefalioú gia na kaqorísete thn swstñ timñ thv qermokrasíav
análoga me ton túpo twn malliýn.
Proqérmansh
1. Na sthríxete to sídero epánw se mía leía kai epípedh epifáneia.
2. Na thn sundésete, na kaqorísete thn qermokrasía ston epiqumhtó baqmó kai na periménete mécriv ótou oi plákev
zestaqoún·qa creiasteí na perásoun 60-90 deuterólepta gia na zestaqoún.
3. To endeiktikó fýv LED qa paúsei na tremosbñnei kai qa parameínei sunecýv anamméno ótan ftásei sthn epiqumhtñ
qermokrasía.
Ruqmíseiv thv qermoikrasíav
Patáte to koumpí “
+” gia na auxánetai h rúqmish prov mía pió uyhlñ qermokrasía. Patáte to koumpí “-” gia na meiýnetai
h rúqmish prov mía pió camhlñ qermokrasía. Ta endeiktiká fýta LED thv qermokrasíav qa tremosbñnoun étsi ýste na
endeiknúoun thn epilegménh qermokrasía. Otan epiteucqeí h epiqumhtñ qermokrasía ta endeiktiká fýta thv qermokrasíav qa
paúsoun na tremosbñnoun kai qa paraménoun anamména sunecýv.
Túpov tou mallioú Rúqmish thv qermokrasíav
Polú lipará, polú megálh antocñ (Uyhlñ) 200º
Puknó, éntono, sklhró gia ísiwma (Mesaía/Uyhlñ) 180º
Kanonikó, se kalñ katástash (Mesaía) 160º/140º
Polú leptó, eúqrasto kai anoiktoú crýmatov (Camhlñ) 120º
Shmeíwsh: Eán to endeiktikó fýv thv qéshv se leitourgía eínai anamméno, kai óla ta endeiktiká fýta
LED thv qermokrasíav
paraménoun sbhstá, oi plákev den qa zestaqoún. Qa prépei na pathqeí to koumpí “+/-”me apýtero skopó oi plákev na arcísoun
na qermaínontai.
Proeidopoíhsh: Na eíste idiaítera prosektikoí ótan crhsimopoieíte tiv plákev isiýmatov epeidñ oi plákev zestaínontai para
polú me thn rúqmish thv qermokrasíav ston pió uyhló baqmó.
Stil kómmwshv
Gia to kómmwsh, to mallí qa prépei na eínai kaqaró. Autév oi plákev isiýmatov eínai scediasménev gia na crhsimopoioúntai
tóso me stegná óso kai bregména malliá. Mporoún epíshv na crhsimopoioúntai kommwtiká proiónta ñ isiýmatov me autév tiv
plákev.
1. Na ergázeste me diaforetiká tmñmata malliýn káqe forá ta opoía na mhn xepernoún ta 6cm se fárdov kai 1cm se
pácov.
2. Topoqeteíte to mallí anámesa stiv zestév plákev kai piézete dunatá prov ta kátw.
3. Tiv diathreíte se sutñn thn qésh gia meriká deuterólepta kai trabáte apo to mallí diathrýntav lígo to téntwma
4. Paúete na piézete kai afñnete to mallí na xefúgei.
FRONTIDA KAI KAQARIOTHTA
Autó to proión periécei kommátia pou den mporoún na epiqewroúntai apo ton crñsth. Na sunbouleuteíte to epíshma
anagnwrisméno proswpikó exuphréthshv.
Kaqarióthta
1. Aposundésete tiv v plákev isiýmatov kai tiv afñnete na kruýsoun. Oi plákev prépei na kaqarízontai mónon ótan eínai
entelýv krúev.
2. Na crhsimopoiñsete éna apaló paní, elafrá bregméno gia na kaqarísete thn labñ. Mhn epitréyete to neró ñ opoiodñpote
állo ugró na mpaínei mésa sthn labñ.
3. Ean sumboún susswreúseiv tou proióntov, na kaqarísete tiv plákev me éna apaló mh apoxestikó sapoúni ñ na
crhsimopoiñsete éna kaqaristikó ugró gia tiv plákev isiýmatov kai na tiv kaqarísete me éna apaló paní.
APOQHKEUSH
1. Aposundéete thn suskeuñ, periménete mécriv ótou kruýsei kai tóte na thn fuláxete se éna xhró kai kaqaró cýro.
2. Na fuláxete to kalýdio tuligméno cwrív na to piézete.
3. Na mhn tulíxete poté to kalýdio gúrw gúrw apo th suskeuñ· autó qa prokaloúse mía fqorá kai ,éna prówro spásimo
tou kalwdíou.
4. Mhn askeíte kanéna téntwma sto kalýdio sthn periocñ thv eisódou me thn labñ, epeidñ káti tetoio qa prokaloúse mía tribñ
kai to piqanó spásimo tou kalwdíou.
5. Na mhn bastáte poté thn suskeuñ apo to kalýdio trofodosíav.
Sav eucaristoúme gia thn epistosúnh pou mav deícnete agorázontav éna apo ta diká mav proiónta

20
21
RU
Проектируя наши изделия, мы стремимся к тому, чтобы их качество, дизайн и функциональность отвечали
стандартам наивысшего уровня. Надеемся, что Вам понравится новые щипцы-выпрямители CHIC фирмы
PALSON.
Перед первым пользованием прибором обязательно прочтите инструкцию.
Во избежание несчастных случаев соблюдайте следующие меры предосторожности:
МЕРЫ ПРЕДОСТОРОЖНОСТИ
1. Всегда отключайте прибор по окончании использования.
2. Не пользуйтесь прибором во время принятия ванны.
3. Класть прибор следует так, чтобы он не смог упасть в ванну или раковину.
4. Не погружайте и не роняйте прибор в воду или другую жидкость.
5. Если прибор упал в воду или другую жидкость, немедленно отключить его от сети. Не погружать руки в воду.
6. Держать прибор вдали от воды.
7. Никогда не оставляйте включенный прибор без присмотра.
8. Не упускайте из-под присмотра детей или лиц с ограниченными возможностями, пользующихся или
находящихся вблизи работающего прибора.
9. Пользуйтесь прибором по назначению согласно настоящим инструкциям. Не использовать вспомогательные
принадлежности, не рекомендованные заводом-изготовителем.
10. Никогда не пользуйтесь прибором с поврежденным кабелем или штепселем, а также, если он пострадал
в результате падения в воду, сильного удара или нанесения иного повреждения. Обратитесь в ближайшую
техническую службу для осмотра или ремонта прибора.
11. Не закрывайте входные отверстия прибора и не кладите его на мягкую поверхность (например, кровать или
диван), во избежание нарушения проходимости его отверстий. Очищать отверстия от волокон, волос и т.п.
12. Держите прибор вдали от источника тепла или нагретых поверхностей. Никогда не накручивайте шнур вокруг
прибора.
13. Не пользуйтесь прибором, если вам хочется спать.
14. Оберегайте отверстия и корпус прибора от попадания каких-либо предметов.
15. Не пользуйтесь прибором на открытом воздухе или в тех местах, где применяется аэрозоль или кислород.
16. Во время работы прибор сильно нагревается. Не подносите нагретый прибор близко к глазам или коже.
17. Не класть прибор на возгораемые поверхности, пока он включен в сеть или еще не остыл.
18. При работе с этим прибором не пользуйтесь удлинителем.
19. При повреждении кабеля питания во избежание опасности его замена должна осуществляться
производителем, официальной технической службой или другими квалифицированными специалистами.
20. Запрещается включать прибор детям и другим лицам без помощи или наблюдения, если их физическое или
умственное состояние не позволяет им безопасно пользоваться прибором. Не оставлять детей без присмотра
и не разрешать им играть с прибором.
ВНИМАНИЕ! Как и в большинстве электробытовых приборов, электрические компоненты сохраняют остаточное
напряжение даже после отключения прибора от электросети.
РЕКОМЕНДАЦИИ ПО УХОДУ ЗА ЭЛЕКТРОШНУРОМ
1. При отключении прибора от сети не тянуть за шнур или за сам прибор.
2. При включении в сеть крепко держать в руке вилку и вставить ее в розетку.
3. При отключении прибора от сети одной рукой удерживать розетку, другой вытащить вилку.
4. Перед каждым использованием осматривать шнур для выявления возможных разрывов и/или потертостей.
При появлении повреждений шнур следует заменить.
5. Не накручивать шнур с натяжкой вокруг прибора, поскольку это может привести к излишнему натяжению
шнура у основания прибора или появлению трещин и разрывов.
НЕ ВКЛЮЧАТЬ ПРИБОР С ПОВРЕЖДЕННЫМ ШНУРОМ ИЛИ, ЕСЛИ ПРИ РАБОТЕ ПРИБОРА ВЫЯВИЛОСЬ, ЧТО
ОН ПОВРЕЖДЕН, НЕ РАБОТАЕТ ИЛИ РАБОТАЕТ С ПЕРЕБОЯМИ.
КАК ПОЛЬЗОВАТЬСЯ ПРИБОРОМ
Этот прибор предназначен только для бытового использования и может быть включен в любую электрическую
розетку переменного тока.
Включение прибора
Внимание: При первом использовании от прибора может пойти запах и легкий дым. Это нормально и не должно
вызвать беспокойство.
Sayfa yükleniyor...
Sayfa yükleniyor...
Sayfa yükleniyor...
Sayfa yükleniyor...
Sayfa yükleniyor...
Sayfa yükleniyor...
Sayfa yükleniyor...
Sayfa yükleniyor...
-
 1
1
-
 2
2
-
 3
3
-
 4
4
-
 5
5
-
 6
6
-
 7
7
-
 8
8
-
 9
9
-
 10
10
-
 11
11
-
 12
12
-
 13
13
-
 14
14
-
 15
15
-
 16
16
-
 17
17
-
 18
18
-
 19
19
-
 20
20
-
 21
21
-
 22
22
-
 23
23
-
 24
24
-
 25
25
-
 26
26
-
 27
27
-
 28
28


Palson 30718 El kitabı
- Kategori
- Saç düzleştiriciler
- Tip
- El kitabı
- Bu kılavuz aynı zamanda aşağıdakiler için de uygundur:
diğer dillerde
- slovenčina: Palson 30718 Návod na obsluhu
- español: Palson 30718 El manual del propietario
- français: Palson 30718 Le manuel du propriétaire
- italiano: Palson 30718 Manuale del proprietario
- Deutsch: Palson 30718 Bedienungsanleitung
- português: Palson 30718 Manual do proprietário
- English: Palson 30718 Owner's manual
- русский: Palson 30718 Инструкция по применению
- Nederlands: Palson 30718 de handleiding