OK. OPJ 4321 Kullanım kılavuzu
- Kategori
- Meyve suyu üreticileri
- Tip
- Kullanım kılavuzu

Folded Size = A5
12
P
0
1
2
14
P
0
1
2
16
P
0
1
2
10
P
0
1
2
11
13
P
0
1
2
15
9
OPJ 4321
EntsaftEr // JuicEr // LicuadOra // cEntrifugEusE
dE
GEBRAUCHSANWEISUNG 3
it
MANUALE DELL’UTENTE 39
En
USER MANUAL 9
nL
GEBRUIKSAANWIJZING 45
Es
MANUAL DE INSTRUCCIONES 15
PL
INSTRUKCJA OBSŁUGI 51
fr
MODE D’EMPLOI 21
Pt
MANUAL DE UTILIZAÇÃO 57
gr
ΟΗΓIΕΣ ΧΡΗΣΗΣ 27
sE
BRUKSANVISNING 63
Hu
FELHASZNÁLÓI KÉZIKÖNYV 33
tr
KULLANIM KILAVUZU 69
IM_OPJ 4321_181029_V07
www.ok-online.com
Imtron GmbH
Wankelstraße 5
85046 Ingolstadt
Germany
www.imtron.eu
9
9
P
0
1
2
cups 5
4
3
2
1
250
500
750
1000
1250 ml
cups 5
4
3
2
1
1250 ml
1000
750
500
250
P
1
0
2
cups 5
4
3
2
1
1250 ml
1000
750
500
250
P
1
0
2
IM_OPJ4321_181029_V07_HR.indb 1 29/10/18 10:43 am

Folded Size = A5
3
5
7
4
6
8
P
1
2
2
P
1
2
P
1
2
P
1
2
P
0
1
2
P
1
2
cups 5
4
3
2
1
1250 ml
1000
750
500
250
P
1
0
2
G
M
IJKL
E
D
C
B
A
F
H
cups 5
4
3
2
1
1250 ml
1000
750
500
250
P
1
0
2
cups 5
4
3
2
1
1250 ml
1000
750
500
250
P
1
0
2
cups 5
4
3
2
1
1250 ml
1000
750
500
250
P
1
0
2
cups 5
4
3
2
1
1250 ml
1000
750
500
250
P
1
0
2
cups 5
4
3
2
1
1250 ml
1000
750
500
250
P
1
0
2
1
a)
c)
d)
e)
b)
N
click
IM_OPJ4321_181029_V07_HR.indb 2 29/10/18 10:43 am

3
DE
HERZLICHEN GLÜCKWUNSCH!
Vielen Dank, dass Sie sich für ein Produkt von ok. entschieden haben. Bitte lesen Sie diese Anleitung
sorgfältig durch und bewahren Sie sie für späteren Gebrauch auf.
WICHTIGE SICHERHEITSANWEISUNGEN. BITTE AUFMERKSAM DURCHLESEN UND FÜR
SPÄTEREN GEBRAUCH AUFBEWAHREN.
1.
Dieses Produkt darf nicht von Kindern benutzt werden.
Das Produkt und seine Anschlussleitung sind von Kindern
fernzuhalten.
2. Dieses Produkt kann von Personen mit reduzierten
physischen, sensorischen oder mentalen Fähigkeiten oder
Mangel an Erfahrung und/oder Wissen benutzt werden,
wenn sie beaufsichtigt werden oder bezüglich des sicheren
Gebrauchs des Produktes unterwiesen wurden und die
daraus resultierenden Gefahren verstanden haben.
3. Kinder dürfen nicht mit dem Produkt spielen.
4. Wenn die Netzanschlussleitung dieses Produktes beschädigt
wurde, muss sie durch den Hersteller oder seinen
Kundendienst oder eine ähnlich qualizierte Person ersetzt
werden, um Gefährdungen zu vermeiden.
5. Dieses Produkt ist nicht für den kontinuierlichen Betrieb
geeignet. Das Produkt nicht länger als 7 Minuten betreiben.
Danach das Produkt abkühlen lassen.
6. Dieses Produkt ist bei nicht vorhandener Aufsicht, vor dem
Zusammenbau, dem Auseinandernehmen und vor der
Reinigung stets vom Netz zu trennen.
7. Vor dem Auswechseln von Zubehör oder Zusatzteilen, die im
Betrieb bewegt werden, muss das Produkt ausgeschaltet und
vom Netz getrennt werden.
8. Falls das drehende Sieb beschädigt ist, darf das Produkt
nicht betrieben werden. Verwenden Sie das Produkt nur
zweckbestimmt und mit den empfohlenen Zubehörteilen
und Komponenten. Eine unsachgemäße oder falsche
Nutzung ist gefährlich.
9. Bitte gehen Sie sehr vorsichtig bei der Handhabung der
scharfen Messer vor, insbesondere wenn Sie den Behälter
leeren und während Sie das Produkt reinigen.
IM_OPJ4321_181029_V07_HR.indb 3 29/10/18 10:43 am

4
Size = A5
DE
10. Dieses Produkt ist für die Verarbeitung haushaltsüblicher
Mengen im Haushalt oder in haushaltsähnlichen, nicht-
gewerblichen Anwendungen bestimmt. Haushaltsähnliche
Anwendungen umfassen z.B. die Verwendung in
Mitarbeiterküchen von Läden, Büros sowie die Nutzung
durch Gäste von Pensionen, kleinen Hotels und ähnlichen
Wohneinrichtungen.
11. Reinigen Sie das Produkt und die übrigen Zubehörteile nach
jedem Gebrauch.
12. Beachten Sie das Kapitel Reinigung und Pege.
13. Beachten Sie alle Sicherheitshinweise, um Schäden durch nicht sachgemäßen Gebrauch zu
vermeiden!
14. Bewahren Sie die Gebrauchsanweisung für den weiteren Gebrauch auf. Sollte dieses Produkt an
Dritte weitergegeben werden, muss diese Gebrauchsanweisung mit ausgehändigt werden.
15. Prüfen Sie vor dem Anschluss an die Netzversorgung, ob Stromart und Netzspannung mit den
Angaben auf dem Typenschild übereinstimmen.
16. Benutzen Sie nie ein beschädigtes Produkt! Trennen Sie das Produkt vom Netzstrom und
benachrichtigen Sie Ihren Einzelhändler, wenn das Produkt beschädigt ist.
17. Verhindern Sie eine Beschädigung des Kabels durch Quetschen, Knicken oder Scheuern an scharfen
Kanten. Halten Sie es von heißen Oberächen und oenen Flammen fern. Halten Sie das Netzkabel
außerdem von rotierenden Klingen fern.
18. Verlegen Sie das Kabel so, dass ein unbeabsichtigtes Ziehen bzw. ein Stolpern über das Kabel nicht
möglich ist.
19. Bei Benutzung eines Verlängerungskabels muss dieses für die entsprechende Leistung geeignet sein.
20. Nehmen Sie das Produkt nicht mit feuchten Händen, oder auf nassem Boden stehend in Betrieb.
Fassen Sie den Netzstecker nie mit nassen oder feuchten Händen an.
21. Önen Sie unter keinen Umständen das Gehäuse. Führen Sie keine Gegenstände in das Innere des
Gehäuses ein.
22. Ziehen Sie den Netzstecker nicht am Netzkabel aus der Steckdose und wickeln Sie das Netzkabel
nicht um das Produkt.
23. Verbinden Sie den Netzstecker mit einer gut erreichbaren Steckdose, um im Notfall das Produkt
schnell von der Netzversorgung trennen zu können. Ziehen Sie den Netzstecker aus der Steckdose,
um das Produkt vollständig auszuschalten. Benutzen Sie den Netzstecker als Trennvorrichtung.
24. Ziehen Sie vor jeder Reinigung, und falls das Produkt längere Zeit nicht benutzt wird, den
Netzstecker.
25. Sollte das Stromkabel überhitzen, stoppen Sie den Gebrauch des Produktes und trennen Sie das
Produkt von der Steckdose.
26. Stellen Sie das Produkt nicht auf Kochplatten (Gas-, Elektro-, Kohle-Herd usw.). Halten Sie das
Produkt von allen heißen Flächen und oenen Flammen fern. Betreiben Sie das Produkt immer auf
einer ebenen, stabilen, sauberen, feuerfesten und trockenen Fläche.
27. Lassen Sie das Produkt nie unbeaufsichtigt, solange es mit dem Stromnetz verbunden ist.
28. Trocknen Sie das Produkt und alle Zubehörteile vor Anschluss an das Stromnetz und bevor Sie
Zubehörteile anbringen.
BESTIMMUNGSGEMÄSSER GEBRAUCH
Das Gerät ist nur für das Entsaften von Obst und Gemüse gedacht. Es ist nur für den Einsatz in
Privathaushalten konzipiert und darf nicht für gewerbliche Zwecke eingesetzt werden. Jegliche andere
Benutzung kann zu Personen- oder Produktschäden führen.
Die Imtron GmbH übernimmt keine Haftung für Schäden am Produkt, Sachschaden, oder Verletzung
von Personen aufgrund von unachtsamer, unsachgemäßer, falscher oder nicht dem vom Hersteller
angegebenen Zweck entsprechender Verwendung des Produkts.
IM_OPJ4321_181029_V07_HR.indb 4 29/10/18 10:43 am

5
DE
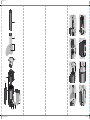
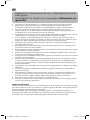
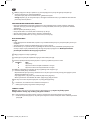
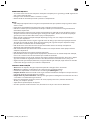
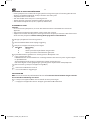
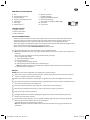
BEDIENELEMENTE UND KOMPONENTEN
A. Stopfer
B. Abdeckung mit Einfüllönung
C. Verriegelungsnuten
D. Edelstahlsieb mit Reibe
E. Siebaufnahme
F. Ausgussönung
G. Motoreinheit
H. Saftbehälter
I. Sicherungsbügel
J. Netzkabel mit Netzstecker
K. Saugnäpfe
L. Ein-/Aus-Schalter (O, 1, 2, P)
M. Tresterbehälter
N. Halterung für Tresterbehälter
LIEFERUMFANG
1 x Entsafter
1 x Gebrauchsanweisung
1 x Garantiekarte
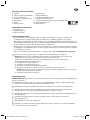
VOR DEM ERSTEN GEBRAUCH
• Entfernen Sie das Produkt und Zubehör vorsichtig aus der Originalverpackung. Es empehlt sich,
die Originalverpackung für späteres Verstauen aufzubewahren. Möchten Sie die Originalverpackung
entsorgen, so tun Sie dies nach den geltenden gesetzlichen Bestimmungen. Haben Sie Fragen zur
richtigen Entsorgung, fragen Sie bei Ihrer örtlichen Behörde nach.
• Überprüfen Sie den Lieferumfang auf Vollständigkeit und eventuelle Transportschäden. Sollten
Transportschäden vorhanden oder der Lieferumfang unvollständig sein, so kontaktieren Sie Ihre
Verkaufsstelle.
• Reinigen Sie das Produkt nach dem Auspacken; siehe Abschnitt Reinigung und Pege.
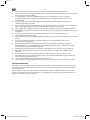
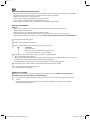
1
Vor dem ersten Gebrauch sollten alle abnehmbaren Teile abgewaschen werden.
Hinweis: Waschen Sie alle abnehmbaren Teile mit einer Mischung aus Wasser und Spülmittel und
trocknen Sie sie danach gründlich ab.
Alternativ können die Teile A, B, D, E, H und M auch in der Spülmaschine gereinigt werden.
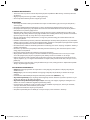
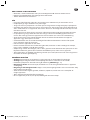
Für die Reinigung zerlegen Sie das Gerät wie folgt:
a) Klappen Sie den Sicherungsbügel nach unten.
b) Entnehmen Sie den Tresterbehälter.
c) Entnehmen Sie die Abdeckung mit Einfüllönung.
d) Ziehen Sie die Siebaufnahme zusammen mit dem Sieb senkrecht nach oben ab.
Hinweis: Die Siebaufnahme sitzt relativ fest. Ziehen Sie von allen Seiten daran, besonders an
der Seite der Ausgussönung.
e) Entnehmen Sie das Sieb aus der Siebaufnahme.
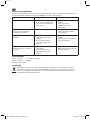
ZUSAMMENBAU DES GERÄTS
ACHTUNG! Stecken Sie niemals den Netzstecker in eine Steckdose, bevor das Gerät nicht vollständig
zusammengebaut wurde.
2
Stellen Sie die Motoreinheit auf eine trockene, ebene und stabile Oberäche. Die Motoreinheit
beim Aufstellen leicht andrücken, damit die Saugfüße richtig haften.
3
Setzen Sie die Siebaufnahme auf die Motoreinheit. Achten Sie darauf, dass die Siebaufnahme und
die Ausgussönung richtig sitzen.
4
Befestigen des Tresterbehälters: Setzen Sie den oberen Teil des Behälters unterhalb der oberen
Tresterbehälterhalterung an der Siebaufnahme ein. Drücken Sie den unteren Teil kräftig in die
untere Halterung des Tresterbehälters.
5
Setzen Sie das Edelstahlsieb in die Siebaufnahme und achten Sie darauf, dass es mit der
Antriebswelle unten ordnungsgemäß verbunden ist.
6
Verriegeln Sie das Sieb richtig: Drücken Sie das Sieb nach unten, bis Sie ein Klicken hören.
7
Setzen Sie die Abdeckung auf den Entsafter.
8
Verriegeln des Bügels: Klappen Sie den Verriegelungsbügel hoch, bis er in den Verriegelungsnuten
auf beiden Seiten der Abdeckung einrastet.
IM_OPJ4321_181029_V07_HR.indb 5 29/10/18 10:43 am

6
Size = A5
DE
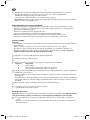
9
Schieben Sie den Stopfer in die Einfüllönung. Achten Sie darauf, dass die Fuge am Stopfer genau
mit der Nut an der Oberseite der Einfüllönung übereinstimmt.
Stellen Sie den Saftbehälter unter die Ausgussönung.
Das Gerät ist nun zusammen gebaut und betriebsbereit.
Hinweis: Achten Sie vor dem Gebrauch unbedingt darauf, dass alle Komponenten, insb. das Sieb,
korrekt zusammengebaut sind.
VORBEREITUNG VON OBST UND GEMÜSE
• Mit diesem Entsafter können Sie frischgepressten Saft aus vielen ausgesuchten Frucht- und
Gemüsesorten herstellen. Es müssen aber zum Genießen wohlschmeckender und leckerer Säfte
einige Vorbereitungen getroen werden.
• Waschen Sie das Obst und Gemüse unter frischem Leitungswasser.
• Schneiden Sie großes das Obst und Gemüse in kleinere Stücke, so dass diese in die Einfüllönung
passen.
• Entfernen Sie bei Steinobst, wie z. B. Kirschen, Prsiche, usw. die Kerne.
• Entfernen Sie dicke oder harte Schalen wie bspw. bei Ananas, Apfelsinen, Melonen, usw.
ENTSAFTEN
Achtung!
• Achten Sie vor dem Anschluss des Entsafters darauf, dass der elektrische Stromkreis nicht durch
andere Geräte überlastet wird.
• Schalten Sie den Entsafter stets aus und ziehen Sie den Netzstecker, wenn er nicht in Gebrauch ist.
• Greifen Sie niemals mit Ihren Händen oder Fingern in den Einfüllönung, um die Zutaten in den
Schacht zu drücken oder um blockierende Zutaten zu entfernen. Verwenden Sie nur den Stopfer.
Gefahr von schweren Verletzungen durch das drehende Sieb!
10
Nehmen Sie den Stopfer aus der Einfüllönung.
11
Schließen Sie den Netzstecker an einer geeigneten Steckdose an.
12
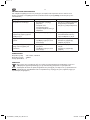
Stellen Sie die den Drehschalter auf die gewünschte Entsaftungsgeschwindigkeit.
Geschwindigkeit Beschreibung
0 Aus
1 Entsaften von weichem Obst/Gemüse
2 Entsaften von festem Obst/Gemüse
13
Geben Sie die vorbereiteten Zutaten in die Einfüllönung. Nicht überfüllen.
Geben Sie kleine Stücke zu mehreren auf einmal hinzu.
Die Reste werden im Tresterbehälter gesammelt. Der frisch gepresste Saft läuft durch die
Ausgussönung in den Saftbehälter.
Drücken Sie mit dem Stopfer die Zutaten im Schacht langsam nach unten.
Füllen Sie immer wieder kleine Mengen in den Einfüllschacht und drücken Sie diese stets langsam
mit dem Stopfer nach unten.
14
Nach dem Gebrauch: Stellen Sie den Drehschalter in die Stellung 0 (Aus).
15
1. Warten Sie, bis sich die Reibe nicht mehr dreht.
2. Ziehen Sie den Netzstecker aus der Steckdose.
PULSFUNKTION
Hinweis: Die Pulsfunktion liefert stets maximale Leistung! Verwenden Sie diese Funktion nicht länger
als 2 Minuten, um ein Überhitzen des Motors zu vermeiden!
16
1. Stellen Sie den Drehschalter in die Stellung P und halten Sie ihn der Stellung, um mit dem
Entsaften zu beginnen.
2. Lassen Sie den Drehschalter los, um den Entsaftungsvorgang zu beenden. Der Drehschalter geht
automatisch in die Stellung 0 zurück.
IM_OPJ4321_181029_V07_HR.indb 6 29/10/18 10:43 am

7
DE
ENTFERNEN VON VERSTOPFUNGEN
• Wenn Zutaten blockieren: Stellen Sie den Drehschalter in die Stellung 0. Warten Sie, bis sich die Reibe
nicht mehr dreht.
• Ziehen Sie den Netzstecker aus der Steckdose und entfernen Sie die Abdeckung.
• Entfernen Sie alle Verstopfungen. Achten Sie dabei darauf, die scharfen Messer nicht zu berühren.
TIPPS FÜR EIN BESSERES ERGEBNIS
• Geben Sie erst Obst oder Gemüse in den Entsafter, wenn er eingeschaltet wurde und der Motor läuft.
• Lassen Sie den Entsafter vor dem Entsaftungsvorgang ein paar Sekunden laufen.
• Drücken Sie die Zutaten nicht mit Gewalt in den Entsafter. Drücken Sie die Zutaten mit dem Stopfer
nach und nach hinunter. Tun Sie dies mit einer gleichmäßigen, langsamen Geschwindigkeit.
• Obst oder Gemüse, das in die Einfüllönung passt, kann als Ganzes hinzugegeben werden. Nur wenn
es zu groß ist, muss es in kleinere Stücke geschnitten werden. Die Zutaten sollten dann in ausreichend
kleine Stücke geschnitten werden, die in die Einfüllönung passen. Schneiden Sie die Zutaten nicht in
zu kleine Stücke.
• Entfernen Sie die großen Kerne von beispielsweise Prsichen, Mangos usw., da sie die Reibe und
möglicherweise das Gerät beschädigen können.
• Lassen Sie den Entsafter für ein paar Sekunden nachlaufen, bevor Sie ihn ausschalten, damit weiterer
Saft herausgepresst werden kann. Warten Sie nach dem Ausschalten des Geräts, bis es vollständig zum
Stillstand gekommen ist und es sich völlig abgekühlt hat, bevor Sie es auseinander bauen.
• Bananen oder Avocados sind zum Entsaften nicht geeignet, da sie zu wenig Saft enthalten und das
Gerät verstopfen können. Geben Sie sie getrennt in einen Mixer.
• Wir raten nicht zum Entsaften von überreifem Obst, da dieses zu viel Trester im Filter zurück lässt und
das Gerät verstopft.
• Geben Sie niemals Flüssigkeiten in das Gerät.
• Wenn Sie kleine oder dünne Obst-/ Gemüsestücke entsaften möchten, geben Sie gleichzeitig
möglichst viele hinzu. Geben Sie für ein besseres Ergebnis beispielsweise 2 oder 3 Karotten auf einmal
in die Einfüllönung.
• Wickeln Sie beim Entsaften von Kräutern oder Weizengras diese in großblättrige Gemüsesorten,
wie zum Beispiel Spinat, Kohl usw. und machen Sie dann mit Obst oder Gemüse weiter, das viel Saft
enthält, wie zum Beispiel Ananas, Äpfel usw.
• Festeres Gemüse (z. B. Rüben) und faseriges Gemüse (z. B. Sellerie) sollten erst kurzgeschnitten und
langsam in die Einfüllönung gegeben werden, um die Verstopfungsgefahr zu verringern.
• Verwenden Sie für sehr saftige Lebensmittel die niedrigere Geschwindigkeitsstufe.
• Beachten Sie, dass der Trester umso feuchter ist, je saftiger die verarbeiteten Lebensmittel (z.B.
Gurken) sind. Drücken Sie den Trester ggf. durch ein Sieb um weiteren Saft zu gewinnen. Drücken Sie
alle Lebensmittel stehst langsam und gleichmäßig mit dem Stopfer nach unten.
• Lebensmittel mit geringen Saftanteil wie z.B. Bananen, Avocados geben nur wenig Saft. Verwenden
Sie diese Art von Lebensmitteln eher als geschmacklichen Zusatz und nicht als primäre Saftquelle.
• Drücken Sie alle Lebensmittel stehst langsam und gleichmäßig mit dem Stopfer nach unten.
• Der entstehende Trester enthält wertvolle Nährstoe. Verwenden Sie in bspw. für die Zubereitung von
Kuchen, Suppen etc.
REINIGUNG UND PFLEGE
• Warnung! Sorgen Sie vor der Reinigung dafür, dass das Gerät ausgeschaltet ist und der Netzstecker
aus der Steckdose gezogen wurde.
• Warnung! Tauchen Sie das Netzkabel, den Netzstecker oder die Motoreinheit niemals in Wasser oder
andere Flüssigkeiten.
• Zerlegen Sie den Entsafter wie im Kapitel Vor dem ersten Gebrauch , Punkte a) bis e), beschrieben.
• Reinigen der Motoreinheit: Verwenden Sie zum Reinigen ein leicht angefeuchtetes Tuch. Achten Sie
darauf, dass während des Reinigens keine Feuchtigkeit in das Geräteinnere gelangt.
• Reinigen aller abnehmbaren Teile: Entfernen Sie grobe Reste von allen abnehmbaren Teilen. Waschen
Sie die Teile in warmem Wasser mit Spülmittel ab. Spülen Sie sie gründlich unter laufendem Wasser ab.
• Benutzen Sie keine ätzenden Reinigungsmittel, Drahtbürsten, abreibenden Scheuermittel,
metallischen oder scharfen Gegenstände zum Reinigen des Gerätes.
• Trocknen Sie das Gerät nach dem Reinigen sorgfältig ab.
• Bewahren Sie das Gerät an einem kühlen, trockenen Platz auf, der für Kinder und Haustiere unzugänglich ist.
IM_OPJ4321_181029_V07_HR.indb 7 29/10/18 10:43 am

8
Size = A5
DE
FEHLERBEHEBUNG
Sollte es während des Betriebs zu Störungen kommen, beachten Sie nachfolgende Tabelle. Sollten die
Probleme wie unter Behebung angegeben nicht abgestellt werden können, wenden Sie sich an Ihren
Händler.
Problem Mögliche Ursache Behebung
Produkt funktioniert nicht • Keine Stromversorgung
• Das Produkt ist nicht
eingeschaltet
• Sicherungsbügel ist nicht
verriegelt
• Überprüfen der
Stromversorgung
• Produkt einschalten
• Überprüfen der
Sicherungsbügel
Motor bleibt beim Entsaften
stehen oder dreht auallend
langsam
• Sieb ist verstopft • Das Produkt ausschalten
und Netzstecker ziehen.
Verstopfung beseitigen
Der Saft spritzt aus dem Produkt
heraus
• Sie arbeiten zu schnell
• Geschwindigkeitsstufe ist zu
hoch eingestellt
• Langsamer arbeiten
• Geschwindigkeitsstufe
niedriger stellen
Während des Betriebs läuft Saft
am Produktsockel herunter
• Sieb oder Ausgussönung ist
verstopft
• Geschwindigkeitsstufe ist zu
hoch eingestellt
• Sieb oder Ausgussönung
reinigen
• Geschwindigkeitsstufe
niedriger stellen
TECHNISCHE DATEN
Nennspannung : 220 - 240 V~, 50/60 Hz
Nennleistung : 1000 W
Schutzklasse : II
ENTSORGUNG
Das Produkt nicht im Hausmüll entsorgen. Das Produkt ist an den ausgewiesenen Sammelstellen
für elektrische und elektronische Geräte zu entsorgen. Für weitere Informationen wenden Sie
sich bitte an Ihren Händler oder die zuständige Behörde am Ort.
IM_OPJ4321_181029_V07_HR.indb 8 29/10/18 10:43 am

9
EN
CONGRATULATIONS
Thank you for your purchase of an ok. product. Please read this manual carefully and keep it for future
reference.
IMPORTANT SAFETY INSTRUCTIONS. READ CAREFULLY AND KEEP FOR FUTURE REFERENCE.
1.
This product shall not be used by children. Keep the product
and its cord out of reach of children.
2. This product can be used by persons with reduced physical,
sensory or mental capabilities or lack of experience and
knowledge if they are being supervised or have been given
instruction concerning usage of the product in a safe way
and understand the hazards involved.
3. Children shall not play with the product.
4. If the supply cord is damaged, it must be replaced by the
manufacturer, its service agent or similarly qualied persons
in order to avoid a hazard.
5. The product is not suitable for continuous operation. Do not
operate the product longer than 7 minutes. Let the product
cool down before next use.
6. Always disconnect the product from the supply if it is left
unattended and before assembling, disassembling or
cleaning.
7. Switch o the product and disconnect it from supply before
changing accessories or approaching parts that move in use.
Do not use the product if the rotating sieve or the protecting
cover is damaged or has visible cracks.
8. Use the product only for its intended purpose and with
recommended accessories and components. Improper use or
wrong operation may lead to hazards.
9. Care shall be taken when handling the sharp cutting blades,
emptying the bowl and during cleaning.
10. The product is designed for the preparation of normal
household quantities in the home, or in household-like, non-
commercial environments. Household-like environments
include sta kitchens in shops, oces, agricultural and other
small businesses or for use by guests at bed-and-breakfast
establishments, small hotels and similar residential facilities.
IM_OPJ4321_181029_V07_HR.indb 9 29/10/18 10:43 am

10
Size = A5
EN
11. Clean the product and all other accessories after each use.
12. Follow the instructions in the chapter Cleaning and care.
13. Observe all safety instructions to avoid damage through improper use!
14. Keep this instruction manual for future use. Should this product be passed on to a third party, then
this instruction manual must be included.
15. Before connecting the product to the power supply, make sure that the power supply voltage and
current rating corresponds with the power supply details shown on the product rating label.
16. Never use a damaged product! Disconnect the product from the electrical outlet and contact your
retailer if it is damaged.
17. To avoid damaging the cord, do not squeeze, bend or chafe it on sharp edges. Keep it away from
hot surfaces and open ames as well. Do not let rotating blades touch the power cord.
18. Lay out the cord in such a way that no unintentional pulling or tripping over it is possible.
19. If an extension cord is used, its capacity needs to be suitable for the power consumed by the
product.
20. Do not operate the product with wet hands or while standing on a wet oor. Do not touch the
power plug with wet hands.
21. Do not open the product casing under any circumstances. Do not insert any foreign objects into
the inside of the casing.
22. Do not pull the power plug out of the electrical outlet by the power cord and do not wrap the
power cord around the product.
23. Connect the power plug to an easily reachable electrical outlet so that in case of an emergency
the product can be unplugged immediately. Pull the power plug out of the electrical outlet to
completely switch o the product. Use the power plug as the disconnection device.
24. Disconnect the power plug from the electrical outlet when the product is not in use and before
cleaning.
25. If the power cord should overheat, stop using the product and disconnect the product from the
electrical outlet.
26. Do not place the product on hot plates (gas, electric, coal cooking range, etc.). Keep the product
away from hot surfaces and open ames. Always operate the product on a level, stable, clean, heat-
resistant and dry surface.
27. Never leave the product unattended during use.
28. Dry the product and all accessories before connecting it to the power supply and prior to attaching
accessories.
INTENDED USE
This appliance is only intended for preparing juices. This product is only suitable for private household
use and it is not designed for commercial purpose. Every other type of use can lead to damage to the
product or injury.
The Imtron GmbH assumes no liability for damage to the product, for property damage or for personal
injury due to careless or improper usage of the product, or usage of product which does not meet the
manufacturer’s specied purpose.
IM_OPJ4321_181029_V07_HR.indb 10 29/10/18 10:43 am

11
EN
CONTROLS AND COMPONENTS
A. Pusher
B. Lid with feeding chute
C. Locking groove
D. Stainless steel sieve with blade
E. Sieve holder
F. Spout
G. Base with motor
H. Juice container
I. Locking bar
J. Power cord with power plug
K. Vacuum cup feet
L. On/o switch (O, 1, 2, P)
M. Pomace container
N. Container holder
DELIVERY CONTENT
1 x Juicer
1 x User manual
1 x Warranty card
BEFORE FIRST TIME USE
• Remove the product and accessories carefully from the original packaging. It is recommended to keep
the original packaging for storage. If you wish to dispose of the original packaging, please observe
applicable legal provisions. Should you have any questions regarding proper disposal, contact your
local waste management center.
• Check for completeness and transport damage. In case of damages or incompleteness please contact
your dealer.
• After unpacking, please refer to chapter Cleaning and care.
1
Before using the rst time, all removable parts should be cleaned.
Note: Wash all removable parts with water, mixed with a little detergent and then rinse and dry
thoroughly.
Alternative the parts A, B, D, E, H and M can also be cleaned in the dishwasher.
Disassemble the device as follows:
a) Put down the safety bar.
b) Remove the pomace container.
c) Remove the lid with the feeding chute.
d) Pull o the sieve holder upwards together with the sieve.
Note: The sieve holder is xed relatively tight. Pull from all sides, especially at the side of the
spout.
e) Remove the sieve from the sieve holder.
ASSEMBLY
WARNING! Never connect the power plug into an electrical outlet before the appliance is fully
assembled.
2
Place the base on a dry, at, and steady surface. Press the base rmly on the surface so that the
suction feet get a good grip.
3
Place the sieve holder on the base. Make sure sieve holder and spout t in place correctly.
4
Attaching the pulp container: Insert its upper part under the receptacle lip. Push the lower part
rmly into the pulp container holder.
5
Insert the stainless steel sieve inside the receptacle, matching its bottom with the base shaft.
6
Lock the sieve in place: Press the sieve edge downward until a click is heard.
7
Place the lid on the juicer.
8
Lock the bar: Lift up the locking bar until it ts the locking grooves on both sides of the lid.
IM_OPJ4321_181029_V07_HR.indb 11 29/10/18 10:43 am

12
Size = A5
EN
9
Insert the pusher into the feeding chute. Make sure the notch of the pusher ts the ridge on the
feeding chute top.
Place the juice container underneath the spout.
Now the appliance is assembled and ready for use.
Note: Ensure that all components, esp. the metal sieve are properly assembled before using the
product.
PREPARING FRUITS AND VEGETABLES
• This juicer can be used to make juices from many dierent types of fruit and vegetables, but some
preparations are needed to create avourful and tasty juices.
• Rinse fruits and vegetables under fresh running water.
• Cut large fruits and vegetables into pieces that t into the feeding chute.
• Remove large seeds, stones, and pits from cherries, peaches, etc.
• Remove thick or hard skin from pineapple, oranges, melons, etc.
EXTRACTING JUICE
Cautions!
• Before plugging in the juicer, make sure the electrical circuit is not overloaded with other appliances.
• Always turn the juicer o and unplug it when not in use.
• Do not put your hand or ngers into the feeding chute to push food or remove clogged food. Use the
pusher only. Danger of serious injury due to the rotating blade!
10
Remove the pusher from the feeding chute.
11
Connect the power plug to a suitable electrical outlet.
12
Set the on/o switch to desired juicing speed.
Speed Description
0 O position
1 Extracting juice from soft fruits and vegetables
2 Extracting juice from hard fruits and vegetables
13
Fill the prepared ingredients into the feeding chute. Do not overload it.
Add small pieces at a time.
Fruit pulp is ejected into the pulp container. Meanwhile, the extracted juice ows through the
spout into the juice container.
Use the pusher to slowly push the ingredients through the feeding chute.
Pour small amounts into the feeding chute again and again and push it down with the pusher.
14
After use: Set the on/o switch to the 0 (o ) position.
15
1. Wait until the blade has stopped running.
2. Disconnect the power plug from the electrical outlet.
PULSE FUNCTION
Note: You can always use the pulse function for maximum power! Use this function for a maximum of
2 minutes to avoid overheating the motor!
16
1. Set the on/o switch to P and hold it to start juicing.
2. Release the on/o switch to stop juicing. The switch goes back to 0 automatically.
REMOVING BLOCKAGES
• If the blades of the sieve are clogged: Set the on/o switch to 0. Wait until the blade stops running.
• Disconnect the power plug from the electrical outlet and remove the lid.
• Clear all clogged foodstu.
IM_OPJ4321_181029_V07_HR.indb 12 29/10/18 10:43 am

13
EN
HINTS
• Do not put any fruit or vegetables in your juicer until power is turned on and the motor is spinning.
• Allow juicer to run for a few seconds before juicing.
• Do not force food into the juicer. Allow food to pass through slowly and steadily using the pusher.
• Any fruit or vegetable that will t the chute can be put through whole. Only cut fruits and vegetables
if they are too large to t into the chute. Then it should be cut into small enough pieces to t in the
chute. Do not cut pieces too small.
• Remove large pits such as peach, mango, etc., as they will damage the blade and possibly the
appliance.
• Let the juicer run for a few seconds before turning it o to allow any excess juice to be extracted. Once
turned o, wait until the appliance has come to a complete standstill and has fully cooled before
disassembling.
• Do not use bananas or avocados as they do not contain juice and will clog the appliance. Add them
separately in a blender.
• We do not recommend using overripe fruit as it will leave too much pulp in the sieve and clog the
appliance.
• Do not pour liquids into the appliance at any time.
• When using small or thin fruits or vegetables, insert more of them at the same time. For example,
insert 2 or 3 carrots at a time into the chute for best results.
• When juicing herbs or wheat grass, wrap them in larger leafed vegetables such as spinach, cabbage,
etc., and follow with a fruit or vegetable that contains an abundance of juice such as pineapple, apple,
etc.
• Always use the slower setting when juicing very juicy foods. Note that the pomace will be wetter the
juicer the used foods are (e.g. cucumbers). Push the pomace through a sieve to receive more juice.
Always push down the foods at a slow but steady pace.
• Fruits, Vegetables that don’t contain a lot of juice (e.g. bananas) won’t give a lot of juice. Rather use
these foods as a avourful addition and not as a the main source of juice. Always push down the
foods at a slow but steady pace.
• Denser vegetables (e.g. beets) and brous vegetables (e.g. celery) should be chopped and fed slowly
into the chute to reduce clogging.
CLEANING AND CARE
• Warning! Before cleaning, always switch o the appliance and disconnect the plug from the power.
• Warning! Never immerse the power cord with plug or the base in water or other liquids.
• Disassemble the juicer as given in chapter Assembly, points a) to e).
• Cleaning the base: Use a soft, slightly damp cloth. Make sure that no moisture is entering the
appliance during cleaning.
• Cleaning all detachable parts: Remove coarse remnants of all removable parts. Wash the parts in
warm water with detergent. Rinse thoroughly under running water.
• Never use corrosive detergents, wire brushes, abrasive scourers, metal or sharp implements to clean
your appliance.
• Dry the appliance thoroughly after cleaning.
• Store the appliance in a cool, dry location, away from children and pets.
IM_OPJ4321_181029_V07_HR.indb 13 29/10/18 10:43 am

14
Size = A5
EN
TROUBLESHOOTING
If there are any problems during operation, please refer to the following table. If problems cannot be
solved as indicated under Solution, please contact your manufacturer.
Problem Possible causes Solution
Problem Possible causes
Solution
• Interrupted power supply
• Product is switched o
• The locking bar is not secured
• Interrupted power supply
• Product is switched o
• The locking bar is not secured
The motor stops while juicing or
it turns noticeably slow
• The sieve is blocked • Switch o the product and
unplug. Clean the sieve.
The juice sprays out of the
product
• You are working too fast
• The speed setting is too high
• Work more slowly
• Change to a lower speed
setting
During the processing, the juice
is running down the product
base
• The sieve or the spout is
blocked
• The speed setting is too high
• Clean the sieve and spout
• Change to a lower setting
TECHNICAL DATA
Rated voltage : 220 - 240 V~, 50/60 Hz
Rated power : 1000 W
Protection class : II
DISPOSAL
Do not dispose of this product as unsorted municipal waste. Return it to a designated collection
point for the recycling of WEEE. By doing so, you will help to conserve resources and protect the
environment. Contact your retailer or local authorities for more information.
IM_OPJ4321_181029_V07_HR.indb 14 29/10/18 10:43 am

15
ES
ENHORABUENA
Gracias por adquirir éste producto ok.. Por favor, lea atentamente este manual y guárdelo para un uso
posterior.
INSTRUCCIONES DE SEGURIDAD IMPORTANTES . LÉALAS CUIDADOSAMENTE Y CONSÉRVELAS
PARA FUTURAS CONSULTAS.
1.
Los niños no deben utilizar este producto. Mantenga el
aparato y su cable lejos del alcance de los niños.
2. Este producto puede ser usado por personas con
capacidades físicas, sensoriales o mentales reducidas, o falta
de experiencia o conocimientos, si reciben supervisión o
instrucciones sobre el uso del producto de forma segura y
comprenden los riesgos que implica.
3. Los niños no deben jugar con el aparato.
4. Un cable de alimentación dañado sólo puede ser
reemplazado por el agente autorizado de servicio para evitar
peligros.
5. El producto no es adecuado para un funcionamiento
continuo. No haga funcionar el producto más de 7 minutos.
Deje que el producto se enfríe antes de su siguiente uso.
6. Desconecte siempre el dispositivo de la fuente de
alimentación si queda sin supervisión y antes de realizar su
montaje, desmontaje o limpieza.
7. Apague el dispositivo y desconéctelo de la fuente de
alimentación antes de cambiar accesorios o acercarse a
piezas que se muevan durante el uso.
8. Use el producto exclusivamente para su nalidad y con
los accesorios y componentes recomendados. Un uso
inadecuado o incorrecto puede provocar riesgos.
9. Se debe tener cuidado al manipular las cuchillas aladas,
mientras esté vaciando el cuenco y durante la limpieza.
10. El producto está diseñado para la preparación de las
cantidades propias del uso doméstico, o de entornos
similares al doméstico, y no es adecuado para uso comercial.
Los entornos similares al doméstico incluyen cocinas para
el personal en tiendas, ocinas y otros negocios pequeños,
o para los huéspedes en albergues, hoteles pequeños e
instalaciones residenciales parecidas.
IM_OPJ4321_181029_V07_HR.indb 15 29/10/18 10:43 am

16
Size = A5
ES
11. Limpie el producto y los demás accesorios después de cada
uso.
12. Siga las instrucciones del capítulo Limpieza y cuidados.
13. ¡Siga todas las instrucciones de seguridad para evitar daños provocados por un uso incorrecto!
14. Conserve estas instrucciones para poder consultarlas en el futuro. En caso de ceder el producto a
terceras partes, debe incluir también el manual de instrucciones.
15. Antes de conectar el producto a la fuente de alimentación, asegúrese de que el voltaje de la fuente
de alimentación y la intensidad nominal coincidan con la información de la fuente de alimentación
que se muestra en la etiqueta de clasicación del producto.
16. ¡Nunca use un producto dañado! Si el producto está dañado, desenchúfelo de la toma de corriente
y póngase en contacto con el vendedor.
17. Para evitar dañar el cable, no lo estruje, lo doble ni lo roce con bordes alados. Manténgalo
alejado de supercies calientes y llamas. No permita que las cuchillas giratorias toquen el cable de
alimentación.
18. Coloque el cable de manera que no se pueda tirar ni tropezar con él de forma accidental.
19. Si se utiliza un alargador, su capacidad debe ser adecuada para la potencia que necesita el
producto.
20. No maneje el producto con las manos mojadas o si está de pie en un suelo mojado. No toque el
enchufe con las manos mojadas.
21. No abra la carcasa del producto bajo ninguna circunstancia. No inserte ningún objeto extraño en el
interior de la carcasa.
22. No desconecte el enchufe de la toma de corriente tirando del cable de alimentación ni enrolle el
cable de alimentación alrededor del producto.
23. Conecte el enchufe a una toma de corriente de fácil acceso para que, en caso de emergencia, el
producto pueda desenchufarse inmediatamente. Desconecte el enchufe de la toma de corriente
para apagar completamente el producto. Use el enchufe como dispositivo de desconexión.
24. Desconecte el enchufe de la toma de corriente cuando no se esté utilizando el producto y antes de
limpiarlo.
25. Si el cable de alimentación se sobrecalienta, deje de usar el producto y desenchúfelo de la toma de
corriente.
26. No coloque el producto sobre placas calientes (cocinas de gas, eléctricas, de carbón, etc.).
Mantenga el producto alejado de supercies calientes y llamas. Utilice siempre el producto sobre
una supercie nivelada, estable, limpia, seca y resistente al calor.
27. Nunca deje el producto sin vigilancia durante el uso.
28. Seque el producto y todos los accesorios antes de conectar el aparato a la fuente de alimentación y
antes de colocar los accesorios.
FINALIDAD DE USO
Este aparato ha sido diseñado únicamente para preparar zumos. Este producto es adecuado solo para
uso doméstico privado y no está diseñado para uso comercial. Cualquier otro uso puede provocar daños
en el producto o lesiones personales.
Imtron GmbH no asume ninguna responsabilidad por daños producidos al producto, a la propiedad o
por lesiones personales debidas al uso inadecuado del producto o por su utilización para una nalidad
distinta a la especicada por el fabricante.
IM_OPJ4321_181029_V07_HR.indb 16 29/10/18 10:43 am

17
ES
CONTROL Y COMPONENTES
A. Empujador de alimentos
B. Tapa con tolva de alimentación
C. Ranura de bloqueo
D. Tamiz de acero inoxidable con cuchilla
E. Soporte del tamiz
F. Caño
G. Base con motor
H. Recipiente de zumo
I. Barra de bloqueo
J. Cable de alimentación con enchufe
K. Patas con ventosas
L. Interruptor de encender/apagar (O, 1, 2, P)
M. Recipiente para pulpa
N. Soporte para el recipiente
CONTENIDO DEL PAQUETE
1 x Exprimidor
1 x Manual de usuario
1 x Tarjeta de garantía
ANTES DEL PRIMER USO
• Saque el producto y sus accesorios cuidadosamente del embalaje original. Se recomienda conservar
el embalaje original para guardarlo. Si quiere desechar el embalaje original, tenga en cuenta las
normas legales aplicables. Si tiene dudas sobre una eliminación adecuada, contacte con su centro de
gestión de residuos local.
• Compruebe que el contenido entregado esté completo y sin daños. Si el contenido está incompleto o
dañado, contacte de inmediato con su lugar de adquisición.
• Tras desembalarlo, consulte el capítulo Limpieza y cuidados.
1
Antes de usar por primera vez, debe limpiar todas las piezas extraíbles.
Nota: Lave todas las piezas extraíbles con agua con un poco de detergente y luego enjuáguelas y
séquelas completamente.
Alternativamente, las partes A, B, D, E, H y M también se pueden lavar en el lavavajillas.
Desmonte el dispositivo de la siguiente manera:
a) Baje la barra de seguridad;
b) Retire el recipiente para pulpa;
c) Retire la tapa con la tolva de alimentación;
d) Tire del soporte del tamiz hacia arriba junto con el tamiz.
Nota: El soporte del tamiz queda relativamente ajustado. Tire de todos lados, especialmente del
lado del caño.
e) Retire el tamiz de su soporte.
MONTAJE
¡ATENCIÓN! Nunca conecte el enchufe a una toma de corriente si el dispositivo no está completamente
montado.
2
Ubique la base en una supercie seca, plana y rme. Coloque rmemente la base sobre la
supercie, de manera que los pies se agarren rmemente.
3
Coloque el recipiente en la base. Asegúrese de que la boquilla y el labio se encuentran en su sitio.
4
Adjuntar el recipiente para la pulpa: Inserte su pieza superior bajo el recipiente con la boquilla.
Empuje rmemente la pieza inferior hacia el soporte del contenedor de pulpas.
5
Inserte el ltro de acero inoxidable en el interior del recipiente, haciéndolo coincidir el fondo con el
eje de la base.
6
Coloque el ltro en el lugar adecuado: Presione el borde del ltro hacia abajo hasta que escuche un
clic.
7
Coloque la tapa en la licuadora.
8
Coloque la barra: Levante la barra de bloqueo hasta que encaje en la ranura de aseguramiento en
ambos lados de la tapa.
IM_OPJ4321_181029_V07_HR.indb 17 29/10/18 10:43 am

18
Size = A5
ES
9
Inserte el empujador en el conducto de alimentación. Asegúrese de que la marca del empujador
coincide con el borde rugoso de la parte superior del conducto de alimentación.
Coloque el recipiente para el zumo debajo de la boquilla.
El dispositivo está montado y listo para ser utilizado.
Nota: Asegúrese de que todos los componentes, especialmente el tamiz metálico, están montados
correctamente antes de usar el producto.
PREPARACIÓN DE FRUTAS Y VERDURAS
• Esta licuadora puede utilizarse para hacer zumos de diferentes tipos de frutas y verduras, pero para
poder crear zumos ricos y sabrosos se necesita alguna preparación.
• Enjuague las frutas bajo el agua corriente fresca.
• Corte las frutas de gran tamaño en trozos de manera que puedan introducirse en el conducto de
alimentación.
• Retire las semillas grandes y huesos de las cerezas, melocotones etc.
• Pele las frutas con una piel muy na (piñas, naranjas, melones, etc.)
EXTRACCIÓN DEL JUGO
¡Precaución!
• Antes de conectar la licuadora, asegúrese de que el circuito eléctrico no está sobrecargado por otros
dispositivos.
• Apague siempre la licuadora y desconéctela cuando no la esté utilizando.
• No coloque sus manos o dedos el conducto de alimentación para introducir comida o retirar comida
obstruida. Utilice únicamente el empujador. ¡Riesgo de lesiones graves a causa de la cuchilla
rotatoria!
10
Retire el empujador del conducto de alimentación.
11
Conecte el enchufe a una toma de corriente adecuada.
12
Ajuste el interruptor de encendido/apagado eligiendo así la velocidad.
Velocidad Descripción
0 Posición de apagado
1 Extracción de zumo de bayas y verduras
2 Extracción de zumo de frutas duras y verduras
13
Vierta los ingredientes preparados en el conducto de alimentación. No lo sobrecargue.
Añada los pequeños trozos a la vez.
El pulpo de la fruta pasa al recipiente para la pulpa. Mientras tanto, el zumo extraído uye a través
de la boquilla llegando hasta el recipiente para el zumo.
Utilice el empujador para empujar los ingredientes a través del conducto de alimentación.
Vierta pequeñas cantidades en la tolva de alimentación una y otra vez y empújelas hacia abajo con
el empujador.
14
Después del uso: Ajuste el interruptor de encendido/apagado a la posición 0 (apagado).
15
1. Espere hasta que la cuchilla haya dejado de funcionar.
2. Desconecte el enchufe de la red eléctrica,
FUNCIÓN TURBO
Nota: ¡Siempre puede utilizar la función turbo para obtener potencia adicional! ¡Utilice esta función
durante un máximo de 2 minutos con el n de evitar un sobrecalentamiento del motor!
16
1. Ajuste el interruptor de encendido/apagado a la posición P y manténgalo pulsado para ponerlo
en funcionamiento.
2. Deje de pulsar el interruptor de encendido/apagado para detener el funcionamiento. El
interruptor vuelve a la posición 0 de forma automática.
IM_OPJ4321_181029_V07_HR.indb 18 29/10/18 10:43 am

19
ES
ELIMINACIÓN DE OBSTRUCCIONES
• Si las cuchillas del tamiz están obstruidas: Ponga el interruptor de encendido/apagado en 0. Espere
hasta que la cuchilla se detenga.
• Desconecte el enchufe de la toma de corriente y quite la tapa.
• Elimine todos los alimentos obstruidos.
CONSEJOS
• No coloque ninguna fruta o verdura en la licuadora hasta que esté conectada y el motor esté girando.
• Permita que la licuadora funcione durante unos segundos antes de elaborar el zumo.
• No introduzca bruscamente la comida en la licuadora. Permita que la comida pase lenta y
continuamente utilizando el empujador.
• Si la fruta o verdura encaja en el conducto por su tamaño, podrá colocar la pieza entera. Si el alimento
es demasiado grande, será necesario cortarlo. Deberá cortarlo en las piezas necesarias para que pueda
caber en el conducto. No corte los trozos demasiado pequeños.
• Retire los huesos grandes como p.ej. del melocotón, mango, etc., ya que podría dañar la cuchilla y
también el dispositivo.
• Deje que la licuadora funcione durante unos segundos antes de apagarla con el n de permitir
que cualquier posible exceso de zumo sea extraído de la pulpa. Una vez apagada, espere a que el
dispositivo se haya detenido por completo y se haya enfriado por completo antes de desmontarla.
• No utilice bananas o aguacates, pues no contienen zumos y atascarían el dispositivo. Añádalos por
separado en una batidora.
• No le recomendamos que utilice fruta demasiado madura, ya que dejaría mucha pulpa en el ltro y
atascaría el dispositivo.
• No vierta líquidos en el aparato en ningún momento.
• Cuando utilice frutas o verduras pequeñas o nas, añada una mayor cantidad al mismo tiempo. Por
ejemplo, inserte 2 o 3 zanahorias al mismo tiempo en el conducto para obtener mejores resultados.
• Al exprimir hierbas o hierba de trigo, envuélvalas en verduras con hojas grandes como las espinacas,
coles, etc., y a continuación siga con una fruta o una verdura que contenga gran abundancia de zumo
como p.ej., una piña, una manzana, etc.
• Las verduras densas (p.ej. remolacha) y las verduras con bra (p.ej. apio) deben picarse e introducirse
lentamente en el conducto para reducir las obstrucciones.
LIMPIEZA Y CUIDADO
• ¡Atención! Antes de limpiar el dispositivo, apague siempre el producto y desconéctelo de la toma de
corriente.
• ¡Atención! Nunca introduzca el cable con el enchufe o la base en el agua u otros líquidos.
• Desmonte la licuadora en el orden contrario de montaje (Montaje a) - e)).
• Limpieza de la base: Utilice un paño suave, levemente mojado Asegúrese de que no se introduzca
humedad en el aparato durante su limpieza.
• Limpieza de las piezas desmontables: Introdúzcalas en detergente caliente y suave durante unos 3
o 5 minutos aproximadamente. Enjuáguelas bajo el agua corriente fresca.
• Nunca utilice detergentes corrosivos, cepillos de alambre, estropajos abrasivos o instrumentos de
metal y alados para limpiar su aparato.
• Seque el aparato cuidadosamente después de limpiarlo.
• Almacene el dispositivo en un lugar frío y seco, alejado de los niños y mascotas.
IM_OPJ4321_181029_V07_HR.indb 19 29/10/18 10:43 am

20
Size = A5
ES
RESOLUCIÓN DE PROBLEMAS
Si aparecen problemas de funcionamiento, consulte la siguiente tabla. Si los problemas no se pueden
resolver como se indica en Solución, contacte con el fabricante.
Problema Causas posibles Solución
El producto no funciona • Suministro de corriente
interrumpido
• El aparato está desconectado
• La barra de bloqueo no está
asegurada
• Compruebe la fuente de
alimentación
• Encienda el producto
• Compruebe la barra de
bloqueo
El motor se para o se ralentiza
mientras se hace el zumo
• El tamiz está obstruido • Apague el producto y
desenchúfelo. Limpie el
tamiz.
El zumo se derrama fuera del
producto
• Está funcionando demasiado
rápido
• La velocidad es demasiado
alta
• Hágalo funcionar más
despacio
• Baje la velocidad
Durante el procesamiento, el
zumo se acumula en la base del
producto
• El tamiz o el caño está
obstruido
• La velocidad es demasiado
alta
• Limpie el tamiz y el caño
• Baje la velocidad
ESPECIFICACIONES
Tensión nominal : 220 - 240 V~, 50/60 Hz
Potencia nominal : 1000 W
Clase de protección : II
ELIMINACIÓN
No deseche este aparato como residuo doméstico convencional. Devuélvalo a un punto de
recogida de reciclado de piezas eléctricas y electrónicas WEEE. Con ello ayudará a preservar los
recursos naturales y a proteger el medio ambiente. Contactar con su vendedor o las autoridades
locales para obtener más información.
IM_OPJ4321_181029_V07_HR.indb 20 29/10/18 10:43 am
Sayfa yükleniyor...
Sayfa yükleniyor...
Sayfa yükleniyor...
Sayfa yükleniyor...
Sayfa yükleniyor...
Sayfa yükleniyor...
Sayfa yükleniyor...
Sayfa yükleniyor...
Sayfa yükleniyor...
Sayfa yükleniyor...
Sayfa yükleniyor...
Sayfa yükleniyor...
Sayfa yükleniyor...
Sayfa yükleniyor...
Sayfa yükleniyor...
Sayfa yükleniyor...
Sayfa yükleniyor...
Sayfa yükleniyor...
Sayfa yükleniyor...
Sayfa yükleniyor...
Sayfa yükleniyor...
Sayfa yükleniyor...
Sayfa yükleniyor...
Sayfa yükleniyor...
Sayfa yükleniyor...
Sayfa yükleniyor...
Sayfa yükleniyor...
Sayfa yükleniyor...
Sayfa yükleniyor...
Sayfa yükleniyor...
Sayfa yükleniyor...
Sayfa yükleniyor...
Sayfa yükleniyor...
Sayfa yükleniyor...
Sayfa yükleniyor...
Sayfa yükleniyor...
Sayfa yükleniyor...
Sayfa yükleniyor...
Sayfa yükleniyor...
Sayfa yükleniyor...
Sayfa yükleniyor...
Sayfa yükleniyor...
Sayfa yükleniyor...
Sayfa yükleniyor...
Sayfa yükleniyor...
Sayfa yükleniyor...
Sayfa yükleniyor...
Sayfa yükleniyor...
Sayfa yükleniyor...
Sayfa yükleniyor...
Sayfa yükleniyor...
Sayfa yükleniyor...
Sayfa yükleniyor...
Sayfa yükleniyor...
-
 1
1
-
 2
2
-
 3
3
-
 4
4
-
 5
5
-
 6
6
-
 7
7
-
 8
8
-
 9
9
-
 10
10
-
 11
11
-
 12
12
-
 13
13
-
 14
14
-
 15
15
-
 16
16
-
 17
17
-
 18
18
-
 19
19
-
 20
20
-
 21
21
-
 22
22
-
 23
23
-
 24
24
-
 25
25
-
 26
26
-
 27
27
-
 28
28
-
 29
29
-
 30
30
-
 31
31
-
 32
32
-
 33
33
-
 34
34
-
 35
35
-
 36
36
-
 37
37
-
 38
38
-
 39
39
-
 40
40
-
 41
41
-
 42
42
-
 43
43
-
 44
44
-
 45
45
-
 46
46
-
 47
47
-
 48
48
-
 49
49
-
 50
50
-
 51
51
-
 52
52
-
 53
53
-
 54
54
-
 55
55
-
 56
56
-
 57
57
-
 58
58
-
 59
59
-
 60
60
-
 61
61
-
 62
62
-
 63
63
-
 64
64
-
 65
65
-
 66
66
-
 67
67
-
 68
68
-
 69
69
-
 70
70
-
 71
71
-
 72
72
-
 73
73
-
 74
74


OK. OPJ 4321 Kullanım kılavuzu
- Kategori
- Meyve suyu üreticileri
- Tip
- Kullanım kılavuzu
diğer dillerde
- español: OK. OPJ 4321 Manual de usuario
- français: OK. OPJ 4321 Manuel utilisateur
- italiano: OK. OPJ 4321 Manuale utente
- svenska: OK. OPJ 4321 Användarmanual
- polski: OK. OPJ 4321 Instrukcja obsługi
- Deutsch: OK. OPJ 4321 Benutzerhandbuch
- português: OK. OPJ 4321 Manual do usuário
- English: OK. OPJ 4321 User manual
- Nederlands: OK. OPJ 4321 Handleiding
İlgili makaleler
Diğer belgeler
-
Palson MULTIFRUIT COMPACT El kitabı
-
Philips HR1870 Kullanım kılavuzu
-
-
-
Electrolux ESF1000 Kullanım kılavuzu
-
Philips HR7777/00 Kullanım kılavuzu
-
Bosch MES4000/01 Kullanma talimatları
-
Bosch MES 4000 Kullanım kılavuzu
-
Philips HR1858/00 Kullanım kılavuzu
-