Dell PowerEdge R810 Hızlı başlangıç Kılavuzu
- Kategori
- Sunucular
- Tip
- Hızlı başlangıç Kılavuzu

Dell™ PowerEdge™
R810 Systems
Getting Started
With Your System
Začínáme se systémem
Guide de mise en route
Erste Schritte mit dem System
Τα πρώτα βήµατα µε το σύστηµά σας
Rozpoczęcie pracy z systemem
Начало работы с системой
Procedimientos iniciales con el sistema
Sisteminizi Kullanmaya Başlarken
תכרעמה םע הדובעה תליחת


Dell™ PowerEdge™
R810 Systems
Getting Started
With Your System
Regulatory Model E05S Series

Notes, Cautions, and Warnings
NOTE: A NOTE indicates important information that helps you make better use of
your computer.
CAUTION: A CAUTION indicates potential damage to hardware or loss of data
if instructions are not followed.
WARNING: A WARNING indicates a potential for property damage,
personal injury, or death.
____________________
Information in this document is subject to change without notice.
© 2009 Dell Inc. All rights reserved.
Reproduction of these materials in any manner whatsoever without the written permission of Dell Inc.
is strictly forbidden.
Trademarks used in this text: Dell, the DELL logo and PowerEdge are trademarks of Dell Inc.;
Intel and Xeon are registered trademarks of Intel Corporation in the U.S. and other countries;
Microsoft, Windows, Windows Server and Hyper-V are either trademarks or registered trademarks
of Microsoft Corporation in the United States and/or other countries; SUSE is a registered trademark
of Novell, Inc. in the United States and other countries; Citrix and XenServer are trademarks
of Citrix Systems, Inc. and/or more of its subsidiaries, and may be registered in the United States
Patent and Trademark Office and in other countries; VMware is a registered trademark or trademark
(the “Marks”) of VMware, Inc. in the United States and/or other jurisdictions; Solaris is a trademark
of Sun Microsystems, Inc. in the United States and other countries.
Other trademarks and trade names may be used in this document to refer to either the entities claiming
the marks and names or their products. Dell Inc. disclaims any proprietary interest in trademarks and
trade names other than its own.
Regulatory Model E05S Series
November 2009 P/N X919M Rev. A01

Getting Started With Your System 3
Installation and Configuration
WARNING: Before performing the following procedure, review the safety
instructions that came with the system.
Unpacking the System
Unpack your system and identify each item.
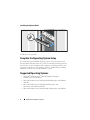
Installing the Rails and System in a Rack
Assemble the rails and install the system in the rack following the safety
instructions and the rack installation instructions provided with your system.

4 Getting Started With Your System
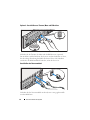
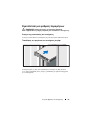
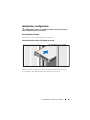
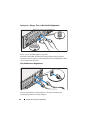
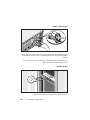
Optional – Connecting the Keyboard, Mouse, and Monitor
Connect the keyboard, mouse, and monitor (optional).
The connectors on the back of your system have icons indicating which cable
to plug into each connector. Be sure to tighten the screws (if any) on the
monitor's cable connector.
Connecting the Power Cable(s)
Connect the system’s power cable(s) to the system and, if a monitor is used,
connect the monitor’s power cable to the monitor.

Getting Started With Your System 5
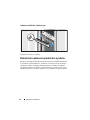
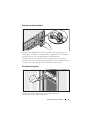
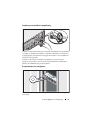
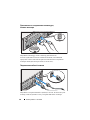
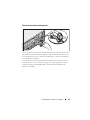
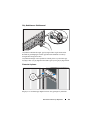
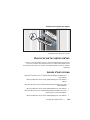
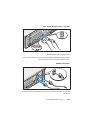
Securing the Power Cable(s)
Attach the power cable retention bracket on the right bend of the power
supply handle. Bend the system power cable into a loop as shown in the
illustration and attach to the bracket’s cable clasp.
Plug the other end of the power cable into a grounded electrical outlet or
a separate power source such as an uninterrupted power supply (UPS)
or a power distribution unit (PDU).
Turning On the System
Press the power button on the system and the monitor. The power indicators
should light.

6 Getting Started With Your System
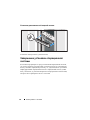
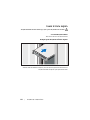
Installing the Optional Bezel
Install the bezel (optional).
Complete the Operating System Setup
If you purchased a preinstalled operating system, see the operating system
documentation that ships with your system. To install an operating system for
the first time, see the installation and configuration documentation for your
operating system. Be sure the operating system is installed before installing
hardware or software not purchased with the system.
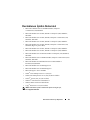
Supported Operating Systems
• Microsoft
®
Windows Server
®
2008 R2 Standard, Enterprise,
and Datacenter (x64) Editions
• Microsoft Windows Server 2008 Standard and Enterprise (x86) Editions
with SP2
• Microsoft Windows Server 2008 Standard, Enterprise, and
Datacenter (x64) Editions with SP2
• Microsoft Windows Server 2008 Standard and Enterprise (x86) Editions

Getting Started With Your System 7
• Microsoft Windows Server 2008 Standard, Enterprise, and
Datacenter (x64) Editions (with Hyper-V role enabled)
• Microsoft Windows Server 2003 Standard and Enterprise (x86) Editions
• Microsoft Windows Server 2003 Standard and Enterprise (x64) Editions
• Microsoft Windows Server 2003 R2 Standard and Enterprise (x86)
Editions with SP2
• Microsoft Windows Server 2003 R2 Standard, Enterprise,
and Datacenter (x64) Editions with SP2
• Microsoft Windows Essential Business Server 2008 Standard and
Premium (x64) Editions
• Microsoft Windows Server 2008 Hyper-V™
• Microsoft Windows Server 2008 R2 Hyper-V
• Microsoft Hyper-V Server 2008 R2
•SUSE
®
Linux Enterprise Server 11 (x86_64)
• SUSE Linux Enterprise Server 10 (x86_64) with SP3
•Solaris
®
10 10/9 (x86_64) (when available)
•VMware
®
ESX Version 4.0 Update 1
• VMware ESXi Version 4.0 Update 1
•Citrix
®
XenServer™ 5.6 (when available)
NOTE: For the latest information on supported operating systems,
see support.dell.com.

8 Getting Started With Your System
Other Information You May Need
WARNING: See the safety and regulatory information that shipped with your
system. Warranty information may be included within this document or as a
separate document.
• The rack documentation included with your rack solution describes
how to install your system into a rack.
•The
Hardware Owner’s Manual
provides information about system
features and describes how to troubleshoot the system and install or
replace system components. This document is available online at
support.dell.com/manuals
.
• Any media that ships with your system that provides documentation
and tools for configuring and managing your system, including those
pertaining to the operating system, system management software,
system updates, and system components that you purchased with
your system.
NOTE: Always check for updates on support.dell.com/manuals and read the
updates first because they often supersede information in other documents.
Obtaining Technical Assistance
If you do not understand a procedure in this guide or if the system does
not perform as expected, see your Hardware Owner’s Manual. Dell™ offers
comprehensive hardware training and certification. See dell.com/training
for more information. This service may not be offered in all locations.

Getting Started With Your System 9
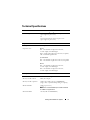
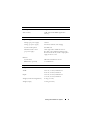
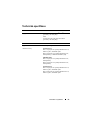
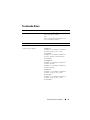
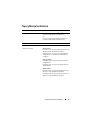
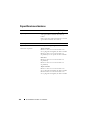
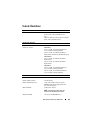
Technical Specifications
Processor
Processor type Up to four Intel
®
Xeon
®
7500 series processors
(up to eight core processors)
Or
Up to four Intel Xeon 6500 series processors
(up to eight core processors)
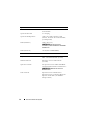
Expansion Bus
Bus type PCI Express Generation 2
Expansion slots Riser 1
Slot 1: x8 link with x16 physical connector,
9.5-inch length, standard height
Slot 2: x4 link with x8 physical connector, low-profile,
with a standard height bracket
System Board
Slot 3: x8 link with x8 physical connector, low-profile
Slot 4: x8 link with x8 physical connector, low-profile
Riser 2
Slot 5: x8 link with x16 physical connector,
9.5-inch length, standard height
Slot 6: x8 link with x16 physical connector,
9.5-inch length, standard height
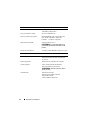
Memory
Architecture 1066 MHz DDR3 registered ECC DIMMs
Memory module sockets Thirty two 240-pin
Memory module capacities 1 GB, 2 GB, 4 GB, 8 GB, or 16 GB RDIMMs
(single, dual, or quad-rank depending on capacity)
Minimum RAM 4 GB (per processor)
NOTE: It is recommended that you install a minimum
of 16 GB to run applications.
Maximum RAM 512 GB (with 16 GB RDIMMs)

10 Getting Started With Your System
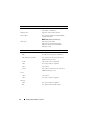
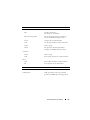
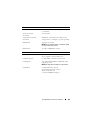
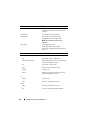
Drives
Hard drives Up to six 2.5-inch, internal hot-swappable
SAS, SATA, or SSD drives
Diskette drive Optional external USB 1.44 MB
Optical drive One optional slimline SATA DVD-ROM
or DVD+RW drive
NOTE: DVD devices are data only.
Flash drive Optional internal USB
Optional internal dual SD module
Optional vFlash card (with iDRAC6
Enterprise card)
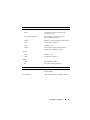
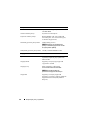
Connectors
Back
NIC
Four RJ-45 (for integrated 1 GB NICs)
NIC (Management NIC)
One optional management NIC port on
iDRAC6 Enterprise card
Serial
9-pin, DTE, 16550-compatible
USB
Four 4-pin, USB 2.0-compliant
Video
15-pin VGA
vFlash
One optional vFlash memory card slot on
iDRAC6 Enterprise card
Front
Video
15-pin VGA
USB
Two 4-pin, USB 2.0-compliant
Internal
USB
One 4-pin, USB 2.0-compliant
SD
Two optional internal SD modules

Getting Started With Your System 11
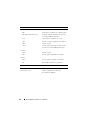
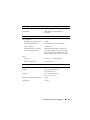
Video
Video type Integrated Matrox G200 with iDRAC6
Video memory 8 MB (shared with iDRAC application
memory)
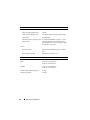
Power
AC power supply
Wattage (per power supply)
1100 W
Voltage (per power supply)
100–240 V, 50/60 Hz, auto-ranging
System heat dissipation
4012 BTU/Hr
Maximum inrush current
(per power supply)
Under typical line conditions and over
the entire system ambient operating range,
the inrush current may reach 55 A per power
supply for 10 ms or less
Batteries
System battery
CR 2032 3.0-V lithium coin cell
RAID battery (optional)
3.7 V lithium ion
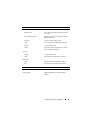
Physical
Height 8.642 cm (3.40 in)
Width 44.05 cm (17.34 in) without bezel
48.24 cm (18.99 in) with bezel
Depth 72.06 cm (28.37 in) without bezel
75.56 cm (29.75 in) with bezel
Weight (maximum configuration) 26.1 kg (57.54 lb)
Weight (empty) 21.15 kg (46.64 lb)

12 Getting Started With Your System
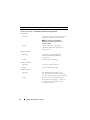
Environmental
NOTE: For additional information about environmental measurements for specific
system configurations, see www.dell.com/environmental_datasheets.
Temperature
Operating
10° to 35°C (50° to 95°F) with a maximum
temperature gradation of 10°C per hour
NOTE: For altitudes above 2950 feet,
the maximum operating temperature is
derated 1ºF/550 ft.
Storage
–40° to 65°C (–40° to 149°F) with
a maximum temperature gradation of
20°C per hour
Relative humidity
Operating
20% to 80% (noncondensing) with
a maximum humidity gradation of
10% per hour
Storage
5% to 95% (noncondensing)
Maximum vibration
Operating
0.26 G at 5–350 Hz for 15 min
Storage
0.5 G at 3–200 Hz for 15 min
Maximum shock
Operating
One shock pulse in the positive z axis
(one pulse on each side of the system) of
31 G for 2.6 ms in the operational orientation
Storage
Six consecutively executed shock pulses
in the positive and negative x, y, and z axes
(one pulse on each side of the system)
of 71 G for up to 2 ms

Getting Started With Your System 13
Altitude
Operating
–16 to 3048 m (–50 to 10,000 ft)
NOTE: For altitudes above 2950 feet,
the maximum operating temperature
is derated 1ºF/550 ft.
Storage
–16 to 10,600 m (–50 to 35,000 ft)
Airborne Contaminant Level
Class
G2 or lower as defined by ISA-S71.04-1985
Environmental (continued)

14 Getting Started With Your System

Systémy Dell™
PowerEdge™ R810
Začínáme se systémem
Regulatorní model: Řada E05S

Poznámky a upozornění
POZNÁMKA:
POZNÁMKA označuje důležité informace, které pomáhají
lepšímu využití počítače.
UPOZORNĚNÍ:
UPOZORNĚNÍ poukazuje na možnost poškození
hardwaru nebo ztráty dat v případě nedodržení pokynů.
VAROVÁNÍ:
VAROVÁNÍ upozorňuje na potenciální nebezpečí
poškození majetku, úrazu nebo smrti.
____________________
Informace v tomto dokumentu se mohou bez předchozího upozornění změnit.
© 2009 Dell Inc. Všechna práva vyhrazena.
Jakákoliv reprodukce těchto materiálů bez písemného povolení společnosti Dell Inc. je přísně zakázána.
Ochranné známky použité v tomto textu:
Dell
, logo
DELL
a
PowerEdge
jsou ochranné známky
společnosti Dell Inc.
Intel
a
Xeon
jsou registrované ochranné známky společnosti Intel Corporation
v USA a dalších zemích.
Microsoft
,
Windows
,
Windows Server
a
Hyper-V
jsou ochranné známky
nebo registrované ochranné známky společnosti Microsoft Corporation v USA a dalších zemích.
SUSE
je registrovaná ochranná známka společnosti Novell, Inc. v USA a dalších zemích.
Citrix
a
XenServer
jsou ochranné známky společnosti Citrix Systems, Inc. a/nebo jedné nebo více
jejích poboček a mohou být registrovány úřadem pro patenty a ochranné známky v USA a dalších zemích.
VMware
je registrovaná ochranná známka nebo ochranná známka společnosti VMware, Inc. v USA
a dalších zemích.
Solaris
je ochranná známka společnosti Sun Microsystems, Inc. v USA a dalších zemích.
V tomto dokumentu mohou být použity další ochranné známky a obchodní názvy s odkazem
na společnosti vlastnící tyto známky a názvy nebo na jejich produkty. Společnost Dell Inc. nemá
vlastnické zájmy vůči ochranným známkám a obchodním názvům jiným než svým vlastním.
Regulatorní model: Řada E05S
Listopad 2009 Č. dílu X919M Rev. A01

Začínáme se systémem
17
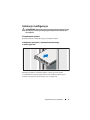
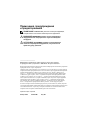
Instalace a konfigurace
VAROVÁNÍ:
Před provedením následujícího postupu si prostudujte
bezpečnostní pokyny dodané se systémem.
Rozbalení systému
Rozbalte systém a identifikujte jeho jednotlivé součásti.
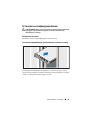
Instalace kolejniček a systému do stojanu
Sestavte kolejničky a nainstalujte systém do stojanu podle bezpečnostních
pokynů a pokynů k instalaci do stojanu dodaných se systémem.

18
Začínáme se systémem
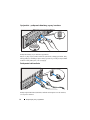
Volitelné – Připojení klávesnice, myši a monitoru
Připojte klávesnici, myš a monitor (volitelné).
Konektory na zadní straně systému mají ikony znázorňující, který kabel se
má připojit ke kterému konektoru. Zajistěte, aby šrouby na konektoru kabelu
monitoru byly dobře dotaženy (je-li jimi konektor vybaven).
Připojení napájecích kabelů
Připojte napájecí kabely k systému, a pokud používáte monitor, připojte
napájecí kabel také k monitoru.
Sayfa yükleniyor...
Sayfa yükleniyor...
Sayfa yükleniyor...
Sayfa yükleniyor...
Sayfa yükleniyor...
Sayfa yükleniyor...
Sayfa yükleniyor...
Sayfa yükleniyor...
Sayfa yükleniyor...
Sayfa yükleniyor...
Sayfa yükleniyor...
Sayfa yükleniyor...
Sayfa yükleniyor...
Sayfa yükleniyor...
Sayfa yükleniyor...
Sayfa yükleniyor...
Sayfa yükleniyor...
Sayfa yükleniyor...
Sayfa yükleniyor...
Sayfa yükleniyor...
Sayfa yükleniyor...
Sayfa yükleniyor...
Sayfa yükleniyor...
Sayfa yükleniyor...
Sayfa yükleniyor...
Sayfa yükleniyor...
Sayfa yükleniyor...
Sayfa yükleniyor...
Sayfa yükleniyor...
Sayfa yükleniyor...
Sayfa yükleniyor...
Sayfa yükleniyor...
Sayfa yükleniyor...
Sayfa yükleniyor...
Sayfa yükleniyor...
Sayfa yükleniyor...
Sayfa yükleniyor...
Sayfa yükleniyor...
Sayfa yükleniyor...
Sayfa yükleniyor...
Sayfa yükleniyor...
Sayfa yükleniyor...
Sayfa yükleniyor...
Sayfa yükleniyor...
Sayfa yükleniyor...
Sayfa yükleniyor...
Sayfa yükleniyor...
Sayfa yükleniyor...
Sayfa yükleniyor...
Sayfa yükleniyor...
Sayfa yükleniyor...
Sayfa yükleniyor...
Sayfa yükleniyor...
Sayfa yükleniyor...
Sayfa yükleniyor...
Sayfa yükleniyor...
Sayfa yükleniyor...
Sayfa yükleniyor...
Sayfa yükleniyor...
Sayfa yükleniyor...
Sayfa yükleniyor...
Sayfa yükleniyor...
Sayfa yükleniyor...
Sayfa yükleniyor...
Sayfa yükleniyor...
Sayfa yükleniyor...
Sayfa yükleniyor...
Sayfa yükleniyor...
Sayfa yükleniyor...
Sayfa yükleniyor...
Sayfa yükleniyor...
Sayfa yükleniyor...
Sayfa yükleniyor...
Sayfa yükleniyor...
Sayfa yükleniyor...
Sayfa yükleniyor...
Sayfa yükleniyor...
Sayfa yükleniyor...
Sayfa yükleniyor...
Sayfa yükleniyor...
Sayfa yükleniyor...
Sayfa yükleniyor...
Sayfa yükleniyor...
Sayfa yükleniyor...
Sayfa yükleniyor...
Sayfa yükleniyor...
Sayfa yükleniyor...
Sayfa yükleniyor...
Sayfa yükleniyor...
Sayfa yükleniyor...
Sayfa yükleniyor...
Sayfa yükleniyor...
Sayfa yükleniyor...
Sayfa yükleniyor...
Sayfa yükleniyor...
Sayfa yükleniyor...
Sayfa yükleniyor...
Sayfa yükleniyor...
Sayfa yükleniyor...
Sayfa yükleniyor...
Sayfa yükleniyor...
Sayfa yükleniyor...
Sayfa yükleniyor...
Sayfa yükleniyor...
Sayfa yükleniyor...
Sayfa yükleniyor...
Sayfa yükleniyor...
Sayfa yükleniyor...
Sayfa yükleniyor...
Sayfa yükleniyor...
Sayfa yükleniyor...
Sayfa yükleniyor...
Sayfa yükleniyor...
Sayfa yükleniyor...
Sayfa yükleniyor...
Sayfa yükleniyor...
Sayfa yükleniyor...
Sayfa yükleniyor...
Sayfa yükleniyor...
Sayfa yükleniyor...
Sayfa yükleniyor...
Sayfa yükleniyor...
-
 1
1
-
 2
2
-
 3
3
-
 4
4
-
 5
5
-
 6
6
-
 7
7
-
 8
8
-
 9
9
-
 10
10
-
 11
11
-
 12
12
-
 13
13
-
 14
14
-
 15
15
-
 16
16
-
 17
17
-
 18
18
-
 19
19
-
 20
20
-
 21
21
-
 22
22
-
 23
23
-
 24
24
-
 25
25
-
 26
26
-
 27
27
-
 28
28
-
 29
29
-
 30
30
-
 31
31
-
 32
32
-
 33
33
-
 34
34
-
 35
35
-
 36
36
-
 37
37
-
 38
38
-
 39
39
-
 40
40
-
 41
41
-
 42
42
-
 43
43
-
 44
44
-
 45
45
-
 46
46
-
 47
47
-
 48
48
-
 49
49
-
 50
50
-
 51
51
-
 52
52
-
 53
53
-
 54
54
-
 55
55
-
 56
56
-
 57
57
-
 58
58
-
 59
59
-
 60
60
-
 61
61
-
 62
62
-
 63
63
-
 64
64
-
 65
65
-
 66
66
-
 67
67
-
 68
68
-
 69
69
-
 70
70
-
 71
71
-
 72
72
-
 73
73
-
 74
74
-
 75
75
-
 76
76
-
 77
77
-
 78
78
-
 79
79
-
 80
80
-
 81
81
-
 82
82
-
 83
83
-
 84
84
-
 85
85
-
 86
86
-
 87
87
-
 88
88
-
 89
89
-
 90
90
-
 91
91
-
 92
92
-
 93
93
-
 94
94
-
 95
95
-
 96
96
-
 97
97
-
 98
98
-
 99
99
-
 100
100
-
 101
101
-
 102
102
-
 103
103
-
 104
104
-
 105
105
-
 106
106
-
 107
107
-
 108
108
-
 109
109
-
 110
110
-
 111
111
-
 112
112
-
 113
113
-
 114
114
-
 115
115
-
 116
116
-
 117
117
-
 118
118
-
 119
119
-
 120
120
-
 121
121
-
 122
122
-
 123
123
-
 124
124
-
 125
125
-
 126
126
-
 127
127
-
 128
128
-
 129
129
-
 130
130
-
 131
131
-
 132
132
-
 133
133
-
 134
134
-
 135
135
-
 136
136
-
 137
137
-
 138
138
-
 139
139
-
 140
140
-
 141
141
-
 142
142


Dell PowerEdge R810 Hızlı başlangıç Kılavuzu
- Kategori
- Sunucular
- Tip
- Hızlı başlangıç Kılavuzu