
USER MANUAL
KULLANIM KILAVUZU
MANUAL DE USUARIO
MANUEL DE L’UTILISATEUR
MANUALE UTENTE
BENUTZERHANDBUCH
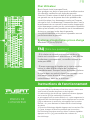
K3 Pro Mechanical Gaming Keyboard

03
EN
USER
MANUAL
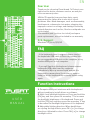
Dear User
Thank you for choosing Pusat brand. To Protect your
rights and for better costumer service, we ask you
note our warranty rules.
•Within 24 months from purchase date, repair
guarranteed for failure due to electrical circuit
problems. Man-Made damages, such as disassembly,
hard impacts, submersion into water, plugging into
improper current or voltage, and damage caused by
natural disasters such as fire, flood or earthquake are
not included.
•Consumable part (such as foot stick) and spare
parts replacement, are not included in our warranty.
O. S. Support
Windows XP/Vista/7/8/10
• If the keyboard doesn’t respond, please check if
the keyboards USB cable is Correctly inserted into
the corresponding USB port on the computer, or try
another USB port on the computer.
• If you spill liquid on the keyboard, please remove
keyboards USB cable from the computer
immediately. Wipe up excess liquid and put the
keyboard in a warm place (for instance, under a
lamp) to let the keyboard dry naturally before using
again.
1. Computer USB port interfaces with the keyboard
without needing to install drivers or software.
2. Multi-level backlight brightness: Press and hold the
[FN] key, and then press the arrow key “↑”to increase
the backlight brightness of the keyboard. Press and
hold the [FN] key, and then press the arrow key “↓”key
to decrease the backlight brightness of the keyboard.
3. Adjustable lighting direction: When backlit keys
are cycling through effects press FN + [←]to change
directions. Adjustable colors: Press FN+[→] to change
backlight colors.
FAQ
Function Instructions
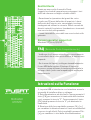
K3 Pro Mechanical Gaming Keyboard

04
EN
4. Adjustable lighting effect speed: Press and hold the [FN] key, and then
press the + key “+” to increase the speed of the lighting effect. Press and hold the [FN]
key, and then press the - key “-” to decrease the speed of the lighting effect. There are 6
levels of adjustment.
5. There are 18 backlighting effects:
<1>FN + INS = A. Trial B. Briefing C. Static
<2>FN + Home = A. Ripple Graff B. Pass without Trace C. Coastal
<3>FN + PGUP= A. Hurricane B. Accumulate C. Digital Times
<4>FN + DEL= A. Go with Stream B. Clouds Fly C. Winding Paths
<5>FN + END = A. Flower blooming B. Snow Winter Jasmine C. Swift action
<6>FN + PGDN = A. Both ways B. Surmount C. Fast and Furious
6. Adjustable side LED lighting effect mode: Press and hold the [FN] key, and then press
the PAUSE key “PAUSE” to change the effect mode. There are Wave, spectrum, breathing,
constant light and off mode (LED light can be customized, and the LED light on the board
and side LED could be synchronized).
7. Adjustable side LED lighting speed mode: Press and hold the [FN] key, and then press
the SCRLK key “SCRLK” to change the speed. There are 5 different level of the adjustment.
8. To disable the [WIN] key: Press and hold the [FN] key, and then press left [WIN] key to
turn off [WIN] key in order to avoid leaving gaming function if user presses [WIN] key by
mistake. Repeat the above operation to restore the function.
9. [Volume Scroller Key Control] Press to switch between Brightness and Volume adjust
modes.
Light On – To adjust the brightness of the keyboard backlit.
Light Off – To adjust the Volume of the system.
10. [Macro Keys, G1 ~ G5] G1 ~ G5 default set as F1 ~ F5. When the “G” key has macro con-
tent, the button light will be on; when there is no content the light will be off and perform
as the default button function F1~F5.
11. [Macro Record Function “REC”] Press the “REC” button to be solid light to start the
recording function, the NUM, CAP, SCR, WIN indicators will flash slowly, then select G1 ~ G5
to flash rapidly to be the corresponding button to be stored. Press the valid button to start
recording, the maximum will be 64 normal buttons or within 30s. The recording will be
automatically exit and save or press the REC button after the recording is completed.
12. [Erase Macro Function] Press the “FN” + “REC” and hold for 5 seconds to erase all the
Macro settings. Erase specific Macro key: Press the “REC” button to be solid light to start
the recording function, the NUM, CAP, SCR, WIN indicators will flash slowly, then select G1 ~
G5 to flash rapidly to be the corresponding button to be erased. Press “REC” key button to
complete the erase process. After the Macro has been erased, it will go back to default
setting as F1 ~ F5.

05
EN
Multi-Media Function (FN + F1~F12)
• FN+F1 Media player
• FN+F2 Volume -
• FN+F3 Volume+
• FN+F4 Mute
• FN+F5 Stop
• FN+F6 Pre-Track
• FN+F7 Play/Pause
• FN+F8 Next Track
• FN+F9 E-mail
• FN+F10 Home
• FN+F11 Calculator
• FN+F12 Search
13. [LED Memory Keys, M1]
Press M1 to light up the LED of W /A /S /D /↑ /↓ /← /→ keys (default: RED color) with stored
setting.
14.[LED Memory Keys, M2]
Press M2 to light up the LED of ESC/ TAB/ SHIFT_L/ CTRL_L/ 1/ 2/ 3/ 4/ 5/ Q/ W/ E/ R/ A/ S/
D/ F/ G /SPACE keys with stored setting.
15. [LED Memory Keys, M3]
Press M3 to light up the LED of ESC/ `/ 1/ 2/ 3/ 4/ TAB/ Q/ W/ E/ P/ A/ S/ D/ F/ G/ V/ B/
CTRL_L/ SPACE keys with stored setting.
16. [LED Memory Keys, M4]
Press M4 to light up the LED of ESC/ 1/ 2/ 3/ 4/ 5/ 6/ TAB/ W/ A/ S/ D/ F/ L/ Z/ X/ C/ V/
CTRL_L/ SPACE keys with stored setting.
17. [LED Macro Record Key, MR]
Press the “MR” key once to start the LED Macro Record mode. The NUM, CAP, SCR, and WIN
indicators will flash slowly. Then select M1 ~ M4 to specify the recording key. The corre-
sponding button will flash rapidly to start to record. Press the valid button on the keyboard
to record the light setting and within 30s it will automatically exit and save the setting. Or
press the “MR” key after recording is comp leted to exit and save the setting.
18. [Erase LED Macro Setting]
Press the “FN” + “MR” and hold for 5 seconds to erase all the LED Macro settings. Erase
specific LED Macro key: Press the “REC” button to be solid light to start the recording
function, the NUM, CAP, SCR, WIN indicators will flash slowly, then select M1 ~ M4 to flash
rapidly to be the corresponding button to be erased. Press “MR” key to complete the erase
process.
19. [Default Setting] Press the “FN” + “PRTSC” to reset the setting to default.

06
DE
BENUTZERHANDBUCH
Lieber Nutzer
Vielen Dank, dass Sie sich für die Marke Pusat entschieden
haben. Zum Schutz Ihrer Rechte und für einen optimalen
Kundenservice möchten wir Sie bitten, unsere Garantie-
bestimmungen zu beachten.
•Über einen Zeitraum von 18 Monaten ab Kaufdatum ga-
rantieren wir die Reparatur aufgrund von Ausfällen durch
Probleme der elektrischen Schaltung.
Anwenderfehler, wie die Demontage, übermäßige Stöße,
unsachgemäßer Kontakt mit Wasser, nicht
ordnungsgemäßer Anschluss an die Strom- bzw.
Spannungsversorgung etc. sowie Schäden durch Naturka-
tastrophen, wie Brand, Überflutung, Erdbeben, Nagetiere
etc.
•Verschleißteile (z.B. Fußsticks) und Ersatzteile sind nicht
von der Garantie abdeckt.
OS-Unterstützung
Windows XP/Vista/7/8/10
• Wenn die Tastatur nicht reagiert, überprüfen Sie, ob das
USB-Kabel der Tastatur korrekt in den entsprechenden
USB-Anschluss des Computers eingesteckt ist, oder versuch-
en Sie es mit einem anderen USB-Anschluss des Computers.
•Wenn Sie Flüssigkeit auf die Tastatur verschütten, entfernen
Sie bitte sofort das USB-Kabel der Tastatur vom Computer.
Wischen Sie überschüssige Flüssigkeit ab und stellen Sie die
Tastatur an einen warmen Ort (z. B. unter eine Lampe), damit
die Tastatur vor dem erneuten Gebrauch auf natürliche Weise
trocknen kann. Unterlagen können die Performance der Maus
beeinträchtigen. Wir empfehlen Ihnen ein Mauspad.
FAQ
K3 Pro Mechanical Gaming Keyboard
1. Computer: Der USB-Port wird mit der Tastatur verbunden,
ohne dass Treiber oder Software installiert werden müssen.
2. Mehrere Helligkeitsstufen der Hintergrundbeleuchtung:
Halten Sie die Taste [FN] gedrückt, und drücken dann die
Pfeiltaste “↑”, um die Helligkeit der Hintergrundbeleuchtung
der Tastatur zu erhöhen. Halten Sie die Taste [FN] gedrückt
und drücken dann die Pfeiltaste “↓”, um die Helligkeit der
Hintergrundbeleuchtung der Tastatur zu verringern.
3. Einstellbare Lichtführung: Wenn hintergrundbeleuchtete
Tasten die Effekte durchlaufen, drücken Sie FN + [←], um die
Richtung zu ändern.
Einstellbare Farben: Drücken Sie FN+[→], um die Farben der
Hintergrundbeleuchtung zu ändern.
Function Instructions

07
DE
4. Einstellbare Geschwindigkeit der Lichteffekte: Halten Sie die [FN]-Taste gedrückt und drücken
Sie dann die +-Taste “+”, um die Geschwindigkeit des Lichteffekts zu erhöhen. Halten Sie die
[FN]-Taste gedrückt und drücken Sie dann die - Taste “-”, um die Geschwindigkeit des
Lichteffekts zu verringern. Es gibt 6 verschiedene Einstellstufen.
5. Es gibt 18 Hintergrund-Beleuchtungseffekte:
<1>FN + INS = A. Prüfung B. Briefing C. Statisch
<2>FN + Home = A. Wellen B. Spurlos verschwinden C. Küste
<3>FN + PGUP= A. Hurrikan B. Akkumulieren C. Digitale Zeiten
<4>FN + DEL= A. Dem Fluss folgen B. Wolken fliegen C. Verschlungene Pfade
<5>FN + END = A. Blühende Blume B. Schnee Winter Jasmin C. Schnelles Handeln
<6>FN + PGDN = A. Beide Richtungen B. Überwinden C. Schnell und wütend
6. Einstellbarer seitlicher LED-Lichteffekt-Modus: Halten Sie die [FN]-Taste gedrückt, und drück-
en Sie dann die PAUSE-Taste “PAUSE”, um den Effektmodus zu ändern. Es gibt Wellen-, Spektral-,
Atem-, Konstantlicht und Aus-Modus (LED-Licht kann angepasst werden, und das LED-Licht auf
der Platine und die Seiten-LED können synchronisiert werden).
7. Einstellbarer seitlicher LED-Beleuchtungsgeschwindigkeitsmodus: Halten Sie die [FN]-Taste
gedrückt und drücken Sie dann die SCRLK-Taste “SCRLK”, um die Geschwindigkeit zu ändern. Es
gibt 5 verschiedene Einstellstufen.
8. Deaktivieren der [WIN]-Taste: Halten Sie die [FN]-Taste gedrückt und drücken Sie dann die linke
[WIN]-Taste, um die [WIN]-Taste auszuschalten. Dies verhindert, dass die Spielfunktion verlassen
wird, wenn der Benutzer versehentlich die [WIN]-Taste drückt. Wiederholen Sie den obigen Vor-
gang, um die Funktion wiederherzustellen.
9. [Lautstärkereglertaste] Drücken Sie diese Taste, um zwischen den Modi Helligkeits- und Laut-
stärkeeinstellung zu wechseln. Licht Ein - Zum Einstellen der Helligkeit der Tastaturbeleuchtung.
Licht Aus - Zum Einstellen der Lautstärke des Systems.
10. [Makro-Tasten, G1 ~ G5] G1 ~ G5 standardmäßig eingestellt auf F1 ~ F5. Wenn die “G”-Taste
einen Makro-Inhalt hat, leuchtet die Tastenbeleuchtung auf; wenn kein Inhalt vorhanden ist, ist
die Beleuchtung aus und arbeitet als Standardfunktion der Tasten F1 ~ F5.
11. [Makro-Aufnahmefunktion “REC”] Drücken Sie die “REC”-Taste, um die Aufnahmefunktion zu
starten. Die Anzeigen NUM, CAP, SCR, WIN blinken langsam, wählen Sie dann G1 ~ G5, um schnell
zu blinken und die entsprechende Taste zu speichern. Drücken Sie die gültige Taste, um die
Aufnahme zu starten; das Maximum beträgt 64 normale Tasten oder innerhalb von 30 Sekunden.
Die Aufnahme wird automatisch beendet und gespeichert oder Sie drücken nach Abschluss der
Aufnahme die REC-Taste.
12. [Makrofunktion löschen] Drücken Sie die Tasten “FN” + “REC” und halten Sie 5 Sekunden lang
gedrückt, um alle Makroeinstellungen zu löschen. Bestimmte Makrotaste löschen: Drücken Sie
die Taste “REC”, um die Aufnahmefunktion zu starten, die Anzeigen NUM, CAP, SCR, WIN blinken
langsam, wählen Sie dann G1 ~ G5, um schnell zu blinken und die entsprechende Taste zu löschen.
Drücken Sie die “REC”-Taste, um den Löschvorgang abzuschließen. Nachdem das Makro gelöscht
wurde, kehrt es zur Standardeinstellung als F1 ~ F5 zurück.

08
DE
Multi-Media Funktion (FN + F1~F12)
• FN+F1 Media-player
• FN+F2 Lautstärke-
• FN+F3 Lautstärke+
• FN+F4 Stumm
• FN+F5 Stopp
• FN+F6 Vorheriger Titel
• FN+F7 Wiedergabe/Pause
• FN+F8 Nächster Titel
• FN+F9 E-Mail
• FN+F10 Web
• FN+F11 Taschenrechner
• FN+F12 Suche
13. [LED-Speichertasten, M1]
Drücken Sie M1, um die LED der Tasten W /A /S /D / ↑ / ↓ / ← / → (Standard: Farbe ROT) mit
gespeicherter Einstellung aufleuchten zu lassen.
14.[LED Memory Keys, M2]
Press M2 to light up the LED of ESC/ TAB/ SHIFT_L/ CTRL_L/ 1/ 2/ 3/ 4/ 5/ Q/ W/ E/ R/ A/ S/ D/ F/
G /SPACE keys with stored setting.
15. [LED-Speichertasten, M3]
Drücken Sie M3, um die LED der Tasten ESC/ `/ 1/ 2/ 3/ 4/ TAB/ Q/ W/ E/ P/ A/ S/ D/ F/ G/ V/ B/
CTRL_L/ SPACE mit gespeicherter Einstellung aufleuchten zu lassen.
16. [LED-Speichertasten, M4]
Drücken Sie M4, um die LED der Tasten ESC/ 1/ 2/ 3/ 4/ 5/ 6/ TAB/ W/ A/ S/ D/ F/ L/ Z/ X/ C/ V/
CTRL_L/ SPACE mit gespeicherter Einstellung aufleuchten zu lassen.
17. [LED-Makro-Aufzeichnungstaste, MR]
Drücken Sie die “MR”-Taste einmal, um den LED-Makro-Aufnahmemodus zu starten. Die Anzeigen
NUM, CAP, SCR und WIN blinken langsam. Wählen Sie dann M1 ~ M4, um die Aufnahmetaste
festzulegen. Die entsprechende Taste blinkt schnell, um mit der Aufzeichnung zu beginnen.
Drücken Sie die gültige Taste auf der Tastatur, um die Lichteinstellung aufzuzeichnen, und
innerhalb von 30 Sekunden wird die Aufzeichnung automatisch beendet und die Einstellung
gespeichert. Oder drücken Sie nach Abschluss der Aufnahme die “MR”-Taste, um die Einstellung
zu beenden und zu speichern.
18. [LED-Makroeinstellung löschen] Drücken Sie die Tasten “FN” + “MR” und halten Sie 5 Se-
kunden lang gedrückt, um alle LED-Makroeinstellungen zu löschen.
Bestimmte LED-Makrotaste löschen: Drücken Sie die “REC”-Taste, um die Aufnahmefunktion zu
starten. Die Anzeigen NUM, CAP, SCR, WIN blinken langsam, wählen Sie dann M1 ~ M4, um schnell
zu blinken und die entsprechende zu löschende Taste zu werden. Drücken Sie die “MR”-Taste, um
den Löschvorgang abzuschließen.
19. [Standardeinstellung] Drücken Sie die Tasten “FN” + “PRTSC”, um die Einstellung auf die
Standardeinstellung zurückzusetzen.

09
TR
KULLANIM
KILAVUZU
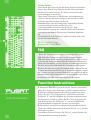
Sevgili Kullanıcı
Pusat markasını seçtiğiniz için teşekkür ederiz.
Haklarınızı korumak ve daha iyi bir müşteri hizmeti
almak için, garanti belgesini okuyunuz.
•Alım tarihinden sonra 24 ay boyunca, kısa devre
hatalarının onarımını garanti ederiz. Kullanıcı hatası
hasarlar; darbe, sökme, suya sokma, uygunsuz akım
ve voltajda kullanma ve doğal felaket sonucu hasar
alması; yanma, su baskını yada deprem garantiye
dahil değildir..
• Çıkarılabilen parçalar ve ayrılabilen parçalar, garanti
kapsamında değildir.
Desteklediği işletim sistemleri
Windows XP/Vista/7/8/10
•Eğer klavye yanıt vermiyorsa lütfen farenin doğru
takılı olduğunu kontrol ediniz ya da başka bir USB
girişinden kontrol ediniz.
•Klavyeye sıvı dökerseniz, lütfen klavyenin USB
kablosunu hemen bilgisayardan çıkarın. Fazla sıvıyı
silin ve yeniden kullanmadan önce klavyenin doğal
olarak kurumasını sağlamak için klavyeyi sıcak bir
yere (örneğin, bir lambanın altına) koyun.
K3 Pro Mechanical Gaming Keyboard
S.S.S. (Sıkça Sorulan Sorular)
1. Bilgisayar USB bağlantı noktası, sürücü veya
yazılım yüklemeye gerek kalmadan klavyeyle arabirim
oluşturur.
2. Çok seviyeli arka ışık parlaklığı: Klavyenin arka ışık
parlaklığını artırmak için [FN] tuşunu basılı tutun
ve ardından “↑” ok tuşuna basın. Klavyenin arka ışık
parlaklığını azaltmak için [FN] tuşunu basılı tutun ve
ardından “↓” ok tuşuna basın.
3. Ayarlanabilir aydınlatma yönü: Arkadan aydınla
malı tuşlar efektler arasında geçiş yaparken yönü
değiştirmek için FN + [←] tuşlarına basın. Ayarlana-
bilir renkler: Arka ışık renklerini değiştirmek için FN +
[→] tuşlarına basın.
İşlev Talimatları

10
TR
4. Ayarlanabilir aydınlatma efekti hızı: Aydınlatma efektinin hızını artırmak için [FN] tuşunu
basılı tutun ve ardından “+” tuşuna basın. Aydınlatma efektinin hızını azaltmak için [FN]
tuşunu basılı tutun ve ardından “-” tuşuna basın. 6 ayar seviyesi vardır.
5. 18 arka aydınlatma efekti vardır:
<1>FN + INS = A. Deneme B. Brifing C. Statik
<2>FN + Home = A. Dalgalı B. İz bırakmadan C. Sahil
<3>FN + PGUP= A. Kasırga B. Birikme C. Dijital Zamanlar
<4>FN + DEL= A. Akışa bırak B. Bulutlar uçuyor C. Sarmal yollar
<5>FN + END = A. Açan çiçekler B. Kar kış yasemin C. Hızlı eylem
<6>FN + PGDN = A. İki yol B. Yükseliş C. Hızlı ve Öfkeli
6. Ayarlanabilir yan LED aydınlatma efekti modu: [FN] tuşunu basılı tutun, ve efekt modunu
değiştirmek için “PAUSE” tuşuna basın. Dalga, spektrum, yanıp sönen, sabit ışık ve kapalı
modlar mevcuttur (LED ışık özelleştirilebilir ve klavye ve yan LED’deki LED ışık senkronize
edilebilir).
7. Ayarlanabilir yan LED aydınlatma hızı modu: [FN] tuşunu basılı tutun ve ardından hızı
değiştirmek için SCRLK tuşuna “SCRLK” basın. Bu ayarda 5 farklı seviye vardır.
8. [WIN] tuşunu devre dışı bırakmak için: Kullanıcının [WIN] tuşuna yanlışlıkla basması
durumunda oyundan çıkılmasını engellemek için [FN] tuşunu basılı tutun ve ardından
[WIN] tuşunu kapatmak için [WIN] tuşuna sol tıklayın. İşlevi geri almak için yukarıdaki
işlemi tekrarlayın.
9. [Ses Kaydırma Tuş Kontrolü] Parlaklık ve Ses Seviyesi ayarlama modları arasında geçiş
yapmak için basın.Işık Açık - Klavye arka aydınlatmasının parlaklığını ayarlamak için. Işık
Kapalı - Sistemin Ses Düzeyini ayarlamak için.
10. [Makro Tuşları, G1 ~ G5] G1 ~ G5 varsayılan değeri F1 ~ F5 olarak ayarlanmıştır. “G”
tuşunun makro içeriği olduğunda düğme ışığı yanar; içerik olmadığında ışık söner ve F1~F5
varsayılan düğme işlevini yerine getirir.
11. [Makro Kayıt İşlevi “REC”] Kayıt işlevini başlatmak için “REC” düğmesine basarak sabit
ışık olmasını sağlayın, NUM, CAP, SCR, WIN göstergeleri yavaşça yanıp sönecek, sonra hızla
yanıp sönecek şekilde G1 ~ G5’deki kaydedilecek ilgili tuşu seçin. Kayda başlamak için
geçerli düğmeye basın, maksimum 64 normal düğme veya 30 saniye içinde olacaktır. Kayıt
otomatik olarak çıkar ve kaydeder veya kayıt tamamlandıktan sonra REC düğmesine basın.
12. [Makro Silme İşlevi] Tüm Makro ayarlarını silmek için “FN” + “REC” tuşlarını 5 saniye
basılı tutun. Belirli bir Makro tuşunu silme: Kayıt işlevini başlatmak için “REC” düğmes-
ine basarak sabit ışık olmasını sağlayın, NUM, CAP, SCR, WIN göstergeleri yavaşça yanıp
sönecek, sonra hızla yanıp sönecek şekilde G1 ~ G5’deki silinecek ilgili tuşu seçin. Silme
işlemini tamamlamak için “REC” tuşuna basın. Makro silindikten sonra, F1 ~ F5 olarak
varsayılan ayara geri döner.

11
TR
Multi-Medya İşlevi (FN + F1~F12)
• FN+F1 Medya Oynatıcı
• FN+F2 Ses -
• FN+F3 Ses+
• FN+F4 Sessiz
• FN+F5 Durdur
• FN+F6 Önceki Parça
• FN+F7 Yürüt / Durdur
• FN+F8 Sonraki parça
• FN+F9 E-posta
• FN+F10 İnternet
• FN+F11 Hesap Makinası
• FN+F12 Ara
13. [LED Bellek Tuşları, M1]
Kayıtlı ayar ile W / A / S / D / ↑ / ↓ / ← / → tuşlarının LED’ini (varsayılan: KIRMIZI renk)
açmak için M1 tuşuna basın.
14. [LED Bellek Tuşları, M2]
Kayıtlı ayar ile ESC/ TAB/ SHIFT_L/ CTRL_L/ 1/ 2/ 3/ 4/ 5/ Q/ W/ E/ R/ A/ S/ D/ F/ G /SPACE
tuşlarının LED’ini açmak için M2 tuşuna basın.
15. [LED Bellek Tuşları, M3]
Kayıtlı ayar ile ESC/ `/ 1/ 2/ 3/ 4/ TAB/ Q/ W/ E/ P/ A/ S/ D/ F/ G/ V/ B/ CTRL_L/ SPACE
tuşlarının LED’ini açmak için M3 tuşuna basın.
16. [LED Bellek Tuşları, M4]
Kayıtlı ayar ile ESC/ 1/ 2/ 3/ 4/ 5/ 6/ TAB/ W/ A/ S/ D/ F/ L/ Z/ X/ C/ V/ CTRL_L/ SPACE
tuşlarının LED’ini açmak için M4 tuşuna basın.
17. [LED Makro Kayıt Tuşu, MR]
LED Makro Kayıt modunu başlatmak için “MR” tuşuna bir kez basın. NUM, CAP, SCR ve WIN
göstergeleri yavaşça yanıp söner.Ardından, kayıt tuşunu belirlemek için M1 ~ M4’ü seçin.
Kayda başlamak için ilgili tuş hızla yanıp söner. Işık ayarını kaydetmek için klavyedeki
geçerli tuşa basın; 30 saniye içinde otomatik olarak ayardan çıkıp kaydeder. Veya ayardan
çıkmak ve kaydetmek için kayıt tamamlandıktan sonra “MR” tuşuna basın.
18. basılı tutun.Belirli LED Makro tuşunu silme: Kayıt işlevini başlatmak için “REC” düğme-
sine basarak sabit ışık olmasını sağlayın, NUM, CAP, SCR, WIN göstergeleri yavaşça yanıp
sönecek, sonra hızla yanıp sönecek şekilde M1 ~ M4’deki silinecek ilgili tuşu seçin. Silme
işlemini tamamlamak için “MR” tuşuna basın.
19. [Varsayılan Ayar] Ayarı varsayılana sıfırlamak için “FN” + “PRTSC” tuşlarına basın.

12
ES
MANUAL DE
USUARIO
Estimado usuario
Gracias por elegir la marca Pusat.
Para proteger sus derechos y recibir un mejor servi-
cio al cliente, lea el certificado de garantía.
• Garantizamos la reparación de averías por corto-
circuito durante 24 meses después de la compra. La
garantía no cubre errores del usuario como golpes,
desmontaje, exposición al agua, uso con corriente
o voltaje incorrecto y daños como consecuencia
de desastres naturales, incendios, inundaciones o
terremotos.
• Partes extraíbles y desmontables no son cubiertas
por la garantía.
Sistemas operativos compatibles
Windows XP/Vista/7/8/10
• Si el teclado no responde, verifique si el ratón está
conectado correctamente o pruebe con otro puerto
USB.
• Si derrama algún líquido sobre el teclado, retire el
cable USB del teclado del ordenador
inmediatamente. Limpie el exceso de líquido y
coloque el teclado en un lugar cálido (por ejemplo,
debajo de una lámpara) para que se pueda secar de
forma natural antes de volver a utilizarlo.
1. El ordenador interactúa con el teclado sin tener que instalar un
puerto USB, driver o software.
2. Brillo de iluminación de fondo de varios niveles: Para aumentar el
brillo de iluminación de fondo del teclado, mantenga presionado el
botón [FN] y luego presione el botón de flecha “↑”. Para reducir el
brillo de iluminación de fondo del teclado, mantenga presionado el
botón [FN] y luego presione el botón de flecha “↓”.
3. Dirección de iluminación ajustable: para cambiar el efecto de los
botones con la iluminación de fondo, presione los botones
FN + [←] para cambiar la dirección. Colores ajustables: para cambiar
los colores de fondo, presione los botones FN + [→].
FAQ (Preguntas más frecuentes)
Instrucciones funcionales
K3 Pro Mechanical Gaming Keyboard

13
ES
4. Velocidad ajustable del efecto de iluminación: para aumentar la velocidad del efecto
de iluminación, mantenga presionado el botón [FN] y luego presione el botón “+”. Para
reducir la velocidad del efecto de iluminación, mantenga presionado el botón [FN] y luego
presione el botón “-”. Hay 6 niveles de configuración.
5. Hay 18 efectos de iluminación:
<1>FN + INS = A. Prueba B. Informe C. Estático
<2>FN + Home = A. Ondas B. Sin rastro C. Playa
<3>FN + PGUP= A. Huracán B. Acumulación C. Tiempos digitales
<4>FN + DEL= A. Seguir la corriente B. Se vuelan las nubes C. Camino helicoidal
<5>FN + END = A. Flores florecientes B. Jazmín de invierno C. Acción rápida
<6>FN + PGDN = A. Dos caminos B. Ascenso C. Rápidos y furiosos
6. Modo de efecto de iluminación LED lateral ajustable: mantenga presionado el botón
[FN] y presione el botón “PAUSE” para cambiar el modo de efecto. Hay modos de ondas,
espectro, parpadea, luz constante y apagado (La luz LED se puede personalizar y
sincronizar con la luz LED del teclado y la luz LED lateral.)
7. Modo de velocidad de iluminación LED lateral ajustable: mantenga presionado el botón
[FN] y luego presione el botón “SCRLK” para cambiar la velocidad. Hay 5 niveles diferentes
en esta configuración.
8. Para desactivar el botón [WIN]: Para evitar que el jugador salga del juego por accidente
después de presionar el botón, mantenga presionado el botón [FN] y luego haga clic con
el botón izquierdo en el botón [WIN] para desactivarlo. Para revertir la acción, repita el pro-
ceso anterior.
9. [Control de la tecla de desplazamiento de volumen] Presione para cambiar entre
los modos de ajuste de brillo y volumen. Si la luz está encendida, sirve para ajustar la
iluminación de fondo del teclado. Si la luz está apagada, sirve para ajustar el volumen del
sistema.
10. [Botones de macro, G1 ~ G5] Los valores predeterminados de G1 ~ G5 se establecieron
como F1 ~ F5. Cuando la tecla “G” tiene contenido macro, la luz del botón se encenderá;
cuando no hay contenido, la luz se apagará y funcionará como la función de botón prede-
terminada F1 ~ F5.
11. [Función de guardar macros “REC”] Para comenzar el proceso de guardado, presione
el botón “REC” y conviértalo en luz constante. Los indicadores de NUM, CAP, SCR, WIN
parpadearán lentamente. Luego, seleccione el botón correspondiente entre G1 ~ G5 que
parpadeará rápidamente para guardar. Para comenzar a guardar, presione el botón deter-
minado. El límite máximo será 64 botones o dentro de los 30 segundos. Saldrá automáti-
camente de la configuración y se guardará, o puede presionar el botón REC una vez que se
haya completado el guardado.
12. [Función de borrar macros] Para borrar todos los ajustes de macros, mantenga
presionado los botones “FN” + “REC” durante 5 segundos. Borrar un botón de macro de-
terminado: Para comenzar el proceso de guardado, presione el botón “REC” y conviértalo
en luz constante. Los indicadores de NUM, CAP, SCR, WIN parpadearán lentamente. Luego,
seleccione el botón correspondiente entre G1 ~ G5 que parpadeará rápidamente para
borrar. Presione el botón “REC” para completar el proceso de borrado. Después de borrar el
macro, vuelven a su configuración predeterminada como F1 ~ F5.

14
ES
Funciones multimedia (FN + F1~F12)
• FN+F1 Reproductor multimedia
• FN+F2 Volumen -
• FN+F3 Volumen +
• FN+F4 Silencio
• FN+F5 Parar
• FN+F6 Pista anterior
• FN+F7 Reproducir/Pausar
• FN+F8 Pista siguiente
• FN+F9 Correo electrónico
• FN+F10 Internet
• FN+F11 Calculadora
• FN+F12 Buscar
13. [Botones de memoria LED, M1]
Presione el botón M1 para encender el LED de las teclas W /A /S /D /↑ /↓ /← /→
(color predeterminado: ROJO) con los ajustes guardados.
14. [Botones de memoria LED, M2]
Presione el botón M2 para encender el LED de las teclas ESC/ TAB/ SHIFT_L/ CTRL_L/ 1/ 2/ 3/ 4/
5/ Q/ W/ E/ R/ A/ S/ D/ F/ G /SPACE con los ajustes guardados.
15. [Botones de memoria LED, M3]
Presione el botón M3 para encender el LED de las teclas ESC/ `/ 1/ 2/ 3/ 4/ TAB/ Q/ W/ E/ P/ A/ S/
D/ F/ G/ V/ B/ CTRL_L/ SPACE con los ajustes guardados.
16. [Botones de memoria LED, M4]
Presione el botón M4 para encender el LED de las teclas ESC/ 1/ 2/ 3/ 4/ 5/ 6/ TAB/ W/ A/ S/ D/ F/
L/ Z/ X/ C/ V/ CTRL_L/ SPACE con los ajustes guardados.
17. [Botón para guardar macros LED, MR]
Para iniciar el modo de guardar macros LED, presione el botón “MR” una vez.
Los indicadores de NUM, CAP, SCR, WIN parpadearán lentamente. Luego, seleccione entre M1 ~
M4 para determinar el botón de guardar. El botón correspondiente parpadeará para comenzar a
guardar. Para guardar la configuración de iluminación, presione el botón correspondiente en el
teclado. Saldrá automáticamente de la configuración y se guardará en 30 segundos. O presione el
botón “MR” para salir de la configuración y guardar una vez que se haya completado el guardado.
18. Borrar un botón de macro LED determinado: Para comenzar el proceso de guardado, presione
el botón “REC” y conviértalo en luz constante. Los indicadores de NUM, CAP, SCR, WIN parpa-
dearán lentamente. Luego, seleccione el botón correspondiente entre M1 ~ M4 que parpadeará
rápidamente para borrar. Presione el botón “MR” para completar el
proceso de borrado.
19. [Configuración predeterminada] Para restablecer la configuración predeterminada, presione
los botones “FN” + “PRTSC”.

15
FR
MANUEL DE
L’UTILISATEUR
Cher Utilisateur
Merci d’avoir choisi la marque Pusat.
Pour protéger vos droits et pour avoir un meilleur service
à la clientèle, veuillez lire nos règles de garantie.
•Dans les 24 mois suivant la date d’achat, la réparation
est garantie en cas de panne due à des problèmes de
circuit électrique. Les dommages causés par l’homme,
tels que le choc, le démontage, l’immersion dans l’eau, le
branchement sur un courant ou une tension inapproprié,
et les dommages causés par des catastrophes naturelles
telles qu’un incendie, une inondation ou un tremblement
de terre ne sont pas inclus dans la garantie.
•Les pièces amovibles et les pièces séparables ne sont
pas incluses dans la garantie.
Systèmes d’exploitation pris en charge
Windows XP/Vista/7/8/10
• Si le clavier ne répond pas, veuillez vérifier si le
clavier est correctement branché sur le port USB de
l’ordinateur correspondant, ou veuillez essayer un
autre port USB.
• Si vous renversez du liquide sur le clavier, veuillez
retirer le câble USB du clavier de l’ordinateur
immédiatement. Essuyez l’excès de liquide et placez
le clavier dans un endroit chaud (par exemple, sous
une lampe) pour laisser le clavier sécher
naturellement avant de le réutiliser.
1. Le port USB de l’ordinateur s’interface avec le clavier sans
avoir besoin d’installer de pilotes ou de logiciels.
2. Luminosité du rétroéclairage à plusieurs niveaux: Appuyez
sur la touche [FN] et maintenez-la enfoncée,
et puis appuyez sur la touche fléchée « ↑ » pour augmenter la
luminosité du rétroéclairage du clavier. Appuyez sur la touche
[FN] et maintenez-la enfoncée, puis appuyez sur la touche
fléchée « ↓ » pour diminuer la luminosité du rétroéclairage
du clavier.
3. Direction d’éclairage réglable: Appuyez sur les touches FN +
[←] pour changer de direction pendant que les touches
rétroéclairées basculent entre les effets. Couleurs réglables:
Appuyez sur FN + [→] pour modifier les couleurs du
rétroéclairage.
FAQ (Foire aux questions)
Instructions de fonctionnement
K3 Pro Mechanical Gaming Keyboard

16
FR
4. Vitesse de l’effet d’éclairage réglable: Appuyez sur la touche [FN] et maintenez-la en-
foncée, et puis appuyez sur la touche « + » pour augmenter la vitesse de l’effet d’éclairage.
Appuyez sur la touche [FN] et maintenez-la enfoncée, et puis appuyez sur la touche « - »
pour diminuer la vitesse de l’effet d’éclairage. Il y a 6 niveaux de réglage.
5. Il y a 18 effets de rétroéclairage:
<1>FN + INS = A. Essai B. Briefing C. Statique
<2>FN + Home = A. Ondulation B. Sans laisser de trace C. Côtier
<3>FN + PGUP= A. Ouragan B. Accumulation C. Temps Numériques
<4>FN + DEL= A. Aller avec le flux B. Les nuages volent C. Chemins sinueux
<5>FN + END = A. Épanouissement des fleurs B. Neige Hiver Jasmin C. Action rapide
<6>FN + PGDN = A. Dans les deux sens B. Surmonter C. Rapide et Furieux
6. Mode d’effet d’éclairage LED latéral réglable: Appuyez sur la touche [FN] et mainten-
ez-la enfoncée, et puis appuyez sur la touche « PAUSE » pour changer le mode d’effet. Les
modes onde, spectre, clignotant, lumière fixe et arrêt sont disponibles (la lumière LED peut
être personnalisée et la lumière LED sur la carte et la LED latérale peuvent être synchro-
nisées).
7. Mode de vitesse d’éclairage à LED latérale réglable: Appuyez sur la touche [FN] et main-
tenez-la enfoncée, et puis appuyez sur la touche SCRLK « SCRLK » pour changer la vitesse.
Il y a 5 niveaux différents de ce réglage.
8. Pour désactiver la touche [WIN]: Appuyez sur la touche [FN] et maintenez-la enfoncée,
et puis faites un clic gauche sur la touche [WIN] pour désactiver la touche [WIN] afin
d’éviter de quitter la fonction de jeu si l’utilisateur appuie sur la touche [WIN] par erreur.
Répétez le processus ci-dessus pour récupérer la fonction.
9. [Contrôle de la touche de défilement du volume] Appuyez pour basculer entre les modes
de réglage de la Luminosité et du Volume. Lumière Allumée - Pour régler la luminosité du
rétroéclairage du clavier. Lumière éteinte - Pour régler le volume du système.
10. [Touches Macro, G1 ~ G5] G1 ~ G5 défini par défaut comme F1 ~ F5. Lorsque la touche
« G » a un contenu macro, le voyant du bouton sera allumé; lorsqu’il n’y a pas de contenu,
la lumière sera éteinte et fonctionnera comme la fonction de bouton par défaut F1 ~ F5.
11. [Fonction d’enregistrement macro « REC »] Appuyez sur le bouton « REC » pour qu’il
s’allume en continu pour démarrer la fonction d’enregistrement. Les indicateurs NUM,
CAP, SCR, WIN clignoteront lentement, et puis sélectionnez la touche correspondante dans
G1 ~ G5 à enregistrer, clignotant rapidement. Appuyez sur le bouton valide pour démarrer
l’enregistrement, le maximum sera de 64 boutons normaux ou dans les 30 secondes.
L’enregistrement sera automatiquement quitté et sauvegardé ou appuyez sur le bouton «
REC » une fois l’enregistrement terminé.
12. [Fonction de suppression de macro] Appuyez sur les touches « FN » + « REC » et
maintenez-les enfoncées pendant 5 secondes pour supprimer tous les paramètres de
Macro. Suppression d’une touche Macro spécifique: Appuyez sur le bouton « REC » pour
qu’il s’allume en continu pour démarrer la fonction d’enregistrement. Les indicateurs NUM,
CAP, SCR, WIN clignoteront lentement, et puis sélectionnez le bouton correspondant dans
G1 ~ G5 à supprimer, clignotant rapidement. Appuyez sur la touche « REC » pour terminer
le processus de suppression. Une fois que la touche Macro a été effacée, elle reviendra au
réglage par défaut comme F1 ~ F5.

17
FR
Fonction multimédia (FN + F1 ~ F12)
• FN+F1 Lecteur multimédia
• FN+F2 Volume -
• FN+F3 Volume +
• FN+F4 Muet
• FN+F5 Arrêter
• FN+F6 Piste précédente
• FN+F7 Lecture/Pause
• FN+F8 Piste suivante
• FN+F9 E-mail
• FN+F10 Internet
• FN+F11 Calculatrice
• FN+F12 Rechercher
13. [Touches de mémoire LED, M1]
Appuyez sur M1 pour allumer la LED des touches W /A /S /D /↑ /↓ /← /→ (par défaut : couleur
ROUGE) avec le réglage enregistré.
14. [Touches de mémoire LED, M2]
Appuyez sur M2 pour allumer la LED des touches ESC/TAB/SHIFT_L/CTRL_L/ 1/ 2/ 3/ 4/5/ Q/
W/ E/ R/ A/ S/ D/ F/ G /ESPACE avec le réglage enregistré.
15. [Touches de mémoire LED, M3]
Appuyez sur M3 pour allumer la LED des touches ESC/ `/ 1/ 2/ 3/ 4/ TAB/ Q/ W/ E/ P/ A/ S/ D/
F/ G/ V/ B/ CTRL_L/ SPACE avec le réglage enregistré.
16. [Touches de mémoire LED, M4]
Appuyez sur M4 pour allumer la LED des touches ESC/ 1/ 2/ 3/ 4/ 5/6/ TAB/ W/ A/ S/ D/ F/ L/
Z/ X/ C/ V/ CTRL_L/ SPACE avec le réglage enregistré.
17. [Touche d’enregistrement de Macro LED, MR]
Appuyez une fois sur la touche « MR » pour démarrer le mode d’enregistrement de Macro
LED. Les indicateurs NUM, CAP, SCR et WIN clignoteront lentement.
Sélectionnez ensuite M1 ~ M4 pour définir la touche d’enregistrement. Le bouton correspon-
dant clignotera rapidement pour commencer à enregistrer. Appuyez sur le bouton valide du
clavier pour enregistrer le réglage de la lumière et dans les 30 secondes, il quittera automa-
tiquement et enregistrera le réglage. Ou appuyez sur la touche « MR » une fois l’enregis-
trement terminé pour quitter et enregistrer le réglage.
18. [Suppression d’une touche Macro spécifique]
Appuyez sur le bouton « REC » pour qu’il s’allume en continu pour démarrer la fonction
d’enregistrement. Les indicateurs NUM, CAP, SCR, WIN clignoteront lentement,
et puis sélectionnez le bouton correspondant dans M1 ~ M4 à supprimer, clignotant
rapidement. Appuyez sur la touche « MR » pour terminer le processus de suppression.
19. [Réglage par défaut] Appuyez sur « FN » + « PRTSC » pour réinitialiser le réglage par
défaut.

18
IT
MANUALE
UTENTE
Gentile Utente
Grazie per aver scelto il marchio Pusat.
Leggere la scheda di garanzia per proteggere i tuoi
diritti ed ottenere un miglior servizio clienti.
• Garantiamo la riparazione dei guasti da corto-
circuito per 24 mesi dalla data di acquisto. I danni
dall’errore dell’utente; urto, smontaggio, tensione
inadeguate ed utilizzo in corrente. Danni causati dai
disastri naturali; bruciature, iinondazione o terremoti
non sono inclusi nella garanzia.
• I pezzi rimuovibili e staccabili non sono inclusi nella
garanzia.
Sistemi operativi supportati
Windows XP/Vista/7/8/10
• Verificare che il mouse sia collegato correttamente
o controllarlo da un’altra porta USB se la tastiera non
risponde.
• Se si versa del liquido, scollegare immediatamente
il cavo USB della tastiera. Eliminare il liquido in
eccesso e prima utilizzare la tastiera posizionarla in
un luogo caldo (sotto una lampadina)per asciugarla
naturelmente.
1. La porta USB si interfaccia con la tastiera senza la
necessità di installare driver o software.
2. Retroilluminazione ad alto livello: Tenere premuto il
testo [FN] per aumentare la luminosità della tastiera
e poi premere la treccia “↑”. Tenere premuto il tasto
[FN] quindi premera la freccia “↓” per diminuire la
luminosità.
3. Direzione della luce regolabile: premere FN + [←]
per cambiare la direzione mentre i tasti retroilluminati
scorrono tra gli effetti. Colori regolabili: premere FN +
[→] per cambiare i colori della retroilluminazione.
FAQ (Domande Poste Frequentemente)
Istruzioni sulla Funzione
K3 Pro Mechanical Gaming Keyboard

FAQ (Domande Poste Frequentemente)
19
IT
4. Velocità dell’effetto luminoso regolabile: tenere premuto il tasto [FN] e quindi premere
il tasto “+” per aumentare la velocità dell’effetto luminoso. Tenere premuto il tasto [FN] e
quindi premere il tasto “-” per diminuire la velocità dell’effetto luminoso. Ci sono 6 livelli di
regolazione.
5. Ci sono 18 effetti di retroilluminazione:
<1>FN + INS = A. Prova B. Briefing C. Statistico
<2>FN + Home = A. Ondulato B. Senza traccia C. Costa
<3>FN + PGUP= A. Uragano B. Accumulo C. Tempi Digitali
<4>FN + DEL= A. Lascialo scorrere B. Nuvole volano C. Percorsi spirale
<5>FN + END = A. Fuori sbocciano B. Inverno neve gelsomino C. Azione rapida
<6>FN + PGDN = A. Due percorsi B. Salita C. Veloce e Furioso
6. Modalità effetto di illuminazione LED laterale regolabile: tenere premuto il tasto [FN] e
premere il tasto “PAUSE” per cambiare la modalità dell’effetto. Sono disponibili le modalità
onda, spettro, lampeggiante, luce fissa e spenta (la luce LED può essere personalizzata e la
luce LED sulla tastiera e il LED laterale possono essere sincronizzate).
7. Modalità velocità di illuminazione LED laterale regolabile: tenere premuto il tasto [FN] e
quindi premere il tasto “SCRLK” per cambiare la velocità. Ci sono 5 diversi livelli in questa
impostazione.
8. Per disabilitare il tasto [WIN]: Nel caso in cui l’utente prema accidentalmente il tasto
[WIN], tenere premuto [FN] per evitare di uscire dal gioco e quindi fare clic con il pulsante
sinistro del mouse sul tasto [WIN] per disattivare [WIN]. Ripetere il processo precedente per
ripristinare la funzione.
9. [Controllo del Tasto di Scorrimento Volume] Premere per alternare tra la modalità di
regolazione luminosità e del volume.
Luce Accesa: per regolare la luminosità della retroilluminazione della tastiera.
Luce Spenta: per regolare il volume del sistema.
10. [Tasti Macro, G1 ~ G5] il valore predefinito G1 ~ G5 è impostato come F1 ~F5 . La spia è
accesa quando il tasto “G” ha un contenuto macro; invece è spenta quando non c’è conte-
nuto e F1~F5 eseguono la funzione del pulsante predefinita.
11. [Funzione di registrazione macro “REC”] Premere il pulsante “REC” per avviare la funzi-
one di registrazione, renderla accesa fissa, selezionare il tasto corrispondente in G1 ~ G5 per
registrare, gli indicatori NUM, CAP, SCR, WIN lampeggeranno lentamente, quindi lampegger-
anno rapidamente. Premere il pulsante corrente per avviare la registrazione,
saranno al massimo 64 pulsanti normali o entro 30 secondi. La registrazione esce auto-
maticamente e viene salvata, oppure premere il pulsante REC al termine della registrazione.
12. [Eliminazione Macro] Tenere premuti i tasti “FN” + “REC” per 5 secondi per eliminare
tutte le impostazioni Macro. Eliminazione di un tasto Macro specifico: premere il pulsante
“REC” per avviare la registrazione, renderlo acceso fisso, selezionare il tasto corrispondente
in G1 ~ G5 da eliminare in modo che gli indicatori NUM, CAP, SCR, WIN lampeggino lenta-
mente, quindi lampeggiare velocemente. Premere il tasto “REC” per completare il processo
di eliminazione. Dopo che la macro è stata eliminata, ritorna all’impostazione predefinita
come F1 ~ F5.

20
IT
Multi-Media Function (FN + F1~F12)
• FN+F1 Media player
• FN+F2 Volume -
• FN+F3 Volume +
• FN+F4 Muto
• FN+F5 Stop
• FN+F6 Brano precedente
• FN+F7 Riproduci / Pausa
• FN+F8 Prossimo brano
• FN+F9 E-mail
• FN+F10 Internet
• FN+F11 Calcolatrice
• FN+F12 Ricerca
13. [LED Tasti di memoria, M1]
Premere M1 per accendere il LED (predefinito: colore ROSSO) dei tasti W / A / S / D / ↑ / ↓/ ←
/ → con l’impostazione salvata.
14. [LED Tasti di memoria, M2]
Premere M2 per accendere il LED dei tasti ESC/ TAB/ SHIFT_L/ CTRL_L/ 1/ 2/ 3/ 4/ 5/ Q/ W/
E/ R/ A/ S/ D/ F/ G /SPACE con l’impostazione salvata.
15. [LED Tasti di memoria, M3]
Premere M3 per accendere il LED dei tasti ESC/ `/ 1/ 2/ 3/ 4/ TAB/ Q/ W/ E/ P/ A/ S/ D/ F/ G/
V/ B/ CTRL_L/ SPACE con l’impostazione salvata.
16. [LED Tasti di memoria, M4]
Premere M4 per accendere il LED dei tasti ESC/ 1/ 2/ 3/ 4/ 5/ 6/ TAB/ W/ A/ S/ D/ F/ L/ Z/ X/
C/ V/ CTRL_L/ SPACE con l’impostazione salvata.
17. [LED Tasti di memoria Macro, MR]
Premere una volta il tasto “MR” per avviare la modalità di registrazione macro LED. Gli
indicatori NUM, CAP, SCR e WIN lampeggiano lentamente, quindi selezionare M1 ~ M4 per
specificare il testo di registro. Il tasto corrispondente lampeggia velocemente per avviare la
registrazione. Premere il tasto corrente sulla tastiera per salvare l’impostazione della luce;
Esce automaticamente e salva in 30 secondi. Oppure premere il tasto “MR” al termine della
registrazione per uscire dall’impostazione e salvarla.
18. Eliminazione del tasto Macro LED specifico: premere il pulsante “REC” per avviare la fun-
zione di registrazione, renderlo acceso fisso, selezionare il tasto corrispondente in M1 ~ M4
da eliminare in modo che gli indicatori NUM, CAP, SCR, WIN lampeggino lentamente, quindi
lampeggia rapidamente. Premere il tasto “MR” per completare il processo di cancellazione.
19. [Impostazione Predefinita] Premere “FN” + “PRTSC” per azzerare
l’impostazione predefinita.

21
AR
K3 Pro Mechanical Gaming Keyboard
.
. 24
.
:
.
.
:
:
.
. 6 .
: .
.
“↑”
“↓”
USB
[FN]
[FN]
“+”
“-”
[FN]
[FN]
[←]
[→]
FN
FN
.
( )
.
.
.
Windows XP/Vista/7/8/10
USB
( ) S.S.S.
.
.1
.2
.3
.4
Sayfa yükleniyor...
Sayfa yükleniyor...
Sayfa yükleniyor...
-
 1
1
-
 2
2
-
 3
3
-
 4
4
-
 5
5
-
 6
6
-
 7
7
-
 8
8
-
 9
9
-
 10
10
-
 11
11
-
 12
12
-
 13
13
-
 14
14
-
 15
15
-
 16
16
-
 17
17
-
 18
18
-
 19
19
-
 20
20
-
 21
21
-
 22
22
-
 23
23


diğer dillerde
- español: Monster PUSAT K3 Pro Manual de usuario
- français: Monster PUSAT K3 Pro Manuel utilisateur
- italiano: Monster PUSAT K3 Pro Manuale utente