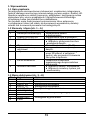
HIKMICRO Autofocus Box Cameras Hızlı başlangıç Kılavuzu
- Tip
- Hızlı başlangıç Kılavuzu

Thermographic Network Box Camera
Quick Start Guide

Thermographic Network Box Camera
English
5
Thermografische Netzwerk-Boxkamera
Deutsch
11
Caméra-boîte thermographique réseau
Français
17
Cámara termográfica con caja de red
Español
22
Termocamera di rete a cassetta
Italiano
27
Câmara de Rede Termográfica
Português
33
Thermografische netwerkboxcamera
Nederlands
38
Termografická síťová skříňová kamera
Čeština
43
Termongrafisk netvæ rks-bokskamera
Dansk
48
Hálózati kocka hőkamera
Magyar
53
Termograficzna sieciowa kamera tubowa
Polski
58
Cameră termografică tip cutie de reţea
Română
63
Termografická sieťová skrinková kamera
Slovenčina
69
အပူပုံရိပ္ကြန္ရက္ေဘာက္စ္ ကင္မရာ
ျမန္မာ
74
Termografik Ağ Kutu Kamerası
Türkçe
84
Сетевая термографическая корпусная камера
Русский
88
Термографічна мережева корпусна камера
Українська
94
測溫網路儲存盒攝影機
繁體中文
100
열화상 네트워크 박스 카메라
한국어
104
サーモグラフィックネットワークボックスカメラ
日本語
109
Kamera Persegi Jaringan Termografis
Bahasa Indonesia
114

1
A
I
1
2
3
4
5
6
7
8

2
II
1
2

3
B
C

4
D

5
English
1. Overview
1.1 Brief Description
The thermographic network box camera is a device that integrates remote
Internet surveillance, video server and HD camera functions.
Remote transmission, preview, and configuration can be realized through
browsers and clients. The device can be simply installed without structured
cabling system.
It can be used independently, or be combined with devices like robots for
into devices like robots for equipment maintenance, failure detection,
industrial process control, etc.
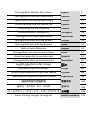
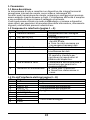
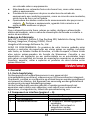
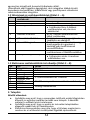
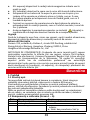
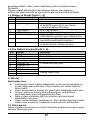
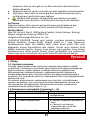
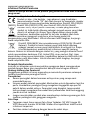
1.2 Component & Interface (Page 1 – A)
No.
Component & Interface
Description
1
Thermal Lens
View the thermal image
2
M3 Thread Holes
Install screws.
3
Network Indicators
● Flash: Transmit network data.
● Solid: The network is connected
without data transmission.
4
Network Interface
RJ-45, network communication
5
I/O Interface
Connect to power supply and
transmit data.
6
Reset Button
Press for 10 s and release the
button, and the device will restore
to factory settings.
7
Grounding Screw
Connect to grounding terminal to
ensure electrical safety.
8
Power Indicator
● Solid Green: Operating.
● Solid Red: System is operating.
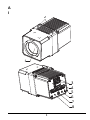
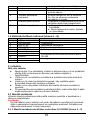
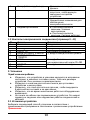
1.3 Pin Electrical Interface (Page 3 – B)
No.
Signal
Description
1
Power
Power Input
2
GND
Grounding
3
RS232_RX
Device Setup
4
RS232_TX
Device Setup
5
ALARM_IN
1, Alarm Input and Output
6
ALARM_OUT
7
RS485-
RS-485 Serial Port Communication
Interface
8
RS485+
9
GND
Analog Video Output
0
CVBS
2. Installation
Before you start:

6
● Make sure the device in the package is in good condition and all the
assembly parts are included. Check the specifications for the device
dimensions.
● Be sure that there is enough space to install the device and
accessories.
● Make sure that the wall is strong enough to withstand at least 8 times
the weight of the system and the mount.
● Make sure all the related equipment is power-off during the
installation.
● Do not drag the cables when moving the device, or it may lead to
falling or affect the performance of interfaces and cables.
2.1 Install the Device
Please select the suitable installation method according to the applying
scenarios and combination with different devices
Note:
The device shell is not water-proof. The device can not be exposed to the
sun and independently installed in the outdoor environment. It is
recommended to combine the device with other cameras.
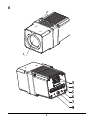
2.1.1 Install the Device to 1/4-20UNC Screw Bracket (Page 3 – C)
Steps:
1. Fix the pinboard to the device with M3 screws.
2. Fix the device with 1/4-20UNC screw to the pointed location.
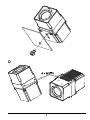
2.1.2 Install the Device to the Positioning System (Page 4 – D)
It is recommended to use four M3 thread holes to fix the device when
combining the device to the positioning systems such as PTZ or robot.
2.2 Finish Installation
Connect the corresponding cables and power on the device. Make sure the
live view image can work normally and then finish the installation.
● If the live view image works normally, the installation finished.
● If the device fails to start up when the device is normal, please check
interfaces of the device cables; If the cable connection is normal,
please check the cables.
3. Activate and Access Network Camera
Visit www.hikmicrotech.com to download and install HIKMICRO Studio.
Refer to the user manual of the device for detailed operation.
Legal Information
© 2022 Hangzhou Microimage Software Co., Ltd. All rights reserved.
About this Manual
The Manual includes instructions for using and managing the Product.
Pictures, charts, images and all other information hereinafter are for
description and explanation only. The information contained in the Manual
is subject to change, without notice, due to firmware updates or other
reasons. Please find the latest version of this Manual at the HIKMICRO
website (www.hikmicrotech.com/).
Please use this Manual with the guidance and assistance of professionals
trained in supporting the Product.
Trademarks Acknowledgement
and other HIKMICRO’s trademarks and logos are the properties of
HIKMICRO in various jurisdictions.
Other trademarks and logos mentioned are the properties of their

7
respective owners.
LEGAL DISCLAIMER
TO THE MAXIMUM EXTENT PERMITTED BY APPLICABLE LAW, THIS MANUAL
AND THE PRODUCT DESCRIBED, WITH ITS HARDWARE, SOFTWARE AND
FIRMWARE, ARE PROVIDED “AS IS” AND “WITH ALL FAULTS AND ERRORS”.
HIKMICRO MAKES NO WARRANTIES, EXPRESS OR IMPLIED, INCLUDING
WITHOUT LIMITATION, MERCHANTABILITY, SATISFACTORY QUALITY, OR
FITNESS FOR A PARTICULAR PURPOSE. THE USE OF THE PRODUCT BY YOU IS
AT YOUR OWN RISK. IN NO EVENT WILL HIKMICRO BE LIABLE TO YOU FOR
ANY SPECIAL, CONSEQUENTIAL, INCIDENTAL, OR INDIRECT DAMAGES,
INCLUDING, AMONG OTHERS, DAMAGES FOR LOSS OF BUSINESS PROFITS,
BUSINESS INTERRUPTION, OR LOSS OF DATA, CORRUPTION OF SYSTEMS, OR
LOSS OF DOCUMENTATION, WHETHER BASED ON BREACH OF CONTRACT,
TORT (INCLUDING NEGLIGENCE), PRODUCT LIABILITY, OR OTHERWISE, IN
CONNECTION WITH THE USE OF THE PRODUCT, EVEN IF HIKMICRO HAS
BEEN ADVISED OF THE POSSIBILITY OF SUCH DAMAGES OR LOSS.
YOU ACKNOWLEDGE THAT THE NATURE OF THE INTERNET PROVIDES FOR
INHERENT SECURITY RISKS, AND HIKMICRO SHALL NOT TAKE ANY
RESPONSIBILITIES FOR ABNORMAL OPERATION, PRIVACY LEAKAGE OR
OTHER DAMAGES RESULTING FROM CYBER-ATTACK, HACKER ATTACK,
VIRUS INFECTION, OR OTHER INTERNET SECURITY RISKS; HOWEVER,
HIKMICRO WILL PROVIDE TIMELY TECHNICAL SUPPORT IF REQUIRED.
YOU AGREE TO USE THIS PRODUCT IN COMPLIANCE WITH ALL APPLICABLE
LAWS, AND YOU ARE SOLELY RESPONSIBLE FOR ENSURING THAT YOUR USE
CONFORMS TO THE APPLICABLE LAW. ESPECIALLY, YOU ARE RESPONSIBLE,
FOR USING THIS PRODUCT IN A MANNER THAT DOES NOT INFRINGE ON THE
RIGHTS OF THIRD PARTIES, INCLUDING WITHOUT LIMITATION, RIGHTS OF
PUBLICITY, INTELLECTUAL PROPERTY RIGHTS, OR DATA PROTECTION AND
OTHER PRIVACY RIGHTS. YOU SHALL NOT USE THIS PRODUCT FOR ANY
PROHIBITED END-USES, INCLUDING THE DEVELOPMENT OR PRODUCTION
OF WEAPONS OF MASS DESTRUCTION, THE DEVELOPMENT OR
PRODUCTION OF CHEMICAL OR BIOLOGICAL WEAPONS, ANY ACTIVITIES IN
THE CONTEXT RELATED TO ANY NUCLEAR EXPLOSIVE OR UNSAFE NUCLEAR
FUEL-CYCLE, OR IN SUPPORT OF HUMAN RIGHTS ABUSES.
IN THE EVENT OF ANY CONFLICTS BETWEEN THIS MANUAL AND THE
APPLICABLE LAW, THE LATTER PREVAILS.
Regulatory Information
These clauses apply only to the products bearing the corresponding mark
or information.
FCC Information
Note: This equipment has been tested and found to comply with the limits
for a Class A digital device, pursuant to part 15 of the FCC Rules. These limits
are designed to provide reasonable protection against harmful interference
when the equipment is operated in a commercial environment. This
equipment generates, uses, and can radiate radio frequency energy and, if
not installed and used in accordance with the instruction manual, may cause
harmful interference to radio communications. Operation of this equipment
in a residential area is likely to cause harmful interference in which case the
user will be required to correct the interference at his own expense.
Please take attention that changes or modification not expressly approved
by the party responsible for compliance could void the user’s authority to
operate the equipment.
This device complies with Part 15 of the FCC Rules. Operation is subject to

8
the following two conditions:
(1) This device may not cause harmful interference, and
(2) This device must accept any interference received, including interference
that may cause undesired operation.
Warning: This is a class A product. In a domestic environment this product
may cause radio interference in which case the user may be required to take
adequate measures.
EU Conformity Statement
This product and - if applicable - the supplied accessories too are
marked with "CE" and comply therefore with the applicable
harmonized European standards listed under the Directive
2014/30/EU(EMCD), Directive 2014/35/EU(LVD) and Directive
2011/65/EU(RoHS).
This product and - if applicable - the supplied accessories too are
marked with "UKCA" and comply therefore with the following
directives: Electromagnetic Compatibility Regulations 2016,
Electrical Equipment (Safety) Regulations 2016, the Restriction of the Use of
Certain Hazardous Substances in Electrical and Electronic Equipment
Regulations 2012.
Directive 2012/19/EU (WEEE Directive): Products marked with this
symbol cannot be disposed of as unsorted municipal waste in the
European Union. For proper recycling, return this product to your
local supplier upon the purchase of equivalent new equipment, or
dispose of it at designated collection points. For more information see:
www.recyclethis.info
According to the Waste Electrical and Electronic Equipment Regulations
2013: Products marked with this symbol cannot be disposed of as unsorted
municipal waste in the United Kingdom. For proper recycling, return this
product to your local supplier upon the purchase of equivalent new
equipment, or dispose of it at designated collection points. For more
information see: www.recyclethis.info.
Directive 2006/66/EC and its amendment 2013/56/EU (Battery
Directive): This product contains a battery that cannot be
disposed of as unsorted municipal waste in the European Union.
See the product documentation for specific battery information.
The battery is marked with this symbol, which may include lettering to
indicate cadmium (Cd), lead (Pb), or mercury (Hg). For proper recycling,
return the battery to your supplier or to a designated collection point. For
more information see: www.recyclethis.info.
According to the Batteries and Accumulators (Placing on the Market)
Regulations 2008 and the Waste Batteries and Accumulators Regulations
2009: This product contains a battery that cannot be disposed of as
unsorted municipal waste in the United Kingdom. See the product
documentation for specific battery information. The battery is marked with
this symbol, which may include lettering to indicate cadmium (Cd), lead (Pb),
or mercury (Hg). For proper recycling, return the battery to your supplier or
to a designated collection point. For more information see:
www.recyclethis.info.
Industry Canada ICES-003 Compliance

9
This device meets the CAN ICES-003 (A)/NMB-003(A) standards
requirements.
Safety Instruction
These instructions are intended to ensure that user can use the product
correctly to avoid danger or property loss.
Laws and Regulations
Use of the product must be in strict compliance with the local electrical
safety regulations.
Transportation
● Keep the device in original or similar packaging while transporting it.
● Keep all wrappers after unpacking them for future use. In case of any
failure occurred, you need to return the device to the factory with the
original wrapper. Transportation without the original wrapper may
result in damage on the device and the company shall not take any
responsibilities.
● DO NOT drop the product or subject it to physical shock. Keep the
device away from magnetic interference.
Power Supply
● Input voltage should meet the Limited Power Source (10 VDC to 30 VDC)
according to the IEC62368 standard. Please refer to technical
specifications for detailed information.
● Make sure the plug is properly connected to the power socket.
● The socket-outlet shall be installed near the equipment and shall be
easily accessible.
● DO NOT connect multiple devices to one power adapter, to avoid
over-heating or fire hazards caused by overload.
● DO NOT touch the bare metal contacts of the inlets after the circuit
breaker is turned off. Electricity still exists.
● + identifies the positive terminal(s) of equipment which is used with, or
generates direct current. - identifies the negative terminal(s) of
equipment which is used with, or generates direct current.
● Use the power adapter provided by qualified manufacturer. Refer to
the product specification for detailed power requirements.
Battery
● Risk of explosion if the battery is replaced by an incorrect type. Dispose
of used batteries according to the instructions.
● The built-in battery cannot be dismantled. Please contact the
manufacture for repair if necessary.
● For long-term storage of the battery, make sure it is fully charged every
half year to ensure the battery quality. Otherwise, damage may occur.
● This equipment is not suitable for use in locations where children are
likely to be present.
● Improper replacement of the battery with an incorrect type may defeat
a safeguard (for example, in the case of some lithium battery types).
● DO NOT dispose of the battery into fire or a hot oven, or mechanically
crush or cut the battery, which may result in an explosion.

10
● DO NOT leave the battery in an extremely high temperature
surrounding environment, which may result in an explosion or the
leakage of flammable liquid or gas.
● DO NOT subject the battery to extremely low air pressure, which may
result in an explosion or the leakage of flammable liquid or gas.
● Use the battery provided by qualified manufacturer. Refer to the
product specification for detailed battery requirements.
● Dispose of used batteries according to the instructions.
Installation
● Never place the equipment in an unstable location. The equipment may
fall, causing serious personal injury or death.
● This equipment is for use only with corresponding brackets. Use with
other (carts, stands, or carriers) may result in instability causing injury.
System Security
● You acknowledge that the nature of Internet provides for inherent
security risks, and our company shall not take any responsibilities for
abnormal operation, privacy leakage or other damages resulting from
cyber attack, hacker attack, however, our company will provide timely
technical support if required.
● Please enforce the protection for the personal information and the
data security as the device may be confronted with the network
security problems when it is connected to the Internet. Please contact
us when the device might exist network security risks.
● Please understand that you have the responsibility to configure all the
passwords and other security settings about the device, and keep your
user name and password.
Maintenance
● If the product does not work properly, please contact your dealer or
the nearest service center. We shall not assume any responsibility for
problems caused by unauthorized repair or maintenance.
● A few device components (e.g., electrolytic capacitor) require regular
replacement. The average lifespan varies, so periodic checking is
recommended. Contact your dealer for details.
● Wipe the device gently with a clean cloth and a small quantity of
ethanol, if necessary.
● Use a soft brush or a blowing dust ball to flick the dust off.
● If the equipment is used in a manner not specified by the manufacturer,
the protection provided by the device may be impaired.
● To reduce the risk of fire, replace only with the same type and rating of
fuse.
● The serial port of the equipment is used for debugging only.
Using Environment
● Make sure the running environment meets the requirement of the
device. The operating temperature shall be 0 °C to 50 °C (32 °F to
122 °F), and the operating humidity shall be 95% or less.

11
● DO NOT expose the device to high electromagnetic radiation or dusty
environments.
● DO NOT aim the lens at the sun or any other bright light.
● The equipment shall not be exposed to dripping or splashing and that
no objects filled with liquids, such as vases, shall be placed on the
equipment.
● No naked flame sources, such as lighted candles, should be placed on
the equipment.
● Provide a surge suppressor at the inlet opening of the equipment under
special conditions such as the mountain top, iron tower, and forest.
● Burned fingers when handling the parts with symbol . Wait one-half
hour after switching off before handling the parts.
Emergency
If smoke, odor, or noise arises from the device, immediately turn off the
power, unplug the power cable, and contact the service center.
Manufacture Address
Room 313, Unit B, Building 2, 399 Danfeng Road, Xixing Subdistrict, Binjiang
District, Hangzhou, Zhejiang 310052, China
Hangzhou Microimage Software Co., Ltd.
COMPLIANCE NOTICE: The thermal series products might be subject to
export controls in various countries or regions, including without limitation,
the United States, European Union, United Kingdom and/or other member
countries of the Wassenaar Arrangement. Please consult your professional
legal or compliance expert or local government authorities for any necessary
export license requirements if you intend to transfer, export, re-export the
thermal series products between different countries.
Deutsch
1. Ü berblick
1.1 Kurzbeschreibung
Die thermografische Netzwerk-Boxkamera ist ein Gerät, das
Internet-Fernüberwachung, Videoserver und HD-Kamerafunktionen integriert.
Fernübertragung, Vorschau und Konfiguration können über Browser und
Clients realisiert werden. Das Gerät kann einfach ohne strukturierte
Verkabelung installiert werden.
Es kann unabhängig oder in Kombination mit Geräten wie Robotern für die
Wartung von Anlagen, die Fehlererkennung, die Steuerung industrieller
Prozesse usw. eingesetzt werden.
1.2 Komponente und Schnittstelle (Seite 1 – A)
Nr.
Komponente und
Schnittstelle
Beschreibung
1
Wärmebildobjektiv
Anzeige des Wärmebildes
2
M3-Gewindebohrungen
Schrauben einbauen.

12
3
Netzwerkanzeigen
● Blinken: Ü bermittlung von
Netzwerkdaten.
● Leuchtet: Das Netz ist ohne
Datenübertragung verbunden.
4
Netzwerkanschluss
RJ-45, Netzwerkkommunikation
5
E/A-Anschluss
Stellt eine Verbindung zur Stromquelle
her und überträgt Daten.
6
Rücksetztaste
Um das Gerät auf die
Werkseinstellungen zurückzusetzen,
müssen Sie die Taste 10 Sekunden
lang gedrückt halten und dann
loslassen.
7
Masseanschluss
Schließen Sie es zur Gewährleistung
der elektrischen Sicherheit an die
Erdungsklemme an.
8
Betriebsanzeige
● Leuchtet Grün: Betrieb.
● Durchgehend rot: Das System ist in
Betrieb.
1.3-polige elektrische Schnittstelle (Seite 3 – B)
Nr.
Signal
Beschreibung
1
Strom
Stromanschluss
2
MASSE
Erdung
3
RS232_RX
Geräteeinrichtung
4
RS232_TX
Geräteeinrichtung
5
ALARM_IN
1, Alarmeingang und -ausgang
6
ALARM_OUT
7
RS485-
Serieller RS-485-Anschluss als
Kommunikationsschnittstelle
8
RS485+
9
MASSE
Analoger Videoausgang
0
CVBS
2. Installation
Bevor Sie beginnen:
● Achten Sie darauf, dass sich das Gerät in der Verpackung in gutem
Zustand befindet und alle Montageteile enthalten sind. Die
Abmessungen des Geräts entnehmen Sie bitte den technischen Daten.
● Stellen Sie sicher, dass ausreichend Platz für die Installation des
Geräts und des Zubehörs vorhanden ist.
● Stellen Sie sicher, dass die Wand ausreichend tragfähig ist, um
mindestens das 8-fache des Gewichts des Systems und der Halterung
zu tragen.
● Achten Sie darauf, dass die Geräte während der Montage
ausgeschaltet sind.
● Ziehen Sie beim Transportieren des Geräts nicht an den Kabeln, da es
dadurch hinfallen oder die Leistung der Schnittstellen und Kabel
beeinträchtigt werden kann.
2.1 Installieren des Geräts
Wählen Sie die passende Installationsmethode je nach Anwendungsszenario
und Kombination mit anderen Geräten.

13
Hinweis:
Das Gehäuse des Geräts ist nicht wasserdicht. Das Gerät darf nicht der
Sonne ausgesetzt und im Außenbereich unabhängig installiert werden.
Es wird empfohlen, das Gerät mit anderen Kameras zu kombinieren.
2.1.1 Installieren des Geräts an der 1/4-20UNC-Schraubenhalterung
(Seite 3 – C)
Schritte:
1. Befestigen Sie die Pinnwand mit M3-Schrauben am Gerät.
2. Befestigen Sie das Gerät mit einer 1/4-20UNC-Schraube an der dafür
vorgesehenen Stelle.
2.1.2 Installieren des Geräts am Positionierungssystem (Seite 4 – D)
Wenn das Gerät mit Positionierungssystemen wie PTZ oder Robotern
kombiniert wird, empfiehlt es sich, zum Befestigen des Geräts vier
M3-Gewindebohrungen zu verwenden.
2.2 Abschließen der Installation
Schließen Sie die entsprechenden Kabel an und schalten Sie das Gerät ein.
Vergewissern Sie sich, dass die Liveanzeige des Bildes normal funktioniert,
und schließen Sie die Installation dann ab.
● Wenn die Liveanzeige des Bildes ordnungsgemäß funktioniert, ist die
Installation abgeschlossen.
● Ü berprüfen Sie die Anschlüsse der Gerätekabel, wenn das Gerät nicht
startet, obwohl es normal angeschlossen ist. Wenn die
Kabelverbindung ordnungsgemäß ausgeführt ist, überprüfen Sie bitte
die Kabel.
3. Aktivieren und Zugriff auf Netzwerk-Kamera
Besuchen Sie zum Herunterladen und Installieren von HIKMICRO Studio die
Website www.hikmicrotech.com. Beachten Sie für detaillierte Anweisungen
die Bedienungsanleitung des Gerätes.
Behördliche Informationen
Diese Bestimmungen gelten nur für Produkte, die das entsprechende
Zeichen oder die entsprechenden Informationen tragen.
EU-Konformitätserklärung
Dieses Produkt und – falls zutreffend – auch das mitgelieferte
Zubehör sind mit „CE“ gekennzeichnet und entsprechen somit den
geltenden harmonisierten europäischen Normen, die unter der
Richtlinie 2014/30/EU (EMV), der Richtlinie 2014/35/EU (NSR) und der
Richtlinie 2011/65/EU (RoHS) aufgeführt sind.
Richtlinie 2012/19/EU (WEEE-Richtlinie): Produkte, die mit diesem
Symbol gekennzeichnet sind, dürfen innerhalb der Europäischen
Union nicht mit dem Hausmüll entsorgt werden. Für korrektes
Recycling geben Sie dieses Produkt an Ihren örtlichen Fachhändler
zurück oder entsorgen Sie es an einer der Sammelstellen. Weitere
Informationen finden Sie unter: www.recyclethis.info
Richtlinie 2006/66/EC und ihre Änderung 2013/56/EU
(Batterierichtlinie): Dieses Produkt enthält eine Batterie, die
innerhalb der Europäischen Union nicht mit dem Hausmüll
entsorgt werden darf. Siehe Produktdokumentation für
spezifische Hinweise zu Batterien. Die Batterie ist mit diesem Symbol

14
gekennzeichnet, das zusätzlich die Buchstaben Cd für Cadmium, Pb für Blei
oder Hg für Quecksilber enthalten kann. Für korrektes Recycling geben Sie
die Batterie an Ihren örtlichen Fachhändler zurück oder entsorgen Sie sie an
einer der Sammelstellen. Weitere Informationen finden Sie unter:
www.recyclethis.info.
Sicherheitshinweis
Diese Anleitungen sollen gewährleisten, dass Sie das Produkt korrekt
verwenden, um Gefahren oder Sachschäden zu vermeiden.
Gesetze und Vorschriften
Die Verwendung des Produkts muss in strikter Ü bereinstimmung mit den
örtlichen Vorschriften zur elektrischen Sicherheit erfolgen.
Transportwesen
● Bewahren Sie das Gerät beim Transport in der ursprünglichen oder
einer vergleichbaren Verpackung auf.
● Bewahren Sie das gesamte Verpackungsmaterial nach dem Auspacken
für zukünftigen Gebrauch auf. Im Falle eines Fehlers müssen Sie das
Gerät in der Originalverpackung an das Werk zurücksenden. Beim
Transport ohne Originalverpackung kann das Gerät beschädigt werden
und wir übernehmen keine Verantwortung.
● Lassen Sie das Produkt nicht fallen und vermeiden Sie heftige Stöße.
Halten Sie das Gerät von magnetischen Störungen fern.
Spannungsversorgung
● Die Eingangsspannung muss gemäß der Norm IEC62368 zur
Stromquelle (10 VDC bis 30 VDC) passen. Siehe technische Daten für
detaillierte Informationen.
● Stellen Sie sicher, dass der Stecker richtig in der Steckdose steckt.
● Die Steckdose sollte sich in der Nähe des Geräts befinden und muss
einfach zugänglich sein.
● Verbinden Sie NICHT mehrere Geräte mit einem Netzteil, da es
andernfalls durch Ü berlastung zu einer Ü berhitzung oder einem Brand
kommen kann.
● Berühren Sie NICHT die blanken Metallkontakte der Eingänge, nachdem
der Schutzschalter ausgeschaltet wurde. Sie stehen noch unter Strom.
● + kennzeichnet den/die Pluspol(e) von Geräten, die mit Gleichstrom
betrieben werden oder Gleichstrom erzeugen. – kennzeichnet den/die
Minuspol(e) von Geräten, die mit Gleichstrom betrieben werden oder
Gleichstrom erzeugen.
● Verwenden Sie das von einem qualifizierten Hersteller mitgelieferte
Netzteil. Detaillierte Angaben zu den Batterie-/Akku-Anforderungen
finden Sie in der Produktspezifikation.
Batterie
● Bei Austausch der Batterie durch einen falschen Typ besteht
Explosionsgefahr. Entsorgen Sie verbrauchte Batterien entsprechend
der Anleitung.
● Der integrierte Akku darf nicht demontiert werden. Wenden Sie sich
gegebenenfalls zur Reparatur an den Hersteller.

15
● Achten Sie bei langfristiger Lagerung des Akkus darauf, dass er alle
sechs Monate vollständig geladen wird, um seine Lebensdauer zu
gewährleisten. Anderenfalls kann es zu Schäden kommen.
● Das Gerät ist nicht für den Einsatz an Orten geeignet, an denen sich
wahrscheinlich Kinder aufhalten.
● Unsachgemäßer Austausch des Akkus durch einen falschen Typ kann
eine Schutzvorrichtung umgehen (z. B. bei einigen
Lithium-Batterietypen).
● Batterien nicht durch Verbrennen, in einem heißen Ofen oder
Zerkleinern oder Zerschneiden entsorgen. Das kann zu einer Explosion
führen.
● Bewahren Sie Batterien nicht in einer Umgebung mit extrem hoher
Temperatur auf. Das kann zu einer Explosion oder zum Auslaufen von
entflammbarer Flüssigkeit oder Gas führen.
● Setzen Sie Batterien keinem extrem niedrigen Luftdruck aus. Das kann
zu einer Explosion oder zum Auslaufen von entflammbarer Flüssigkeit
oder Gas führen.
● Verwenden Sie nur einen von einem qualifizierten Hersteller
gelieferten Akku. Detaillierte Angaben zu den
Batterie-/Akku-Anforderungen finden Sie in der Produktspezifikation.
● Entsorgen Sie verbrauchte Batterien entsprechend der Anleitung.
Installation
● Stellen Sie das Gerät niemals an einem instabilen Ort auf. Es könnte
umfallen und schwere oder sogar tödliche Verletzungen verursachen.
● Dieses Gerät darf nur mit den entsprechenden Halterungen verwendet
werden. Die Verwendung anderen Halterungen (Wagen, Ständer oder
Träger) kann zu Instabilität führen und Verletzungen verursachen.
Systemsicherheit
● Sie erkennen an, dass die Natur des Internets damit verbundene
Sicherheitsrisiken mit sich bringt und unser Unternehmen übernimmt
keine Verantwortung für anormale Betriebsabläufe,
Datenschutzverletzungen oder andere Schäden, die sich durch
Cyber- oder Hackerangriffe ergeben. Bei Bedarf wird unser
Unternehmen jedoch zeitnahe technische Unterstützung leisten.
● Bitte sorgen Sie für den Schutz der persönlichen Daten und die
Datensicherheit, da das Gerät Netzwerksicherheitsproblemen
ausgesetzt werden kann, wenn es mit dem Internet verbunden ist.
Bitte setzen Sie sich mit uns in Verbindung, wenn das Gerät
Netzwerksicherheitsrisiken aufweist.
● Bitte nehmen Sie zur Kenntnis, dass Sie die Verantwortung dafür tragen,
alle Passwörter und andere Sicherheitseinstellungen für das Gerät zu
konfigurieren und Ihren Benutzernamen und Ihr Passwort
aufzubewahren.
Wartung
● Falls das Produkt nicht einwandfrei funktionieren sollte, wenden Sie

16
sich an Ihren Händler oder den nächstgelegenen Kundendienst.
Wir übernehmen keine Haftung für Probleme, die durch nicht
Reparatur- oder Instandhaltungsarbeiten von nicht autorisierten
Dritten verursacht werden.
● Einige Gerätekomponenten (z. B. Elektrolytkondensator) müssen
regelmäßig ausgetauscht werden. Die durchschnittliche Lebensdauer
variiert, weshalb eine regelmäßige Prüfung empfohlen wird.
Einzelheiten erfahren Sie von Ihrem Händler.
● Wischen Sie das Gerät bei Bedarf sanft mit einem sauberen Tuch und
einer geringen Menge Ethanol ab.
● Verwenden Sie einen weichen Pinsel oder eine Staubkugel, um
etwaigen Staub zu beseitigen.
● Wenn das Gerät nicht vom Hersteller vorgegebenem Sinne genutzt
wird, kann der durch das Gerät bereitgestellte Schutz beeinträchtigt
werden.
● Um die Feuergefahr zu verringern, ersetzen Sie Sicherungen nur durch
Sicherungen des gleichen Typs und der gleichen Leistung.
● Die serielle Schnittstelle des Geräts wird nur zur Fehlersuche
verwendet.
Einsatzumgebung
● Achten Sie darauf, dass die Betriebsumgebung den Anforderungen des
Geräts entspricht. Die Betriebstemperatur des Geräts beträgt 0 °C bis
+50 °C und die Betriebsluftfeuchtigkeit darf höchstens 95 % betragen.
● Setzen Sie das Gerät KEINER hohen elektromagnetischen Strahlung
oder staubigen Umgebungen aus.
● Richten Sie das Objektiv NICHT auf die Sonne oder eine andere helle
Lichtquelle.
● Das Gerät vor tropfenden oder spritzenden Flüssigkeiten schützen.
Auf dem Gerät dürfen keine mit Flüssigkeit gefüllten Objekte, wie z. B.
Vasen, abgestellt werden.
● Stellen Sie keine offenen Flammen (wie brennende Kerzen) auf dem
Gerät ab.
● Sorgen Sie für einen Ü berspannungsschutz an den Eingängen der
Anlage bei besonderen Umgebungsbedingungen wie Berggipfel,
Metallturm und Wald.
● Dieses Symbol weist darauf hin, dass Sie sich beim Umgang mit den
Teilen die Finger verbrennen können. Warten Sie nach dem
Ausschalten eine halbe Stunde, bevor Sie die Teile anfassen.
Notruf
Sollten sich Rauch, Gerüche oder Geräusche in dem Gerät entwickeln, so
schalten Sie es unverzüglich aus und ziehen Sie den Netzstecker; wenden Sie
sich dann an den Kundendienst.
Anschrift des Herstellers
Raum 313, Einheit B, Gebäude 2, 399 Danfeng-Straße, Gemarkung Xixing,
Stadtbezirk Binjiang, Hangzhou, Zhejiang 310052, China

17
Hangzhou Microimage Software Co., Ltd.
RECHTLICHER HINWEIS: Die Produkte der Wärmebild-Serie unterliegen
unter Umständen in verschiedenen Ländern oder Regionen Exportkontrollen,
wie zum Beispiel in den Vereinigten Staaten, der Europäischen Union, dem
Vereinigten Königreich und/oder anderen Mitgliedsländern des
Wassenaar-Abkommens. Bitte wenden Sie sich an Ihren professionellen
Rechts- oder Compliance-Experten oder an die zuständigen Behörden, wenn
Sie beabsichtigen, Produkte der Wärmebild-Serie zwischen verschiedenen
Ländern zu transferieren, zu exportieren oder zu reexportieren, um
Informationen über eine eventuell erforderliche Ausfuhrgenehmigung zu
erhalten.
Français
1. Vue d’ensemble
1.1 Brève description
La caméra-boîte thermographique réseau est un appareil qui intègre les
fonctions de surveillance à distance par Internet, de serveur vidéo et de
caméra HD.
La transmission, la prévisualisation et la configuration à distance peuvent
être réalisées via des navigateurs et des clients. L’appareil peut être
simplement installé sans système de câblage structuré.
Il peut être utilisé indépendamment ou être combiné avec d’autres
appareils, tels que des robots, pour faciliter la maintenance d’équipement,
l’inspection d’installations, le contrôle de procédés industriels, etc.
1.2 Composant et interface (Page 1 – A)
N°
Composants et interface
Description
1
Objectif thermique
Vue de l’image thermique
2
Trous filetés M3
Pour les vis d’installation.
3
Indicateurs réseau
● Clignotement : Transmission de
données réseau.
● Fixe : Le réseau est connecté,
sans transmission de données.
4
Interface réseau
RJ-45, communication réseau
5
Interface d’E/S
Se connecte à l’alimentation
électrique et transmet les données.
6
Bouton de réinitialisation
Appuyez sur le bouton pendant
10 s, puis relâchez pour que
l’appareil retourne au paramétrage
d’origine.
7
Vis de mise à la terre
Connectez à la borne de mise à la
terre pour assurer que le circuit soit
sécuritaire.
8
Voyant d’alimentation
● Vert fixe : Fonctionnement.
● Rouge fixe : Le système est en
cours de fonctionnement.
1.3 Interface électrique (Page 3 – B)
N°
Signal
Description

18
1
Alimentation
Entrée d’alimentation
2
GND
Mise à la terre
3
RS232_RX
Configuration de l’appareil
4
RS232_TX
Configuration de l’appareil
5
ALARM_IN
1, Entrée et sortie d’alarme
6
ALARM_OUT
7
RS485-
Interface de communication du port série
RS-485
8
RS485+
9
GND
Sortie vidéo analogique
0
CVBS
2. Installation
Avant de commencer :
● Assurez-vous que l’appareil dans l’emballage est en bon état et que
toutes les pièces d’assemblage sont incluses. Vérifiez les spécifications
pour connaître les dimensions de l’appareil.
● Assurez-vous qu’il y a assez d’espace pour l’installation de l’appareil et
de ses accessoires.
● Assurez-vous que le mur est assez résistant pour supporter au moins
8 fois le poids du système et du support.
● Assurez-vous que l’équipement connexe est bien hors tension
pendant l’installation.
● Ne laissez pas traîner les câbles lorsque vous déplacez l’appareil. Cela
pourrait causer des chutes ou nuire à la performance des interfaces et
des câbles.
2.1 Installation de l’appareil
Veuillez sélectionner la méthode d’installation appropriée selon
l’emplacement et les divers appareils associés.
Remarque :
la coque de l’appareil n’est pas imperméable. L’appareil ne peut pas être
installé au soleil ou installé indépendamment à l’extérieur. Il est
recommandé de combiner cet appareil avec d’autres caméras.
2.1.1 Installez l’appareil sur le support fileté 1/4-20UNC (Page 3 – C)
Procédures :
1. Fixez la barre de brassage à l’appareil à l’aide de vis M3.
2. Attachez l’appareil à l’endroit indiqué à l’aide d’une vis 1/4-20UNC.
2.1.2 Fixez l’appareil au système de positionnement (Page 4 – D)
Il est recommandé d’utiliser quatre trous à filetage M3 pour fixer l’appareil
lorsque l’appareil est combiné à un système de positionnement tel qu’un
système PTZ ou un robot.
2.2 Finalisation de l’installation
Connectez les câbles correspondants et allumez l’appareil. Assurez-vous que
l’image en direct fonctionne normalement, puis complétez l’installation.
● Si l’image en direct fonctionne normalement, l’installation est
terminée.
● Si l’appareil ne démarre pas, veuillez vérifier les raccords des câbles.
Si les raccords sont bien connectés, vérifiez l’intégrité des câbles.
Sayfa yükleniyor...
Sayfa yükleniyor...
Sayfa yükleniyor...
Sayfa yükleniyor...
Sayfa yükleniyor...
Sayfa yükleniyor...
Sayfa yükleniyor...
Sayfa yükleniyor...
Sayfa yükleniyor...
Sayfa yükleniyor...
Sayfa yükleniyor...
Sayfa yükleniyor...
Sayfa yükleniyor...
Sayfa yükleniyor...
Sayfa yükleniyor...
Sayfa yükleniyor...
Sayfa yükleniyor...
Sayfa yükleniyor...
Sayfa yükleniyor...
Sayfa yükleniyor...
Sayfa yükleniyor...
Sayfa yükleniyor...
Sayfa yükleniyor...
Sayfa yükleniyor...
Sayfa yükleniyor...
Sayfa yükleniyor...
Sayfa yükleniyor...
Sayfa yükleniyor...
Sayfa yükleniyor...
Sayfa yükleniyor...
Sayfa yükleniyor...
Sayfa yükleniyor...
Sayfa yükleniyor...
Sayfa yükleniyor...
Sayfa yükleniyor...
Sayfa yükleniyor...
Sayfa yükleniyor...
Sayfa yükleniyor...
Sayfa yükleniyor...
Sayfa yükleniyor...
Sayfa yükleniyor...
Sayfa yükleniyor...
Sayfa yükleniyor...
Sayfa yükleniyor...
Sayfa yükleniyor...
Sayfa yükleniyor...
Sayfa yükleniyor...
Sayfa yükleniyor...
Sayfa yükleniyor...
Sayfa yükleniyor...
Sayfa yükleniyor...
Sayfa yükleniyor...
Sayfa yükleniyor...
Sayfa yükleniyor...
Sayfa yükleniyor...
Sayfa yükleniyor...
Sayfa yükleniyor...
Sayfa yükleniyor...
Sayfa yükleniyor...
Sayfa yükleniyor...
Sayfa yükleniyor...
Sayfa yükleniyor...
Sayfa yükleniyor...
Sayfa yükleniyor...
Sayfa yükleniyor...
Sayfa yükleniyor...
Sayfa yükleniyor...
Sayfa yükleniyor...
Sayfa yükleniyor...
Sayfa yükleniyor...
Sayfa yükleniyor...
Sayfa yükleniyor...
Sayfa yükleniyor...
Sayfa yükleniyor...
Sayfa yükleniyor...
Sayfa yükleniyor...
Sayfa yükleniyor...
Sayfa yükleniyor...
Sayfa yükleniyor...
Sayfa yükleniyor...
Sayfa yükleniyor...
Sayfa yükleniyor...
Sayfa yükleniyor...
Sayfa yükleniyor...
Sayfa yükleniyor...
Sayfa yükleniyor...
Sayfa yükleniyor...
Sayfa yükleniyor...
Sayfa yükleniyor...
Sayfa yükleniyor...
Sayfa yükleniyor...
Sayfa yükleniyor...
Sayfa yükleniyor...
Sayfa yükleniyor...
Sayfa yükleniyor...
Sayfa yükleniyor...
Sayfa yükleniyor...
Sayfa yükleniyor...
Sayfa yükleniyor...
Sayfa yükleniyor...
Sayfa yükleniyor...
Sayfa yükleniyor...
Sayfa yükleniyor...
Sayfa yükleniyor...
-
 1
1
-
 2
2
-
 3
3
-
 4
4
-
 5
5
-
 6
6
-
 7
7
-
 8
8
-
 9
9
-
 10
10
-
 11
11
-
 12
12
-
 13
13
-
 14
14
-
 15
15
-
 16
16
-
 17
17
-
 18
18
-
 19
19
-
 20
20
-
 21
21
-
 22
22
-
 23
23
-
 24
24
-
 25
25
-
 26
26
-
 27
27
-
 28
28
-
 29
29
-
 30
30
-
 31
31
-
 32
32
-
 33
33
-
 34
34
-
 35
35
-
 36
36
-
 37
37
-
 38
38
-
 39
39
-
 40
40
-
 41
41
-
 42
42
-
 43
43
-
 44
44
-
 45
45
-
 46
46
-
 47
47
-
 48
48
-
 49
49
-
 50
50
-
 51
51
-
 52
52
-
 53
53
-
 54
54
-
 55
55
-
 56
56
-
 57
57
-
 58
58
-
 59
59
-
 60
60
-
 61
61
-
 62
62
-
 63
63
-
 64
64
-
 65
65
-
 66
66
-
 67
67
-
 68
68
-
 69
69
-
 70
70
-
 71
71
-
 72
72
-
 73
73
-
 74
74
-
 75
75
-
 76
76
-
 77
77
-
 78
78
-
 79
79
-
 80
80
-
 81
81
-
 82
82
-
 83
83
-
 84
84
-
 85
85
-
 86
86
-
 87
87
-
 88
88
-
 89
89
-
 90
90
-
 91
91
-
 92
92
-
 93
93
-
 94
94
-
 95
95
-
 96
96
-
 97
97
-
 98
98
-
 99
99
-
 100
100
-
 101
101
-
 102
102
-
 103
103
-
 104
104
-
 105
105
-
 106
106
-
 107
107
-
 108
108
-
 109
109
-
 110
110
-
 111
111
-
 112
112
-
 113
113
-
 114
114
-
 115
115
-
 116
116
-
 117
117
-
 118
118
-
 119
119
-
 120
120
-
 121
121
-
 122
122
-
 123
123
-
 124
124


