
OWNER’S MANUAL
LED TV*
Click! User Guide
Please read this manual carefully before operating your set
and retain it for future reference.
P/NO : MFL68066605 (1410-REV05)
Printed in Korea
www.lg.com
*MFL68066605*
*
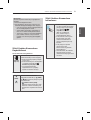
LG LED TVs are LCD TVs with
LED backlighting.
UB85** UB98** UG88**
UB93** UC97**
UB95** UC9*

A-2
TABLE OF CONTENTS
TABLE OF CONTENTS
A-3 SETTING UP THE TV
A-3 Attaching the stand
A-9 Tidying cables
A-11 Assembling the AV cover
A-12 MAKING CONNECTIONS
A-12 Antenna Connection
A-12 Satellite dish Connection
A-13 HDMI Connection
A-14 - ARC (Audio Return Channel)
A-15 DVI to HDMI Connection
A-16 Component Connection
A-17 Composite Connection
A-18 MHL Connection
A-19 Audio Connection
A-19 - Digital optical audio Connection
A-20 Headphone Connection
A-20 USB Connection
A-21 CI module Connection
A-22 Euro Scart Connection
LANGUAGE LIST
English
Türkçe
B-1 SPECIFICATIONS
COMMON
COMMON
LANGUAGE

A-3
SETTING UP THE TV
SETTING UP THE TV
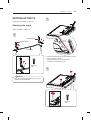
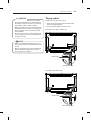
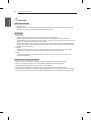
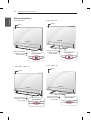
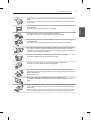
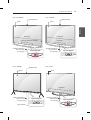
Image shown may differ from your TV.
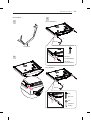
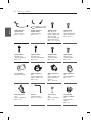
Attaching the stand
1
2
Stand Base
Stand Body (R)
Stand Body (L)
M4 x L20
4EA
UB85**-ZA, UB93**, UB95**-ZA
1
2
y
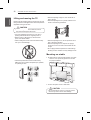
Be sure to check the Stand Body (L), (R), when
installing on the stand base.
NOTE
1 Attach the stand to the TV using the upper mounting
hole on the back of the TV.
2 Attach the stand to the TV using the lower
connection on the back of the TV.
3
M4 x L20
4EA

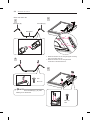
A-4
SETTING UP THE TV
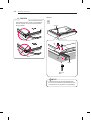
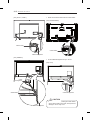
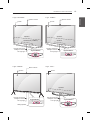
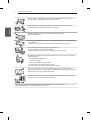
1 Attach the stand to the TV using the upper mounting
hole on the back of the TV.
2 Attach the stand to the TV using the lower
connection on the back of the TV.
1
2
3
4
M4 x L20
4EA
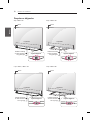
UB85**-ZD, UB95**-ZB
y
Be sure to check the Stand Body (L), (R), when
installing on the stand base.
NOTE
1
Stand Body (L)
Stand Body (R)
Stand Base
2
4EA
M4 x L10

A-5
SETTING UP THE TV
Stand Base
1
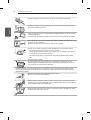
65/79/84UB98**
2
(Only 65/79UB98**)
3
1
2
Wrench
1
2
1
2
Wrench
4EA
M6 x L52
1
2
4EA
(Insulation
Holder)
(Only 84UB98**)
4EA
M6 x L47
(Only 65UB98**)
M6 x L52
(Only 79UB98**)

A-6
SETTING UP THE TV
y
Make sure that the screws are inserted correctly
and fastened securely. (If they are not fastened
securely enough, the TV may tilt forward after
being installed.)
CAUTION
1
98UB98**
1
2
1
2
M6 x L47
6EA
Mold
Wrench
y
The stand screws are already attached at the
back of the TV. Please use these attached screw
to assemble the TV and stand. (Only 98UB98**)
NOTE

A-7
SETTING UP THE TV
2
3
1
2
1
2
1
2
1
2
1
2
Stand Base
Wrench
1
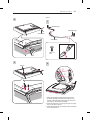
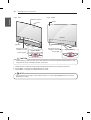
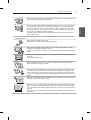
UC97**
2
1
2
2
3
Stand Body (L)
Stand Body (R)
Stand Base
M4 x L10
4EA
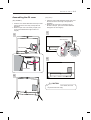
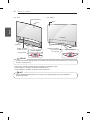
1 When assembling the stand, lay the front screen
protective package included in the product box on
a table or flat surface and then place the TV screen
face down on the protective package.
2 Attach the stand to the TV using the upper mounting
hole on the back of the TV.
3 Attach the stand to the TV using the lower connection
on the back of the TV.

A-8
SETTING UP THE TV
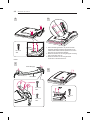
1 When assembling the stand, lay the front screen
protective package included in the product box on
a table or flat surface and then place the TV screen
face down on the protective package.
2 Attach the stand to the TV using the upper mounting
hole on the back of the TV.
3 Attach the stand to the TV using the lower
connection on the back of the TV.
1
2
3
2
1
3
1
M4 x L14
4EA
3
M4 x L20
4EA
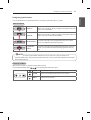
UG88**
1
Stand Base
Stand Body (R)
Stand Body (L)
M4 x L14
6EA
M4 x L10
2EA

A-9
SETTING UP THE TV
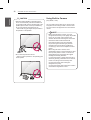
Tidying cables
Image shown may differ from your TV.
1 Gather and bind the cables with the Cable Holder
and the Cable Management.
2 Fix the Cable Management firmly to the TV.
(Only UB85**-ZA, UB93**, UB95**-ZA)
Cable Holder
Cable Management
(Only UB85**-ZD, UB95**-ZB)
Cable Holder
Cable Management
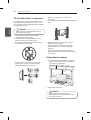
y
When attaching the stand to the TV set, place
the screen facing down on a cushioned table or
flat surface to protect the screen from scratches.
(Only UB85**, UB93**, UB95**, UB98**)
y
Make sure that the screws are inserted correctly
and fastened securely. (If they are not fastened
securely enough, the TV may tilt forward after
being installed.)
Do not use too much force and over tighten the
screws; otherwise screw may be damaged and
not tighten correctly.
CAUTION
y
Remove the stand before installing the TV on a
wall mount by performing the stand attachment in
reverse.
y
Remove the protective film from the stand base
and then attach the stand body to the stand
base. (Only UC97**, UG88**)
NOTE

A-10
SETTING UP THE TV
(Only 65/79/84UB98**)
Cable Holder
1 Gather and bind the cables with the Cable Holder.
(Only UC97**, UG88**)
Cable Holder
Cable Management
(Only 98UB98**)
y
Do not move the TV by holding the cable holders,
as the cable holders may break, and injuries and
damage to the TV may occur.
CAUTION
Cable Holder
Cable Management
Cable
management
(Only UC9*)
Cable Management
1 Fix the Cable Management firmly to the TV.

A-11
SETTING UP THE TV
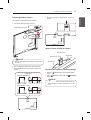
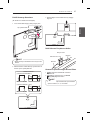
Assembling the AV cover
(Only 98UB98**)
1 Insert the cover holder attached to the AV port cover
into the hole of the main body of the product as
illustrated.
2 Attach the port cover onto the AV port part. (The
cover remains attached through the use of a
magnet.)
y
If you do not attach the cover holder, the cover
may fall off and cause injury.
CAUTION
AV Port Cover
Cover Holder
2
1
(Only UC9*)
1 Insert the cover holder attached to the AV port cover
into the hole of the main body of the product as
illustrated.
2 Attach the AV port cover by inserting it into the
left hole of the port. (The cover remains attached
through the use of a magnet.)
2
1
2
1
1
2
AV Port Cover
2
1
2
1
Cover
Holder

A-12
MAKING CONNECTIONS
IN
13 / 18 V
700mA Max LNB IN
Satellite
Satellite Dish
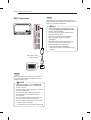
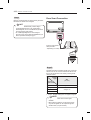
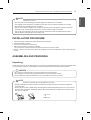
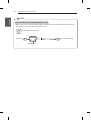
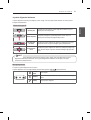
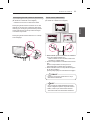
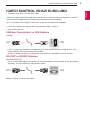
Satellite dish Connection
(Only satellite models)
English
Connect the TV to a satellite dish to a satellite socket
with a satellite RF cable (75 Ω).
Türkçe
TV’yi uydu RF kablosu (75 Ω) kullanarak çanak antene
ve uydu soketine bağlayın.
(*Not Provided)
Türkçe
TV’yi RF kablosu (75 Ω) ile duvar anten soketine
bağlayın.
y
İkiden fazla TV’de kullanmak için bir sinyal
ayırıcısı kullanın.
y
Görüntü kalitesinin kötü olması durumunda
görüntü kalitesini artırmak üzere bir sinyal
güçlendiricisi kullanın.
y
Anten bağlıyken görüntü kalitesinin kötü olması
durumunda anteni doğru yönde yeniden
hizalamayı deneyin.
y
Anten kablosu ve dönüştürücü ürünle birlikte
verilmemektedir.
y
Desteklenen DTV Ses: MPEG, Dolby Digital,
Dolby Digital Plus, HE-AAC
NOT
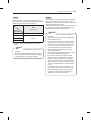
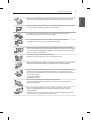
MAKING CONNECTIONS
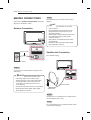
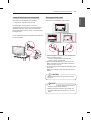
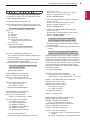
This section on MAKING CONNECTIONS mainly uses
diagrams for the UB85** models.
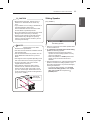
Antenna Connection
Wall Antenna Socket
IN
ANTENNA / CABLE
(*Not Provided)
English
Connect the TV to a wall antenna socket with an RF
cable (75 Ω).
y
Use a signal splitter to use more than 2 TVs.
y
If the image quality is poor, install a signal
amplifier properly to improve the image quality.
y
If the image quality is poor with an antenna
connected, try to realign the antenna in the
correct direction.
y
An antenna cable and converter are not supplied.
y
Supported DTV Audio: MPEG, Dolby Digital,
Dolby Digital Plus, HE-AAC
NOTE

A-13
MAKING CONNECTIONS
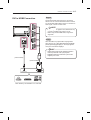
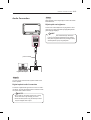
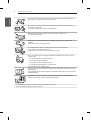
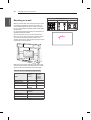
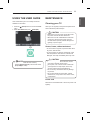
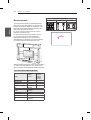
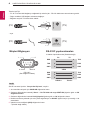
HDMI Connection
DVD / Blu-Ray / HD Cable Box
/ HD STB / PC
HDMI
2 3 1
4
/ DVI IN
(ARC)
(HDCP 2.2)
(MHL)
(10Bit)
(4K@60Hz)
(*Not Provided - Depending on model)
English
Transmits the digital video and audio signals from an
external device to the TV. Connect the external device
and the TV with the HDMI cable as shown.
y
It is recommended to use the TV with the HDMI
connection for the best image quality.
y
Use the latest High Speed HDMI™ Cable with
CEC (Customer Electronics Control) function.
y
High Speed HDMI™ Cables are tested to carry
an HD signal up to 1080p and higher.
y
Supported HDMI Audio format : Dolby
Digital(32Khz, 44.1Khz, 48Khz), DTS(44.1Khz,
48Khz), PCM(32Khz, 44.1Khz, 48Khz, 96Khz,
192Khz)
y
When you use HDMI port 3, it is recommended
that you use the cable provided. If you want to
use a regular HDMI cable, use one that is a high-
speed HDMI cable (3m or less). (Depending on
model)
NOTE
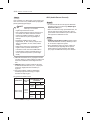
1) HDMI specifications may be different for each input
port, so make sure to check the device specifications
before connecting.
2) The HDMI IN 3 port is especially suitable for the
specifications to enjoy UHD Video (4:4:4, 4:2:2) of
4K @ 50/60 Hz. However, video or audio may not
be supported depending on the specifications of
the external equipment. In that case, use any other
HDMI IN port.
3) Contact customer service for more information on
the HDMI specifications of each input port.
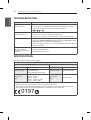
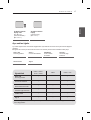
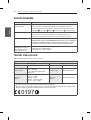
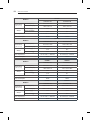
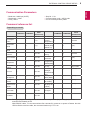
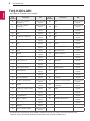
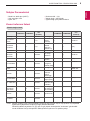
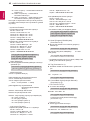
4K @ 50/60 Hz Support Format
Resolution
Frame
rate (Hz)
Colour Depth /
Chroma Sampling
8 bit 10 bit 12 bit
3840 x 2160p
4096 x 2160p
50.00
59.94
60.00
YCbCr
4:2:0
YCbCr 4:2:0
1
YCbCr 4:2:2
1
YCbCr
4:4:4
1
- -
RGB
4:4:4
1
- -
1: Only Supported at HDMI IN 3 Port

A-14
MAKING CONNECTIONS
Türkçe
Harici cihazdan TV’ye dijital video ve ses sinyalleri gön-
derir. Harici cihaz ile TV’yi HDMI kablosuyla aşağıdaki
şekilde gösterildiği gibi bağlayın.
y
En iyi görüntü kalitesi için, TV’nin HDMI
bağlantısıyla kullanılması önerilir.
y
CEC (Tüketici Elektronik Kontrolü) fonksiyonlu en
son Yüksek Hızlı HDMI™ Kablosunu kullanın.
y
Yüksek Hızlı HDMI™ Kablolarının 1080p ve
üzerine kadar HD sinyalini taşıyabildiği test
edilmiştir.
y
Desteklenen HDMI Ses biçimi: Dolby
Digital(32Khz, 44.1Khz, 48Khz), DTS(44.1Khz,
48Khz), PCM(32Khz, 44.1Khz, 48Khz, 96Khz,
192Khz)
y
HDMI kablosu kullanmanız gerektiğinde (HDMI
bağlantı noktası 3) birlikte verilen kabloyu
kullanmanız önerilir. Normal bir HDMI kablosu
kullanacaksanız yüksek hızlı HDMI kablosu (3
metre veya daha kısa) kullanın (modele bağlı
olarak).
NOT
1) HDMI teknik özellikleri her bir giriş bağlantı noktası
için farklı olabilir, bu yüzden bağlantı kurmadan önce
cihaz teknik özelliklerini kontrol ettiğinizden emin
olun.
2) HDMI IN 3 bağlantı noktası özellikle 4K @ 50/60
Hz kalitesinde UHD Videonun (4:4:4, 4:2:2) keyfini
çıkarmanızı sağlayacak teknik özellikler için
uygundur.
3) Her bir giriş bağlantı noktasının HDMI teknik
özellikleriyle ilgili daha fazla bilgi için müşteri
hizmetleri ile iletişime geçin.
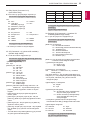
4K @ 50/60 Hz Destek Formatı
Çözünürlük
Kare hızı
(Hz)
Renk Derinliği / Renk
Örnekleme
8 bit 10 bit 12 bit
3840 x 2160p
4096 x 2160p
50.00
59.94
60.00
YCbCr
4:2:0
YCbCr 4:2:0
1
YCbCr 4:2:2
1
YCbCr
4:4:4
1
- -
RGB
4:4:4
1
- -
1: Yalnızca HDMI IN 3 Bağlantı Noktasında Desteklenir
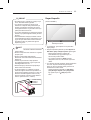
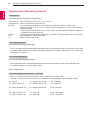
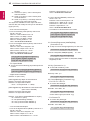
ARC (Audio Return Channel)
English
y
An external audio device that supports SIMPLINK
and ARC must be connected using HDMI(4K @ 60
Hz)/DVI IN 2 (ARC) port.
y
When connected with a high-speed HDMI cable, the
external audio device that supports ARC outputs
optical SPDIF without additional optical audio cable
and supports the SIMPLINK function.
Türkçe
y
HDMI(4K @ 60 Hz)/DVI IN 2 (ARC) bağlantı noktası
kullanılarak SIMPLINK ve ARC’yi destekleyen harici
bir ses cihazının bağlanması gerekir.
y
ARC’yi destekleyen harici ses cihazı, yüksek hızlı
bir HDMI kablosuyla bağlandığında ek optik ses
kablosu eklemeye gerek kalmadan optik SPDIF
çıkışı sağlar ve SIMPLINK fonksiyonunu destekler.

A-15
MAKING CONNECTIONS
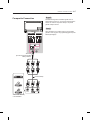
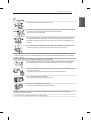
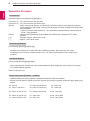
DVI to HDMI Connection
DVI OUT
AUDIO OUT
IN
AV2
2 3 1
4
(ARC)
(HDCP 2.2)
(MHL)
(10Bit)
/ DVI IN
(4K@60Hz)
(*Not Provided)
(*Not Provided)
DVD / Blu-Ray / HD Cable Box / PC / HD STB
English
Transmits the digital video signal from an external
device to the TV. Connect the external device and the
TV with the DVI-HDMI cable as shown. To transmit an
audio signal, connect an audio cable.
y
Depending on the graphics card, DOS mode may
not work if a HDMI to DVI Cable is in use.
y
When using the DVI/HDMI cable, single link is
supported.
NOTE
Türkçe
Harici cihazdan TV’ye dijital video sinyali gönderir.
Harici cihaz ile TV’yi DVI-HDMI kablosuyla aşağıdaki
şekilde gösterildiği gibi bağlayın. Ses sinyali gönder-
mek için bir ses kablosu bağlayın.
y
Grafik kartına bağlı olarak, HDMI-DVI Kablosu
kullanılıyorsa DOS modu çalışmayabilir.
y
HDMI/DVI kablosunu kullanırken yalnızca tek
bağlantıya izin verilir.
NOT

A-16
MAKING CONNECTIONS
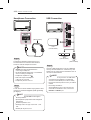
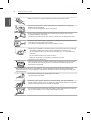
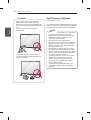
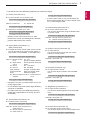
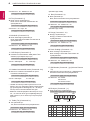
Component Connection
VIDEO
AUDIO
LR
IN
COMPONENT
YP
B
AUDIO
AV2
P
R
VIDEO
AV2
DVD / Blu-Ray
/ HD Cable Box
GREEN
GREEN
GREEN
BLUE BLUE
BLUE
RED RED
RED
RED RED
RED
WHITE WHITE
WHITE
YELLOW
(Use the composite
gender cable provided.)
(*Not Provided)
GREEN
YELLOW
(Use the component
gender cable provided.)
English
Transmits analogue video and audio signals from an
external device to the TV. Connect the external device
and the TV with a component cable(or component
gender cable) as shown.
y
If cables are not installed correctly, it could cause
this image to display in black and white or with
distorted colours.
NOTE
Türkçe
Harici cihazdan TV’ye analog video ve ses sinyalleri
gönderir. Harici aygıt ile TV'yi gösterildiği gibi kompo-
nent kablosuyla bağlayın.
y
Kabloların yanlış takılması, görüntünün siyah
beyaz veya bozuk renklerle gösterilmesine neden
olabilir.
NOT

A-17
MAKING CONNECTIONS
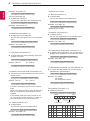
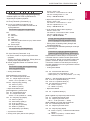
Composite Connection
IN
COMPONENT
YP
B
AUDIO
AV2
P
R
VIDEO
AV2
VIDEO
MONO
( )
AUDIO
LR
RED RED RED
WHITE WHITE
WHITE
YELLOW
YELLOW YELLOW
(Use the composite gender
cable provided.)
(*Not Provided)
YELLOW
VCR / DVD / Blu-Ray
/ HD Cable Box
English
Transmits analog video and audio signals from an
external device to the TV. Connect the external device
and the TV with the composite cable(or composite
gender cable) as shown.
Türkçe
Harici cihazdan TV’ye analog video ve ses sinyalleri
gönderir. Harici aygıt ile TV'yi gösterildiği gibi kompozit
kablosuyla bağlayın.

A-18
MAKING CONNECTIONS
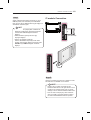
English
Mobile High-denition Link (MHL) is an interface for
transmitting digital audiovisual signals from mobile
phones to television sets.
y
Connect the mobile phone to the HDMI(4K @
60 Hz)/DVI IN 4 (MHL) port to view the phone
screen on the TV.
y
The MHL passive cable is needed to connect the
TV and a mobile phone.
y
This only works for the MHL-enabled phone.
y
Some applications can be operated by the
remote control.
y
For some mobile phones supporting MHL, you
can control with the magic remote control.
y
Remove the MHL passive cable from the TV when:
»
the MHL function is disabled
»
your mobile device is fully charged in standby mode
NOTE
MHL Connection
2 1
4
(MHL)
1(HDCP 2.2)
2(ARC)
/ DVI IN/ DVI IN
(4K@60Hz)
3(10Bit)
MHL passive cable
(*Not Provided)
Mobile phone
Türkçe
Mobil Yüksek Tanımlı Bağlantı (MHL) dijital görsel
işitsel sinyalleri cep telefonlarından televizyon setlerine
iletmek için kullanılan bir arabirimdir.
y
TV’de telefon ekranını görüntülemek için cep
telefonunu HDMI(4K @ 60 Hz)/DVI IN 4 (MHL)
bağlantı noktasına bağlayın.
y
TV ile cep telefonunu birbirine bağlamak için
MHL pasif kablo gereklidir.
y
Bu yalnızca MHL etkin telefonlarda çalışır.
y
Bazı uygulamalar uzaktan kumanda ile
çalıştırılabilir.
y
MHL desteği olan bazı cep telefonlarını sihirli
uzaktan kumanda olarak kullanabilirsiniz.
y
MHL pasif kablosunu TV’den çıkarın:
»
MHL işlevi devre dışı bırakıldığında
»
Mobil cihazınız bekleme modunda tamamen şarj
edildiğinde
NOT

A-19
MAKING CONNECTIONS
Audio Connection
OUT
OPTICAL
DIGITAL
AUDIO
OPTICAL
AUDIO IN
(*Not Provided)
Digital Audio System
English
You may use an external audio system instead of the
built-in speaker.
Digital optical audio Connection
Transmits a digital audio signal from the TV to an exter-
nal device. Connect the external device and the TV with
the optical audio cable as shown.
y
Do not look into the optical output port. Looking
at the laser beam may damage your vision.
y
Audio with ACP (Audio Copy Protection) function
may block digital audio output.
NOTE
Türkçe
Dahili hoparlör yerine isteğe bağlı bir harici ses sistemi
kullanabilirsiniz.
Dijital optik ses bağlantısı
TV’den harici cihaza dijital ses sinyali gönderir. Harici
cihaz ile TV’yi optik ses kablosuyla aşağıdaki şekilde
gösterildiği gibi bağlayın.
y
Optik çıkış bağlantı noktasına doğru bakmayın.
Lazer ışınına bakmak gözlerinize zarar verebilir.
y
ACP (Ses Kopyalama Koruması) özelliğine sahip
sesler dijital ses çıkışını engelleyebilir.
NOT

A-20
MAKING CONNECTIONS
Headphone Connection
English
Transmits the headphone signal from the TV to
an external device. Connect the external device
and the TV with the headphone as shown.
y
AUDIO menu items are disabled when
connecting a headphone.
y
OPTICAL DIGITAL AUDIO OUT is not available
when connecting a headphone.
y
Headphone impedance: 16
y
Max audio output of headphone :
0.627 mW to 1.334 mW
y
Headphone jack size: 0.35 cm
NOTE
OUT
Ext.SPEAKER
/ H/P
(*Not Provided)
Türkçe
TV’den harici bir cihaza kulaklık sinyali gönderir. Harici
cihaz ile TV’yi kulaklıkla aşağıdaki şekilde gösterildiği
gibi bağlayın.
y
Kulaklık bağlandığında SES menüsü öğeleri
devre dışı bırakılır.
y
Optik Dijital Ses Çıkışı kulaklık takılı olduğunda
kullanılamaz.
y
Kulaklık empedansı: 16 Ω
y
Kulaklığın maks. ses çıkışı: 0,627 mW - 1,334
mW
y
Kulaklık jakı boyutu: 0,35 cm
NOT
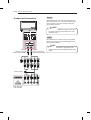
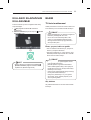
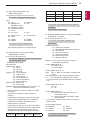
USB Connection
English
Connect a USB storage device such as a USB ash
memory, external hard drive or a USB memory card
reader to the TV and access the SmartShare menu to
use various multimedia les.
y
Some USB Hubs may not work. If a USB device
connected using a USB Hub is not detected,
connect it to the USB IN port on the TV directly.
y
Connect the external power source if your USB is
needed.
y
Connecting via USB 3.0 :
Some USB device may not work if it does not
meet USB 3.0 standard. In case, connect it to
USB IN 2 or USB IN 3 port.
NOTE
HUB
(*Not Provided)
USB
(*Not Provided)
HDD
(*Not Provided)
HDD IN
2
1
3
USB IN
(USB 3.0 IN)
Sayfa yükleniyor...
Sayfa yükleniyor...
Sayfa yükleniyor...
Sayfa yükleniyor...
Sayfa yükleniyor...
Sayfa yükleniyor...
Sayfa yükleniyor...
Sayfa yükleniyor...
Sayfa yükleniyor...
Sayfa yükleniyor...
Sayfa yükleniyor...
Sayfa yükleniyor...
Sayfa yükleniyor...
Sayfa yükleniyor...
Sayfa yükleniyor...
Sayfa yükleniyor...
Sayfa yükleniyor...
Sayfa yükleniyor...
Sayfa yükleniyor...
Sayfa yükleniyor...
Sayfa yükleniyor...
Sayfa yükleniyor...
Sayfa yükleniyor...
Sayfa yükleniyor...
Sayfa yükleniyor...
Sayfa yükleniyor...
Sayfa yükleniyor...
Sayfa yükleniyor...
Sayfa yükleniyor...
Sayfa yükleniyor...
Sayfa yükleniyor...
Sayfa yükleniyor...
Sayfa yükleniyor...
Sayfa yükleniyor...
Sayfa yükleniyor...
Sayfa yükleniyor...
Sayfa yükleniyor...
Sayfa yükleniyor...
Sayfa yükleniyor...
Sayfa yükleniyor...
Sayfa yükleniyor...
Sayfa yükleniyor...
Sayfa yükleniyor...
Sayfa yükleniyor...
Sayfa yükleniyor...
Sayfa yükleniyor...
Sayfa yükleniyor...
Sayfa yükleniyor...
Sayfa yükleniyor...
Sayfa yükleniyor...
Sayfa yükleniyor...
Sayfa yükleniyor...
Sayfa yükleniyor...
Sayfa yükleniyor...
Sayfa yükleniyor...
Sayfa yükleniyor...
Sayfa yükleniyor...
Sayfa yükleniyor...
Sayfa yükleniyor...
Sayfa yükleniyor...
Sayfa yükleniyor...
Sayfa yükleniyor...
Sayfa yükleniyor...
Sayfa yükleniyor...
Sayfa yükleniyor...
Sayfa yükleniyor...
Sayfa yükleniyor...
Sayfa yükleniyor...
Sayfa yükleniyor...
Sayfa yükleniyor...
Sayfa yükleniyor...
Sayfa yükleniyor...
Sayfa yükleniyor...
Sayfa yükleniyor...
Sayfa yükleniyor...
Sayfa yükleniyor...
Sayfa yükleniyor...
Sayfa yükleniyor...
Sayfa yükleniyor...
Sayfa yükleniyor...
Sayfa yükleniyor...
Sayfa yükleniyor...
Sayfa yükleniyor...
Sayfa yükleniyor...
Sayfa yükleniyor...
Sayfa yükleniyor...
Sayfa yükleniyor...
Sayfa yükleniyor...
Sayfa yükleniyor...
Sayfa yükleniyor...
Sayfa yükleniyor...
Sayfa yükleniyor...
Sayfa yükleniyor...
Sayfa yükleniyor...
Sayfa yükleniyor...
Sayfa yükleniyor...
Sayfa yükleniyor...
Sayfa yükleniyor...
Sayfa yükleniyor...
Sayfa yükleniyor...
Sayfa yükleniyor...
Sayfa yükleniyor...
Sayfa yükleniyor...
Sayfa yükleniyor...
Sayfa yükleniyor...
Sayfa yükleniyor...
Sayfa yükleniyor...
Sayfa yükleniyor...
Sayfa yükleniyor...
Sayfa yükleniyor...
-
 1
1
-
 2
2
-
 3
3
-
 4
4
-
 5
5
-
 6
6
-
 7
7
-
 8
8
-
 9
9
-
 10
10
-
 11
11
-
 12
12
-
 13
13
-
 14
14
-
 15
15
-
 16
16
-
 17
17
-
 18
18
-
 19
19
-
 20
20
-
 21
21
-
 22
22
-
 23
23
-
 24
24
-
 25
25
-
 26
26
-
 27
27
-
 28
28
-
 29
29
-
 30
30
-
 31
31
-
 32
32
-
 33
33
-
 34
34
-
 35
35
-
 36
36
-
 37
37
-
 38
38
-
 39
39
-
 40
40
-
 41
41
-
 42
42
-
 43
43
-
 44
44
-
 45
45
-
 46
46
-
 47
47
-
 48
48
-
 49
49
-
 50
50
-
 51
51
-
 52
52
-
 53
53
-
 54
54
-
 55
55
-
 56
56
-
 57
57
-
 58
58
-
 59
59
-
 60
60
-
 61
61
-
 62
62
-
 63
63
-
 64
64
-
 65
65
-
 66
66
-
 67
67
-
 68
68
-
 69
69
-
 70
70
-
 71
71
-
 72
72
-
 73
73
-
 74
74
-
 75
75
-
 76
76
-
 77
77
-
 78
78
-
 79
79
-
 80
80
-
 81
81
-
 82
82
-
 83
83
-
 84
84
-
 85
85
-
 86
86
-
 87
87
-
 88
88
-
 89
89
-
 90
90
-
 91
91
-
 92
92
-
 93
93
-
 94
94
-
 95
95
-
 96
96
-
 97
97
-
 98
98
-
 99
99
-
 100
100
-
 101
101
-
 102
102
-
 103
103
-
 104
104
-
 105
105
-
 106
106
-
 107
107
-
 108
108
-
 109
109
-
 110
110
-
 111
111
-
 112
112
-
 113
113
-
 114
114
-
 115
115
-
 116
116
-
 117
117
-
 118
118
-
 119
119
-
 120
120
-
 121
121
-
 122
122
-
 123
123
-
 124
124
-
 125
125
-
 126
126
-
 127
127
-
 128
128
-
 129
129
-
 130
130


