
BC 180
LIBRETTO USO E MANUTENZIONE
VEJLEDNING OM BRUG OG VEDLIGEHOLDELSE
MANUAL DE USO E MANUTENÇÃO
HANDLEIDING VOOR GEBRUIK EN ONDERHOUD
MANUEL D’UTILISATION ET DE MAINTENANCE
MANUAL DE INSTRUCCIONES PARA EL USO Y MANTENIMIENTO
BEDIENUNGS- UND WARTUNGSANLEITUNG
USER AND MAINTENANCE BOOK
KASUTUS- JA HOOLDUSJUHEND
LIETOŠANAS UN TEHNISKĀS APKOPES GRĀMATINA
NAUDOJIMO IR PRIEŽIŪROS KNYGELE
KNJIŽICA O UPORABI I ODRŽAVANJU
ANVÄNDAR- OCH UNDERHÅLLSHANDBOK
ІНСТРУКЦІЯ КОРИСТУВАЧА ТА ОБСЛУГОВУВАНЯ ОБЛАДНАННЯ
НАРЪЧНИК ЗА ИЗПОЛЗВАНЕ И ПОДДРЪЖКА
PRÍRUČKA PRE POUŽITIE A ÚDRŽBU
KULLANIM VE BAKIM K
i
TAPÇIĞI
PRIROČNIK Z NAVODILI ZA UPORABO IN VZDRŽEVANJE
HASZNÁLATI ÉS KARBANTARTÁSI KÉZIKÖNYV
PŘÍRUČKA PRO POUŽITÍ A ÚDRŽBU
РУКОВОДСТВО ПО ЭКСПЛУАТАЦИИ И ТЕХНИЧЕСКОМУ ОБСЛУЖИВАНИЮ
HEFTE FOR BRUK OG VEDLIKEHOLD
KÄYTTÖ- JA HUOLTO-OHJE
LIVRET DE UTILIZARE SI ÎNTREŢINERE
INSTRUKCJA OBSŁUGI I KONSERWACJI
it
da
pt
nl
fr
es
de
en
et
lv
lt
hr
sv
uk
bg
sk
tr
sl
hu
cs
ru
no
ro
pl
.
,
,
ΕΓΧΕΙΡΙΔΙΟ ΧΡΗΣΗΣ ΚΑΙ ΣΥΝΤΗΡΗΣΗΣ
el

FIGURES - FIGURE - ABBILDUNGEN - FIGURAS - FIGURES - FIGUREN
- FIGURAS - FIGURER - KUVAT - FIGURER - FIGURER - ILUSTRACJE
- ИЛЛЮСТРАЦИИ - OBRÁZKY - ÁBRÁK - SLIKE - ŞEKİLLER - SLIKE -
ILIUSTRACIJOS - ATTĒLI - JOONISED - IMAGINI - OBRÁZKY - СХЕМИ - ДАНІ
- ΕΙΚΟΝΕΣ - 图示 - СУРЕТТЕМЕЛЕР
Figures and texts of this book are protected by COPYRIGHT.
1
1
2
3
4
5
6
7 8
9
10
11
12
13
14
15
16

en
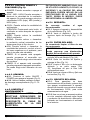
►►1. INFORMATION REGARDING
SAFETY
IMPORTANT: READ AND
UNDERSTAND THIS
OPERATIONAL MANUAL BEFORE
ASSEMBLING, COMMISSIONING
OR PERFORMING MAINTENANCE
ON THIS APPLIANCE. INCORRECT
USE OF THE APPLIANCE CAN
CAUSE SERIOUS INJURY. KEEP
THIS MANUAL FOR FURTHER
REFERENCE.
IMPORTANT: This appliance is
not suitable for use by persons
(including children) with reduced
physical, sensory and mental
capacities or with lack of experience
or knowledge unless supervised
by a person responsible for their
safety. Children must be supervised
to make sure they do not play with
the appliance.
►1.1. Fill the appliance tank only with
clean water.
►1.2. Switch off and disconnect the
appliance from the mains before
lling it.
►1.3. Do not move the appliance, once
the tank has been lled.
►1.4. When using the appliance,
comply with all local regulations and
Standard in force.
►1.5. Keep the appliance dry, in order
to avoid electric shocks. Hands must
always be dry.
►1.6. Use only in ventilated and dry
areas.
►1.7. For indoor use only.
►1.8. Power the appliance only with
voltage and frequency as specied
on the data plate.
►1.9. Only use extensions with three
wires appropriately connected to
earth.
►1.10. Do not cover the appliance
with paper, cardboard, plastic, metal
sheets or any other inammable
material during use, in order to
prevent any risk.
►1.11. The appliance must be used on
a stable and levelled surface, in order
to prevent any risk.
►1.12. When it is not used, disconnect
the appliance from the power plug.
►1.13. Do not block the air vent (rear
side) or the air outlet (front side) of
the appliance.
►1.14. The minimum safety distance
recommended between the appliance
and walls or other items is 0,5 m.
►1.15. When the appliance is connected
to the mains or running, it must
never be moved, handled, topped-
up or subject to any maintenance
operation.
►1.16. The appliance (power cable
included) must be kept at a suitable
safety distance from heat sources.
►1.17. In any case, the appliance
must be opened and/or repaired by
authorised after-sales centre.
►1.18. If the power cable is damaged,
it must be replaced by the technical
after-sales centre, in order to prevent
any risk.
►1.19. Rinse the case with clean water
and clean it before using, after the
period during which the bio cooler
was not in use.
►1.20. In the case of improper operation
of the product at the start, disconnect
itfrom the power supply immediately
and contact service point.
►1.21. Protect the power supply cord
from damage as a result of movement
of the vehicles or pedestrians. The
connection of improper electrical
voltage or improper installation, will
cause the electrical shock hazard.
►1.22. Conditions of use:
A) Air temperature: 18°C to 45°C;
Water temperature: <45°C.
B) The air supply must be free of dust,
pollutants, or additional cleaning
should be used.
Figures and texts of this book are protected by COPYRIGHT.

en
►►2. UNPACKING
►2.1. Remove all packaging materials
used to wrap and deliver the appliance
and dispose of them in compliance with
the Standards in force.
►2.2. Extract all items from the packaging.
►2.3. Verify if damage undergone during
transport. If the appliance appears
damaged, inform the dealer, where the
purchase was made, immediately.
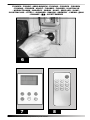
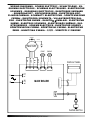
►►3. ASSEMBLY
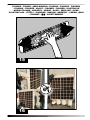
The device is equipped with wheels to
facilitate handling. Depending on the
model, wheels can be found already
installed or not. Components equipped
with relative nuts and bolts are found
inside the packaging (Fig. 1).
►►4. OPERATION
WARNING: Thoroughly read the
”INFORMATION REGARDING
SAFETY”, before switching the
appliance on.
WARNING: Only use clean water to
prevent failures or other anomalies.
WARNING: Verify if your electronic
system is earthed correctly.
Connection to the mains must
be made in compliance with the
National Standards in force. Power
the appliance only with voltage and
frequency as specied on the data
plate.
NOTE: These models can be
connected to the water mains, by
connecting the pipe to the tting
(Fig. 10).
►►4.1. SWITCHING ON:
►4.1.1. Open the tank door (Fig. 2).
►4.1.2. Fill the tank with water (Fig. 3);
water level must be within MIN and
MAX level of the graduated scale (Fig.
4), in order to prevent risks.
►4.1.3. Close the tank door (Fig. 5).
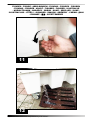
►4.1.4. Connect the supply plug to the
power mains (Fig. 6).
CAUTION: When the supply plug is
connected to the power mains, the
display shows the approximate room
temperature.
►4.1.5. Press the ON/OFF / POWER
button to switch on the appliance (Fig.
9).
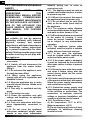
►►4.2.1. CONTROL PANEL AND
FUNCTIONS (Fig. 7):
►ON/OFF: Turns on or off the device.
►WIND SPEED: Increases or decreases
the ventilation speed of the device. You
can choose from three speeds.
►COOL: Enables or disables the cooling
mode.
CAUTION: By pressing this button,
ventilation activates after a few seconds.
►SWING: Enables or disables the
automatic vertical swing of the ns to
direct the air ow.
►ANION: Enables or disables the
ionisation mode, that is, the release
of negative ions in the atmosphere, to
make air healthier.
NOTE: When the control panel
display shows the icon “TANK”
(ashing), accompanied by a beep,
it means that the tank is empty and
must be relled to reactivate the
“COOL” function.
►►4.2.2. REMOTE CONTROL
AND FUNCTIONS (Fig. 8):
►POWER: Turns on or off the device.
►LOW - MID - HIGH: Increases or
decreases the ventilation speed of the
device. You can choose from three
speeds: LOW, MID and HIGH.
►COOL: Enables the cooling mode.
CAUTION: By pressing this button,
ventilation activates after a few seconds.
►WIND: Enables the ventilation mode
ONLY.
Figures and texts of this book are protected by COPYRIGHT.

en
►SWING: Enables or disables the
automatic vertical swing of the ns to
direct the air ow.
►ION: Enables or disables the ionisation
mode, that is, the release of negative
ions in the atmosphere, to make air
healthier.
►TIMER: If the device is off, it allows
programming the delayed start. You can
choose between one-hour intervals.
►TIMER: If the device is on, it allows
programming the automatic switch-
off. You can choose between one-hour
intervals.
►►4.3. SWITCHING OFF:
►4.3.1. Press the ON/OFF / POWER
button to switch off the appliance (Fig.
9).
►4.3.2. Empty the tank using the drain
cap (Fig. 11-12-13).
►►5. CLEANING AND
MAINTENANCE
WARNING: BEFORE PERFORMING
ANY MAINTENANCE OR REPAIR,
DISCONNECT THE POWER CABLE
FROM THE MAINS.
DEPENDING ON THE ENVIRONMENT
WHERE THE APPLIANCE IS USED,
DUST, DIRT OR WATER QUALITY CAN
AFFECT THE PERFORMANCE OF THE
UNIT. THEREFORE, CLEANING THE
FOLLOWING COMPONENTS CAN BE
NECESSARY:
►►5.1. TANK:
We recommend changing the water
frequently.
►5.1.1. Switch off the appliance and
disconnect the plug from the mains
(Fig. 9-6).
►5.1.2. Remove the drain plug and
empty the vessel, then wash it, using
a soft cloth. Wash away the dirt from
the water sensor, water pump and oat
valve. Rinse everything.
►5.1.3. In order to clean the housing, use
delicate soap and a soft cloth. Do not
use any caustic detergents, which may
damage the air conditioner housing.
►5.1.4. In order to prevent the
accumulation of algae and other
biological organisms in the vessel,
add chlorine or bromine tablets or
other tablets recommended by the
manufacturer regularly, intended for the
vessels of evaporation air conditioners.
►►5.2. AIR FILTER:
We recommend cleaning the air lter
frequently.
WARNING: A dirty air lter can lead
to a signicant drop in performance
of the device.
►5.2.1. Turn off the device and disconnect
the plug from the power mains (Fig.
9-6).
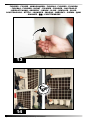
►5.2.2. Remove the fastening screws
and then the lter (Fig. 14).
►5.2.3. Clean the lter with a mild
detergent and a clean cloth (Fig. 15).
Make sure that the lter is perfectly dry.
►5.2.4. Reposition the lter and secure it
with the screws (Fig. 16).
►►5.3. WATER CIRCUIT:
►5.3.1. To ensure proper operation of
the cooler, turn off COOL mode a few
minutes before completely switching off
the appliance, in order to avoid stagnant
water.
►5.3.2. Once a month we recommend
performing a complete cycle using
clean water and appropriate disinfection
products, running the cooler outdoors.
Figures and texts of this book are protected by COPYRIGHT.

en
Figures and texts of this book are protected by COPYRIGHT.
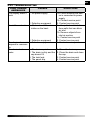
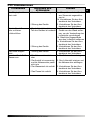
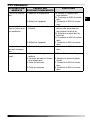
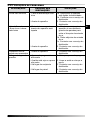
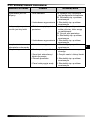
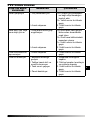
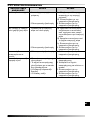
►►6. TROUBLESHOOTING
FUNCTIONING
ANOMALIES
CAUSES SOLUTIONS
The display doesn’t
work
1. No power supply
2. Defective equipment
1a. Check whether the devi-
ce is connected to power
supply
1b. Contact service point
2. Contact service point
No air ow or too low 1. Obstruction of the air
intake on the back
2. Defective equipment
1a. Keep the back side far
from walls that can block
air inlet
1b. Remove objects from
inlet air section
1c. Contact service point
2. Contact service point
The device does not
respond to comman-
ds
1. Defective equipment 1. Contact service point
The device leak
water
1. The drain cap is loose
2. The drain is dirty and the
cap doesn’t t
3. The tank leak
4. The panel drip
1. Close the drain cap
2. Clean the drain and close
the cap
3. Contact service point
4. Contact service point

it
►►1. INFORMAZIONI SULLA
SICUREZZA
!
IMPORTANTE: LEGGERE E COM-
PRENDERE QUESTO MANUALE OPE-
RATIVO PRIMA DI EFFETTUARE L’AS-
SEMBLAGGIO, LA MESSA IN FUNZIO-
NE O LA MANUTENZIONE DI QUE-
STO APPARECCHIO. L’USO ERRATO
DELL’ APPARECCHIO PUÒ CAUSARE
LESIONI GRAVI. CONSERVARE QUE-
STO MANUALE A TITOLO DI FUTURO
RIFERIMENTO.
!
IMPORTANTE: Questo apparec-
chio non è adatto all’uso da parte di
persone (incluse bambini) con capaci
-
tà siche, sensoriali e mentali ridotte,
o inesperte, a meno che non venga
-
no supervisionate da una persona
reponsabile per la loro sicurezza. I
bambini devono essere controllati,
per assicurarsi che non giochino con
l’apparecchio.
►1.1. Rifornire il serbatoio dell’appa-
recchio solamente con acqua pulita.
►1.2. Prima di effettuare il rifornimen-
to, spegnere l’apparecchio e staccare
l’alimentazione.
►1.3. Dopo aver riempito il serbatoio,
non spostare l’apparecchio.
►1.4. Durante l’uso dell’apparecchio,
attenersi a tutte le ordinanze locali ed
alla normativa vigente.
►1.5. Per proteggersi da scosse elettri-
che, mantenere l’apparecchio asciut-
to. Non operare con le mani bagnate.
►1.6. Utilizzare solamente in aree ben
ventilate e perfettamente asciutte.
►1.7. Utilizzare solo in strutture coper-
te.
►1.8. Alimentare l’apparecchio sola-
mente con tensione e frequenza spe-
cicata sulla targa dati.
►1.9. Usare solamente prolunghe a tre
li opportunamente collegate a mas-
sa.
►1.10. Non coprire l’apparecchio con
carta, cartone, plastica, fogli metallici
o qualsiasi altro materiale inamma-
bile, durante l’uso, in modo da preve-
nire ogni rischio.
►1.11. L’apparecchio deve essere uti-
lizzato su una supercie stabile e
livellata, in modo da evitare ogni ri-
schio.
►1.12. Scollegare l’apparecchio dalla
presa di rete, quando non lo si usa.
►1.13. Non bloccare mai la presa dell’a
-
ria (lato posteriore), né l’uscita dell’a-
ria (lato anteriore) dell’apparecchio.
►1.14. La distanza minima di sicurez
-
za, consigliata, intercorrente tra l’ap-
parecchio e pareti o altri oggetti è 0,5
m.
►1.15. Quando l’apparecchio è colle
-
gato alla rete elettrica o in funzione
non deve mai essere spostato, ma
-
neggiato, rifornito né soggetto ad al-
cun intervento di manutenzione.
►1.16. Mantenere una adeguata di
-
stanza di sicurezza dell’apparecchio
(compreso il cavo di alimentezione)
da fonti di calore.
►1.17. In qualsiasi caso far aprire e/o
riparare l’apparecchio solamente dal
centro di assistenza autorizzato.
►1.18. Se il cavo di alimentazione ri
-
sulta danneggiato, deve essere sosti-
tuito dal centro assistenza tecnica, in
modo da prevenire ogni rischio.
►1.19. Lavare il contenitore con acqua
pulita e pulirlo prima dell’uso, dopo il
periodo durante il quale il bio cooler
non è stato utilizzato.
►1.20. In caso di funzionamento non
corretto del prodotto all’accensione,
scollegarlo dall’alimentazione imme
-
diatamente e contattare il centro di
assistenza del distributore.
►1.21. Proteggere il cavo di alimen
-
tazione da potenziali danni derivati
dal movimento di veicoli o pedoni. Il
collegamento improprio alla tensione
elettrica o l’installazione impropria,
può provocare il rischio di scosse
elettriche.
►1.22. Condizioni di utilizzo:
A) Temperatura dell’aria: 18°C a 45°C;
Temperatura dell’acqua: <45°C.
Figures and texts of this book are protected by COPYRIGHT.

it
B) L’aria deve essere priva di polvere,
sostanze inquinanti, altrimenti deve
essere fatta una pulizia supplemen
-
tare.
►►2. DISIMBALLAGGIO
►2.1. Rimuovere tutti i materiali di imbal-
laggio usati per confezionare e spedire
l’apparecchio e smaltirli secondo le nor-
me vigenti.
►2.2. Estrarre tutti gli articoli dall’imballo.
►2.3. Controllare eventuali danni subi-
ti durante il trasporto. Se l’apparecchio
appare danneggiato, informare imme-
diatamente il concessionario presso il
quale è stato acquistato.
►►3. ASSEMBLAGGIO
L’apparecchio è dotato di ruote per age-
volare la movimentazione. A seconda del
modello, le ruote si possono trovare instal-
late, oppure sono da installare. I compo-
nenti, completi della relativa bulloneria di
montaggio, sono situati all’interno dell’im-
ballo (Fig. 1).
►►4. FUNZIONAMENTO
AVVERTENZA: Leggere attentamente
le ”INFORMAZIONI SULLA
SICUREZZA”, prima di accendere
l’apparecchio.
AVVERTENZA: Usare solamente
acqua pulita, per evitare guasti o altre
anomalie.
AVVERTENZA: Vericare la corretta
messa a terra del vostro impianto
elettrico. Il collegamento alla rete
elettrica va fatto in accordo con le
norme nazionali vigenti. Alimentare
l’apparecchio solamente con tensione
e frequenza specicata sulla targa
dati.
NOTA: Questi modelli possono essere
collegati alla rete idrica, collegando il
tubo al raccordo (Fig. 10).
►►4.1. ACCENSIONE:
►4.1.1. Aprire lo sportello del serbatoio
(Fig. 2).
►4.1.2. Rifornire d’acqua il sebatoio
(Fig. 3), il livello dell’acqua deve essere
compreso tra MIN e MAX della scala
graduata (Fig. 4), al ne di evitare rischi.
►4.1.3. Chiudere lo sportello del serbato-
io (Fig. 5).
►4.1.4. Collegare la spina di alimentazione
alla rete elettrica (Fig. 6).
ATTENZIONE: Quando viene collegata
la spina di alimentazione alla rete
elettrica, sul display viene visualizzata la
misura approssimativa della temperatura
ambiente.
►4.1.5. Premere il pulsante ON/OFF /
POWER per accendere l’apparecchio
(Fig. 9).
►►4.2.1. PANNELLO DI
CONTROLLO E FUNZIONI (Fig. 7):
►ON/OFF: Permette di accendere o
spegnere l’apparecchio.
►WIND SPEED: Permette di aumentare
o diminuire la velocità della ventilazione
dell’apparecchio. Si può scegliere fra tre
velocità.
►COOL: Permette di attivare o disattivare
la modalità raffrescamento.
ATTENZIONE: Premendo questo
pulsante, la ventilazione si attiva circa
dopo alcuni secondi.
►SWING: Permette di attivare o disattivare
l’oscilazione verticale automatica delle
alette per direzionare il usso d’aria.
►ANION: Permette di attivare o disattivare
la modalità ionizzazione, cioè il rilascio
di ioni negativi in ambiente, per rendere
più salutare l’aria.
NOTA: Quando sul display del
pannello di controllo appare l’icona
”SERBATOIO” (lampeggiando),
accompagnata da un bip acustico,
signica che il serbatoio è vuoto e va
riempito nuovamente per riattivare la
funzione ”COOL”.
Figures and texts of this book are protected by COPYRIGHT.

Figures and texts of this book are protected by COPYRIGHT.
►►4.2.2. TELECOMANDO
REMOTO E FUNZIONI (Fig. 8):
►POWER: Permette di accendere o
spegnere l’apparecchio.
►LOW - MID - HIGH: Permette di
aumentare o diminuire la velocità della
ventilazione dell’apparecchio. Si può
scegliere fra tre velocità LOW, MID e
HIGH.
►COOL: Permette di attivare la modalità
raffrescamento.
ATTENZIONE: Premendo questo
pulsante, la ventilazione si attiva circa
dopo alcuni secondi.
►WIND: Permette di attivare la modalità
SOLO ventilazione.
►SWING: Permette di attivare o disattivare
l’oscilazione verticale automatica delle
alette per direzionare il usso d’aria.
►ION: Permette di attivare o disattivare
la modalità ionizzazione, cioè il rilascio
di ioni negativi in ambiente, per rendere
più salutare l’aria.
►TIMER: Se l’apparecchio è spento,
permette di programmare l’accensione
ritardata. Si può scegliere fra intervalli di
un’ora.
►TIMER: Se l’apparecchio è acceso,
permette di programmare lo spegnimento
automatico. Si può scegliere fra intervalli
di un’ora.
►►4.3. SPEGNIMENTO:
►4.3.1. Premere il pulsante ON/OFF /
POWER per spegnere l’apparecchio
(Fig. 9).
►4.3.2. Svuotare il sebatoio dall’apposito
tappo di scarico (Fig. 11-12-13).
►►5. PULIZIA E MANUTENZIONE
AVVERTENZA: PRIMA SI EFFETTUARE
QUALSIASI MANUTENZIONE O
RIPARAZIONE, SCOLLEGARE IL
CAVO DI ALIMENTAZIONE DALLA
RETE ELETTRICA.
A SECONDA DELL’AMBIENTE IN CUI
L’APPARECCHIO VIENE IMPIEGATO,
LA POLVERE, LO SPORCO, LA
QUALITA’ DELL’ACQUA UTILIZZATA
POSSONO INFLUIRE SULLE
PRESTAZIONI DELL’UNITÀ. QUINDI
A SECONDA DEL MODELLO PUÒ
RENDESI NECESSARIO LA PULIZIA DI:
►►5.1. SERBATOIO:
Si consiglia di cambiare l’acqua
frequentemente.
►5.1.1. Spegnere l’apparecchio e
staccare la spina dalla rete elettrica (Fig.
9-6).
►5.1.2. Svuotare il sebatoio dall’apposito
tappo di scarico (Fig. 11-12-13).
►►5.2. FILTRO ARIA:
Si consiglia di pulire il ltro dell’aria
frequentemente.
AVVERTENZA: Il ltro dell’aria sporco
può portare ad un notevole calo delle
prestazioni dell’apparecchio.
►5.2.1. Spegnere l’apparecchio e
staccare la spina dalla rete elettrica (Fig.
9-6).
►5.2.2. Togliere le viti di ssaggio e
rimuovere il ltro (Fig. 14).
►5.2.3. Pulire il ltro con un detergente
delicato e un panno morbido (Fig. 15).
Assicurarsi che il ltro sia perfettamente
asciutto.
►5.2.4. Riposizionare il ltro e ssarlo con
le viti (Fig. 16).
►►5.3. CIRCUITO ACQUA:
►5.3.1. Per garantire il corretto
funzionamento del raffrescatore,
è necessario prima di spegnere
completamente l’apparecchio,
disattivare per alcuni minuti la
modalità COOL, al ne di evitare
ristagni d’acqua.
►5.3.2. Con frequenza mensile si
consiglia di eseguire un ciclo completo
utilizzando acqua pulita e prodotti
di disinfezzione idonei, facendo
funzionare il raffrescatore all’esterno.
it

Figures and texts of this book are protected by COPYRIGHT.
it
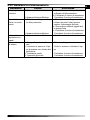
►►6. ANOMALIE DI FUNZIONAMENTO
ANOMALIA CAUSA SOLUZIONE
Il display non
funziona
1. Mancanza alimentazione
2. Apparecchiatura difettosa
1a. Controllare che il dispositivo sia
collegato all’alimentazione
1b. Contattare il centro di assistenza
2. Contattare il centro di assistenza
Non c’è usso
d’aria o è molto
basso
1. Ostruzione della presa d’a
-
ria lato posteriore
2. Apparecchiatura difettosa
1a. Tenere il retro dell’apparecchio
lontano da pareti che possono
ostruire il passaggio dell’aria
1b. Rimuovere eventuali oggetti dal-
la presa d’aria
1c. Contattare il centro di assistenza
2. Contattare il centro di assistenza
Il dispositivo non
risponde ai co
-
mandi
1. Apparecchiatura difettosa 1. Contattare il centro di assistenza
Il dispositivo per
-
de acqua
1. Il tappo di scarico è allen-
tato
2. Lo scarico è sporco e il tap-
po di scarico non chiude alla
perfezione
3. Il serbatoio perde
4. Il pannello gocciola
1. Chiudere il tappo
2. Pulire lo scarico e chiudere il tap-
po
3. Contattare il centro di assistenza
4. Contattare il centro di assistenza

de
►►1. SICHERHEITSHINWEISE
WICHTIGER HINWEIS: DIESE
BEDIENUNGSANLEITUNG
MUSS VOR ZUSAMMENBAU,
INBETRIEBNAHME BZW. WARTUNG
DES GERÄTES GELESEN UND
VERSTANDEN WORDEN SEIN.
FALSCHER GEBRAUCH DES
GERÄTES KANN ZU SCHWEREN
VERLETZUNGEN FÜHREN.
BEWAHREN SIE DIESE ANLEITUNG
ZUM SPÄTEREN NACHSCHLAGEN
GUT AUF.
WICHTIGER HINWEIS: Dieses Gerät
ist nicht geeignet für den Gebrauch
durch Personen (einschließlich
Kindern) mit begrenzten
körperlichen, sensorischen und
geistigen Fähigkeiten bzw. ohne
ausreichende Fachkenntnis, es
sei denn, sie werden durch eine
für ihre Sicherheit verantwortliche
Person beaufsichtigt. Kinder sind zu
beaufsichtigen, damit sie nicht mit
dem Gerät spielen.
►1.1. Tank des Gerätes nur mit sauberem
Wasser befüllen.
►1.2. Vor dem Nachfüllen Gerät
ausschalten und Stromversorgung
abtrennen.
►1.3. Nach dem Füllen des Tanks das
Gerät nicht bewegen.
►1.4. Während des Betriebs des Geräts
sind alle örtlichen Bestimmungen und
geltenden Vorschriften zu beachten.
►1.5. Zum Schutz vor Stromschlägen
sollte das Gerät trocken gehalten werden.
Nicht mit nassen Händen bedienen.
►1.6. Nur in gut belüfteten, vollkommen
trockenen Bereichen verwenden.
►1.7. Nur in überdachten Räumen
verwenden.
►1.8. Die Stromversorgung des Geräts
muss der auf dem Typenschild
angegebenen Spannung und Frequenz
entsprechen.
►1.9. Nur dreiadrige, ordnungsgemäß
geerdete Verlängerungskabel benutzen.
►1.10. Gerät während des Gebrauchs
nicht mit Papier, Pappe, Kunststoff,
Metallfolien oder anderen brennbaren
Stoffen abdecken, um jedes Risiko zu
vermeiden.
►1.11. Das Gerät muss auf einer stabilen
und ebenen Fläche stehen, um jedes
Risiko zu vermeiden.
►1.12. Trennen Sie das Gerät vom
Stromnetz, wenn Sie es nicht benutzen.
►1.13. Niemals die Luftzufuhr (Rückseite)
oder die Luftaustrittsöffnung
(Vorderseite) des Geräts blockieren.
►1.14. Der empfohlene Mindest-
Sicherheitsabstand zwischen Gerät und
Wänden oder anderen Gegenständen
beträgt 0,5 m.
►1.15. Wenn das Gerät an das Stromnetz
angeschlossen oder in Betrieb ist, darf
es niemals bewegt oder nachgefüllt oder
gewartet werden.
►1.16. Halten Sie das Gerät (einschließlich
Netzkabel) in ausreichendem
Sicherheitsabstand von Wärmequellen.
►1.17. Lassen Sie das Gerät ausschließlich
durch den autorisierten Kundendienst
öffnen bzw. reparieren.
►1.18. Wenn das Netzkabel beschädigt
ist, muss es durch den Kundendienst
ausgetauscht werden, um Gefahren
auszuschließen.
►1.19. Wenn der Bio Cooler eine Zeitlang
nicht betrieben wurde, ist das Gehäuse
mit sauberem Wasser abzuspülen und
zu reinigen.
►1.20. Wenn das Gerät beim Start nicht
richtig arbeitet, ist es umgehend von
der Stromnetz zu trennen. Zugleich ist
der Kundendienst des Vertreibers zu
kontaktieren.
►1.21. Das Speisekabel ist vor
Beschädigung infolge des Fahrzeug-
bzw. Personenverkehrs zu schützen.
Beim Anschluss an falsche Spannung
oder eine nicht intakte Elektroanlage
besteht die Gefahr eines elektrischen
Schlags.
►1.22. Betriebsbedingungen:
A) Lufttemperatur: 18°C bis 45°C;
Wassertemperatur: <45°C.
B) Der Lufteintritt ist vom Staub und von
anderen Verunreinigungen frei zu halten.
Bei Bedarf ist er zusätzlich zu reinigen.
Figures and texts of this book are protected by COPYRIGHT.

de
►►2. AUSPACKEN
►2.1. Entfernen Sie alle für Verpackung
und Versand des Geräts verwendeten
Materialien und entsorgen Sie diese
vorschriftsgemäß.
►2.2. Nehmen Sie alle Artikel aus der
Verpackung.
►2.3. Kontrollieren Sie, ob Transportschäden
vorliegen. Wenn das Gerät beschädigt ist,
sofort den Vertragshändler informieren,
bei dem es erworben wurde.
►►3. ZUSAMMENBAU
Das Gerät besitzt Räder, damit es einfacher
bewegt werden kann. Je nach Modell sind
die Räder bereits montiert oder müssen noch
montiert werden. Die Bauteile dazu benden
sich zusammen mit den zugehörigen
Schrauben zur Montage in der Verpackung
(Abb. 1).
►►4. BEDIENUNG
WARNHINWEIS: Vor dem
Einschalten des Gerätes sind
die „SICHERHEITSHINWEISE“
aufmerksam durchzulesen.
WARNHINWEIS: Nur sauberes
Wasser verwenden, um Defekte und
andere Störungen zu vermeiden.
WARNHINWEIS: Prüfen Sie, ob Ihre
elektrische Anlage ordnungsgemäß
geerdet ist. Der Stromanschluss
muss gemäß geltenden nationalen
Vorschriften vorgenommen werden.
Die Stromversorgung des Geräts
muss der auf dem Typenschild
angegebenen Spannung und
Frequenz entsprechen.
HINWEIS: Diese Modelle
können an einen
Wasserversorgungsanschluss
mittels Verbindung der Leitung
an ein Verbindungselement
angeschlossen werden (Abb. 10).
►►4.1. INBETRIEBNAHME:
►4.1.1. Klappe des Tanks öffnen (Abb. 2).
►4.1.2. Wasser in den Tank füllen (Abb. 3),
der Wasserstand muss sich zwischen MIN
und MAX der Skala benden (Abb. 4), um
Gefahren zu vermeiden.
►4.1.3. Klappe des Tanks schließen (Abb.
5).
►4.1.4. Netzstecker an das Stromnetz
anschließen (Abb. 6).
ACHTUNG: Wenn der Netzstecker an
das Stromnetz angeschlossen wird, wird
auf dem Display der ungefähre Wert der
Umgebungstemperatur angezeigt.
►4.1.5. Zum Einschalten des Geräts die
Taste ON/OFF / POWER drücken (Abb. 9).
►►4.2.1. BEDIENTAFEL UND
FUNKTIONEN (Abb. 7):
►ON/OFF: Zum Ein-/Ausschalten des
Geräts.
►WIND SPEED: Zum Erhöhen oder
Verringern der Gebläse-Drehzahl
des Geräts. Zur Wahl stehen drei
Drehzahlstufen.
►COOL: Zum Ein-/Ausschalten des
Kühlmodus.
ACHTUNG: Wird diese Taste gedrückt,
wird das Gebläse nach einigen Sekunden
aktiviert.
►SWING: Zum Ein-/Ausschalten des
automatischen vertikalen Schwingens der
Luftklappen, um den Luftstrom zu lenken.
►ANION: Zum Ein-/Ausschalten des
Ionisierungsmodus, d. h. Freisetzung
negativ geladener Ionen in den Raum, um
die Luft gesünder zu machen.
HINWEIS: Wenn auf dem Display das
Symbol ”TANK” (blinkend), gefolgt
von einem Summton, angezeigt wird,
bedeutet das, dass der Tank leer ist
und erneut gefüllt werden muss,
um die Funktion ”COOL” wieder zu
aktivieren.
►►4.2.2. FERNSTEUERUNG UND
FUNKTIONEN (Abb. 8):
►POWER: Zum Ein-/Ausschalten des
Geräts.
►LOW - MID - HIGH: Zum Erhöhen oder
Verringern der Gebläse-Drehzahl des
Geräts. Zur Wahl stehen die Drehzahlstufen
LOW, MID und HIGH.
►COOL: Zum Einschalten des Kühlmodus.
Figures and texts of this book are protected by COPYRIGHT.

Figures and texts of this book are protected by COPYRIGHT.
ACHTUNG: Wird diese Taste gedrückt,
wird das Gebläse nach einigen Sekunden
aktiviert.
►WIND: Zum Einschalten des Modus NUR
Lüftung.
►SWING: Zum Ein-/Ausschalten des
automatischen vertikalen Schwingens der
Luftklappen, um den Luftstrom zu lenken.
►ION: Zum Ein-/Ausschalten des
Ionisierungsmodus, d. h. Freisetzung
negativ geladener Ionen in den Raum, um
die Luft gesünder zu machen.
►TIMER: Wenn das Gerät ausgeschaltet
ist, kann die verzögerte Einschaltung
programmiert werden. Zur Wahl stehen
Zeiten mit einem Intervall von einer Stunde.
►TIMER: Wenn das Gerät eingeschaltet
ist, kann die automatische Ausschaltung
programmiert werden. Zur Wahl stehen
Zeiten mit einem Intervall von einer Stunde.
►►4.3. AUSSCHALTEN:
►4.3.1. Zum Ausschalten des Geräts die
Taste ON/OFF / POWER drücken (Abb.
9).
►4.3.2. Den Tank über den vorgesehenen
Auslassverschluss entleeren (Abb. 11-12-
13).
►►5. REINIGUNG UND WARTUNG
WARNHINWEIS: VOR WARTUNGS-
ODER REPARATURARBEITEN
STETS DAS NETZKABEL AUS DER
STECKDOSE ZIEHEN.
JE NACHDEM, WO DAS GERÄT
EINGESETZT WIRD, KÖNNEN STAUB
UND SCHMUTZ SOWIE DIE QUALITÄT
DES VERWENDETEN WASSERS
SEINE LEISTUNG BEEINFLUSSEN.
DAHER KANN ES JE NACH MODELL
ERFORDERLICH WERDEN, FOLGENDE
TEILE ZU REINIGEN:
►►5.1. TANK:
Wir empfehlen, das Wasser häug zu
wechseln.
►5.1.1. Gerät abschalten und Stecker aus
der Netz-Steckdose ziehen (Abb. 9-6).
►5.1.2. Tank über den entsprechenden
Entleerungsverschluss entleeren (Abb. 11-
12-13).
►►5.2. LUFTFILTER:
Es wird empfohlen, den Luftlter oft zu
reinigen.
WARNUNG: Ein schmutziger Luftlter
kann die Geräteleistungen beachtlich
beeinträchtigen.
►5.2.1. Gerät abschalten und Stecker aus
der Netz-Steckdose ziehen (Abb. 9-6).
►5.2.2. Die Befestigungsschrauben lösen
und den Filter entfernen (Abb. 14).
►5.2.3. Filter mit einem sanften Reiniger
und einem weichen Tuch reinigen (Abb.
15). Sicherstellen, dass der Filter völlig
trocken ist.
►5.2.4. Den Filter erneut positionieren und
mit den Schrauben befestigen (Abb. 16).
►►5.3. WASSERKREISLAUF
►5.3.1. Um den korrekten Betrieb der
Kühlung zu gewährleisten, muss das Gerät
vor dem vollständigen Ausschalten einige
Minuten lang im Modus COOL deaktiviert
werden, um ein Anstauen von Wasser zu
vermeiden.
►5.3.2. Es wird empfohlen, jeden Monat
einen kompletten Zyklus auszuführen, in
dem sauberes Wasser und ein geeignetes
Desinfektionsmittel verwendet werden und
die externe Kühlung in Betrieb ist.
de
Sayfa yükleniyor...
Sayfa yükleniyor...
Sayfa yükleniyor...
Sayfa yükleniyor...
Sayfa yükleniyor...
Sayfa yükleniyor...
Sayfa yükleniyor...
Sayfa yükleniyor...
Sayfa yükleniyor...
Sayfa yükleniyor...
Sayfa yükleniyor...
Sayfa yükleniyor...
Sayfa yükleniyor...
Sayfa yükleniyor...
Sayfa yükleniyor...
Sayfa yükleniyor...
Sayfa yükleniyor...
Sayfa yükleniyor...
Sayfa yükleniyor...
Sayfa yükleniyor...
Sayfa yükleniyor...
Sayfa yükleniyor...
Sayfa yükleniyor...
Sayfa yükleniyor...
Sayfa yükleniyor...
Sayfa yükleniyor...
Sayfa yükleniyor...
Sayfa yükleniyor...
Sayfa yükleniyor...
Sayfa yükleniyor...
Sayfa yükleniyor...
Sayfa yükleniyor...
Sayfa yükleniyor...
Sayfa yükleniyor...
-
 1
1
-
 2
2
-
 3
3
-
 4
4
-
 5
5
-
 6
6
-
 7
7
-
 8
8
-
 9
9
-
 10
10
-
 11
11
-
 12
12
-
 13
13
-
 14
14
-
 15
15
-
 16
16
-
 17
17
-
 18
18
-
 19
19
-
 20
20
-
 21
21
-
 22
22
-
 23
23
-
 24
24
-
 25
25
-
 26
26
-
 27
27
-
 28
28
-
 29
29
-
 30
30
-
 31
31
-
 32
32
-
 33
33
-
 34
34
-
 35
35
-
 36
36
-
 37
37
-
 38
38
-
 39
39
-
 40
40
-
 41
41
-
 42
42
-
 43
43
-
 44
44
-
 45
45
-
 46
46
-
 47
47
-
 48
48
-
 49
49
-
 50
50
-
 51
51
-
 52
52
-
 53
53
-
 54
54


diğer dillerde
- español: Master BC 180 El manual del propietario
- français: Master BC 180 Le manuel du propriétaire
- italiano: Master BC 180 Manuale del proprietario
- polski: Master BC 180 Instrukcja obsługi
- Deutsch: Master BC 180 Bedienungsanleitung
- português: Master BC 180 Manual do proprietário
- română: Master BC 180 Manualul proprietarului
İlgili makaleler
-
Master CCX4.0 4034.804 E19R2 El kitabı
-
-
-
-
-
-
-
-
-